Truschino o Graffietto / Marking Gauges
English translation at the end of the article

Il truschino, comunemente chiamato anche graffietto, e’ uno di quegli utensili di cui si parla poco ma che risulta indispensabile soprattutto nelle lavorazioni manuali.
La sua funzione, come suggerisce il nome, e’ quella di “graffiare” il legno, segnando tracce che serviranno poi come riferimento fisico e visivo per il successivo impiego di altri utensili come la sega, la pialla o lo scalpello.
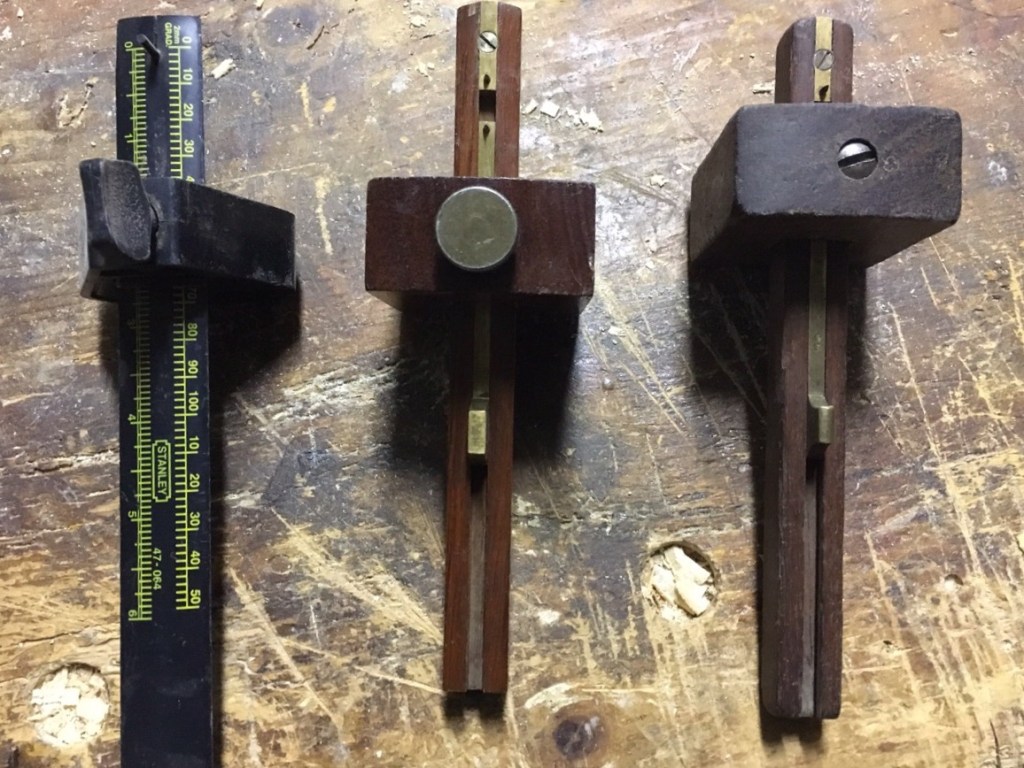
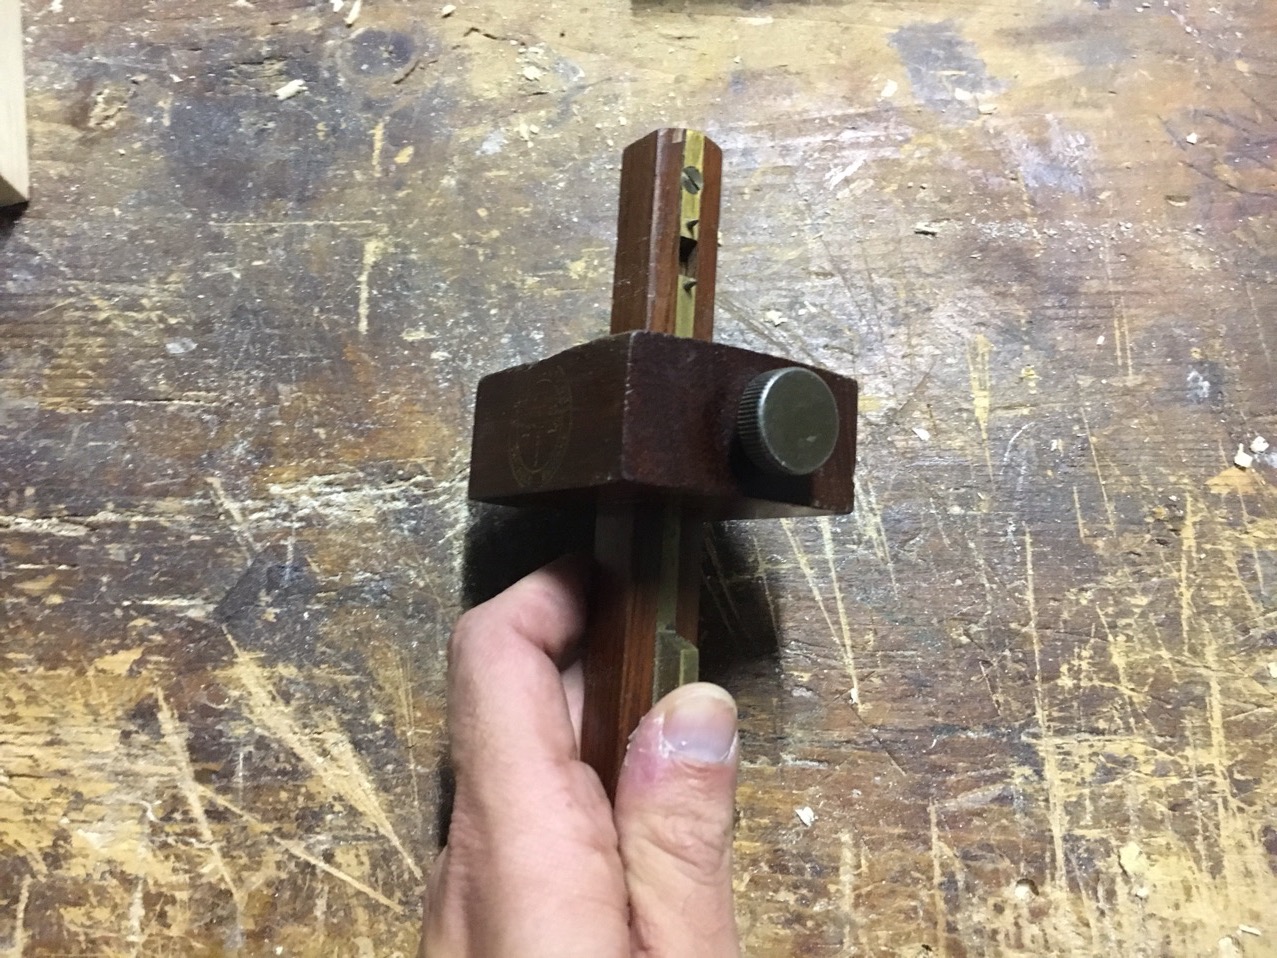
Si compone, nella sua versione base, di due pezzi di legno (o altro materiale). Un’asta di legno più lunga con inserito alla sua estremità un punteruolo (o marcatore) con la funzione di tracciare il legno che scorre all’interno dell’altro pezzo di legno che fa da base e riscontro. Tutto l’insieme e’ tenuto bloccato da una vite (pomello, rotella, cuneo di legno o altri sistemi). Allentando il blocco, la base o battuta viene fatta scorrere sino alla misura che si vuole riportare sul legno. Una volta raggiunta tale misura si procede a bloccare nuovamente la base mediante il sistema di cui sopra.
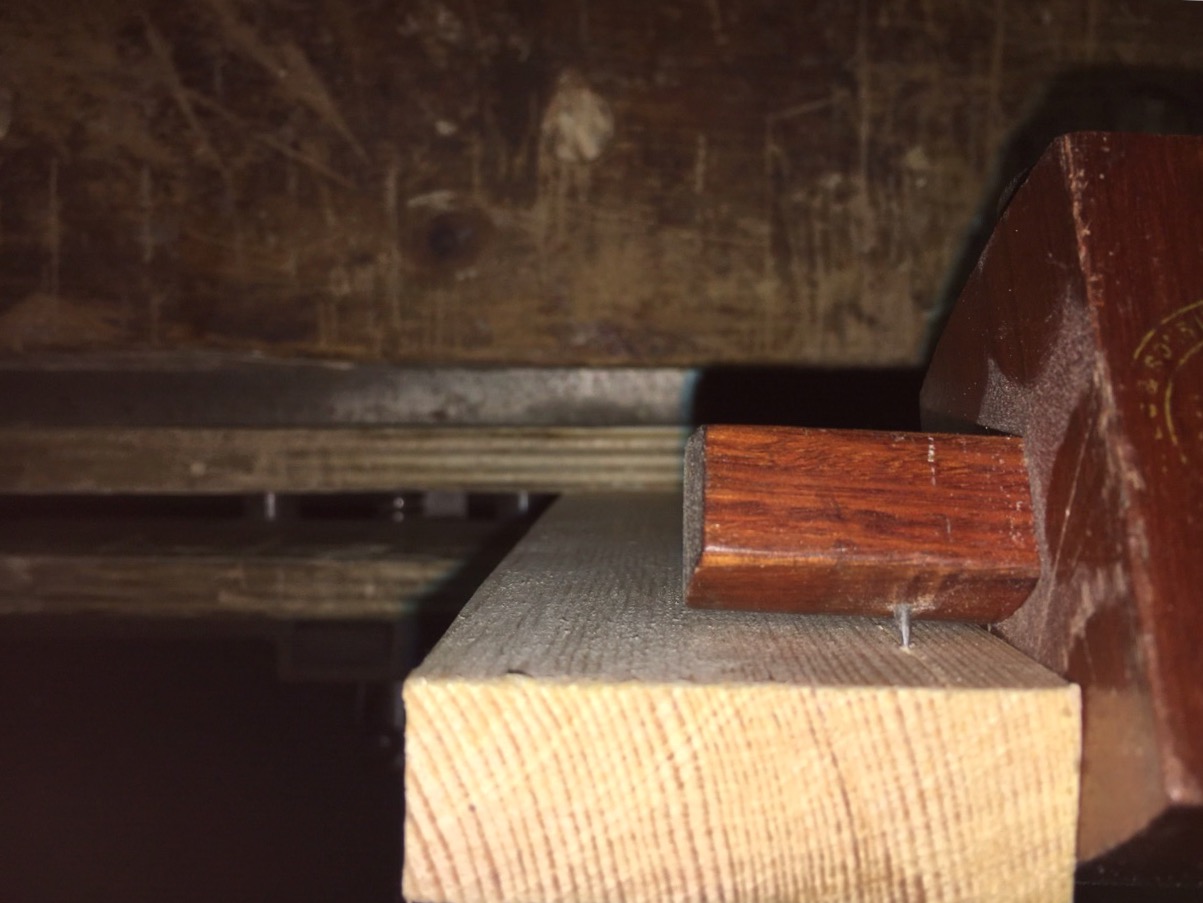
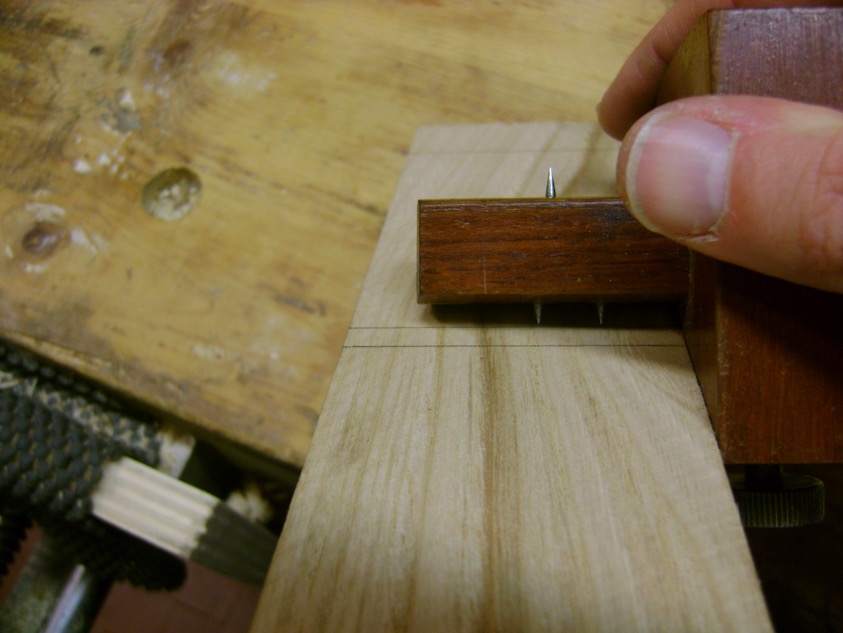
Per la tracciatura si fa scorrere il truschino nella direzione voluta appoggiando la battuta sul legno e lasciando che il punteruolo inserito sull’asta segni il solco nel legno.

L’utilizzo corretto del truschino prevede l’impugnatura in modo tale che la punta incontri il legno in modo inclinato. Occorre mantenere ben adeso il riscontro in battuta al pezzo di legno da segnare e non esercitare troppa pressione sulla punta del tracciatore. Se si pressa troppo la punta specialmente lungovena si corre il rischio di far deviare la tracciatura desiderata andando a seguire invece la venatura longitudinale del legno.
In commercio esistono svariati modelli di truschino, fatti in plastica, in lega metallica ed in legno. Personalmente preferisco quelli datati, fatti con legno duro come ebano, mogano, palissandro e con inserti in ottone. Se ne trovano comunemente anche fatti con il legno di faggio.
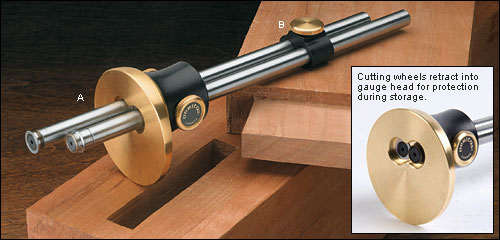
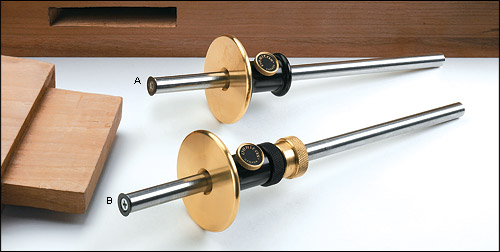
Inutile dire che quelli in plastica sono anche i più economici. Meglio orientarsi su quelli in legno (nel nuovo o nel vastissimo mercato dell’usato) o su quelli in lega metalllica. Tra questi ultimi merita una nota di merito il truschino della Veritas, molto performante soprattutto per le tracce lungovena. Questo tipo di truschino e’ innovativo nel sistema di tracciatura avendo sostituito la punta con un disco con tagliente. La bontà del sistema si riscontra nella tracciatura stessa lasciando un taglio delle fibre del legno preciso e pulito.
Inserisco il link dove e’ possibile acquistarlo ad un buon prezzo.
http://www.rma-tools.com/index.php?main_page=product_info&products_id=431
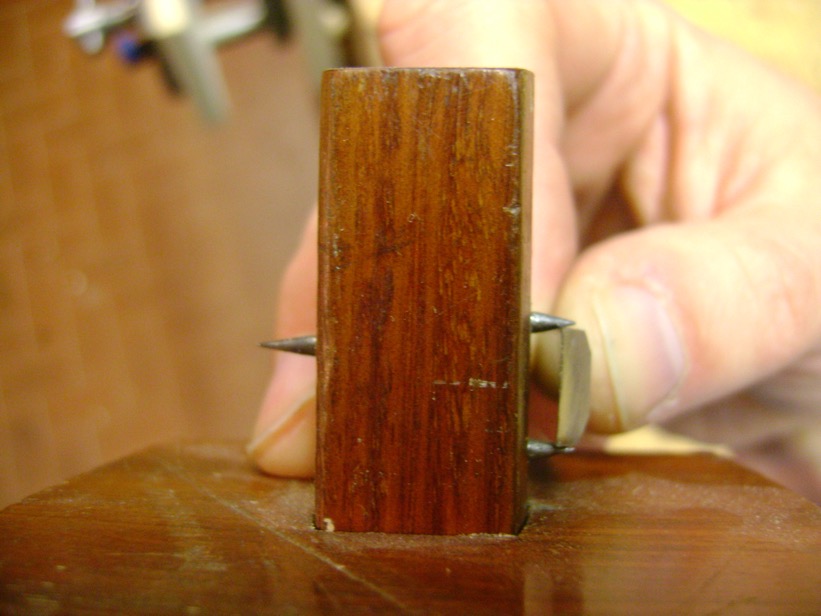
Sul mercato si trovano tre tipi di truschino. Quello semplice ed anche il più antico descritto sopra, ad una sola punta. Quello a due punte per tracciare mortase (dotato di un’asta metallica scorrevole inserita all’interno dell’asta di legno che comanda la distanza di una delle punte rispetto all’altra che è fissa) e quello combinato, che unisce le caratteristiche dei precedenti modelli e possiede quindi tre punte due da un lato per le mortase ed una dall’altra per la tracciatura semplice.
Sarebbe utile possedere tutti e tre i modelli, così da lasciarli settati per quei lavori che necessitano di misurazioni ripetitive in diverse fasi della lavorazione evitando di doverli settare continuamente. Non potendo possederli tutti, per iniziare consiglierei senza dubbio un truschino combinato con sistema di blocco con rotella o pomello, evitando quindi il sistema a vite che prevede una procedura di settaggio più lunga. Questo truschino ha l’indubbio vantaggio di riunire in se’ le caratteristiche delle altre due tipologie di truschini.
Il sistema di bloccaggio, una volta inserito, non deve permettere lo slittamento dell’asta durante la tracciatura. Le punte che segnano il legno devono essere ben appuntite. Nei truschini combinati si nota che le due punte per le mortase sono più piccole e tozze rispetto alla punta singola. La differenza probabilmente e’ dovuta al tipo di tracciatura che devono compiere.
In caso di usura le punte si possono comunque riaffilare con una lima semplice per i vecchi modelli o diamantata per i truschini più moderni.
——————————————————————————-
The marking gauge is one of those little-known tools, but indispensable especially in handworking.
Its function, is to “scratch” the wood, marking traces that will then be useful as a physical and visual reference for subsequent use of other tools such as saw, plane or chisel.
It consists, in its basic version, of two pieces of wood (or other material) called stock and stem. A longer wooden rod, the stem, with a pin at its near end with the function of tracing the wood sliding through the other piece of wood, the stock, that makes the base and match. All the set is held locked by a screw (knob, wheel, wooden wedge or other systems). By loosening the lock system, the inserted stem slide to the size you want. Once this measure is reached, the stem is locked to the stock by the above-mentioned system.
For tracing, slide the gauge in the desired direction by placing the stock on the wood and let the pin on the stem mark a groove in the wood.
The correct use of the gauge is to tilt it slightly so that the pin meets the wood in an inclined way. It is important to keep the stock well pressed on the piece of wood and and not to apply too much pressure on the pin. If you press too much the pin, especially in long grain, you run the risk of diverting the desired trace by following the long grain of the wood.
On the market, there are various models of gauges made of plastic, metal alloy and wood. I personally prefer gauges dated, made of hardwood such as ebony, mahogany, rosewood and with brass mechanisms. They are commonly found also with beech wood.
Needless to say, plastic ones are also the cheapest. It is better to orient yourself on wood (new or in the large market of used ones) or on metallic alloys. Among these, worth a mention the Veritas gauge, which is particularly good for long grain fibres. This type of gauge is innovative in the tracing system by replacing the pin with a sharp disk. The goodness of the system is that the tracing itself leave a clean and precise cut in wood fibers.
I enter the link where you can buy it at a good price.
There are three types of gauges on the market. The simple and even the oldest one described above, with one pin. The two pinned mortise gauge (with a sliding metal rod inserted inside the wooden stem that controls the distance of one of the pin to the other, that is fixed) and the combination one, combining the features of the previous models and that is provided with three pins, two pins on the one hand for the mortise and one on the other for simple tracing.
It would be useful to own all three models so that they can be set for those jobs that require repetitive measurements at different stages of the work, avoiding to set them every time. Not being able to buy all of them, to begin I would definitely recommend a combination gauge with a locking system with a wheel or knob, avoiding the screw system that need a longer set-up. This gauge has the advantage of bringing together the characteristics of the previous two types of gauges.
The locking system, once locked, must not allow the slippery of the beam during tracing. The pins that mark the wood must be sharply pointed. In the combination gauges you note that the two pin for the mortise are smaller and weaker than the single pin. The difference is probably due to the type of tracing you have to make.
In case of wear, the pins can still be re sharpened with a simple file for the old models or diamond file for the most modern gauges.
Alcune foto ed immagini sono state tratte da siti internet esterni per soli scopi informativo didattici e senza fini di lucro. Se si è proprietari delle immagini e se ne desidera la rimozione si prega di segnalarlo nella sezione contatti.

Scrivi una risposta a Tavolo da caffè / Coffee table | CreaRobi di Roberta e Giorgio Cancella risposta