AFFILATURA CON MOLA A SECCO E PIETRE. I BEDANI / SHARPENING WITH A BENCH GRINDER AND STONES. THE MORTISE CHISELS
English translation at the end of the article

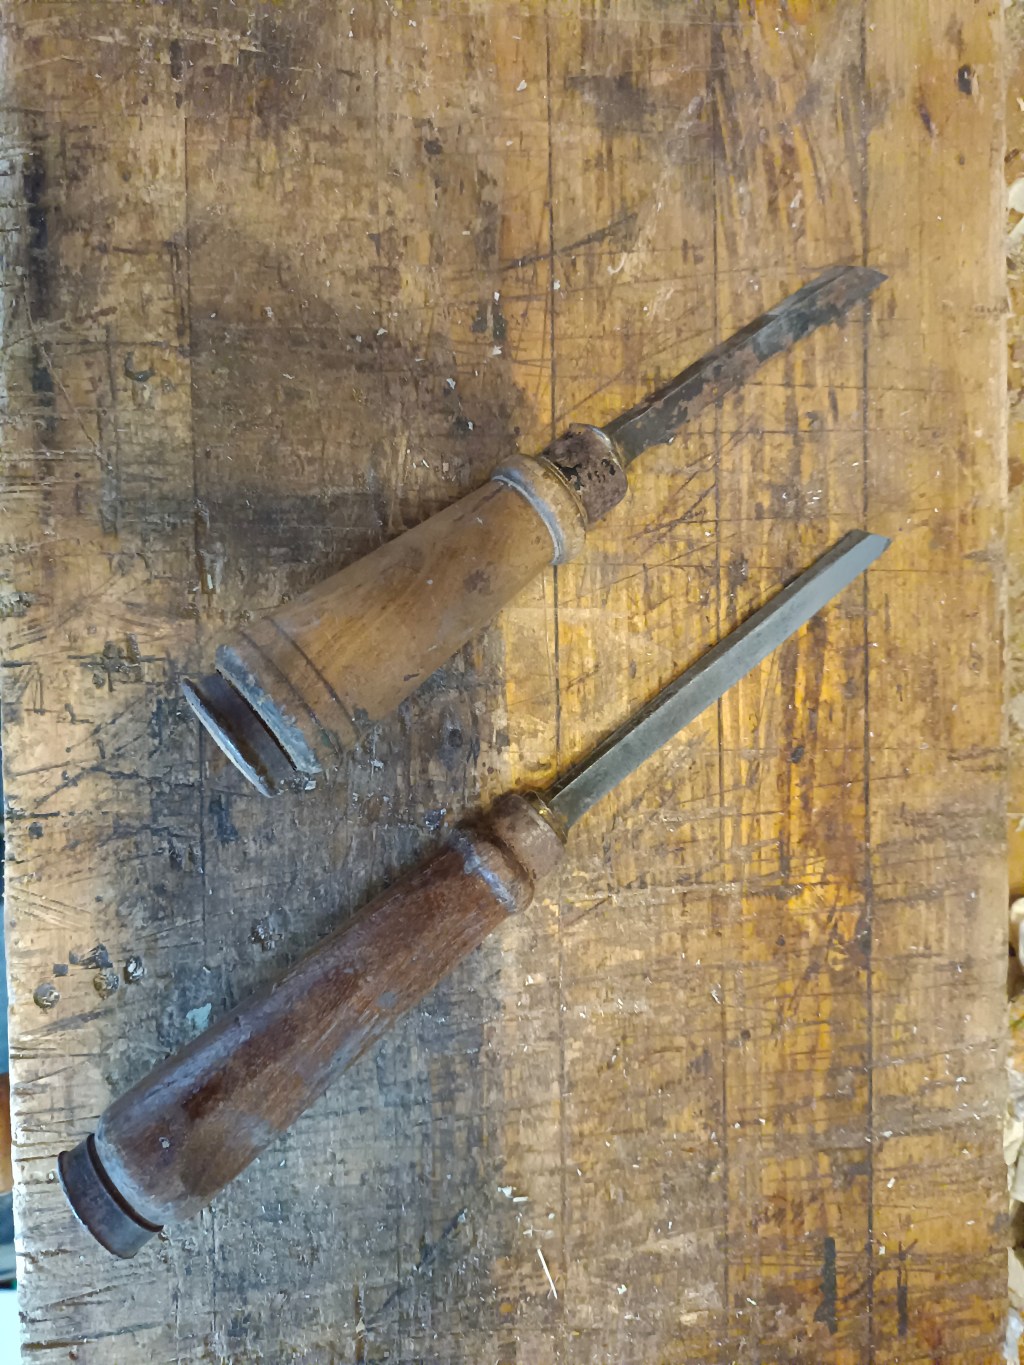
Parecchio tempo fa un anziano falegname mi ha lasciato “in eredità” una cassetta con svariati attrezzi. Cacciaviti di diverse misure, pinze, forbici, martelli, tenaglie, raschietti e scalpelli, molti scalpelli, tanti dei quali purtroppo in pessime condizioni.
Per un lavoratore manuale del legno, molti di questi utensili, seppure indispensabili, sono di poco utilizzo. Di scalpelli, poi, ne avevo già parecchi, ma tra questi ho trovato dei bedani. Il bedano (si pronuncia con l’accento tonico sulla a) è un particolare tipo di scalpello utilizzato soprattutto per lavori di sgrosso, tipo lo scavare mortase nel legno. Non per niente in inglese sono denominati mortise chisels (scalpelli per mortase). Sono facilmente riconoscibili in quanto hanno una lama molto spessa e robusta, a forma di parallelepipedo, leggermente rastremata verso la punta. Anche il manico è più grosso e la testa é più ampia. Il ferro, posto sul manico, aiuta a prevenirne le spaccature. Il tagliente dei bedani deve essere più resistente di quello dei normali scalpelli e per tale motivo possono venire affilati anche fino a 40 gradi. Tutte caratteristiche che, messe assieme, contribuiscono a farne un utensile robusto, in grado di resistere ai pesanti colpi di mazzuolo. Oggigiorno i bedani sono molto meno utilizzati che in passato, quando quasi tutto veniva fatto manualmente, compreso la realizzazione di porte, finestre e mobili che richiedevano scavi di mortase di grandi dimensioni.
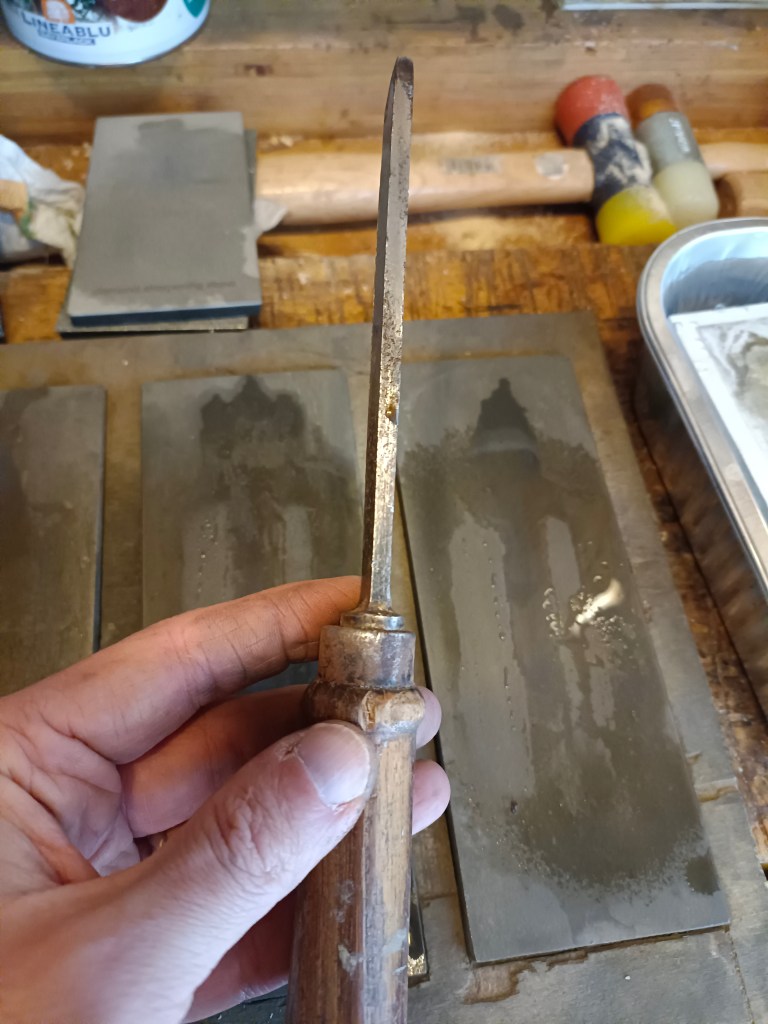
Sebbene sia oramai abituato ad utilizzare gli scalpelli di forma trapezoidale, (in inglese, bevel edge chisels), praticamente per tutti i miei lavori, ho voluto comunque recuperarli, per averli a disposizione casomai ne avessi avuto bisogno. Erano scalpelli vecchi, arrugginiti e probabilmente di poco valore e la loro sistemazione richiedeva tempo e lavoro. Per questo ho sempre rimandato ma, alla fine, mi sono deciso a dargli una possibilità. Per inciso, non sono molto avvezzo ad utilizzare la mola ma in questo caso non ho avuto molta scelta in quanto il bisello era veramente malmesso e oltretutto con un’inclinazione di oltre 45 gradi, troppi per le mie necessità. I bedani, come detto, hanno un’inclinazione del bisello più alta dei normali scalpelli, proprio perché devono resistere ad un lavoro più gravoso. Un’affilatura di 35 gradi mi é sembrata comunque un buon compromesso, ma impossibile da ottenere con il solo utilizzo delle pietre.

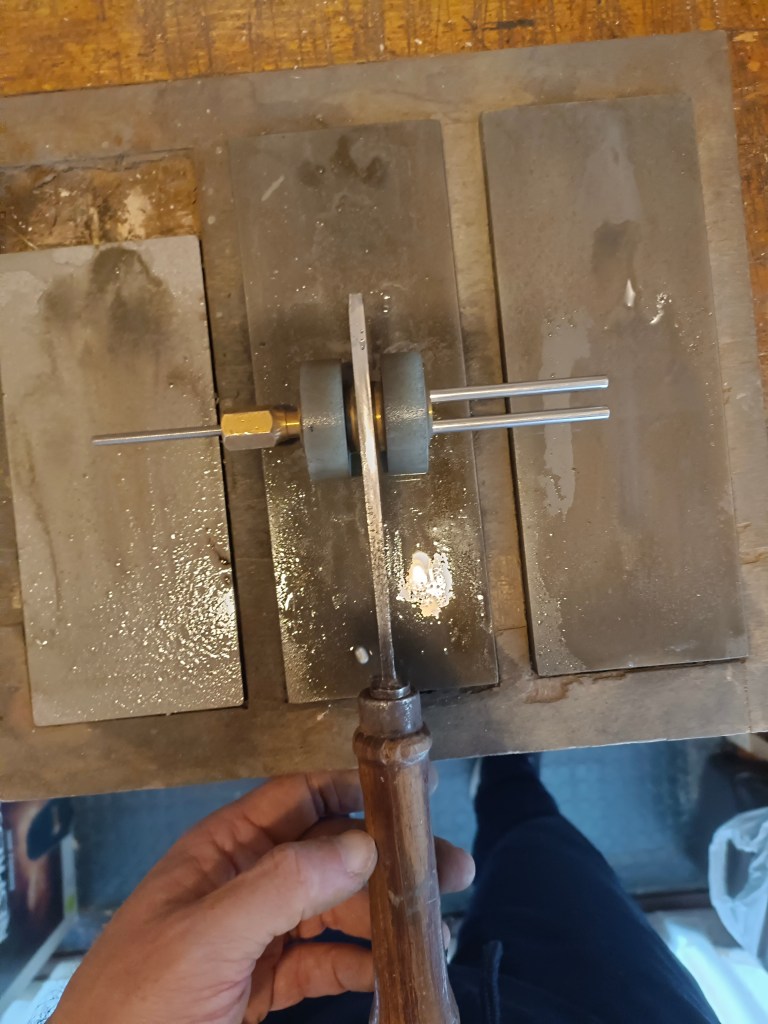
Ecco che la mola (o smerigliatrice), a secco o a umido che sia, diventa uno strumento indispensabile in questo tipo di lavori, ovvero per cambiare di molti gradi l’affilatura di un bisello, cambiare forma al tagliente della lama o riparare un tagliente danneggiato da una caduta, da un chiodo o da un nodo particolarmente duro. La mia mola è economica, modello Parkside (acquistata da Lidl), a secco, con dei dischi probabilmente di scarsa qualità e sottodimensionati (15 cm. di diametro). I sostegni sono troppo piccoli e poco stabili. Alla mancanza di stabilità ho però ovviato sostituendo le viti in dotazione con delle viti particolarmente efficaci (ovvero quelle avanzate dalla sostituzione di una tavoletta wc). Ho poi segnato a pennarello, sui due sostegni, delle tracce che mi sono servite come riferimento per mantenere il parallelismo tra la lama da affilare e il disco. Il disco di sinistra, a grana 36, è dedicato alla rettifica della punta del tagliente, e il sostegno rimane sempre in posizione abbassata. Il disco di destra, a grana 80, é dedicato alla rettifica del bisello e viene registrato a seconda dell’inclinazione desiderata. Per impostare la corretta inclinazione ho trovato molto utile dotarmi di un inclinometro digitale, acquistabile per pochi euro. Lo so che molti penseranno che le mole ad acqua sono migliori, che occorrono dischi più grandi e soprattutto di buona qualità, che dovrei dotarmi di sostegni più grandi e più stabili, ecc. ma per le volte che faccio uso della mola (forse una volta l’anno) per me va benissimo così. Detto fra le righe, poi, io sono il tipo che al posto della mola elettrica utilizzerebbe volentieri quelle azionate a manovella o a piede. Il problema semmai è trovarne una ad un prezzo onesto. Ovviamente, a fianco della mola ho preparato una vaschetta con acqua per raffreddare l’acciaio della lama.

Come prima operazione ho rettificato il dorso della lama lavorandola sulle pietre diamantate, partendo da una grana grossa e passando poi alle grane più fini. Infine ho lucidato il dorso con la pasta abrasiva.

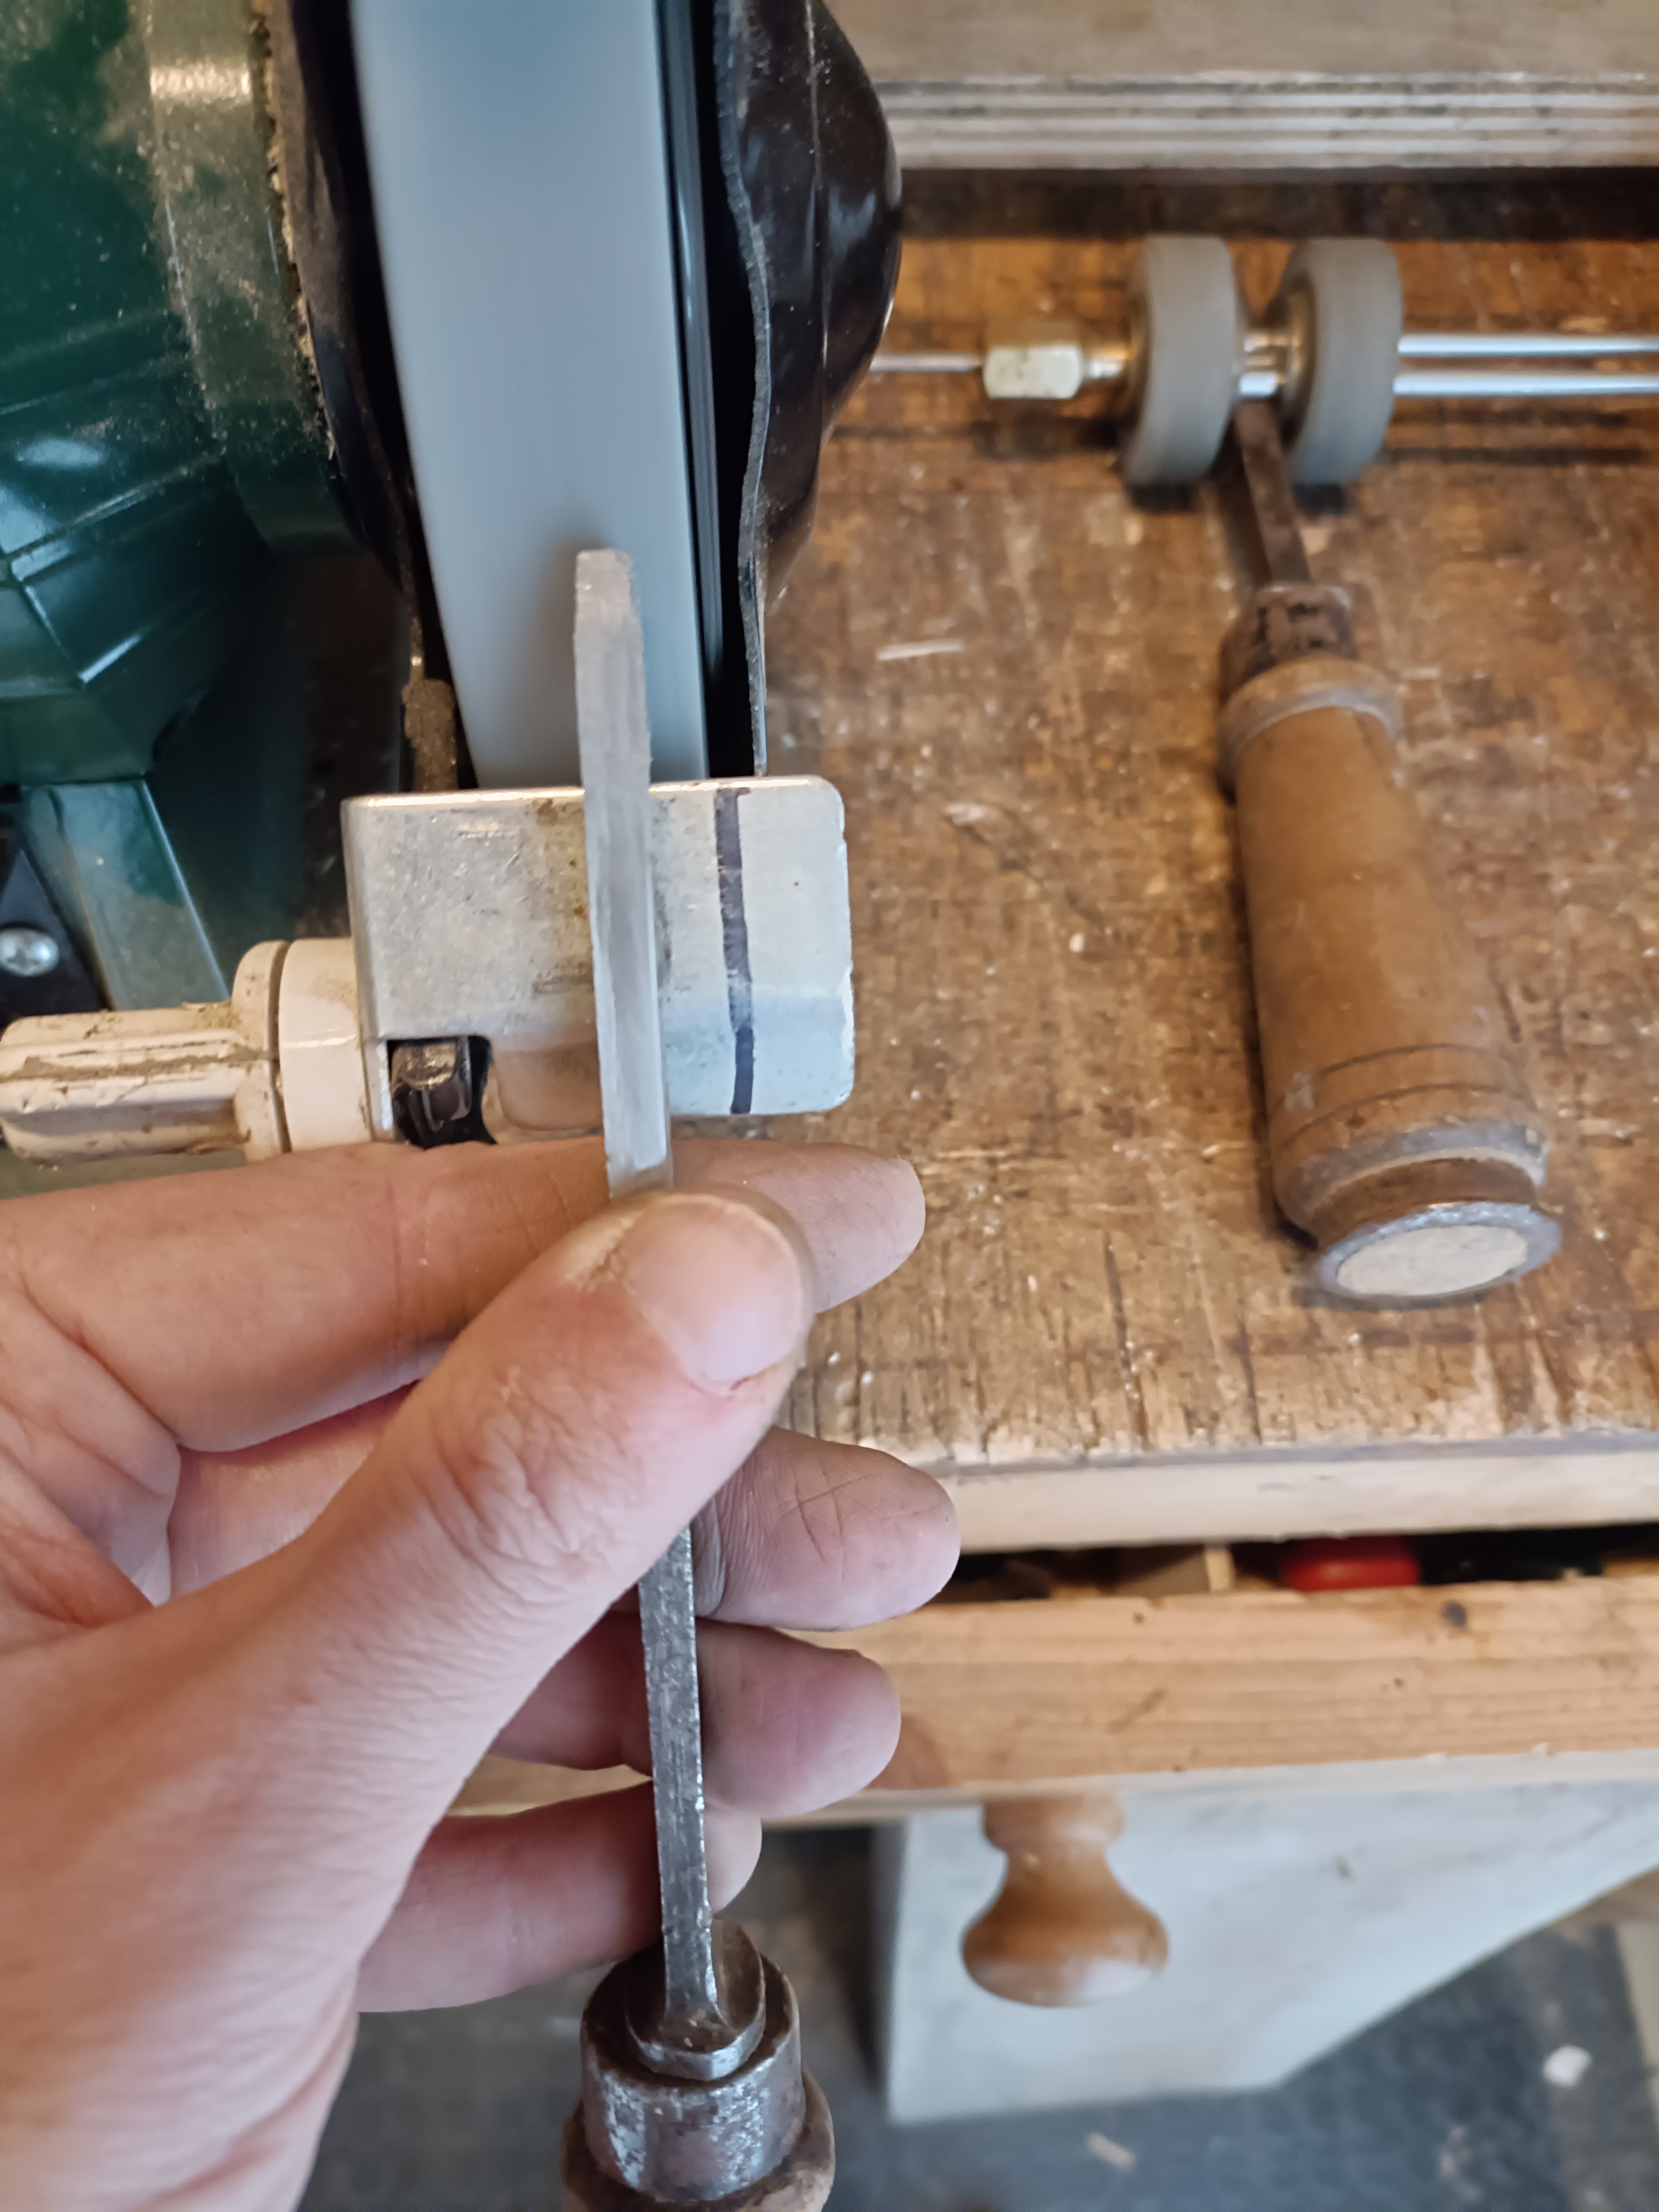

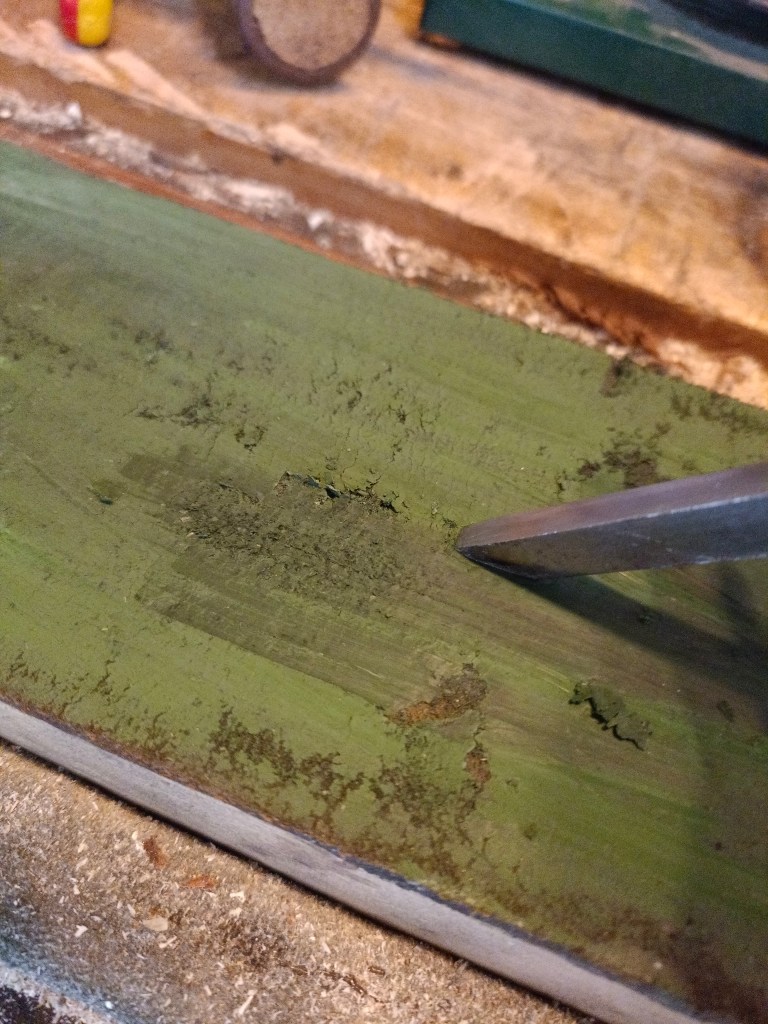
Di seguito sono passato a lavorare sulla mola. Dapprima ho rettificato la punta del tagliente, che si presentava storta. Per farlo é bastato molare la punta per un paio di secondi avendo l’accortezza di presentare dritta la lama rispetto al disco di sinistra, aiutandomi con la traccia di riferimento sul pianetto.
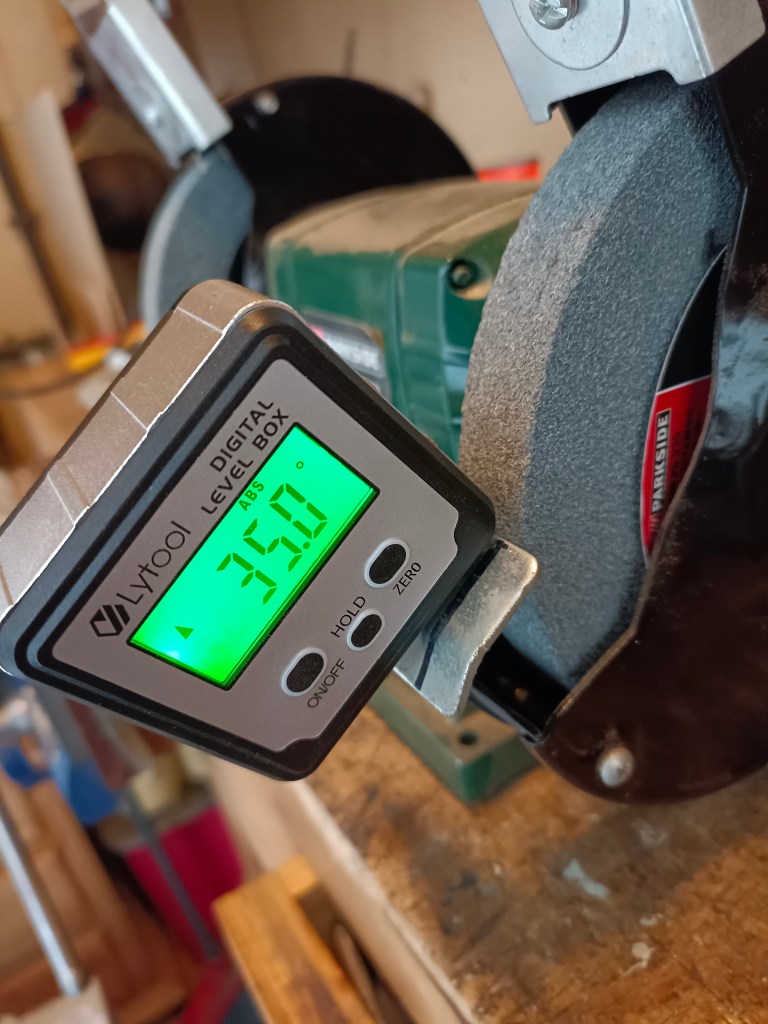
Poi mi sono concentrato sull’affilatura del bisello. Con l’aiuto dell’inclinometro digitale ho settato l’angolo del pianetto di destra a 35 gradi. Ho iniziato a molare avendo l’accortezza di mantenere la lama ben adesa al pianetto, la punta a contatto con la mola e l’utensile sempre dritto rispetto al disco, aiutandomi sempre con la traccia di riferimento. Con un leggero movimento destra – sinistra ho molato a più riprese per qualche secondo, raffreddando frequentemente la punta in acqua. Durante l’affilatura cerchiamo di non rimanere fermi in un punto e raffreddiamo spesso la punta al fine di non surriscaldare la lama e fargli perdere la tempra.
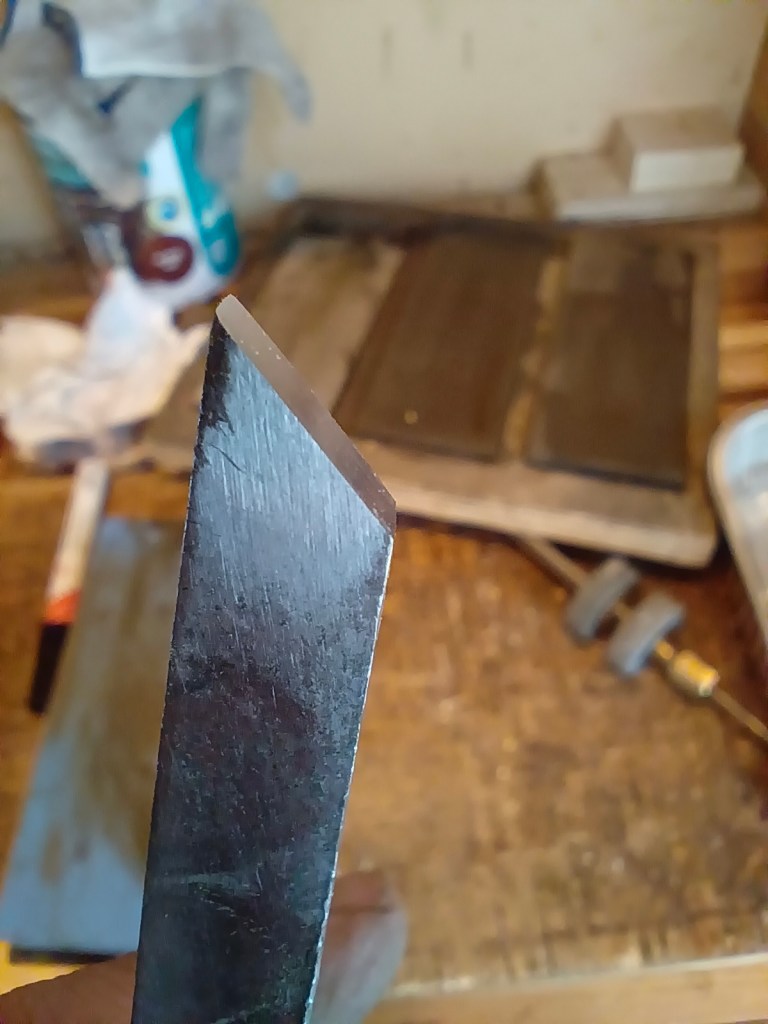
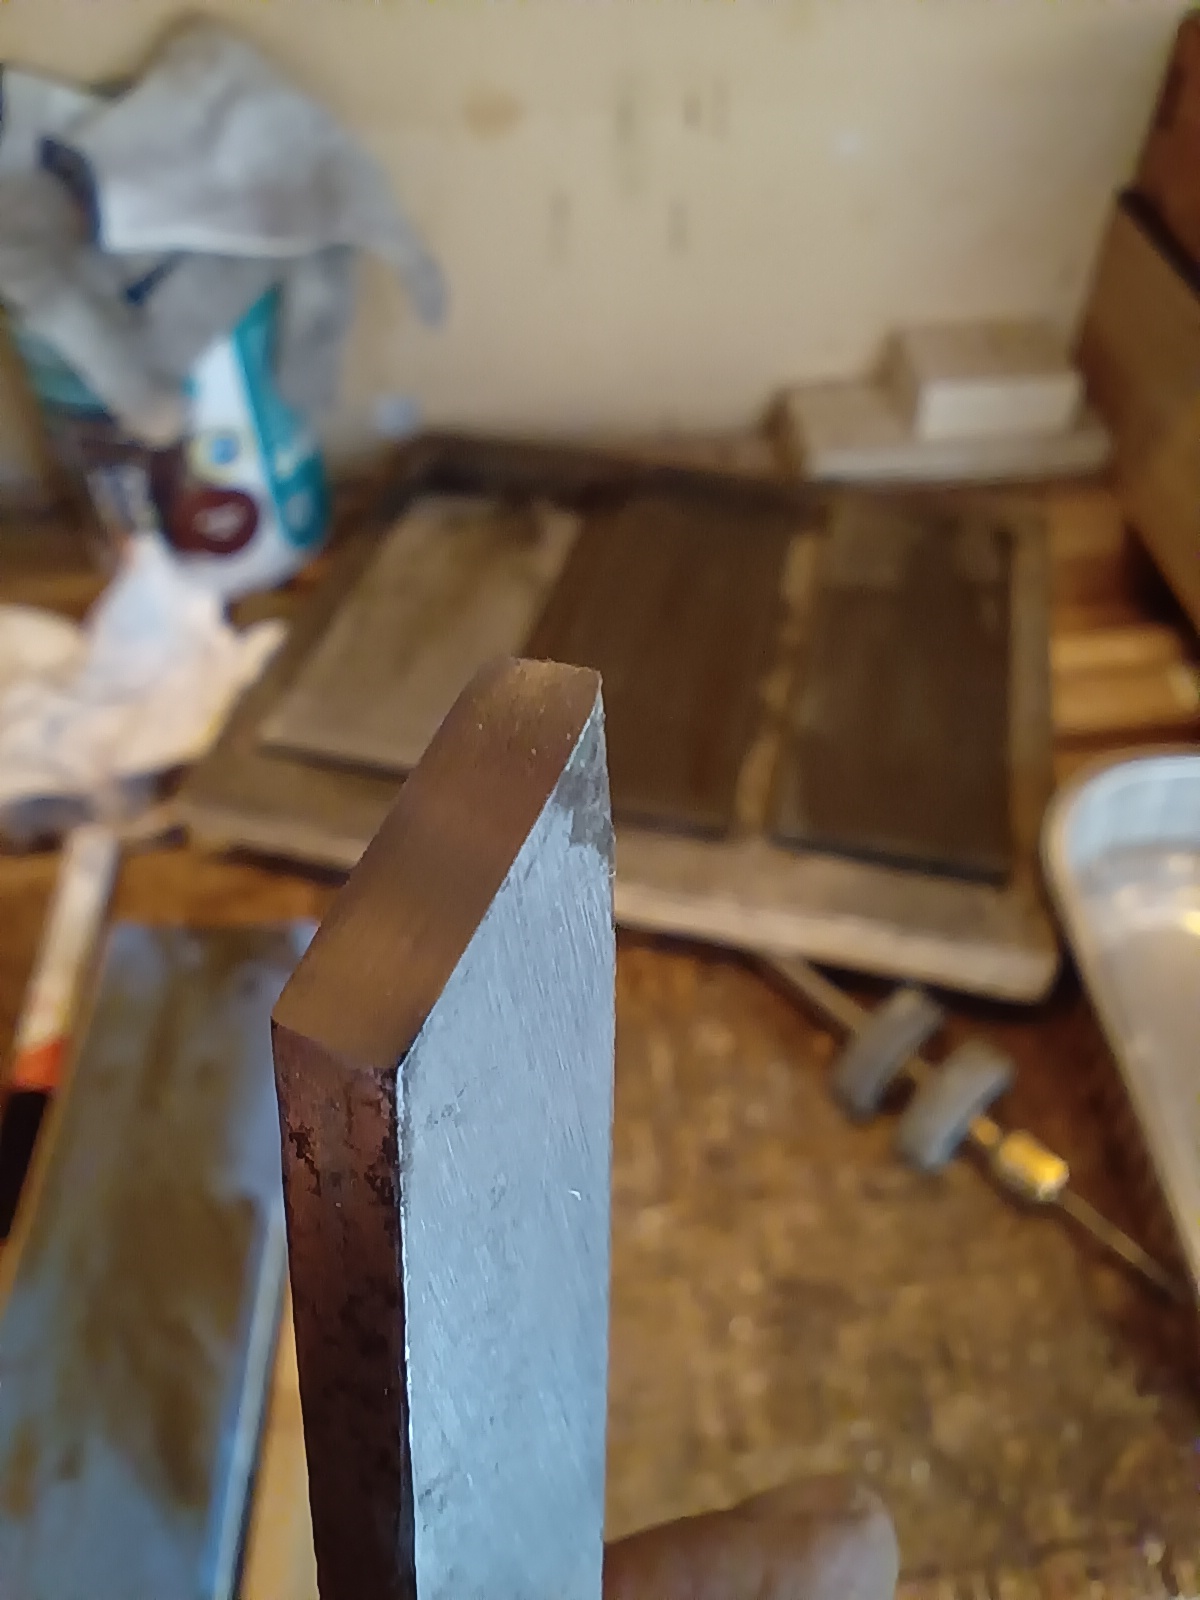
Una volta ottenuto un bisello uniforme, mi sono dedicato all’affilatura sulle pietre. Per questo tipo di scalpelli non ho fatto un’affilatura a mano libera perché non volevo creare inavvertitamente uno smusso secondario. Quindi ho utilizzato una guida per affilare, una Richard Kell honing guide, impostata sempre a 35 gradi, ed ho utilizzato pietre diamantate (in ordine, grana 150, 600 e 1200). Per la lappatura ho utilizzato una pietra ad acqua, grana 6000.

Questa pietra fa parte di un set di pietre Parkside uscito in vendita alla Lidl qualche tempo fa. Anche le pietre ad acqua, come la mola, trovano poco impiego nel mio ciclo di affilatura. Solitamente affilo su pietre diamantate fino alla 1200, a volte fino alla 3000, e poi uso per la lucidatura una pasta abrasiva. Le pietre ad acqua non mi sono simpatiche. Vanno immerse preventivamente e per per svariati minuti in acqua, sporcano molto e richiedono più spazio. Inoltre, non rimangono piatte a lungo e vanno quindi rettificate con una pietra più dura. Però devo dire che questa pietra ha lavorato bene, seppure economica. Certo, non ho termini di paragone con altre pietre ad acqua, ma la lucidatura mi é sembrata ottimale. Infine, come sempre, una passata con la pasta abrasiva.
In questo ciclo di affilatura mi sono affidato a quattro diversi strumenti di affilatura: mola, pietre diamantate, pietre ad acqua e pasta abrasiva lucidante. Ho potuto farlo con tranquillità in quanto le grane erano molto distanti l’una dall’altra e non vi era pericolo che, ad esempio, la pietra da 1200 grit potesse essere più aggressiva della pietra ad acqua 6000 grit. Lo stesso discorso però potrebbe non valere se usiamo pietre ad acqua o ad olio o diamantate, magari di diversi produttori, con grane dichiarate molto vicine l’una all’altra. In questi casi non vale tanto quanto dichiarato dal produttore, che spesso le definisce genericamente a grana grossa (coarse) o media o fine, e nemmeno il numero di grana, quanto invece il numero di micron. Per tale motivo é sempre consigliabile non cambiare il supporto abrasivo in una stessa sessione di affilatura (ad esempio, cominciare ad affilare su una pietra diamantata, poi proseguire su una ad olio e poi finire sulle carte abrasive). É un argomento un po’ tecnico che avrò modo di approfondire in futuro.
———————————————————————-
Some time ago an elderly carpenter “inherited” me with a box with various tools. Screwdrivers of different sizes, pliers, scissors, hammers,
scrapers and chisels, many chisels, many of which are unfortunately in very poor condition. For a woodworker by hand many of these tools, although essential, are of little use.
Furthermore, I already had quite a few chisels, but among these I found some mortise chisels. The mortise chisel is a particular type of chisel used mainly for rough work, such as digging holes in wood, i.e. for chopping mortises. They are easily recognizable as they have a very thick and robust blade, in the shape of a parallelepiped, slightly tapered towards the tip. The handle is also thicker and the head is wider. The ferrule, placed on the handle, helps prevent splitting. The cutting edge of the mortise chisels must be more resistant than that of bevel edge chisels and for this reason they can be sharpened even up to 40 degrees. All characteristics which, put together, contribute to making it a robust tool, capable of withstanding heavy mallet blows. Nowadays mortise chisels are used much less than in the past, when almost everything was done by hand, including the making of doors, windows and furniture which required large mortises. Although I am now used to using bevel edge chisels for all my work, I still wanted to rescue them, to have them available in case I needed them. They were old, rusty and probably worthless chisels and it took time and work to fix them. This is why I always put it off but, actually, I decided to give it a chance. I’m not very used to using the grinding wheel but in this case I didn’t have much choice as the bevel was really in bad shape and moreover with an inclination of over 45 degrees, too many for my needs. The mortise chisels, as mentioned, have a higher bevel inclination than other chisels, because they have to withstand more hard work. However, a sharpness of 35 degrees seemed a good to me, but impossible to obtain with the sole use of stones. Here the grinder, whether dry or wet, becomes an indispensable tool in this type of work, or to change the sharpness of a bevel by many degrees or reshaping the blade or repair a cutting edge damaged by a fall, a nail or a particularly hard knot. My grinder is a cheap one, Parkside model (purchased from Lidl), dry, with grinding wheels that are probably of poor quality and undersized (15 cm in diameter). The supports are too small and unstable. However, I remedied the lack of stability by replacing the supplied screws with particularly effective screws (i.e. those left over from the replacing a toilet seat). I then marked with a felt-tip pen, on the two supports, some traces that served me as a reference to maintain the parallelism between the blade to be sharpened and the disk. The left grinding wheel, with 36 grain, is dedicated to grinding the tip of the cutting edge, and the support always remains in the lowered position. The right grinding wheel, with 80 grain, is dedicated to grinding the bevel and is adjusted according to the desired inclination. To set the correct inclination I found it very useful to equip myself with a digital inclinometer, which can be purchased for a few euros. I know that many will think that water-based grinders are better, that larger and above all good quality discs are needed, that I should equip myself with larger and more stable supports, etc. but for the times I use the grinder (maybe once a year) that’s fine for me. Putting it between the lines, then, I’m the type who would gladly use those operated by a crank or foot instead of an electric grinder. The problem, if anything, is finding one at a fair price. Obviously, next to the grinding wheel I prepared a tray with water to cool the steel of the blade. As a first operation I ground the back of the blade by working it on the diamond stones, starting from a coarse grits and then moving on to the finer grits. Finally I polished the back with abrasive paste. Afterwards I moved on to work on the grindstone. First I ground the tip of the cutting edge, which was crooked. To do this, it was enough to grind the tip for a couple of seconds, being careful to present the blade straight with respect to the left disc, helping myself with the reference mark on the surface. Below I focused on sharpening the bevel. With the help of the digital inclinometer I set the angle of the right at 35 degrees. I started grinding having the foresight to maintain the blade well adhered to the surface, the bevel in contact with the grinding wheel and the tool always straight in relation to the disc, always helping me with the reference mark. With a slight right – left movement I ground several times for a few seconds, frequently cooling the blade in water. During sharpening we try not to stay still in one point and we often cool the blade in order not to overheat the blade and cause it to lose temper. Once I had a uniform bevel, I dedicated myself to sharpening on the stones. For this type of chisel I didn’t do freehand sharpening because I didn’t want to
inadvertently create a secondary bevel. So I used a sharpening guide, a Richard Kell honing guide, always set at 35 degrees, and I used
diamond stones (in order, 150, 600 and 1200 grit). For lapping I used a water stone, 6000 grit. This stone is part of a set of Parkside
stones released on sale at Lidl some time ago. Even water stones find little use in my sharpening cycle. I usually sharpen on diamond stones up to 1200 grit, sometimes up to 3000 grit, and then use an abrasive paste for
polishing. I don’t like water stones. They must be immersed beforehand and for several minutes in water, they make a lot of dirt and require more space. Furthermore, they do not remain flat for long and therefore need to be ground with a harder stone. But I must say that this stone worked well, even if it was cheap. Of course, I have no terms of comparison with other water stones, but the polishing seemed good to me. Finally, as always, a pass with the honing compound. In this sharpening cycle I relied on four different sharpening tools:
grinding wheel, diamond stones, water stones and honing compound. I was able to do this with peace of mind as the grits were very far from each other and there was no danger that, for example, the 1200 grit diamond stone could be more aggressive than the 6000 grit water stone. However, the same argument may not apply if we use water, oil or diamond stones, perhaps from different producers, with grains declared to be very close to each other. In these cases what is declared by the producers is not valid, which often generically defines them as coarse, medium or fine, nor even the number of grains, but instead the number of microns. For this reason it is always advisable not to change the abrasive support in the same sharpening session (for example, start sharpening on a diamond stone, than on an oil stone and finishing with abrasive papers). It’s a technical argument I want to discuss in a future post.

Lascia un commento