LA VASTRINGA. STANLEY N. 151 / THE SPOKESHAVE. THE N. 151 STANLEY SPOKESHAVE
English translation at the end of the article
La vastringa è un utensile manuale poco conosciuto che, date le sue caratteristiche e finalità d’uso, può farsi rientrare nella categoria delle cosiddette pialle speciali. Seppure la sua forma sia molto diversa dalle pialle da banco e molto più simile a quella di una cabinet scraper, da quest’ultima si differenzia sostanzialmente per il tipo di lavorazione alla quale è deputata.
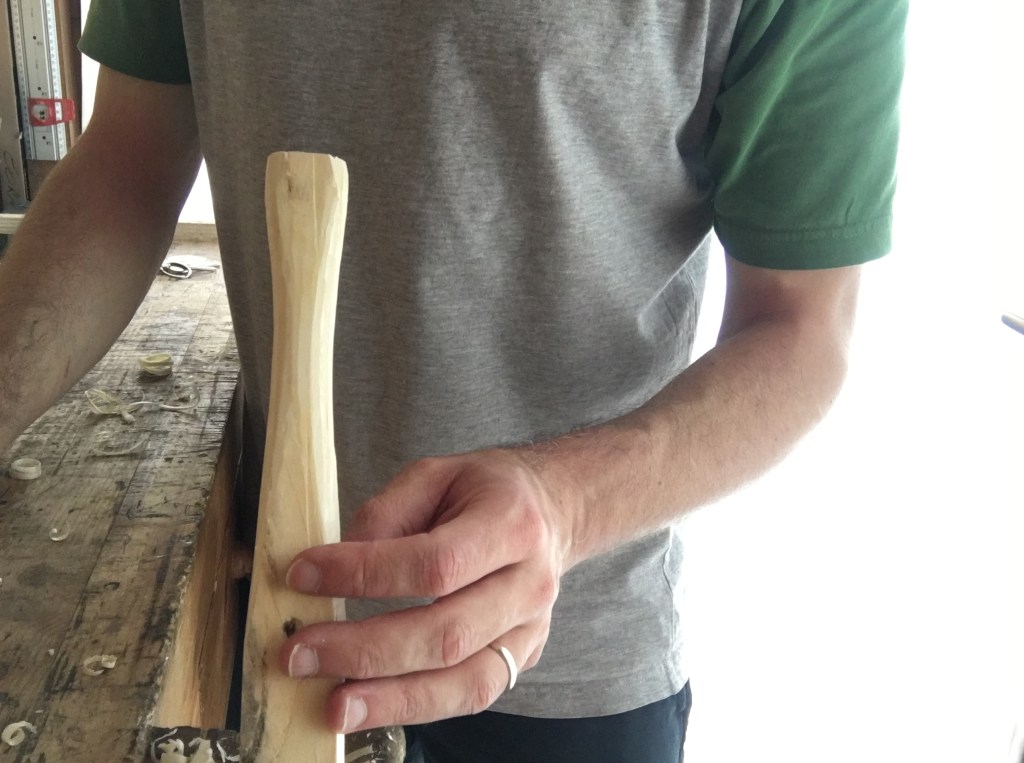
La vastringa viene utilizzata per realizzare sagomature nel legno e quindi è in grado di ricavare forme, smussature, curvature e rotondità. La suola di ridotte dimensioni permette di seguire le forme di legni curvi, nelle loro concavità e convessità, rimuovendo materiale con estrema facilità come farebbe una normale pialla da banco. Le grandi impugnature e la sua leggerezza la rendono molto maneggevole ed estremamente versatile e quindi particolarmente adatta a lavorazioni su pezzi piccoli.
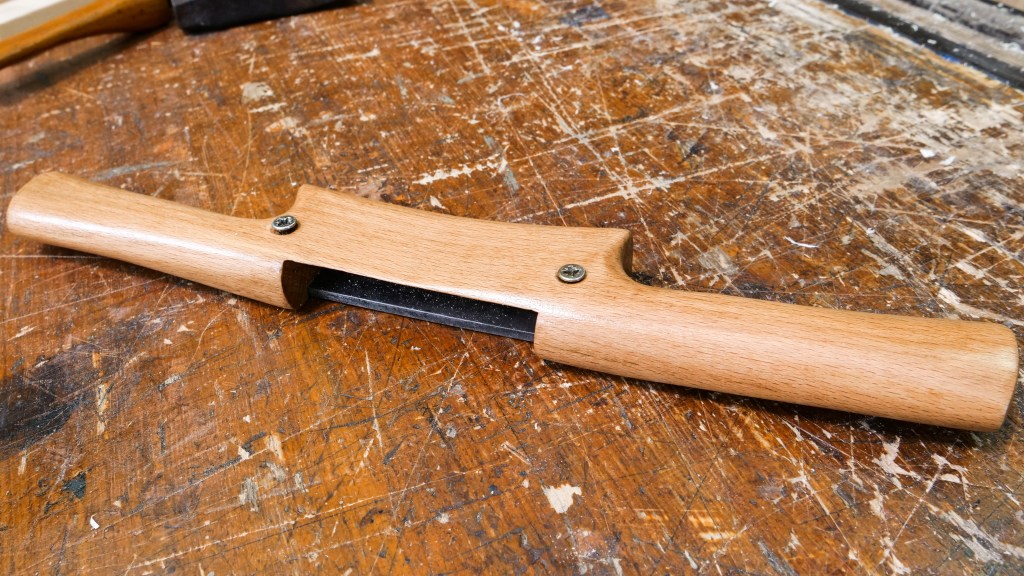
Come per le pialle da banco anche i primi modelli di vastringa furono prodotti in legno per poi essere quasi del tutto soppiantate, durante il secolo scorso, da quelle in metallo e in legno e metallo.

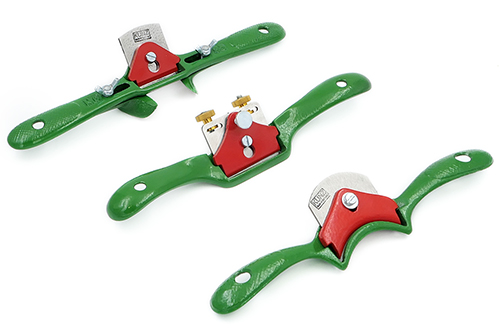
La vastringa n. 151 a suola piana prodotta dalla Stanley, dalla Record e da altri produttori rimane probabilmente il modello più diffuso e famoso. È possibile trovarla di diversi colori (japanning) ma la forma è rimasta sostanzialmente la stessa nel corso dei decenni, anche se taluni produttori moderni hanno recentemente introdotto alcune varianti, senza tuttavia operare stravolgimenti.
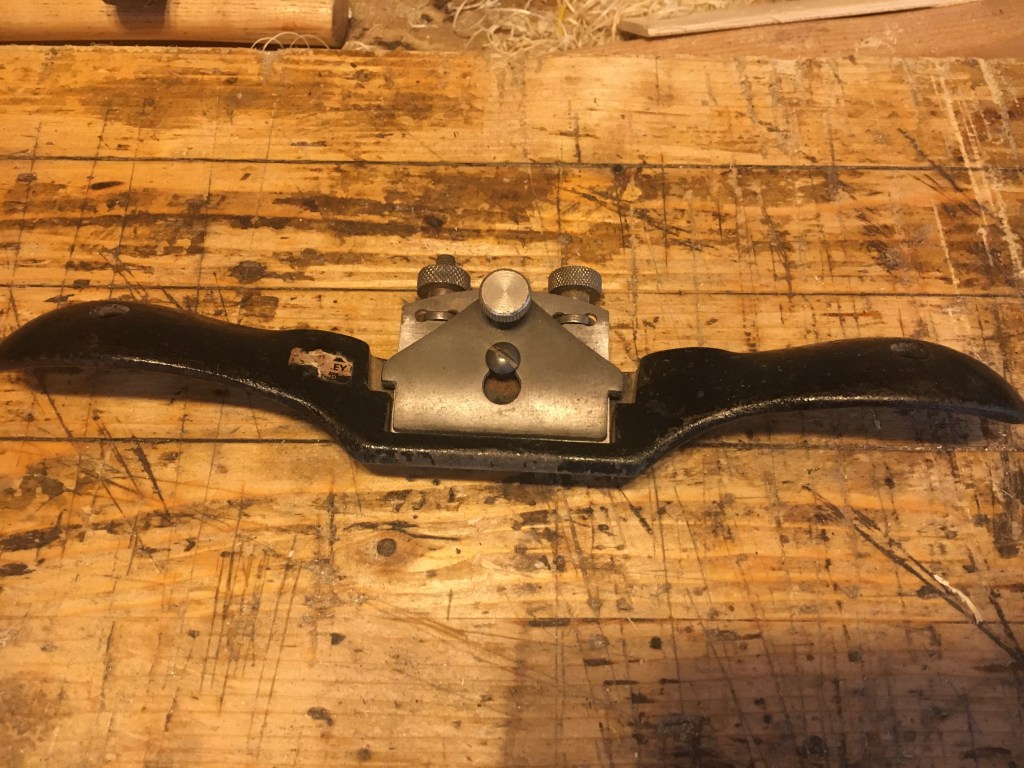
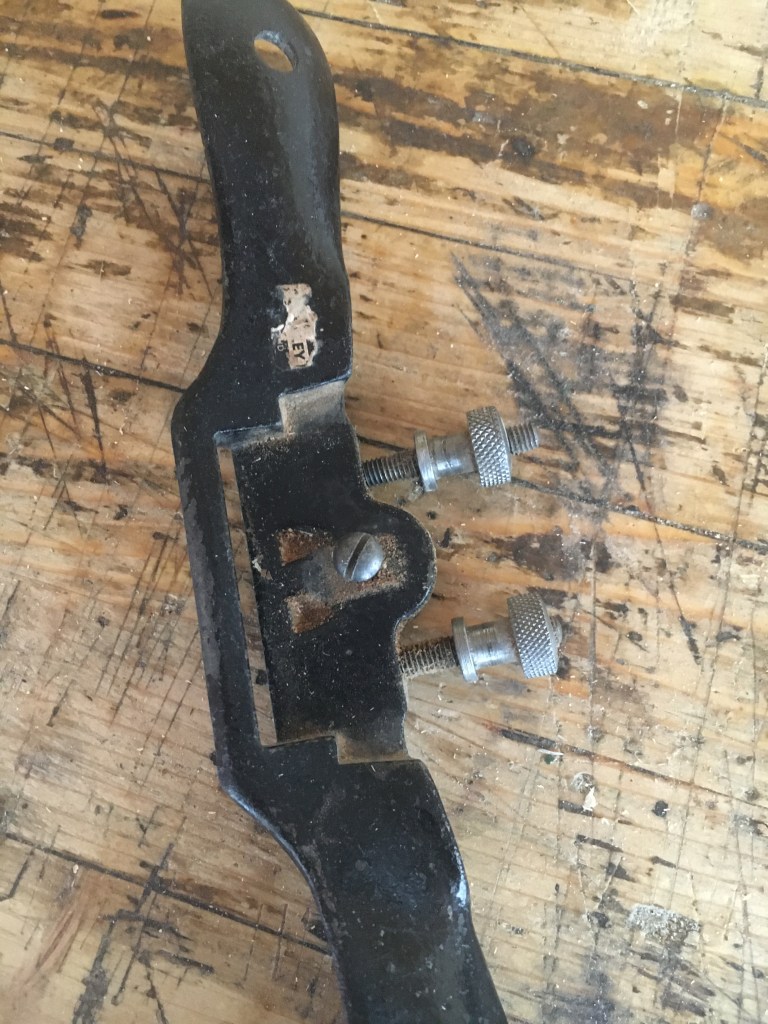
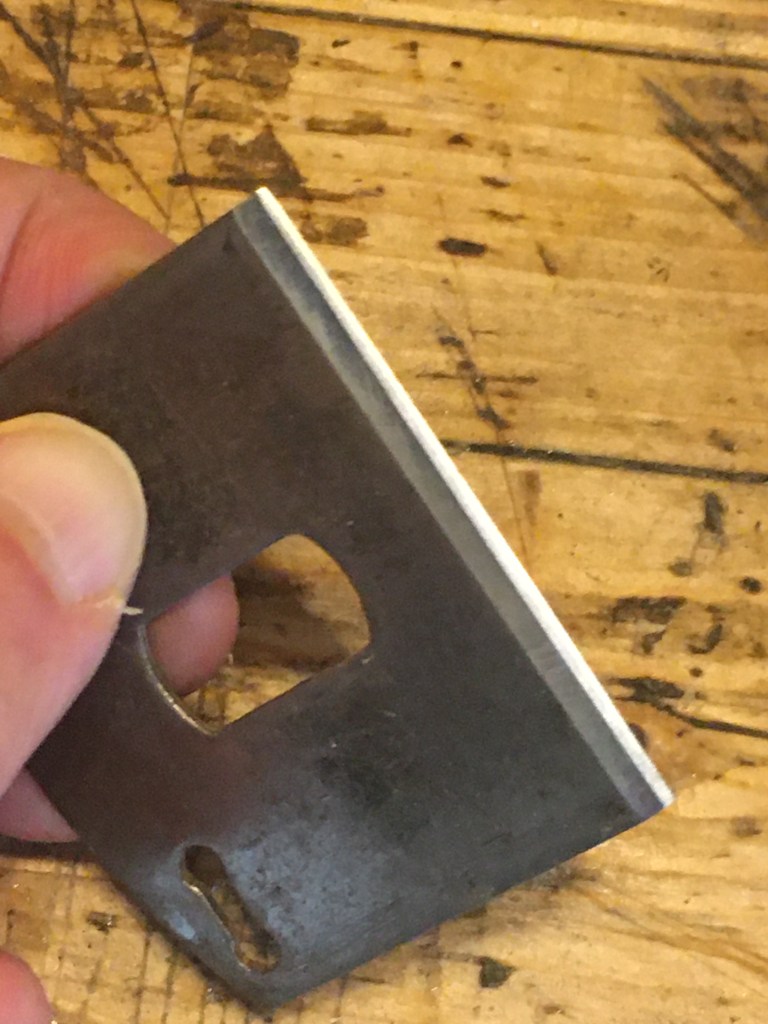
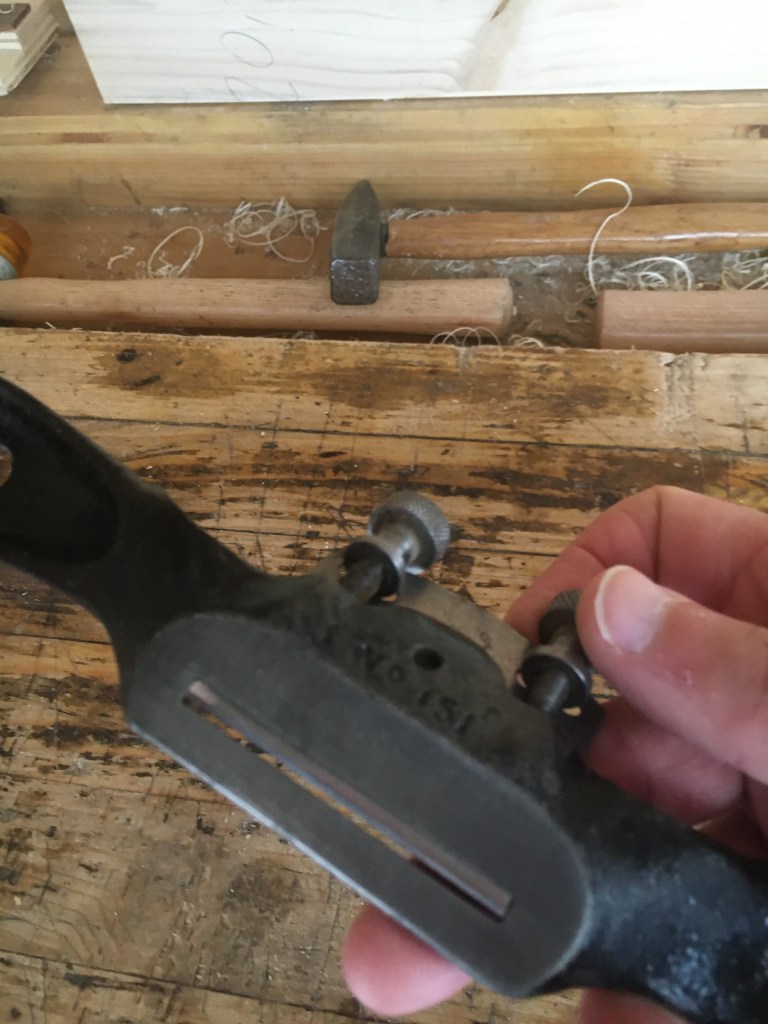
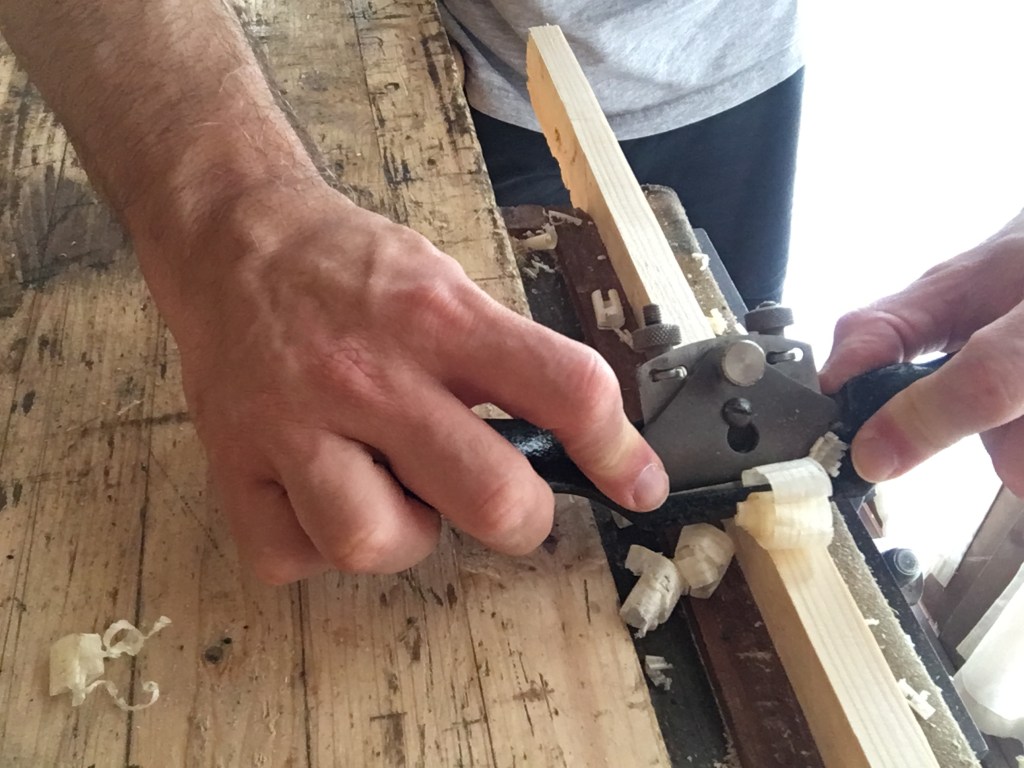
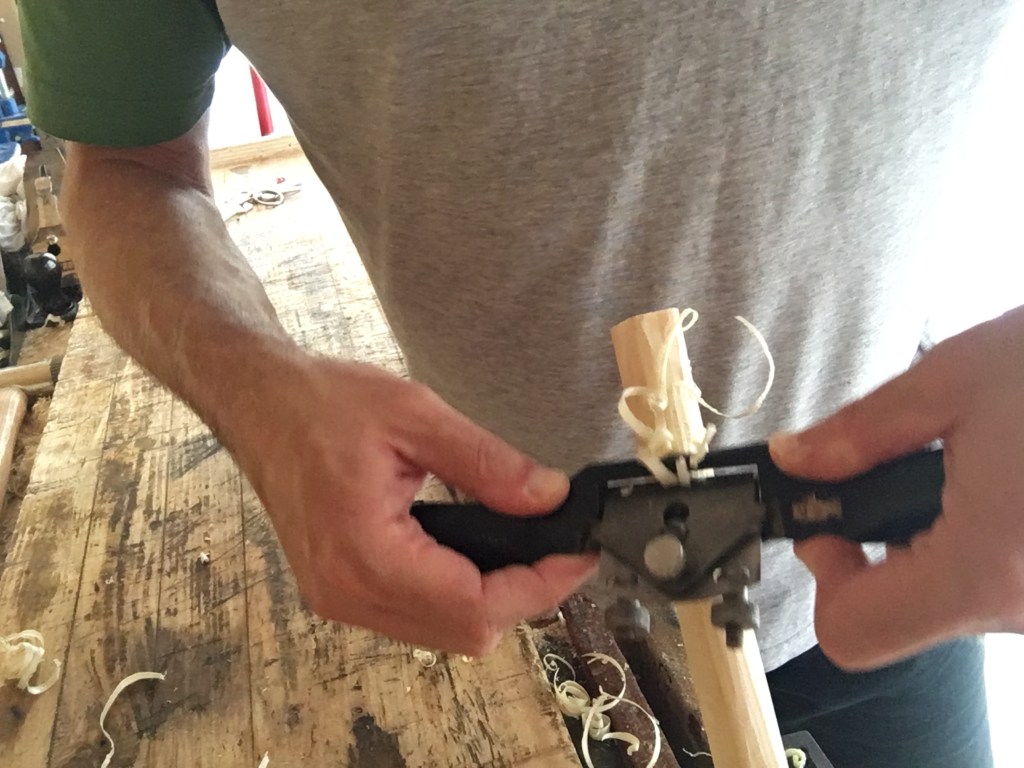
La vastringa n. 151 è composta da un unico pezzo dal quale sono sagomate le impugnature e la suola. Nella suola è ricavata la bocca dalla quale fuoriesce una lama di ridotte dimensioni il cui movimento di avanzamento e arretramento è governato da due rotelle zigrinate (indipendenti l’una dall’altra) che scorrono su delle barre filettate.
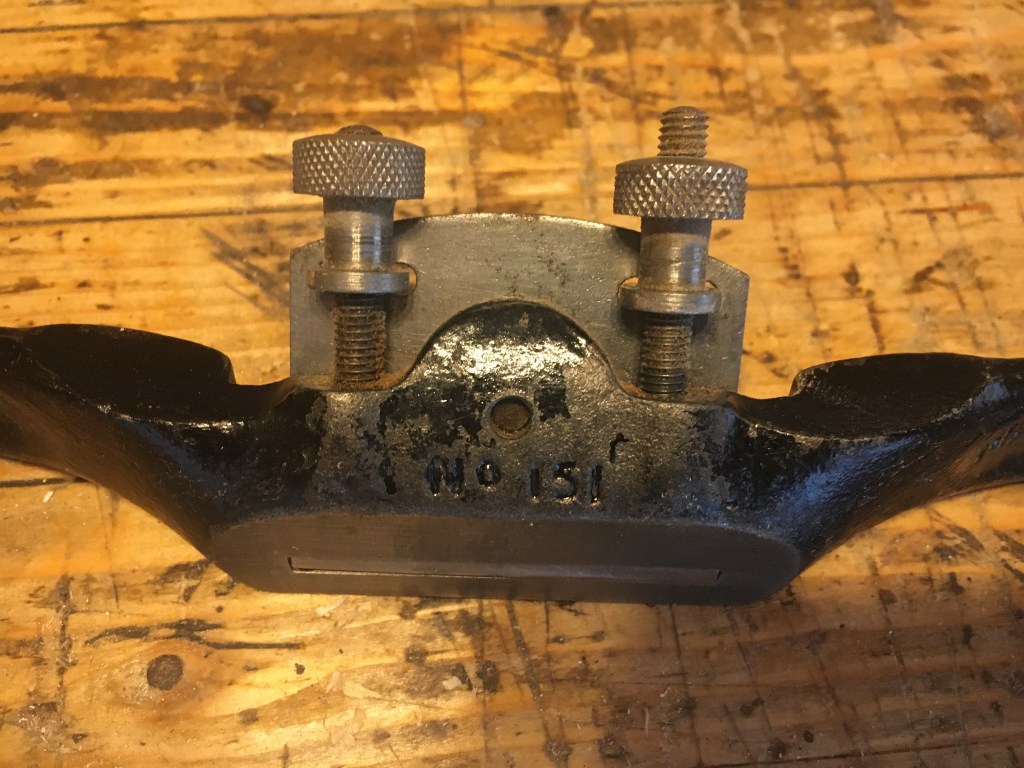
Nella testa delle rotelle sono ricavati dei perni che si inseriscono in apposite scanalature presenti nella lama. Ruotando le rotelle in senso orario, la lama, che appoggia sul corpo della suola, si sposta in avanti facendo sporgere maggiormente il tagliente della lama dalla bocca. Ruotando in senso antiorario faremo invece arretrare la lama.

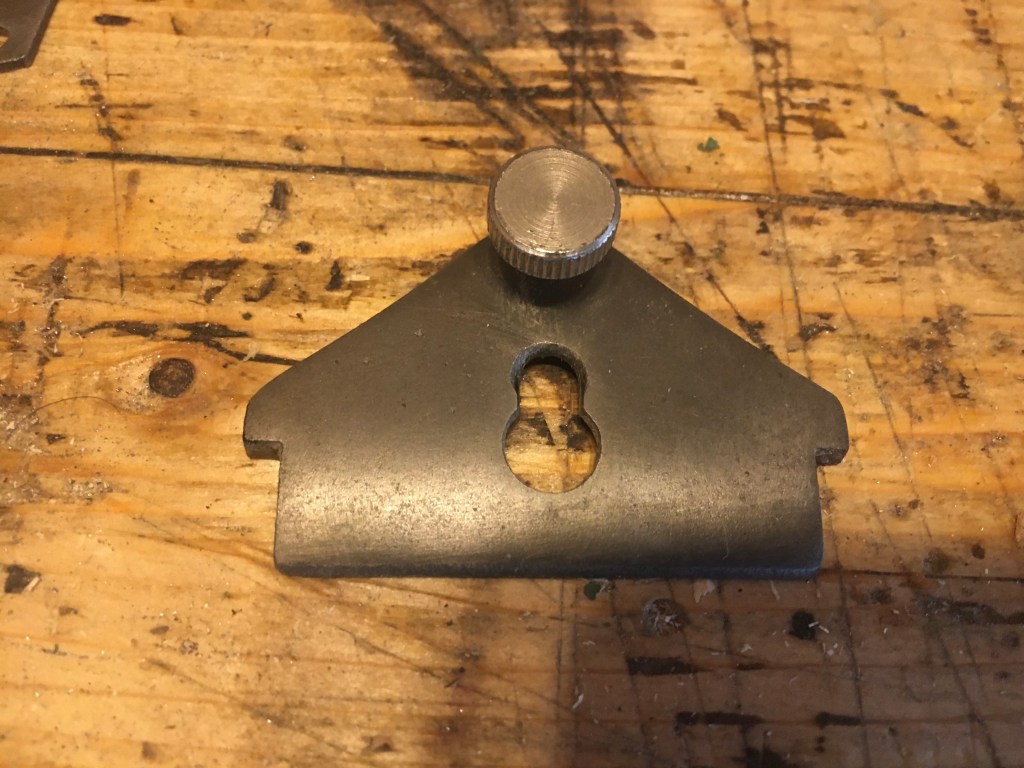
Il vantaggio di questo sistema di movimento, governato da due rotelle indipendenti, è che potremo inclinare la sporgenza del tagliente semplicemente facendo avanzare maggiormente una parte della lama rispetto all’altra. Potremo quindi usare la vastringa dalla parte dove il tagliente fuoriesce maggiormente per rimuovere più legno e dalla parte dove fuoriesce di meno per la rifinitura. La lama della vastringa non ha controferro ed è tenuta in posizione attraverso il cap iron.
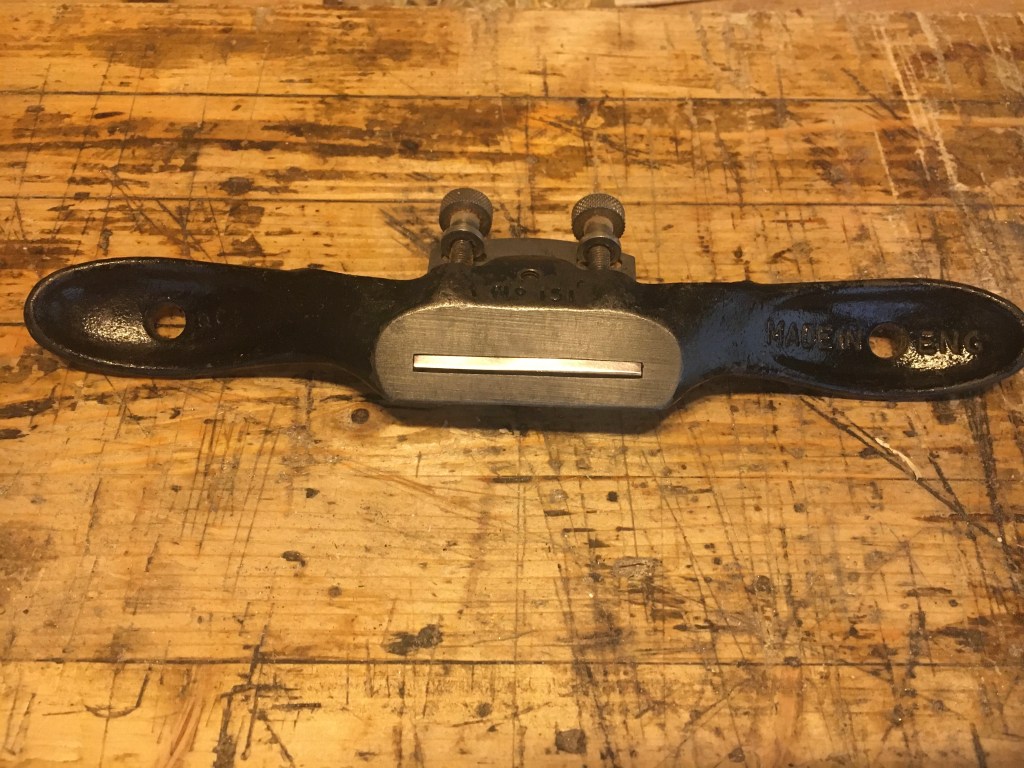
La vastringa n. 151 è stata prodotta in due versioni. Quella con suola piatta e quella con suola arrotondata (convessa) denominata con la sigla 151R. Il modello a suola piatta soddisfa la maggior parte delle esigenze ed è quindi il più utilizzato. Lavora molto bene sia sulle superfici dritte che arcuate, seguendo sia le aree concave che convesse, sempre a condizione che l’angolo di curvatura non sia eccessivamente stretto. In quest’ultimo caso è necessario utilizzare il modello con la suola arrotondata.
Le vastringhe in legno montano la lama in modalità bevel up quindi con il tagliente rivolto verso l’alto. Quelle in metallo in modalità bevel down, quindi con il tagliente rivolto verso il basso. Difficile dire quale tipo di vastringa lavori meglio, se quella in legno o quella in metallo. Sembra che quella in legno scivoli meglio (legno su legno) ma sia più problematico sia il settaggio della lama che la sua affilatura.
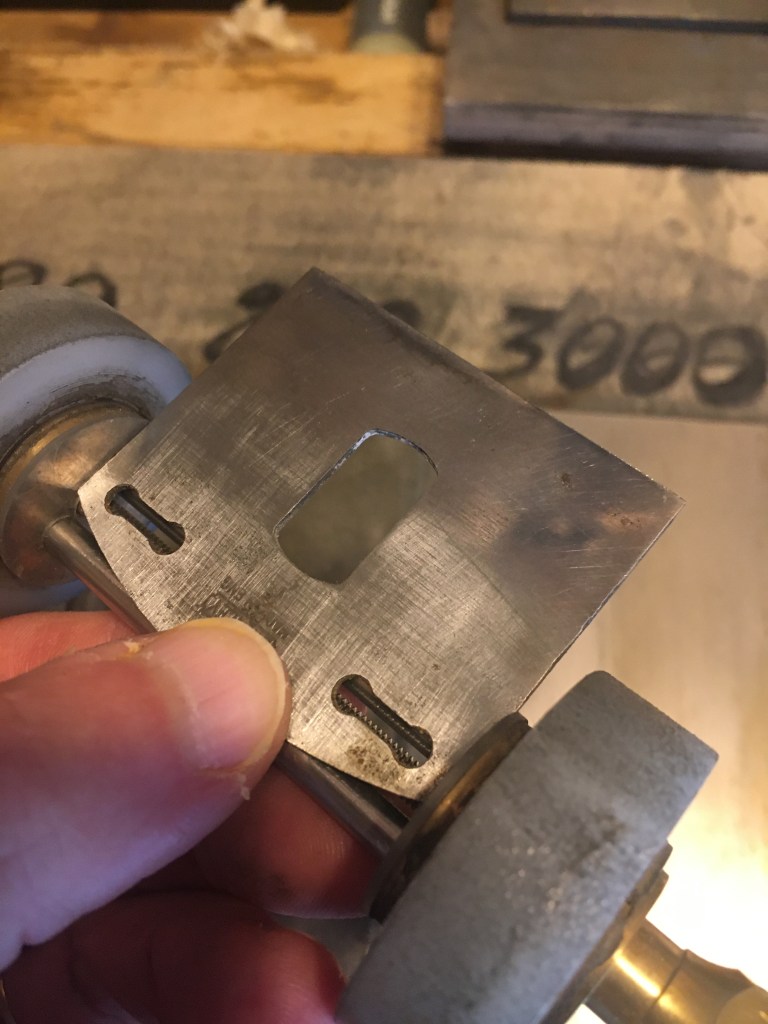
L’affilatura della lama di una vastringa in metallo segue la stessa procedura di tutte le lame delle pialle da banco. A causa delle dimensioni ridotte della lama, l’affilatura a mano libera può però risultare difficoltosa e non ottimale. L’inserimento nella guida di affilatura è sicuramente consigliabile anche se ha poca superficie di appoggio.
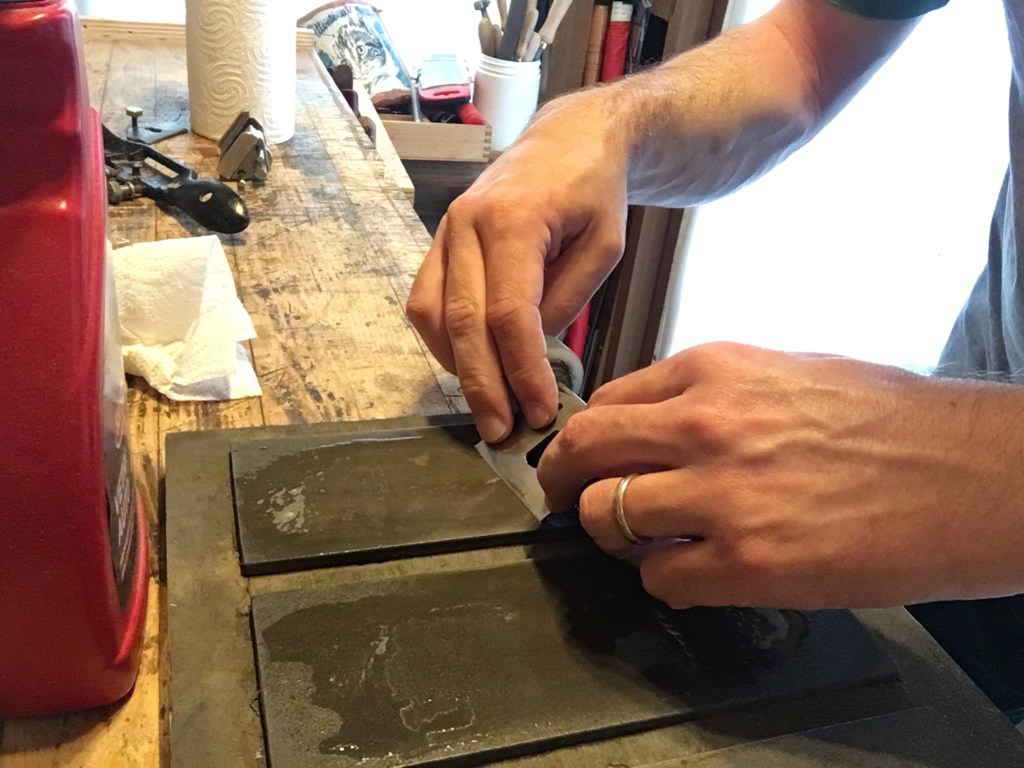
Eventualmente è possibile dotarsi di un supporto autocostruito, sul quale andremo a fissare la lama unitamente al cap iron. Sul supporto, di lunghezza di almeno 15 cm. e di larghezza pari a quella della lama, pratichiamo uno smusso a 25 gradi, uguale quindi all’angolo di affilatura della lama. Tale supporto in pratica farà da prolunga alla lama e potrà essere utilizzato direttamente sulle pietre diamantate (o su qualunque superficie abrasiva intendiamo usare) o inserito in una guida per affilatura.
Possiamo eventualmente prevedere un micro bevel di un paio di gradi.
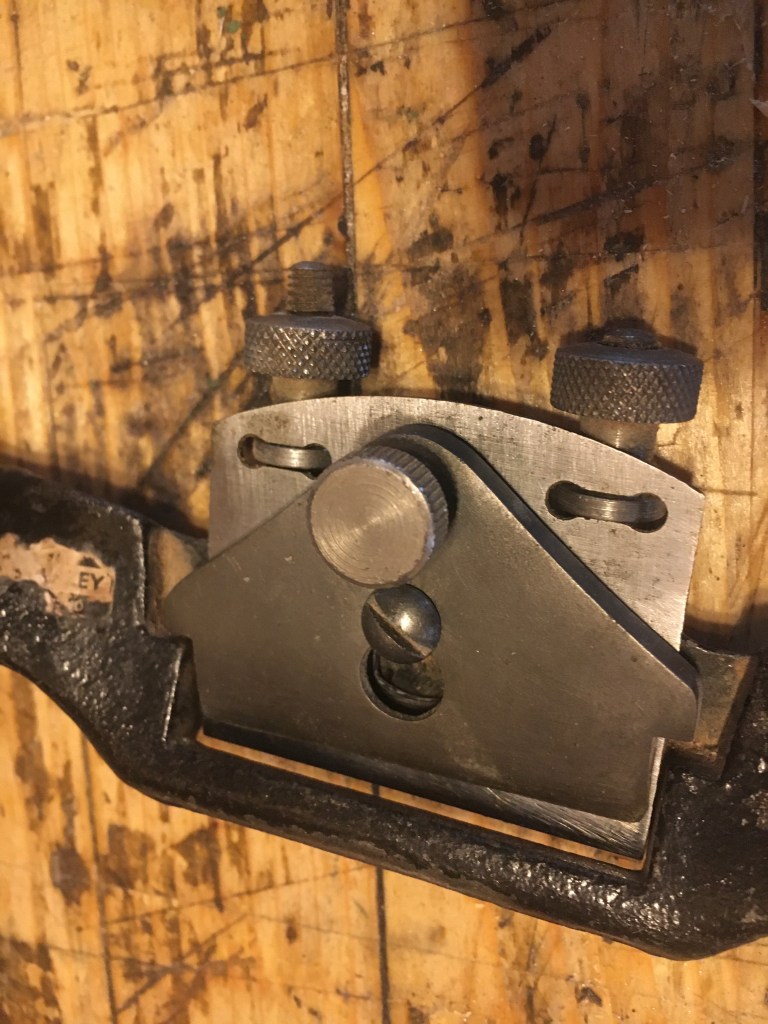
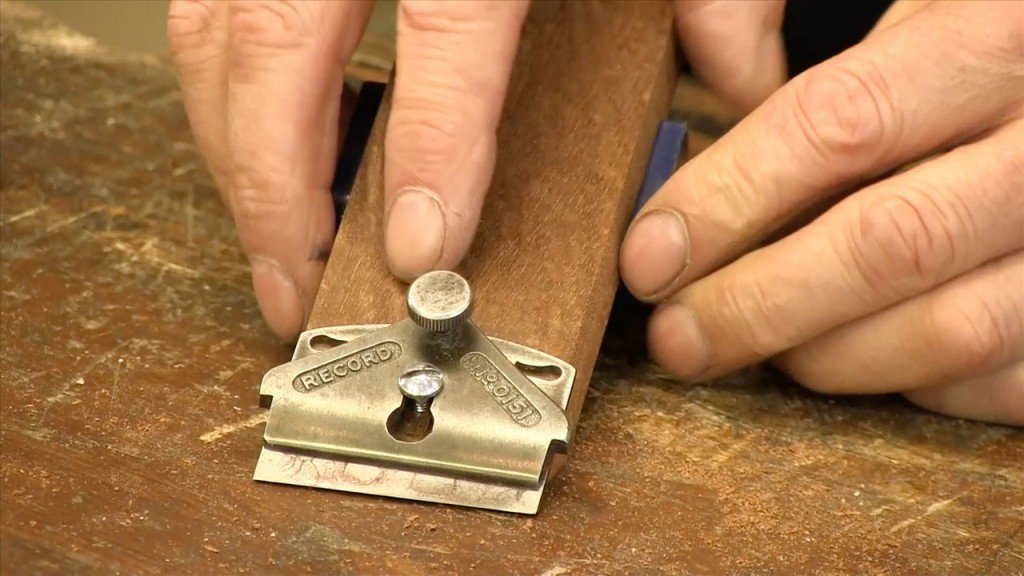
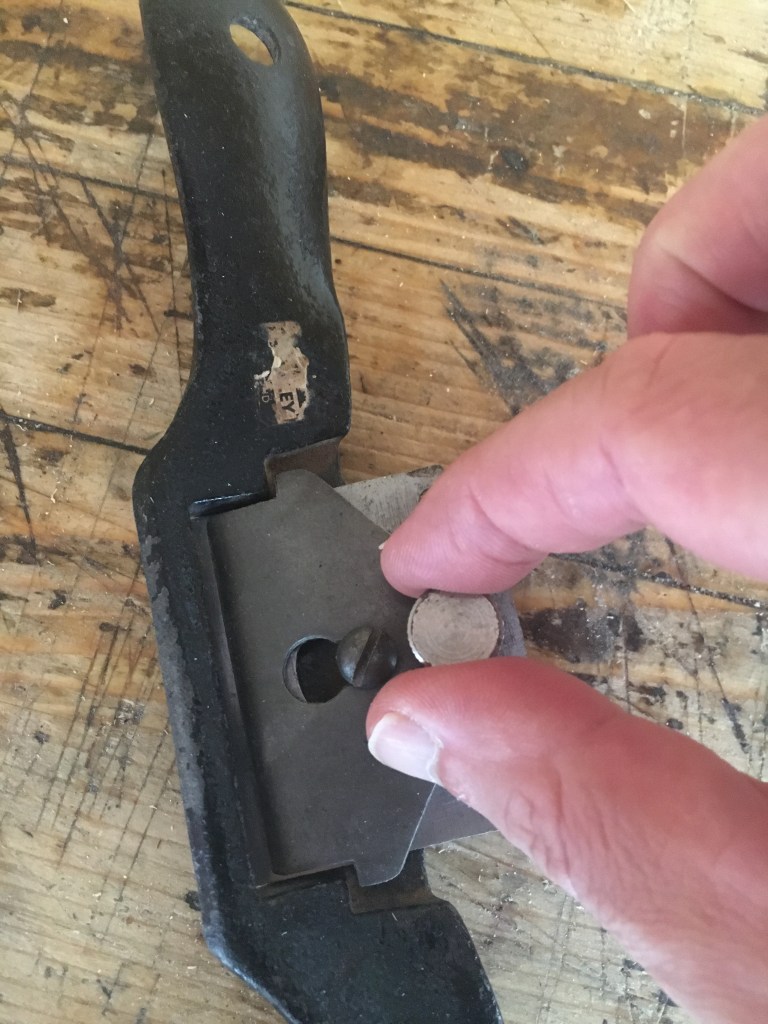
Una volta affilata la lama poniamo la vastringa sul banco con la suola rivolta verso il basso e poggiamo la lama sopra il frog (parte superiore della suola) in modo che le scanalature della lama accolgano la testa delle rotelle zigrinate.
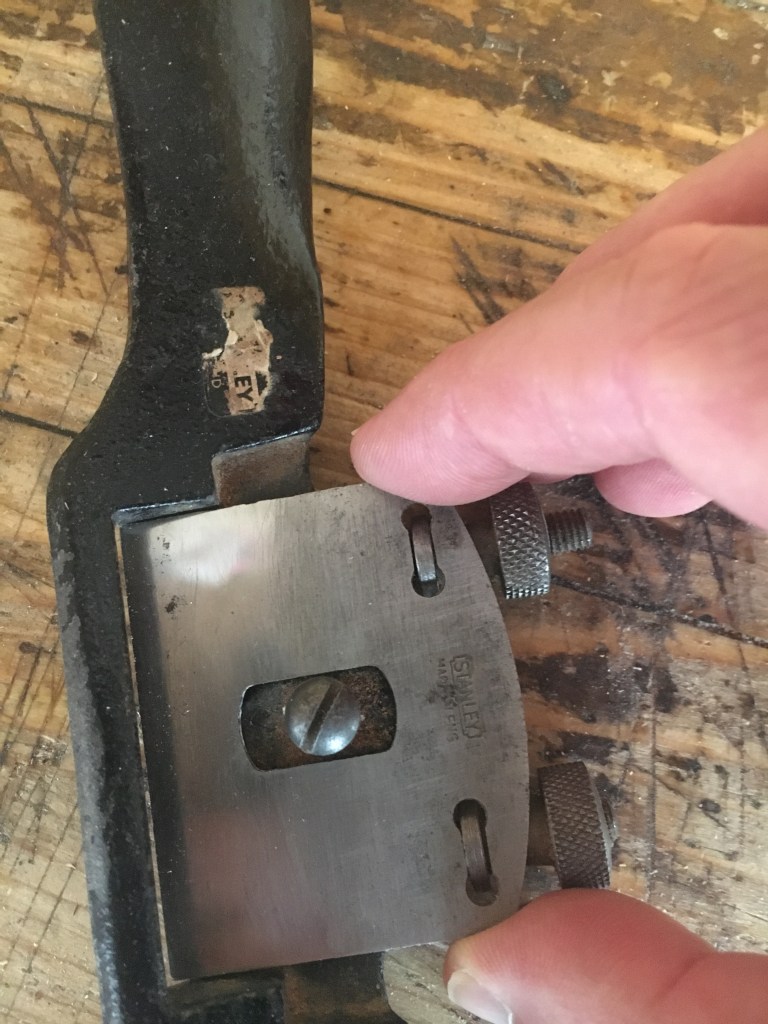
Poggiamo il cap iron sopra la lama inserendolo nella vite centrale che farà come guida di riferimento. Serriamo la vite quel poco che basta a che la sua testa tocchi il cap iron, quindi senza stringere, ed avvitiamo la vite superiore più grande (sempre senza stringere troppo, altrimenti sarà difficoltoso far avanzare ed arretrare la lama) per bloccare la lama ed il cap iron in posizione e dare la giusta tensione al gruppo di taglio appena inserito.
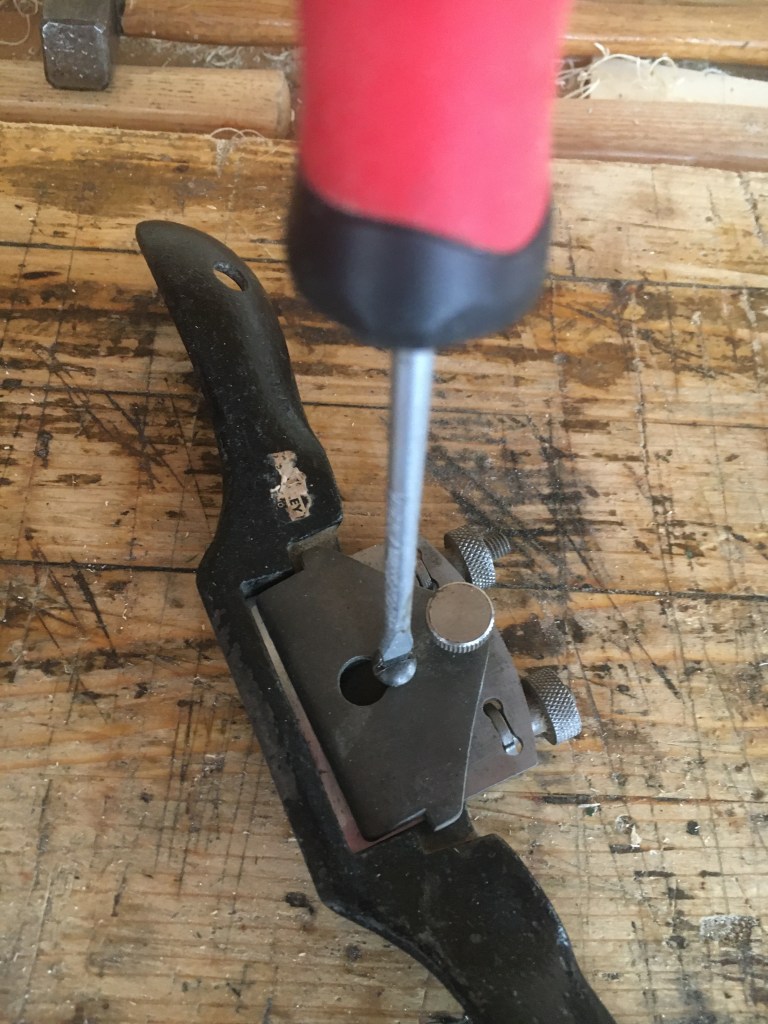
La funzione di quest’ultima vite è anche quella di trasferire la pressione esercitata sulla lama dal punto di contatto direttamente alla zona del tagliente. Accertiamoci infine che le rotelle che comandano il movimento della lama girino facilmente. Se fossero troppo dure allentiamo leggermente la vite.
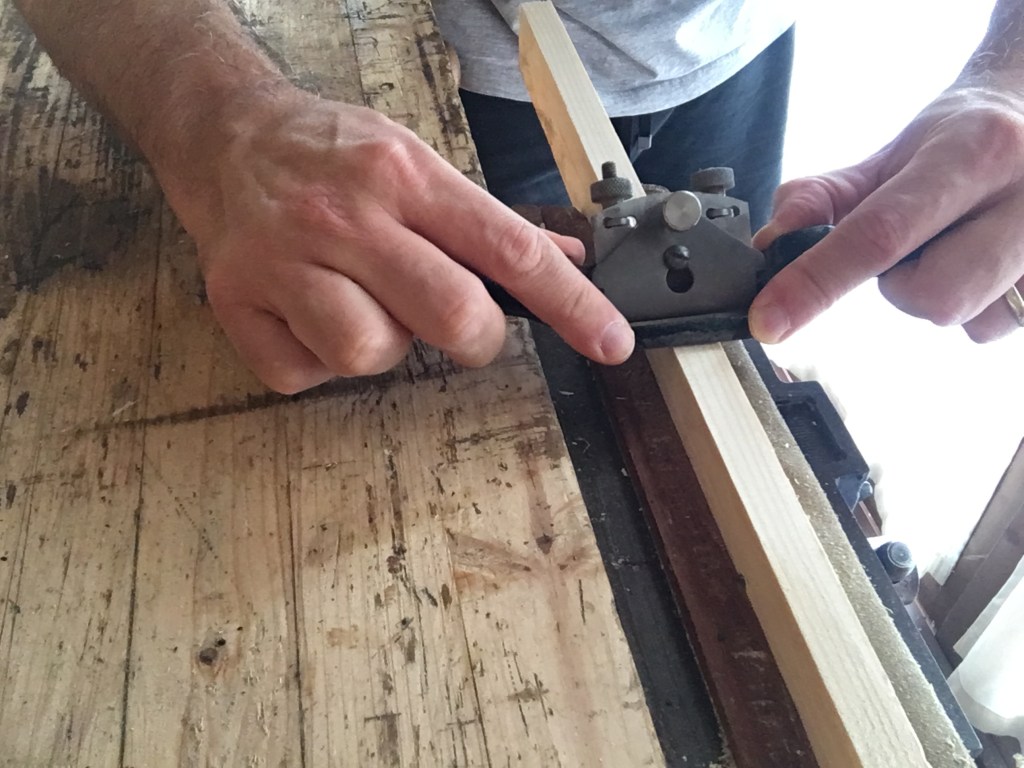
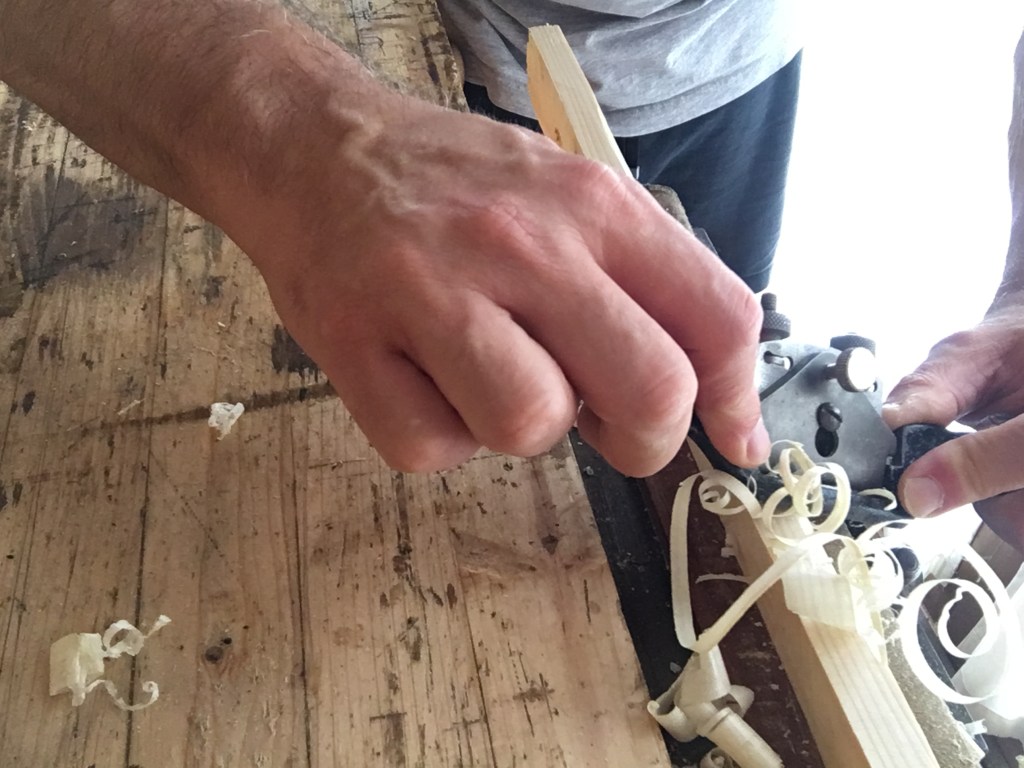
Infine prepariamola per lavorare sul legno. Per fare questo ritraiamo tutta la lama dentro la bocca della suola per mezzo delle rotelle zigrinate. Quindi prendiamo un pezzo di legno di circa 2 cm. di spessore e mettiamolo in morsa. Facciamo diversi passaggi con la vastringa sul legno, continuando ad abbassare la lama e agendo su entrambe le rotelle fino a quando non otterremo un primo truciolo.
Controlliamo quindi che il tagliente che fuoriesce dalla suola sia perfettamente parallelo al bordo della bocca ed eventualmente non lo fosse agiamo ancora sulle rotelle sino a quando non lo diventerà. Procediamo per tentativi verificando i trucioli prodotti e il parallelismo della lama fino a quando non otterremo un truciolo di spessore uniforme per tutta la sua larghezza.
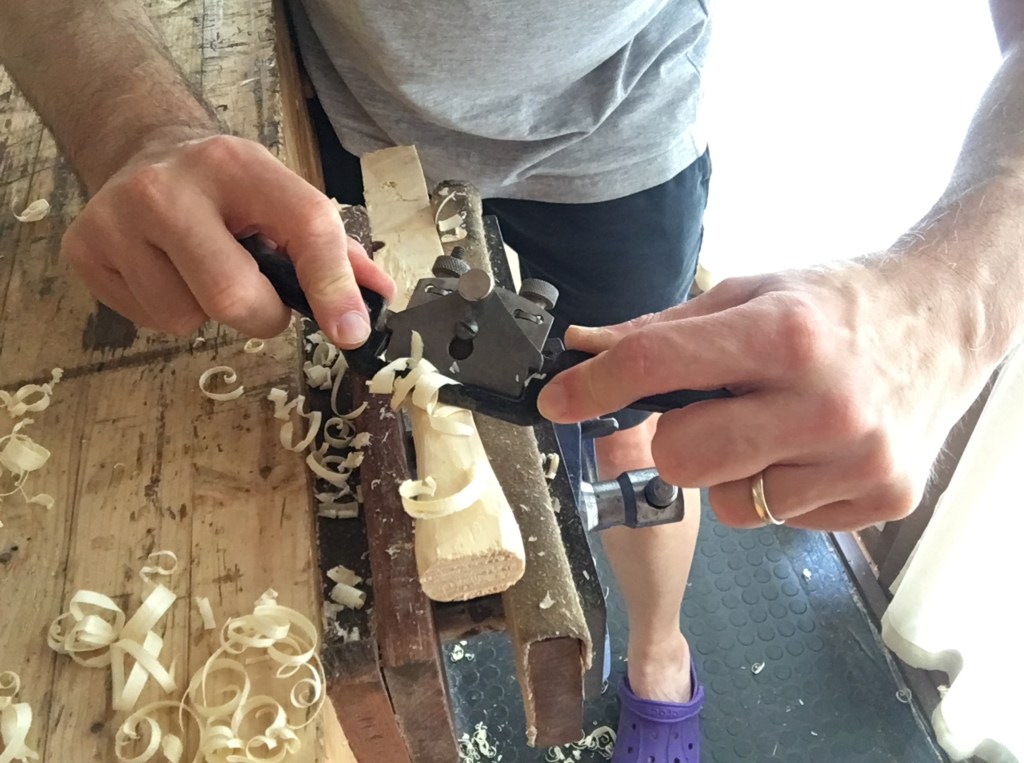
Se lavoriamo con il movimento a spingere il modo più efficace di impugnare la vastringa è quello di afferrarla per i manici con entrambe le mani e porre i pollici dietro ai manici (dove sono ricavate due rientranze sagomate fatte apposta per accoglierli) e le dita indice messe sulla parte superiore della vastringa vicino al bordo frontale.

Se invece lavoriamo con il movimento a tirare i pollici vanno sulla parte superiore e gli indici dietro alle impugnature. Così facendo otterremo sempre un controllo ottimale dell’utensile.
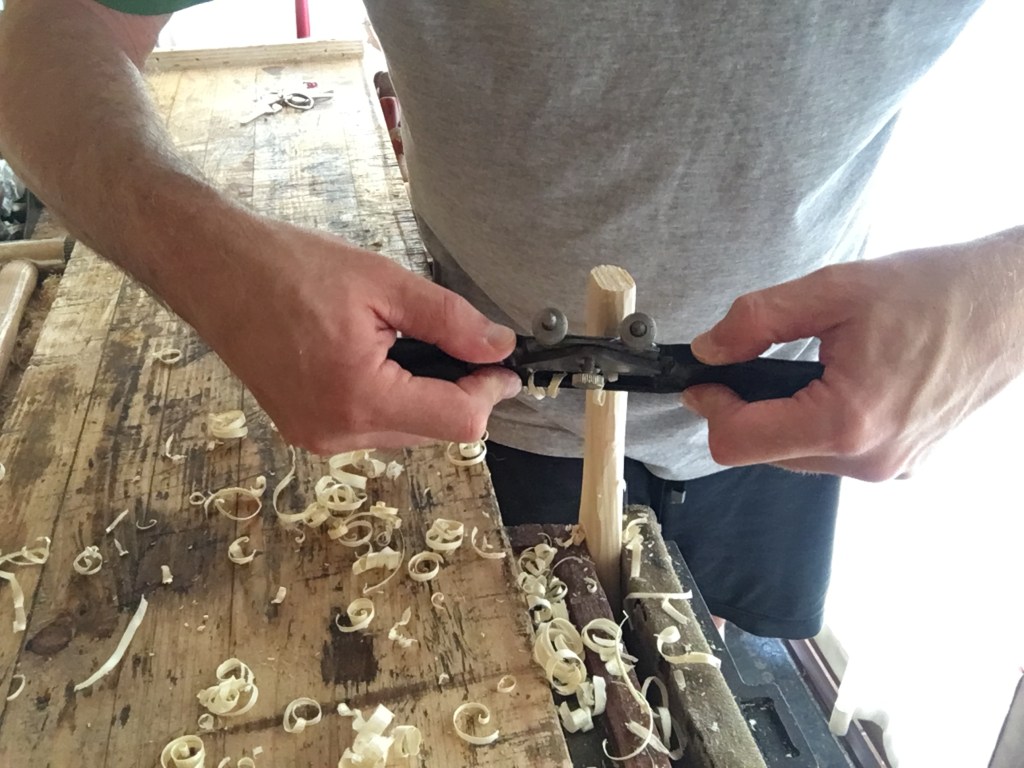
Come detto, la vastringa lavora sia a spingere (movimento in avanti), che a tirare (movimento verso di noi), ma normalmente viene utilizzata nel movimento a spingere, che risulta anche essere il più naturale. La scelta di come adoperarla dipenderà comunque principalmente dalla direzione della venatura del legno, dalla sua configurazione, dalla forma che stiamo creando ed altro ancora.
In punti particolarmente difficili del legno potremo orientarla di traverso rispetto alla direzione di piallatura così da ottenere un angolo di taglio più basso e più efficace.

Con le dita indice e pollice manteniamo sempre ben adesa la suola al pezzo da lavorare così da evitare sobbalzi. Lavoriamo sempre con fermezza ma stiamo sempre pronti a cambiare direzione non appena sentiamo che il legno oppone resistenza.
Come detto all’inizio, un buon metodo di lavoro consiste nel mantenere il tagliente più sporgente dalla bocca su un lato rispetto all’altro così da permettere di asportare più materiale da una parte e meno materiale dall’altra.
Essendo un utensile molto leggero, maneggevole e con la suola di dimensioni ridotte la vastringa consente di raggiungere il pezzo in lavorazione da diverse angolazioni permettendo di cambiare il tipo di movimento a seconda di come il legno reagisce alle nostre azioni. È quindi solo con la pratica che capiremo come utilizzarla al meglio.
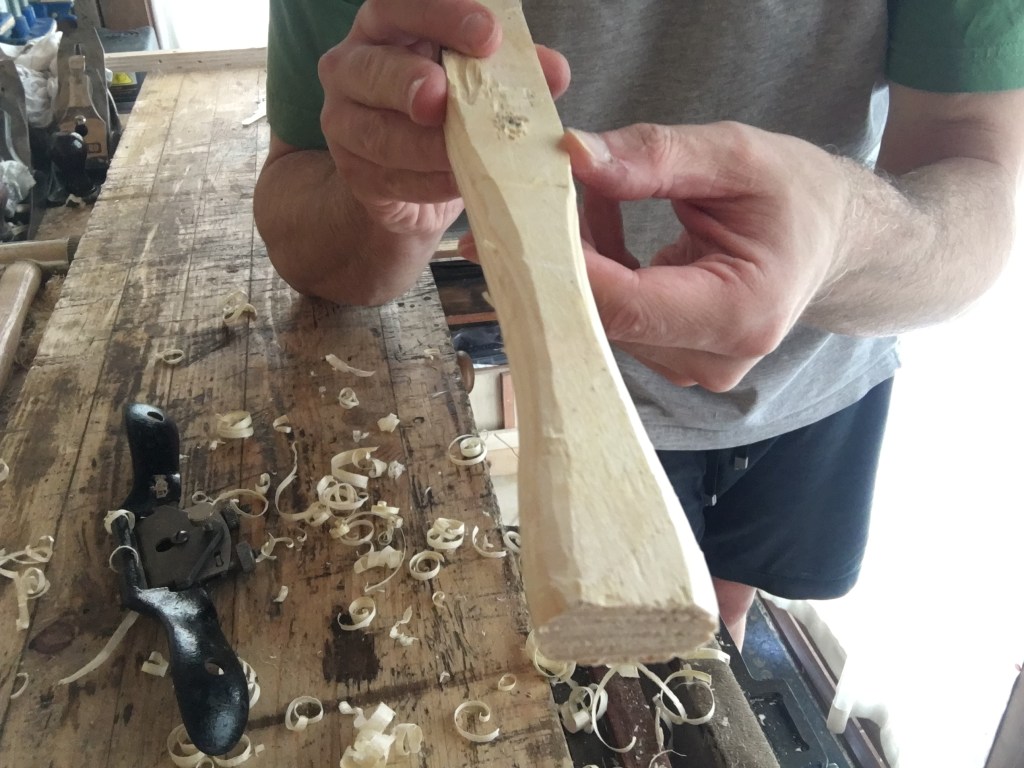
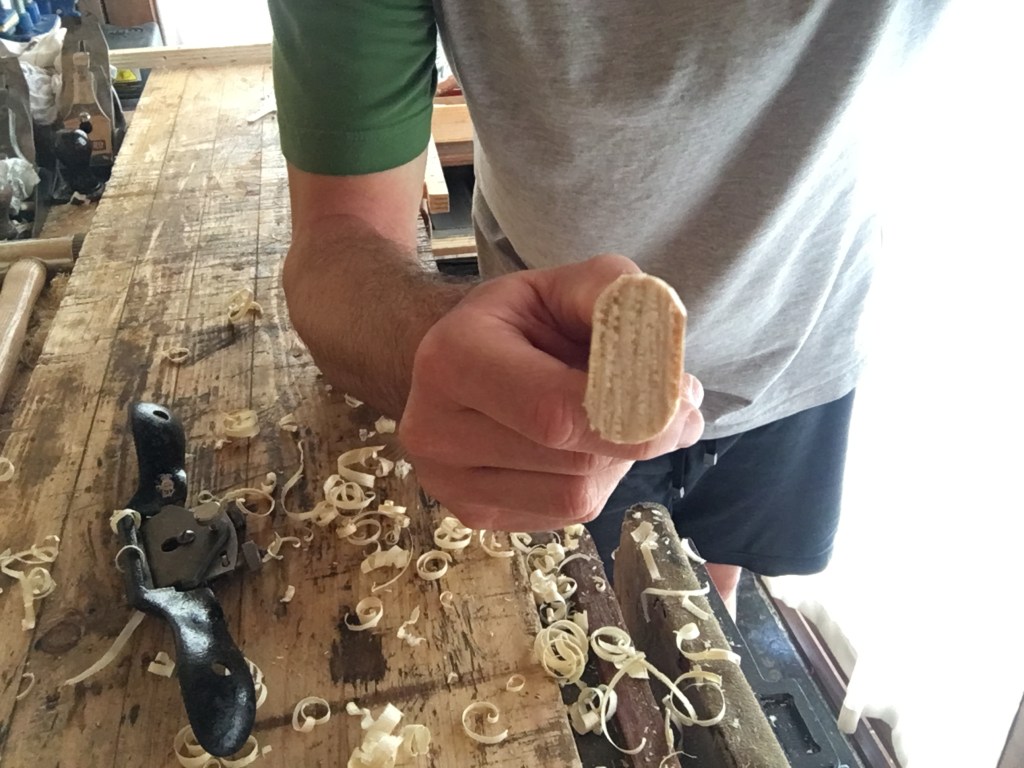
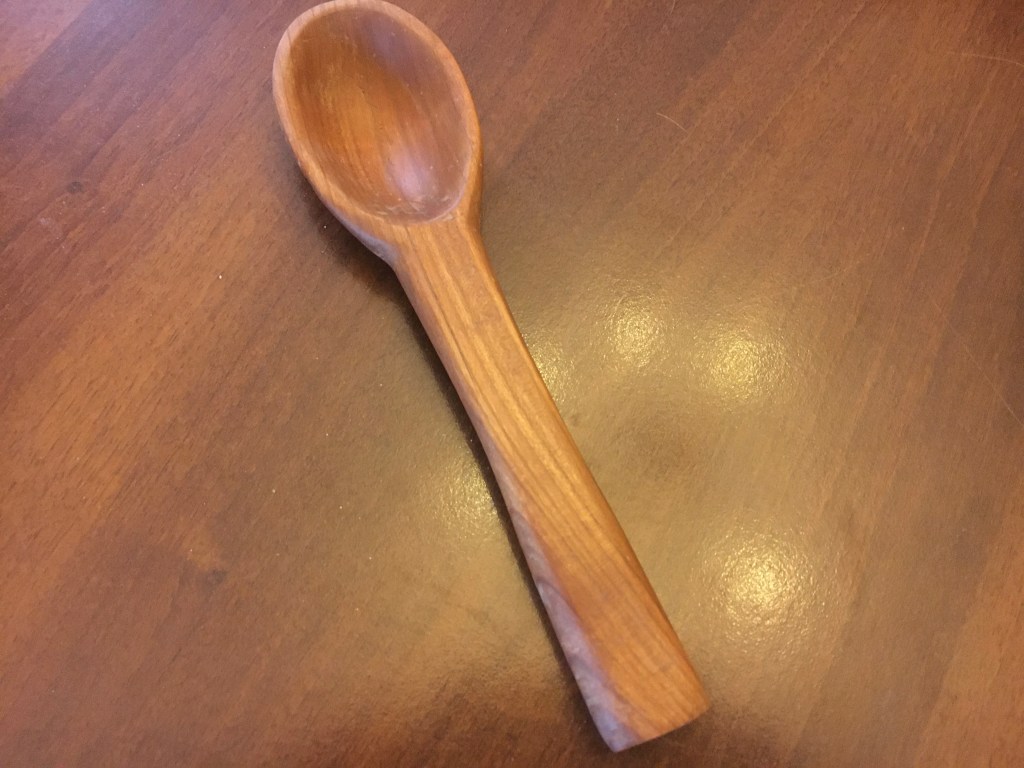
I campi di utilizzo della vastringa sono molteplici. Può essere utilizzata per smussare gli spigoli vivi di un manufatto, per creare le sagome degli ornamenti dei mobili, per la realizzazione di sedie, nella costruzione di strumenti musicali, per fare cucchiai e spatole per la cucina, per ottenere cilindri da parallelepipedi e in generale ogni qualvolta si debba ottenere o rifinire delle curve nel legno.
Tra tutti gli utensili manuali è forse quello che più si avvicina al lavoro della tornitura anche se la vastringa è più adatta a rifinire le superfici curve che non ad eliminare grandi quantità di materiale. Di solito infatti viene utilizzata solo dopo aver sgrossato il legno con altri utensili, come seghe e scalpelli, e comunque prima di intervenire con la rasiera, la raspa, la lima e le carte abrasive.
Se comunque la lama della vastringa è ben affilata lascerà una superficie talmente liscia che necessiterà solamente di una veloce levigata.
Come accennavo ad inizio articolo la vastringa lavora molto bene anche su pezzi piccoli. L’unico problema che potrebbe insorgere è quello di come bloccare il pezzo al banco dato che la morsa del banco è fissa, bassa e troppo grande per poter permettere il bloccaggio e contemporaneamente una lavorazione ottimale con la vastringa.

Se si prevede di dover lavorare molto con questo utensile una buona idea potrebbe essere quella di acquistare una morsa più piccola da porre sopra il banco e in grado di ruotare a 360 gradi. Per questo vi consiglio di dare un’occhiata al link sotto.
https://www.dictum.com/it/morse/morsa-multipla-705755
La vastringa è uno di quegli utensili manuali ai quali non si ricorre spesso e quindi non ritengo sia fondamentale averla in laboratorio. Di tanto in tanto peró può capitare di averne la necessità e quando accade risulta veramente utilissima. Quindi consiglierei comunque di acquistarne almeno una con la suola piatta ed eventualmente anche una seconda con la suola tonda cercandole usate su ebay.co.uk (scrivendo Record o Stanley spokeshave 151) oppure acquistarne una nuova, ad esempio della Kunz che, tra i vari modelli prodotti, ne propone una equipaggiata di talune migliorie.
Questi modelli sono economici e lavorano molto bene. In alternativa, potendo spendere qualcosa in più, potremmo considerare l’acquisto della vastringa della Veritas, un’azienda specializzata che costruisce ottimi prodotti ma con prezzi non proprio accessibili a tutte le tasche.

Sia Kunz che Veritas hanno nel loro catalogo vastringhe a suola piatta e a suola tonda, sia concava che convessa. Infine potremmo considerare anche l’acquisto di una vastringa in legno.
Di seguito indico alcuni link utili per l’acquisto.
https://www.antichitabelsito.it/vastringhe_kunz.html
https://www.utensiliprofessionali.com/veritas-schabhobel.html
____________________________________________________________________________________________________
The spokeshave is a little-known hand tool that, given its characteristics and purpose of use, can fall into the category of the so-called special planes. Although its shape is very different from bench planes and much more similar to that of a cabinet scraper , it differs substantially from the latter in the type of working it is used for. The spokeshave is used to make shapes in wood and therefore is able to obtain shapes, chamfers, curves and roundness. The sole of reduced dimensions it allows to follow the shapes of curved woods, in their concavity and convexity, removing material with extreme ease as a normal bench plane would do. The large handles and its lightness make it very handy and extremely versatile and therefore particularly suitable for working small pieces. As with the bench planes, the first spokeshaves models were produced in wood and were then almost completely supplanted, during the last century, by those in metal and wood and metal. The 151 spokeshave with a flat sole produced by Stanley, Record and other manufacturers is probably the most popular and famous model. You can find it in different colors (japanning) but the shape has remained substantially the same over the decades, even if some modern producers have recently introduced some variations, without however making changes. The n. 151 spokeshave is made up of a single piece from which the handles and the sole are shaped. In the sole there is the mouth from which comes out a small blade whose forward and backward movement is governed by two knurled wheels (independent of each other) that slide on threaded bars. In the head of the wheels there are pins which are inserted in special slots in the blade. By turning the wheels clockwise, the blade, which rests on the body of the sole, moves forward, making the cutting edge of the blade protrude further from the mouth. Turning counterclockwise will instead make the blade retract. The advantage of this movement system, governed by two independent wheels, is that we will be able to skew the protrusion of the cutting edge simply by advancing one part of the blade more than the other. We can then use the spokeshave on the part where the cutting edge protrudes most to remove more wood and on the part where it protrudes least for finishing. The blade of the spokeshave has no back iron and is held in place by the cap iron . The n. 151 spokeshave was produced in two versions. The one with a flat sole and the one with a rounded (convex) sole called 151R. The flat sole model satisfies most needs and is therefore the most used. It works very well on both straight and round surfaces, following both concave and convex areas, always provided that the angle of curvature is not excessively tight. In the latter case it is necessary to use the model with the rounded sole. The wooden spokeshaves mount the blade in bevel up mode, therefore with the cutting edge facing upwards. Those in metal in bevel down mode , therefore with the cutting edge facing down. It is difficult to say which type of spokeshave works best, whether the wooden one or the metal one. It seems that the wooden one glides better (wood on wood) but it is more problematic both the setting of the blade and its sharpening. The sharpening of the blade of a metal spokeshave follows the same procedure of the bench planes. However, due to the small size of the blade, freehand sharpening can be difficult and not optimal. The insertion in the sharpening guide is certainly advisable even if it has little support surface. Eventually it is possible to equip yourself with a self-made support, on which we will fix the blade together with the cap iron . On the support, at least 15 cm long. and with a width equal to that of the blade, we make a bevel at 25 degrees, therefore equal to the angle of sharpening of the blade. In practice, this support will act as an extension to the blade and can be used directly on the diamond stones (or on any abrasive surface we intend to use) or inserted in a sharpening guide. We can possibly make a micro bevel of a couple of degrees. Once the blade has been sharpened, we place the spokeshave on the bench with the sole facing downwards and place the blade over the frog (upper part of the sole) so that the slots of the blades accommodate the head of the knurled wheels. We place the cap iron on the blade by inserting it into the central screw which will act as a reference guide. We tighten the screw just enough for its head to touch the cap iron, so without tightening, and screw the larger upper screw (always without tightening too much, otherwise it will be difficult to move the blade forward and backward) to lock the blade and the cap iron in position and give the right tension to the cutting unit just inserted. The function of the latter screw is also to transfer the pressure exerted on the blade from the contact point directly to the cutting edge area. Finally, make sure that the wheels that control the movement of the blade turn easily. If they are too hard we loosen the screw slightly. Finally, let’s prepare it to work on wood. To do this, we retract the entire blade into the mouth of the sole bythe knurled wheels. So we take a piece of wood of about 2 cm. thick and put it in a vice. We make several passes with the spokeshave on the wood, continuing to lower the blade and acting on both wheels until we get a first shaving. We therefore check that the cutting edge that comes out of the sole is perfectly parallel to the edge of the mouth and if it is not, we still operate on the wheels until it becomes so. We proceed by these checkings until the shavings produced with the parallelism of the blade is of uniform thickness over its entire width. If we work with the pushing movement, the most effective way to grip the spokeshave is to grab it by the handles with both hands and place the thumbs behind the handles (where there are two shaped recesses made specifically to accommodate them) and the index fingers placed on the top of the spokeshave near the front edge. On the other hand, if we work with the pulling movement, the thumbs go to the top and the index fingers behind the handles. By doing so, we will always achieve optimal tool control. As mentioned, the spokeshave works both to push (forward movement) and to pull (movement towards us), but it is normally used in the pushing movement, which is also the most natural. The choice of how to use it will however depend mainly on the direction of the wood grain, its configuration, the shape we are creating and more. In particularly difficult points of the wood we can skew it with respect to the planing direction in order to obtain a lower and more effective cutting angle. With the index and thumb fingers we always keep the sole well adhered to the workpiece so as to avoid jumpings. We always work firmly but always ready to change direction as soon as we feel that the wood offers resistance. As mentioned at the beginning, a good working method consists in keeping the cutting edge more protruding from the mouth on one side than the other so as to allow you to remove more material on one side and less material on the other. Being a very light tool, easy to handle and with a small sole, the spokeshave allows you to reach the workpiece from different angles allowing you to change the type of movement depending on how the wood reacts to our actions. It is therefore only with practice that we will understand how to best use it. Many works can be made with the spokeshave. It can be used to chamfer the sharp edges of a piece of wood, to create the shapes of furniture ornaments, for the creation of chairs, in the construction of musical instruments, to make spoons and spatulas for the kitchen, to obtain cylinders from parallelepipeds and in general whenever it is necessary to obtain or finish curves in the wood. Among all the hand tools it is perhaps the one that comes closest to the work of turning even if the spokeshave is more suitable for finishing curved surfaces than for eliminating large quantities of material. In fact, it is usually used only after having roughed the wood with other tools, such as saws and chisels, and in any case before intervening with the scraper, the rasp, the file and the abrasive papers. However, if the blade of the spokeshaveis well sharpened it will leave a surface so smooth that it will only need a quick sanding. As I mentioned at the beginning of the article, the spokeshave works very well even on small pieces. The only problem that could arise is that of how to lock the piece to the bench since the bench vice is fixed, low and too large to allow locking and at the same time an optimal processing with the spokeshave. If you plan to have to do a lot of work with this tool a good idea might be to buy a smaller vice to be placed on top of the bench and able to rotate 360 degrees. For this I recommend you take a look at the link above. The spokeshave is one of those hand tools that is not often used and therefore I do not think it is essential to have it in the laboratory. From time to time, however, it may happen to have the need and when it happens it is really useful. So I would still recommend buying at least one with a flat sole and possibly also a second one with a round sole by looking for them used on ebay.co.uk or buying a new one, for example from Kunz which, among others models produced, proposes one equipped with certain improvements. These models are inexpensive and work very well. Alternatively, being able to spend a little more, we could consider the purchase of the Veritas spokeshave, a specialized company that builds excellent products but with prices not exactly accessible to all budgets. Both Kunz and Veritas have in their catalog spokeshaves with a flat sole and round sole, which is concave and convex. Finally, we could also consider purchasing a wooden spokeshave. Above I indicate some useful links for the purchase.
Alcune foto ed immagini sono state tratte da siti internet esterni / libri per soli scopi informativo didattici e senza fini di lucro. Se si è proprietari delle immagini e se ne desidera la rimozione si prega di segnalarlo nella sezione contatti.

Lascia un commento