LE GUIDE PER AFFILARE GLI UTENSILI MANUALI / HONING GUIDES FOR SHARPENING HAND TOOLS
English translation at the end of the article
 L’argomento affilatura è da sempre oggetto di un appassionato dibattito tra diverse scuole di pensiero. C’è chi preferisce affilare con le guide e chi a mano libera, chi preferisce le pietre ad acqua e ad olio e chi le pietre diamantate o la carta abrasiva, chi è contrario all’utilizzo delle mole e chi non ne può fare a meno (e tra questi chi la utilizza a secco e chi a umido), chi vuole arrivare ad un’affilatura a specchio e chi invece non lo reputa necessario, chi affila facendo anche il micro bevel e chi affila tutto il bisello alla stessa angolazione. E potrei continuare ancora. Personalmente, dopo qualche anno di esperienza nell’affilatura ed avendo sperimentato le varie possibilità, sono arrivato a delle conclusioni ben precise di cui parlerò a fine articolo. Mi preme però sottolineare fin da adesso che quello che va bene per me non è detto vada bene per gli altri e questo perché il metodo di affilatura è una questione prettamente personale, dettato da innumerevoli fattori, come ad esempio il tipo di legno che si vuole lavorare, il tempo da potere e volere dedicare all’affilatura, la qualità che si desidera ottenere dall’affilatura rapportata alle nostre reali necessità lavorative ed altro ancora. I falegnami di una volta affilavano esclusivamente a mano libera, regolando l’angolo di inclinazione dell’utensile semplicemente ad occhio e l’uso delle mole e delle pietre ad olio erano la normalità per la gran parte di loro. Difficilmente utilizzavano le guide e le pietre diamantate erano sconosciute. Il tempo da dedicare all’affilatura doveva essere il minimo indispensabile, necessario al ripristino della funzionalità del tagliente e rientrava nella normale routine. Non c’era tempo per inutili tecnicismi, bisognava badare al concreto. Oggi, che la figura del falegname tradizionale è quasi sparita, le cose sono cambiate. L’affilatura è diventata più un esercizio di stile per hobbisti che una reale necessità lavorativa e questo proprio perché chi lavora il legno alla vecchia maniera lo fa più per passione che non per bisogno. Non dovendo più lavorare il legno per vivere ma semplicemente per diletto ecco spiegato il proliferare di una corposa letteratura in materia e la presenza di migliaia di articoli e video su internet che mirano a soddisfare la curiosa ingordigia di chi è alla continua ricerca del tagliente perfetto e della lucidatura a specchio, dedicando a questo scopo interminabili sessioni di affilatura, spesso acquistando materiali dal costo spropositato ma perdendo di vista ciò che è veramente importante, ovvero ottenere una lama affilata quanto basta da permettere di tornare a lavorare quanto prima. Dopo questa breve introduzione vediamo nello specifico cosa sono le guide per affilatura e come funzionano.
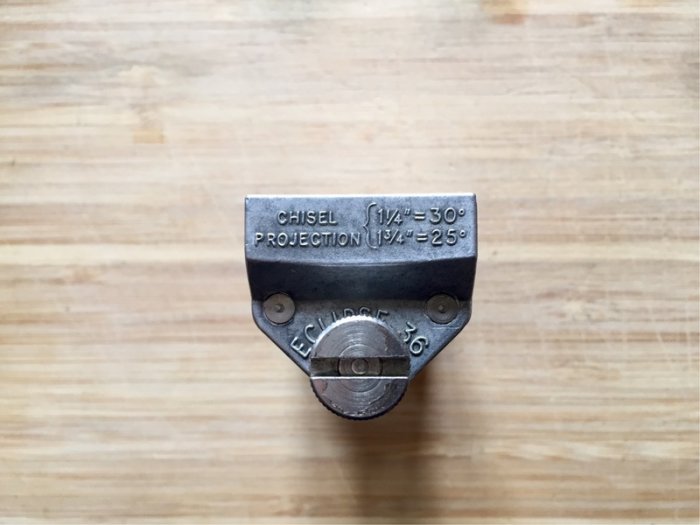 Le guide per affilatura sono degli ausili che permettono di mantenere inclinata la lama di una pialla o di uno scalpello mentre le si affila sulla pietra o sulla carta abrasiva. Il primo modello di guida è stata la storica Eclipse n. 36 tutt’oggi acquistabile su Ebay.co.uk o sui siti specializzati a prezzi relativamente economici (escludendo ovviamente le spese di spedizione), sempre se rapportata ad altri modelli di guide sviluppate negli ultimi anni. Sul mercato oggigiorno è possibile trovare molti cloni della Eclipse n. 36 a prezzi molto bassi, spesso Made in China. Sulla qualità di questo tipo di guide non saprei dire ma, volendo comunque testarne una, ho acquistato questa https://www.amazon.it/gp/aw/d/B087BQTZPK?psc=1&ref=ppx_pop_mob_b_asin_title del tutto similare alla Eclipse n.36 e l’ho paragonata alla guida della Stanley 14 – 050 (altra guida economica) ed alla guida Richard Kell n.2 LGE (di fascia medio alta) utilizzandole per un po’ di tempo e traendone delle impressioni d’uso di cui dirò tra poco. Prima però vorrei accennare brevemente a due modelli di guida che non possiedo ma che sono molto diffusi tra gli appassionati.
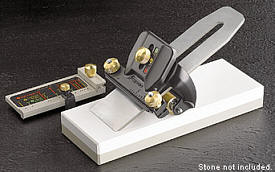
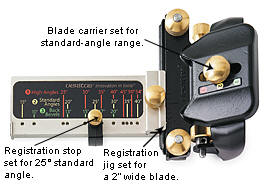
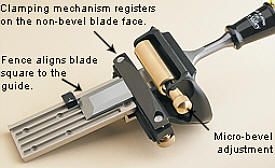
Il primo è la guida Veritas MKII sulla quale ho letto recensioni estremamente positive. Su questa guida è possibile impostare un grado di inclinazione ripetibile ad ogni affilatura, grazie al misuratore dato in dotazione sul quale è montata una battuta scorrevole che, bloccata alla gradazione voluta (le gradazioni riportate sono veramente tante), permette non solo di arrestare la lama alla giusta inclinazione ma di riprendere sempre la stessa angolazione nelle successive affilature, senza essere costretti a rifare tutto il bisello. Il misuratore è anche dotato di una utile battuta parallela che permette di inserire la lama perfettamente allineata e in squadra con la guida. Una volta strette le due viti poste sopra la guida basterà allentare la vite di blocco del misuratore e sfilarlo. Inoltre è possibile creare il micro bevel senza dover smontare la lama, grazie all’apposita regolazione del rullo inferiore. Appare particolarmente robusta, ha un ampia superficie di appoggio grazie alle dimensioni del rullo inferiore in ottone, ma non è sicuramente economica (si piazza tra le guide di fascia medio alta) e qualcuno ne lamenta comunque la laboriosità del settaggio della lama nella guida.
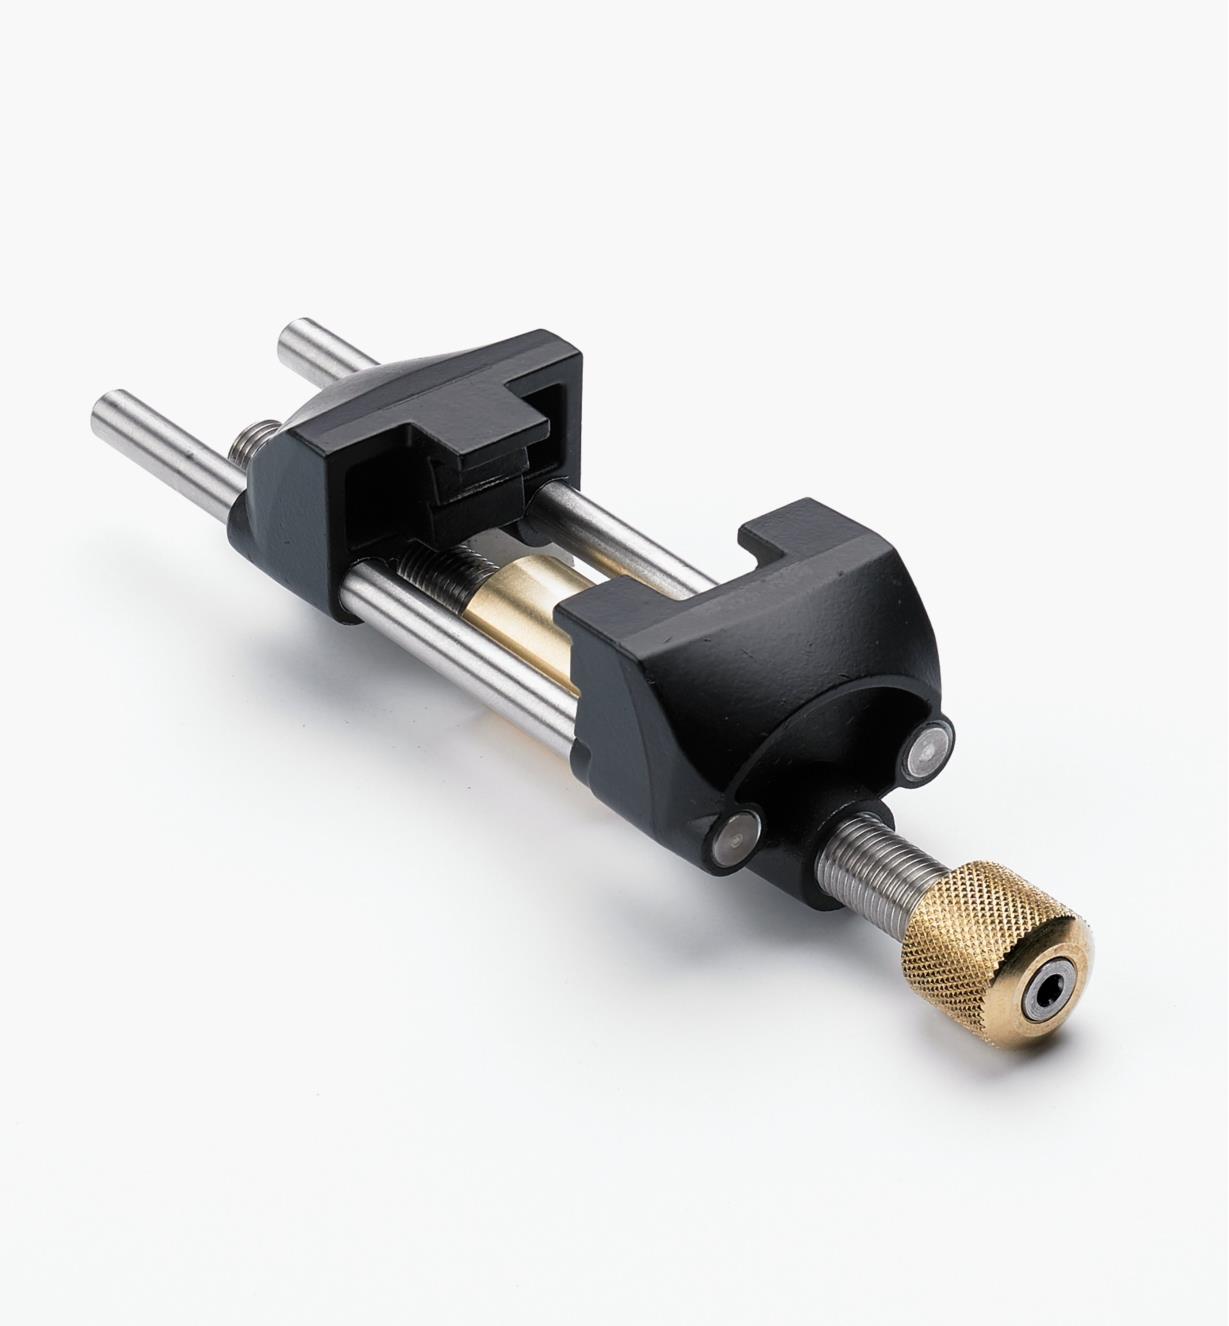 Proprio di questi giorni è la notizia dell’uscita di una nuova guida a marchio Lee Valley Veritas che somiglia, nella sua struttura, ad una Eclipse. Non è ancora presente in Europa ma il prezzo sembra abbordabile, almeno per il momento, considerando però che bisogna aggiungere le spese di spedizione. Inserisco di seguito alcuni link per l’acquisto sia della MKII che della nuova versione. https://www.utensiliprofessionali.com/G307971.ml
Il secondo modello meritevole di menzione è la guida della Lie Nielsen che si attesta in una fascia di prezzo decisamente più alta. Riprende in toto le caratteristiche e la struttura della Eclipse n.36, quindi con un sistema di blocco laterale. Ha la peculiarità di poter sostituire le ganasce così da inserire quelle più adatte alla lama da affilare (utili quindi anche per lame speciali come le lame skewed, le lame corte, ecc.). Il funzionamento è del tutto identico alla Eclipse di cui dirò tra poco. Probabilmente il prezzo così alto non è giustificato ma ho letto recensioni lusinghiere sul suo funzionamento e questo alla fine è quello che conta. Di seguito inserisco un link dove è possibile acquistarla. https://www.axminstertools.com/lie-nielsen-honing-guide-101795.
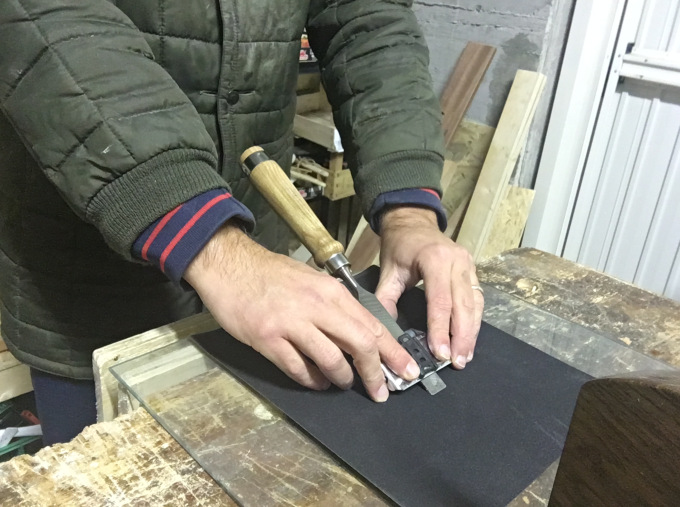
Le guide per affilare si dividono in due grandi categorie: quelle con il sistema di serraggio della lama laterale (tipo Eclipse) e quelle con il sistema di serraggio superiore (tipo Veritas MKII). Alcune guide hanno “di serie” l’indicatore dell’inclinazione, altre invece hanno bisogno di un goniometro (o inclinometro) digitale così da inserire la lama all’inclinazione desiderata o prevedono l’utilizzo di un apposito jig, acquistabile con la guida o a parte, oppure auto costruito, come nel mio caso. Ogni guida ha caratteristiche specifiche che la rendono diversa dalle altre e per tale motivo la maggiore difficoltà è quella di imparare come inserire e serrare correttamente la lama della pialla o lo scalpello. Una volta compreso questo passaggio, si tratterà solo di metterla al lavoro. La guida va fatta muovere avanti e indietro sulla pietra o sulla carta abrasiva avendo cura di poggiare e far pressione con le dita indice in prossimità del tagliente, mantenendolo sempre ben adeso alla superficie. Controlliamo di tanto in tanto che il tagliente venga dritto e quando sentiremo essersi formata sul dorso, per tutta la sua larghezza, la bava metallica, passiamo alle grane via via più fini, come visto nei post passati dedicati all’affilatura e ai quali vi rimando a fine articolo.
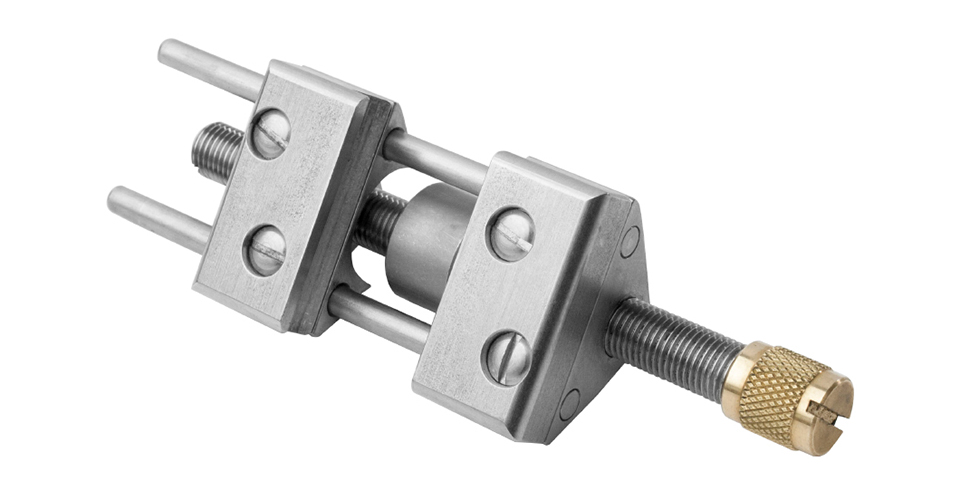
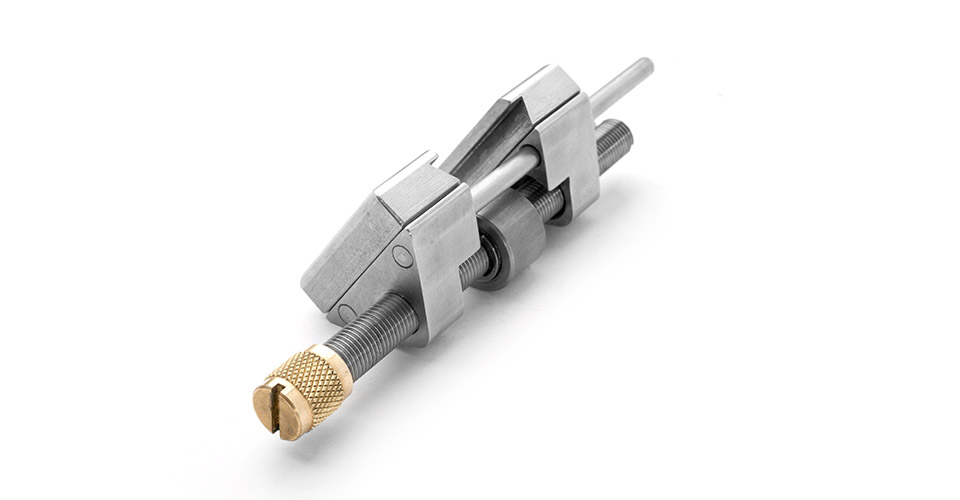
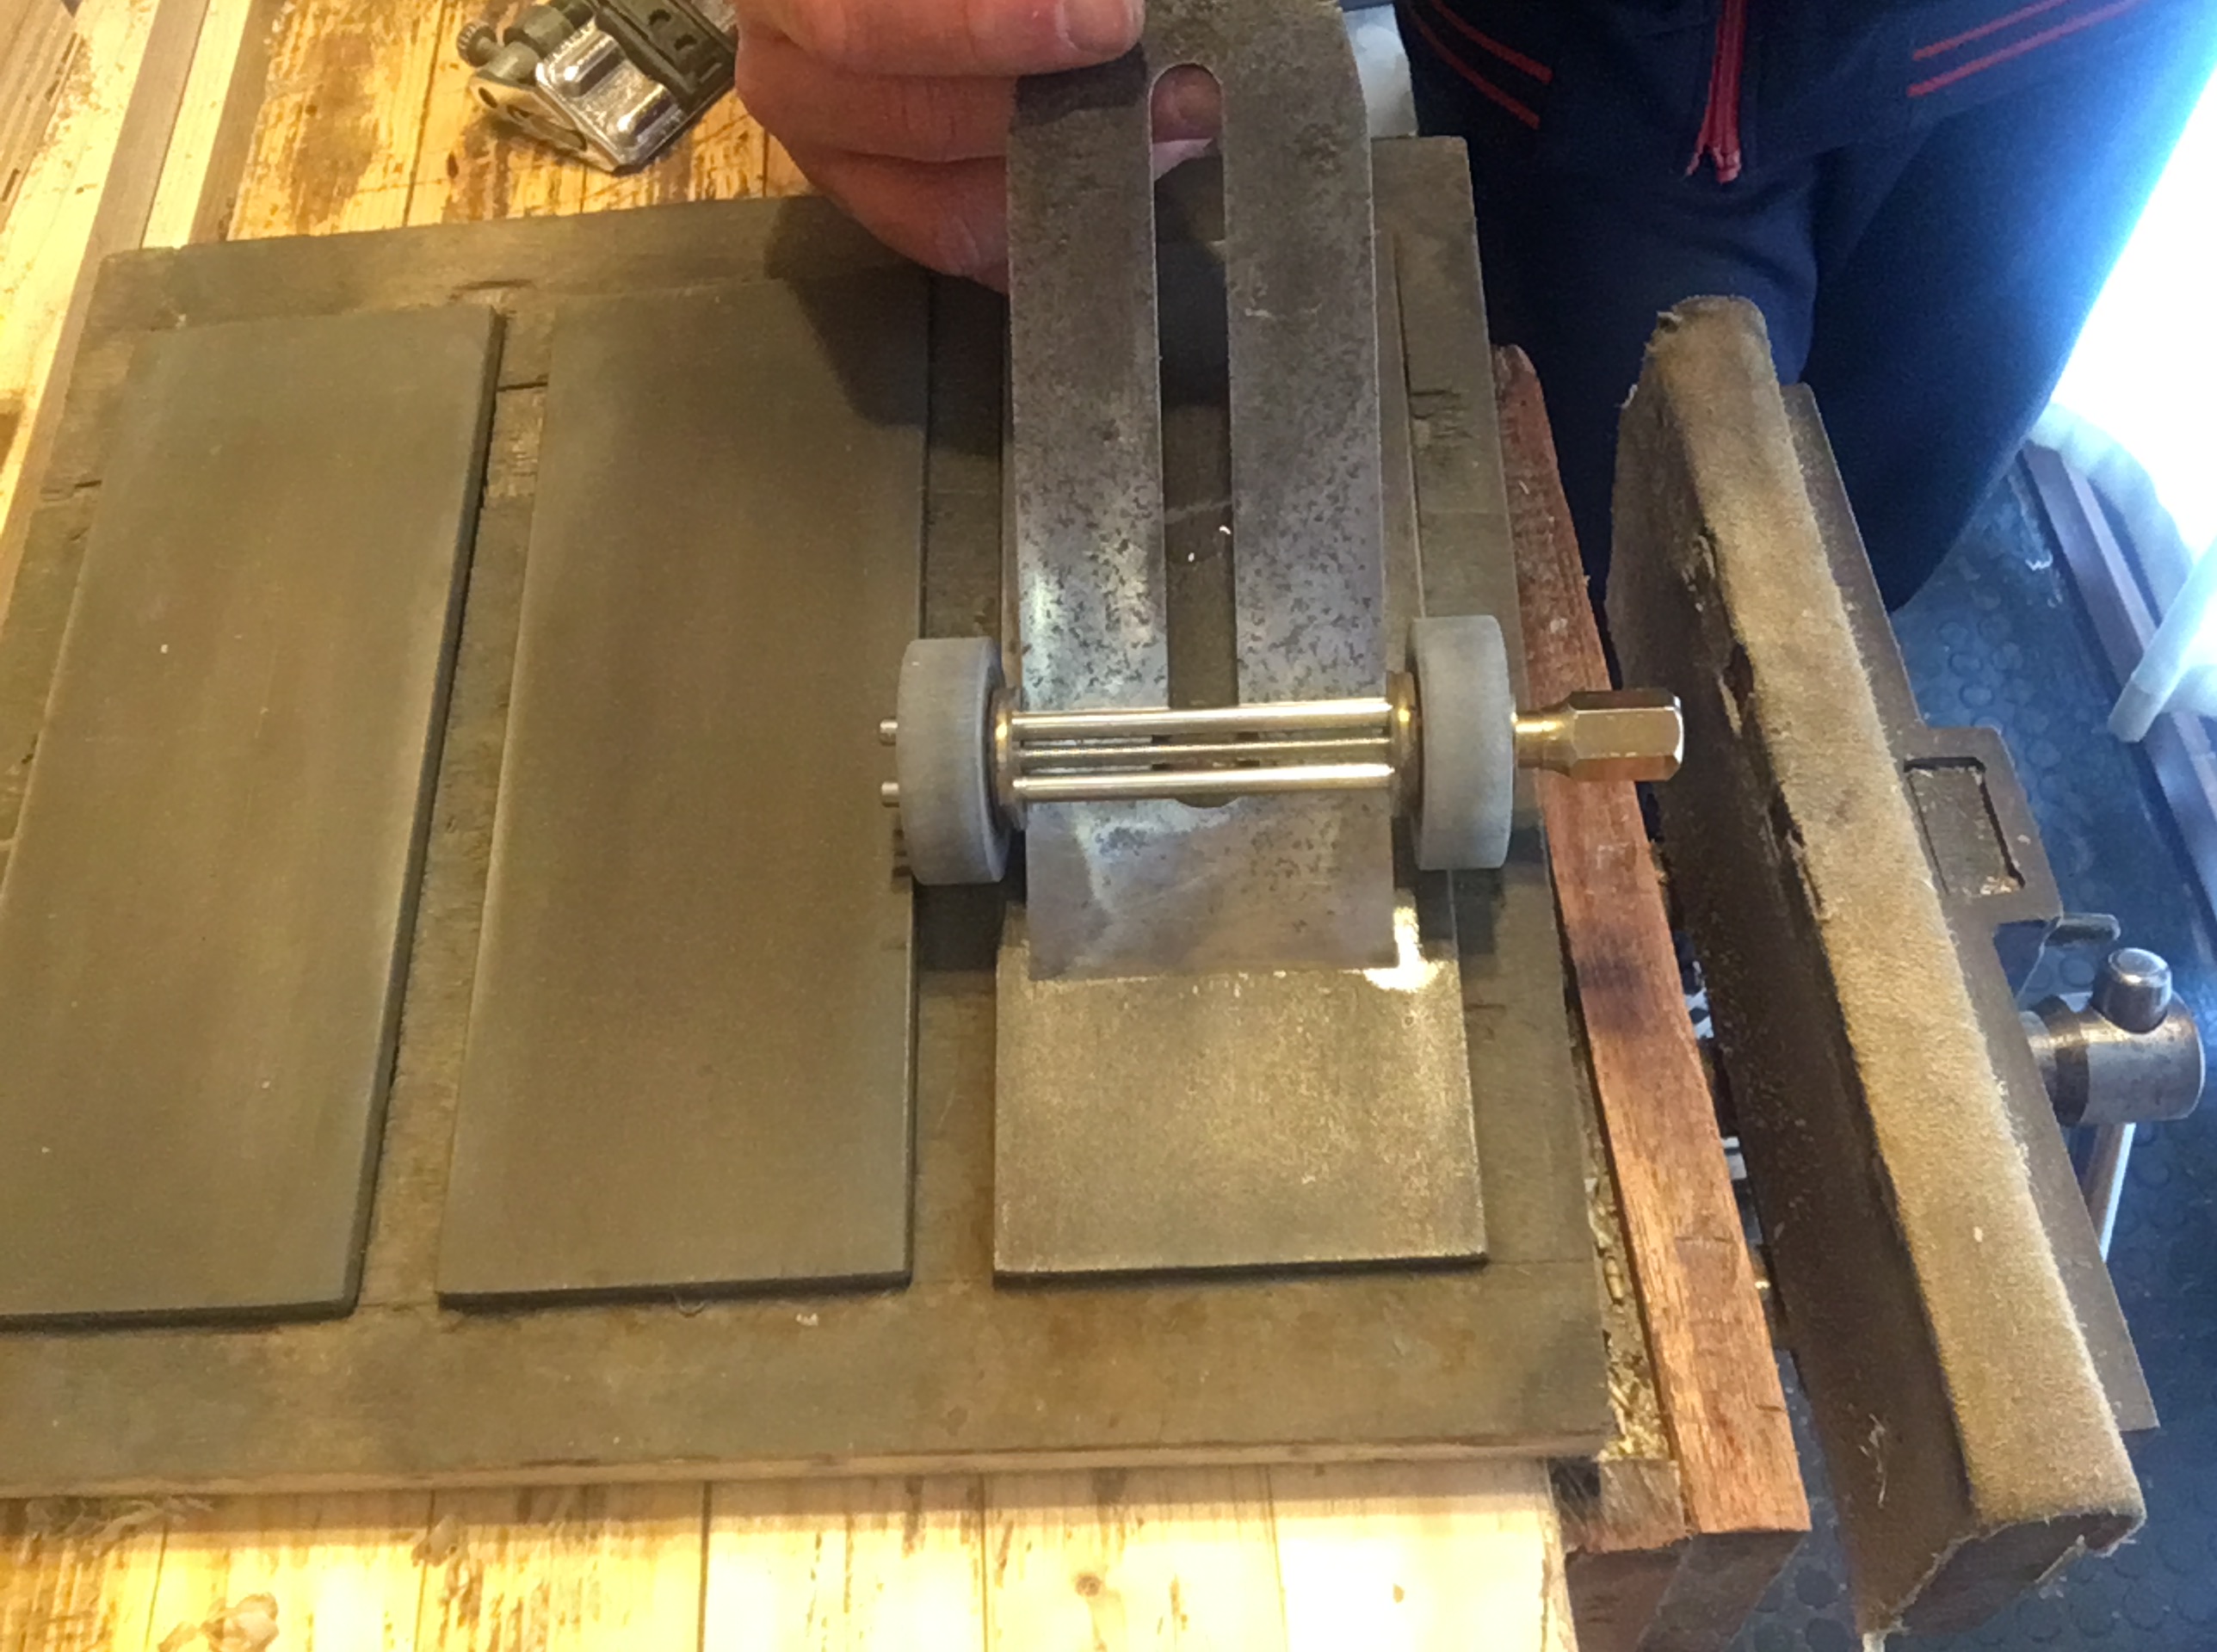
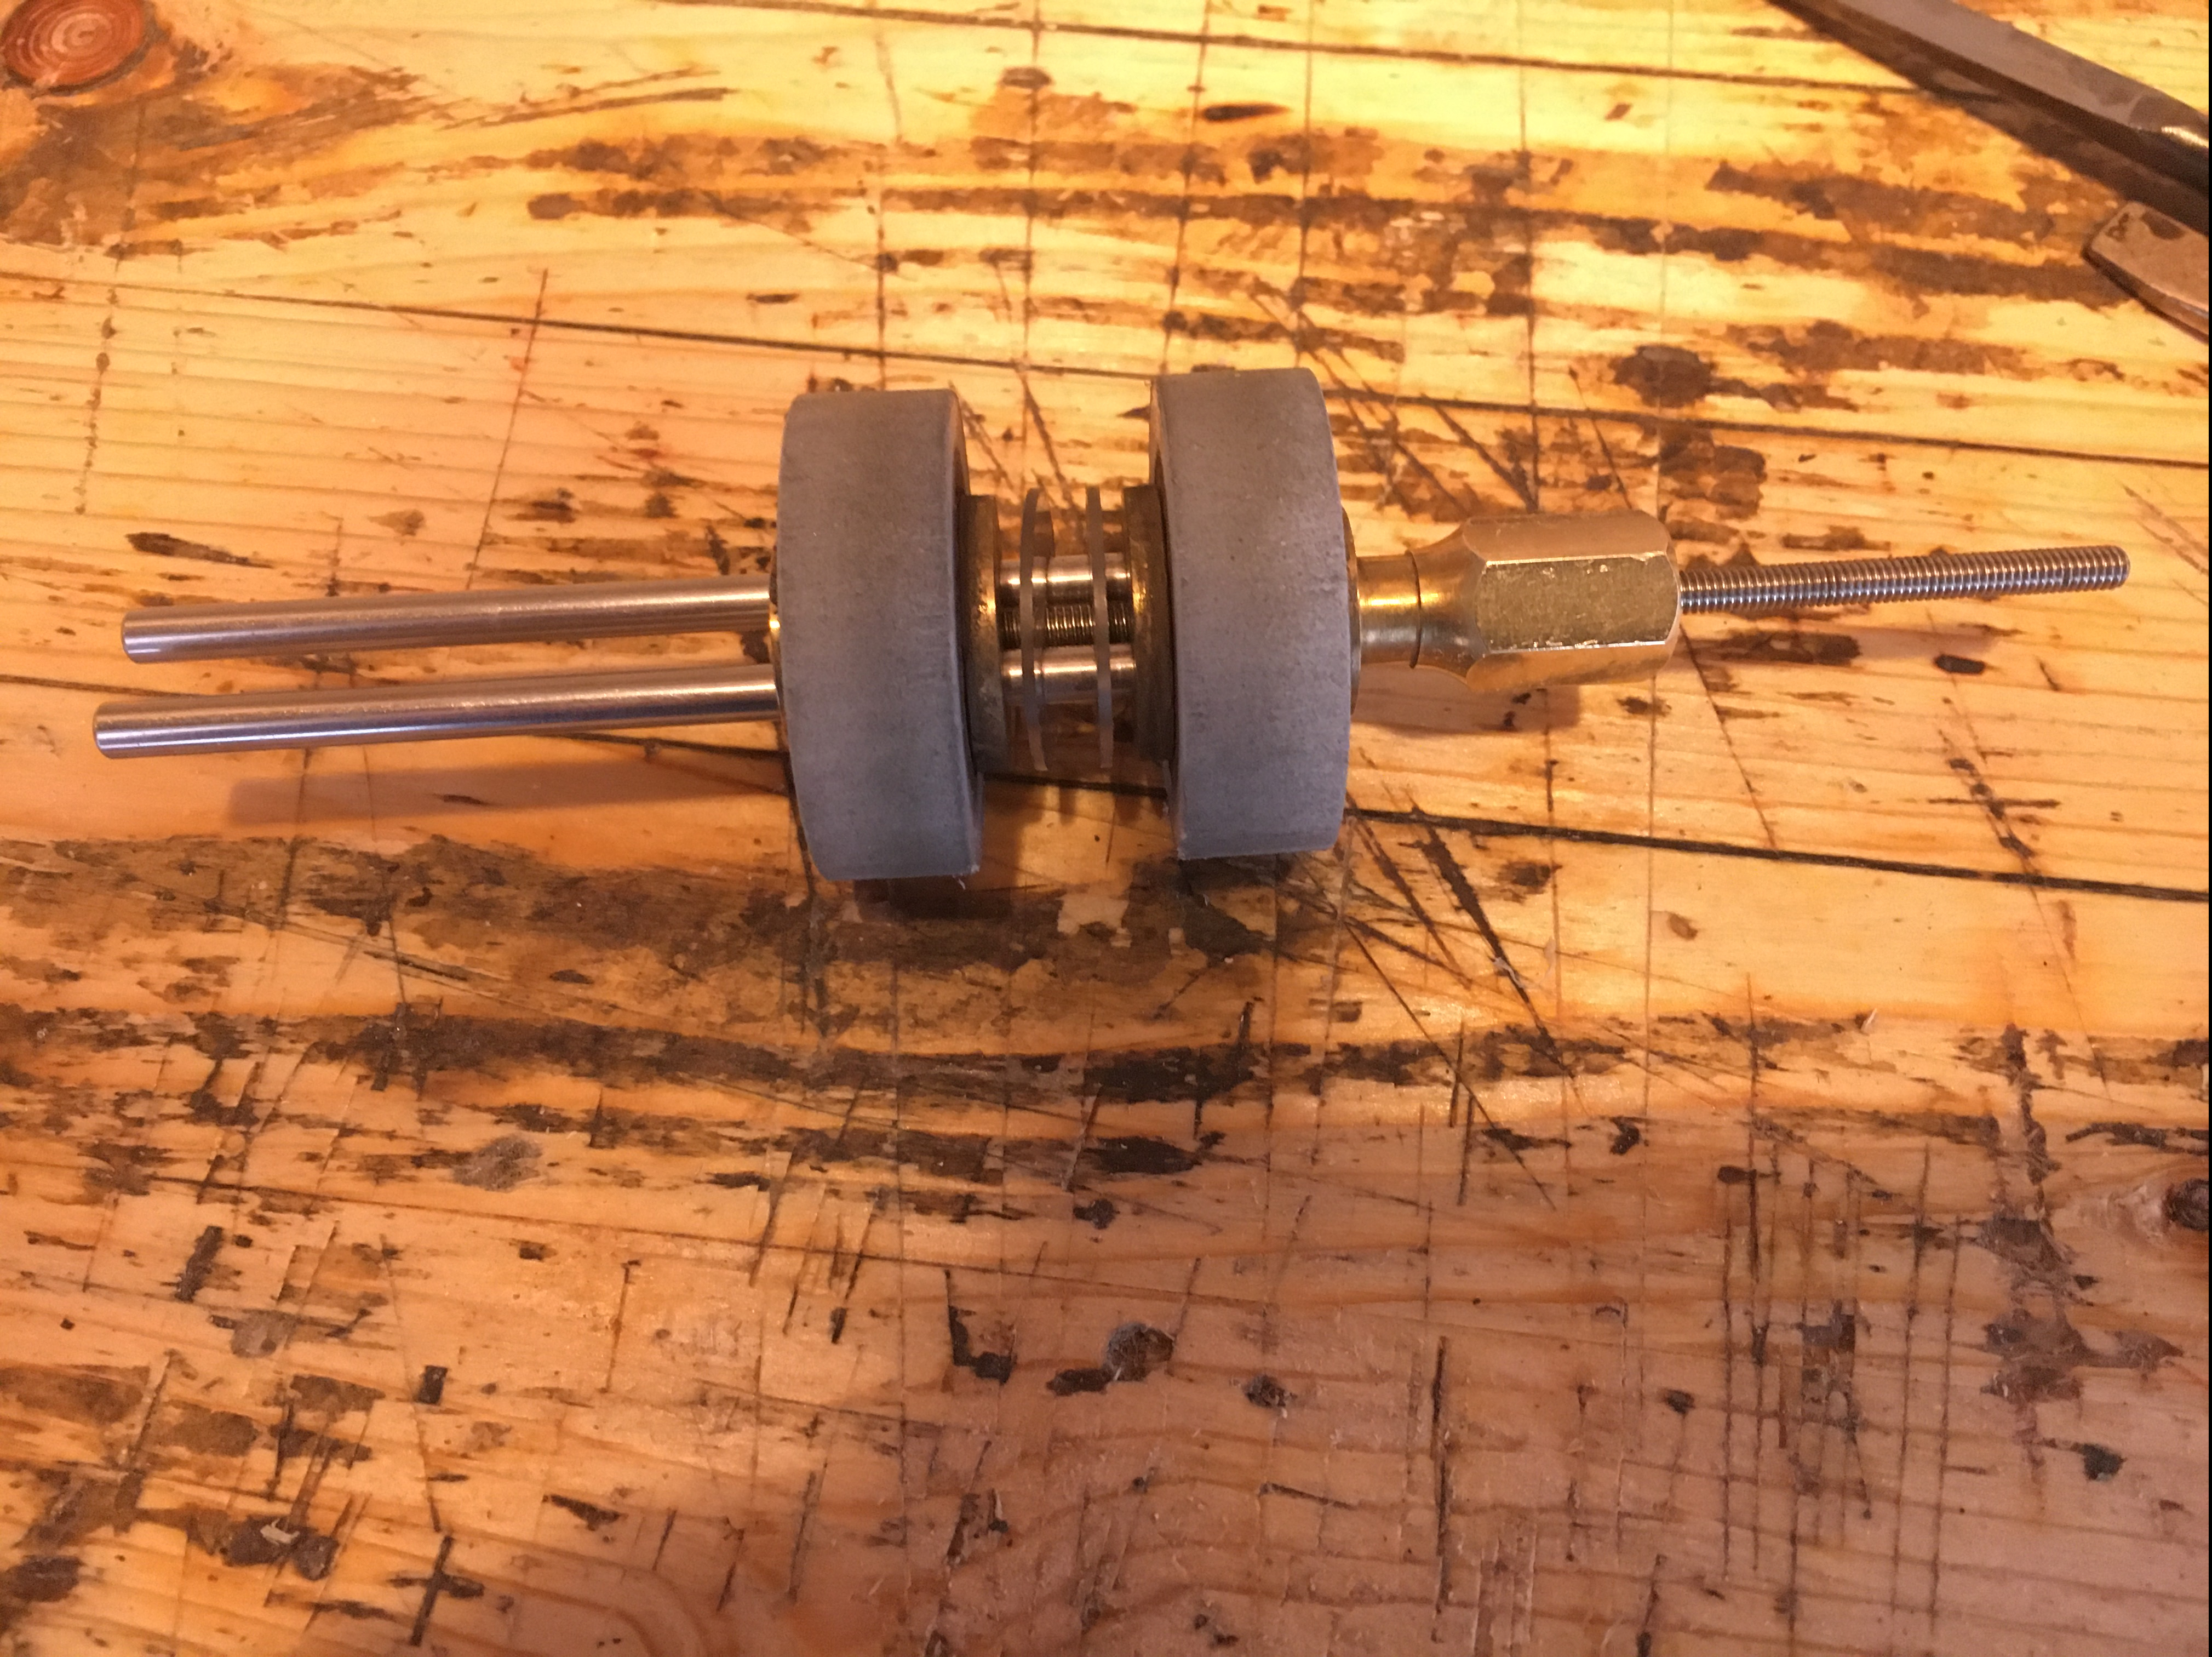 Veniamo adesso a conoscere più da vicino le guide che possiedo e di cui quindi posso parlare con cognizione di causa. La guida Richard Kell n. 2 LGE non è certamente economica ma posso consigliarla in quanto costruita con ottimi materiali, è estremamente robusta e molto affidabile in quanto a forza di serraggio della lama. La versione n.2 presenta delle rotelle più grandi rispetto alla precedente versione n.1 e permette di montare lame fino a 7 cm. di larghezza. La guida non riporta alcuna incisione che possa aiutare a mettere la lama nella posizione corrispondente all’inclinazione desiderata.
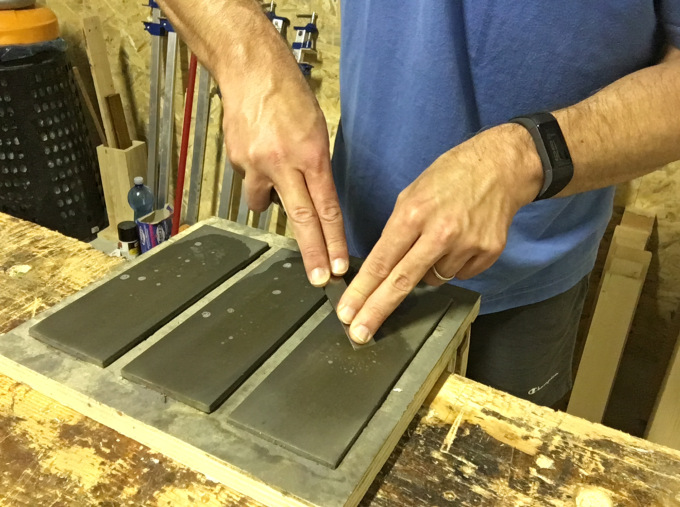
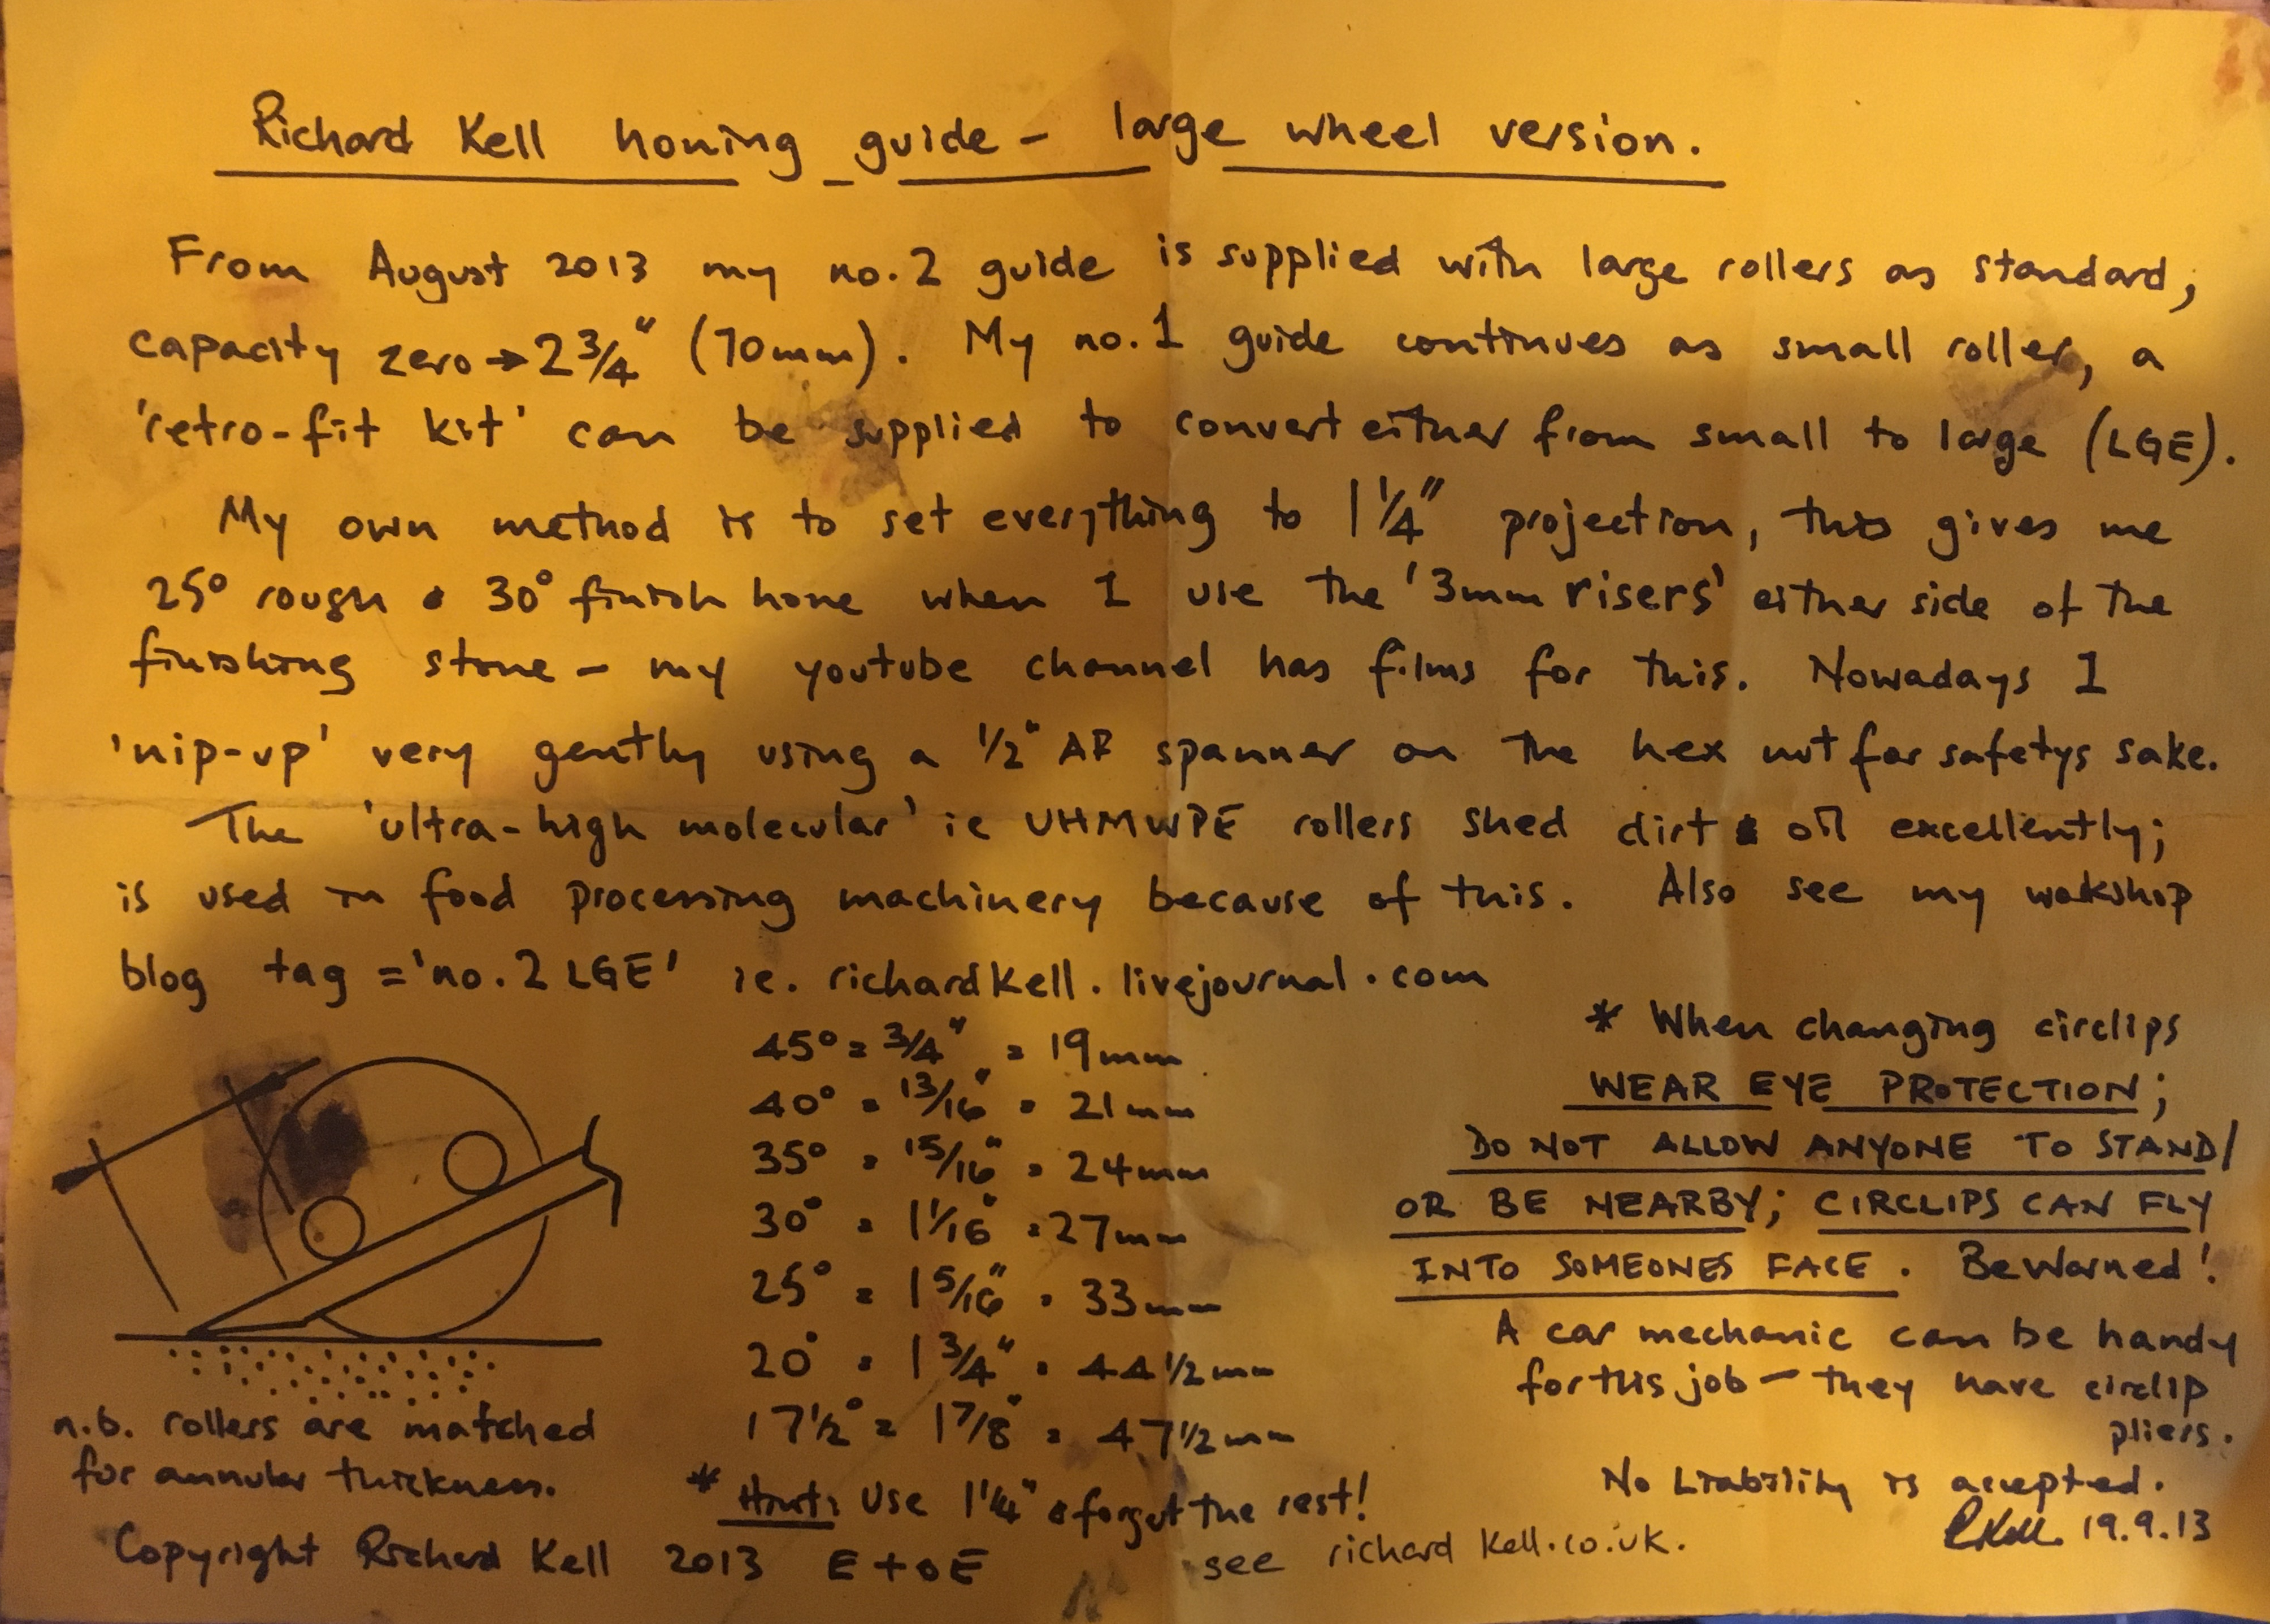 Il foglietto illustrativo (scritto in corsivo e in inglese) è di poco aiuto se non per l’indicazione delle distanze corrispondenti ai vari gradi di inclinazione. Le misure riportate sul foglietto illustrativo sono corrispondenti alla distanza tra la barra di sostegno (quella più vicina al tagliente) e il tagliente stesso, poggiando la lama con il dorso sulle due barre di sostegno.
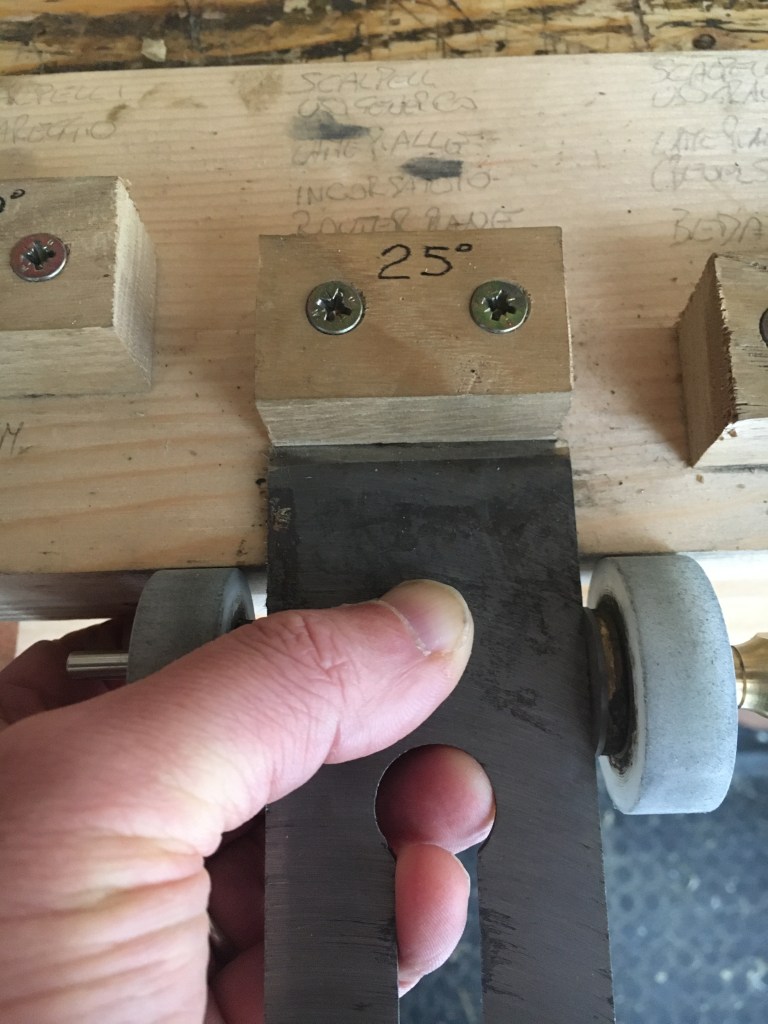
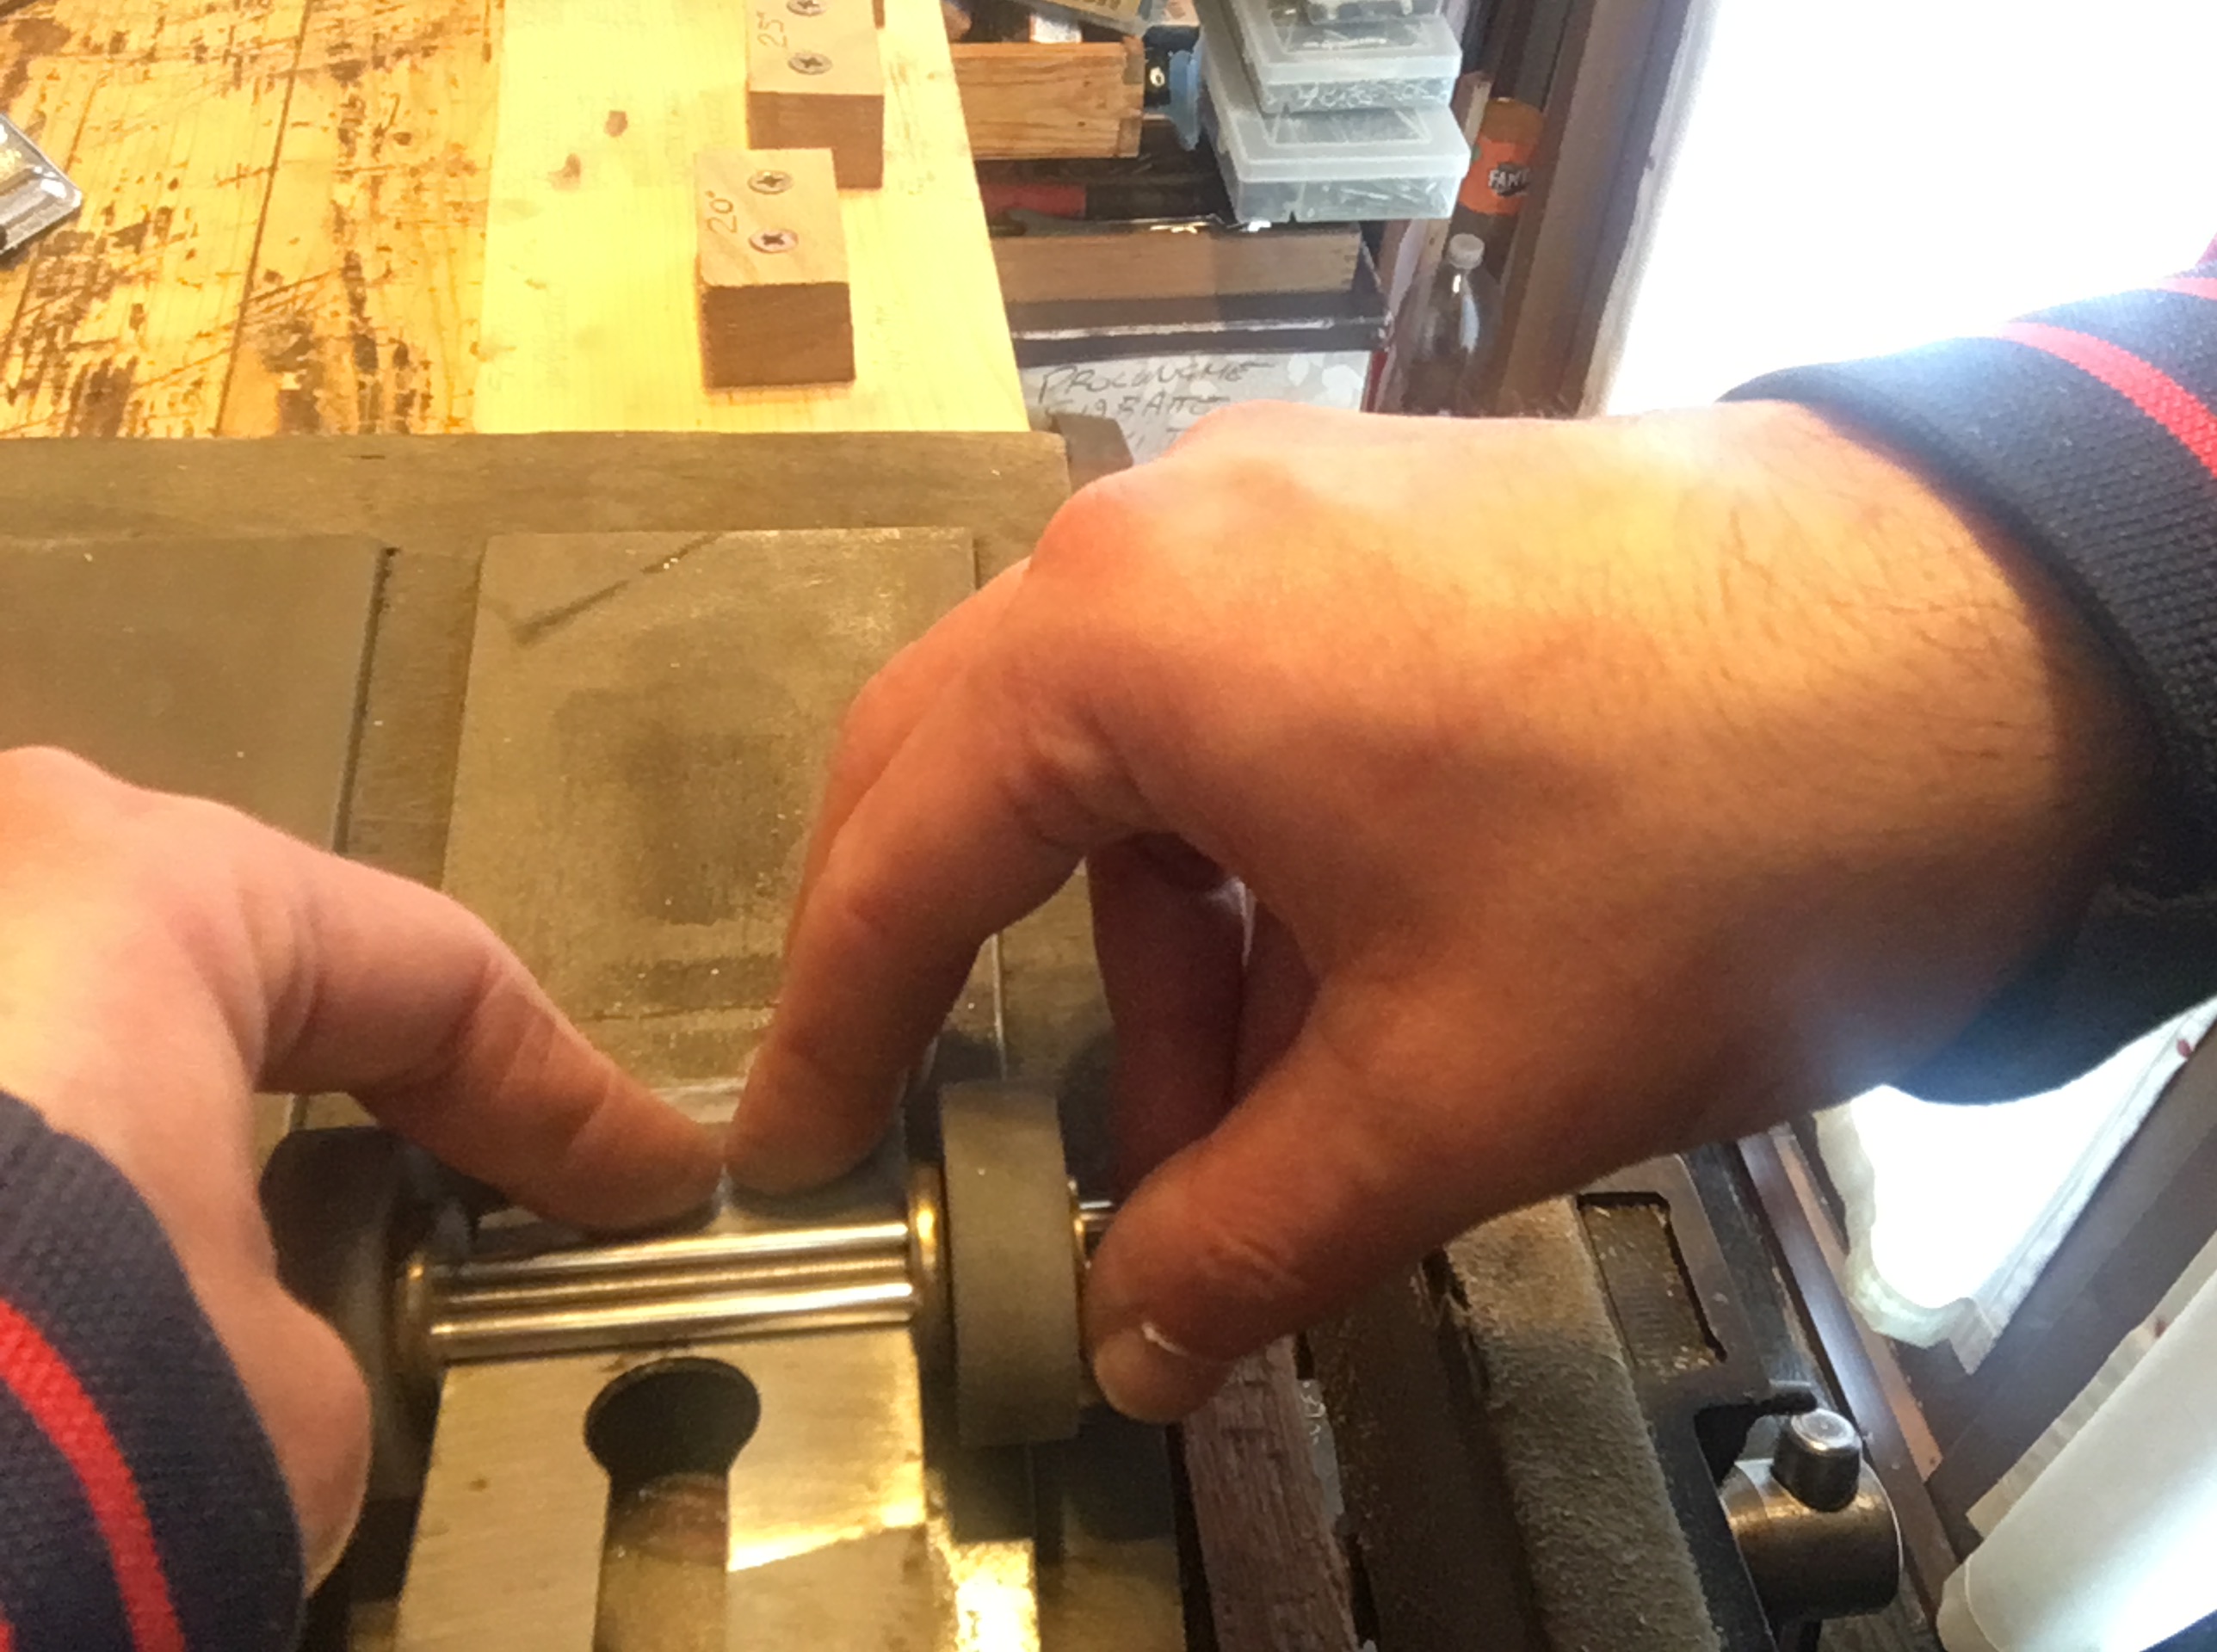
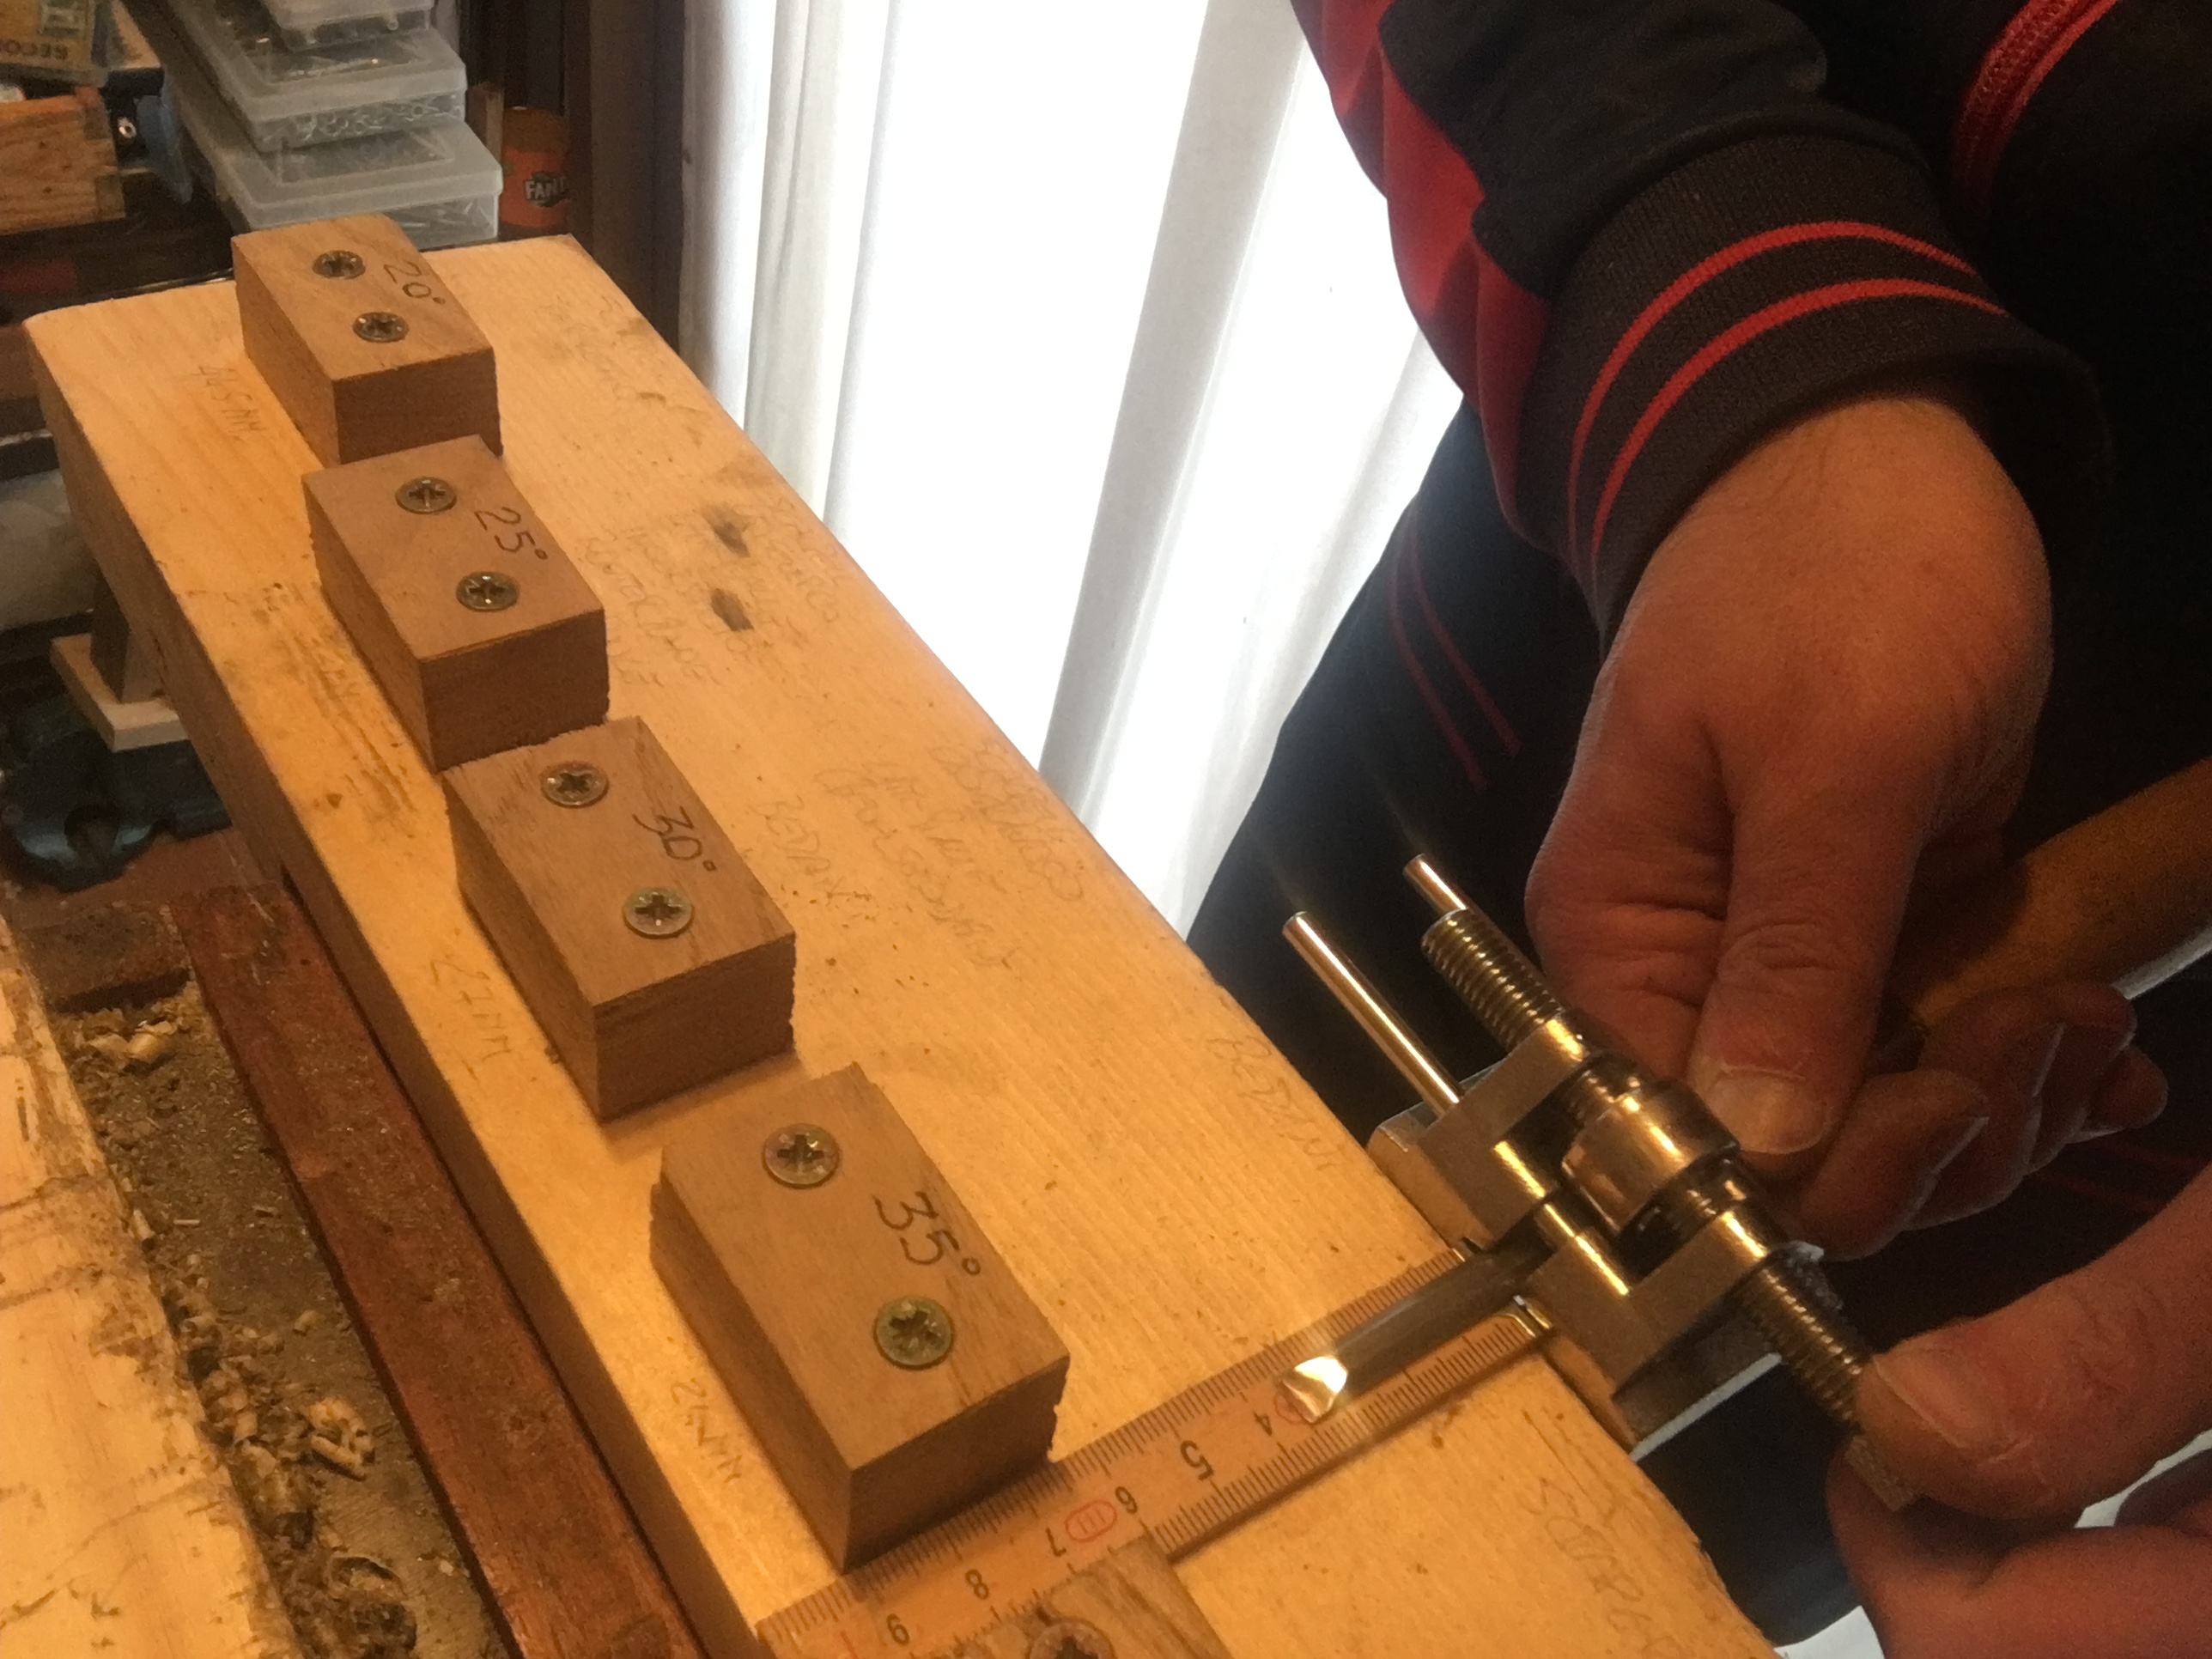
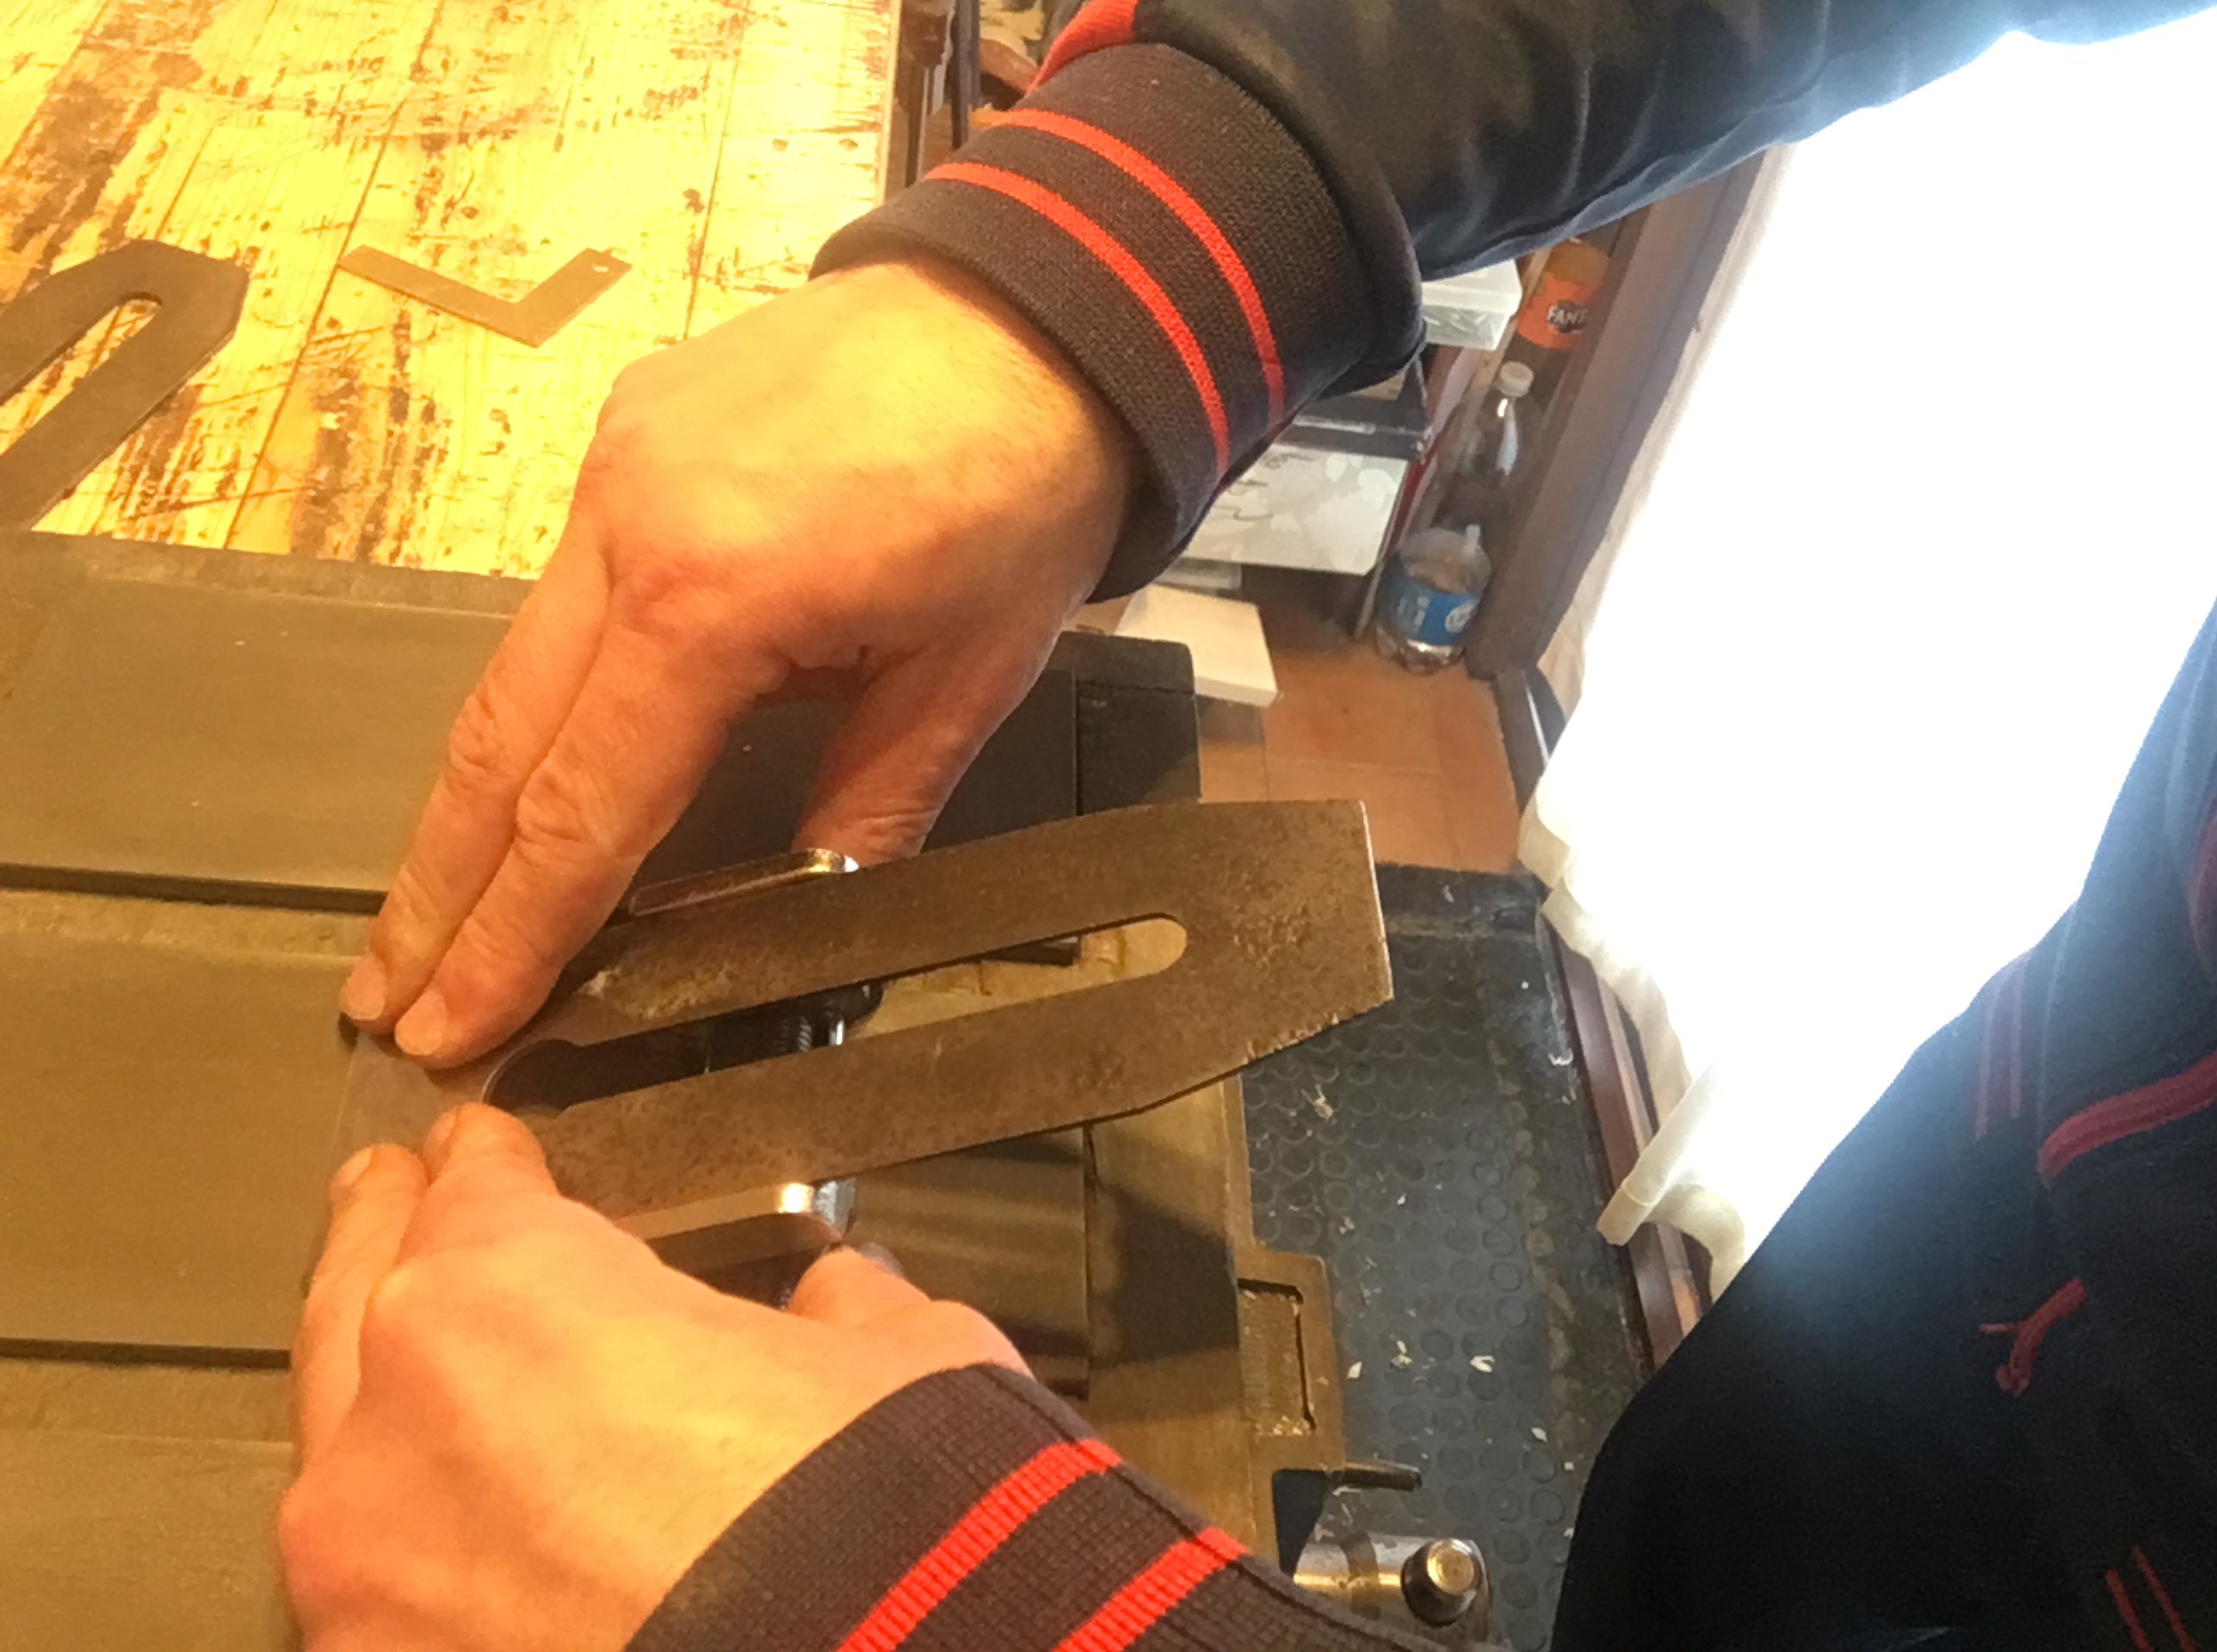
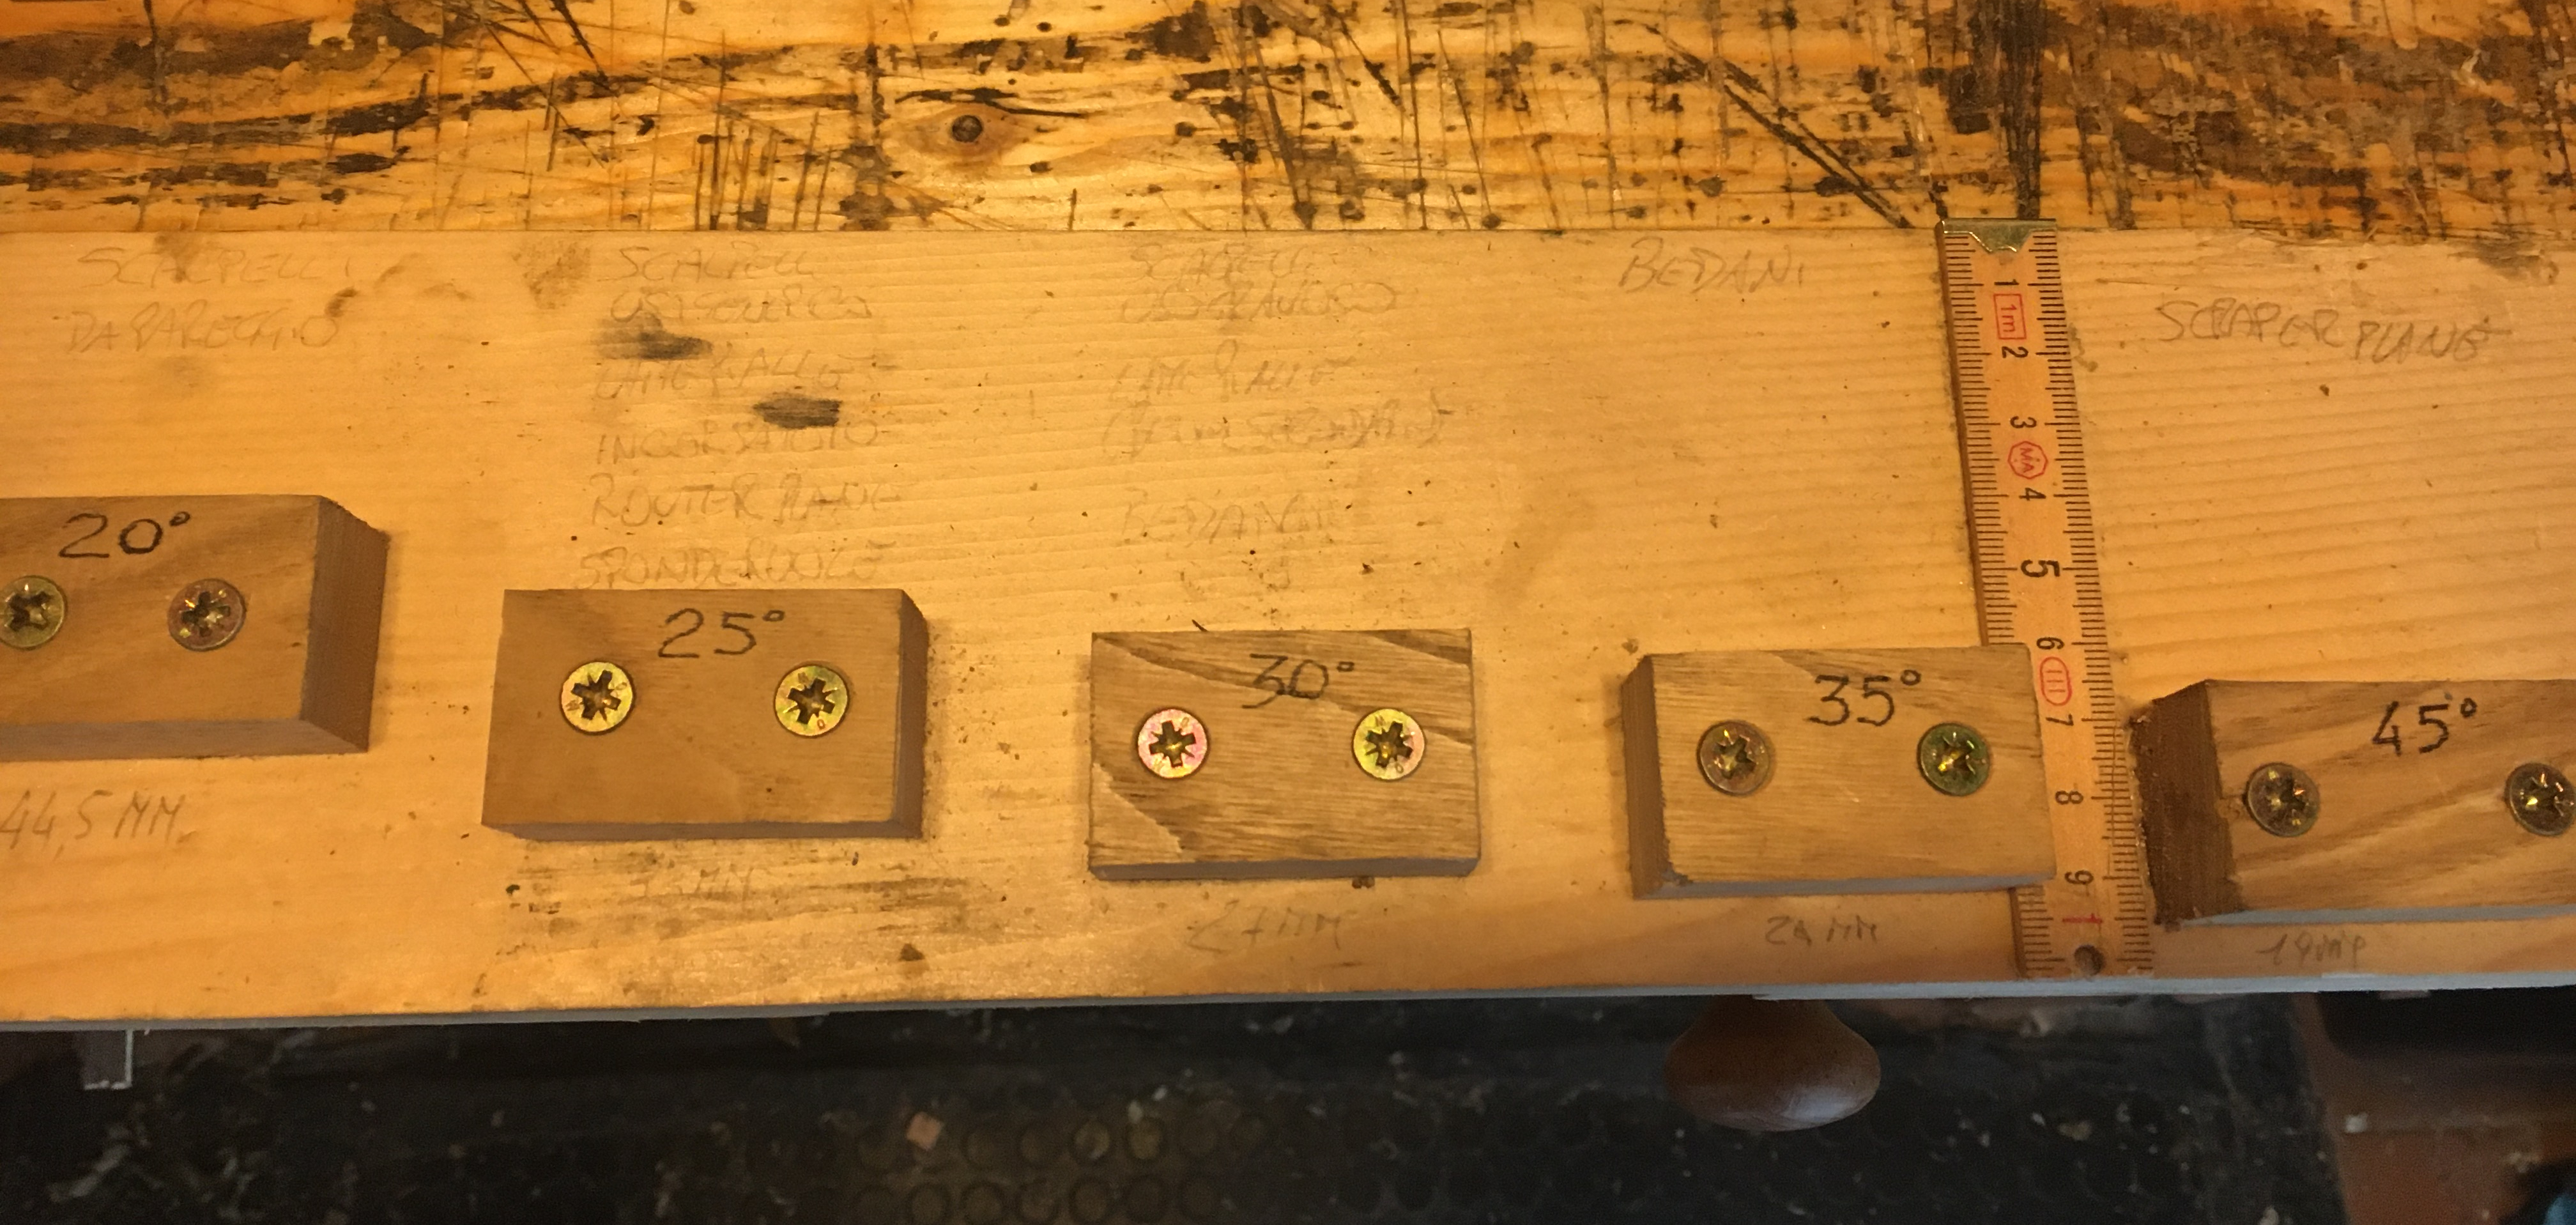 Per impostare l’inclinazione della lama ho trovato utile dotarmi di un jig autocostruito. Questo jig monta dei blocchetti fissati a varie distanze, corrispondenti alle varie inclinazioni della lama. Basta poggiare le ruote contro il bordo del jig e far scivolare il dorso della lama sulle barre di sostegno della guida fino a far battere il tagliente contro il blocchetto di legno del jig, serrando infine la lama in posizione, agendo sulla rotella laterale e mantenendo sempre ben adeso il dorso della lama alle barre della guida. Ogni guida ha il suo specifico settaggio e quindi se possediamo più guide dovremo giocoforza utilizzare più jig, ognuno dedicato ad una sola guida.
 La guida ha un notevole grip sulle lame delle pialle che però decresce considerevolmente sugli scalpelli più stretti. Riesce comunque a mantenere ottimamente la lama in posizione. In ogni caso è buona norma stringere sempre bene la rotella laterale per evitare che la lama si sganci durante l’affilatura e soprattutto assicuriamoci sempre che il dorso sia ben aderente alle barre di appoggio della guida. Se la lama fosse inserita inclinata, il filo del tagliente verrebbe storto.
 La lama si aggancia in modo tale che durante l’affilatura si trovi al di sotto delle barre di sostegno. Durante il movimento di affilatura l’impostazione delle dita sulla lama è leggermente ostacolata sia dall’ingombro delle barre orizzontali che dalla grandezza oggettiva delle ruote stesse, costringendo ad una posizione non proprio confortevole. Le sessioni di affilatura, talvolta lunghe, potrebbero diventare alquanto faticose. Trovo inoltre qualche difficoltà in fase di bloccaggio delle lame strette in quanto le due ruote vanno a stringere inevitabilmente anche le dita, oltre alla lama stessa. Nessun problema invece per le lame di media dimensione.
 Sulle lame molto grandi, come per la Stanley 7, l’affilatura diventa problematica in quanto viene a mancare l’appoggio per le dita della mano destra (o sinistra a seconda di come abbiamo impostato la guida), perché tutta la lunghezza delle barre è impegnata dal serraggio della lama. Altra grossa limitazione è proprio nel fatto che, avvenendo il serraggio lateralmente per mezzo delle due grandi ruote, l’ingombro in larghezza supera le dimensioni delle comuni pietre da affilatura quando vogliamo serrare lame particolarmente larghe. In questi casi infatti le ruote hanno pochissimo appoggio laterale sulla pietra. Si può ovviare al problema accostando ai lati della pietra due rialzi che portino le ruote laterali allo stesso livello della stessa. In alternativa potremmo affilare sfruttando la pietra per la sua larghezza invece che in lunghezza, costringendoci però a passate più brevi. Di seguito inserisco un link dove è possibile acquistarla. https://www.fine-tools.com/richardkellhoningguide.html
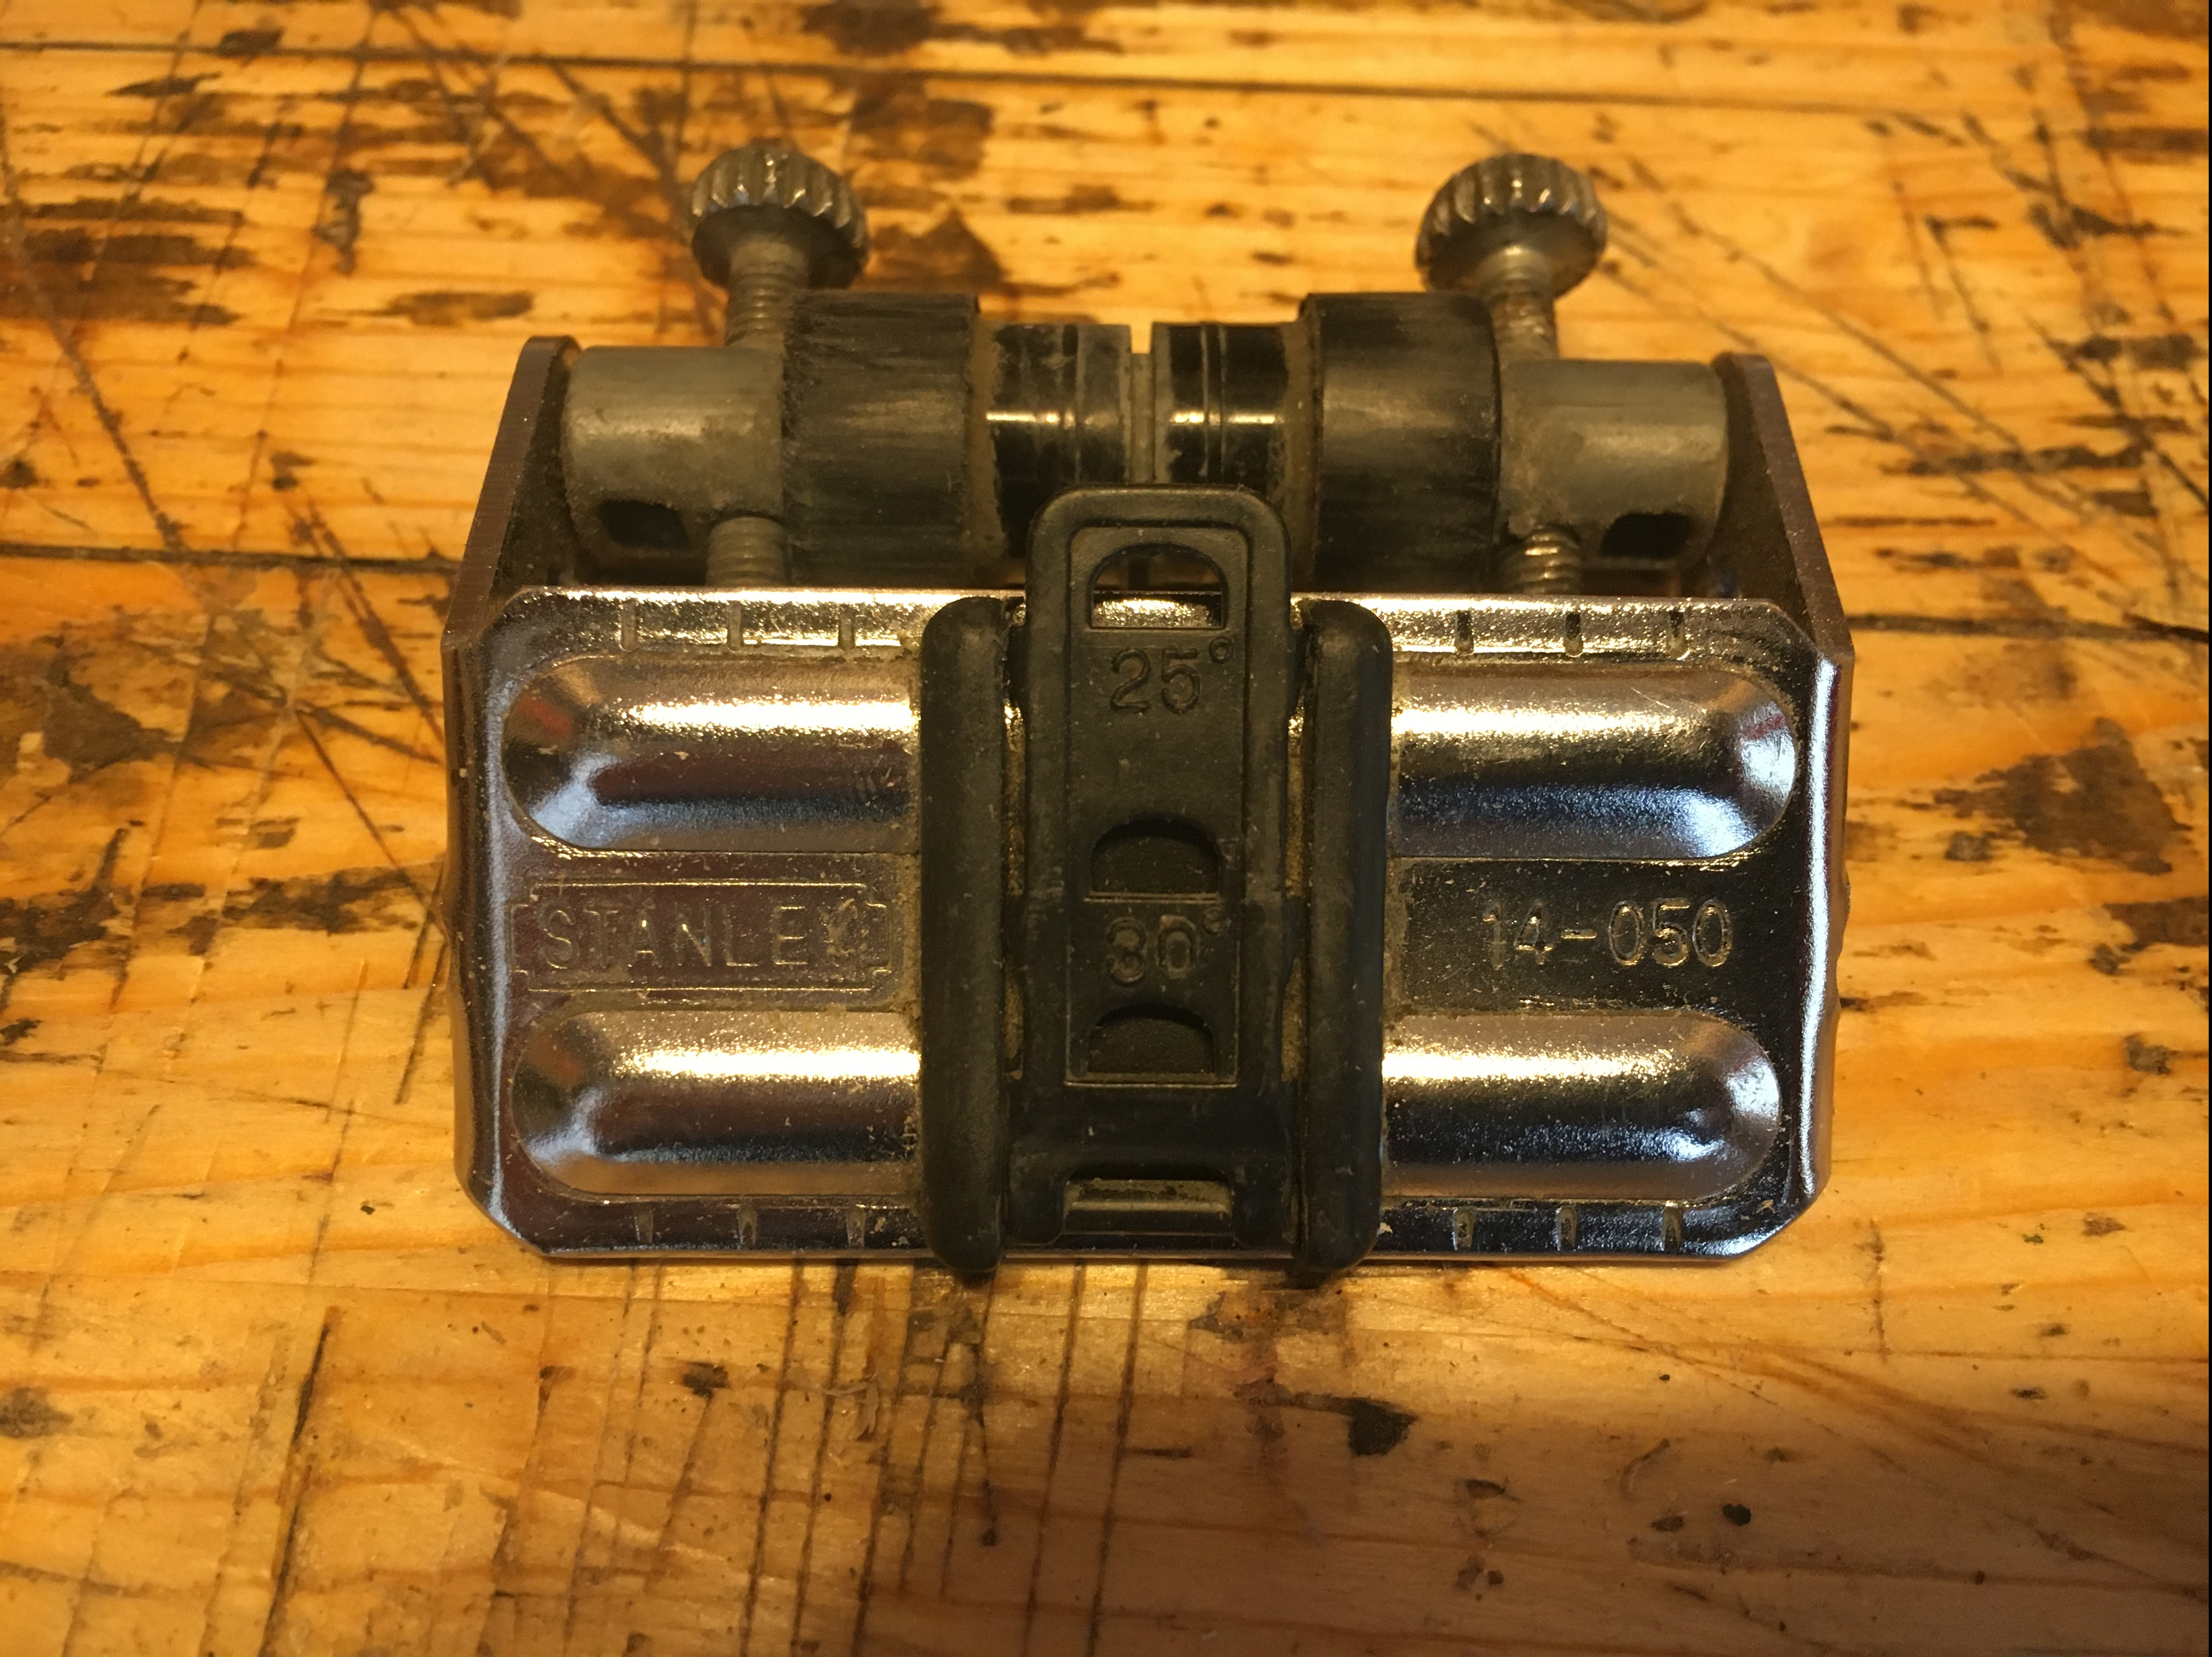 La guida Stanley 14 – 050 (oggi chiamata 0 – 16 – 050) è la prima che ho acquistato ed è quella che ho utilizzato per più tempo sino adesso. Veniva venduta in un kit che comprendeva anche una pietra per affilare (a doppia grana, una da sgrosso e una da finitura) ed un flaconcino di olio lubrificante. Onestamente non ho mai usato la pietra ad olio, essendo passato da subito alle pietre diamantate, ma ho letto su qualche sito che non sono di buona qualità. D’altro canto il kit è veramente economico e non si può pretendere molto. Non mi sento di condividere in pieno le tante recensioni negative che ho letto in rete, valutando la guida nel suo complesso. Vero è che evidenzia alcune problematiche non trascurabili che vedremo tra poco. Il corpo principale è in metallo ma le due rotelle dove scorre la guida sono in plastica e questo inizialmente potrebbe far storcere il naso. Personalmente però non ho mai avuto particolari problemi durante l’utilizzo e queste ruote hanno sempre funzionato a dovere, senza rotture o inceppamenti di sorta. Purtroppo non ha una forza di serraggio impeccabile e questo può essere un problema, poiché la lama potrebbe muoversi (comunque quasi impercettibilmente e sempre se si pratica molta forza) dalla posizione iniziale, con il rischio di perdere l’allineamento e con il risultato finale di un filo del tagliente storto. Inoltre, in fase di montaggio della lama nella guida, risulta difficoltoso sia mettere in squadra la lama rispetto alla guida (specialmente gli scalpelli e le lame strette), seppure sulla guida siano state praticate delle incisioni da prendere come riferimento per l’allineamento della lama, sia mantenere ferma la lama mentre si cerca di stringere forte le due rotelle zigrinate.
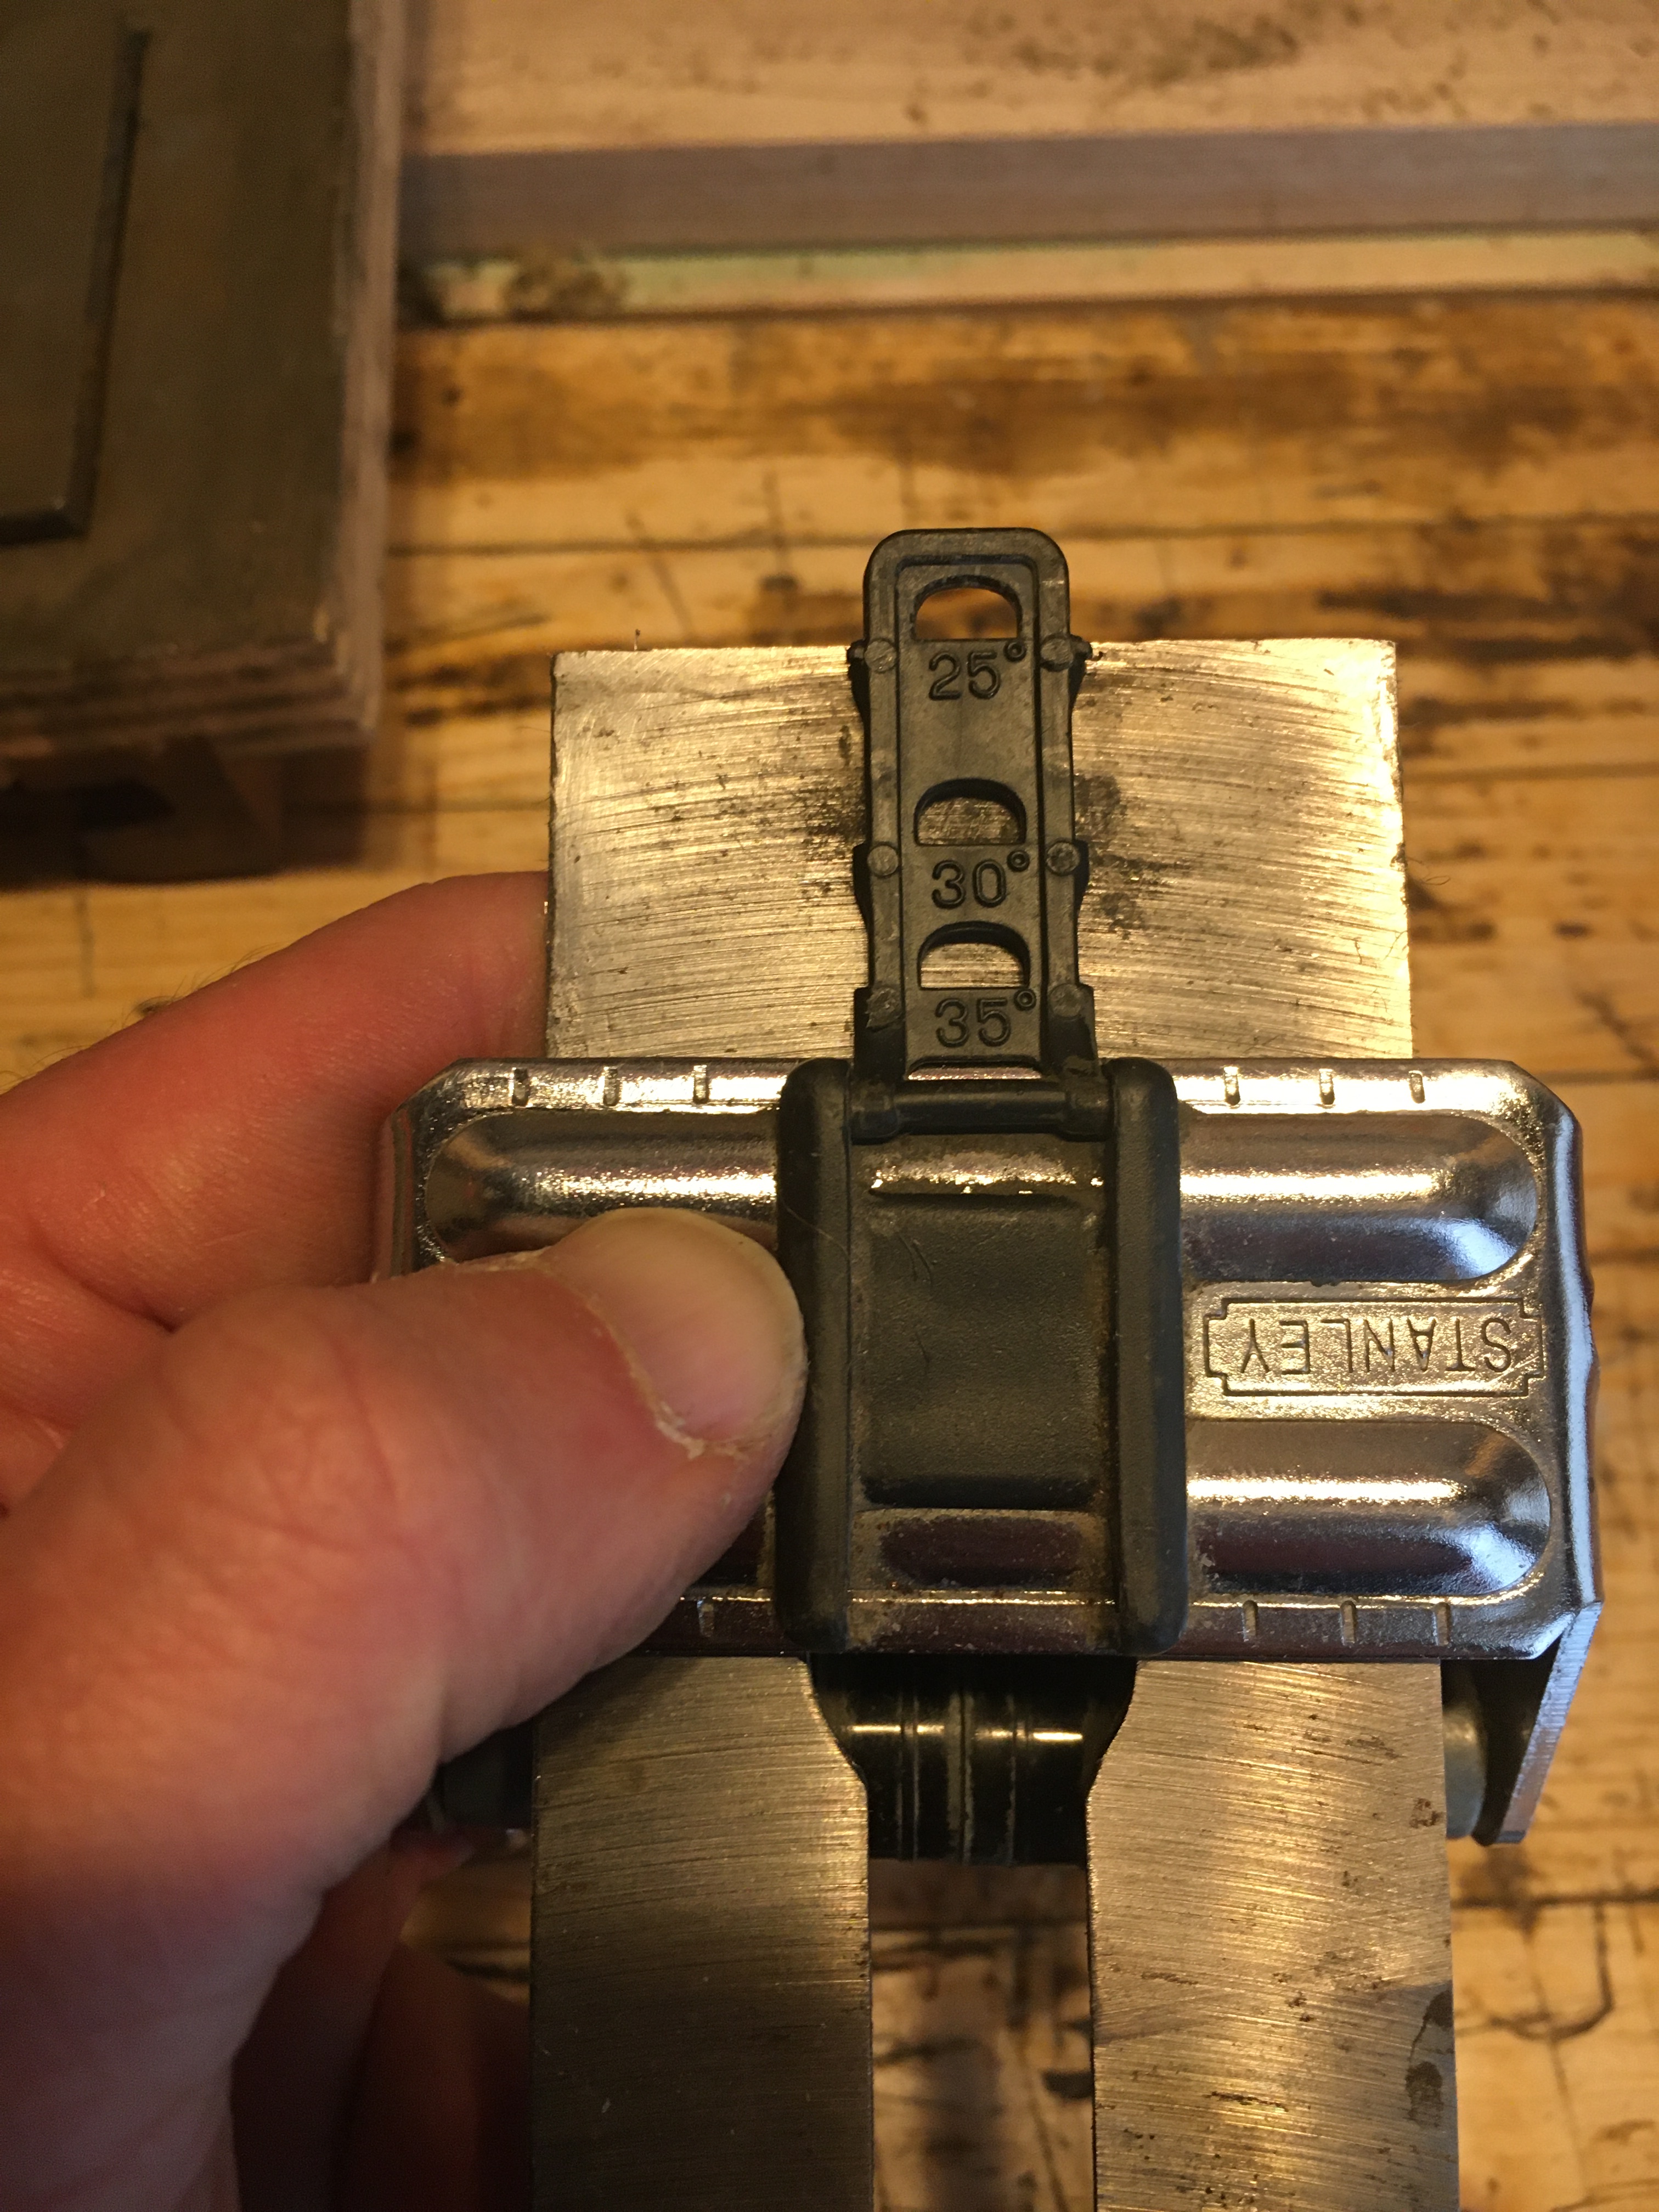
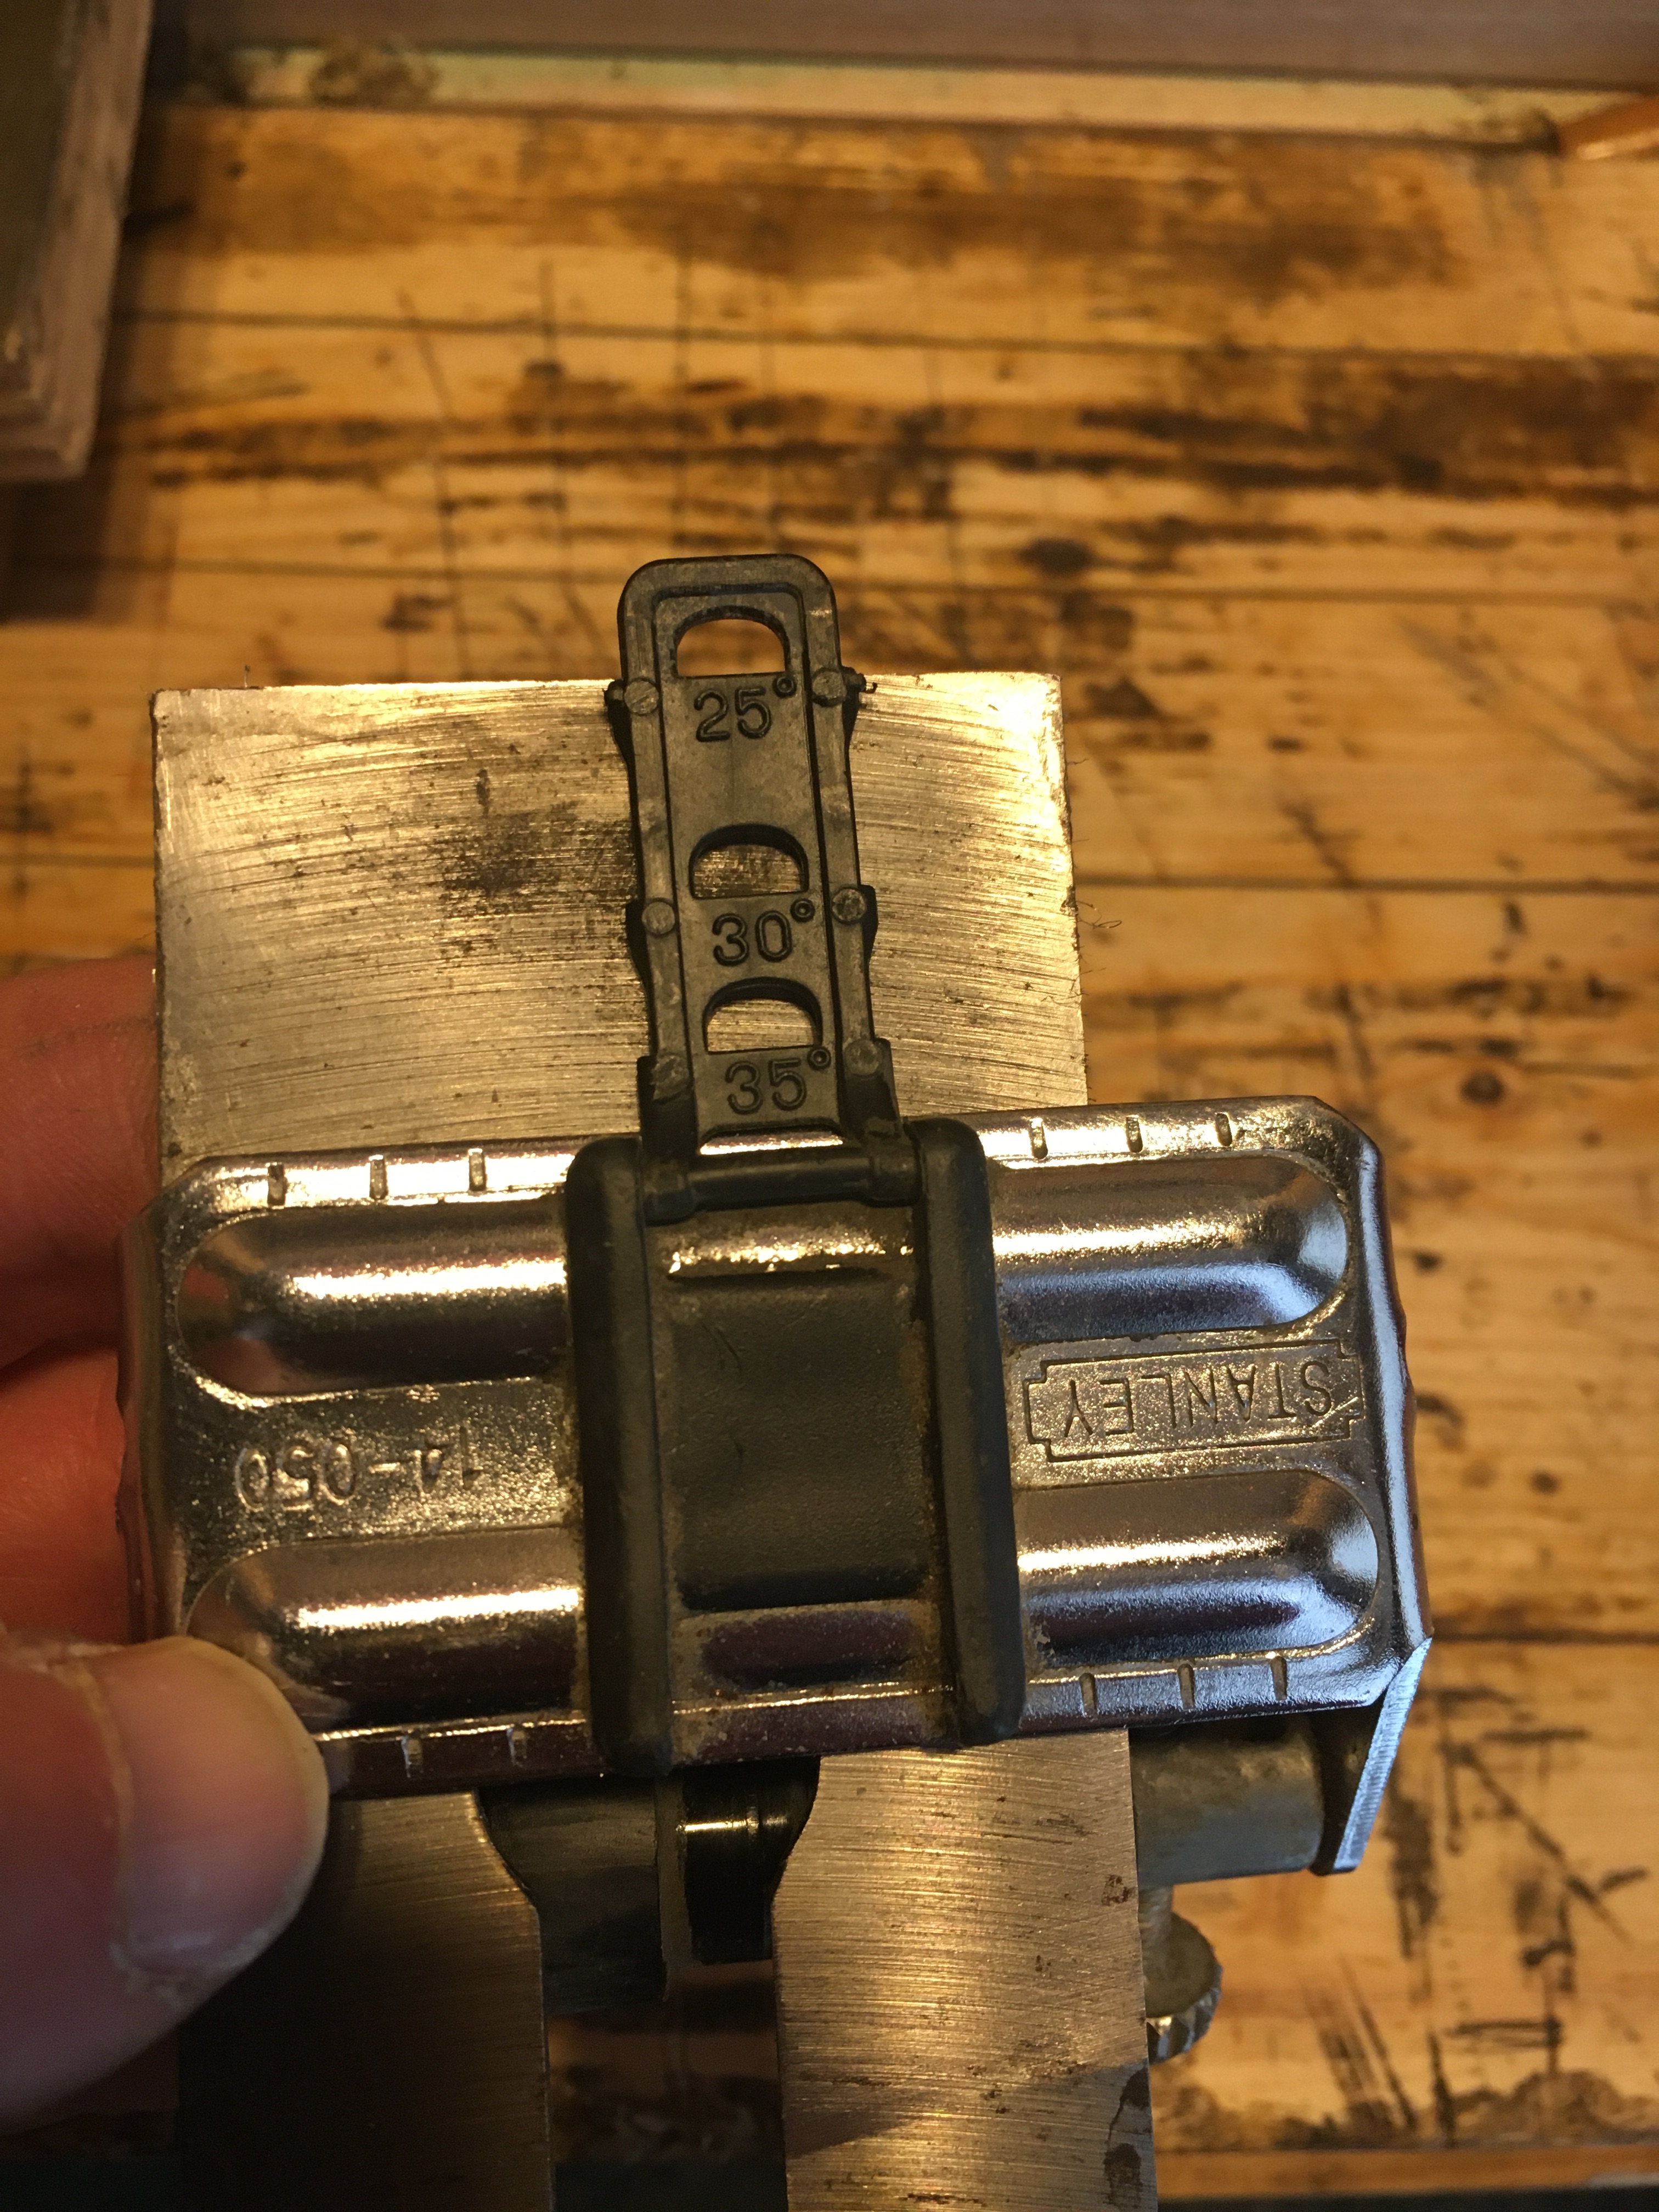
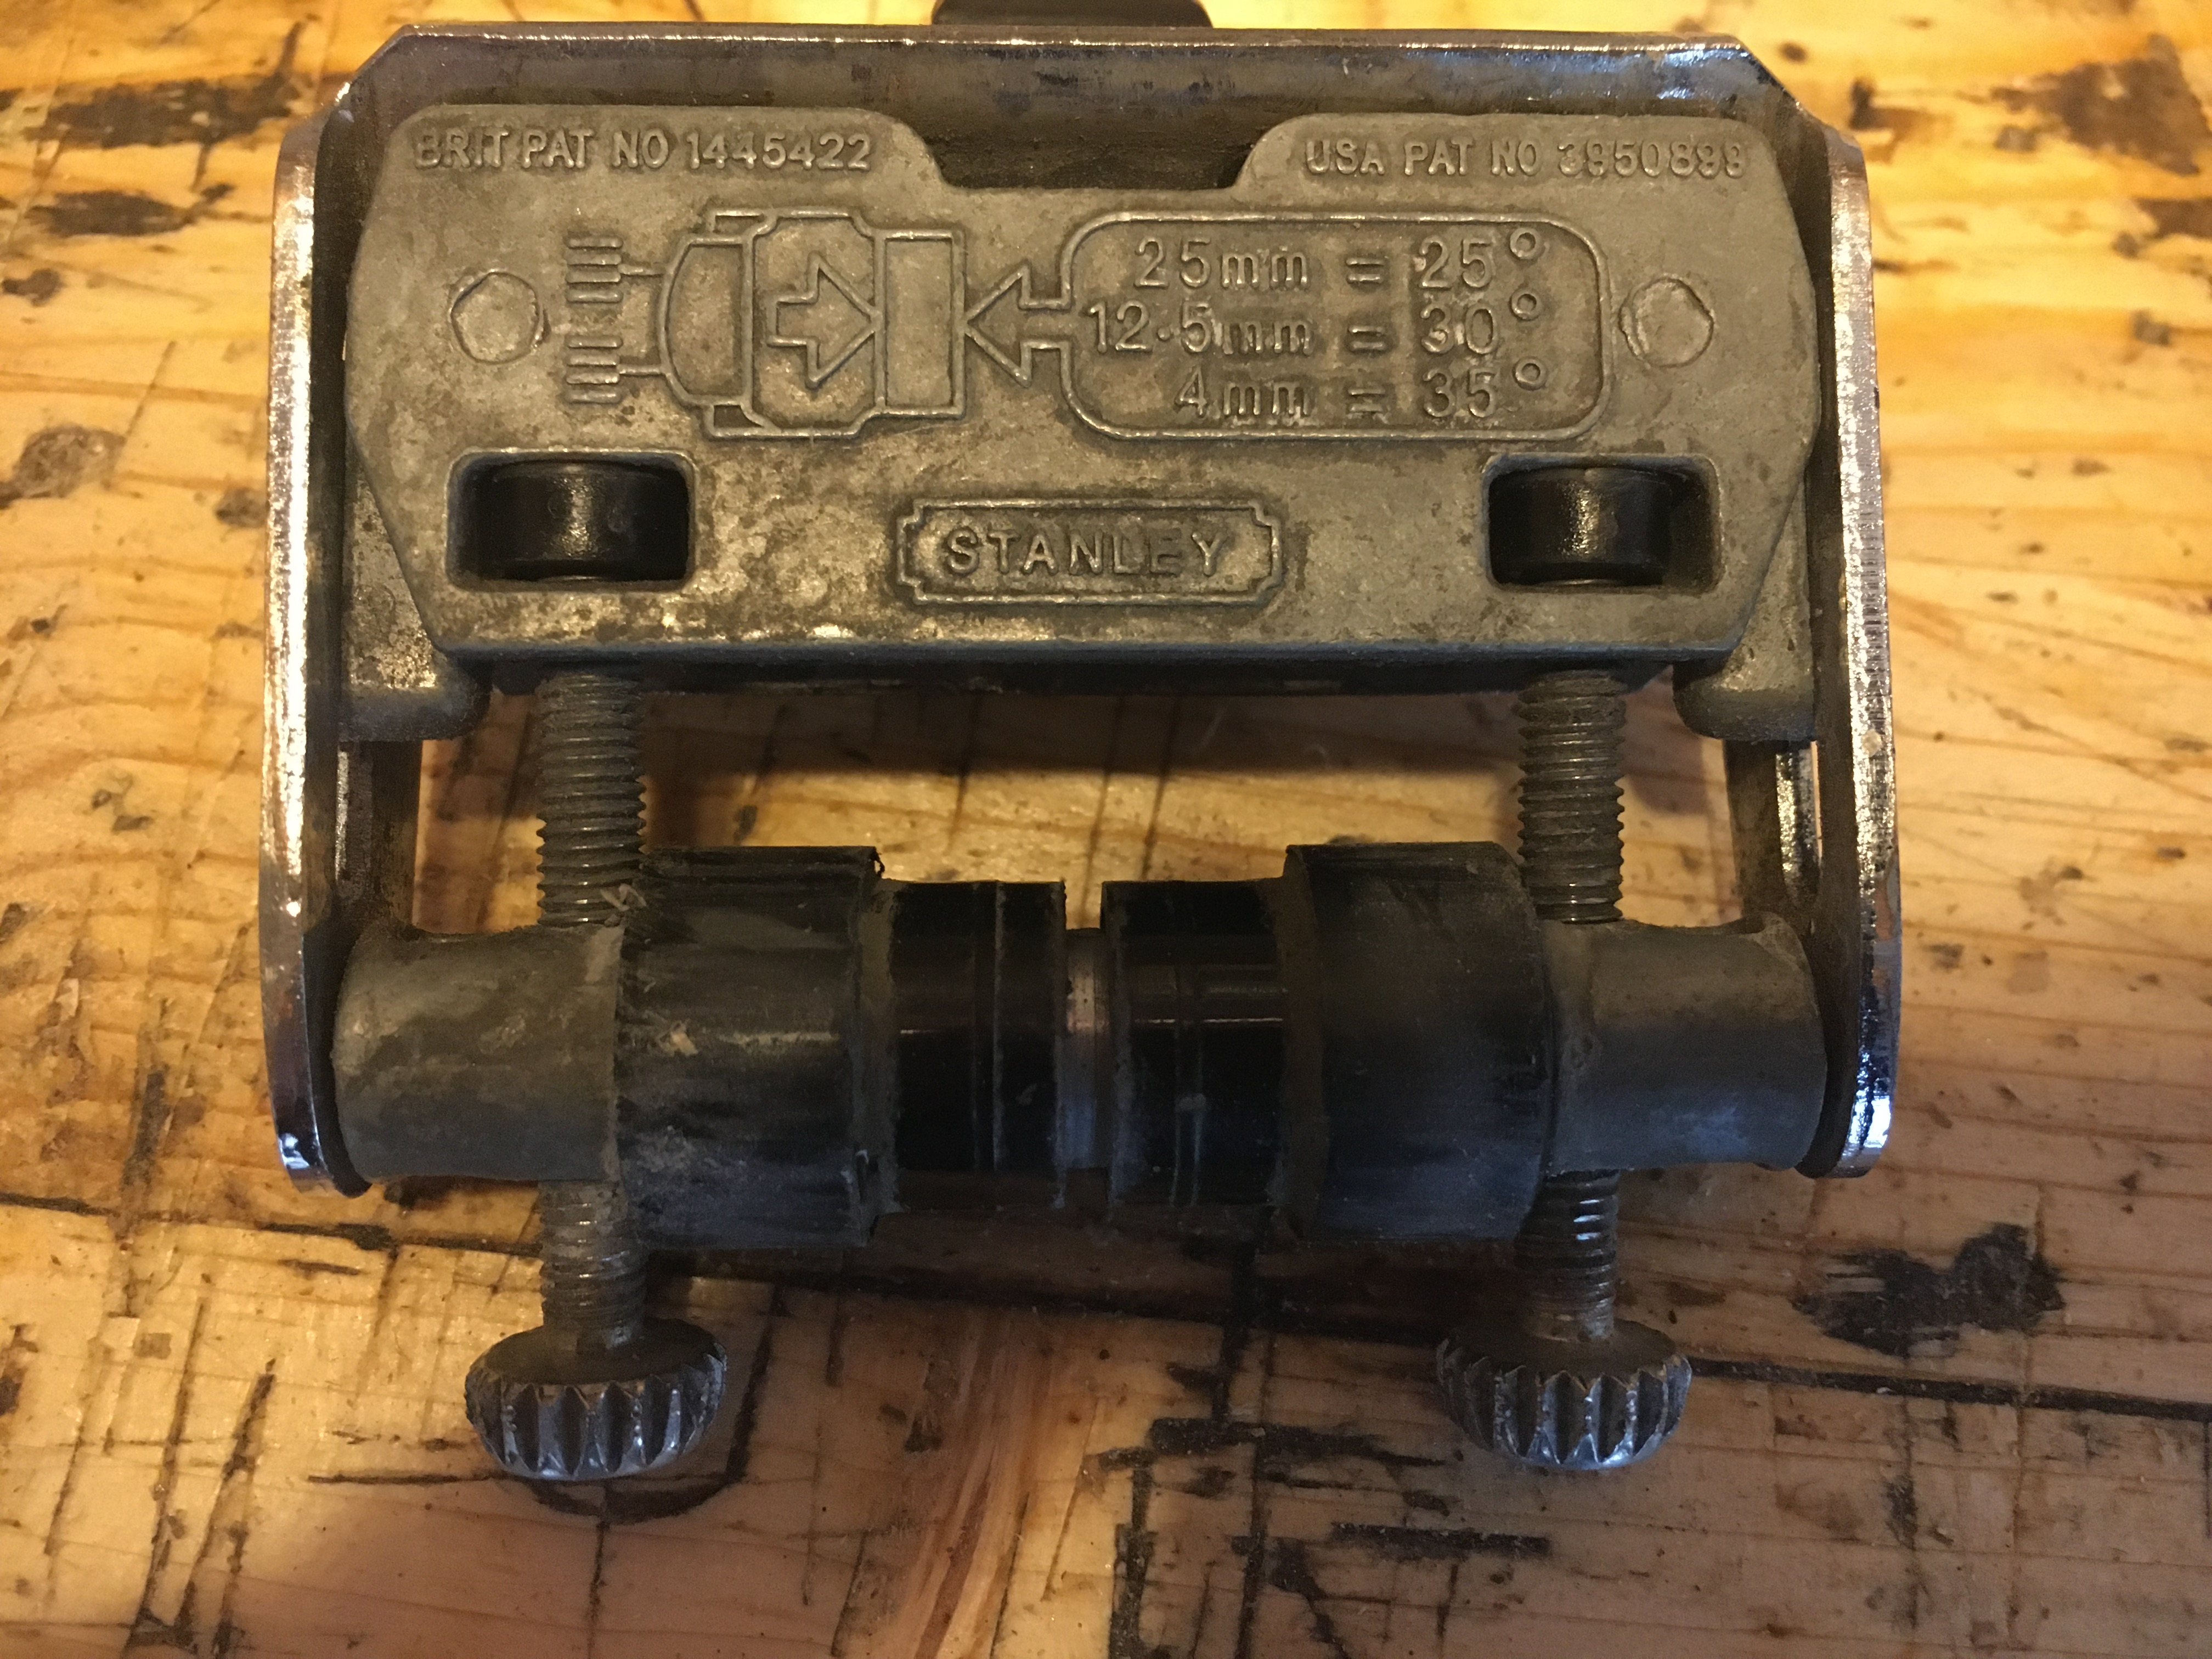 Nella parte inferiore della guida è presente una barra, che serve a serrare le lame, barra sulla quale sono indicate in rilievo le tre gradazioni principali utilizzate in falegnameria e in corrispondenza delle quali sono riportate delle misurazioni che indicano di quanto deve sporgere la lama rispetto alla parte superiore della guida per ottenere la corrispondente gradazione, il tutto reso molto intuitivo anche grazie alla miniatura della stessa guida stilizzata in rilievo sul corpo della guida. Le distanze indicate sono: 25 mm = 25 gradi, 12,5 mm = 30 gradi, 4 mm = 35 gradi.
 Le stesse misurazioni le possiamo ritrovare anche sulla linguetta in plastica posta sul dorso della guida che, se ribaltata, rivela delle tacche corrispondenti alle tre inclinazioni indicate sopra (25, 30 e 35 gradi).

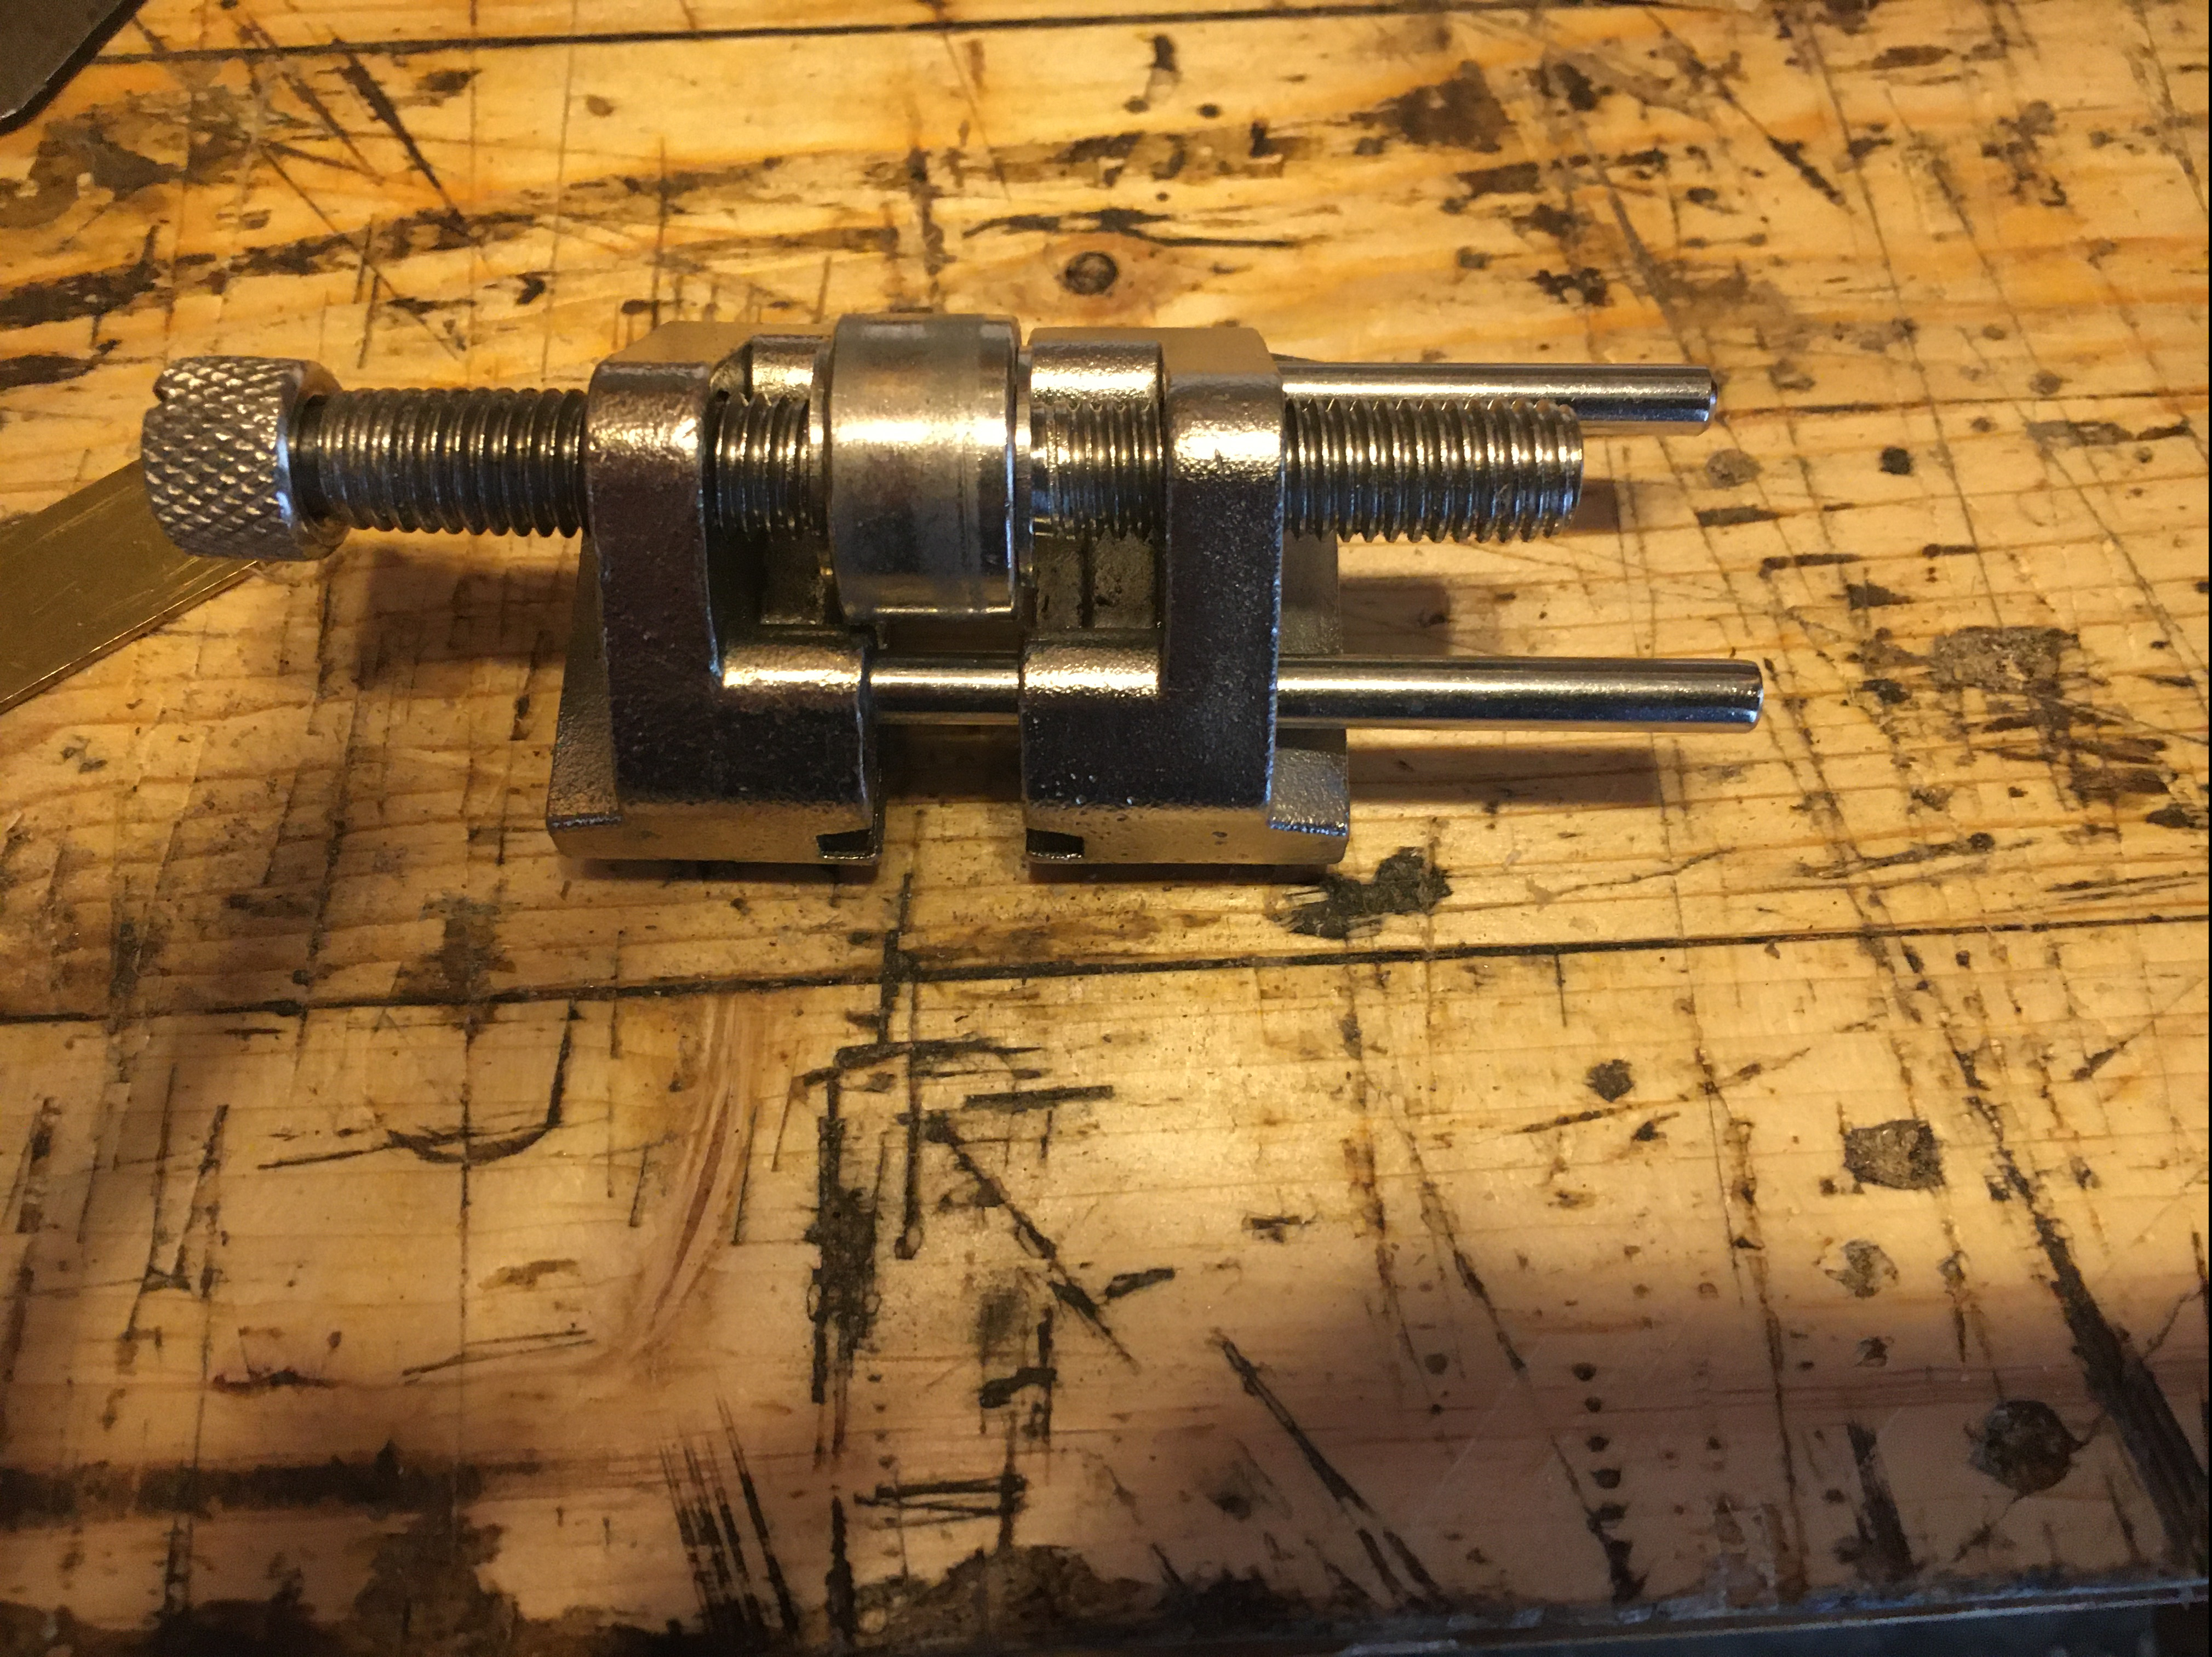
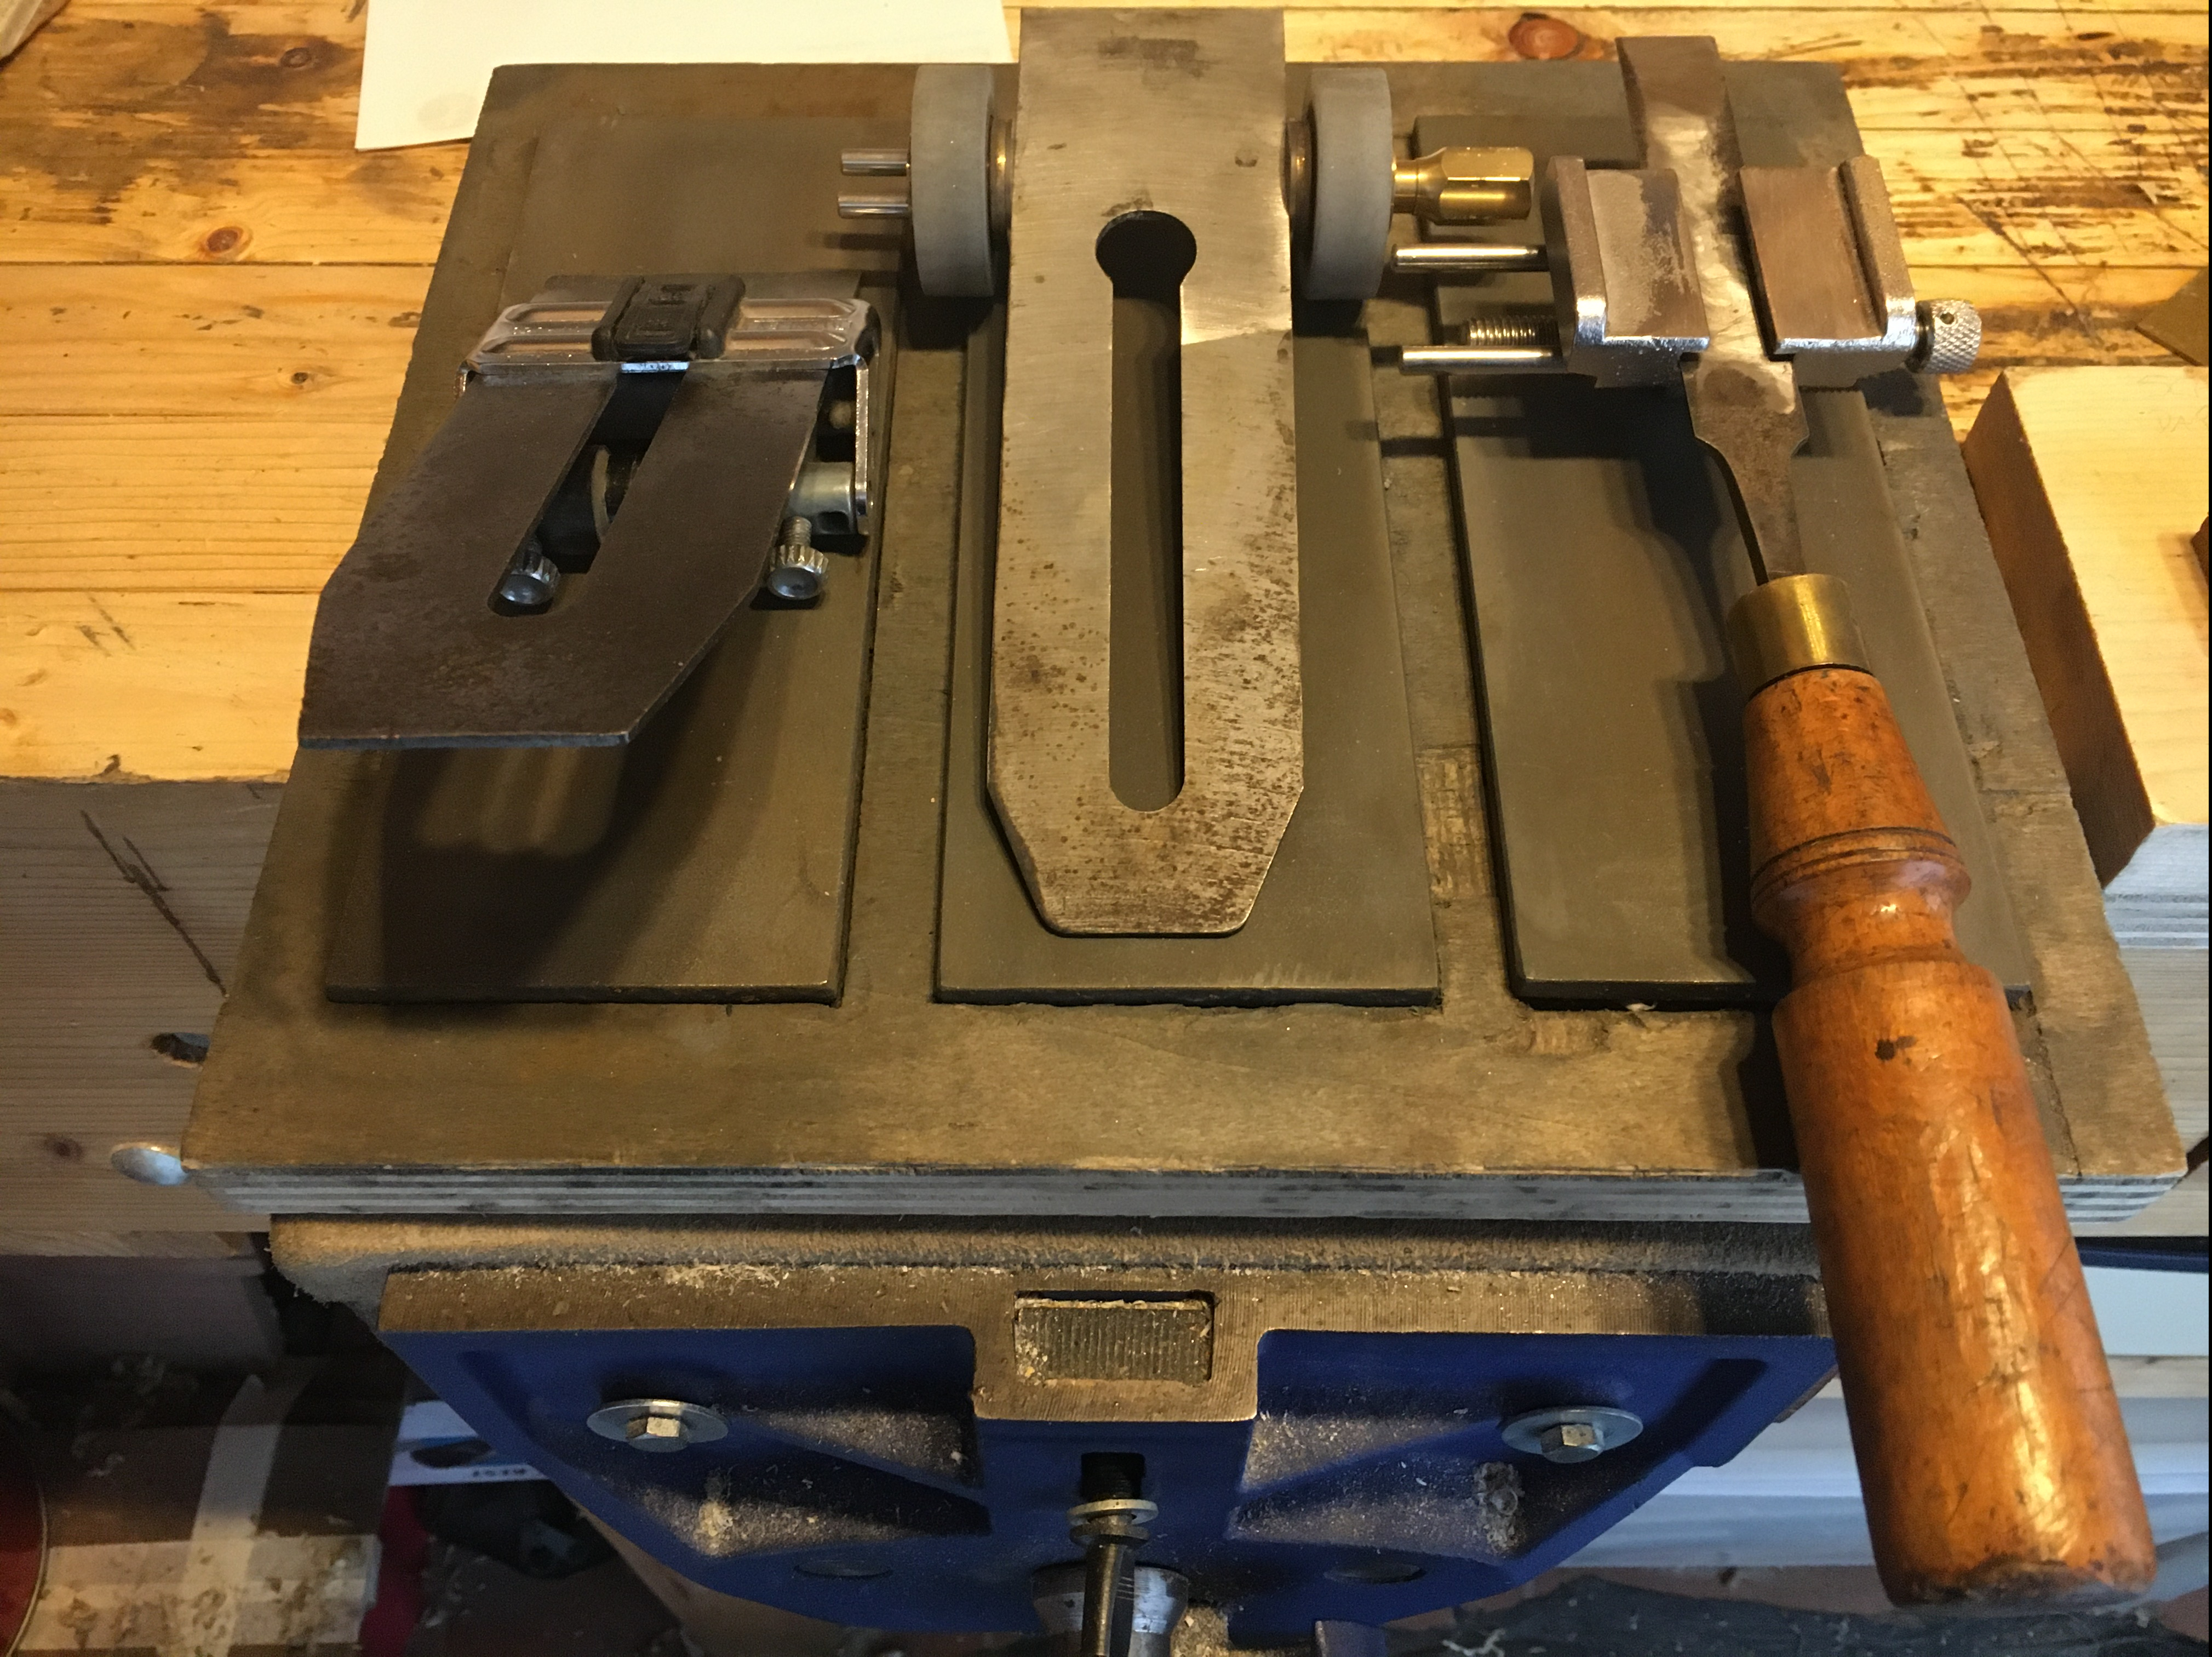
 Per la messa in opera è sufficiente allentare le due rotelle zigrinate, poste sul retro della guida e che comandano l’azione di due barre filettate, così da far arretrate la piastra inferiore di serraggio della lama, quindi inserire la lama fino a far combaciare il tagliente con la tacca (a linguetta ribaltata) che indica l’inclinazione desiderata e infine stringere le due rotelle zigrinate. La barra inferiore spinta in avanti dalle barre filettate stringerà la lama contro il corpo della guida. La guida è in grado di accogliere lame fino a 6,5 cm. di larghezza e montando le rotelle nella parte inferiore della guida invece che lateralmente può tranquillamente essere utilizzata su tutte le normali pietre da affilatura, essendo l’unico limite la reale capacità in larghezza della guida stessa.
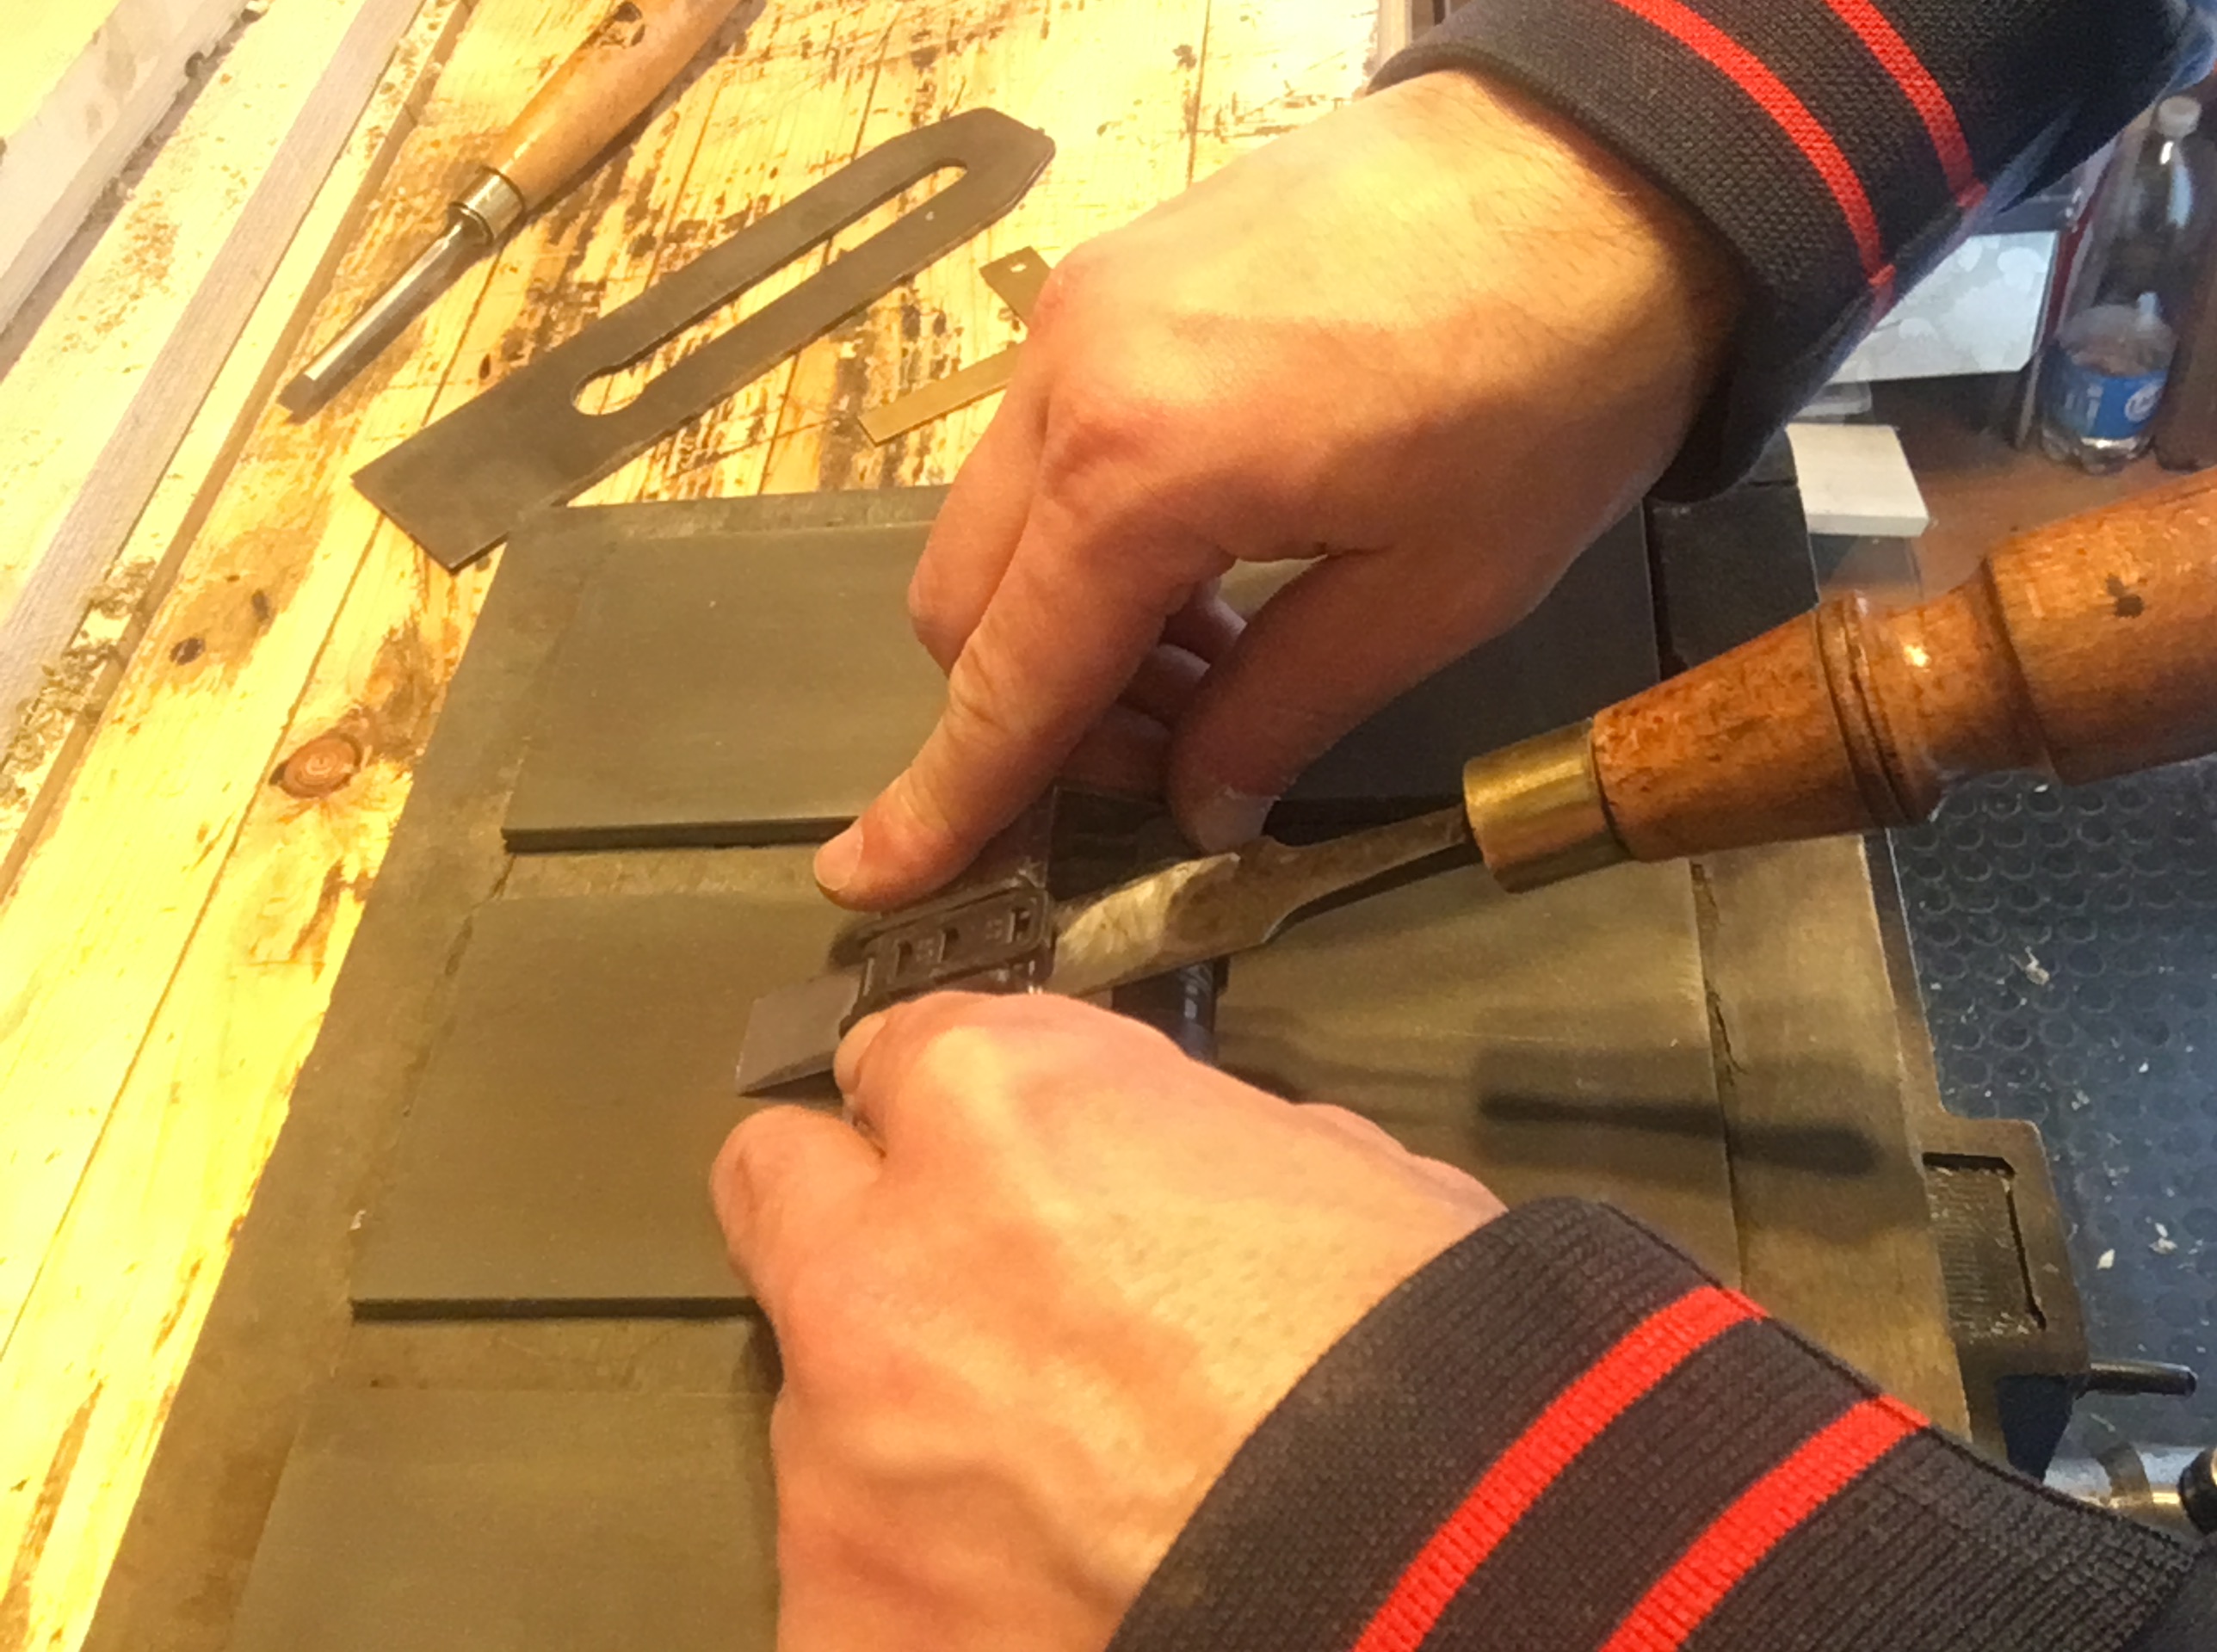

 Su questa guida si sente veramente la mancanza di una battuta alla quale la lama possa appoggiarsi, così da mantenersi dritta e ferma in posizione, seppure sia eventualmente possibile accostare tutta la lama su un fianco, sempre che la larghezza della lama consenta comunque di essere serrata. In conclusione, posso dire che trattasi di una discreta guida che, seppur economica, risulta affidabile, robusta e durevole nel tempo, necessitando però di alcune accortezze per non incorrere in disallineamenti. Inserisco di seguito un link dove è possibile acquistarla. https://www.manomano.it/pietre-per-affilare-1304?model_id=2002528&g=1&referer_id=689880&gclid=EAIaIQobChMIyrq0-IyU8AIVA7d3Ch0Fjgb2EAQYASABEgK5kfD_BwE
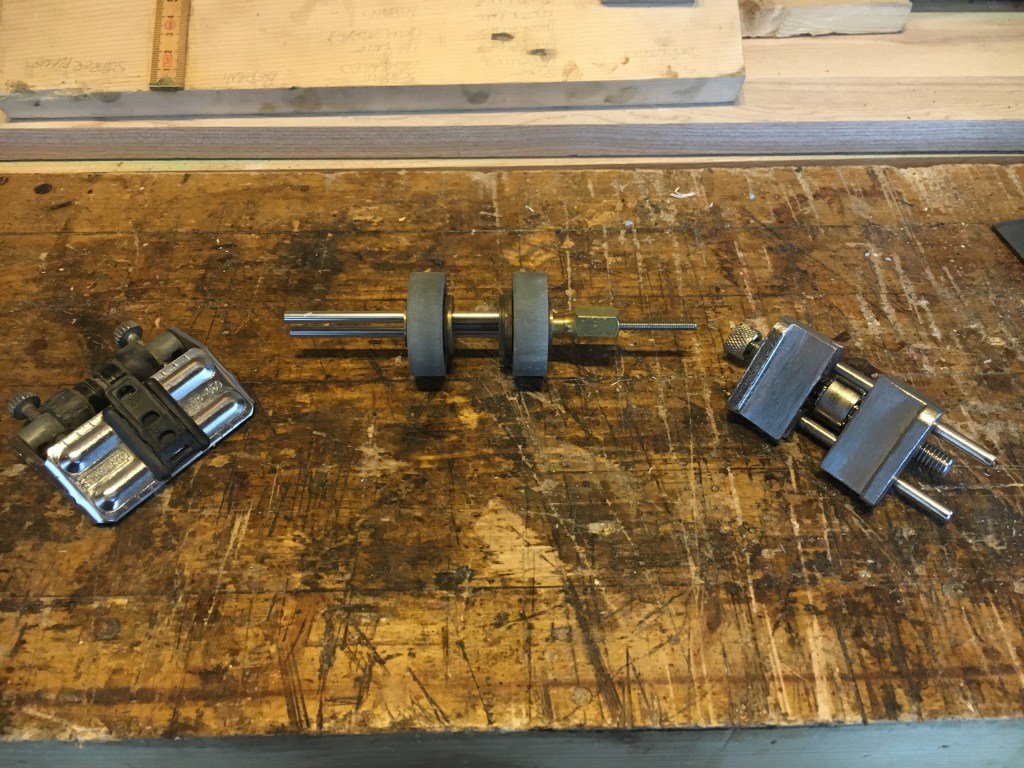
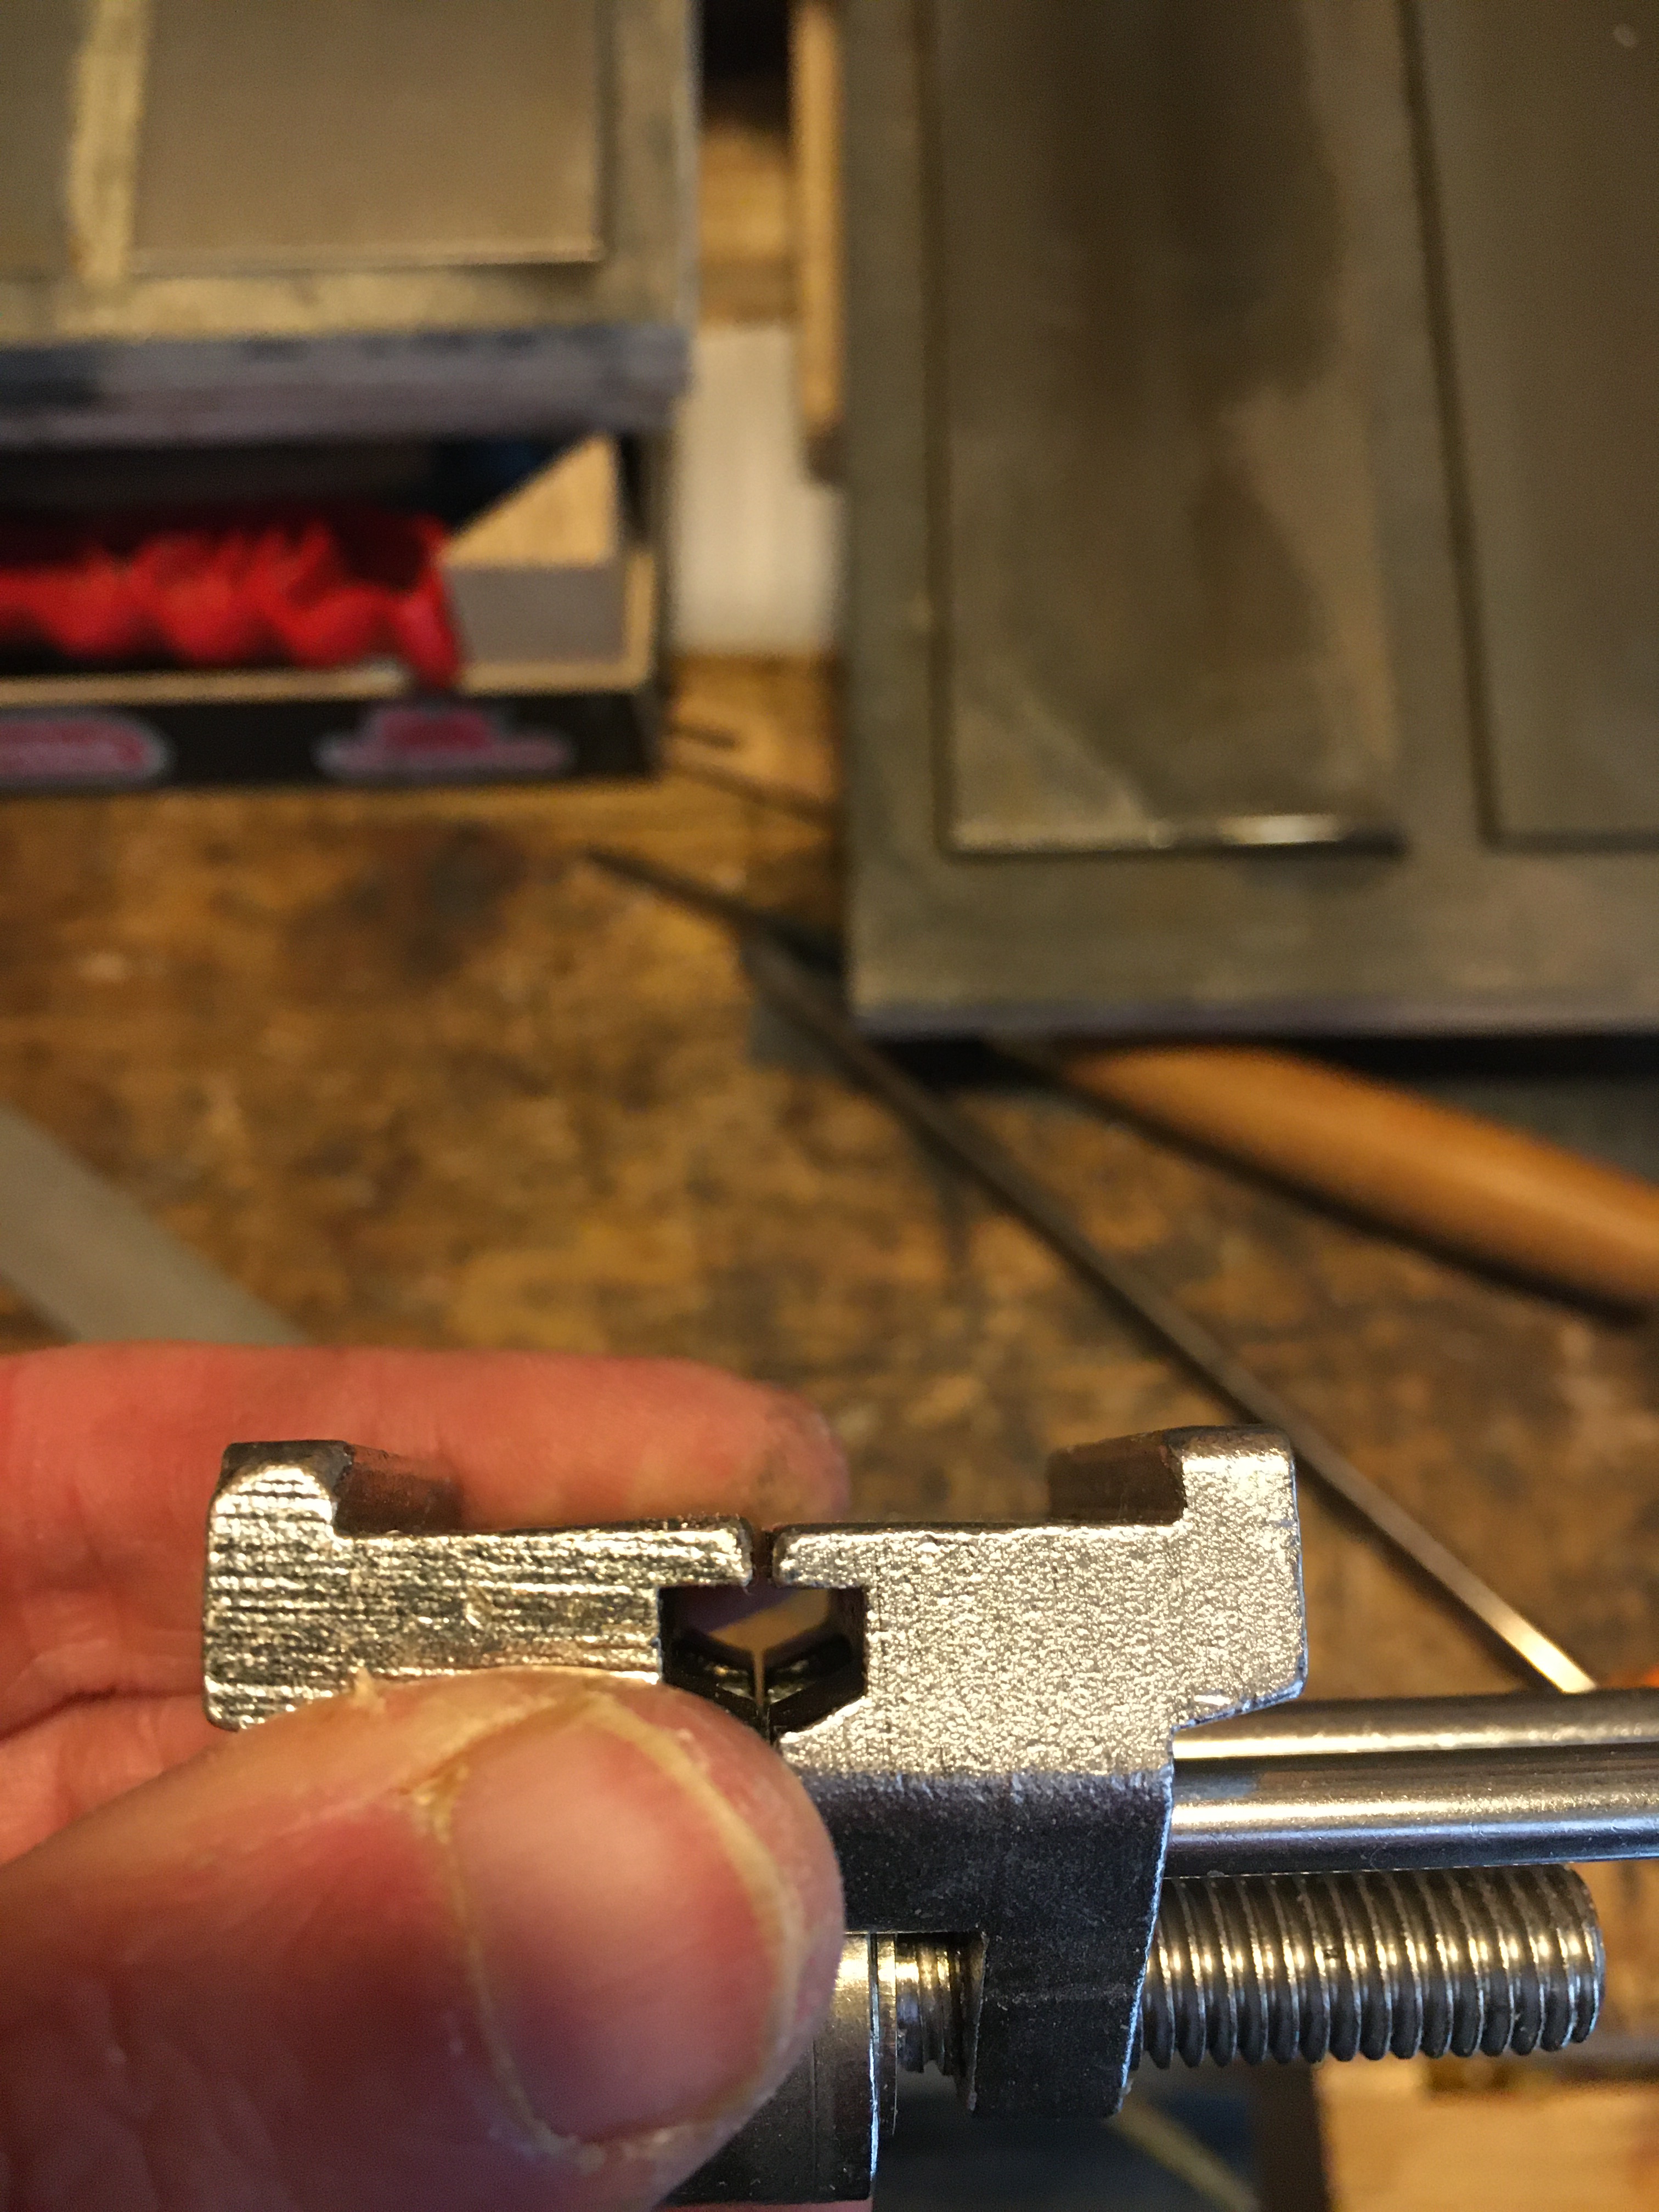
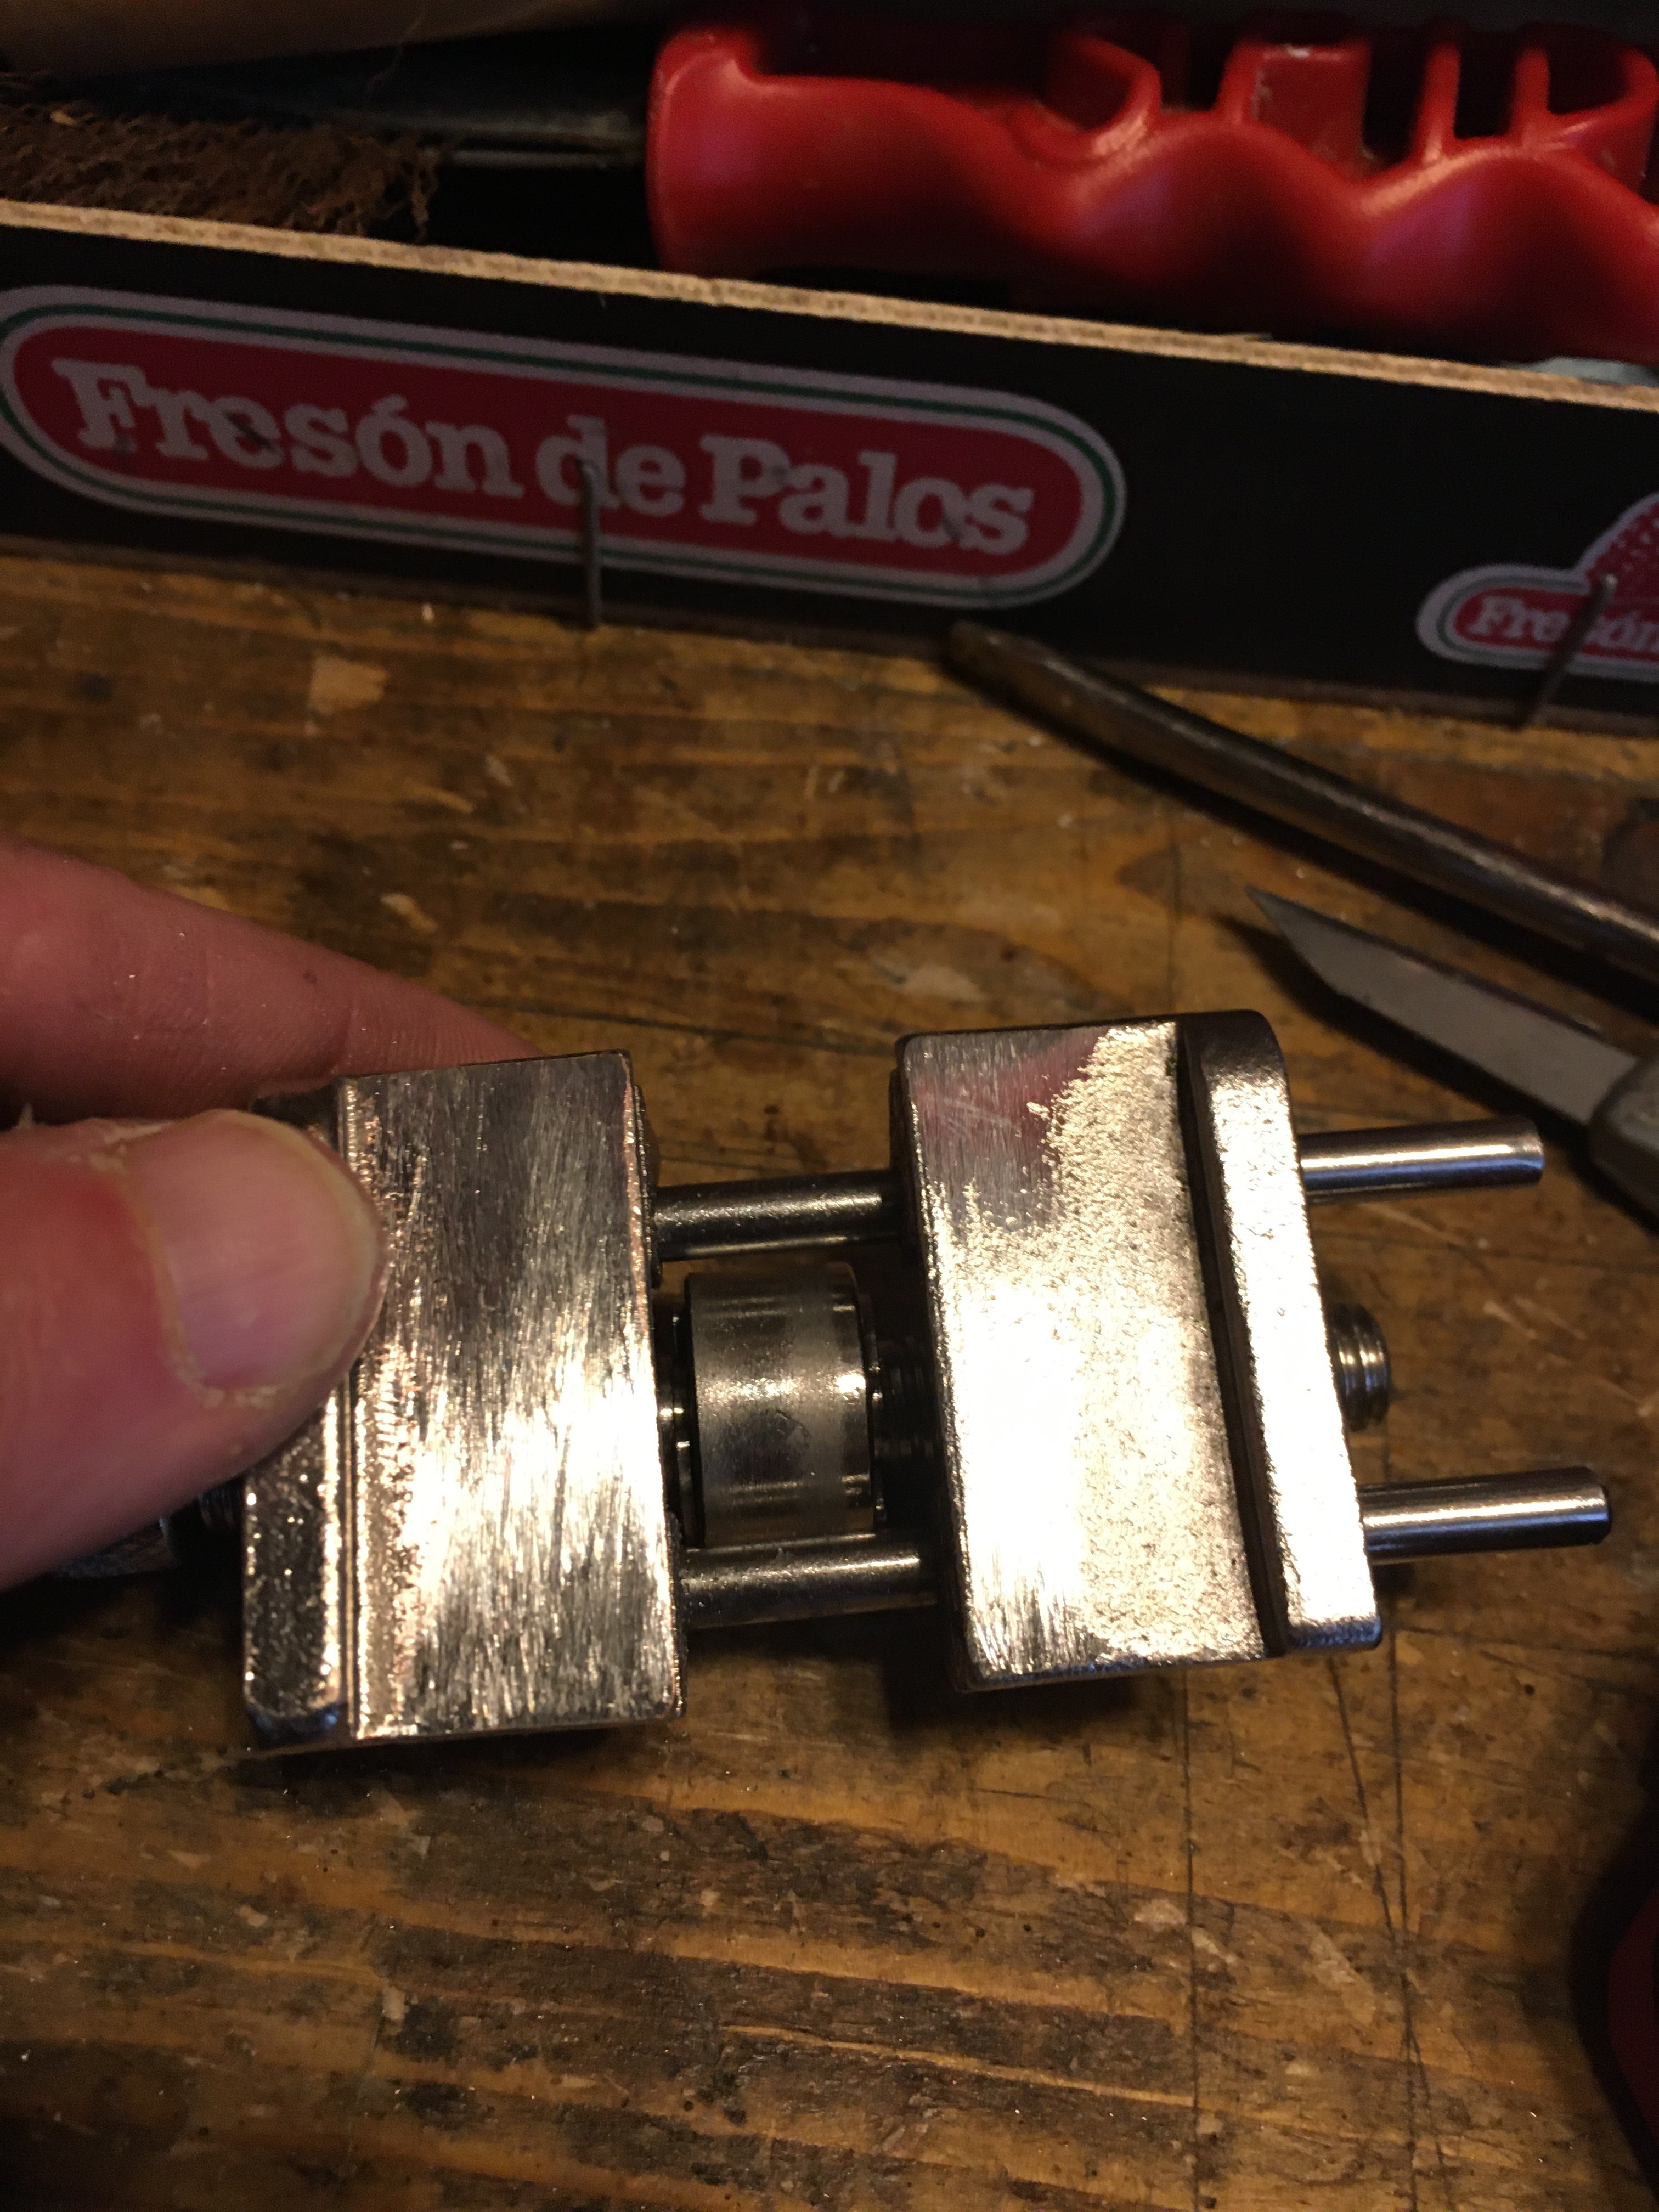
 La guida simil Eclipse n.36 è strutturalmente concepita come la Eclipse n.36. Si compone infatti di un corpo in metallo formato da due parti (ganasce laterali) comandate da una rotella zigrinata che agisce su una barra filettata che fa scorrere le ganasce su due barre. Si inserisce la lama, poggiandola sui piani delle due ganasce e si serrano per mezzo della vite filettata nella cui testa è ricavata un’ impronta a taglio per l’inserimento di un cacciavite a stringere.
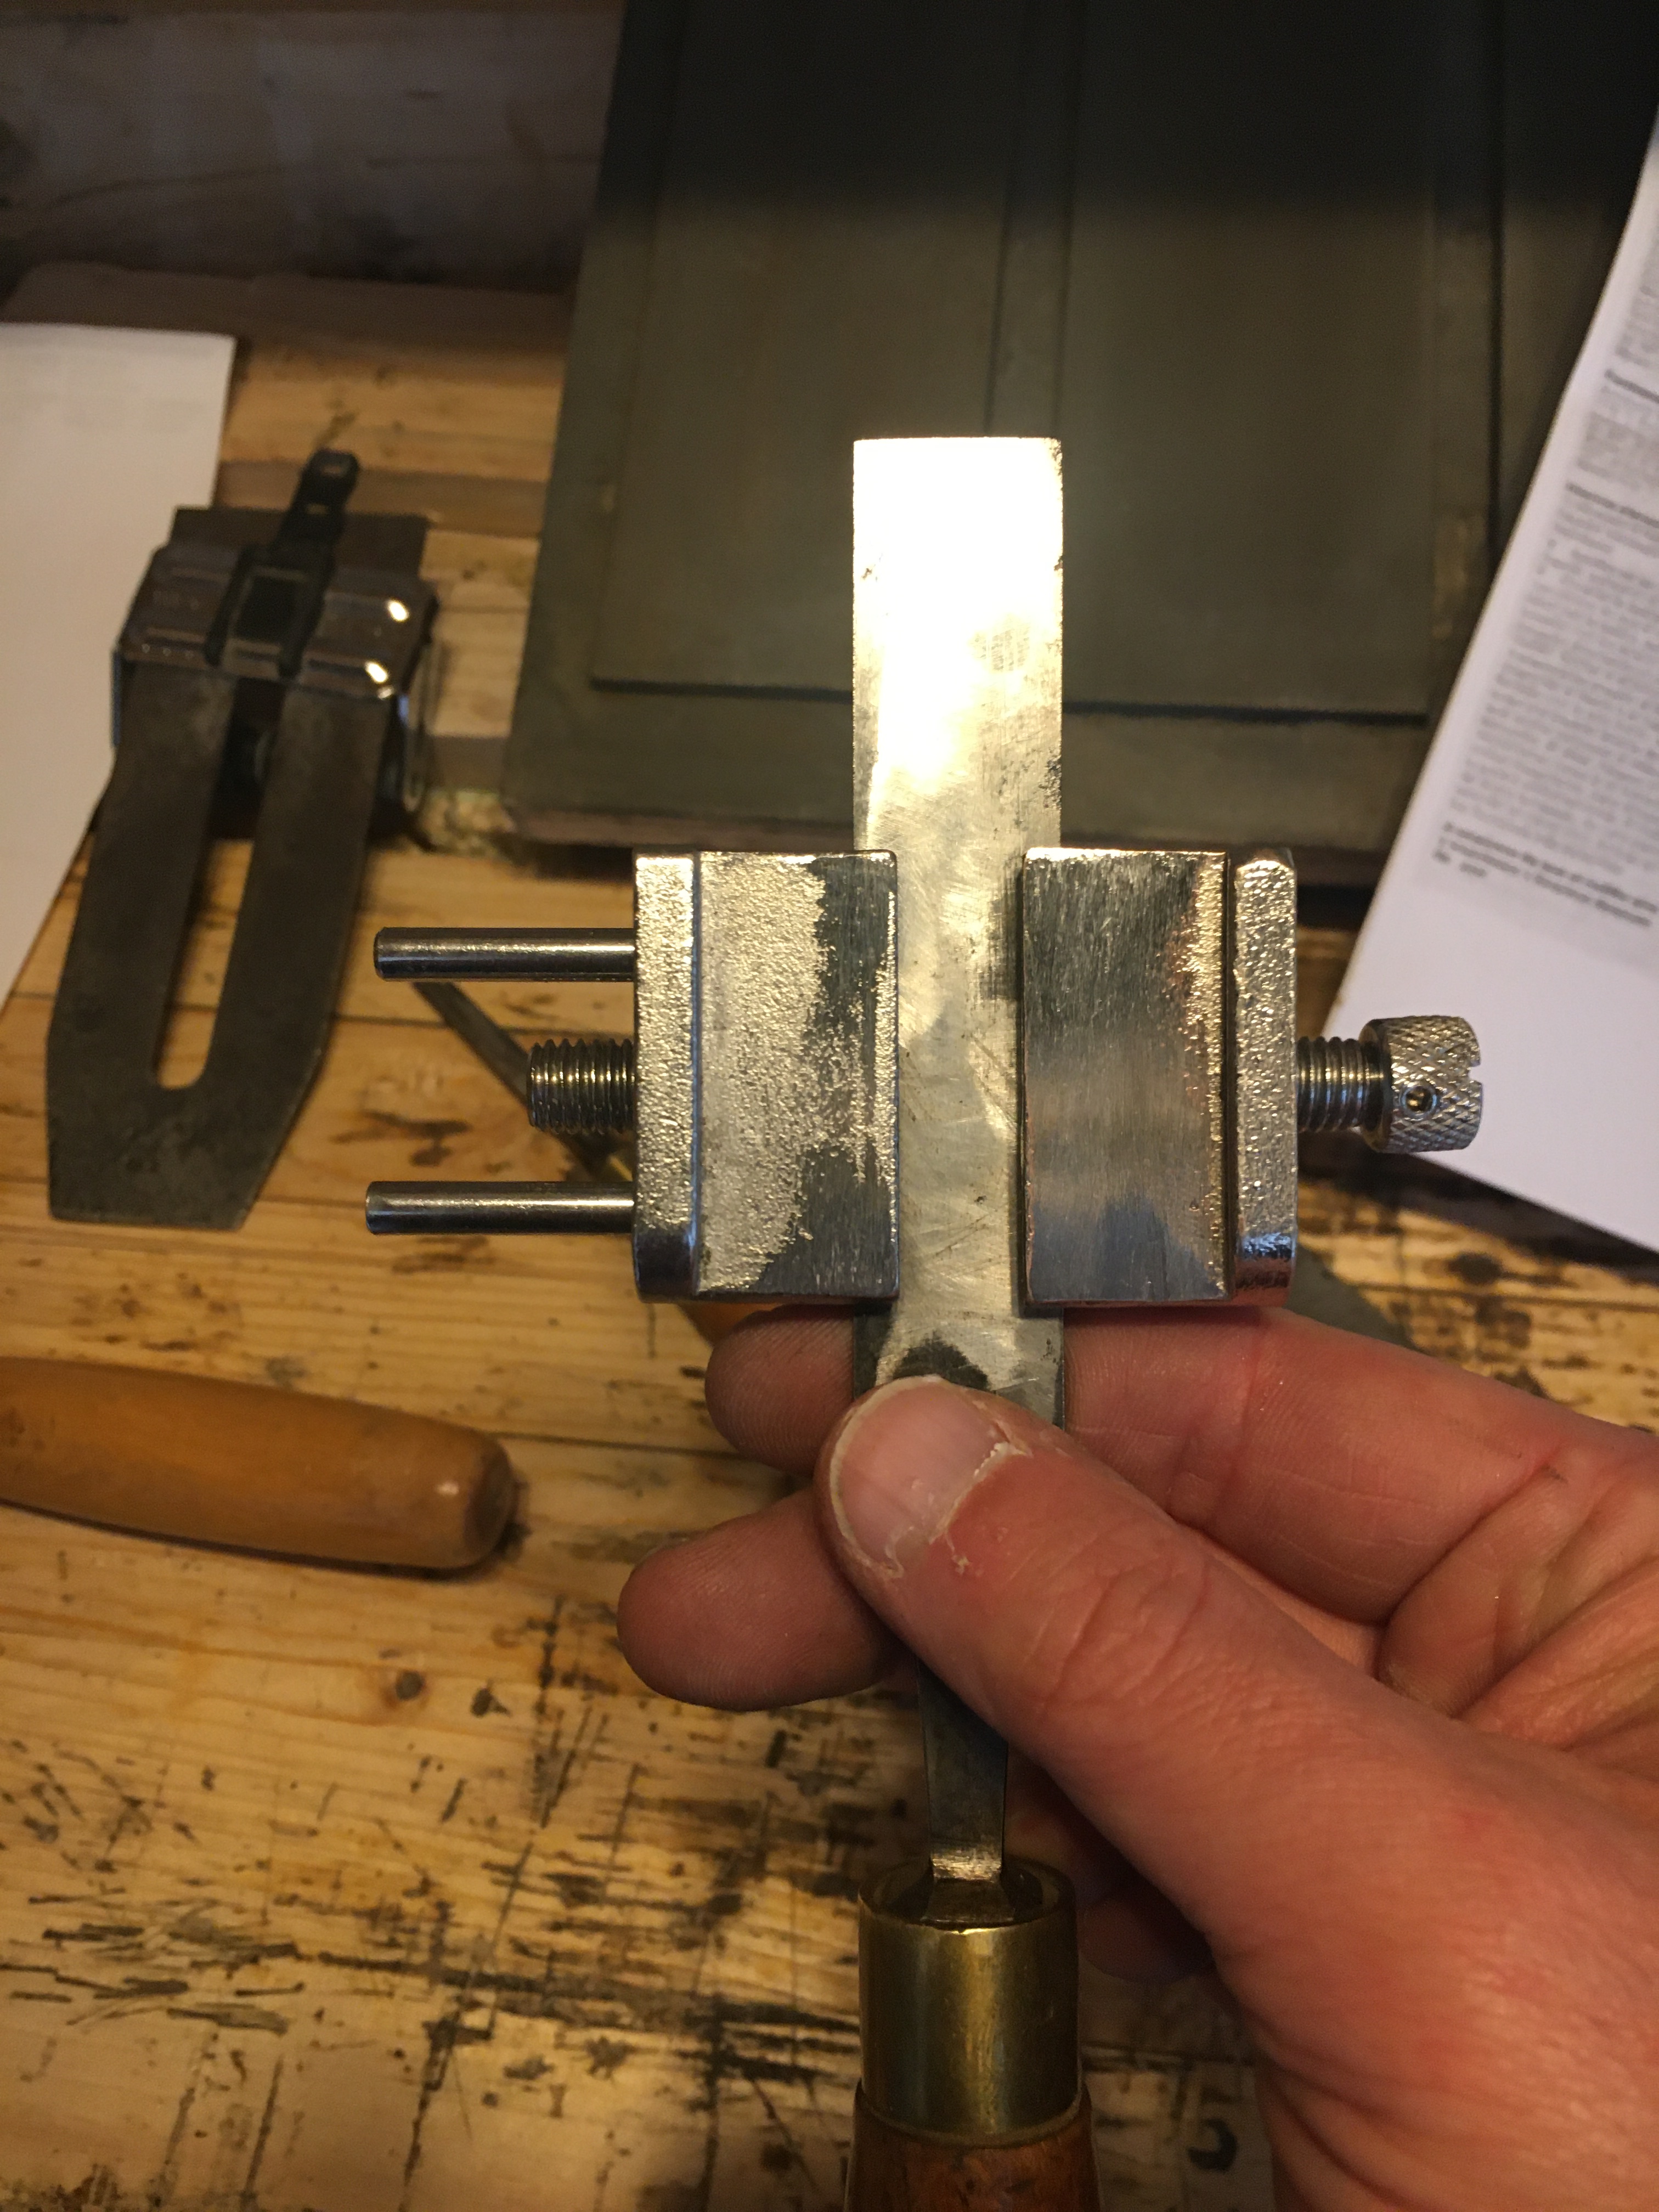 La parte superiore delle ganasce è dedicata alle lame delle pialle mentre per gli scalpelli (specialmente quelli più stretti) è possibile l’inserimento nelle apposite scanalature ricavate in posizione inferiore nelle ganasce stesse. Per il settaggio alla inclinazione desiderata vale quanto detto sopra per la guida Kell, ovvero occorre utilizzare dei jig oppure misurare la distanza con un righello.
 Trattandosi di un modello speculare alla Eclipse possiamo riferirci al manuale di istruzioni di quella guida, dove sono indicate tra l’altro le sporgenze dal bordo delle ganasce, per ottenere l’affilatura sia a 25 gradi che a 30 gradi. Su alcuni modelli passati di Eclipse n.36 l’ulteriore scanalatura per il serraggio delle lame più strette era già presente e tale preziosa caratteristica è stata mantenuta su questo modello. La rotella di scorrimento della guida è in acciaio (anche se sulla confezione viene raffigurata in ottone ed avessi richiesto espressamente quella in ottone) e scorre bene.
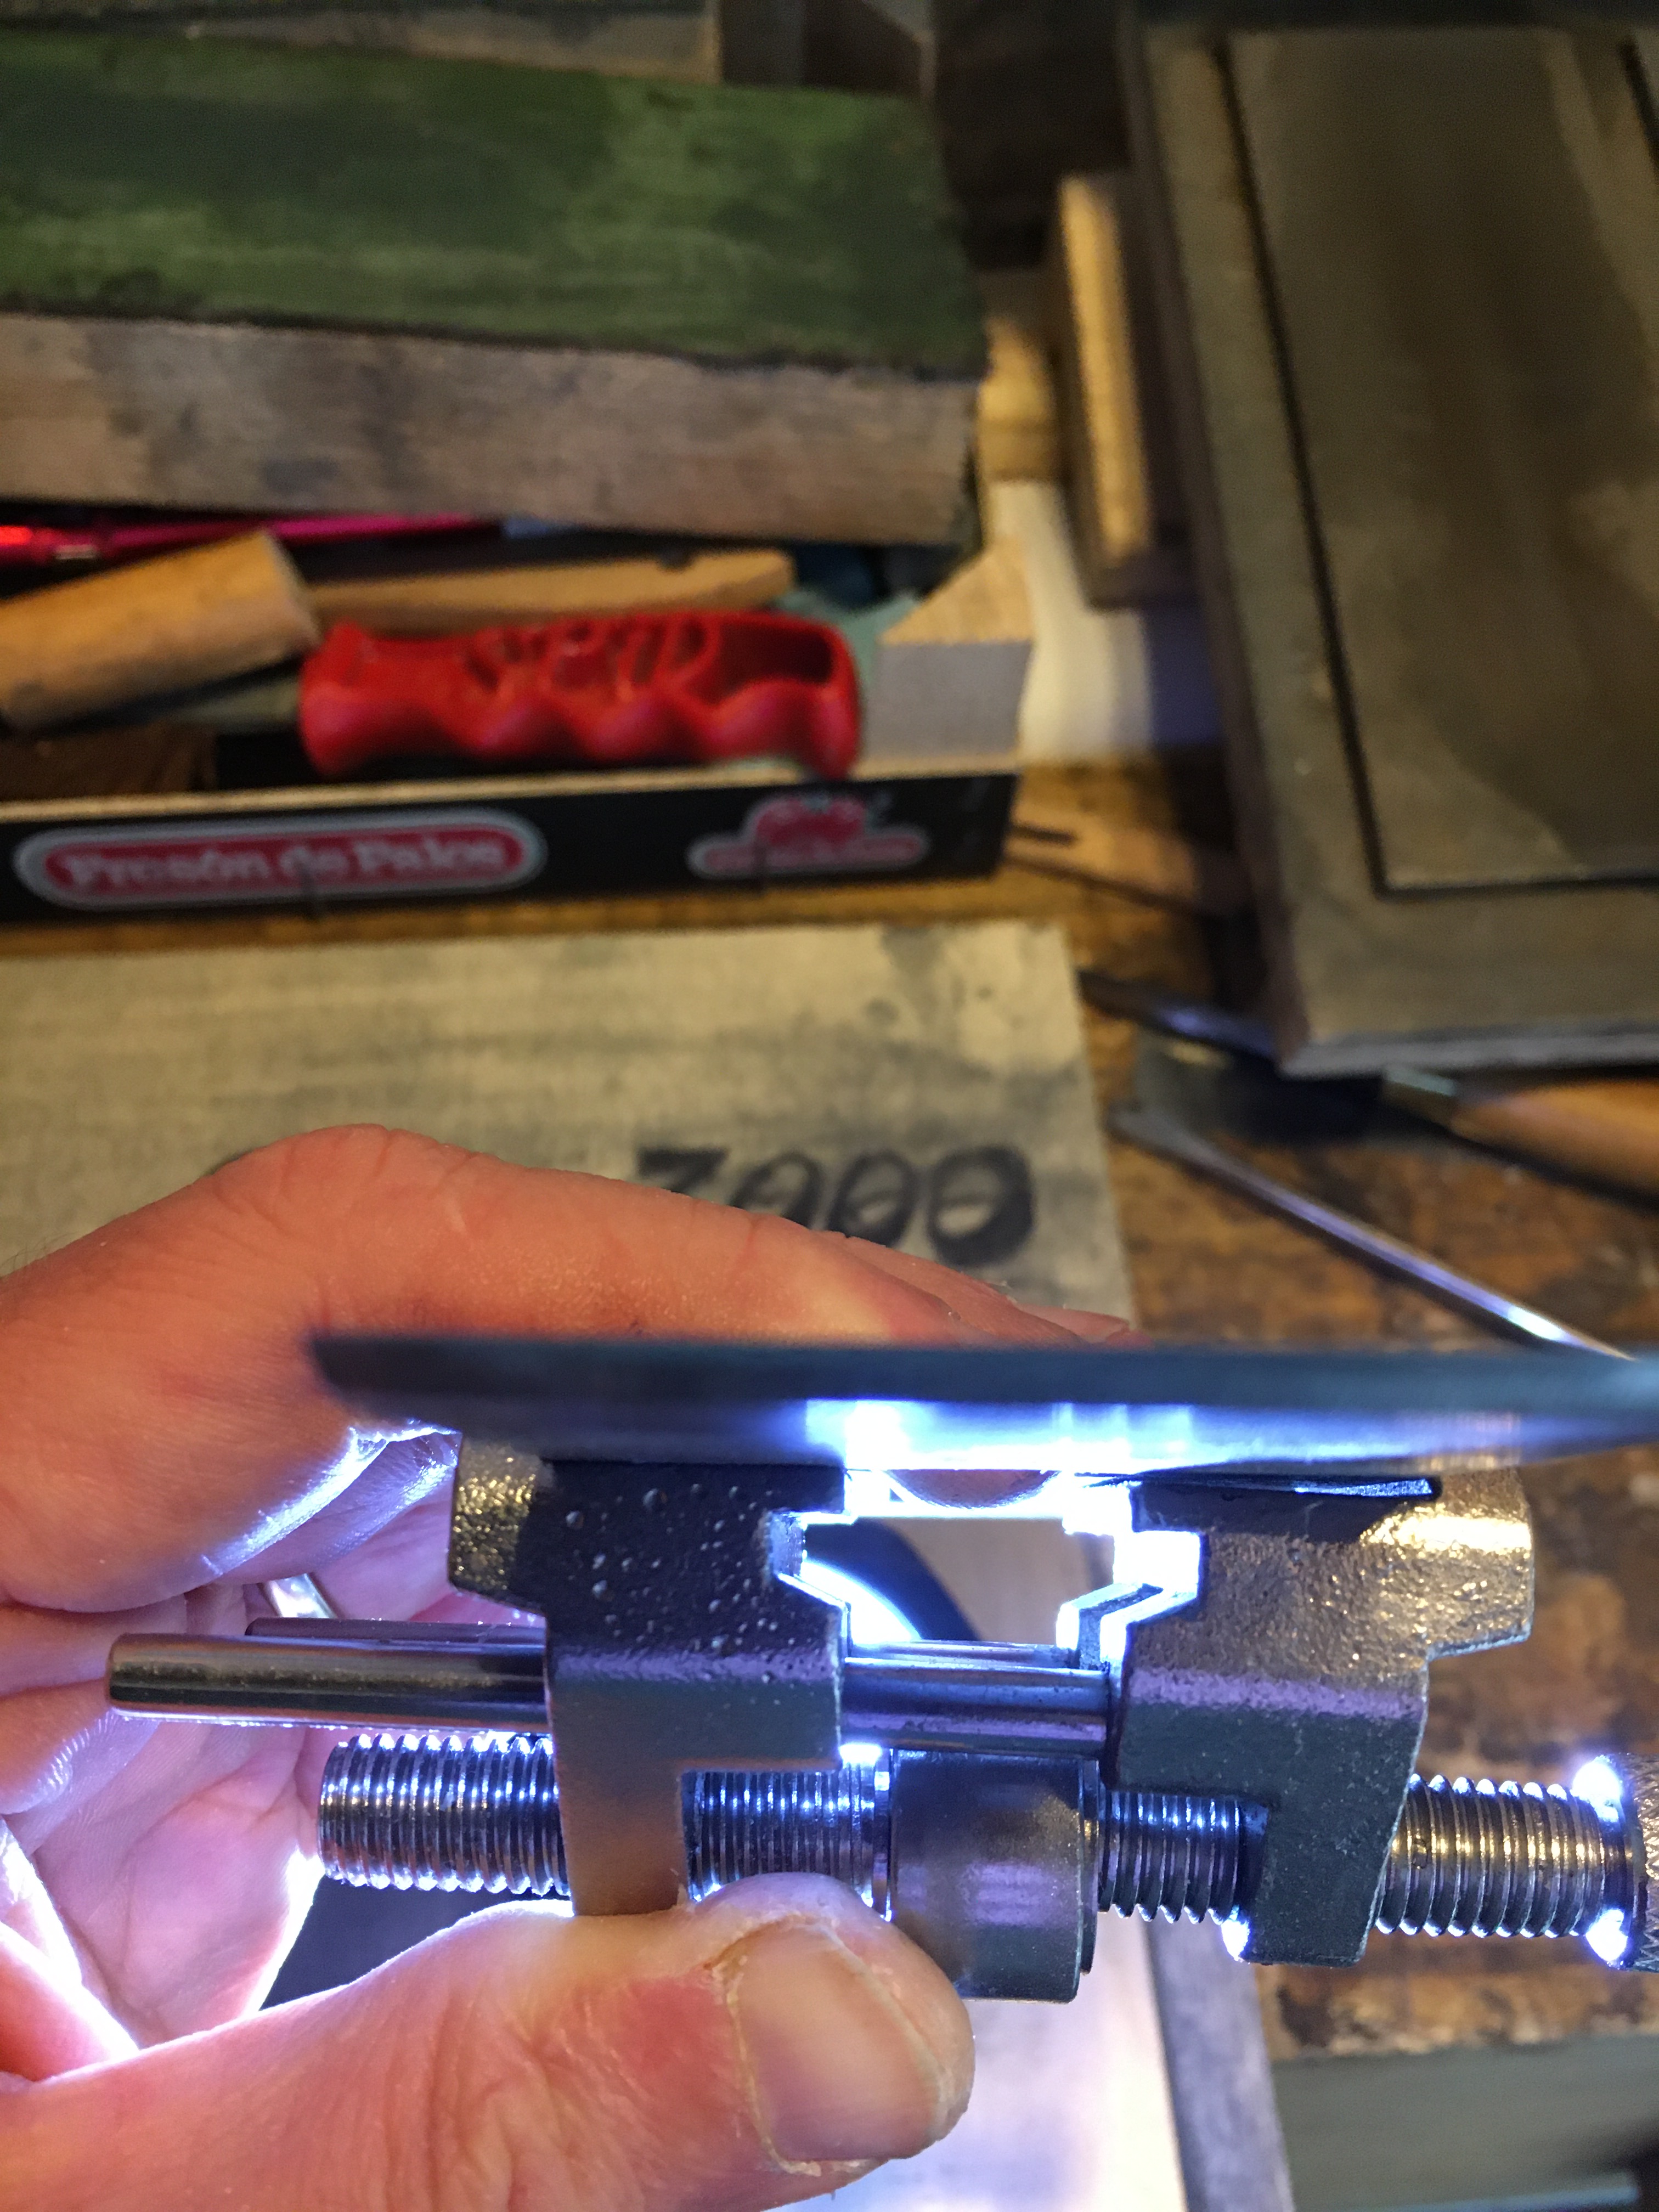
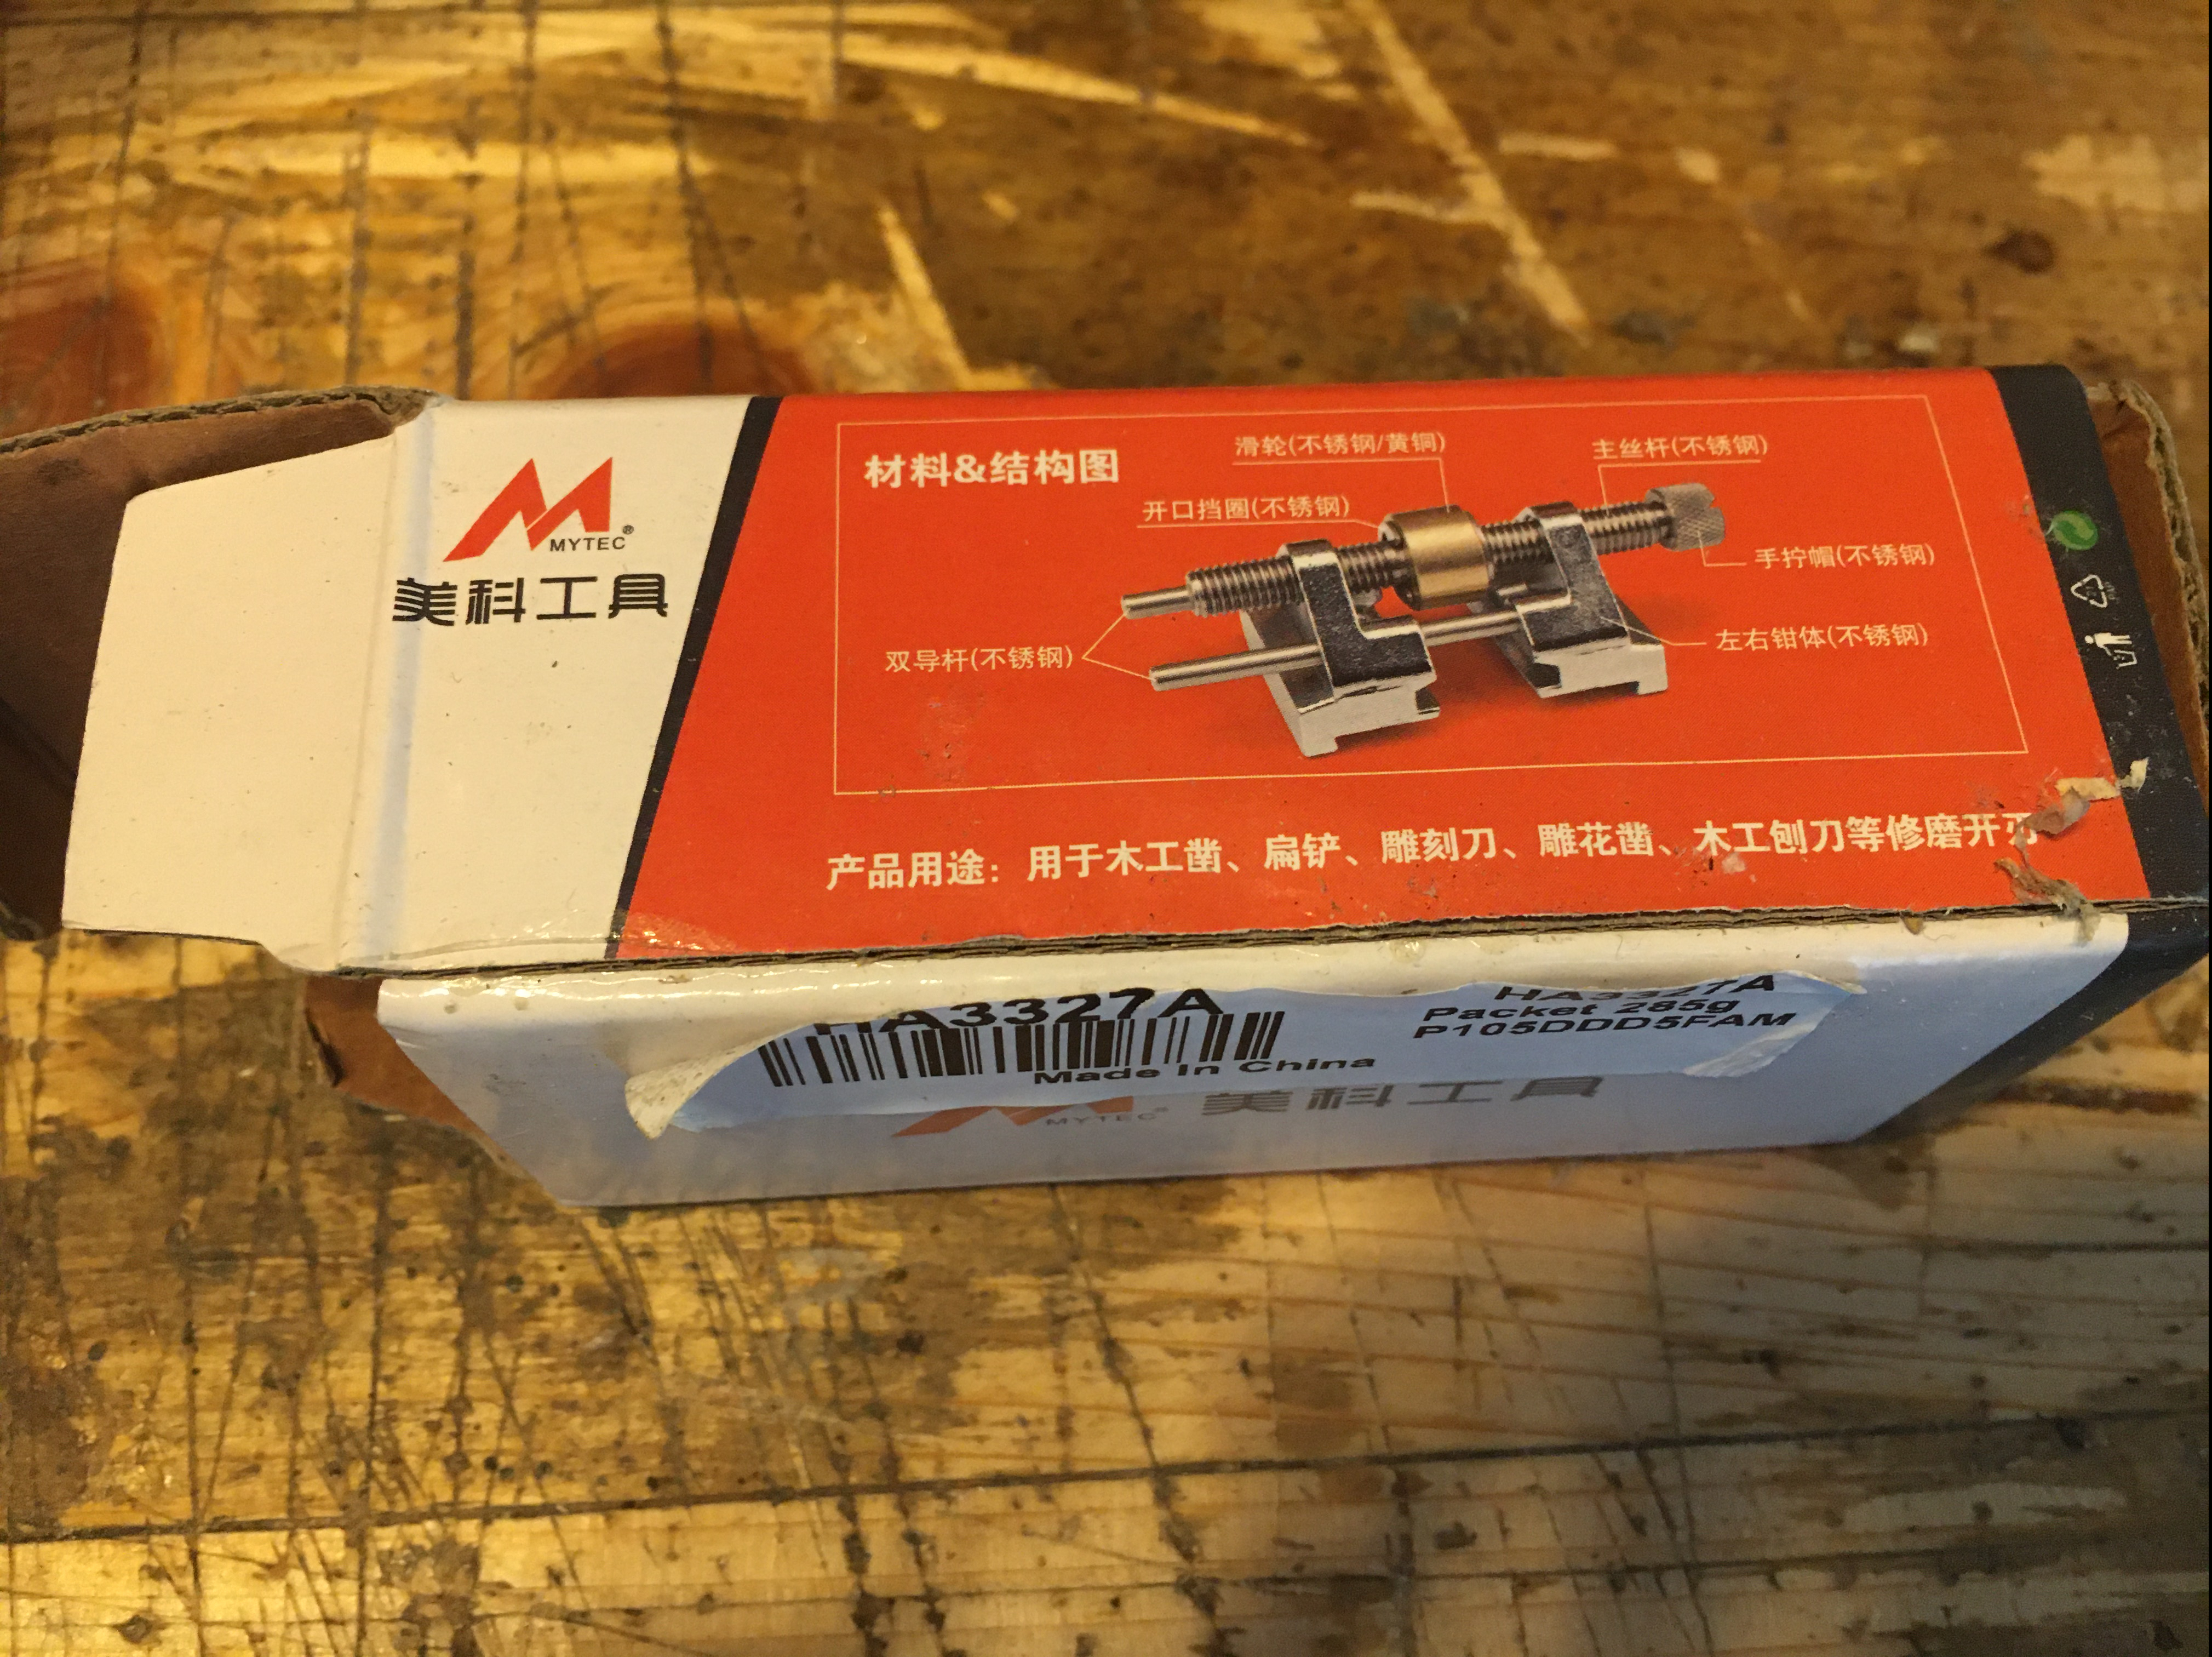 La guida, come accennato sopra, arriva senza alcuna istruzione ad eccezione di qualche riferimento sulla confezione, purtroppo in cinese. Nessuna indicazione incisa sul corpo della guida che si presenta comunque poco rifinito. Le scanalature inferiori, conformate per ricevere gli scalpelli più stretti, sono precise e chiudono bene.
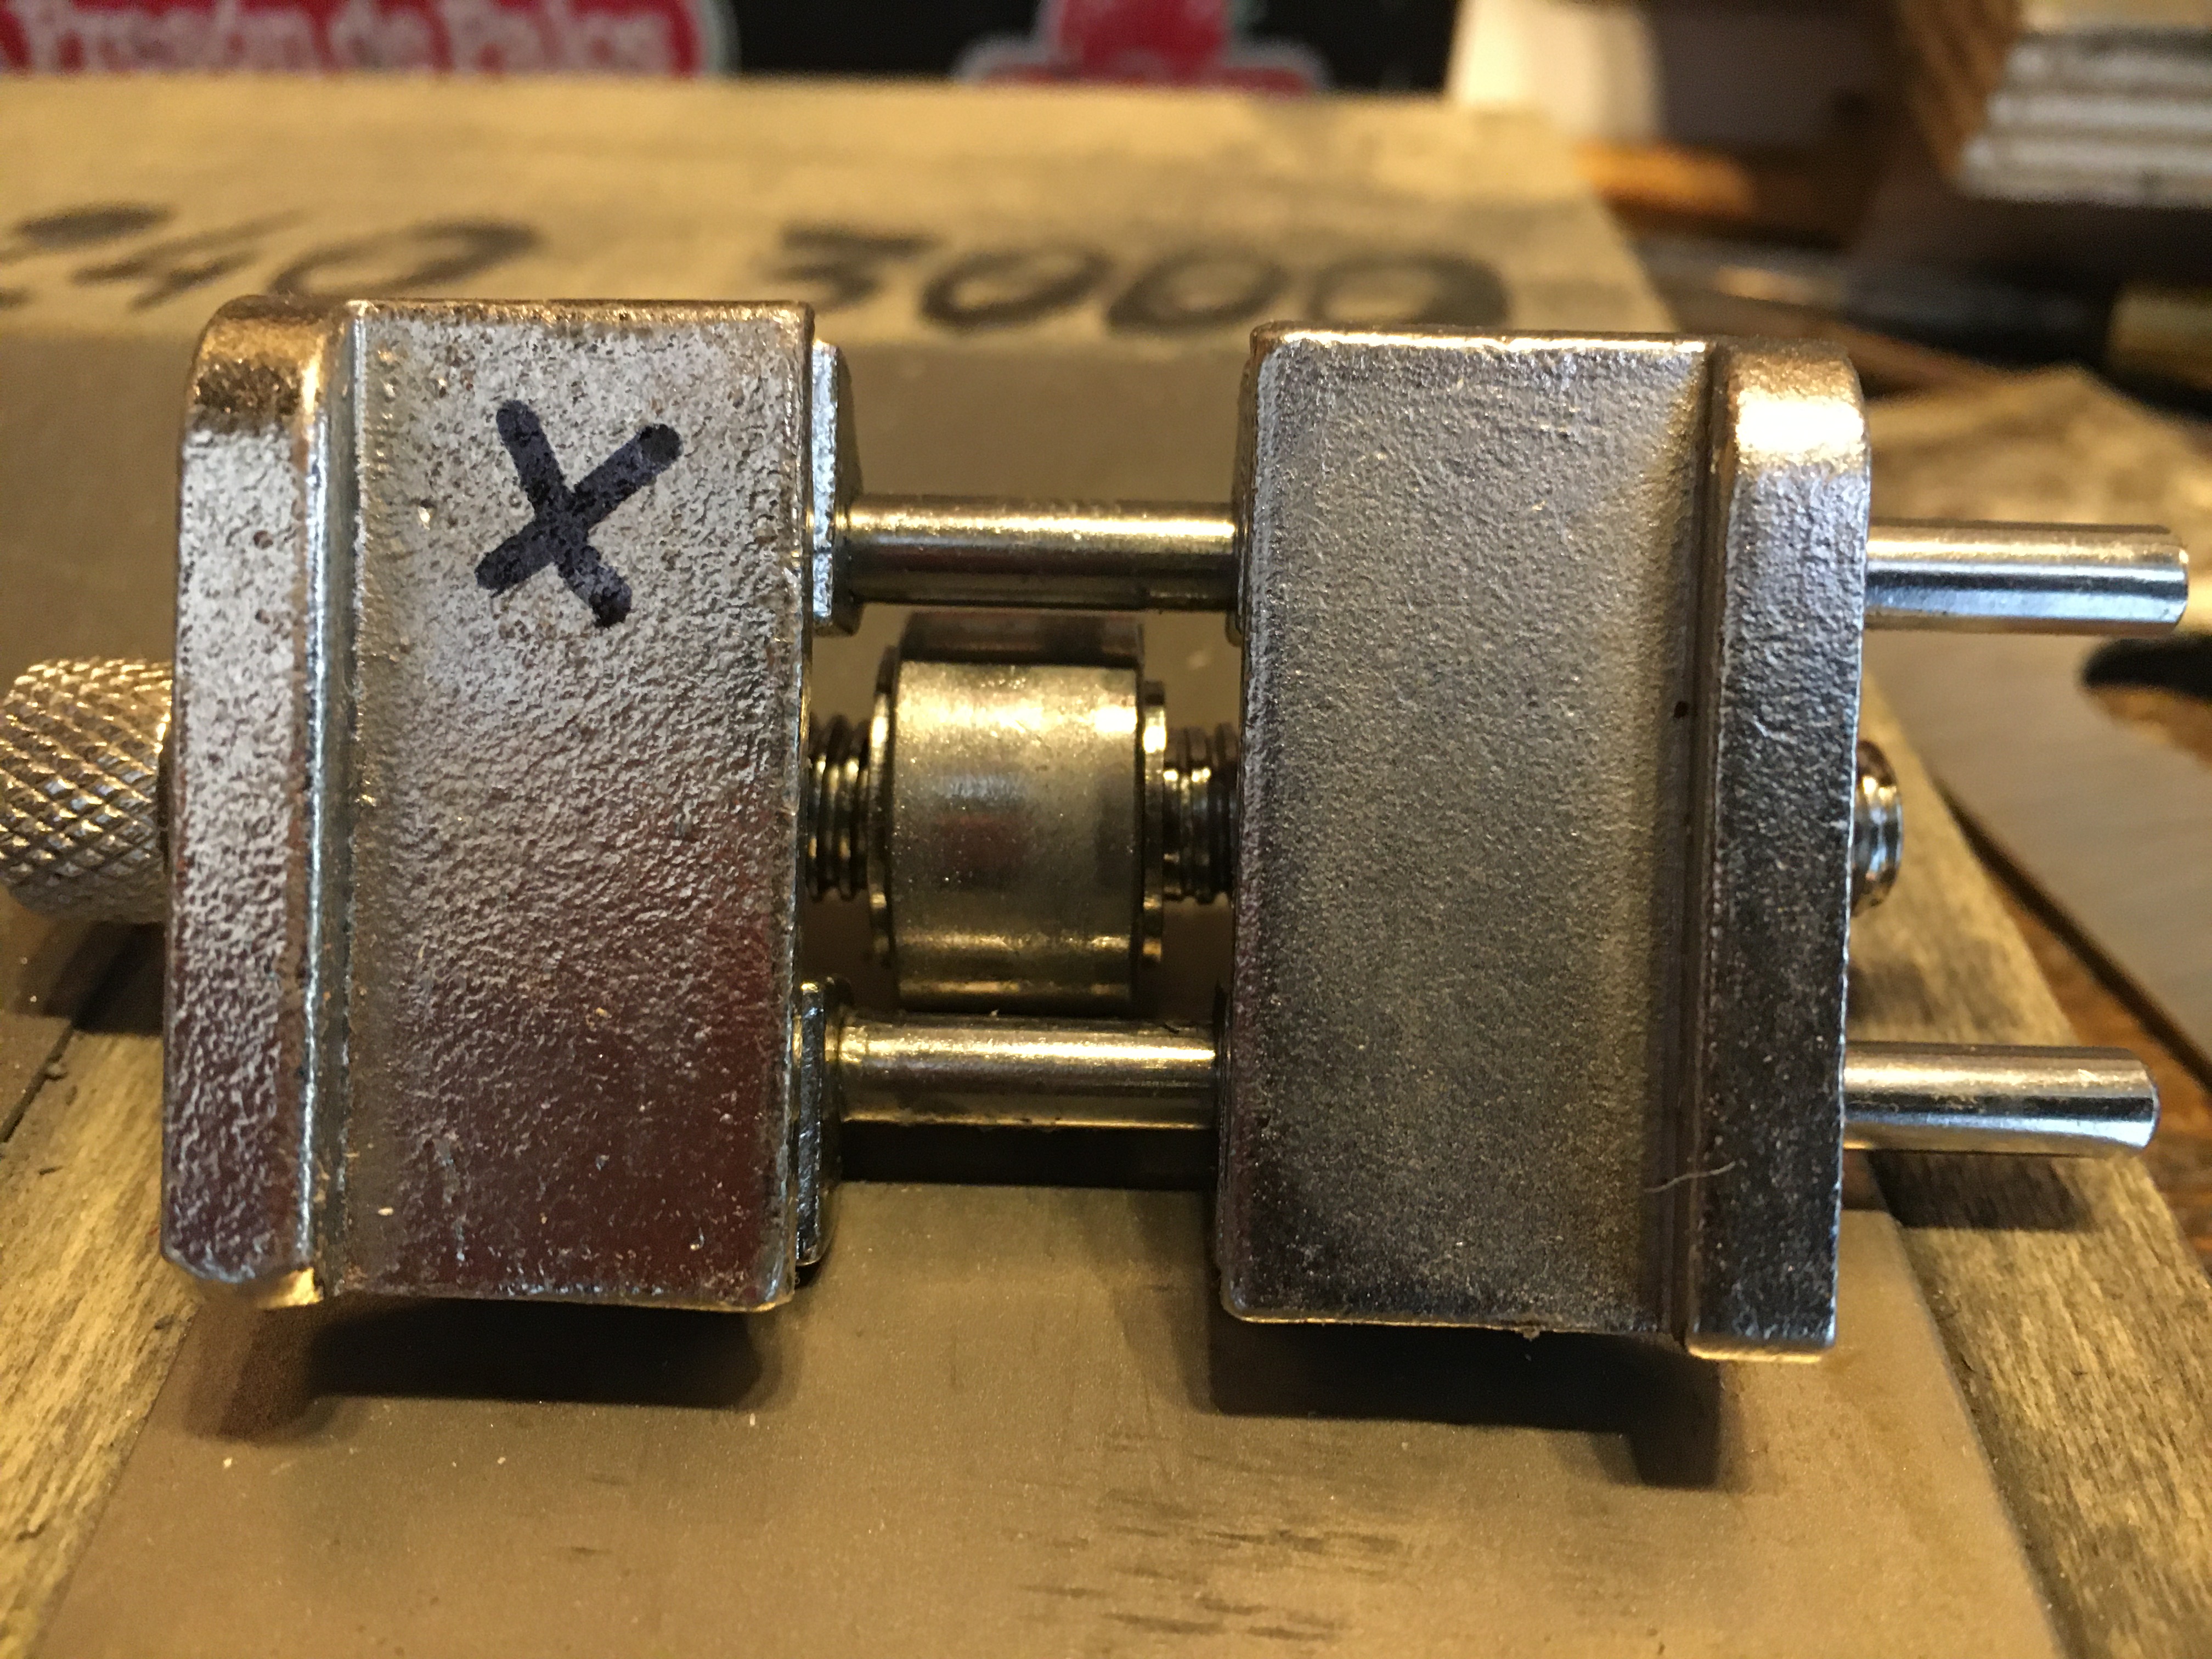 Lo stesso non ho potuto dire per i supporti superiori. La porzione centrale di una delle due ganasce risultava infatti essere leggermente più alta dell’altra (non saprei dire se a causa di un disallineamento delle ganasce o perchè costruita male la ganascia stessa) e questo in fase di serraggio faceva in modo che la lama, non poggiando parallelamente sui piani delle ganasce, si ponesse leggermente inclinata e quindi il filo del tagliente non venisse parallelo.
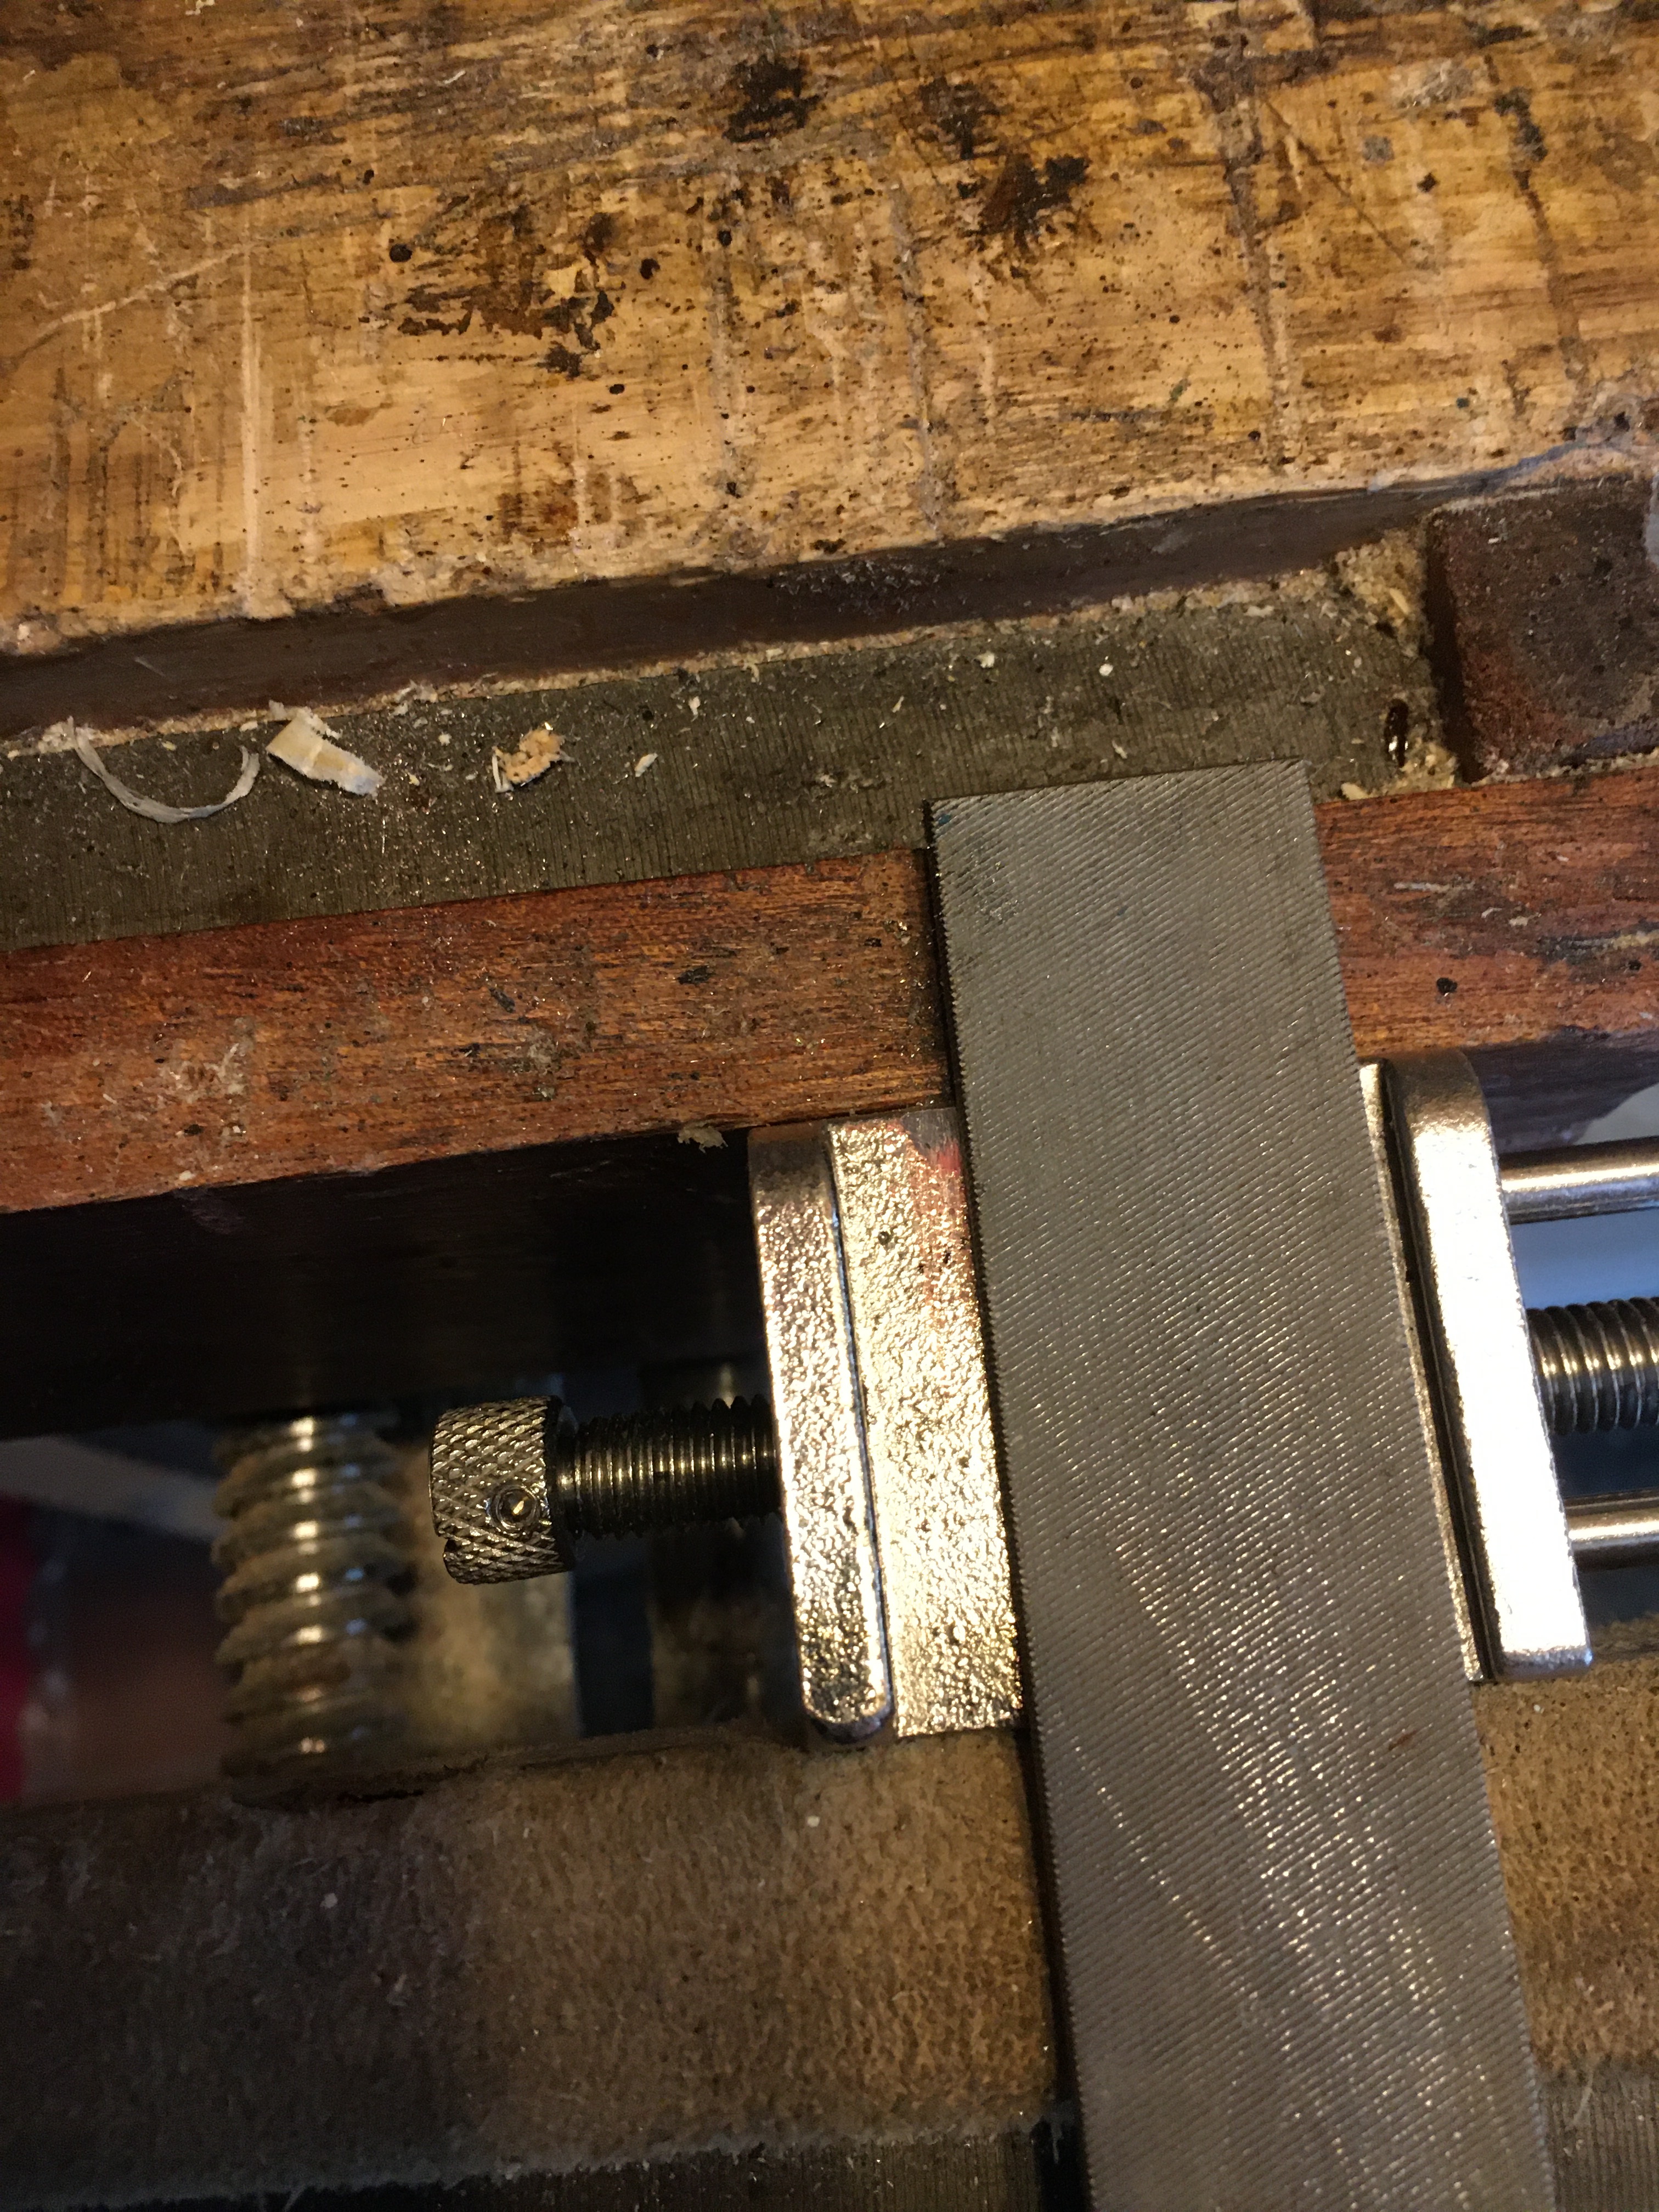
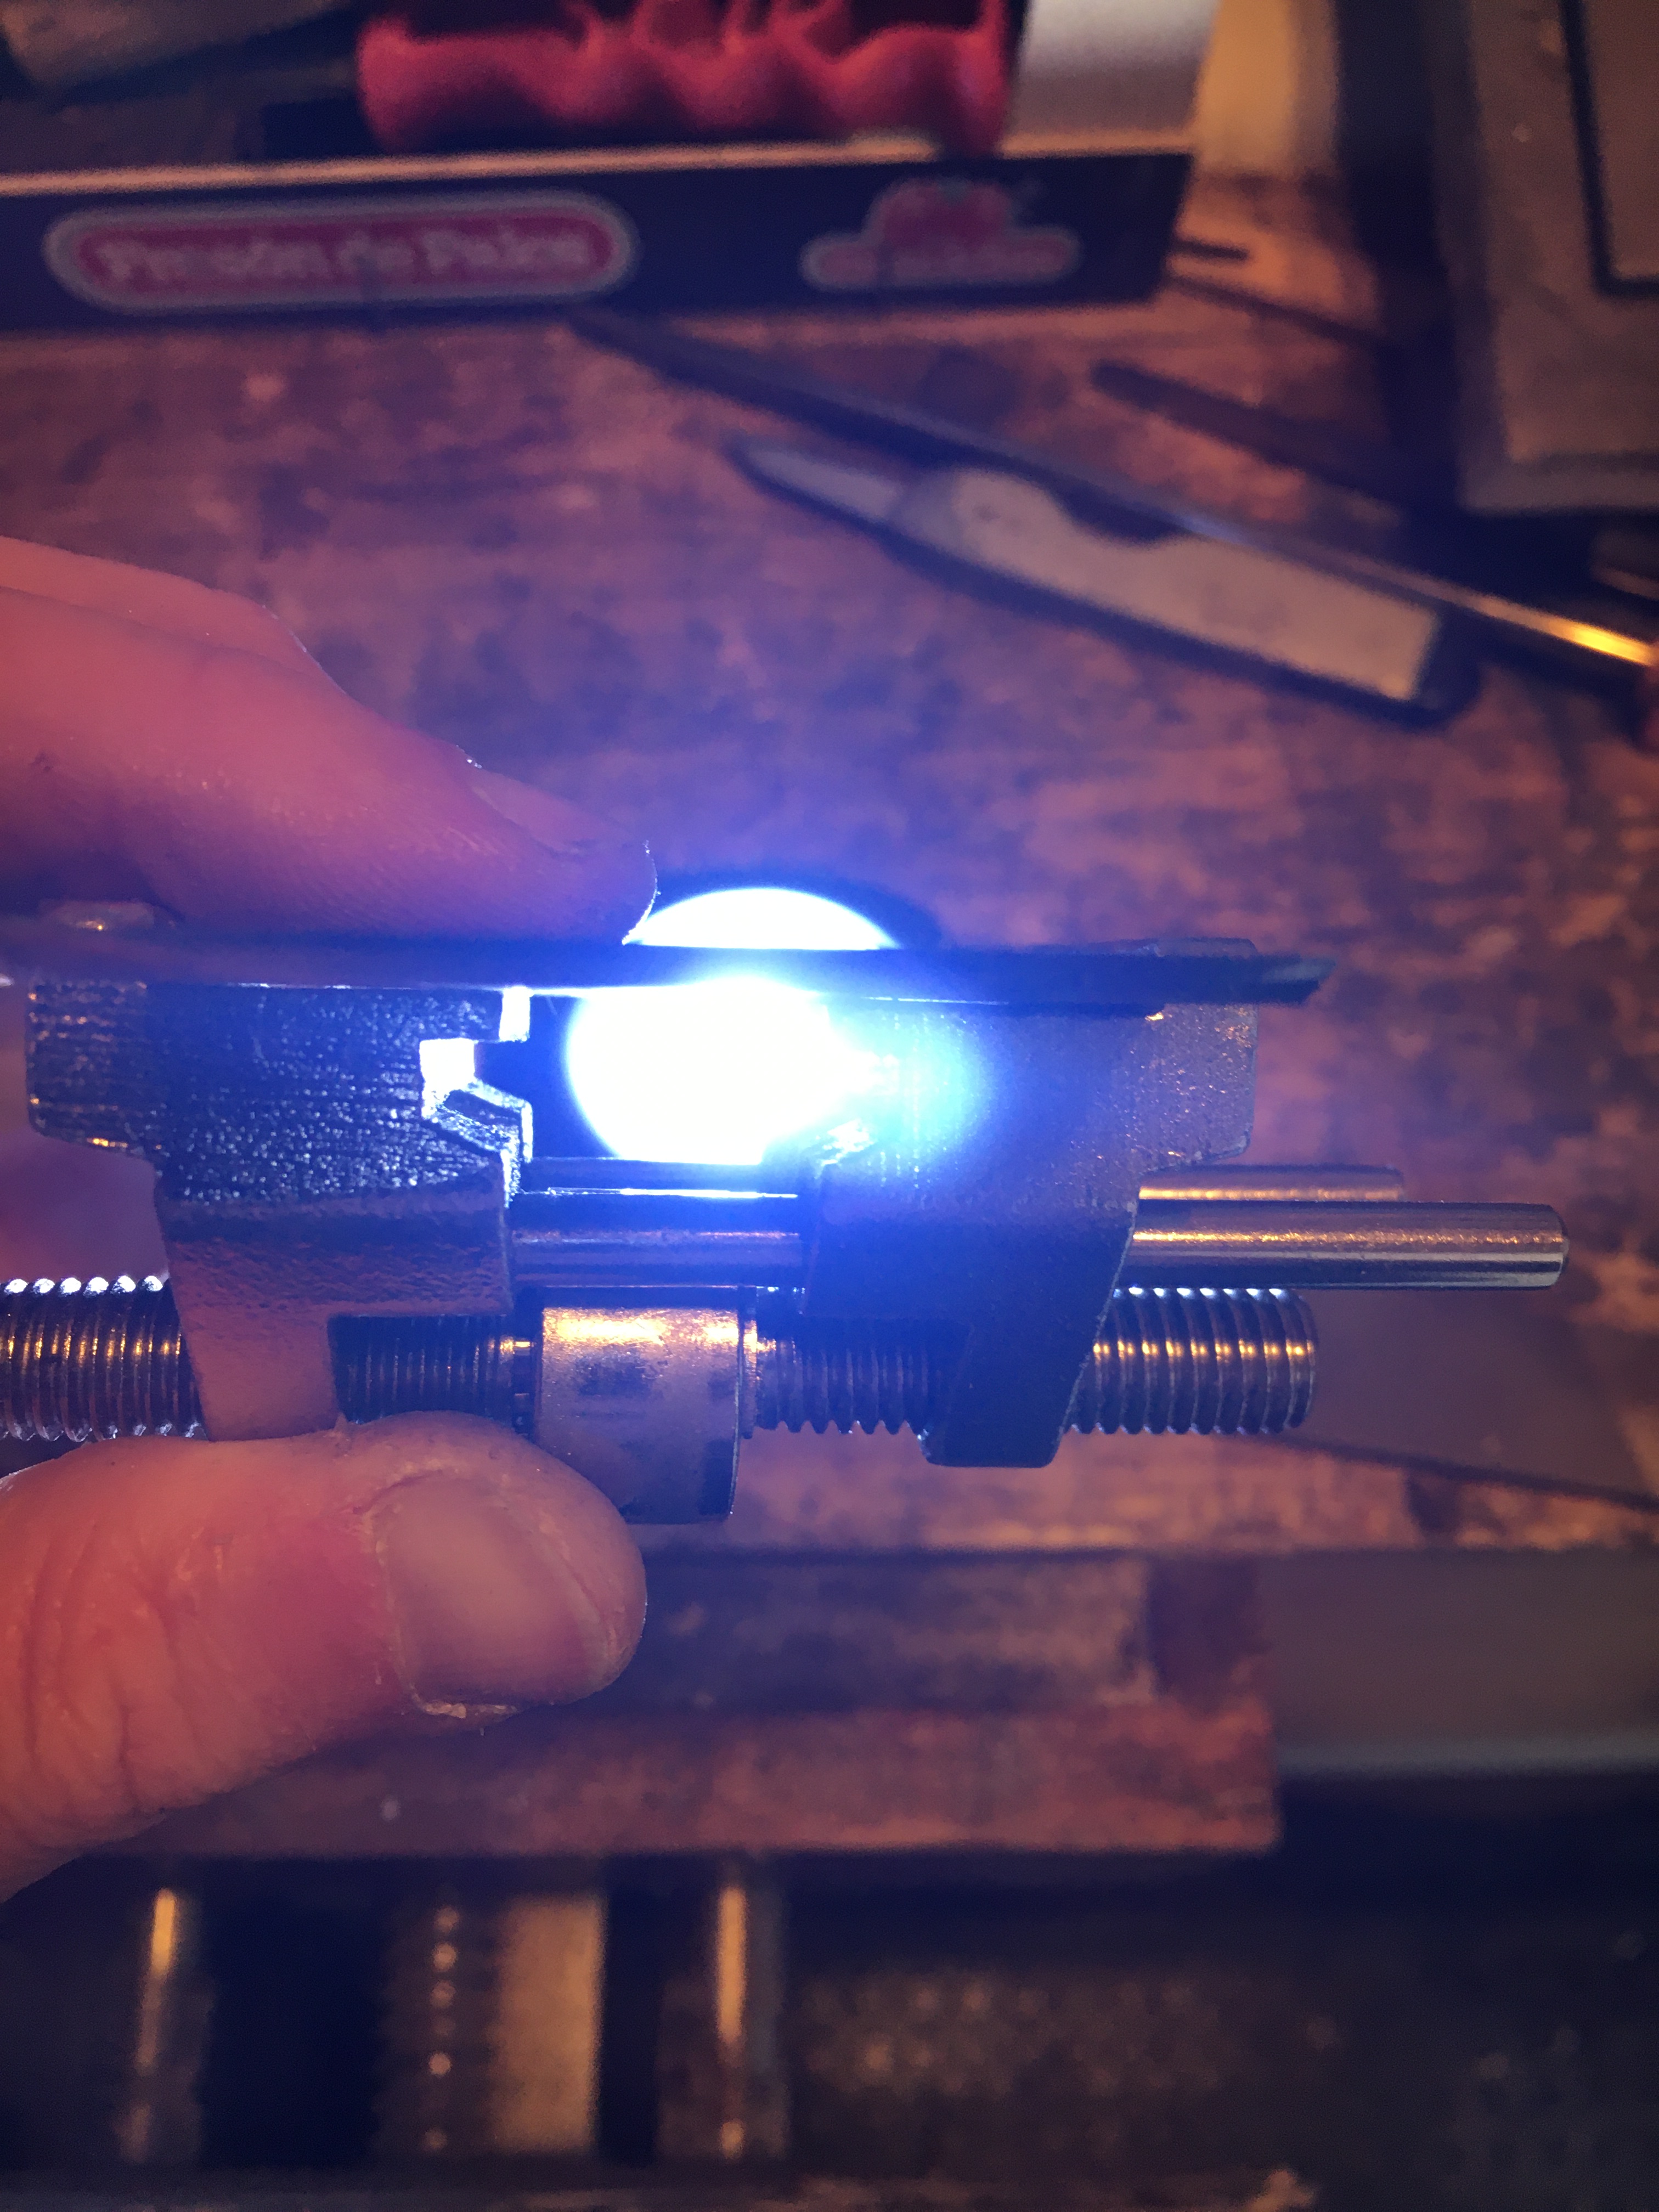
Con una lima sono intervenuto sulla ganascia più alta abbassandola al livello dell’altra e il problema sembra essersi risolto. Non so se tutte le guide Eclipse mostrano questo gioco o è stato un caso isolato del mio clone cinese. Fatto sta che probabilmente, su una guida di qualità, il problema non si sarebbe nemmeno presentato. Non posso esprimermi sulla durata di questa guida, essendo un acquisto piuttosto recente, ma messa alla prova con svariati cicli di affilatura posso dire che, pur essendo una guida super economica, risulta essere molto maneggevole, precisa e sicura.
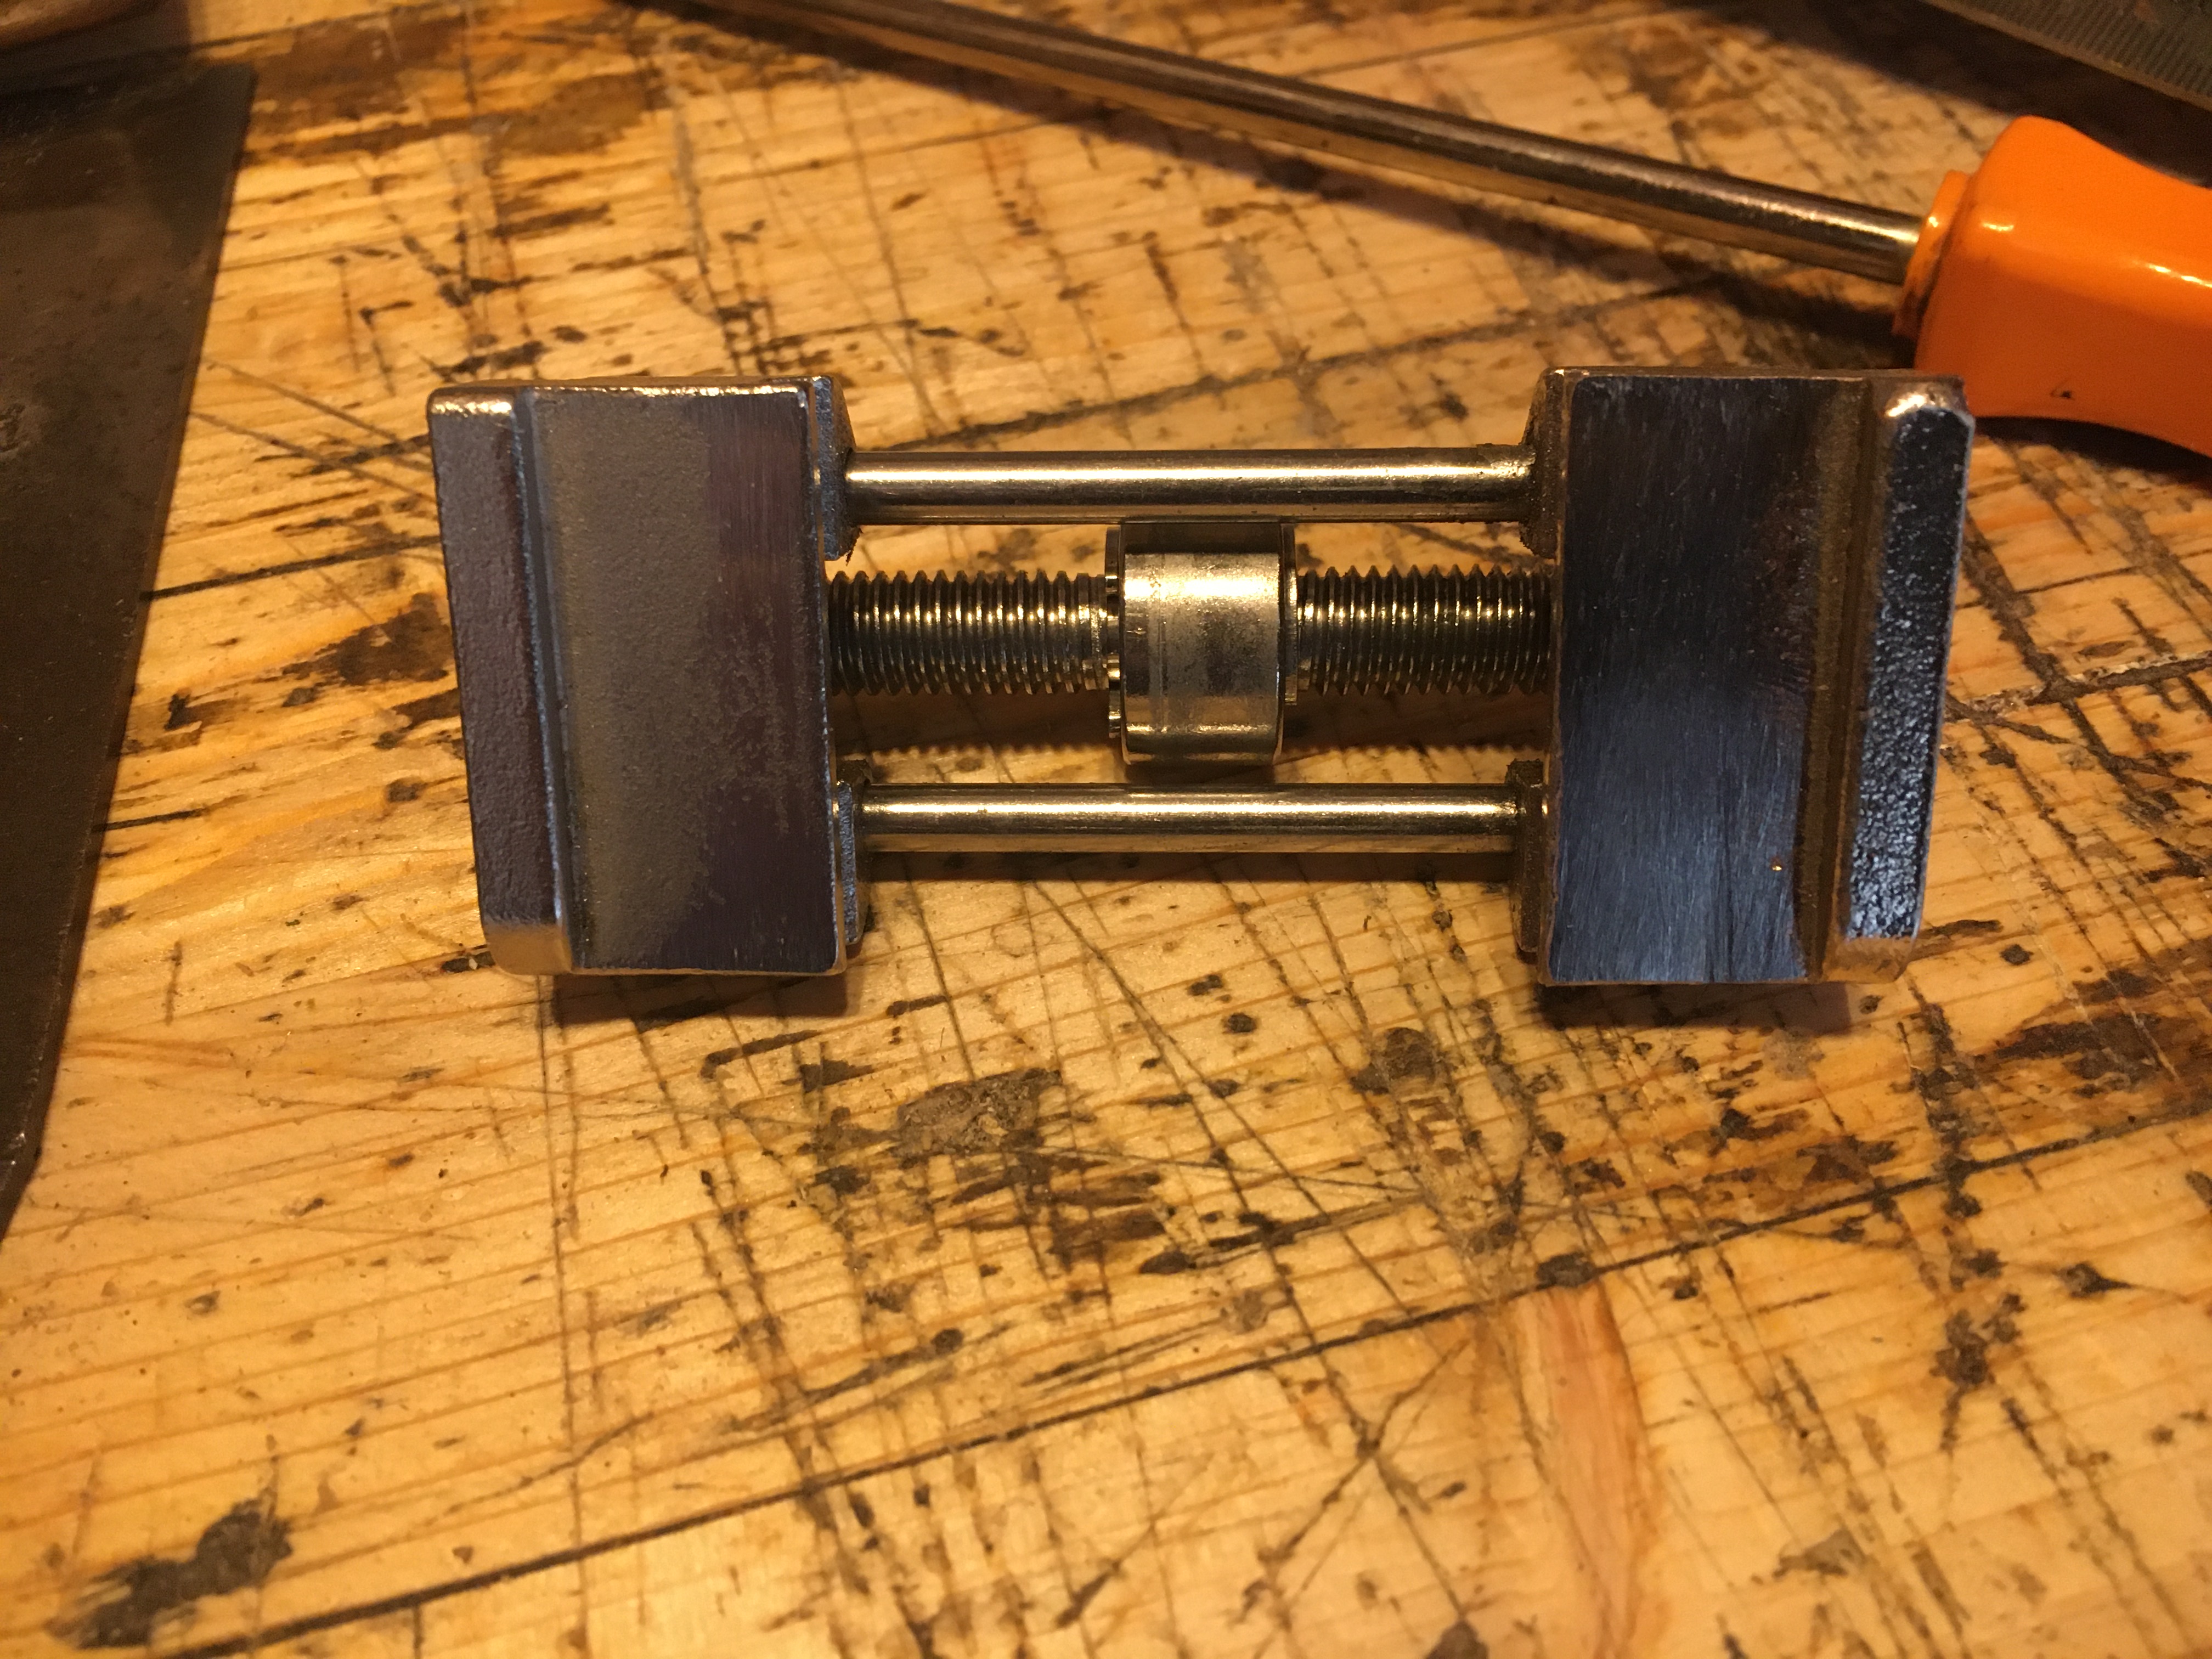

 Questa simil Eclipse riunisce in sé taluni aspetti positivi visti per le altre guide, come la possibilità di montare sia lame molto larghe (fino a circa 8 cm. sulle ganasce superiori ) che molto strette (fino a poco meno di 1 cm. nella scanalatura inferiore), il poterla comunque utilizzare in larghezza sulle comuni pietre, l’ottima forza di serraggio e la possibilità di poter tenere dritta e in squadra la lama. Ripeto di seguito il link dove è possibile acquistarla.
https://www.amazon.it/gp/aw/d/B087BQTZPK?psc=1&ref=ppx_pop_mob_b_asin_title
Tutte le guide che ho potuto utilizzare fanno onestamente il lavoro per le quali sono state progettate ed ognuna ha pregi e difetti che possono farla preferire rispetto ad altre. La guida Kell offre un serraggio della lama veramente ottimale ed è in grado di bloccare praticamente tutte le lame. Ma il fatto di avere le ruote laterali ne limita l’utilizzo sulle pietre larghe (si può ovviare con gli espedienti visti sopra) oltre ad un’oggettiva difficoltà di controllo sempre sulle lame molto larghe. Inoltre non è economica. La guida Stanley possiede un sistema di blocco superiore e inferiore ed è quindi adatta a quasi tutti i tipi di lama ma è difficile da mettere in squadra e il problema è che se non serrata a sufficienza la lama tende a spostarsi dalla posizione impostata. È però molto economica. La guida simil Eclipse invece sembra ovviare a tutti i difetti sopra evidenziati, ma bisogna essere preparati all’eventualità di dover intervenire su difetti di fabbricazione, come nel mio caso.
 Utilizzare la guida è sicuramente il modo migliore per avvicinarsi all’affilatura senza rimanere traumatizzati. Serve a prendere confidenza con le lame, a stare tranquilli che il bisello verrà sicuramente dritto ed il tagliente in squadra e ben affilato, senza la preoccupazione di dover mantenere la lama al giusto angolo di inclinazione per tutto il ciclo di affilatura. Anche utilizzando le guide è comunque sempre possibile premere leggermente di più sugli angoli della lama così da smussarli lievemente, pratica molto utile sulle lame delle pialle. In definitiva, con una guida ben settata, non resteremo mai delusi perché avremo sempre la garanzia di aver affilato bene e alla giusta angolazione. Aspetti negativi sono però il tempo necessario a preparare la lama nella guida (specialmente se vogliamo fare anche il bevel secondario) ed il fatto che anche con le guide non è sempre garantita la perfetta ripetibilità dello stesso tagliente ad ogni ciclo di affilatura.
 Ecco quindi che con il tempo e con l’esperienza potremmo voler provare ad affilare a mano libera, che per molti rimane il metodo di affilatura più veloce, efficace e di maggior soddisfazione, oltre al fatto che a mano libera possiamo variare l’esperienza di affilatura, come ad esempio inserire un camber. Personalmente non ho pregiudizi ad utilizzare l’uno o l’altro sistema di affilatura, ma la guida la reputo uno strumento insostituibile allorquando dobbiamo riprendere un tagliente storto o quando dobbiamo impostare un nuovo angolo di gradazione al tagliente o dobbiamo rifare completamente il bisello. In questi casi è fondamentale affilare con precisione alla giusta inclinazione. Se invece devo riprendere un tagliente che ha perso il filo allora preferisco andare a mano libera. Da neofita utilizzavo esclusivamente la guida, in seguito mi sono impratichito anche con l’affilatura a mano libera. Oggi utilizzo indifferentemente l’uno e l’altro sistema ma tengo separato ciò che affilo con la guida da quello che affilo a mano libera, così da non dover rifare sempre tutto il bisello. Quando ho fretta affilo però sempre a mano libera, seguendo il metodo di Paul Sellers, ovvero sulle pietre diamantate dalla 250 grit alla 1200 grit (ultimamente ho aggiunto anche la 3000 grit) quindi lappatura con pasta abrasiva a 12000 grit con lo strop. La finitura non viene mai perfettamente a specchio, ma la reputo più una questione estetica che non di vera utilità. Non saprei dire se affilando a mano libera ottengo un’affilatura migliore rispetto a quando utilizzo la guida. Esteticamente un bisello affilato con la guida si presenta perfettamente dritto (eventualmente si può aggiungere un bevel secondario), mentre affilato a mano libera mostra un camber, ovvero un bisello leggermente convesso che ricomprende quindi anche il bevel secondario, più o meno accentuato. Alla prova pratica però mi sembra che le lame lavorino comunque efficacemente (o comunque quanto basta a me per poter lavorare con soddisfazione) usando indifferentemente entrambi i metodi.
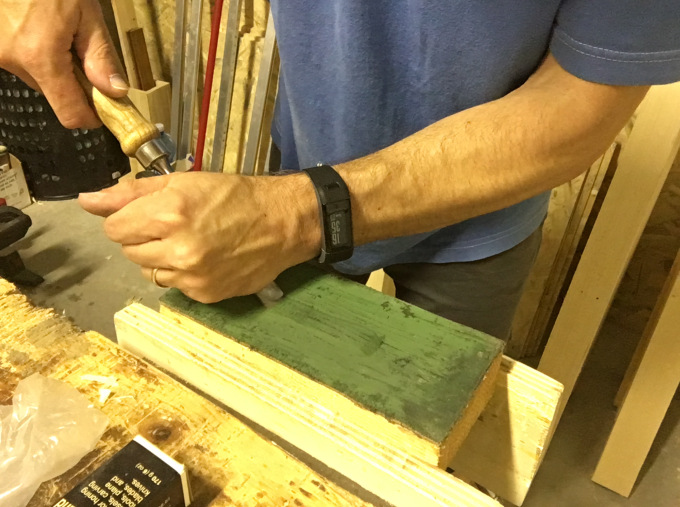
 Non uso mai la mola e anche per ripristinare un tagliente estremamente danneggiato uso sempre la carta abrasiva a grana molto aggressiva (60 – 80), applicata su una superficie piatta come una lastra di vetro o di granito. Per quanto riguarda l’acquisto di una guida, se non avete problemi a spendere qualcosa di più, consiglio di comprare una guida di buona qualità, come la Veritas MKII (o addirittura la nuova versione che sembra promettere bene) oppure la Kell n.2 LGE. In ogni caso, economica o meno, il consiglio è comunque quello di averne almeno una in dotazione perché è un ausilio fondamentale nel processo di affilatura. Se volete approfondire alcuni aspetti legati all’affilatura delle lame delle pialle e degli scalpelli vi rimando ai seguenti link.
L’ affilatura degli utensili manuali / Sharpening hand tools
Affilare gli scalpelli e le lame delle pialle / Sharpening chisels and plane irons
____________________________________________________________________________________________________
Sharpening has always been the subject of a passionate debate between different schools of thought. There are those who prefer to sharpen with guides and those freehand, those who prefer water and oil stones and those who prefer diamond stones or abrasive paper, those who are against the use of grinding wheels and those who cannot do without them (and among these those who use it dry and those who wet), those who want to achieve a mirror sharpening and those who do not consider it necessary, those who sharpen by also doing the micro bevel and those who sharpen the whole bevel at the same angle. And I could go on. Personally, after a few years of experience in sharpening and having experimented with the various possibilities, I have come to very precise conclusions which I will talk about at the end of the article. However, I would like to underline right now that what is good for me is not said is good for others and this is because the sharpening method is a purely personal matter, dictated by countless factors, such as the type of wood you work, the time to be able and willing to devote to sharpening, the quality that you want to obtain from the sharpening in relation to our real working needs and more. Woodworkers of the past only sharpened freehand, adjusting the angle of the tool simply by eye and the use of grinding wheels and oil stones were the norm for most of them. They hardly used guides and diamond stones were unknown. The time to devote to sharpening had to be the bare minimum, necessary to restore the functionality of the cutting edge and was part of the normal work. There was no time for useless technicalities, they had to pay attention to the concrete. Today, when the traditional woodworker has almost disappeared, things have changed. Sharpening has become more of an exercise in style for hobbyists than a real working necessity and this is precisely because those who work wood in the old way do it more for passion than for need. No longer having to work wood to live but simply for pleasure, this explains the proliferation of a substantial literature on the subject and the presence of thousands of articles and videos on the internet that aim to satisfy the curious greed of those who are constantly looking for the perfect cutting edge and of mirror polishing, dedicating interminable sharpening sessions to this purpose, often buying materials with a disproportionate cost but losing sight of what is really important, that is to obtain a blade sharp enough to allow you to return to work as soon as possible. After this brief introduction, let’s see specifically what sharpening guides are and how they work.
The sharpening guides are aids that allow you to keep the blade of a plane or chisel to a certain angle while sharpening them on stone or sandpaper. The first guide was the historic Eclipse no. 36 still available today on Ebay.co.uk or on specialized sites at relatively cheap prices (obviously excluding shipping costs), again when compared to other models of guides developed in recent years. On the market today it is possible to find many clones of the Eclipse No. 36 at very low prices, often Made in China. I can’t say about the quality of this type of guide but, wanting to test one anyway, I bought this https://www.amazon.it/gp/aw/d/B087BQTZPK?psc=1&ref=ppx_pop_mob_b_asin_title completely similar to Eclipse n. 36 and I compared it to the guide of the Stanley 14 – 050 (another economic guide) and to the Richard Kell guide n.2 LGE (medium-high range) using them for some time and drawing impressions of use of which I will tell soon. But first I would like to briefly mention two guides that I do not own but which are very popular among enthusiasts.
The first is the Veritas MKII guide on which I have read extremely positive reviews. On this guide it is possible to set a repeatable degree at each sharpening, thanks to the supplied measuring device on which a sliding stop is mounted which, locked to the desired gradation (the gradations shown are really many), allows not only to stop the blade at the right angle but to always resume the same angle in subsequent sharpening, without being forced to re sharpen the entire bevel. The gauge is also equipped with a useful parallel stop that allows you to insert the blade perfectly aligned and square with the guide. Once the two screws located above the guide have been tightened, simply loosen the locking screw of the registration jig and remove it. It is also possible to create the micro bevel without having to disassemble the blade, thanks to the special adjustment of the lower roller. It appears particularly solid, has a large support surface thanks to the dimensions of the lower brass roller, but it is certainly not cheap (it is placed between the medium-high range guides) and some people still complain of the laboriousness of setting the blade in the guide.
Just these days is the news of the release of a new guide under the Lee Valley Veritas brand that resembles, in its structure, an Eclipse. It is not yet present in Europe but the price seems affordable, at least for the moment, considering, however, that shipping costs must be added. Here are some links to purchase both the MKII and the new version. https://www.utensiliprofessionali.com/G307971.ml
The second model worthy of mention is the guide of the Lie Nielsen which stands in a much higher price range. It fully incorporates the characteristics and structure of the Eclipse n.36, therefore with a side locking system. It has the peculiarity of being able to replace the jaws so as to insert those most suitable for the blade to be sharpened (therefore also useful for special blades such as skewed blades, short blades, etc.). The operation is completely identical to the Eclipse which I will talk about shortly. Probably the high price is not justified but I have read good reviews on how it works and this is what counts in the end. Below I insert a link where you can buy it. https://www.axminstertools.com/lie-nielsen-honing-guide-101795
The sharpening guides are divided into two main categories: those with the side blade clamping system (type Eclipse) and those with the upper clamping system (type Veritas MKII). Some guides have an inclination indicator “as standard”, while others need a digital protractor so as to insert the blade at the desired angle or require the use of a special jig, which can be purchased with the guide or part, or self-made, as in my case. Each guide has specific characteristics that make it different from the others and for this reason the greatest difficulty is to learn how to correctly insert and tighten the plane blade or the chisel. Once you understand this step, it’s just a matter of putting it to work. The guide makes it move back and forth on the stone or on the abrasive paper, taking care to place and apply pressure with the index fingers near the cutting edge, always keeping it well adhered to the surface. We check from time to time that the cutting edge is straight and when we feel the burr has formed on the back, for its entire width, we move on to the finer grits, as seen in past posts dedicated to sharpening and to which I refer you at the end of the article.
Now let’s get to know more closely the guides I own and of which I can therefore speak with knowledge of the facts. The Richard Kell Guide No. 2 LGE is certainly not cheap but I can recommend it as it is built with excellent materials, it is extremely robust and very reliable in terms of blade clamping force. Version 2 has larger wheels than the previous version 1 and allows you to mount blades up to 7 cm. wide. The guide does not carry any incisions that can help to put the blade in the position corresponding to the desired angle.
The leaflet (written in italics and in English) is of little help except for the indication of the distances corresponding to the various degrees of inclination. The measurements shown on the package insert correspond to the distance between the support bar (the one closest to the cutting edge) and the cutting edge itself, resting the blade with the back on the two support bars.
To set the angle of the blade I found it useful to equip myself with a self-made jig. This jig mounts blocks fixed at various distances, corresponding to the various inclinations of the blade. Just place the wheels against the edge of the jig and slide the back of the blade on the guide support bars until the cutting edge hits the wooden block of the jig, finally tightening the blade in place, acting on the side wheel and always maintaining the back of the blade is well attached to the guide bars. Each guide has its own specific setting and therefore if we have more guides we will have to use more jigs, each dedicated to a single guide.
The guide has a perfect grip on the plane blades which, however, decreases considerably on the narrower chisels. It still manages to keep the blade in position very well. In any case, it is good practice to always tighten the side wheel well to prevent the blade from slacking during sharpening and above all, always make sure that the back is well adherent to the support bars of the guide. If the blade were inserted at an angle, the cutting edge would be twisted.
The blade engages in such a way that it is under the support bars during sharpening. During the sharpening movement, the setting of the fingers on the blade is slightly hindered both by the encumbrance of the horizontal bars and by the objective size of the wheels themselves, forcing a position that is not exactly comfortable. The sometimes long sharpening sessions could become quite tiring. I also find some difficulties in locking the narrow blades as the two wheels inevitably tighten the fingers, as well as the blade itself. On the other hand, no problem for medium-sized blades.
On very large blades, such as for the Stanley 7, sharpening becomes problematic as there is no support for the fingers of the right (or left, according on how we set the guide) hand, because the entire length of the bars is occupied by the tightening of the blade. Another big limitation is in the fact that, by tightening laterally by means of the two large wheels, the overall width exceeds the dimensions of common sharpening stones when we want to tighten particularly wide blades. In these cases, in fact, the wheels have very little lateral support on the stone. The problem can be solved by placing two elevations on the sides of the stone that bring the side wheels to the same level. Alternatively we could sharpen using the stone for its width instead of length, but forcing ourselves to shorter passes. Below I insert a link where you can buy it. https://www.fine-tools.com/richardkellhoningguide.html
The Stanley 14 – 050 guide (now called 0 – 16 – 050) is the first I bought and it is the one I have used for the longest time until now. It was sold in a kit that also included a sharpening stone (double-grained, one for roughing and one for finishing) and a vial of lubricating oil. Honestly I have never used the oil stone, having immediately switched to diamond stones, but I have read on some sites that they are not of good quality. On the other hand, the kit is really cheap and you can’t expect much. I do not feel like I can fully share the many negative reviews I have read online, evaluating the guide as a whole. It is true that it highlights some non-negligible problems that we will see shortly. The main body is made of metal but the two wheels where the guide slides are made of plastic and this could initially make you turn up your nose. Personally, however, I have never had any particular problems during use and these wheels have always worked properly, without breakages or jams of any kind.
In the lower part of the guide there is a bar, which is used to tighten the blades, on which the three main gradations used in woodworking are indicated in relief and in correspondence with which there are measurements that indicate how much the blade must protrude with respect to the upper part of the guide to obtain the corresponding gradation, all made very intuitive also thanks to the miniature of the same stylized guide embossed on the body of the guide. The distances indicated are: 25 mm = 25 degrees, 12.5 mm = 30 degrees, 4 mm = 35 degrees.
The same measurements can also be found on the plastic tab on the back of the guide which, if overturned, reveals notches corresponding to the three inclinations indicated above (25, 30 and 35 degrees).
For installation, simply loosen the two knurled wheels, located on the back of the guide and which control the action of two threaded bars, so as to make the lower blade clamping plate back, then insert the blade until the cutting edge correspond to the notch (with folded tongue) that indicates the desired inclination and finally tighten the two knurled wheels. The lower bar pushed forward by the threaded rods will tighten the blade against the guide body. The guide is capable of accommodating blades up to 6.5 cm. wide and by mounting the wheels in the lower part of the guide instead of laterally it can easily be used on all normal sharpening stones, the real width of the blade being the only limit.
Unfortunately it does not have a great clamping force and this can be a problem, since the blade could move (however almost imperceptibly and always if you practice a lot of force) from the initial position, with the risk of losing alignment and with the final result of a misaligned cutting edge. Furthermore, during the assembly phase of the blade in the guide, it is difficult to square the blade with respect to the guide (especially the chisels and narrow blades), even if some incisions have been made on the guide to be taken as a reference for the alignment of the blade , or hold the blade steady while trying to squeeze the two knurled wheels tightly.
In this case you really feel the lack of a fence on which the blade can rest, so as to remain straight and stationary in position, even if it is eventually possible to approach the whole blade on its side, provided that the width of the blade still allows it to be tightened.. In conclusion, I can say that it is a fair guide which, although economical, is reliable, robust and durable over time, but however it requires some precautions to avoid misalignments. I insert below a link where you can buy it. https://www.manomano.it/stones-for-affilare-1304?model_id=2002528&g=1&referer_id=689880&gclid=EAIaIQobChMIyrq0-IyU8AIVA7d3Ch0Fjgb2EAQYASABEgK5kfD_BwE
The guide like Eclipse # 36 is structurally conceived as the Eclipse # 36. In fact, it consists of a metal body formed by two parts (side jaws) controlled by a knurled wheel that acts on a threaded bar that makes the jaws slide on two bars. The blade is inserted, resting it on the planes of the two jaws and tightened by means of the threaded screw in whose head a slotted impression is obtained for the insertion of a screwdriver to tighten.
For narrower chisels it is possible to insert them in the special grooves obtained in the lower position in the jaws themselves. For the setting to the desired inclination, what has been said above for the Kell guide applies, that is, you must use jigs or measure the distance with a ruler.
Being a mirror model of the Eclipse we can refer to the instruction manual of that guide, where the protrusions from the edge of the jaws are indicated, to obtain sharpening both at 25 degrees and at 30 degrees. On some past Eclipse # 36 models the additional groove for tightening the narrower blades was already present and this valuable feature has been retained on this model. The wheel of the guide is made of steel (even if on the package it is depicted in brass and I had specifically requested the brass one) and it runs well.
The guide, as mentioned above, arrives without any instructions except for some reference on the packaging, unfortunately in Chinese. No indication engraved on the body of the guide. The lower grooves, shaped to receive the narrowest chisels, are precise and close well.
I couldn’t say the same for the top mounts. The central portion of one of the two jaws was in fact slightly higher than the other (I don’t know if it was due to a misalignment of the jaws or because the jaw itself was badly constructed) and this during the tightening phase meant that the blade, not resting parallel on the planes of the jaws, is placed slightly inclined and therefore the edge of the cutting edge is not parallel.
With a file I filed on the highest jaw lowering it to the level of the other and the problem seems to have been solved. I don’t know if all the Eclipse guides show this game or it was an isolated case of my Chinese clone. The fact is that probably, on a quality guide, the problem would not even arise. I cannot comment on the duration of this guide, being a rather recent purchase, but put to the test with several sharpening cycles I can say that, despite being a super cheap guide, it turns out to be very manageable, precise and safe.
This Eclipse-like system brings together some positive aspects seen for the other guides, such as the possibility of mounting both very wide blades (up to about 8 cm. on the upper jaws) and very narrow (up to a little less than 1 cm. in the lower groove. ), being able to use it in width on common stones, the excellent clamping force and the possibility of being able to keep the blade straight and square. Check the link mentioned above where you can buy it.
All the guides that I have been able to use honestly do the job for which they were designed and each has strengths and weaknesses that can make it preferable over others. The Kell guide offers truly optimal blade clamping and is capable of locking virtually all blades. But the fact of having the side wheels limits their use on large stones (this can be remedied with the expedients seen above) as well as an objective difficulty of control always on very wide blades. It is also not cheap. The Stanley guide has an upper and lower locking system and is therefore suitable for almost all types of blades but it is difficult to square and the problem is that if not tightened sufficiently the blade tends to move from the set position. However, it is very cheap. The Eclipse-like guide instead seems to obviate all the defects highlighted above, but you must be prepared for the eventuality of having to intervene on manufacturing defects, as in my case.
Using the guide is certainly the best way to approach sharpening without being traumatized. It serves to become familiar with the blades, to rest assured that the bevel will surely be straight and the cutting edge square and well sharpened, without the worry of having to keep the blade at the right angle of inclination throughout the sharpening cycle. Even using the guides it is still possible to press slightly more on the corners of the blade so as to slightly bevel them, a very useful practice on plane blades. Ultimately, with a well-set guide, we will never be disappointed because we will always have the guarantee of having sharpened well and at the right angle. Negative aspects, however, are the time needed to prepare the blade in the guide (especially if we also want to do the secondary bevel) and the fact that even with guides the perfect repeatability of the same cutting edge is not always guaranteed at each sharpening cycle.
So with time and experience we may want to try to sharpen freehand, which for many remains the fastest, most effective and most satisfying method of sharpening, in addition to the fact that freehand we can vary the experience of sharpening, such as inserting a camber. Personally I am not prejudiced in using one or the other sharpening system, but I consider it an irreplaceable tool when we have to pick up a crooked cutting edge or when we have to set a new gradation angle to the cutting edge or we have to completely restablish the bevel. In these cases it is essential to sharpen with precision at the right angle. If, on the other hand, I have to pick up a cutting edge that has lost its edge then I prefer to go freehand. As a beginner I used only the guide, later I also got acquainted with freehand sharpening. Today I use both systems indifferently but I keep separate what I sharpen with the guide from what I sharpen freehand, so as not to always have to restablish the whole bevel. When I’m in a hurry, however, I always sharpen freehand, following the Paul Sellers method, on diamond stones from 250 grit to 1200 grit (lately I also added 3000 grit) then lapping with abrasive paste at 12000 grit with the strop. The finish is never perfectly mirrored, but I consider it more an aesthetic question than not of real use. I don’t know if I get a better sharpening when sharpening freehand than when I use the guide. Aesthetically, a sharpened bevel with the guide is perfectly straight (possibly a secondary bevel can be added), while when sharpened freehand it shows a camber, or a slightly convex bevel that therefore also includes the secondary bevel, more or less accentuated. In the practical test, however, it seems to me that the blades still work effectively (or at least enough for me to work with satisfaction) using both methods indifferently.
I never use the grinding wheel and also to restore an extremely damaged edge I always use very aggressive grit sandpaper (60 – 80), applied to a flat surface such as a glass or granite plate. As for the purchase of a guide, if you do not have problems spending a little more, I recommend buying a good quality guide, such as the Veritas MKII (or even the new version that seems to be promising) or the Kell n.2 LGE. In any case, economic or not, the advice is to have at least one supplied because it is a fundamental aid in the sharpening process. If you want to learn more about some aspects related to the sharpening of plane blades and chisels, I refer you to the links above.
Alcune foto ed immagini sono state tratte da siti internet esterni / libri per soli scopi informativo didattici e senza fini di lucro. Se si è proprietari delle immagini e se ne desidera la rimozione si prega di segnalarlo nella sezione contatti.

Lascia un commento