
PIALLE IN LEGNO. PIALLE PER MODANATURE / WOODEN PLANES. MOULDING PLANES
English translation at the end of the article Introduzione: storia e generalità.
Sebbene non vi siamo certezze sulle sue origini si reputa che la pialla in legno fosse già conosciuta ed utilizzata ai tempi degli antichi egizi e della civiltà greca. Vi è invece sicura testimonianza che queste pialle venissero costruite ed utilizzate dagli antichi romani. Si trattava di semplici pialle in legno ma anche di alcune tipologie di pialle più complesse, come quelle per modanatura. Purtroppo, il crollo dell’Impero Romano prima ed il Medioevo poi trascineranno nell’oscurità questo tipo di utensile. Ma intorno al 1500, complice il gusto rinascimentale, le pialle in legno risorgono da secoli di oblio.
Sarà tra il 1700 ed il 1850 che le pialle in legno vivranno la loro massima espansione. Si trattò perlopiù di una produzione fatta da artigiani per gli artigiani, fiorente soprattutto in Stati del Nord Europa come Inghilterra e Olanda. Successivamente, intorno al 1850 e a seguito dello sviluppo industriale, gli USA invasero il mercato con le prime pialle in metallo, che di fatto andranno a sostituire quelle in legno. La produzione si estenderà poi in tutta Europa (soprattutto in Inghilterra) sino al 1960, anno dal quale può dirsi cominciare il declino della fabbricazione di questo tipo di utensile.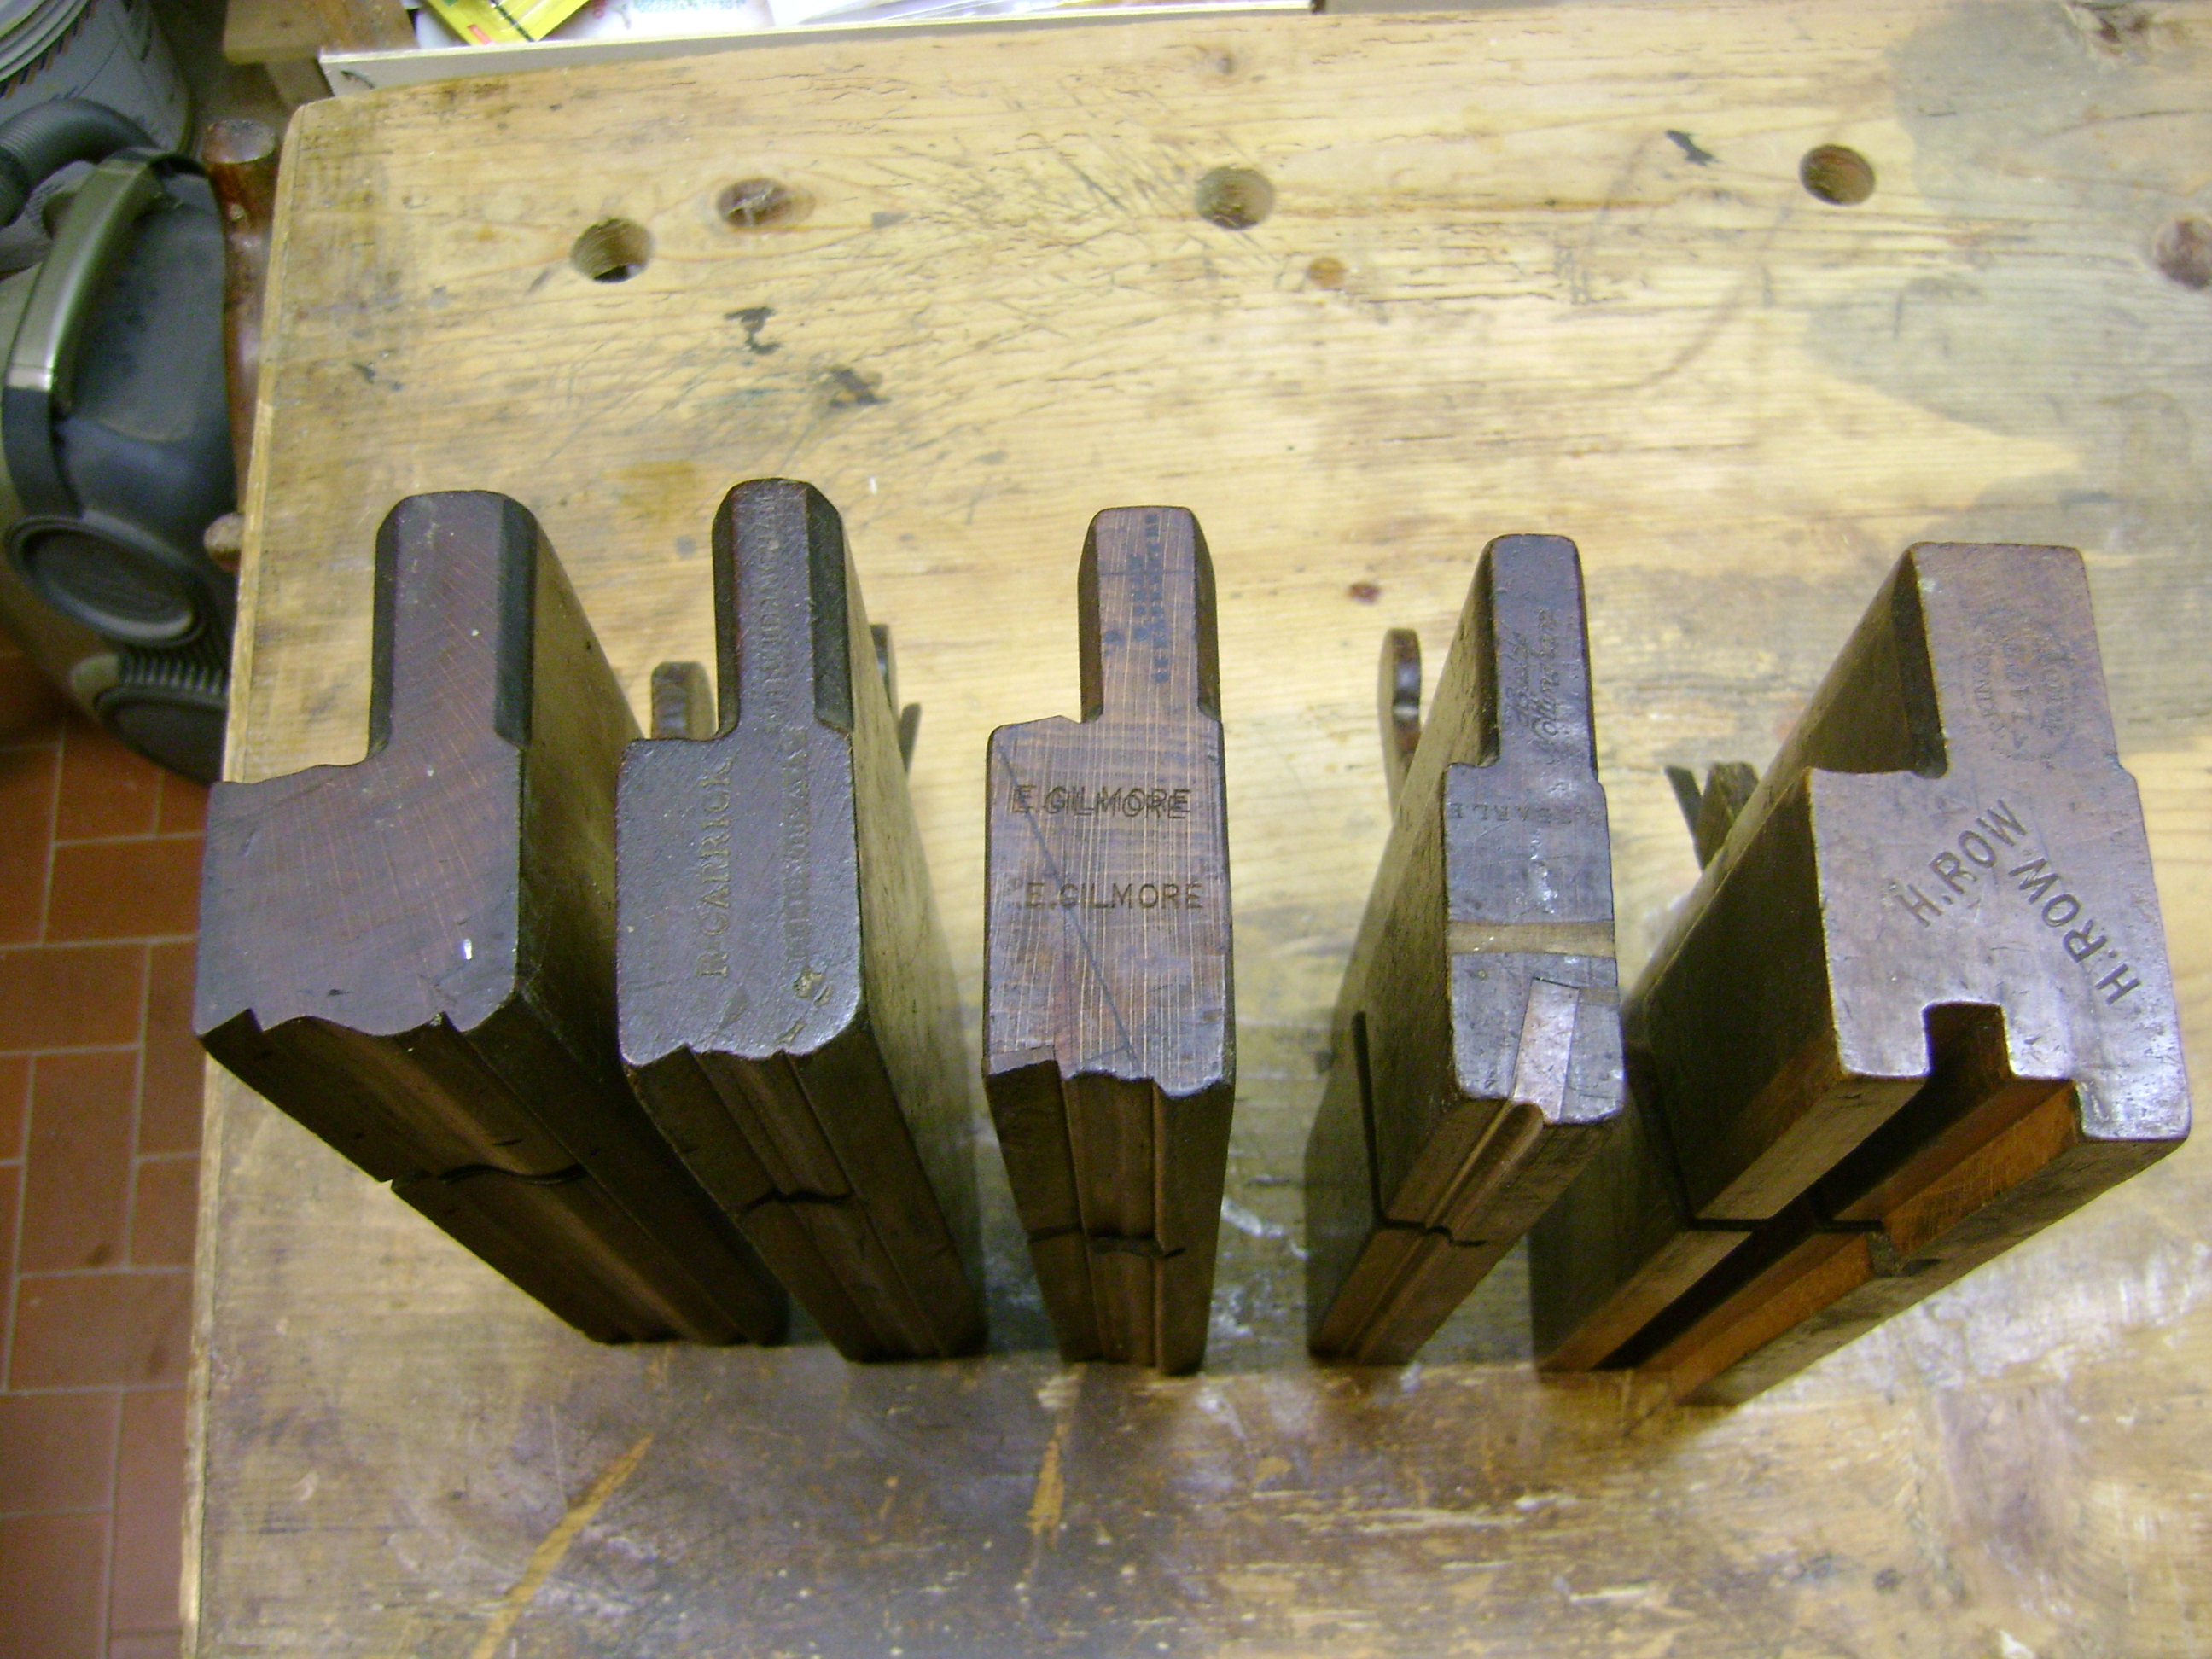 Da questa breve introduzione si capisce che la storia delle pialle è quasi interamente fatta da pialle in legno. Questo perché anche in tempi antichi era relativamente semplice costruirne una. Traendo spunto dal funzionamento degli scalpelli era solo questione di infilare una lama affilata in un’apertura opportunamente sagomata in un pezzo di legno duro e mantenerla ferma in posizione con un cuneo di legno. Questa forma si è mantenuta pressochè inalterata sino ai giorni nostri. Sarebbe impossibile condensare in un unico articolo l’enorme mole di nozioni che riguardano lo sterminato universo delle pialle in legno.
 È preferibile quindi parlarne poco alla volta, magari accostando alcune nozioni di base, comuni a tutte le pialle in legno, all’illustrazione specifica di un particolare tipo di pialla. Ecco perché mi sono ripromesso di scrivere presto un articolo dedicato allo sbozzino, una pialla in legno estremamente utile nella lavorazione manuale del legno grezzo e poi anche delle sponderuole e degli incorsatoi in legno. In questo articolo vorrei però parlare di un’altra categorie di pialle, alle quali ho accennato nella prefazione, ovvero delle pialle per modanatura o sagomatura (moulding planes, molding in the USA).
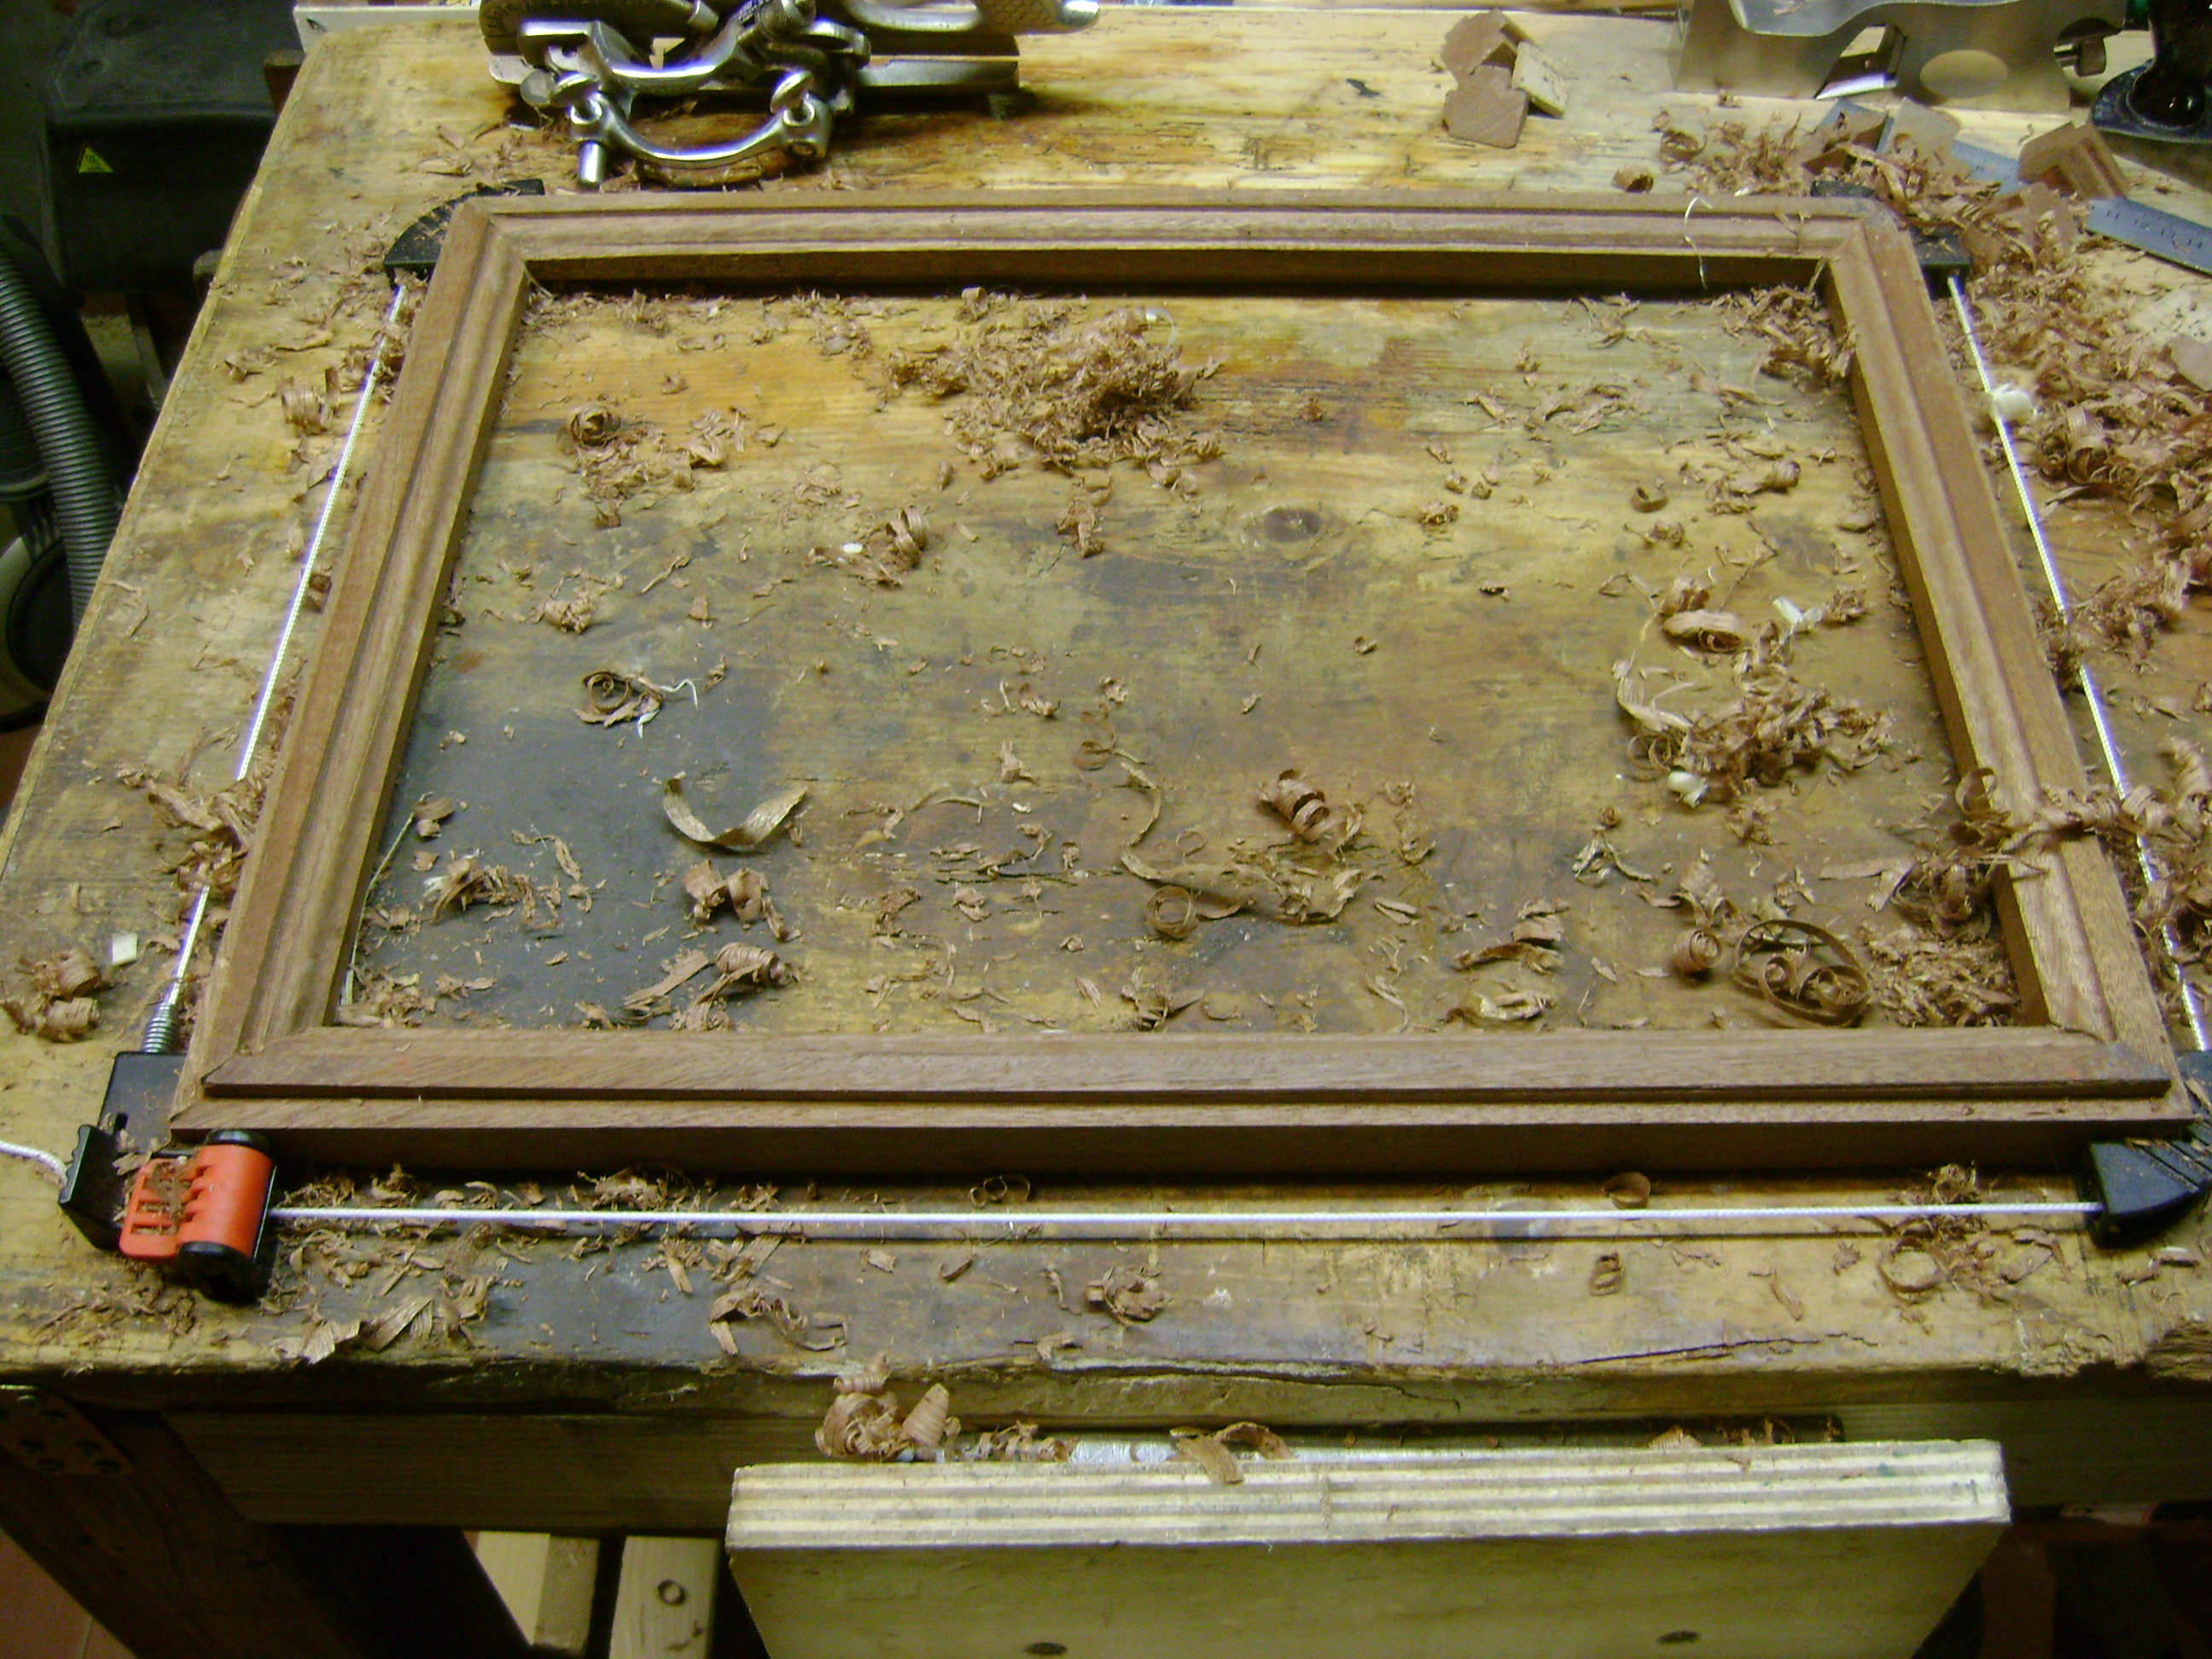
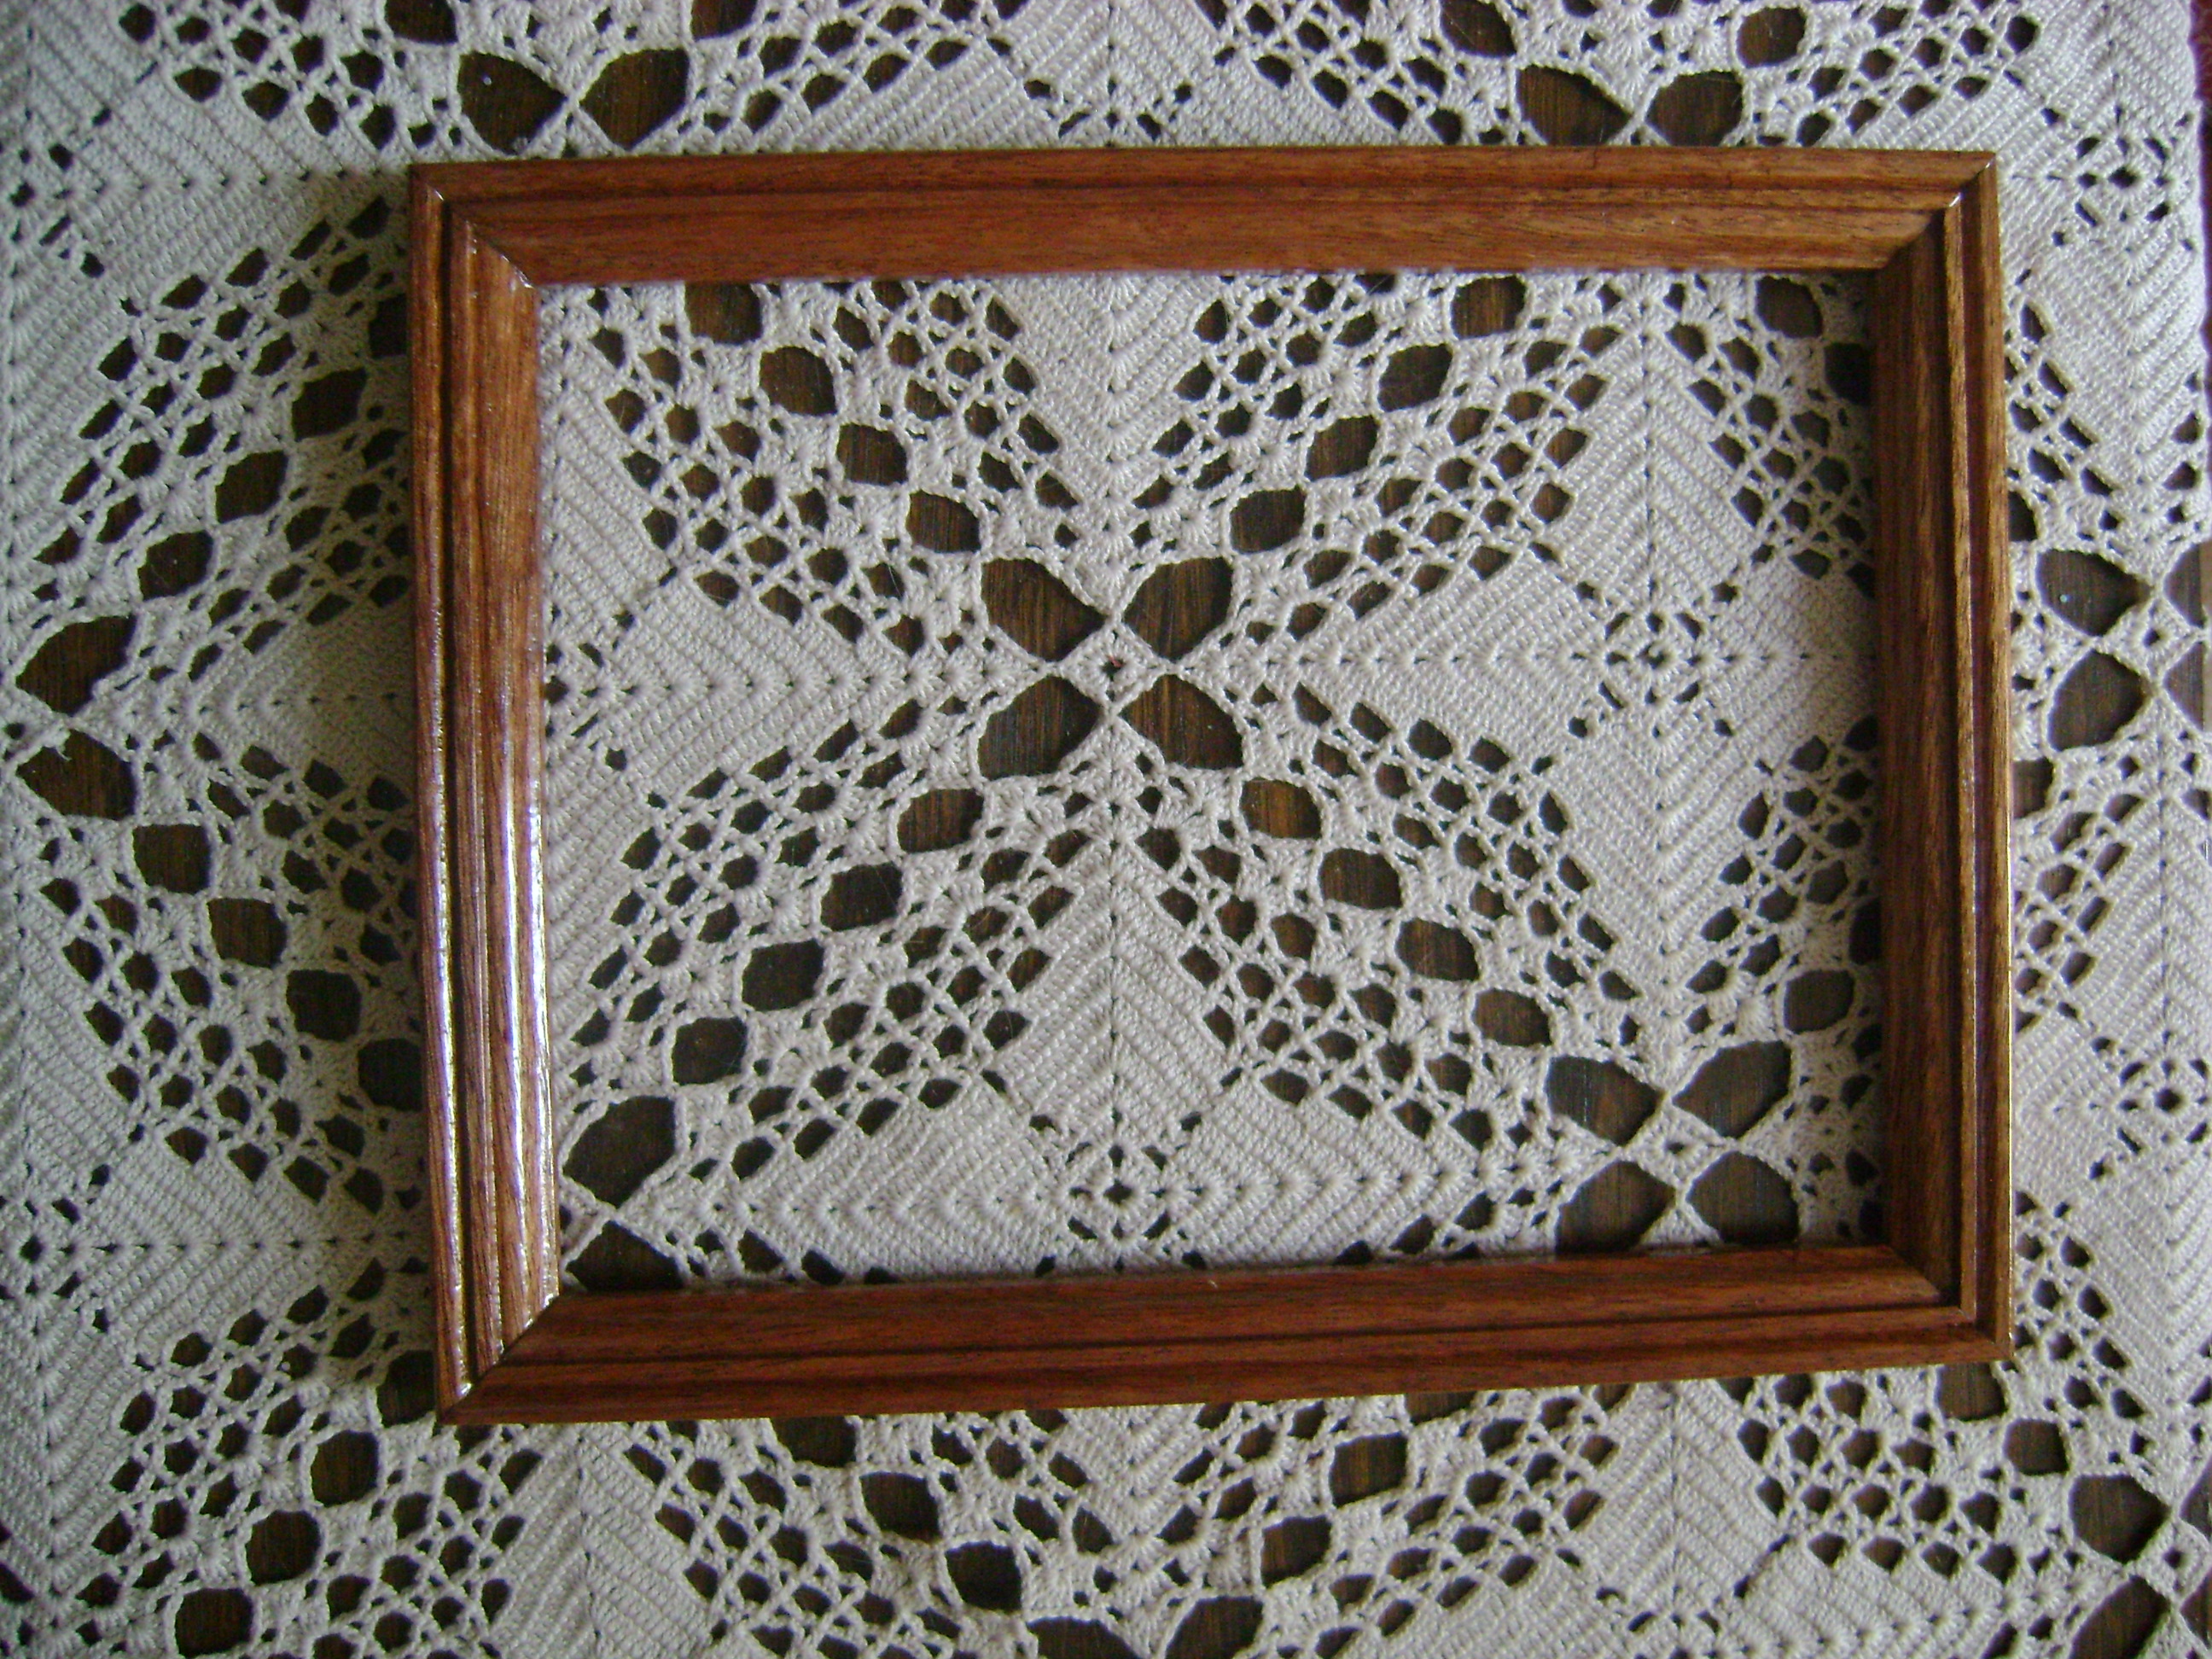 Come si può intuire dal nome stesso questo tipo di pialle sono specifiche per creare profili sagomati nel legno. Esempi di lavorazioni che possono essere effettuate con questo tipo di pialle sono le cimase in genere, le cornici di quadri o di specchi, i listelli di rifinitura delle ante di alcuni mobili e finestre, i profili interni dei telai di uno sportello, i bordi di un tavolo o di un pensile e comunque un qualsiasi elemento decorativo sagomato si voglia praticare sul bordo del legno. È con questo tipo di pialle che è stato possibile in passato riprodurre sui mobili profili di qualsiasi tipo. Tra questi, tanto per citarne uno, il famoso “becco di civetta”.

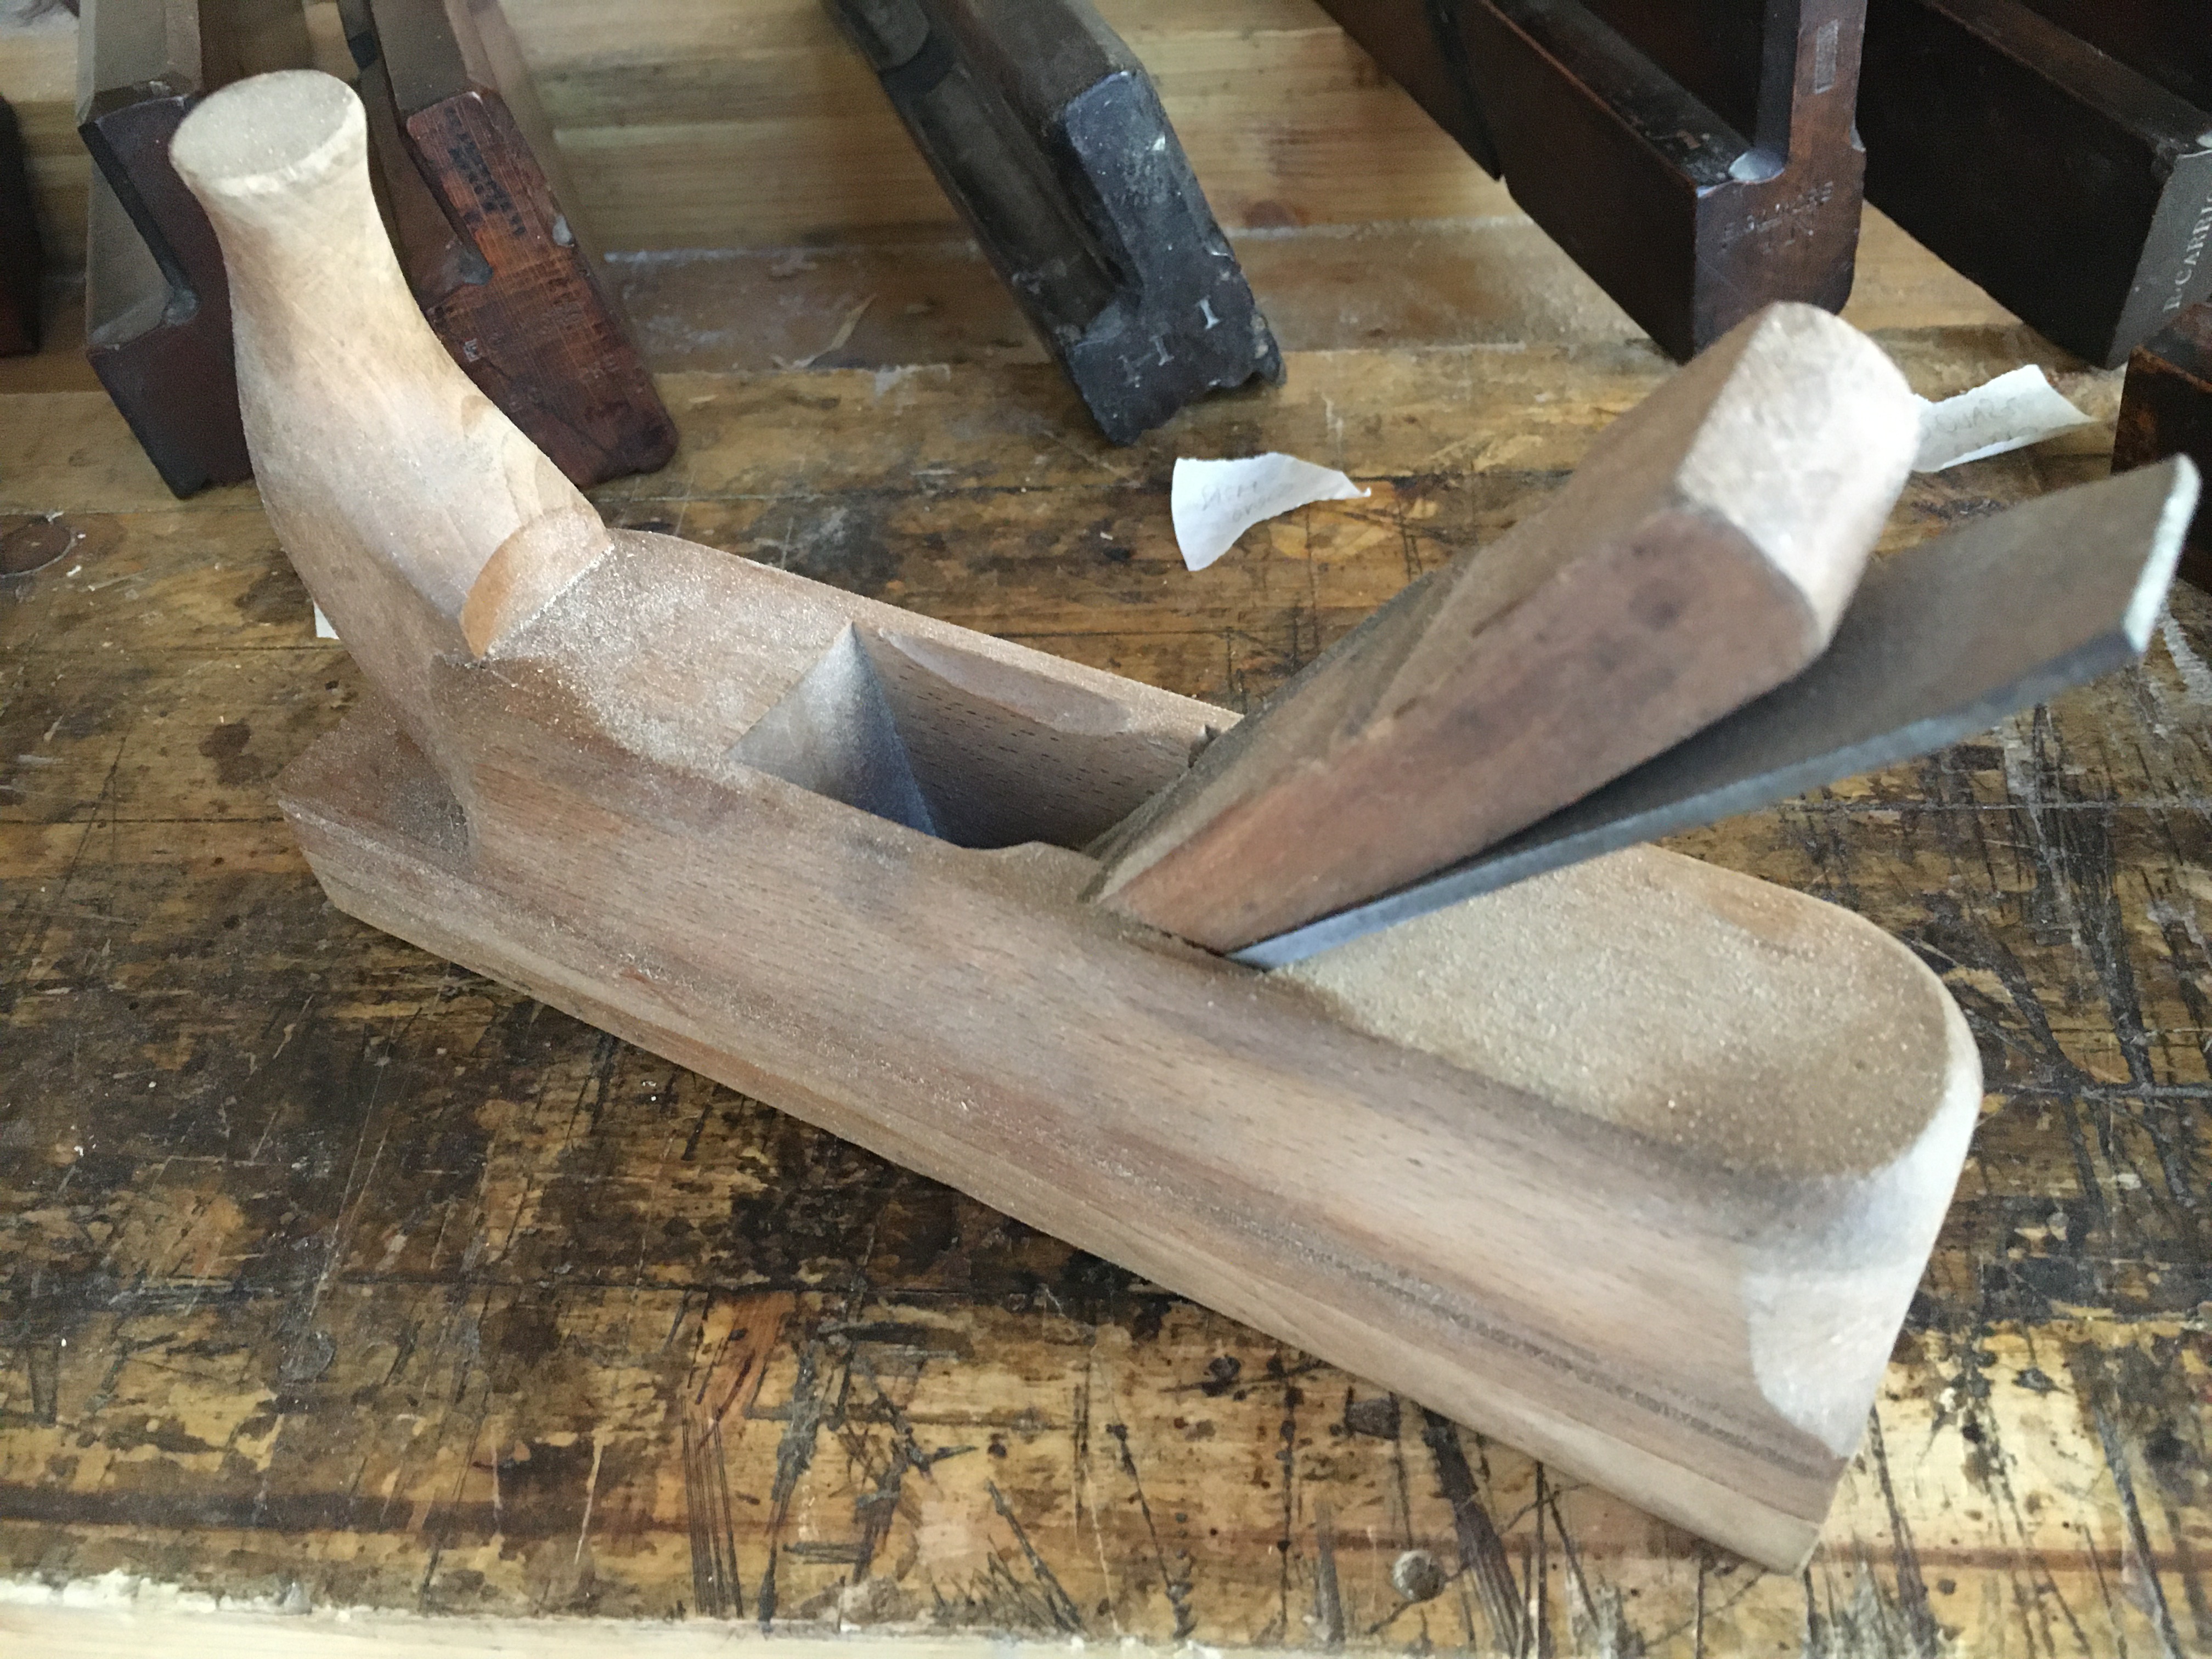
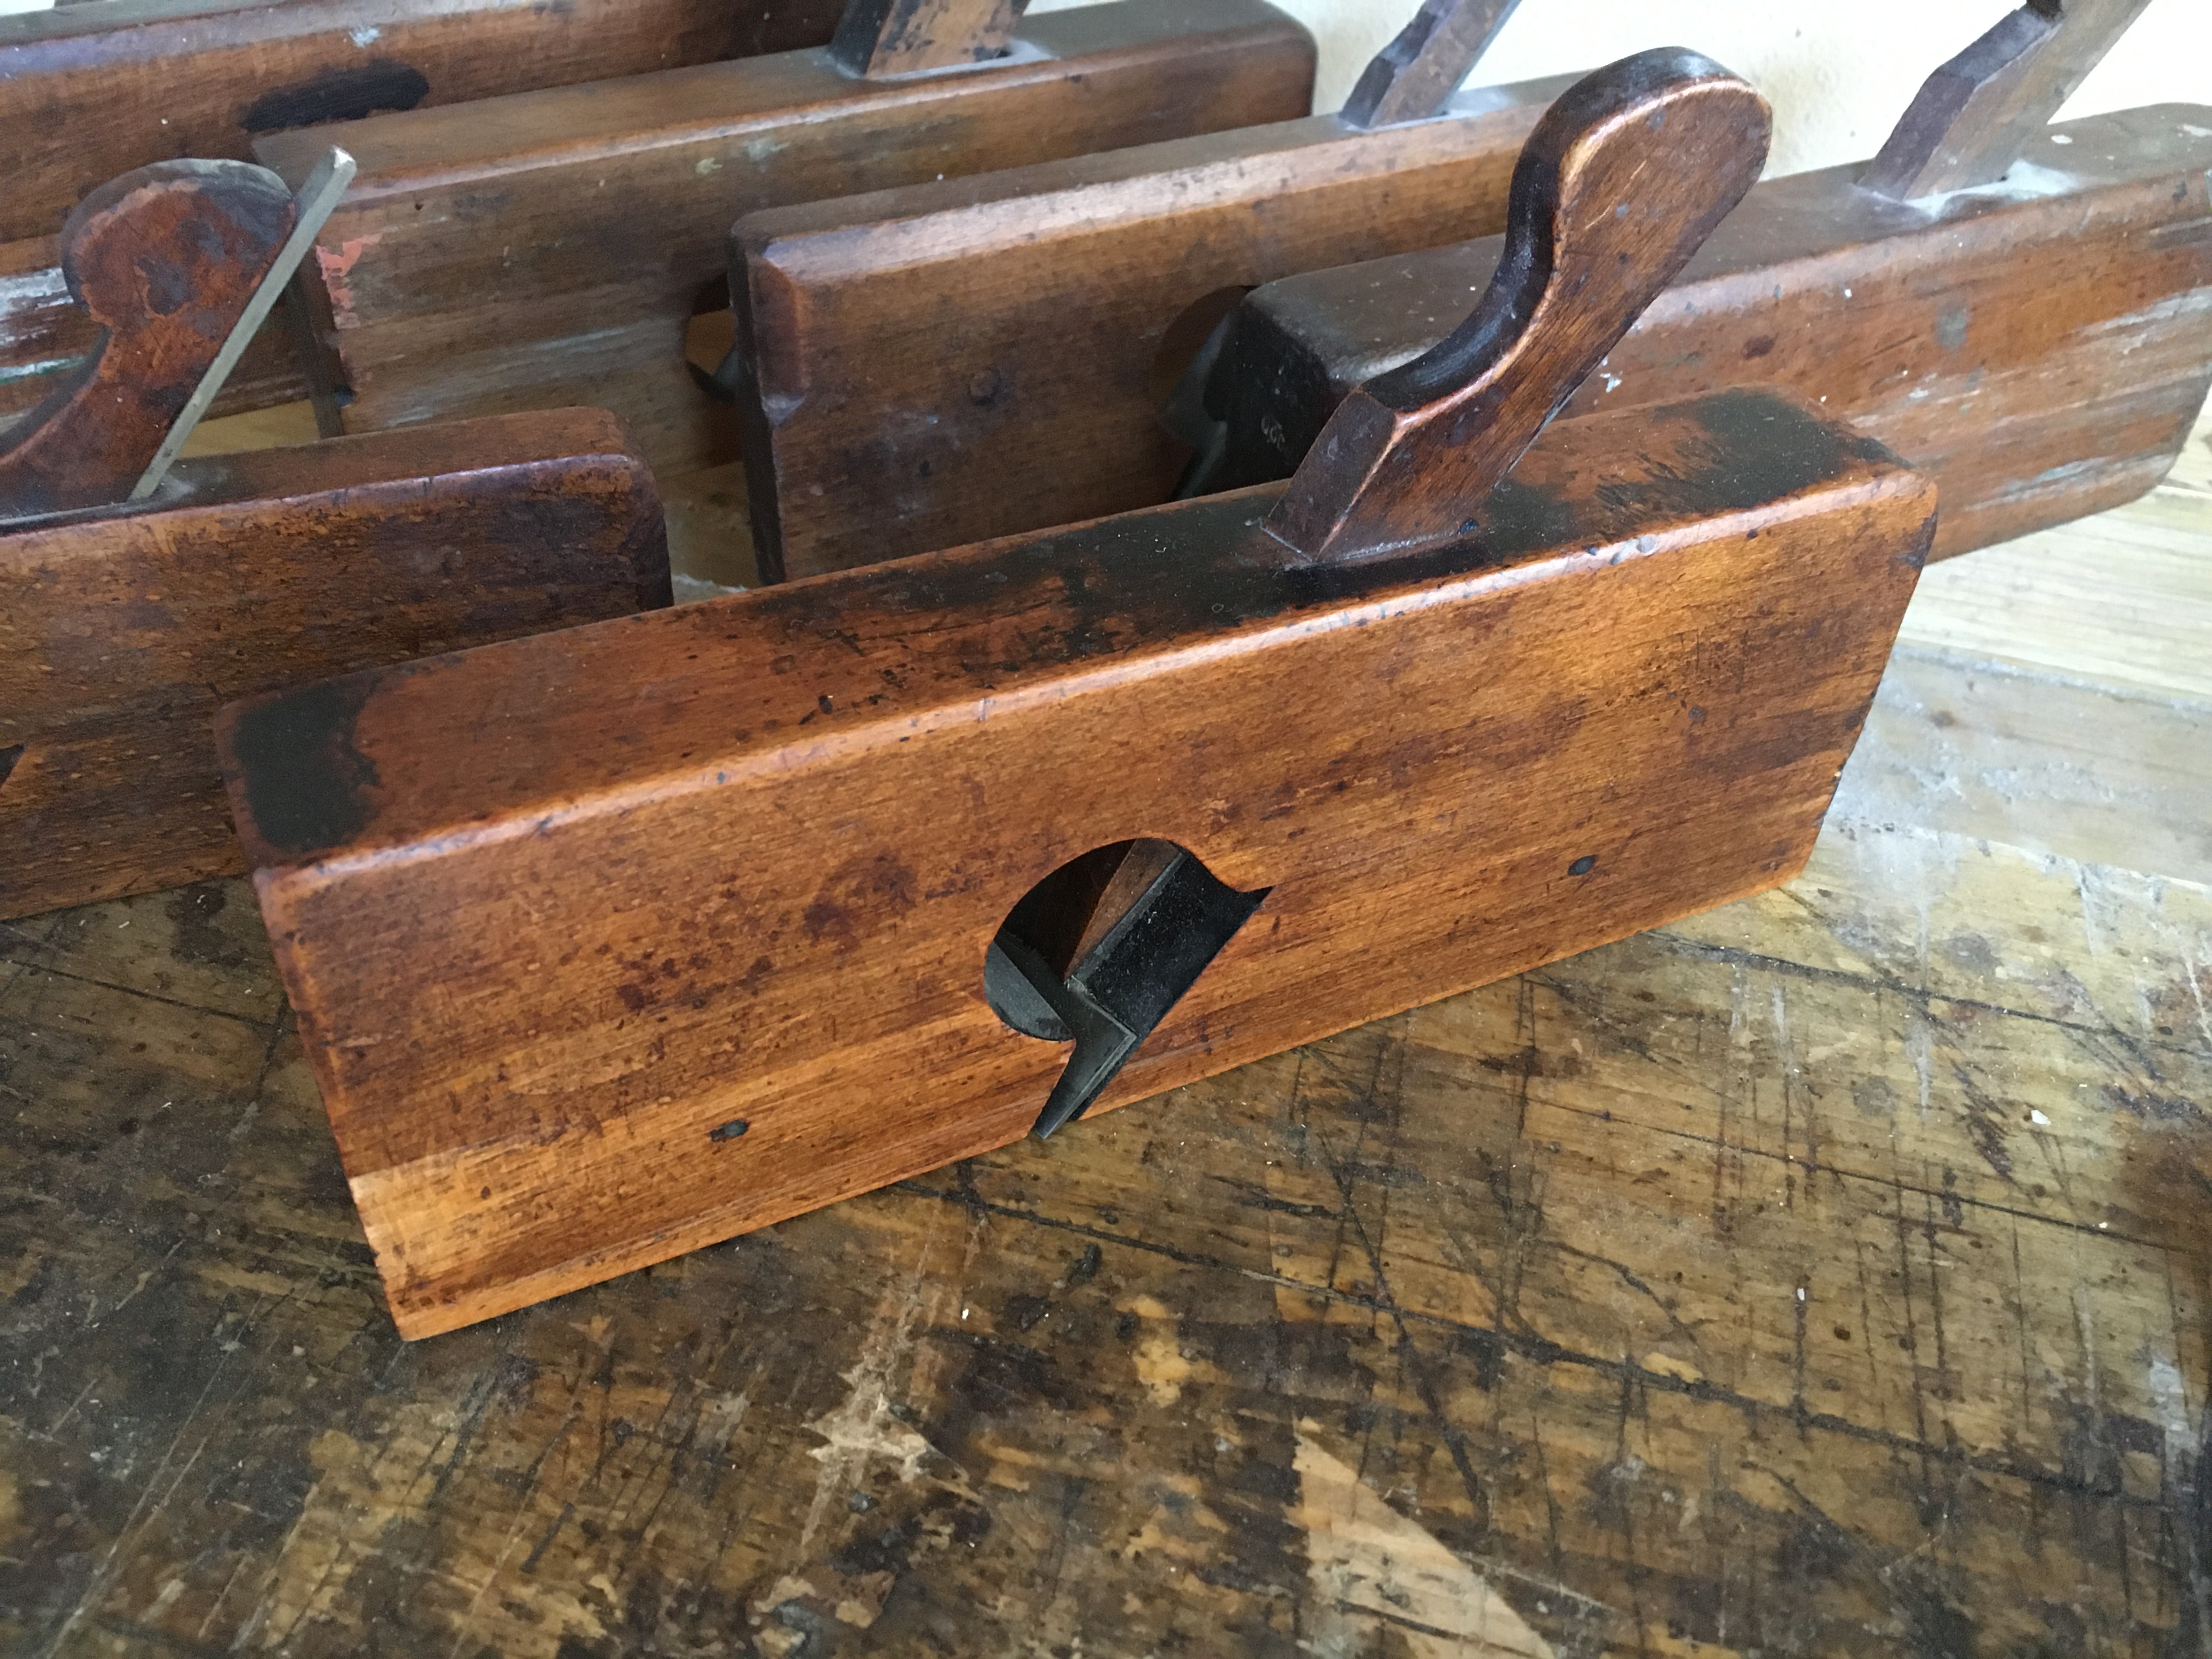
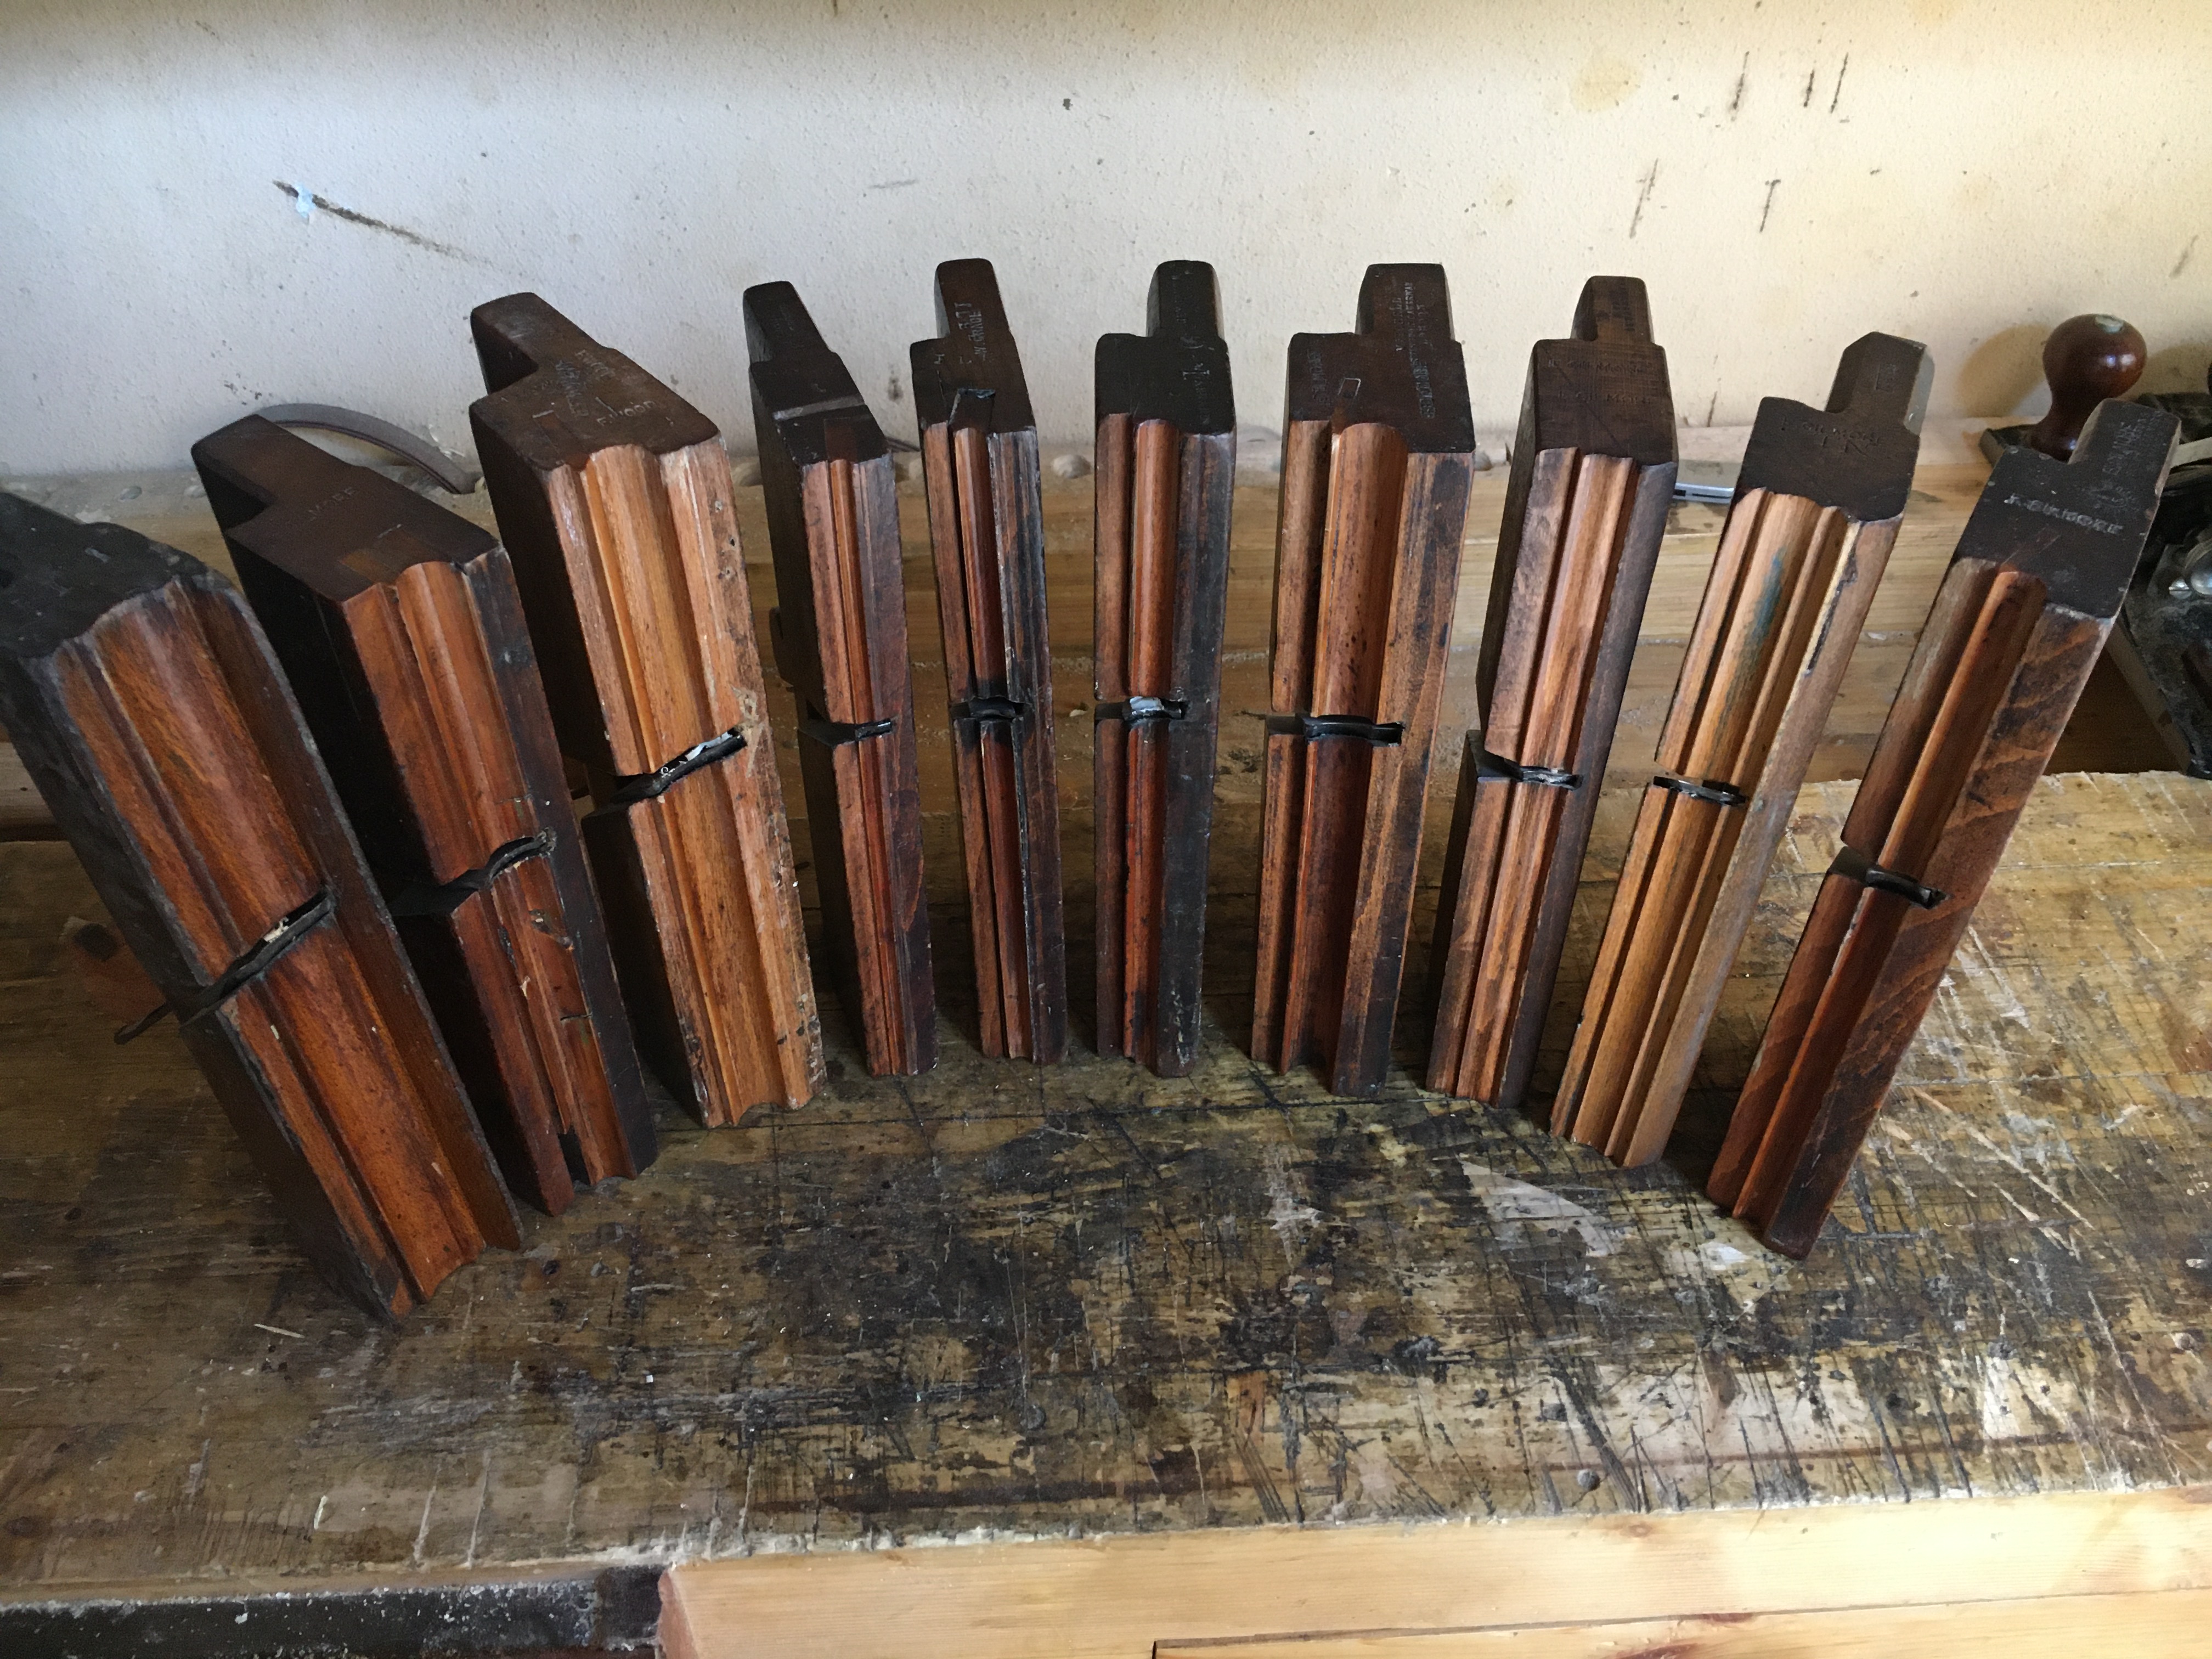
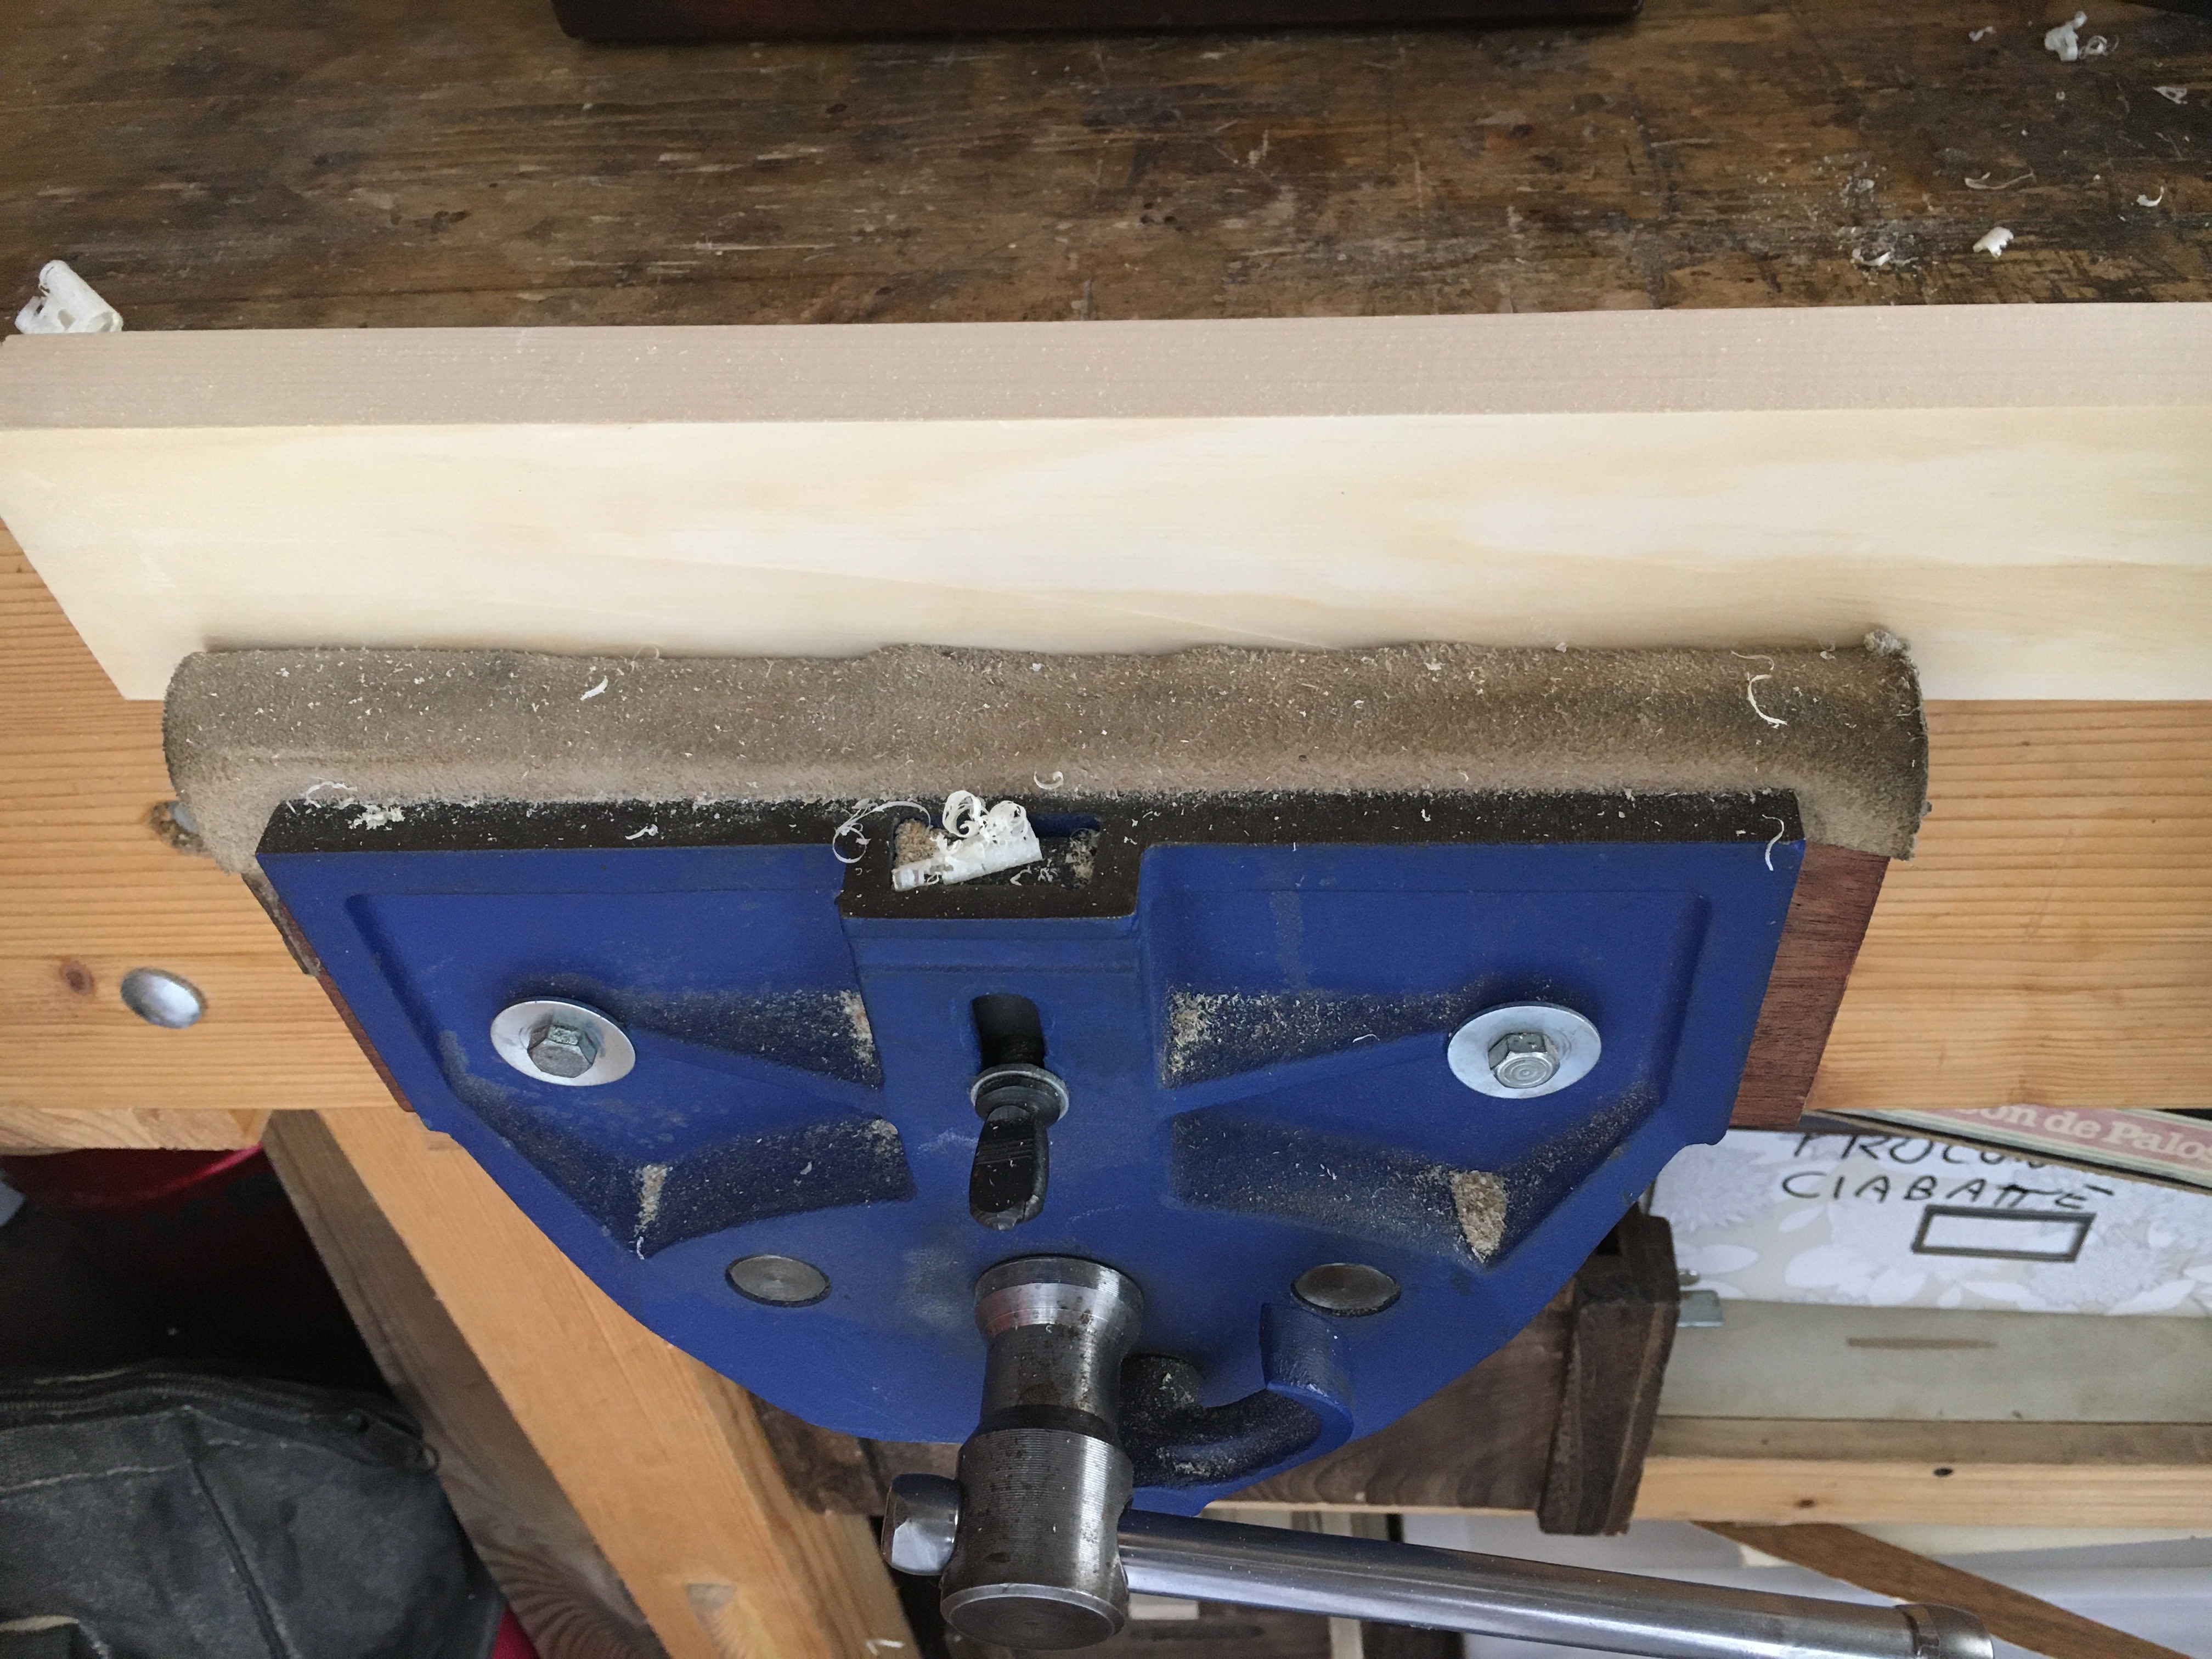
Le pialle da modanatura, come tutte le pialle in legno, sono ricavate da pezzi di legno duro, principalmente faggio, ma anche da altri tipi di legno (sempre duro), come il leccio ed in generale dai legni degli alberi da frutto. Il legno utilizzato dovrebbe comunque essere sempre ben stagionato, meglio se tagliato di quarto, a fibra regolare e compatta. Queste caratteristiche aiutano a prevenire i fenomeni di interscambio di umidità con l’ambiente circostante, a cui le pialle in legno sono particolarmente soggette, ed inoltre garantiscono una maggiore resistenza sia contro l’usura a cui sono costantemente sottoposte nel lavoro di sfregamento di legno su legno durante la piallatura, sia ai colpi di martello assestati al corpo pialla allo scopo di rilasciare il cuneo.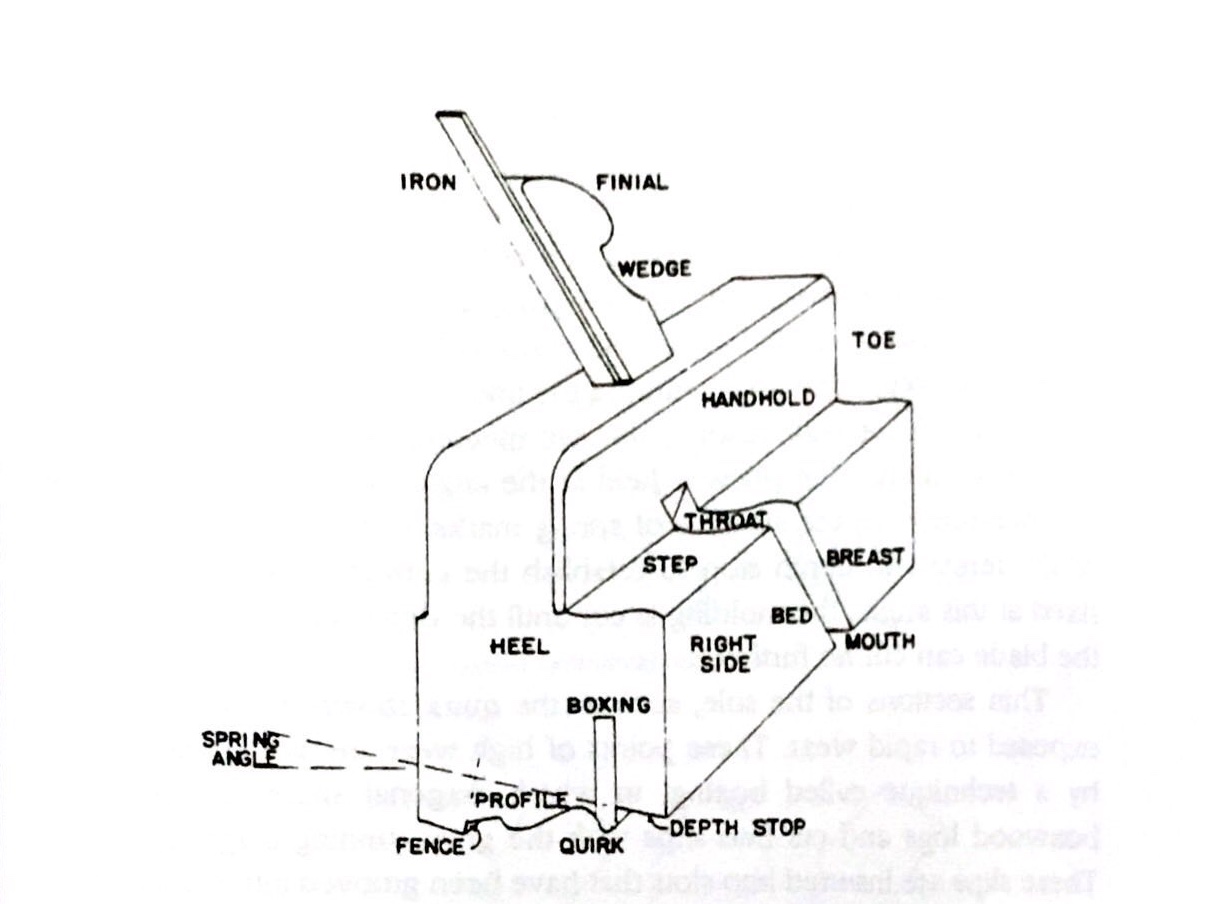 La conformazione delle pialle da modanatura differisce sostanzialmente dalle normali pialle. Vi è l’assenza sia del manico posteriore che di quello anteriore, quest’ultimo presente ad esempio nello sbozzino in legno. Non è presente una guida parallela regolabile ed estraibile, almeno nei modelli più semplici e maggiormente utilizzati.
 Presentano quasi sempre nel corpo pialla un’apertura laterale sul fianco destro per l’espulsione del truciolo. Hanno una suola sagomata che replica esattamente la forma della lama che viene montata. Infine la modalità di utilizzo può divergere significativamente a seconda del tipo di pialla che si sta utilizzando. Nei modelli di pialla che creano profili complessi nel legno, la guida parallela e lo stop di profondità sono ricavati direttamente nella suola.
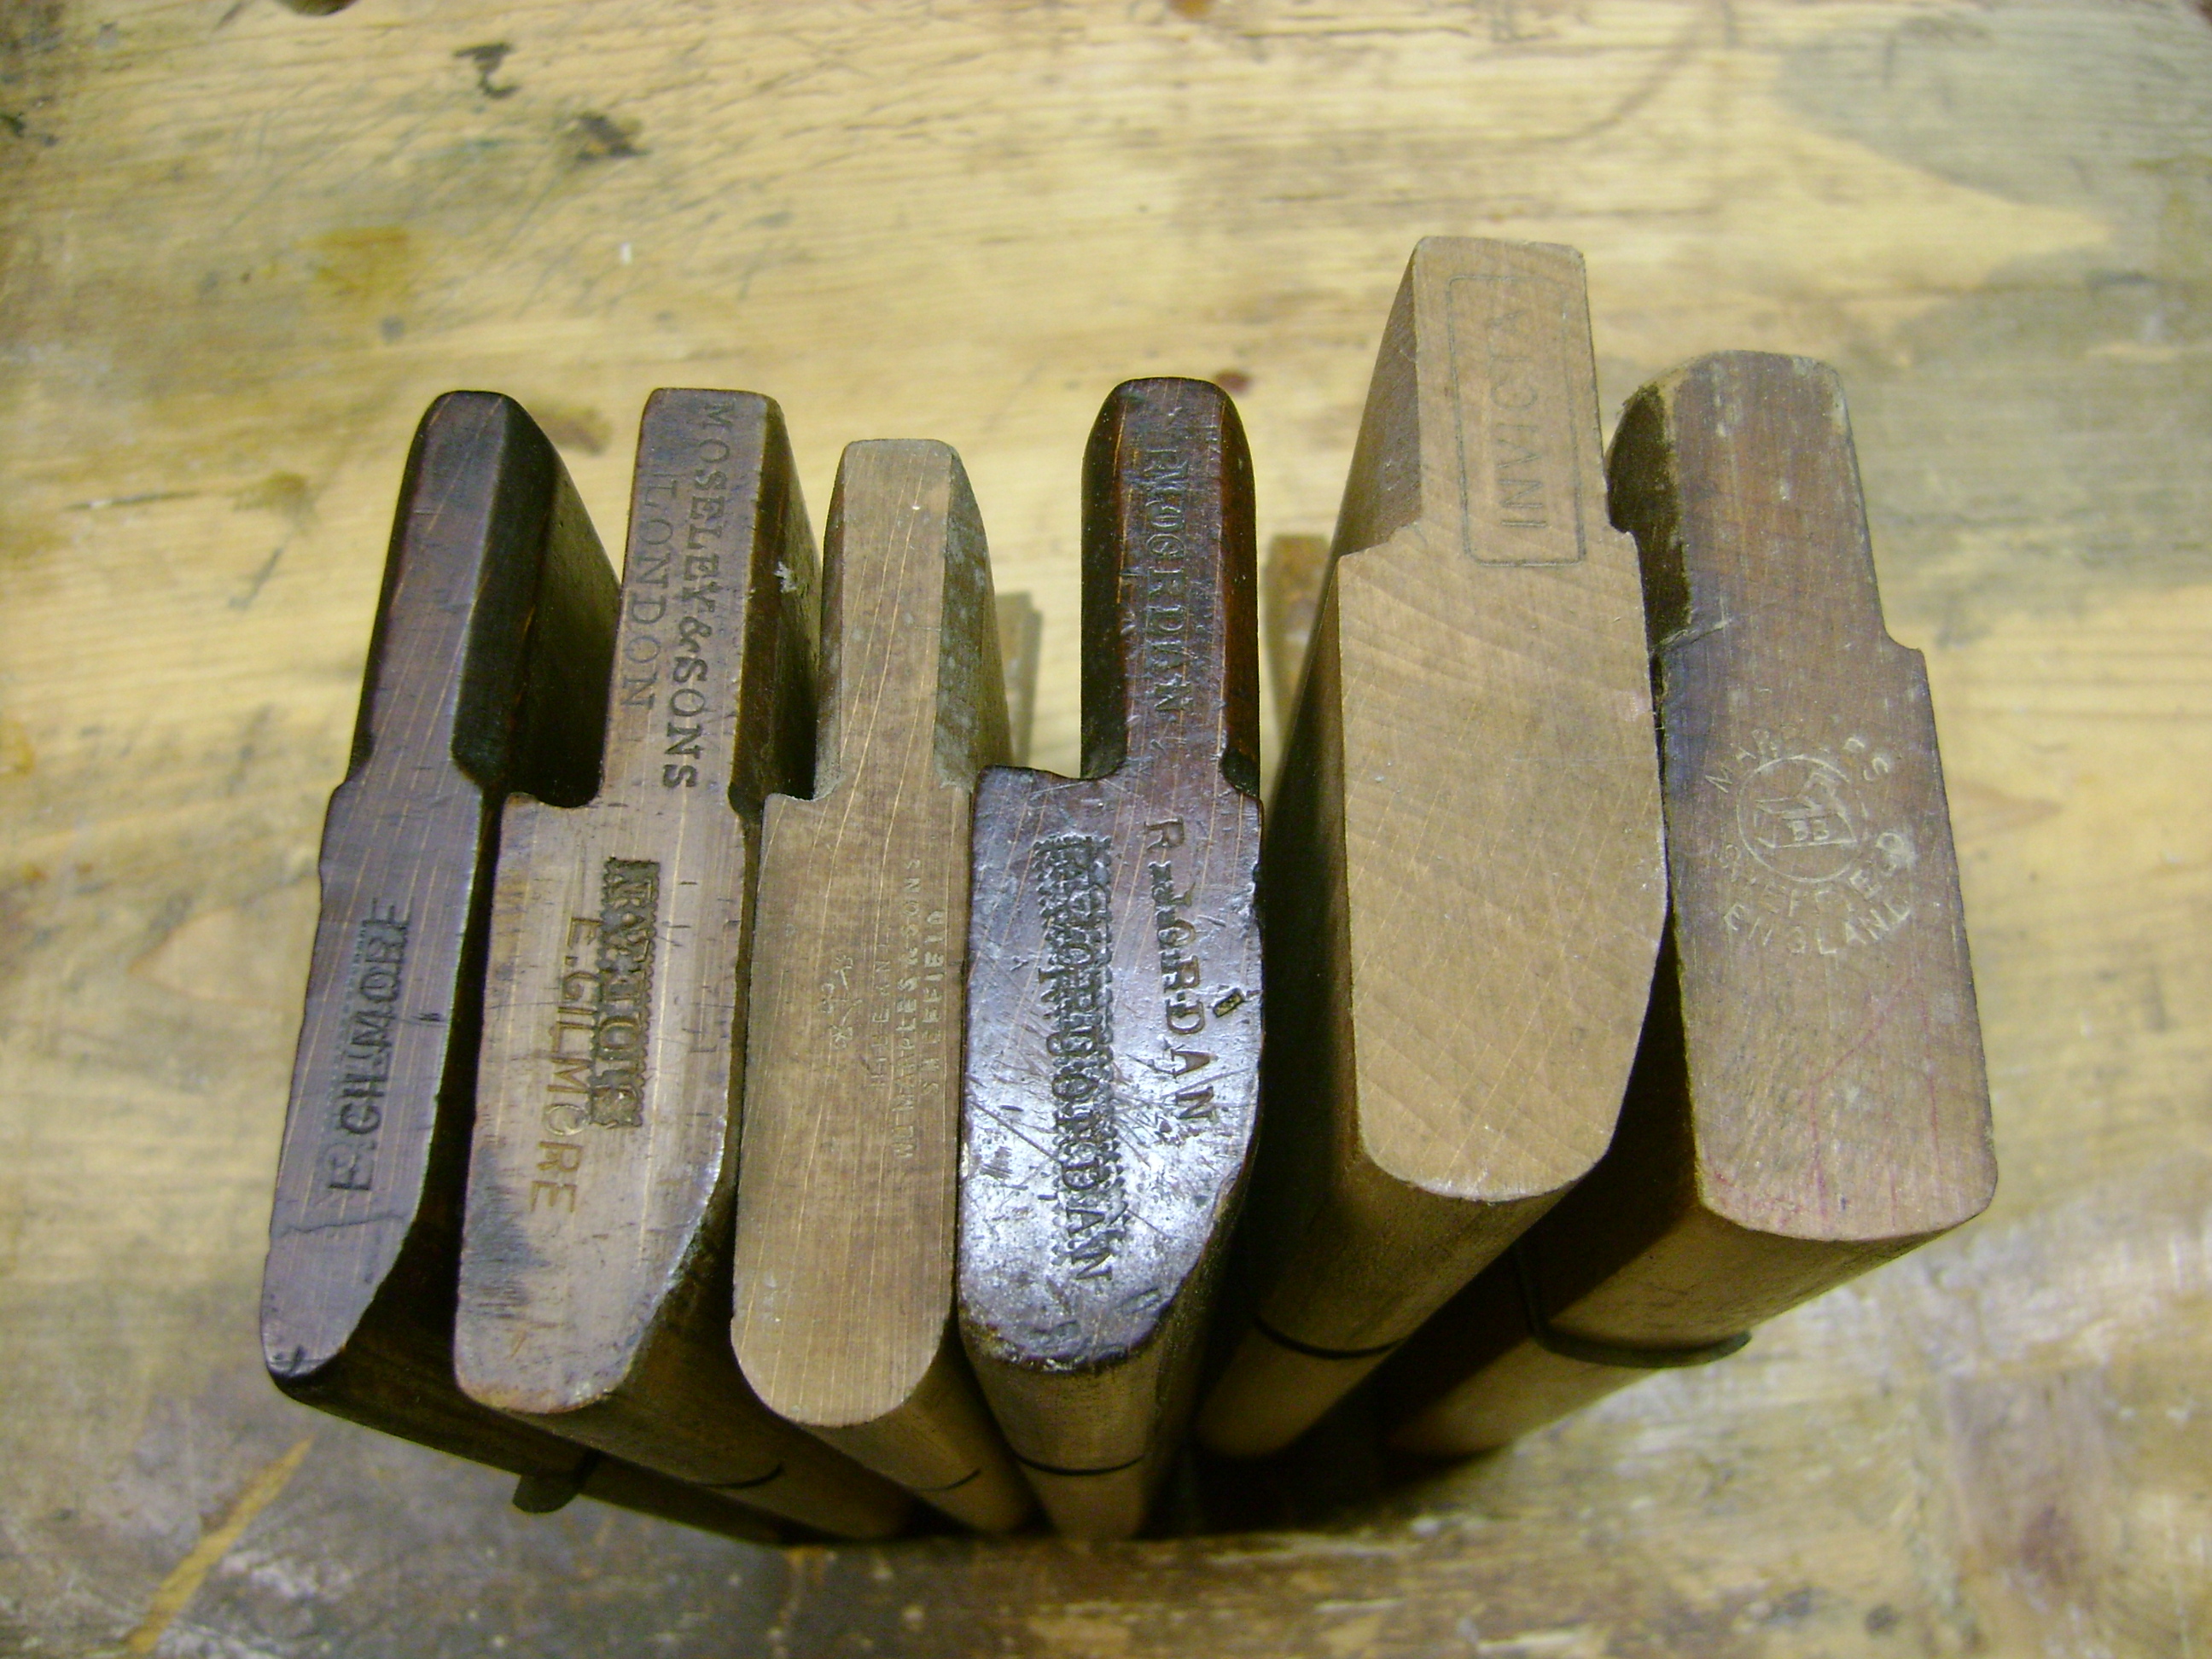

In altri modelli, come ad esempio nelle pialle hollows and rounds (profilo concavo e convesso) sia la guida parallela che lo stop di profondità non sono presenti. Le pialle per modanatura possono creare profili che variano da pochi millimetri fino a svariati centimetri di larghezza. Ovviamente più la pialla è di grosse dimensioni più sarà faticoso farla lavorare sul legno. Per questo motivo talvolta si preferisce, invece di utilizzare una sola pialla con una suola troppo larga e con un profilo complesso, utilizzare una combinazione di pialle più piccole e di diversa forma e dimensione. Perché se è vero che nel corso dei secoli sono state prodotte decine e decine di pialle con i profili più svariati è anche vero che utilizzando insieme pialle di dimensioni più contenute e con profili diversi le possibilità di creare nuove sagome nel legno diventano praticamente infinite. 
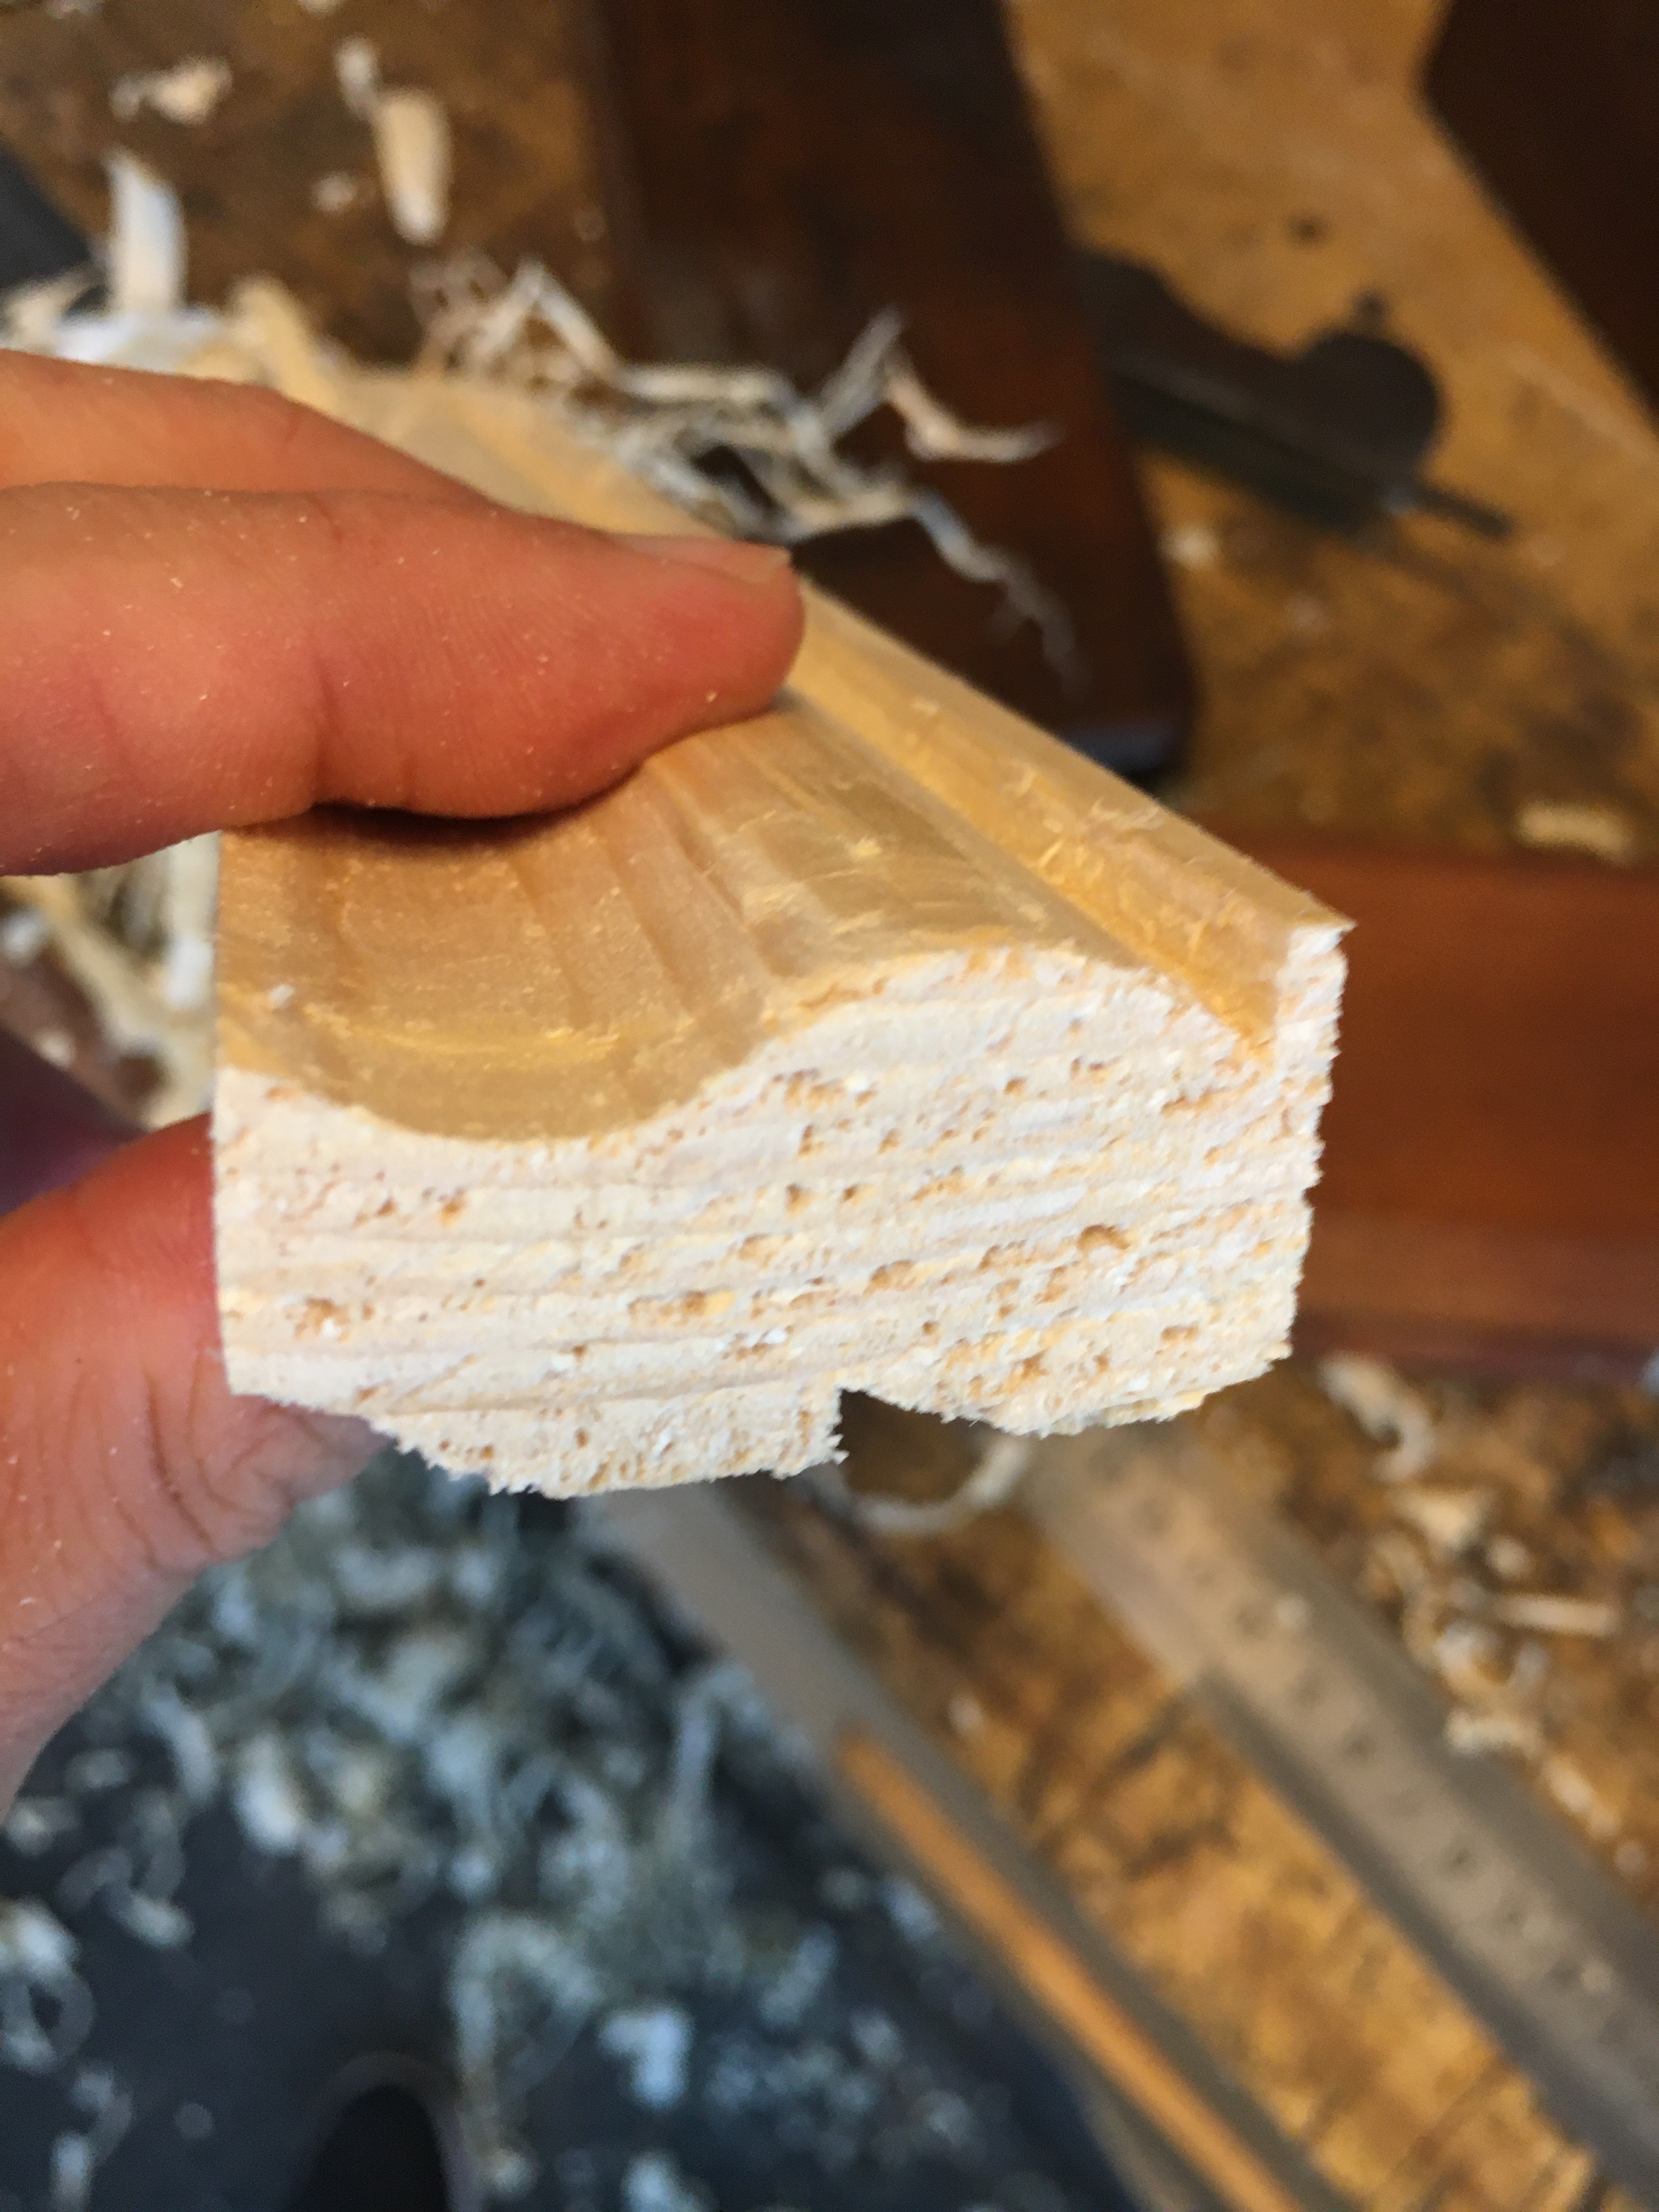
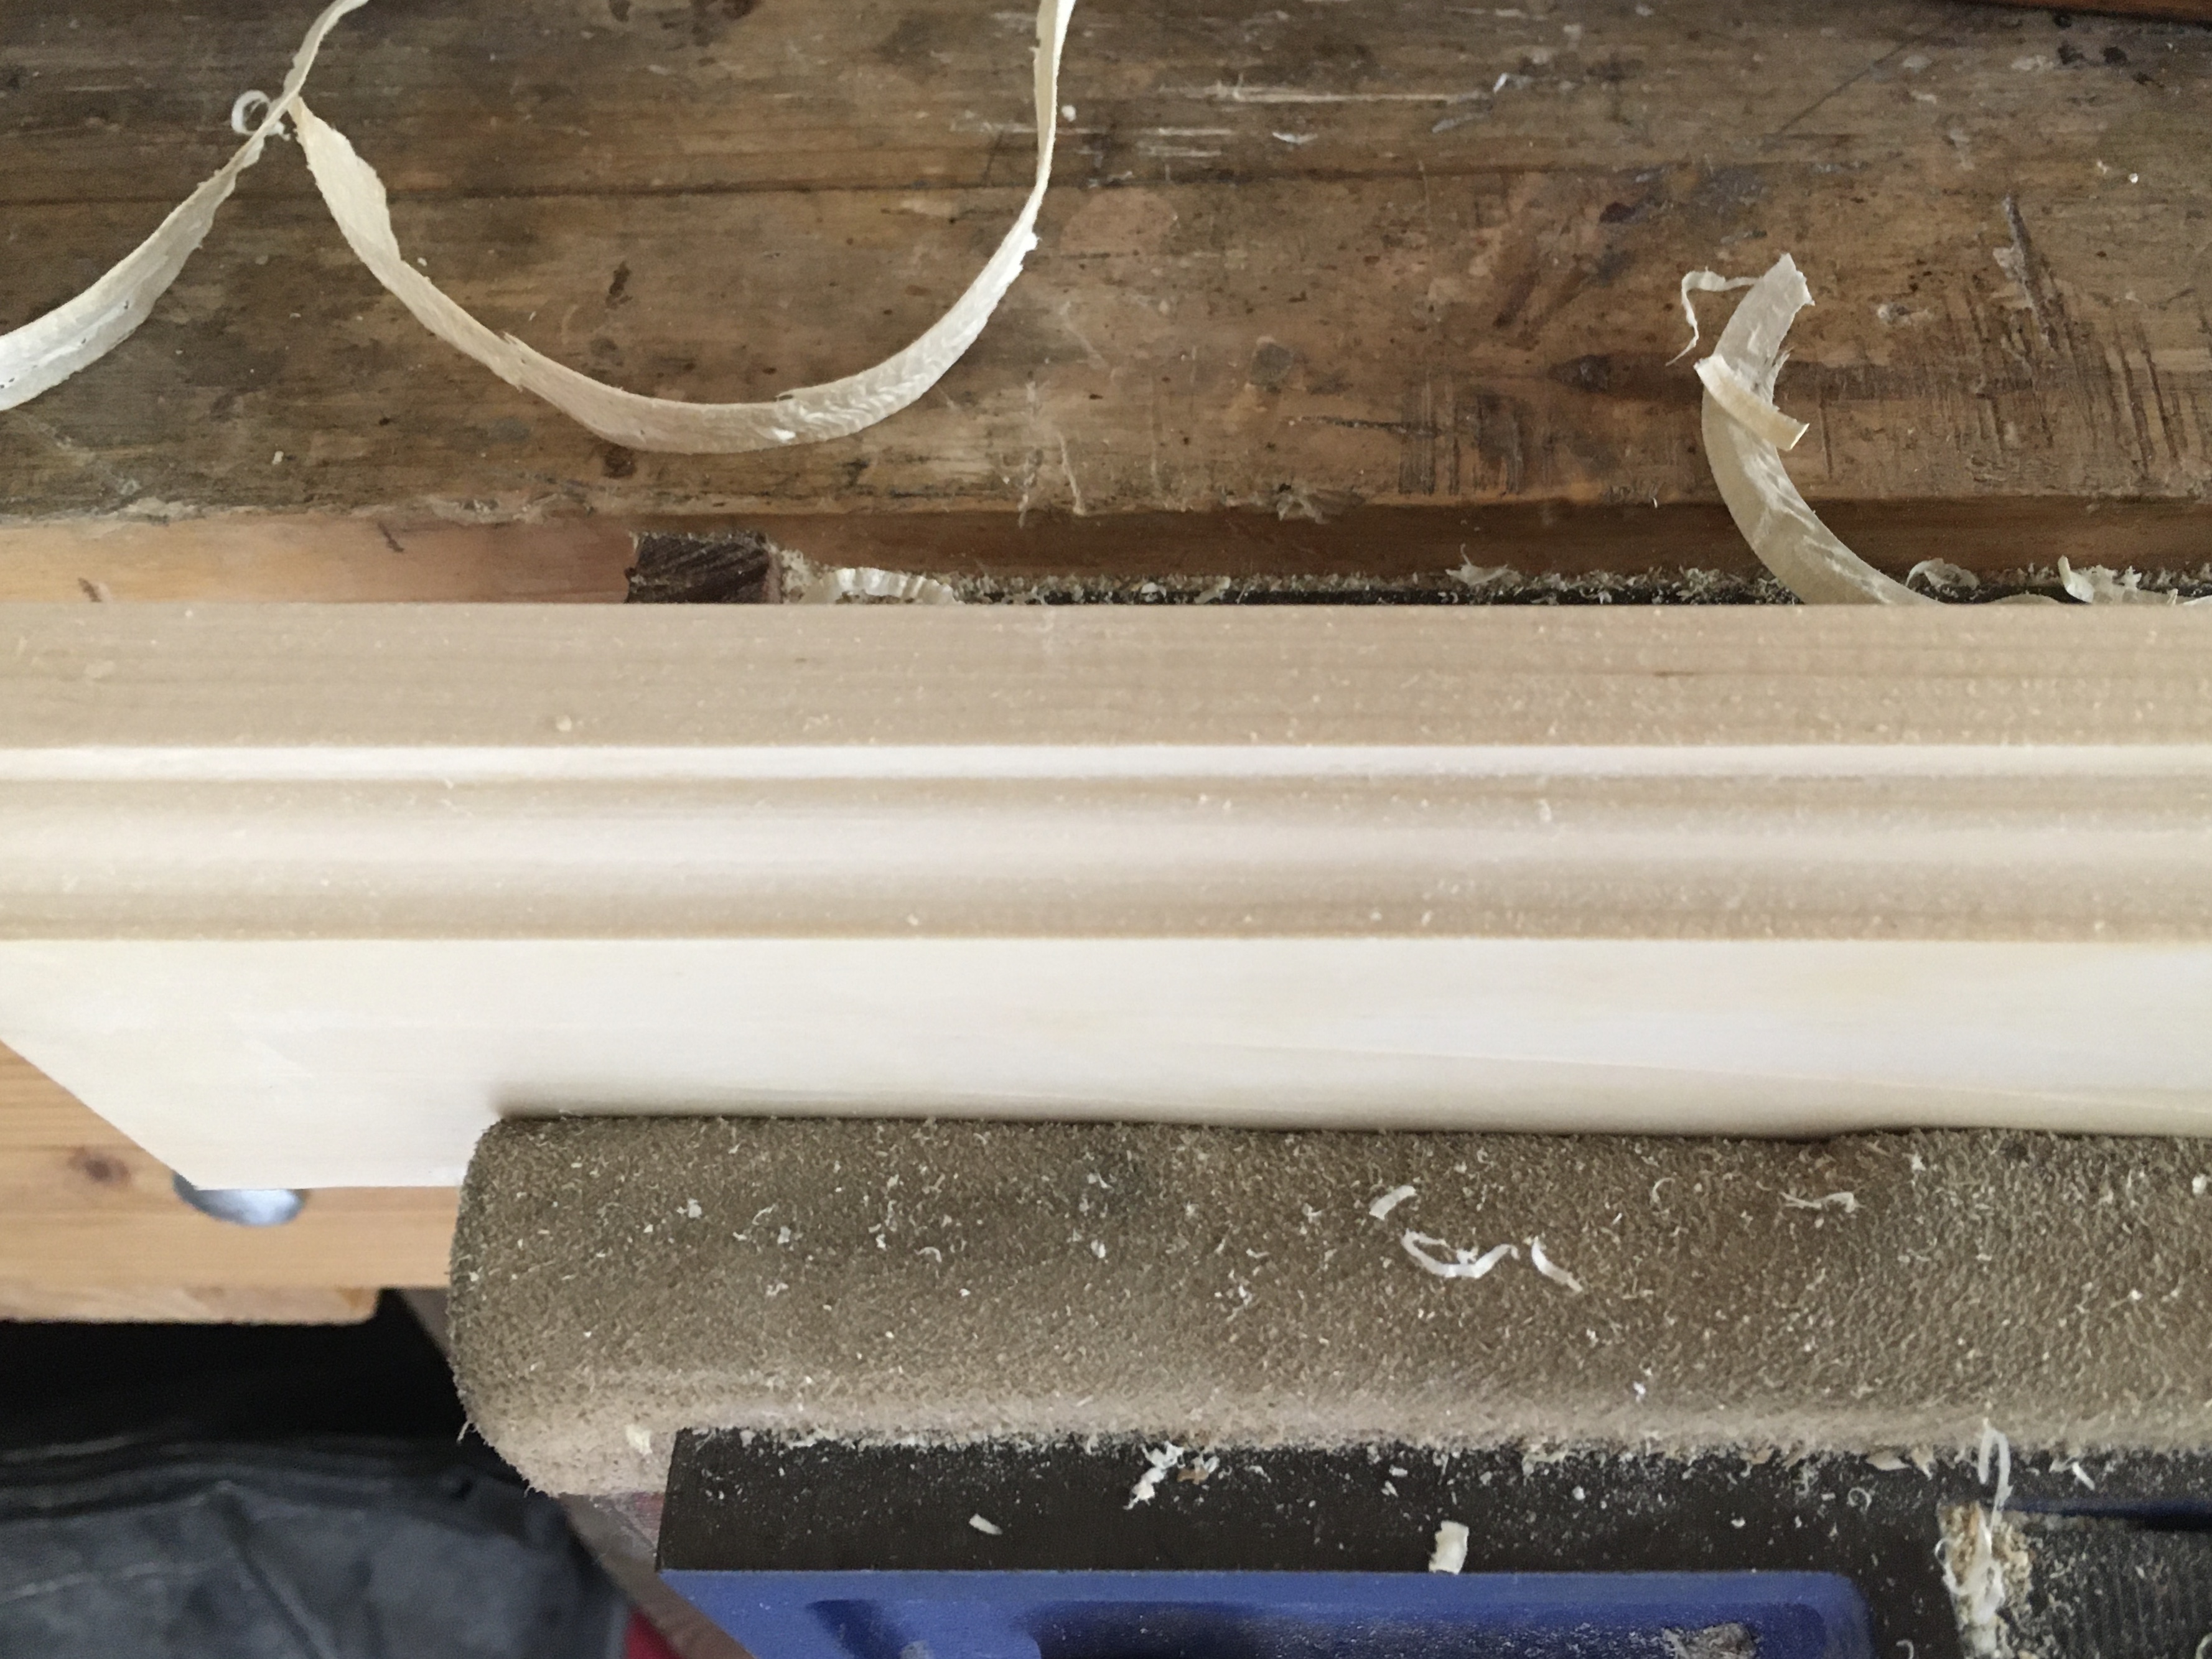
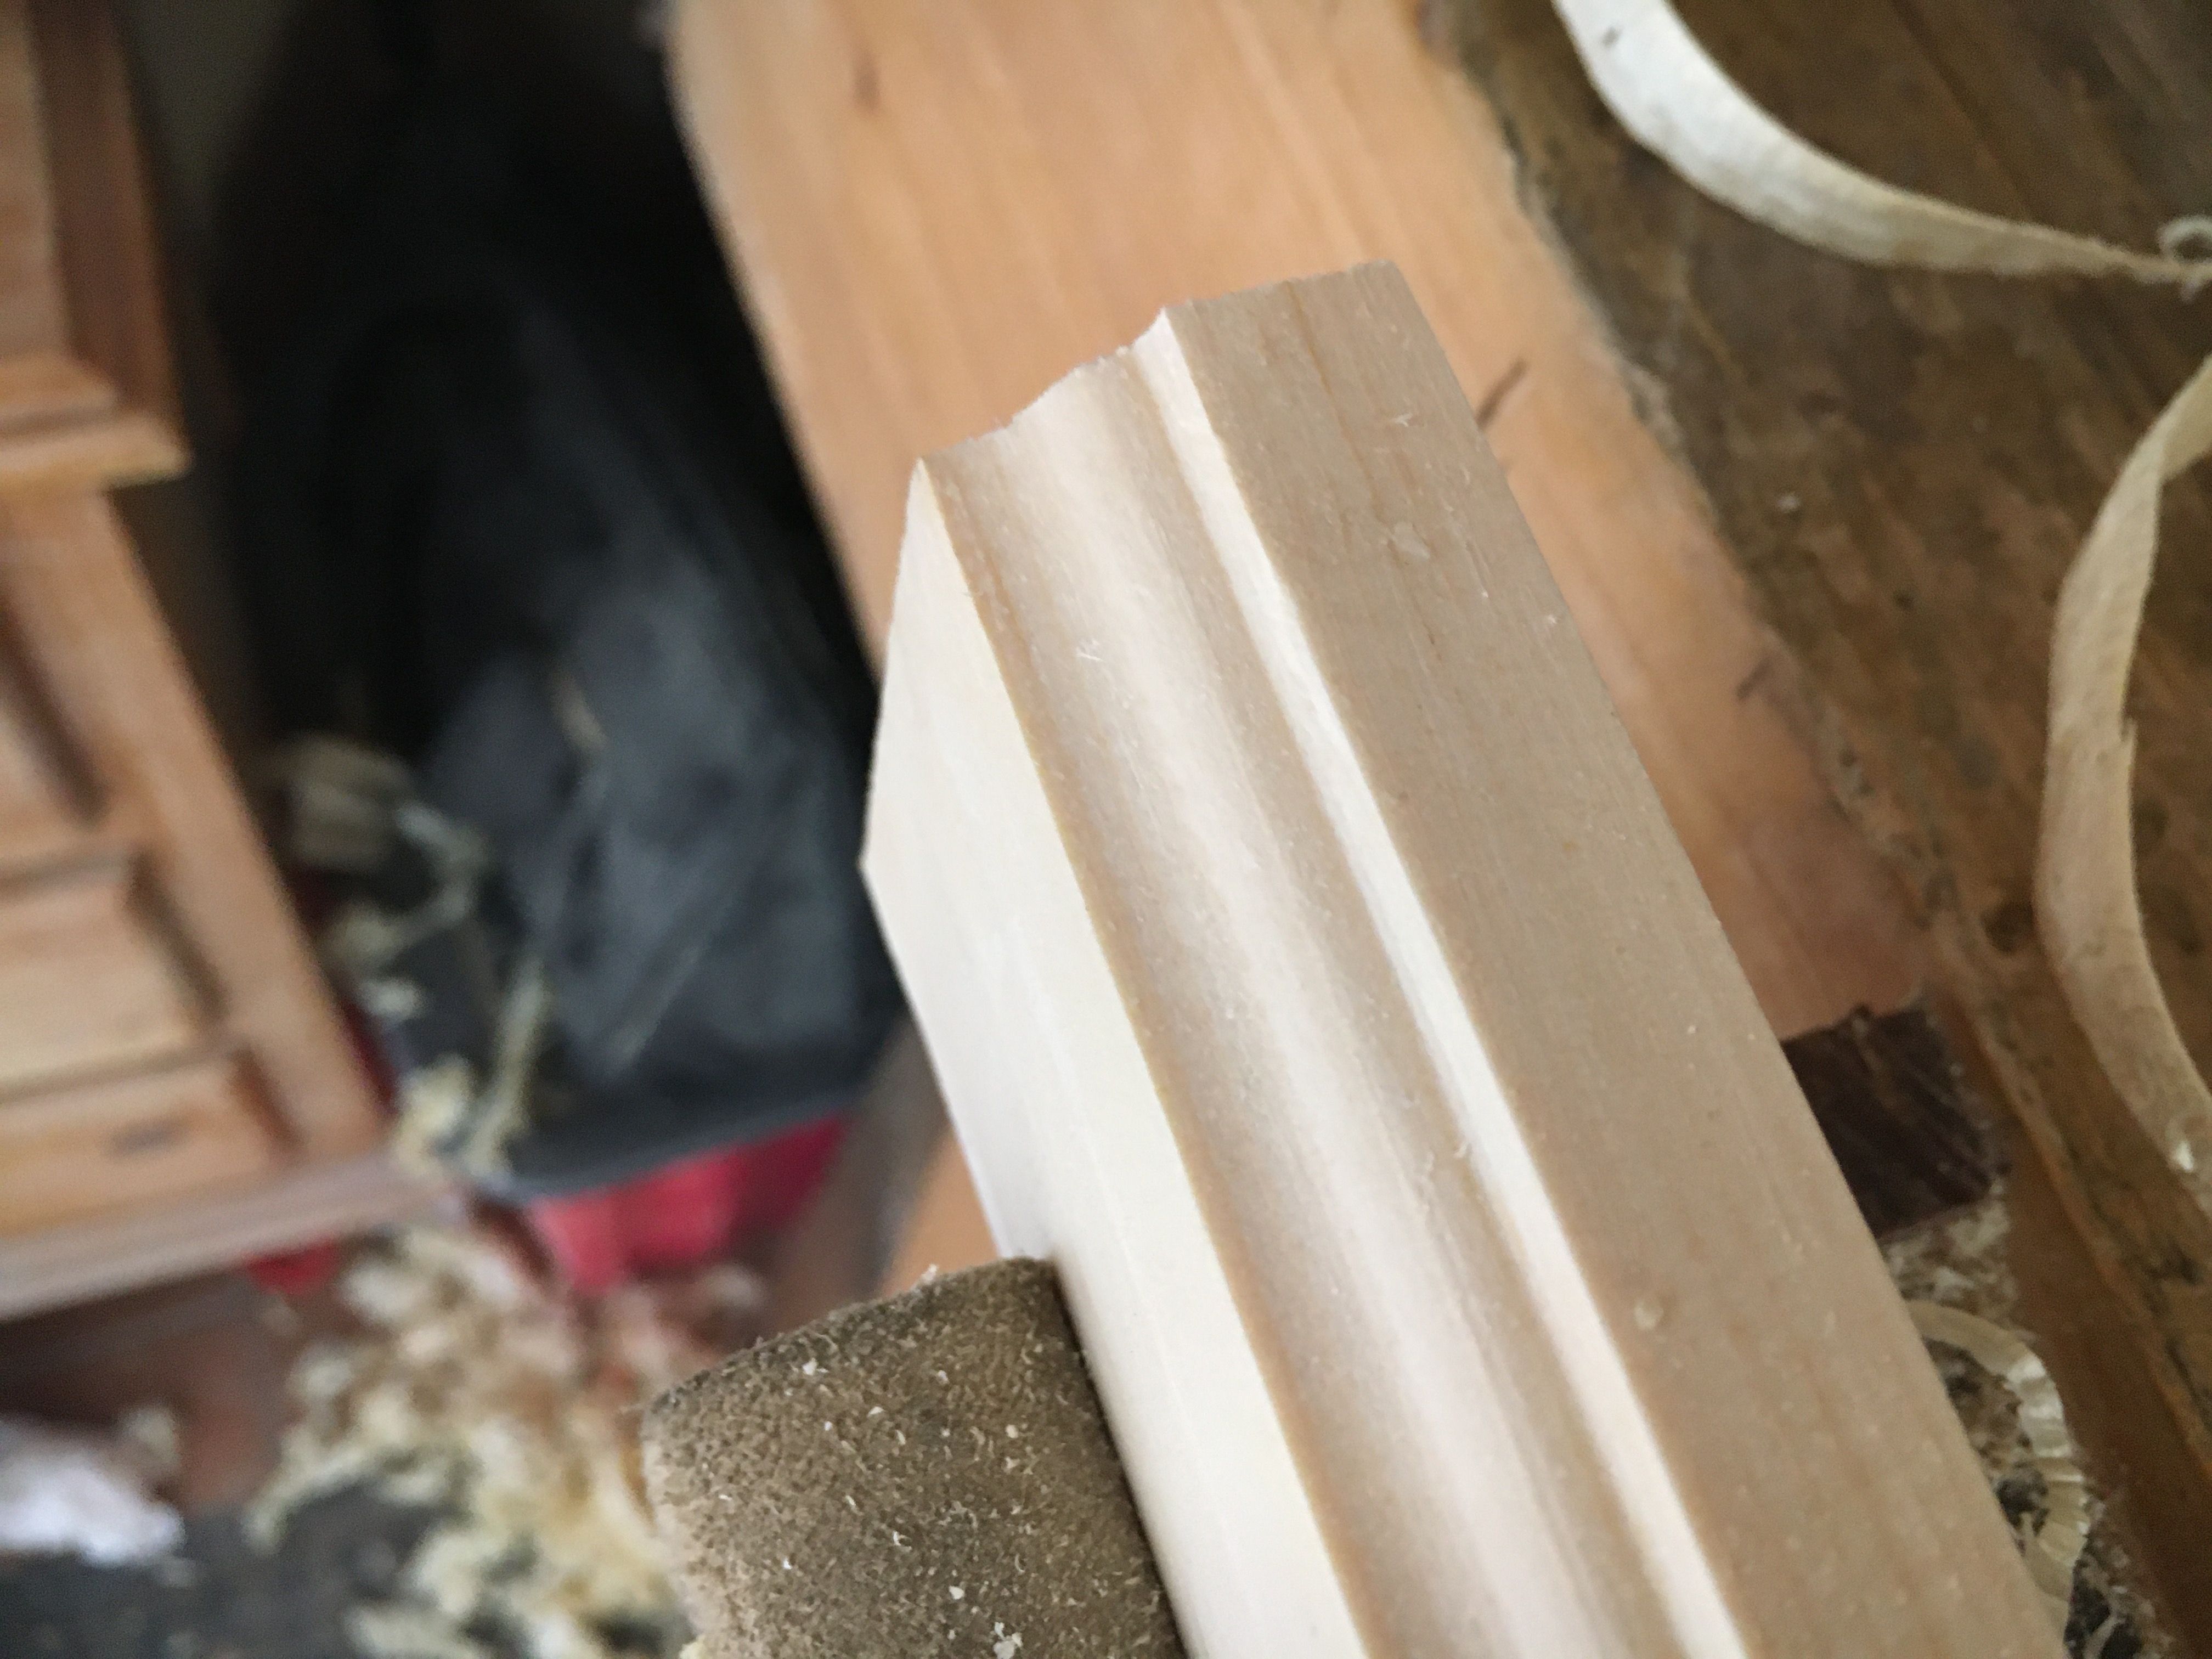
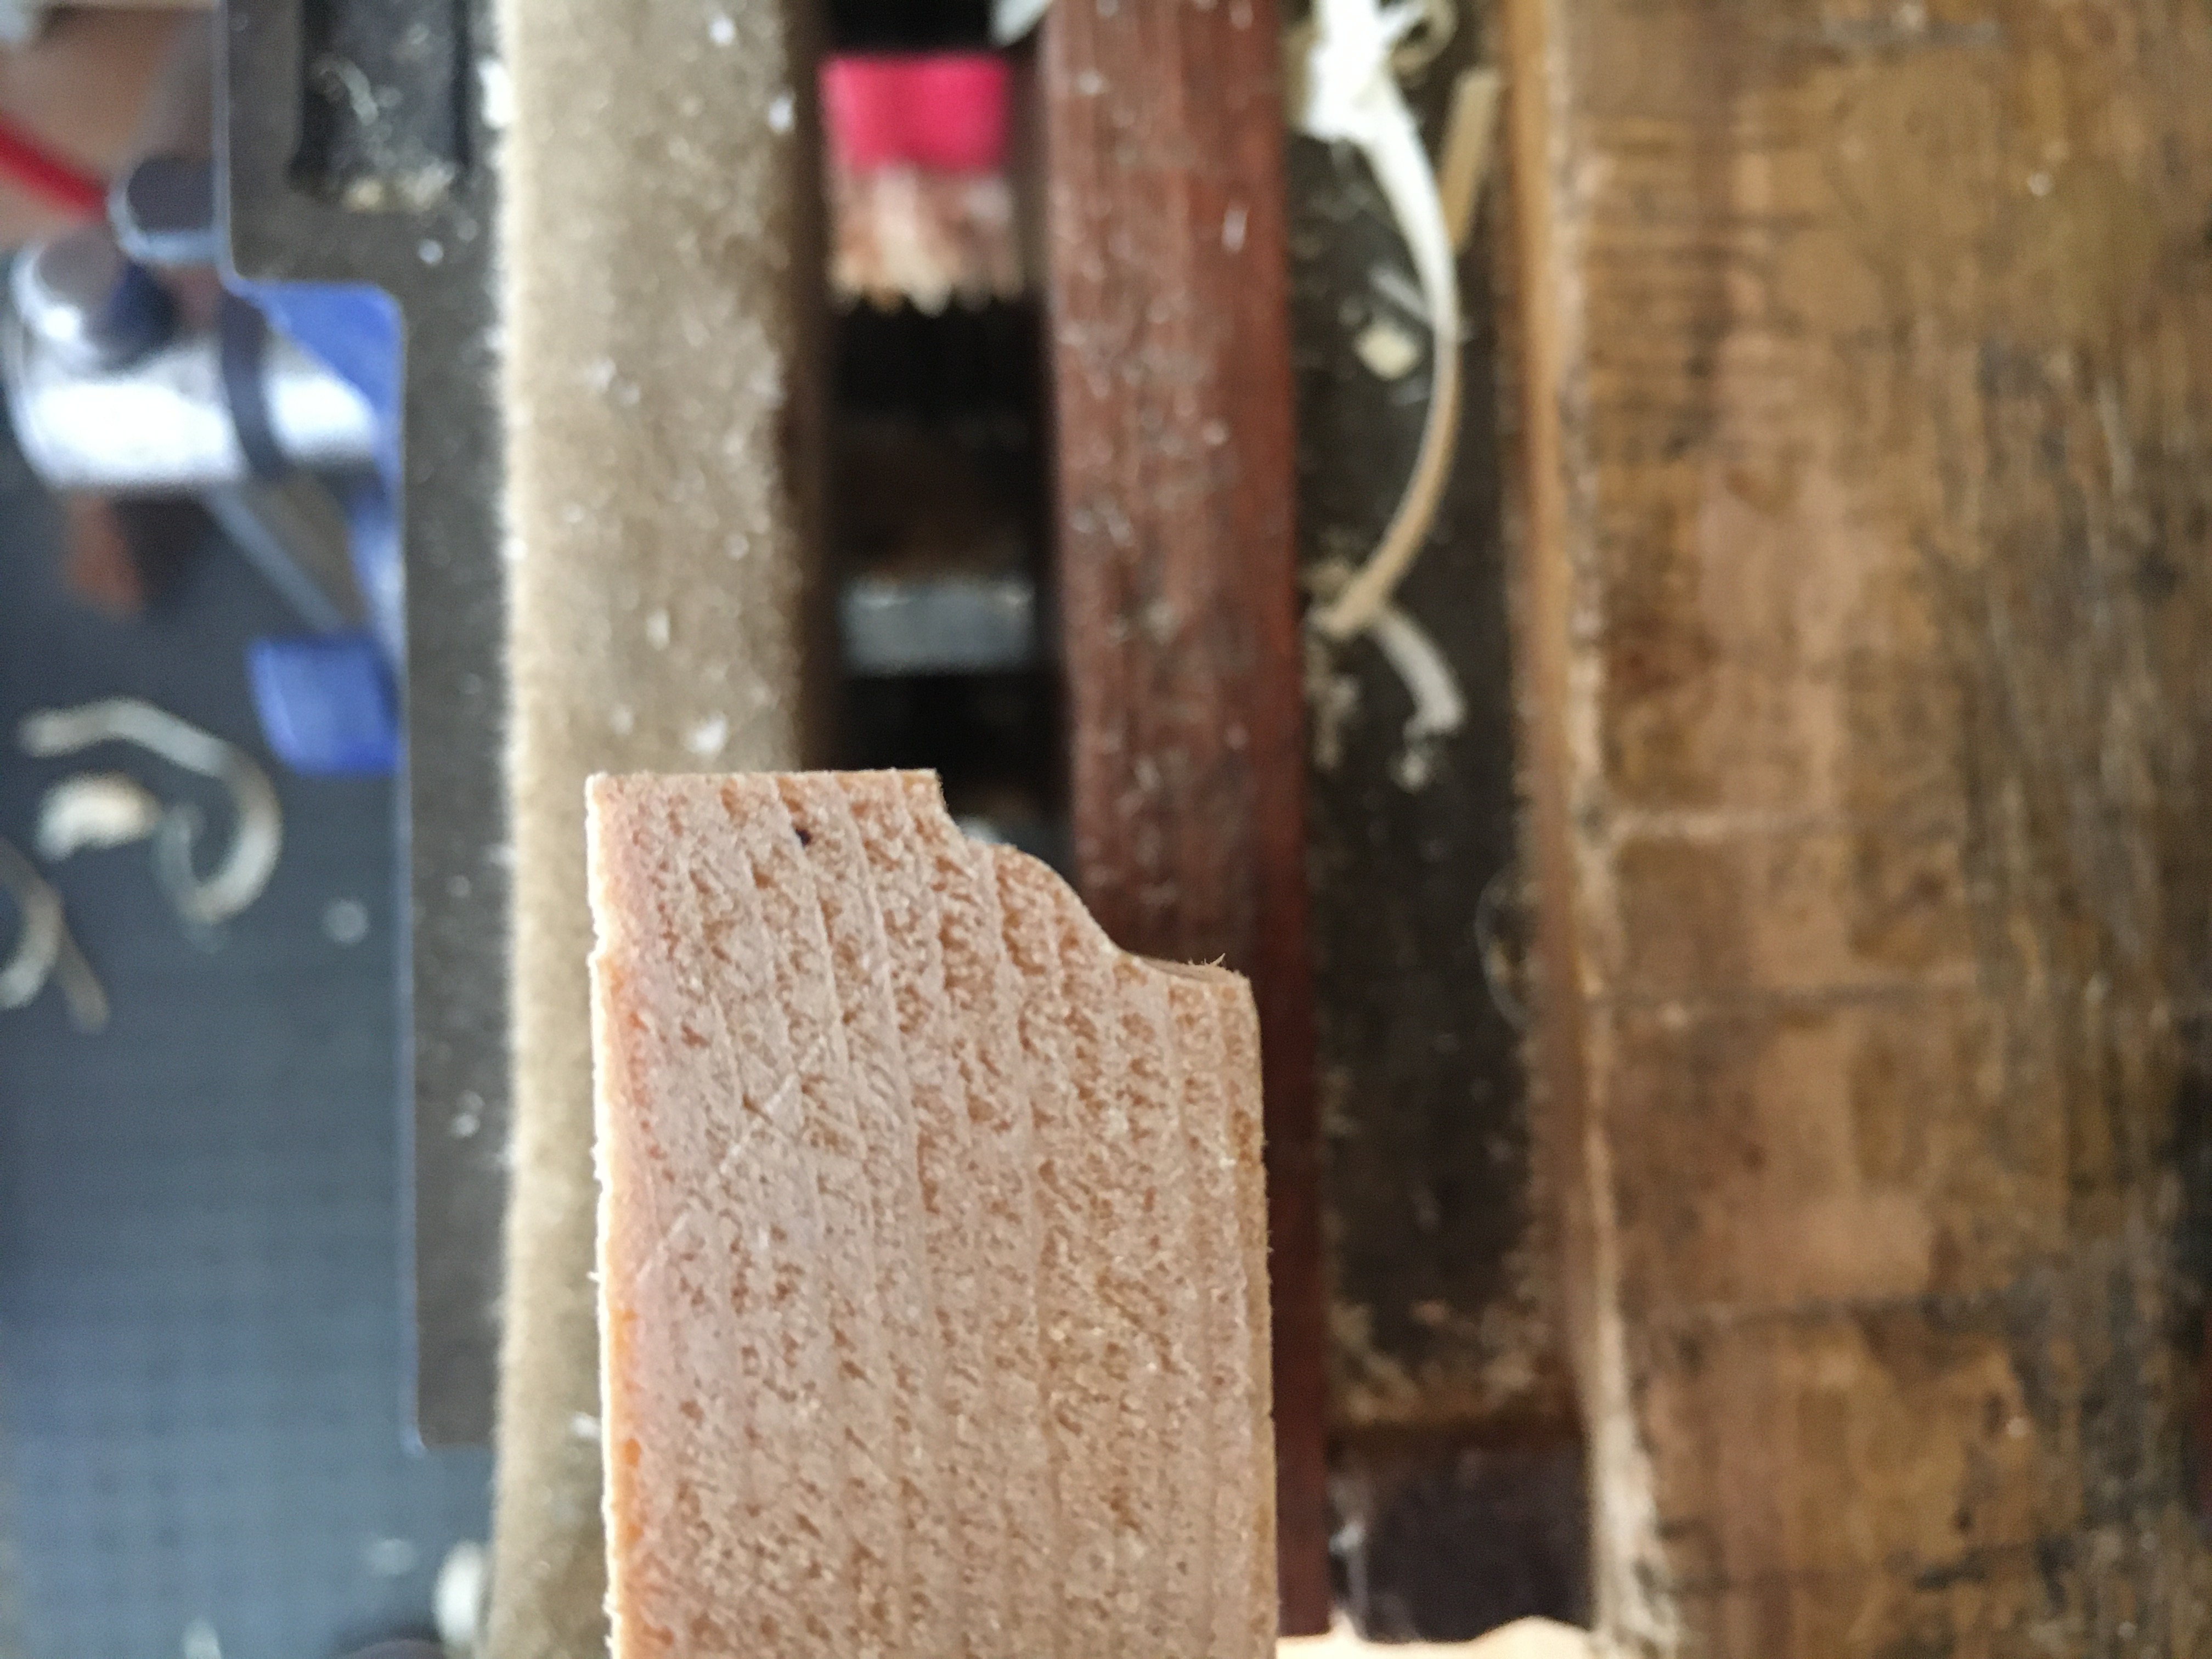
La particolarità delle pialle da modanatura è soprattutto nella forma della suola e della lama. Osservando la suola della pialla, di fronte o sul retro, potremo vederne il profilo. Il profilo della suola rispecchia fedelmente il profilo della lama. Ed il profilo che vediamo sarà quello che otterremo sul legno, ma al negativo.
 Quindi prestiamo sempre attenzione a scegliere la giusta pialla per il corretto profilo che vogliamo praticare, tenendo sempre presente che la sagoma della suola della pialla che vediamo non è quella che otterremo lavorando il legno ma esattamente il suo contrario. Per questo motivo, per ogni tipo di pialla che possediamo, è consigliabile tenere vicino un piccolo pezzo di legno, sul quale avremo ricavato la sagoma del profilo ottenibile da quella pialla, così da avere subito un riscontro visivo.
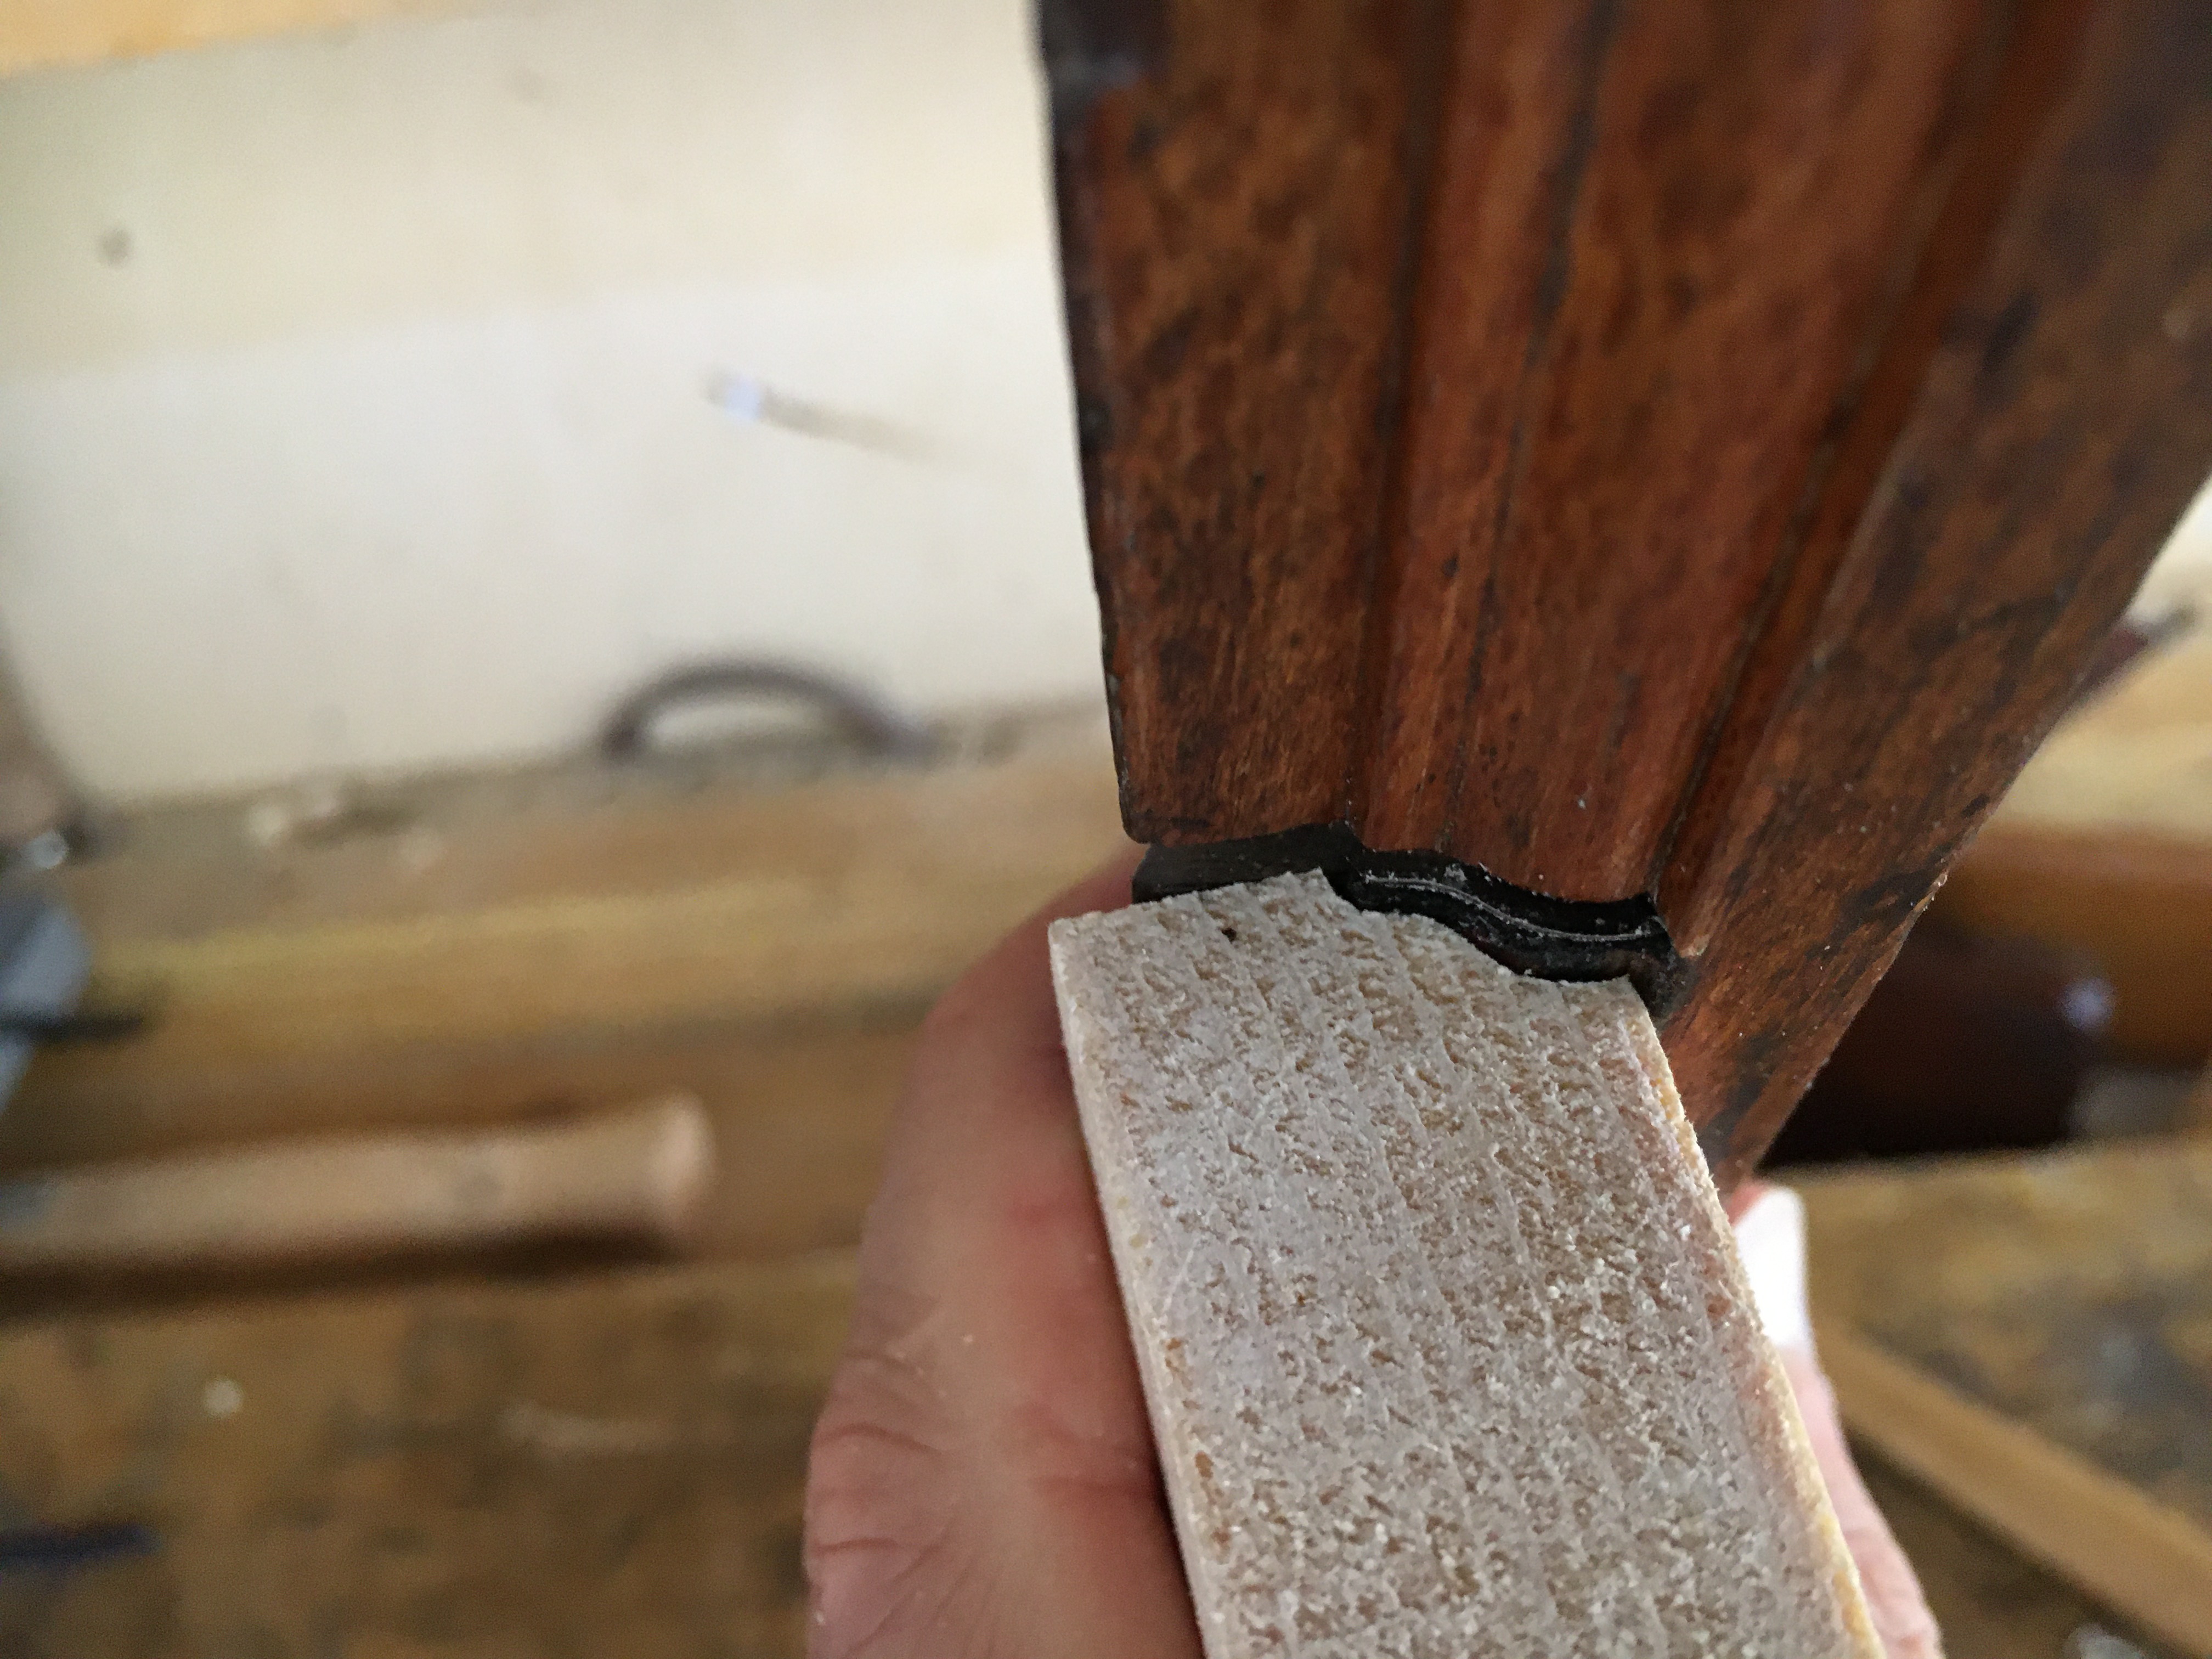
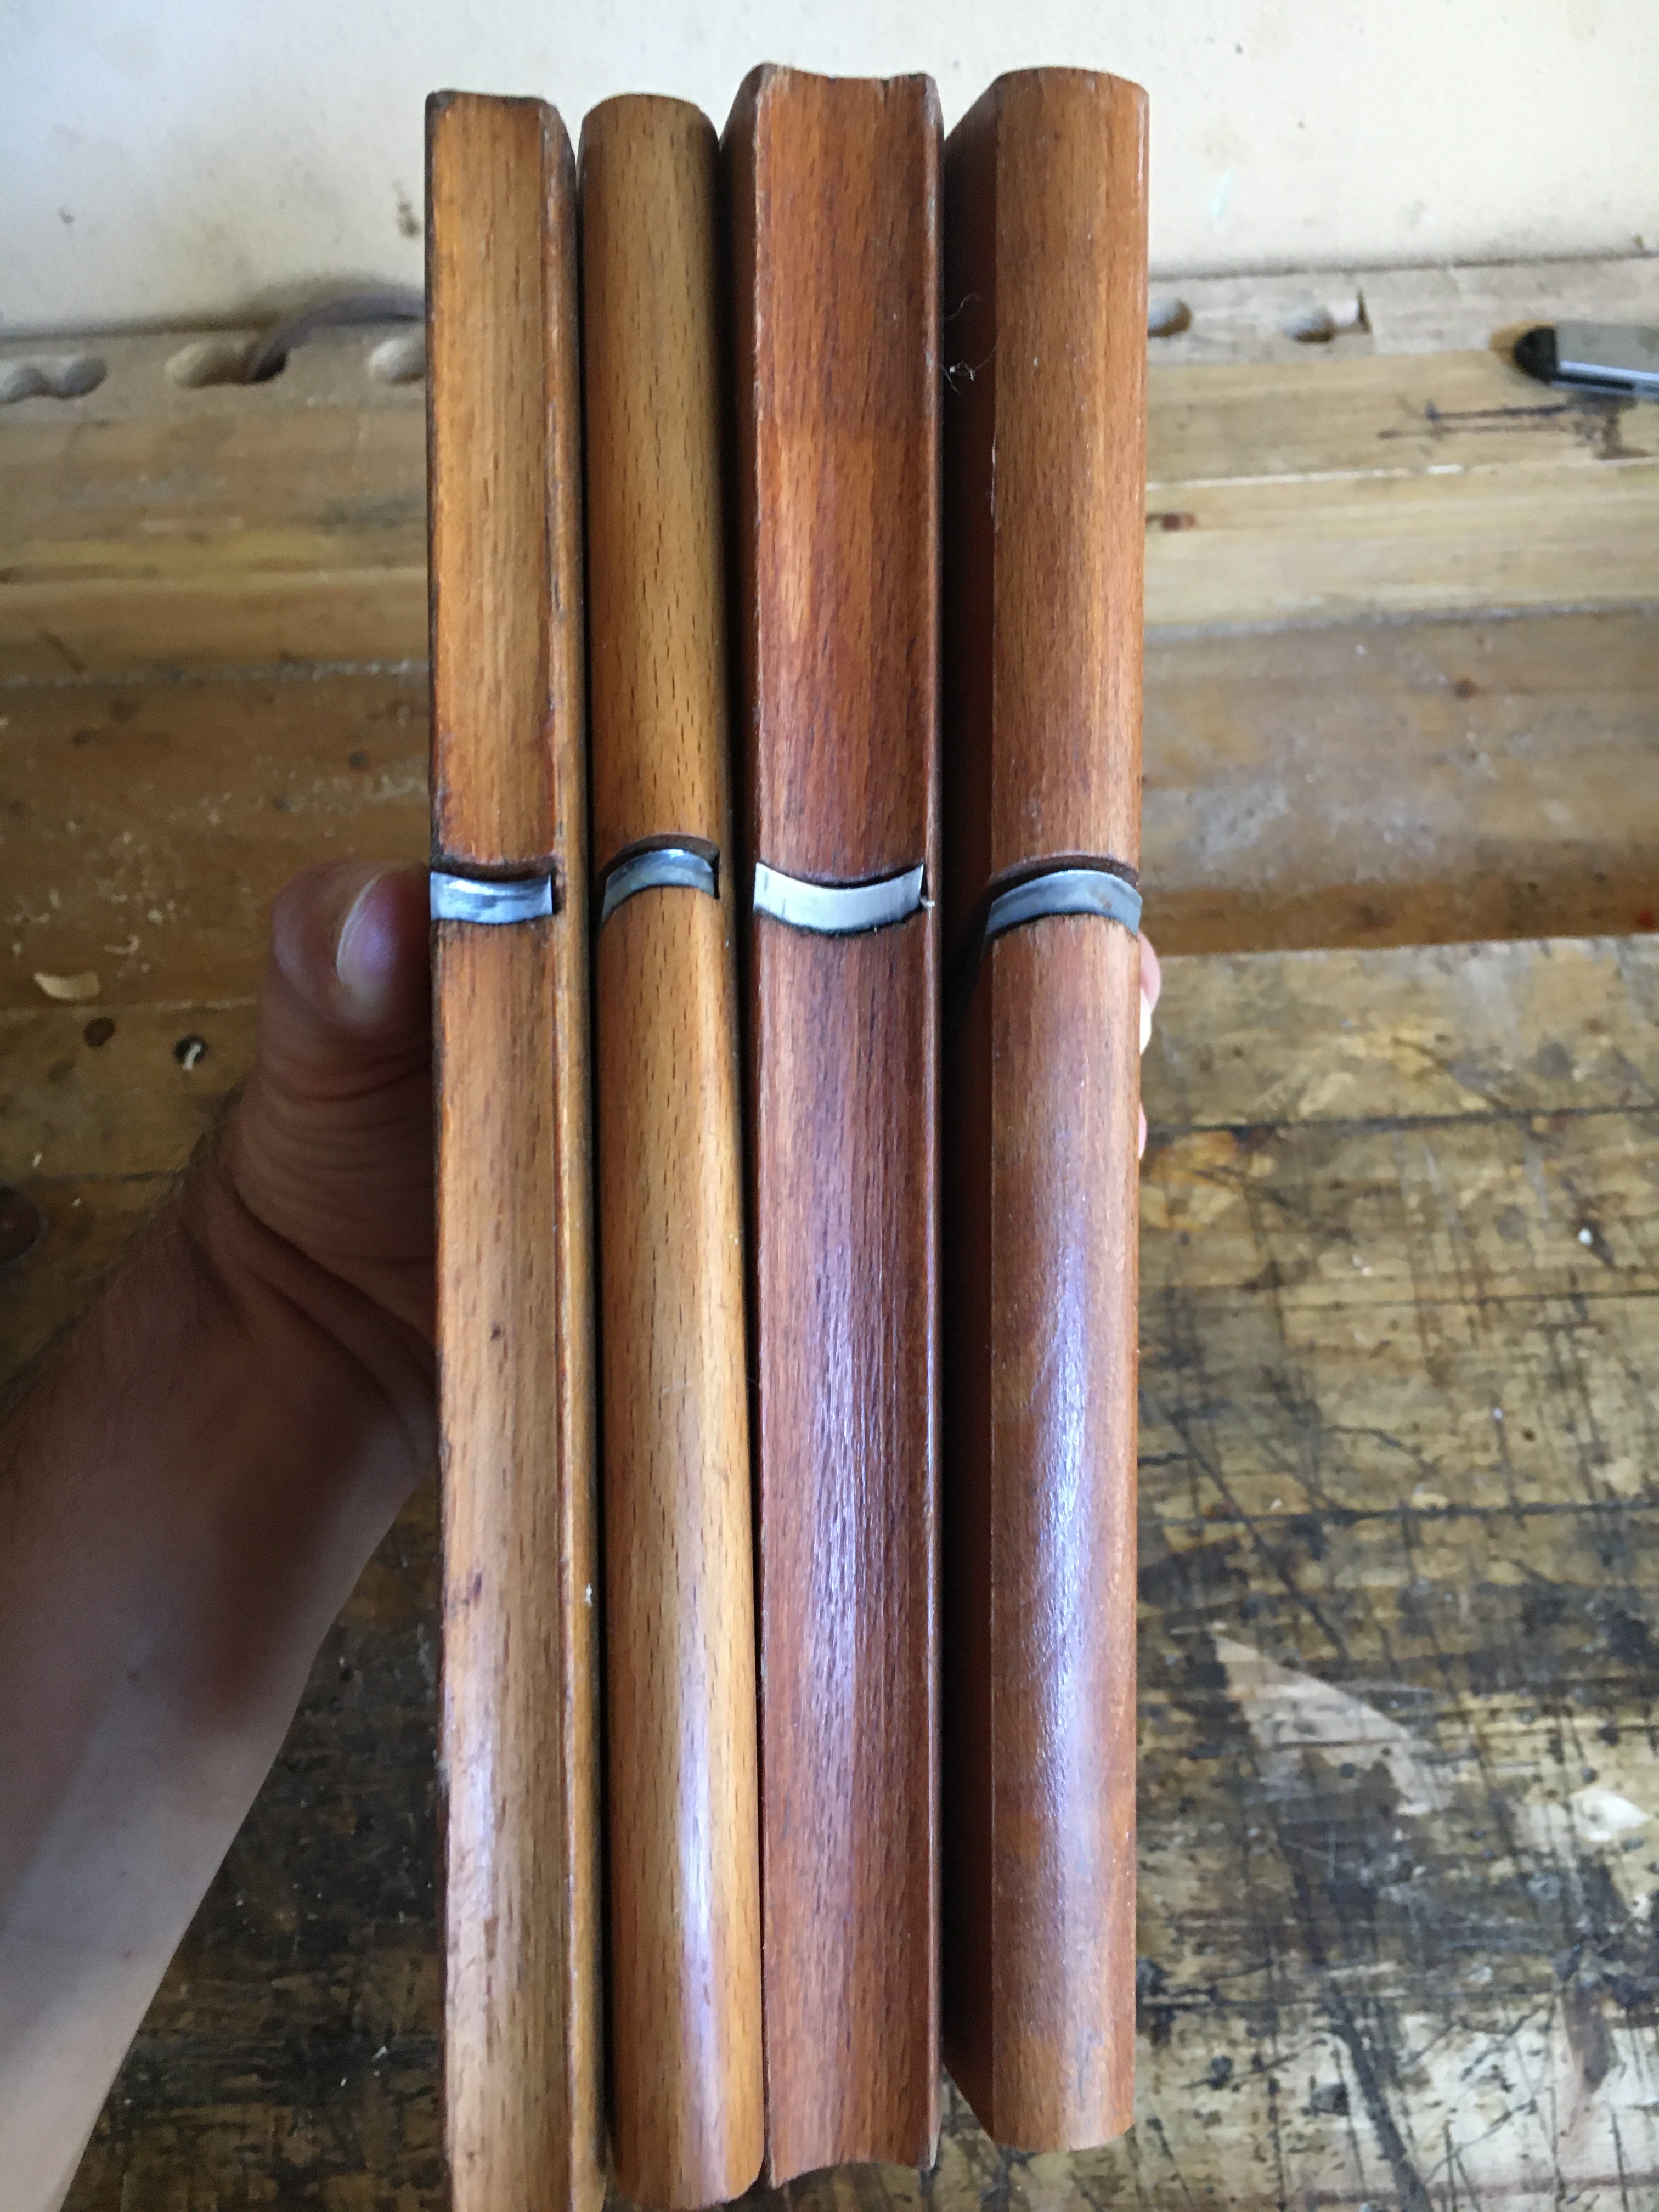
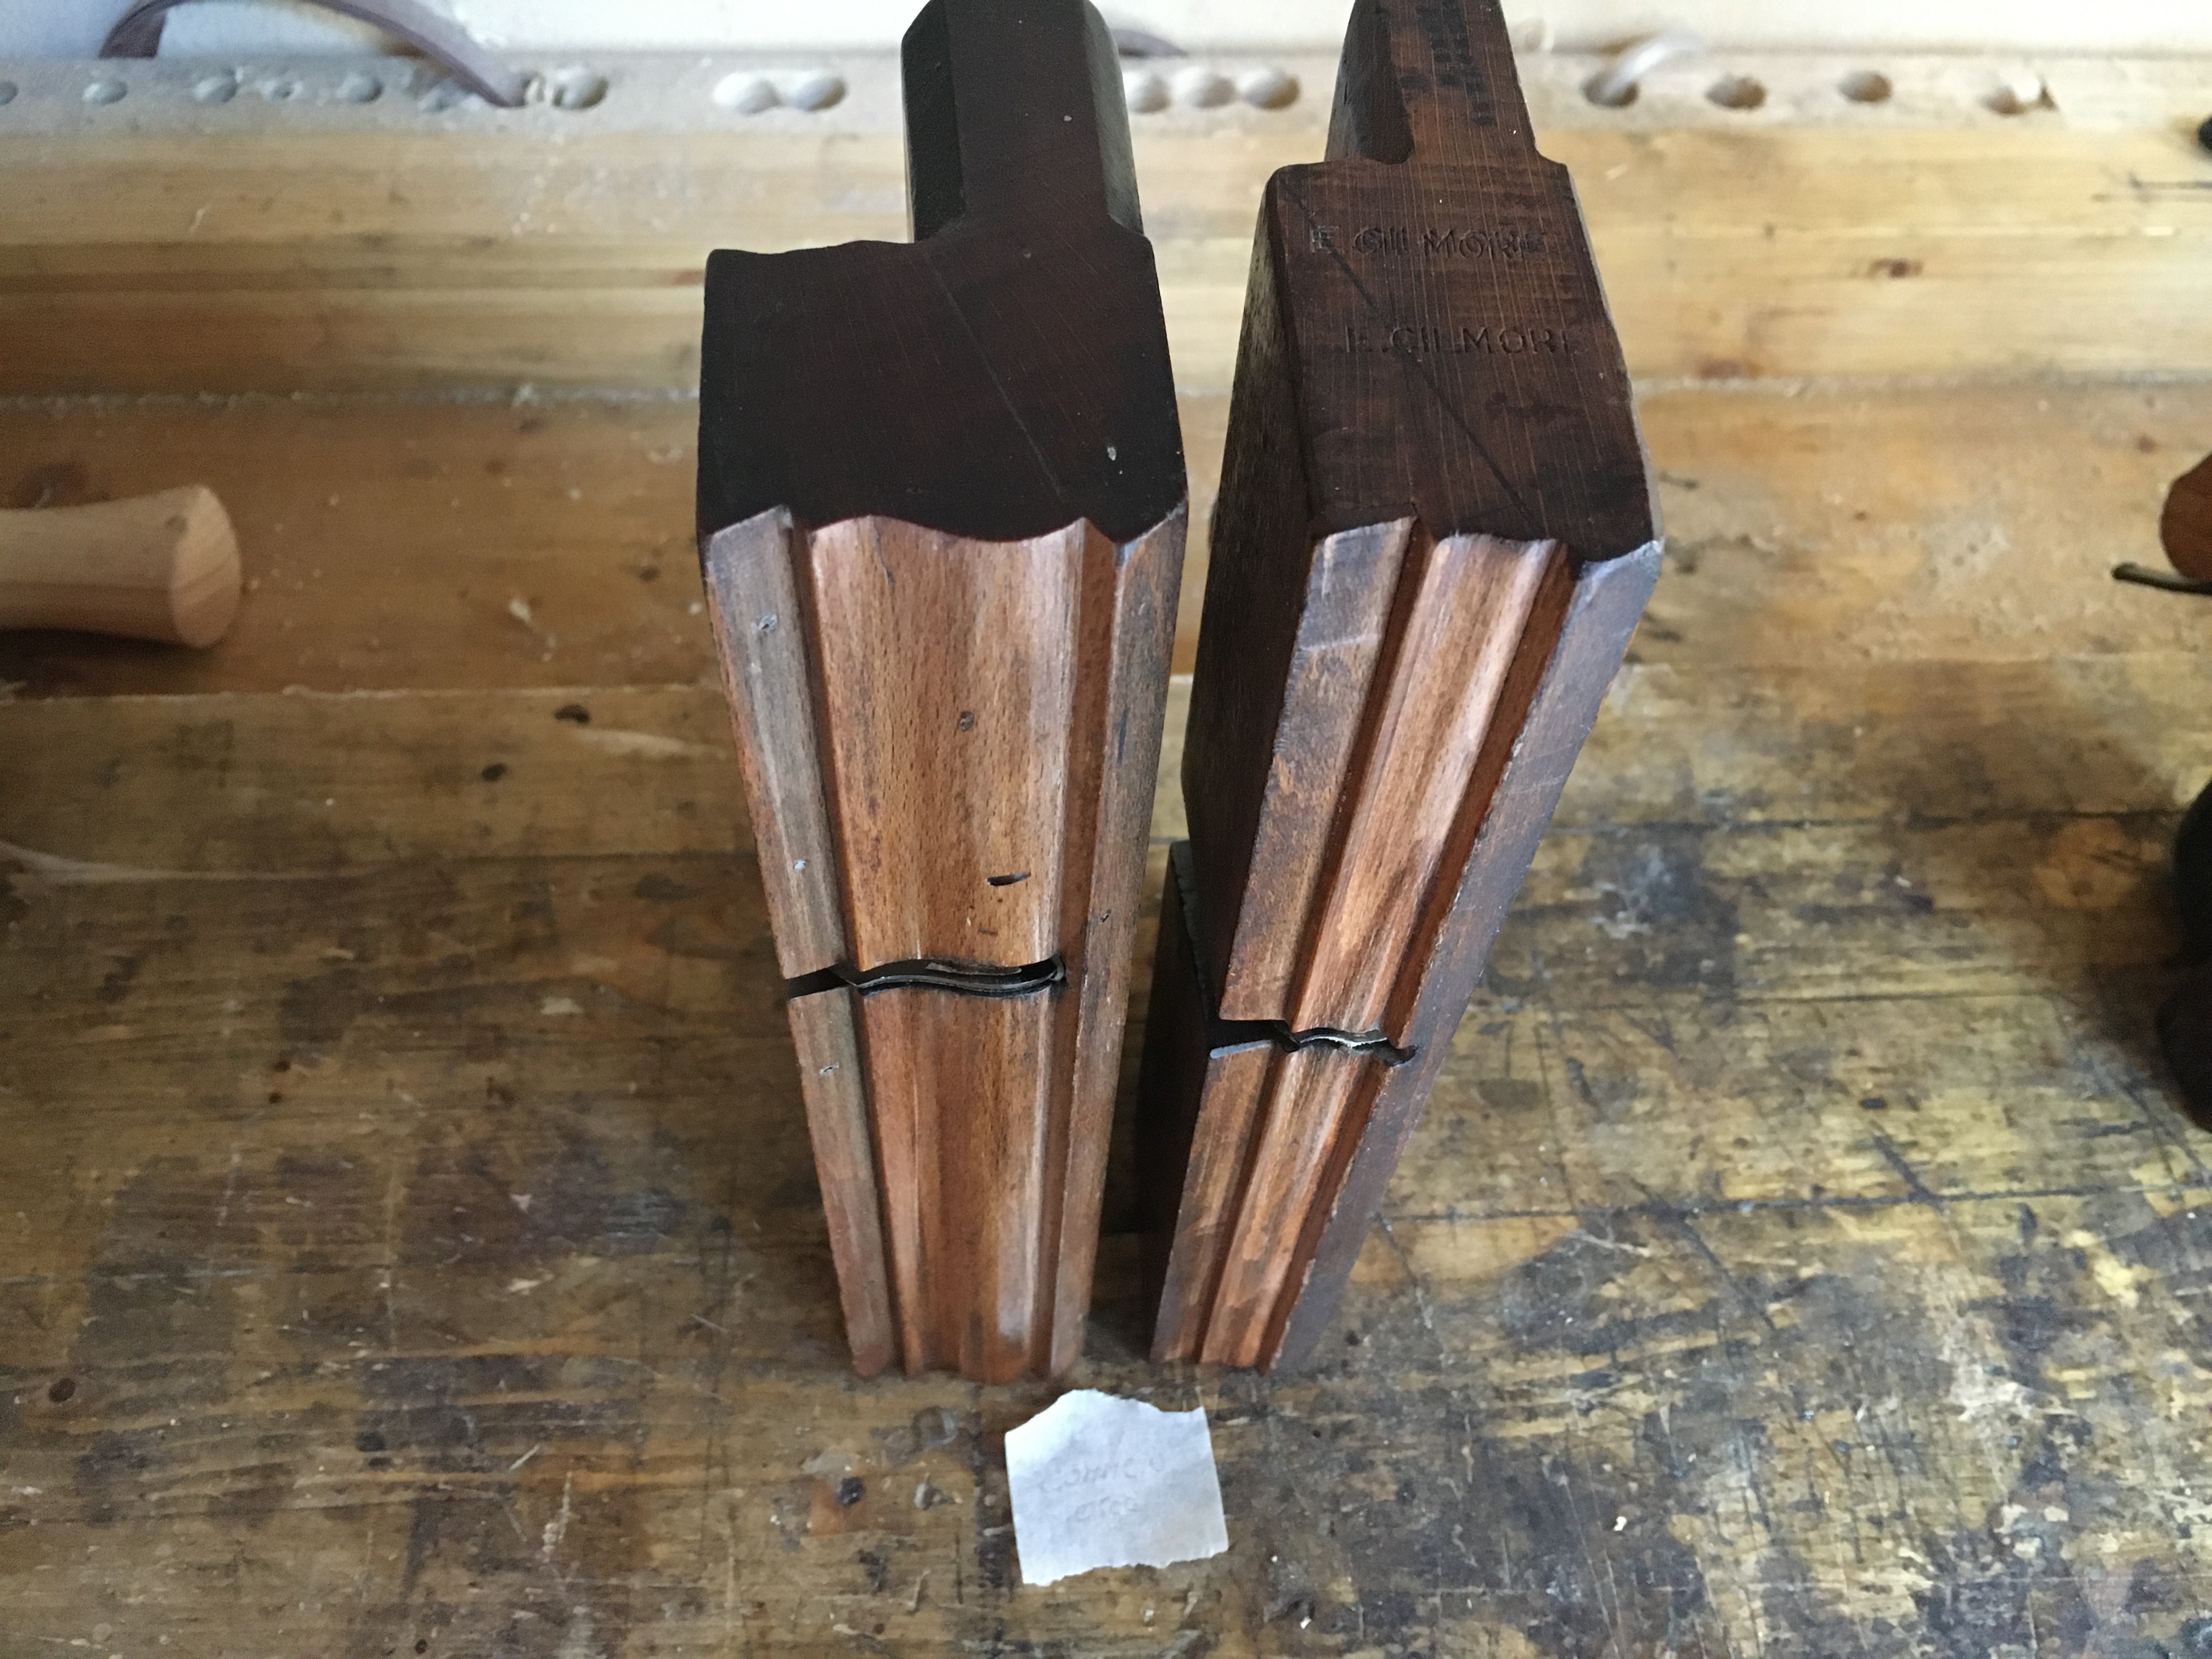
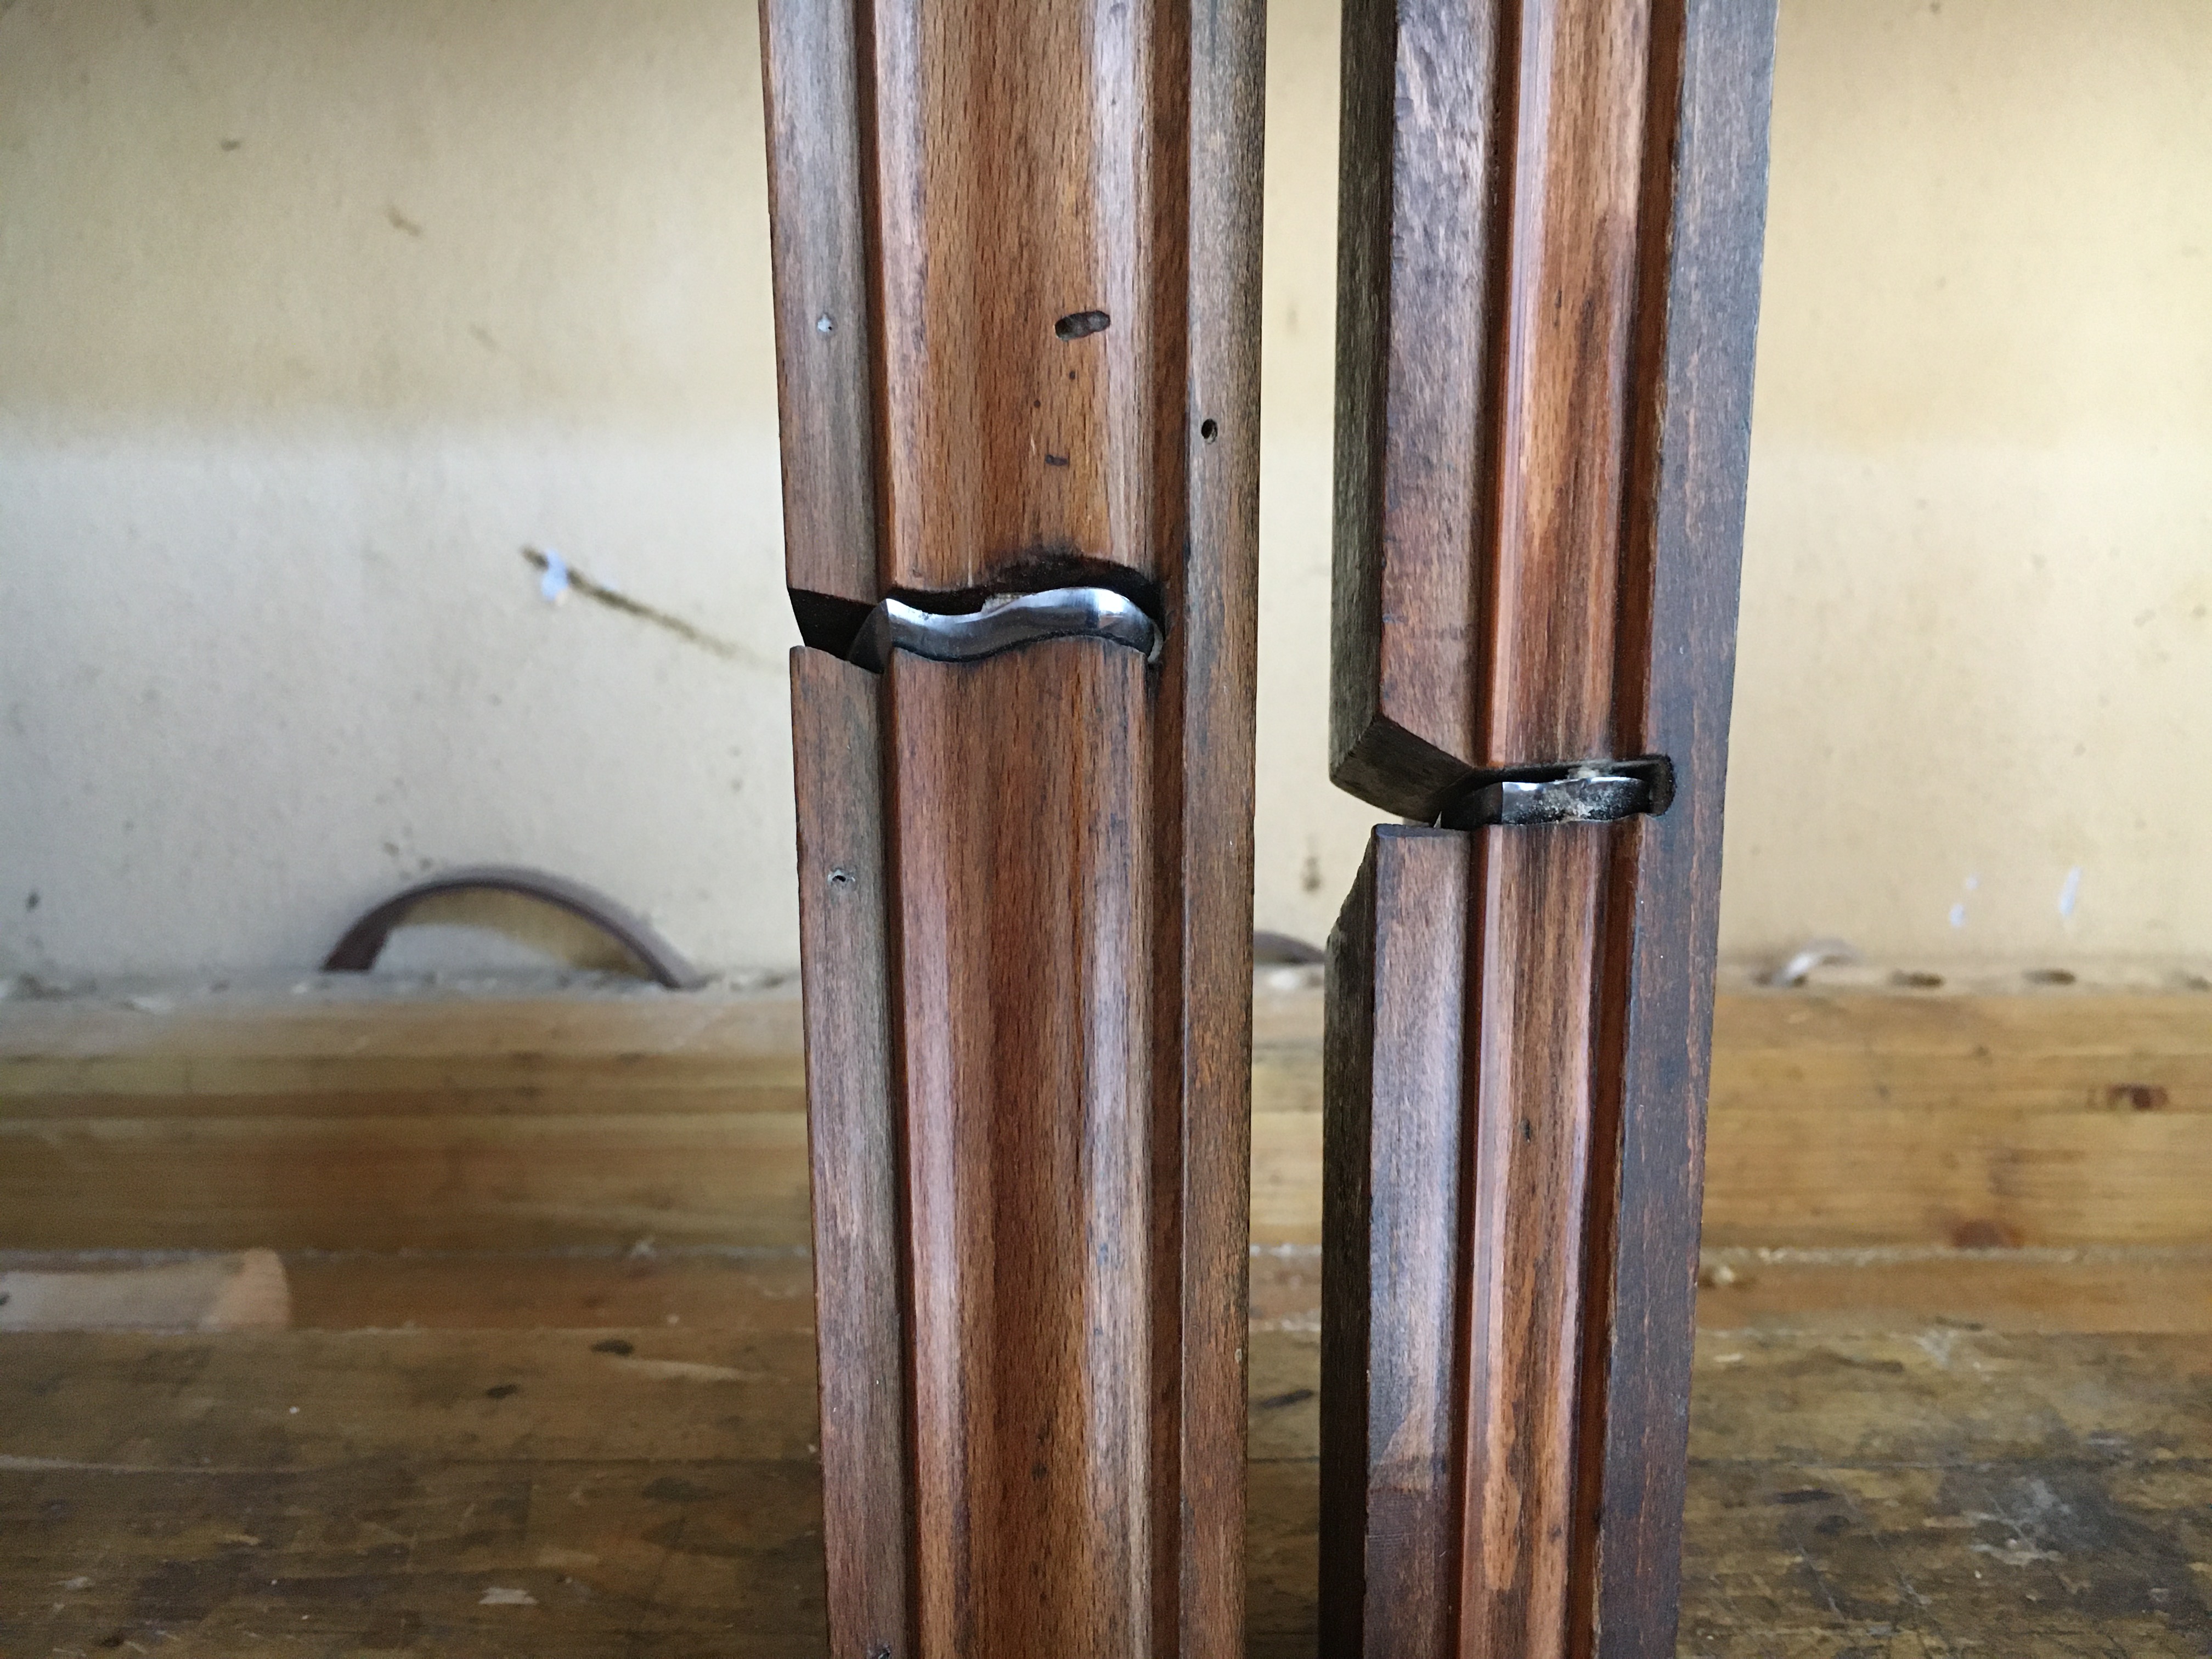
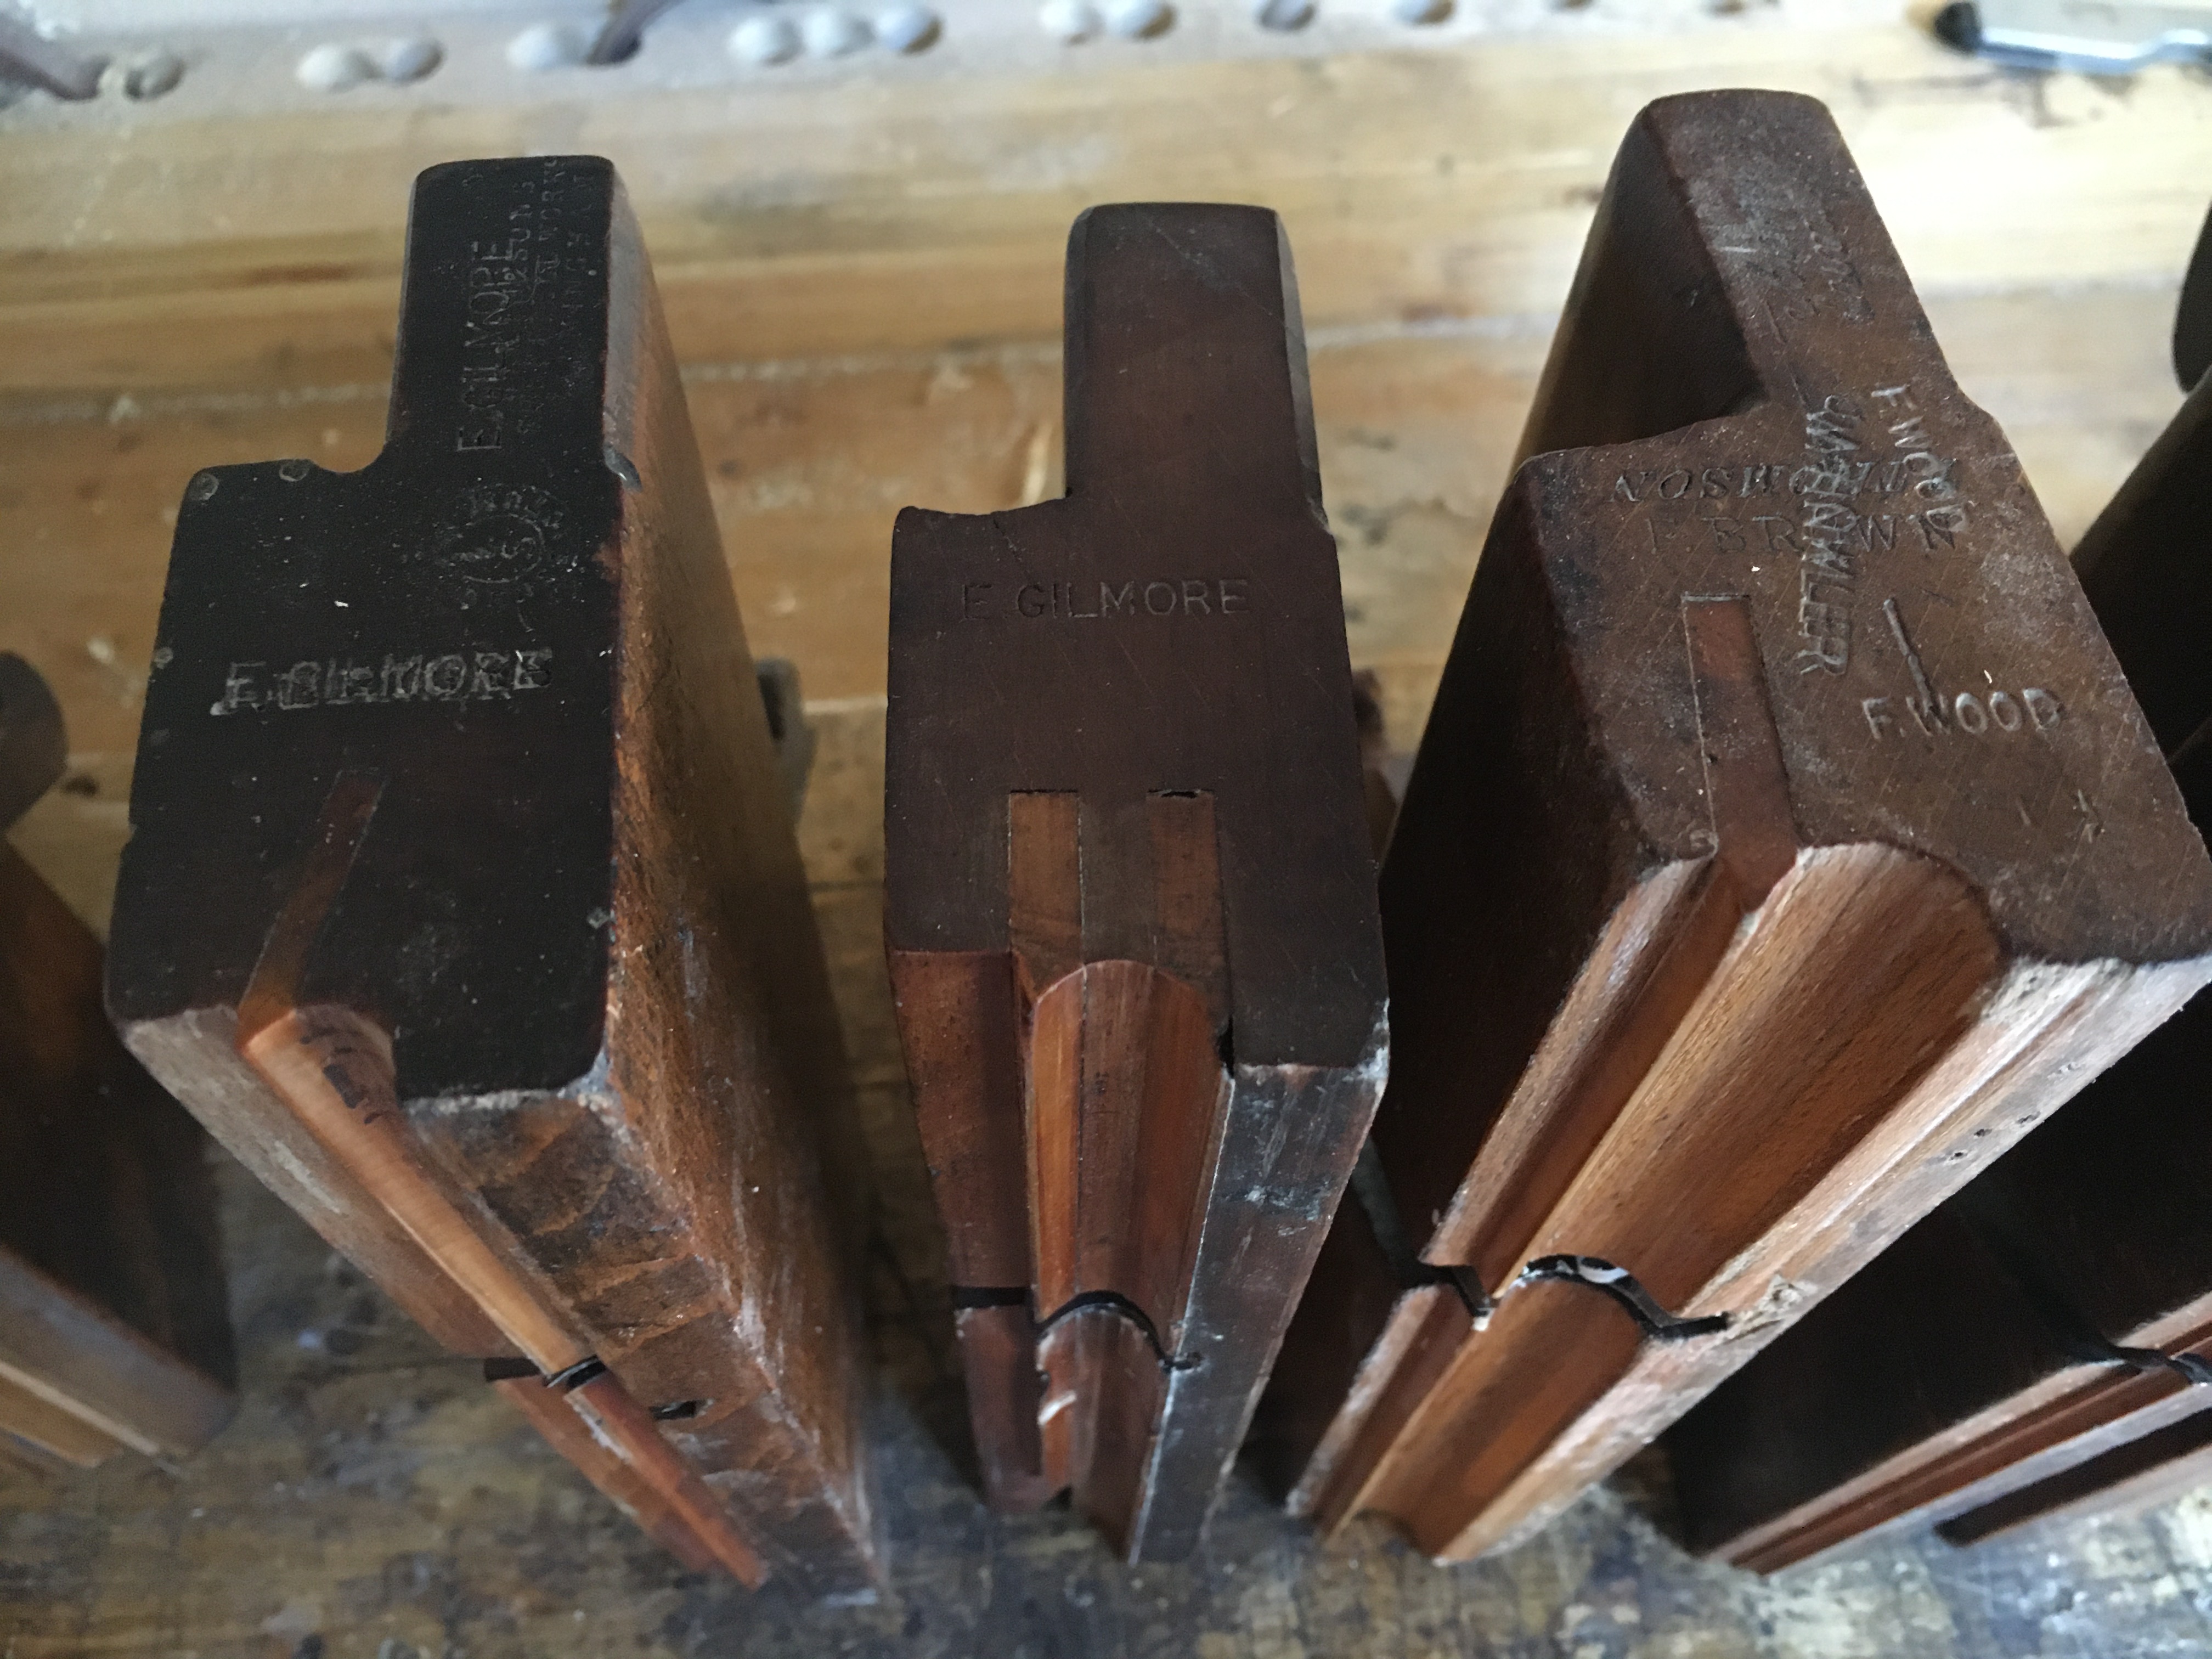 Le pialle per modanatura presentano anche un’altra particolarità. Non di rado infatti possiamo trovare esemplari che presentano degli inserti in legno duro (solitamente in legno di bosso), facilmente riconoscibili per il diverso colore e forma, inseriti nella suola della pialla (boxing). Questi listelli possono essere di varia forma e grandezza ed anche la tipologia di inserimento può divergere. Molto particolare e bello a vedersi è l’inserto a coda di rondine scorrevole. L’aggiunta di questi listelli in legno duro perseguiva lo scopo di prevenire l’usura della suola, sottoposta a continuo logorio, con la possibilità di poter essere sostituiti una volta consumati. Come accennato, esistono tantissimi modelli di pialla in grado di creare profili nel legno, spesso anche molto complessi. Farne una catalogazione in questo articolo sarebbe impossibile, oltrechè superfluo, ma reputo utile consigliare la lettura dei seguenti tre libri che, seppur in lingua inglese, illustrano molto bene la stragrande maggioranza dei profili ottenibili fornendo al contempo un’infinità di riferimenti storici:
British Planemakers from 1700 di W.L. Goodman seconda edizione, particolarmente utile per una ricerca storica sulle pialle da modanatura;
Mouldings in practice di M.S. Bickford, un libro relativamente recente che spiega molto bene le tecniche di piallatura;
The Wooden Plane di J.M. Whelan, un libro veramente esaustivo che affronta ogni aspetto relativo al mondo delle pialle da modanatura.
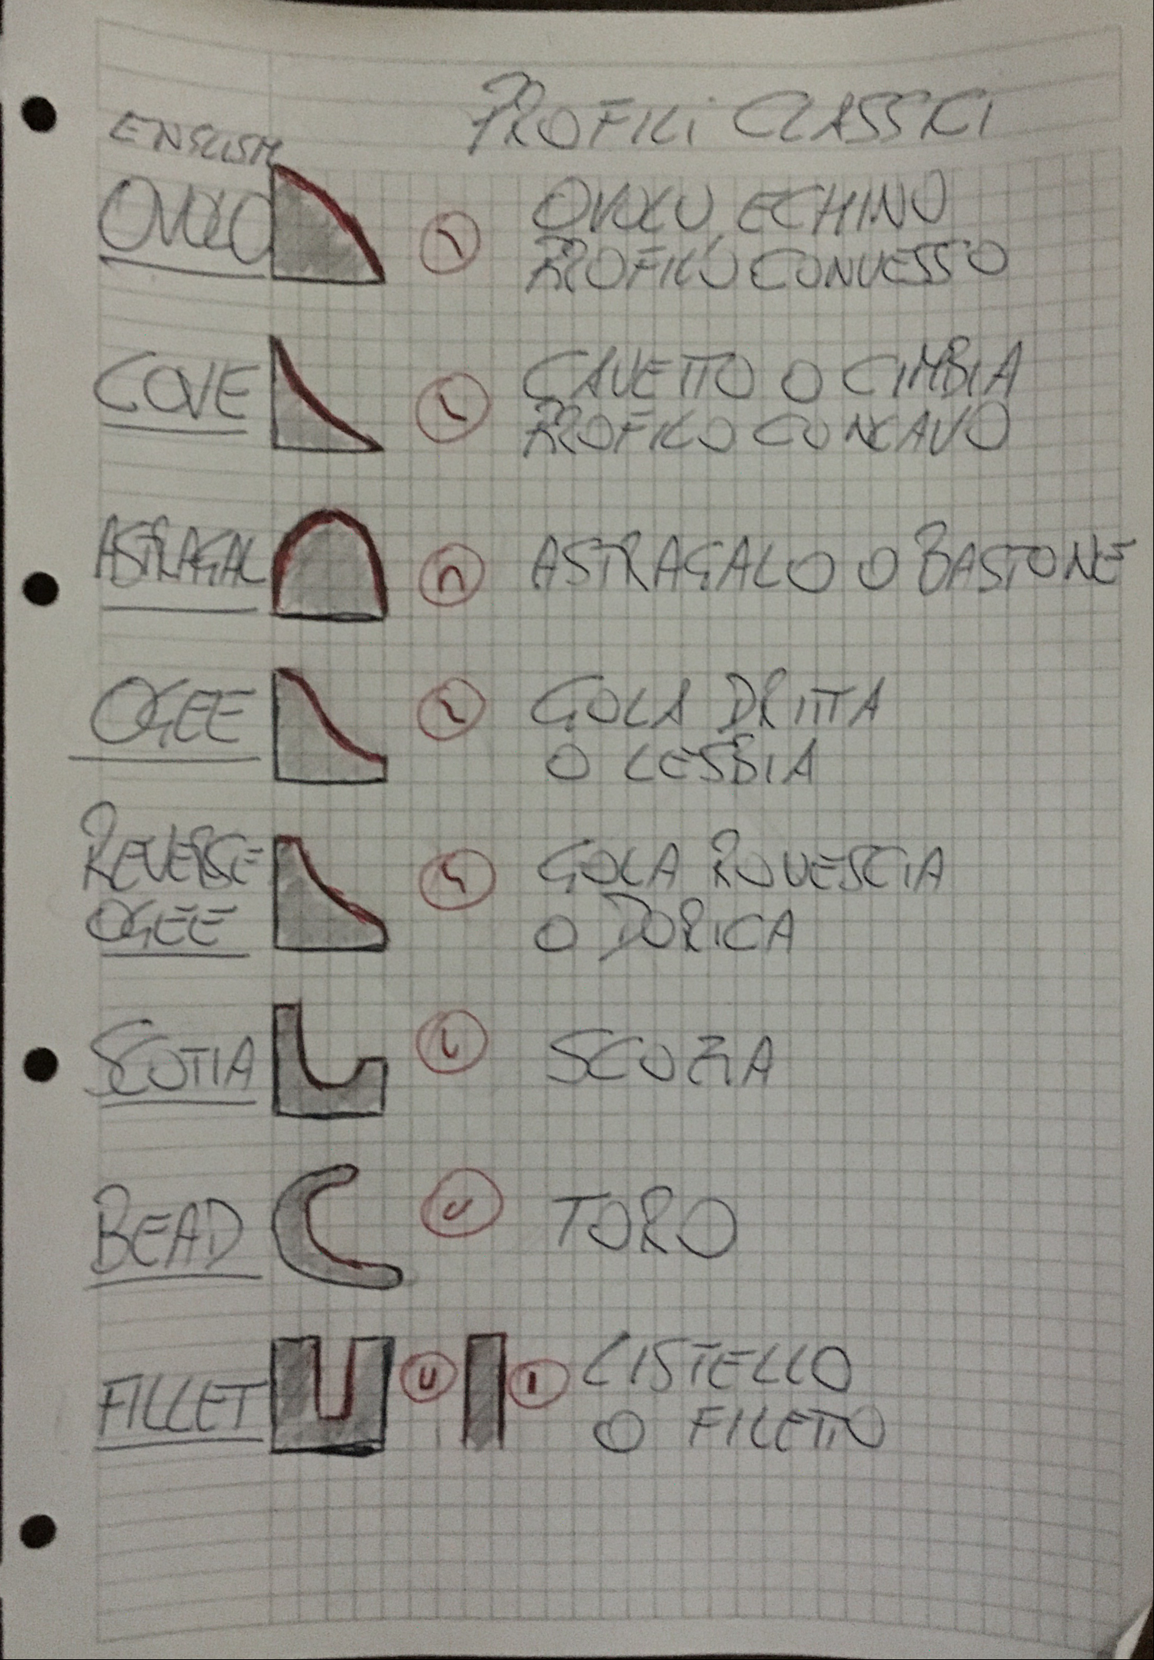
Profili classici.
Volendo comunque elencare i profili classici maggiormente diffusi potremmo indicare i seguenti:
Concavo, detto anche cavetto o cimbia. È un quarto di circonferenza ottenibile con una pialla con profilo convesso (round);
Convesso, detto anche ovolo o echino. È un quarto di circonferenza ottenibile con una pialla con profilo concavo (hollow);
Astragalo a profilo concavo. È una semicirconferenza ottenibile con una pialla con profilo convesso (round);
Gola. Di forma sinusoidale, formata da profili concavi e convessi consequenziali di un quarto di cerchio. Esiste la variante dritta (o lesbia) e rovescia (o dorica). È ottenibile con pialle per modanatura con lame opportunamente sagomate.
Scozia. Con profilo concavo, un arco di circonferenza variabile e con asse non centrato. È ottenibile con pialle con profilo convesso con la suola con angolo di spring.
Toro. È un profilo a sezione convessa di varia grandezza. La parte di circonferenza può essere simmetrica o meno. È ottenibile con pialle con profilo concavo con lame opportunamente sagomate.
Listello o filetto. A differenza degli altri profili è a sezione quadrata e può assumere la forma di un rilievo o di un canale. Sono ottenibile con particolari tipi di pialle utilizzate talvolta in coppia per realizzare un incastro dente e canale, come nelle perline.
 Salvo qualche rara eccezione tutti i profili delle pialle per modanatura possono definirsi variazioni sul tema e riconducibili ai profili classici riportati sopra.
Nelle modanature dei mobili d’epoca e nelle cornici antiche era di solito presente un solo tipo di profilo. Talvolta però, se le dimensioni lo permettevano, era possibile praticare anche più tipologie di profilo insieme usando all’occorrenza una sola pialla la cui lama potesse ricomprendere due diversi stili architettonici. Nella generalità dei casi però le modanature a profilo complesso erano create usando 2 diversi tipi di pialla per modanare, una con un profilo ovolo o cavetto e l’altra con un profilo a gola dritta o rovescia.
Pialle hollows and rounds.
Seppure le pialle da modanatura complesse, ovvero quelle in grado di creare profili elaborati nel legno, siano quelle di maggior fascino, le pialle maggiormente utilizzate, almeno in origine, furono quelle denominate hollows and rounds. Questo per la loro relativa semplicità di utilizzo, velocità di affilatura, ed estrema versatilità nel poter creare forme curve nel legno semplicemente alternando il profilo concavo e convesso. Inoltre erano estremamente utili per rimuovere preventivamente e velocemente il materiale prima di finire il lavoro con la pialla della sagoma desiderata. Questa tipologia di pialle merita un piccolo approfondimento.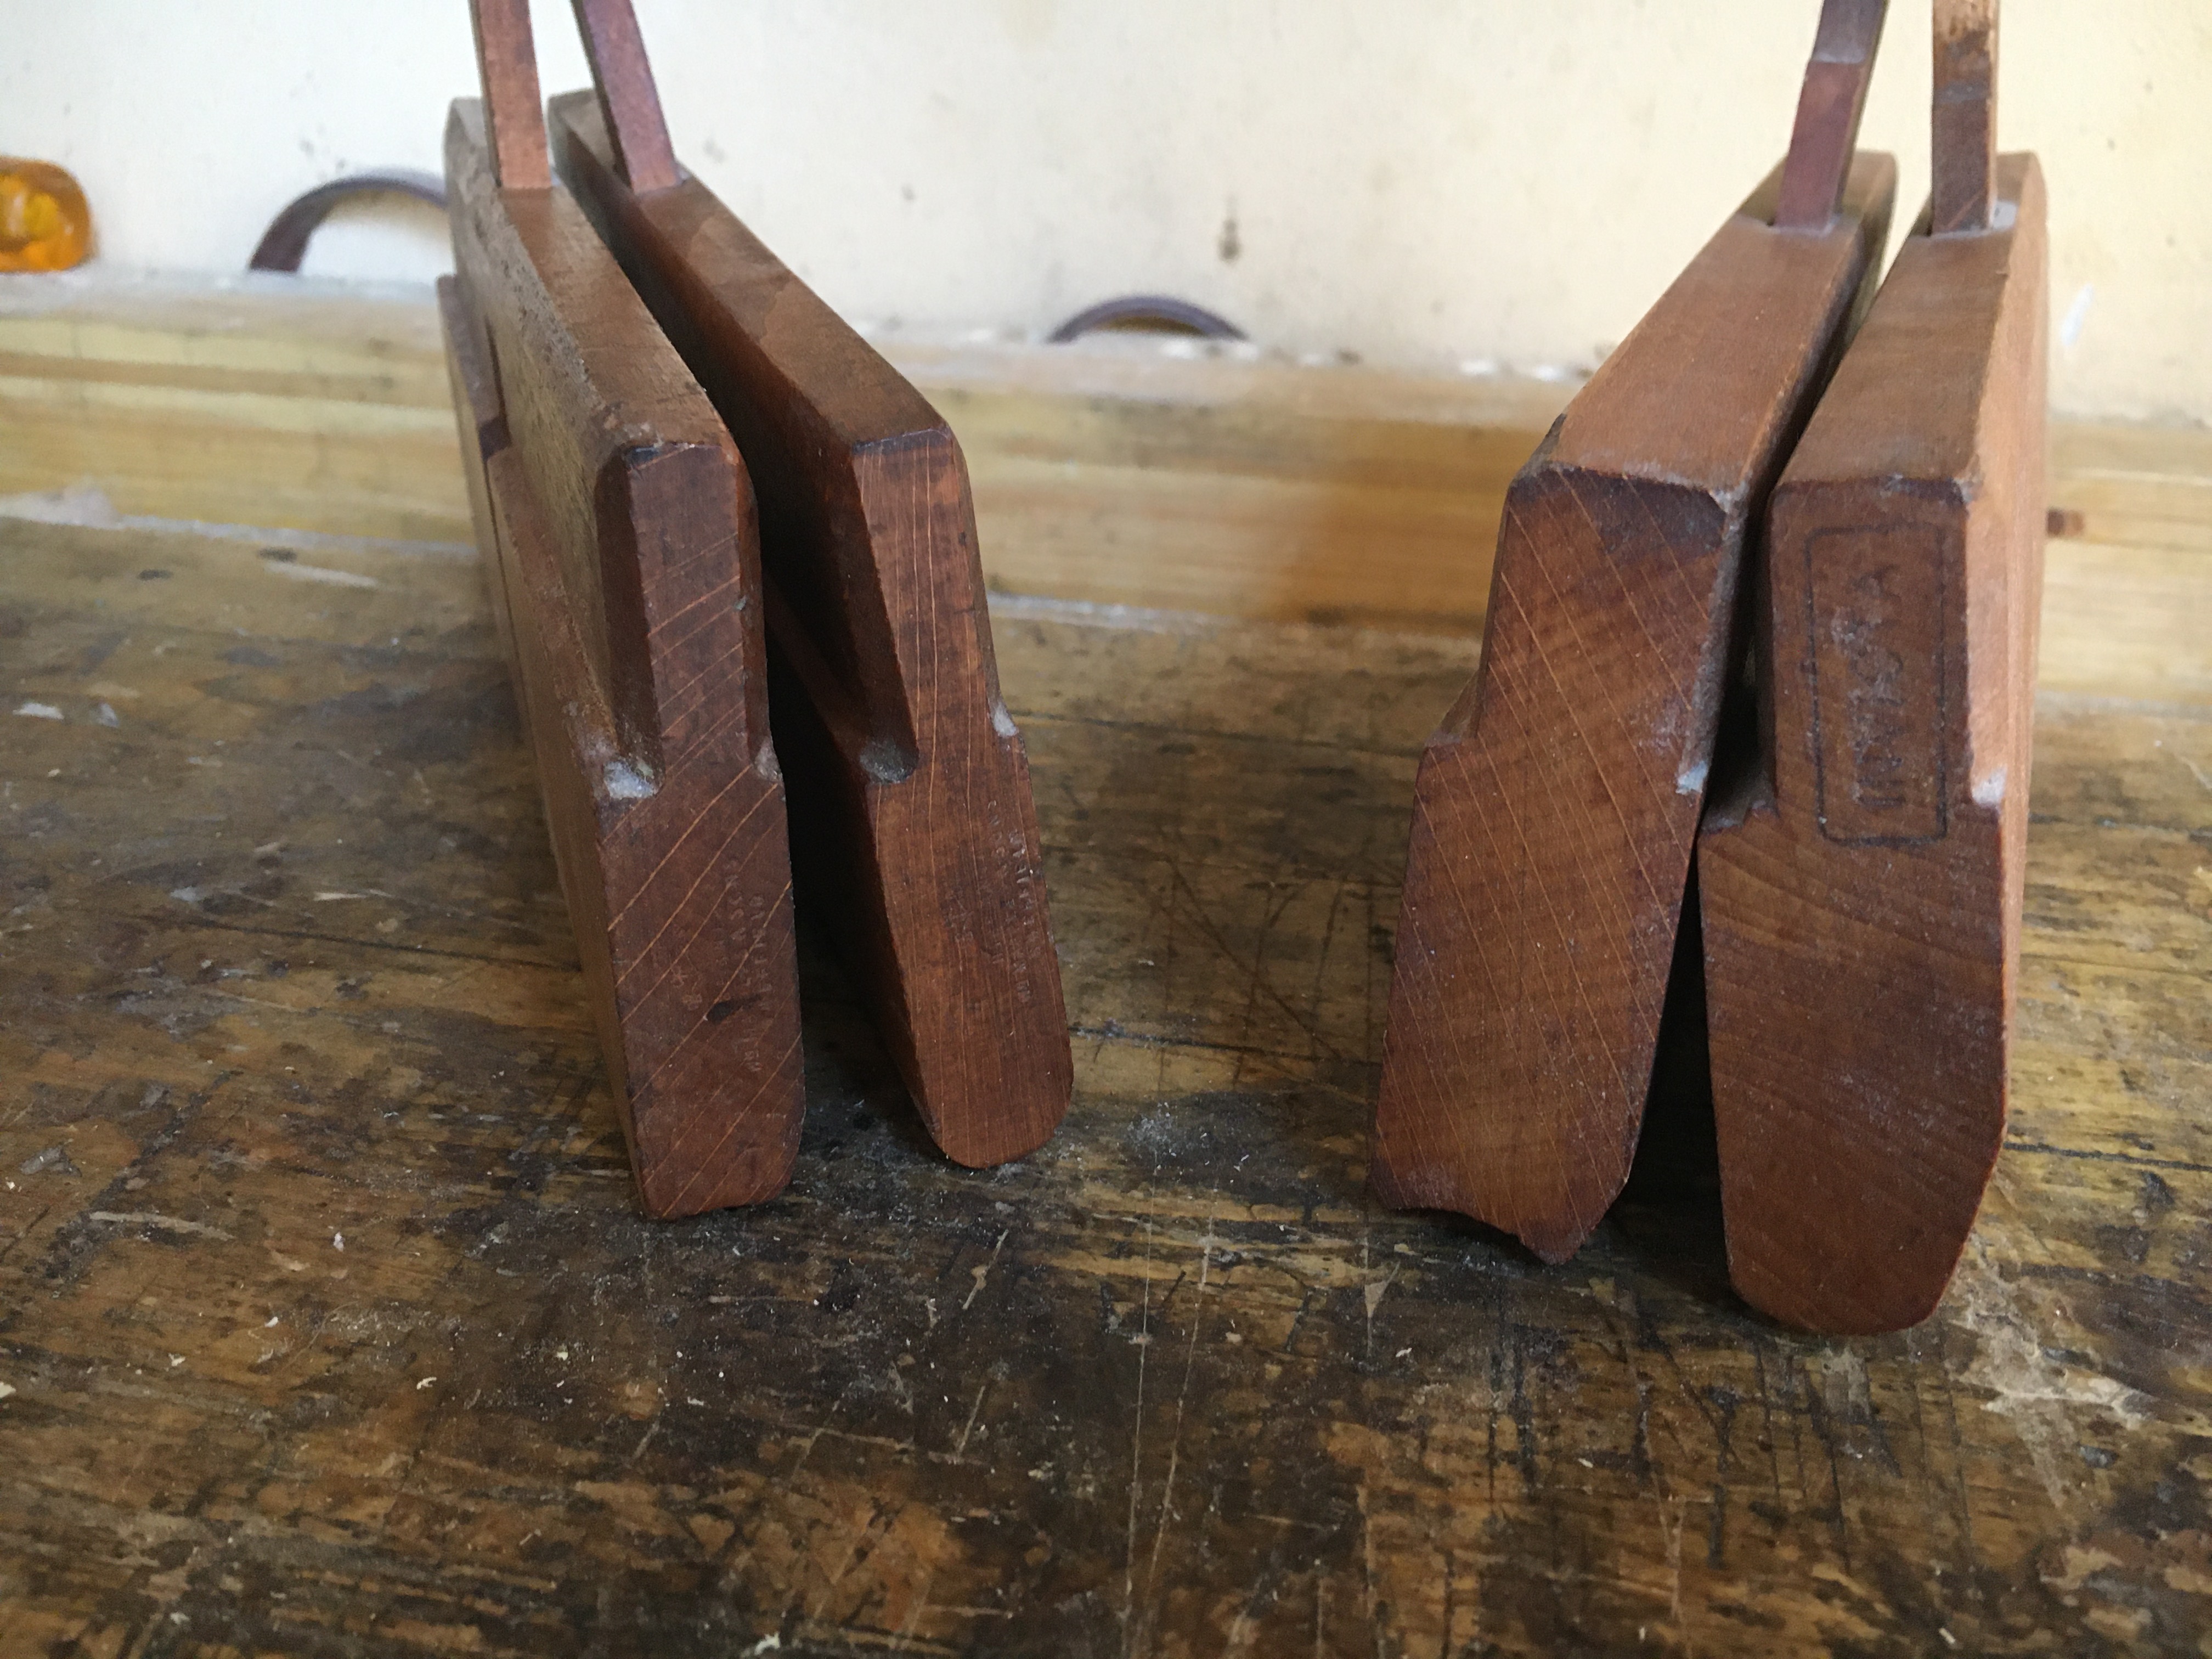
 Le pialle per modanatura hollows and rounds si traducono in italiano come pialle concave e convesse. La terminologia concavo e convesso indica la forma della suola e non il profilo ottenibile sul legno (anche se negli USA spesso si indica il contrario). Quindi quando si parla di una pialla hollow sarà una pialla con suola e lama a profilo concavo in grado di praticare profili di forma convessa. Quando si parla di una pialla round sarà una pialla con suola e lama a profilo convesso in grado di praticare profili di forma concava. Venivano solitamente vendute in coppie (una con profilo concavo ed una con profilo convesso) di uguale misura.
 Molto diffuso (ed oggi ricercato dai collezionisti) era il set comprendente 18 paia di pialle (full set) di svariate raggiature ma anche il set più piccolo da 9 paia (half set). Questo tipo di pialle sono in grado di ricavare circa un quarto di cerchio nel legno. La loro particolarità sta nel fatto che non sono provviste di battuta laterale e stop di profondità. Quindi le rende adatte a lavorare non solo sul fianco di un pezzo ma su qualsiasi faccia del pezzo e dando la possibilità di intervenire da ambo le direzioni di piallatura. L’unica accortezza è quella di riuscire a mantenerle in posizione stabile durante tutto il movimento di piallatura, cosa non propriamente agevole se non avendo l’accortezza di aiutarsi con l’appoggio delle dita e comunque se non dopo aver acquisito una certa esperienza.
 Può tornare utile in questi casi aiutarsi con un listello di legno che faccia da riscontro e da battuta al fianco della pialla così da poterla mantenere sempre nella stessa posizione. Queste pialle sono volgarmente chiamate bastoni anche se, volendo essere precisi, bastone è solo la pialla con profilo convesso mentre si chiama forcella (dalla forma della lama) la pialla con profilo concavo. Volendo acquistarle su Ebay bisogna prestare particolare attenzione alla misura della lama in quanto, se la coppia non è stata realizzata dallo stesso produttore, possono esserci piccole differenze in termini di raggiatura della lama. Meglio quindi, ove possibile, acquistare coppie di pialle che riportano lo stesso timbro del produttore impresso sul fronte e/o sul retro della suola.
I profili complessi.
Molto di quanto detto sino ad adesso per le pialle a profilo concavo e convesso vale anche per le pialle in grado di riprodurre profili complessi, ovvero quelle in grado di creare modanature con più profili classici contemporaneamente. Talvolta questo era possibile con pialle a profilo complesso di dimensioni notevoli, che potevano arrivare a misurare svariati centimetri di larghezza. Molto più spesso però, come già accennato sopra, i profili complessi altro non erano che l’unione nella stessa modanatura di più profili classici, solitamente due, ottenibili dall’utilizzo di due diversi tipi di pialla, solitamente una con profilo ad ovolo o cavetto e l’altra con profilo a gola dritta o rovescia.

Quando si ha a che fare con pialle con i profili classici e quindi con suole particolarmente elaborate, il problema è quello che ci si possa trovare con una suola non perfettamente planare (in lunghezza o in larghezza) o con un profilo non più corrispondente a quello della lama in dotazione. In questi casi bisogna intervenire sul corpo pialla o sulla lama stessa, cercando ove possibile di ovviare al problema. Se il profilo è danneggiato oppure i rilievi sono troppo smussati e irregolari, risulta molto difficile poter intervenire con il restauro, anche se si può comunque tentare. Tra tutti i difetti riscontrabili penso che quello del profilo della suola usurato sia comunque il più grave in assoluto. Se la lama risulta troppo spostata lateralmente verso sinistra rispetto al profilo si può cercare di intervenire limando con attenzione il fianco destro della lama e cercare così di riportarla in asse, oppure provare ad intervenire direttamente nella gola che ospita il cuneo e la lama creando un ulteriore spazio laterale in grado di ospitare il fianco della lama. Se la lama fosse invece spostata troppo verso destra rispetto al profilo della suola si può tentare di inserire uno spessore nella gola sul fianco destro. Se il cuneo fosse troppo lento si può tentare di ricostruirlo nella parte usurata oppure crearne uno nuovo. Il problema principale di questo tipo di pialle è che quelle in circolazione sono quasi tutte di origine anglosassone e quindi acquistabili usate esclusivamente on line su siti specializzati o su Ebay.co.uk. In quest’ultimo caso molto spesso le descrizioni fornite dal venditore sono approssimative, vuoi un po’ per disonestà, vuoi per effettiva ignoranza riguardo le caratteristiche tecniche di ciò che si vende. Spesso poi le foto inserite non aiutano a capire se ci troviamo di fronte ad un esemplare in buone condizioni o meno.
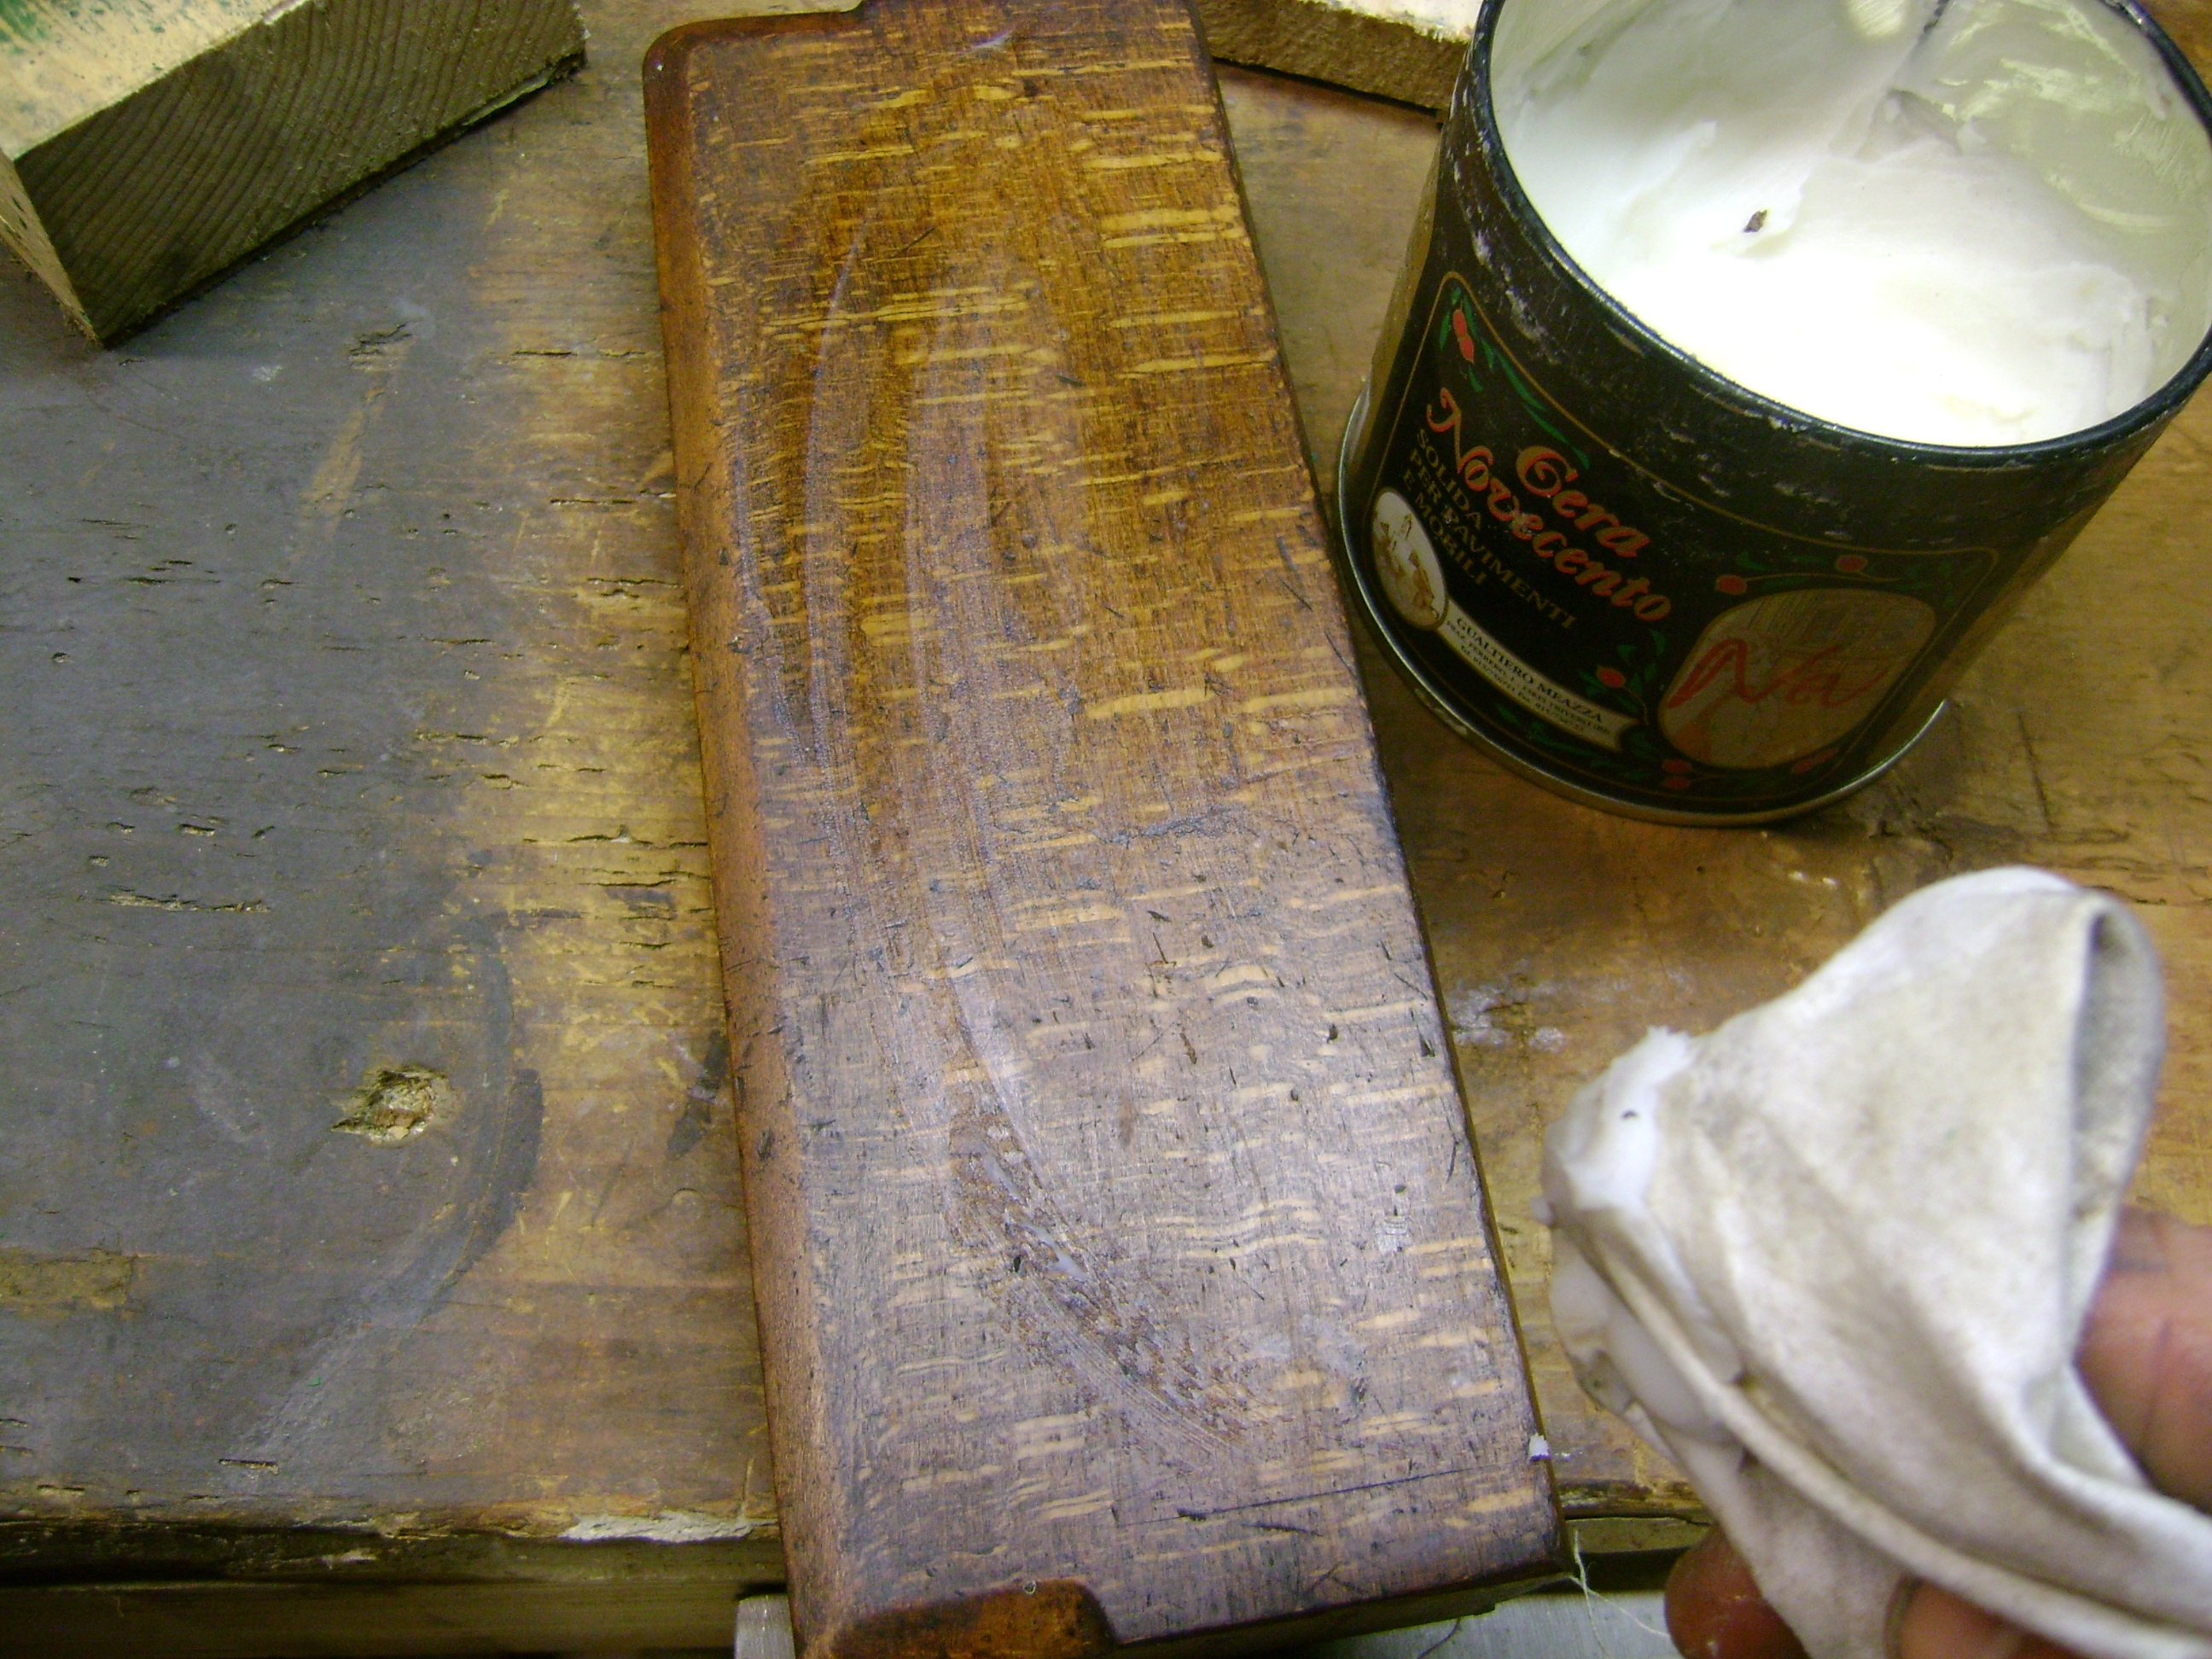
 In linea generale si può dire che quasi tutte le pialle usate avranno sicuramente bisogno di una buona pulizia con acqua e sapone o acqua e aceto. Quindi un paio di mani di olio (di lino cotto o crudo ad esempio) intervallate con carta abrasiva fine o lana di acciaio e per finire una passata di cera neutra. È sempre meglio comunque non accanirsi troppo con interventi aggressivi anche allo scopo di preservare quella patina naturale che il tempo ha depositato su questo tipo di utensile.
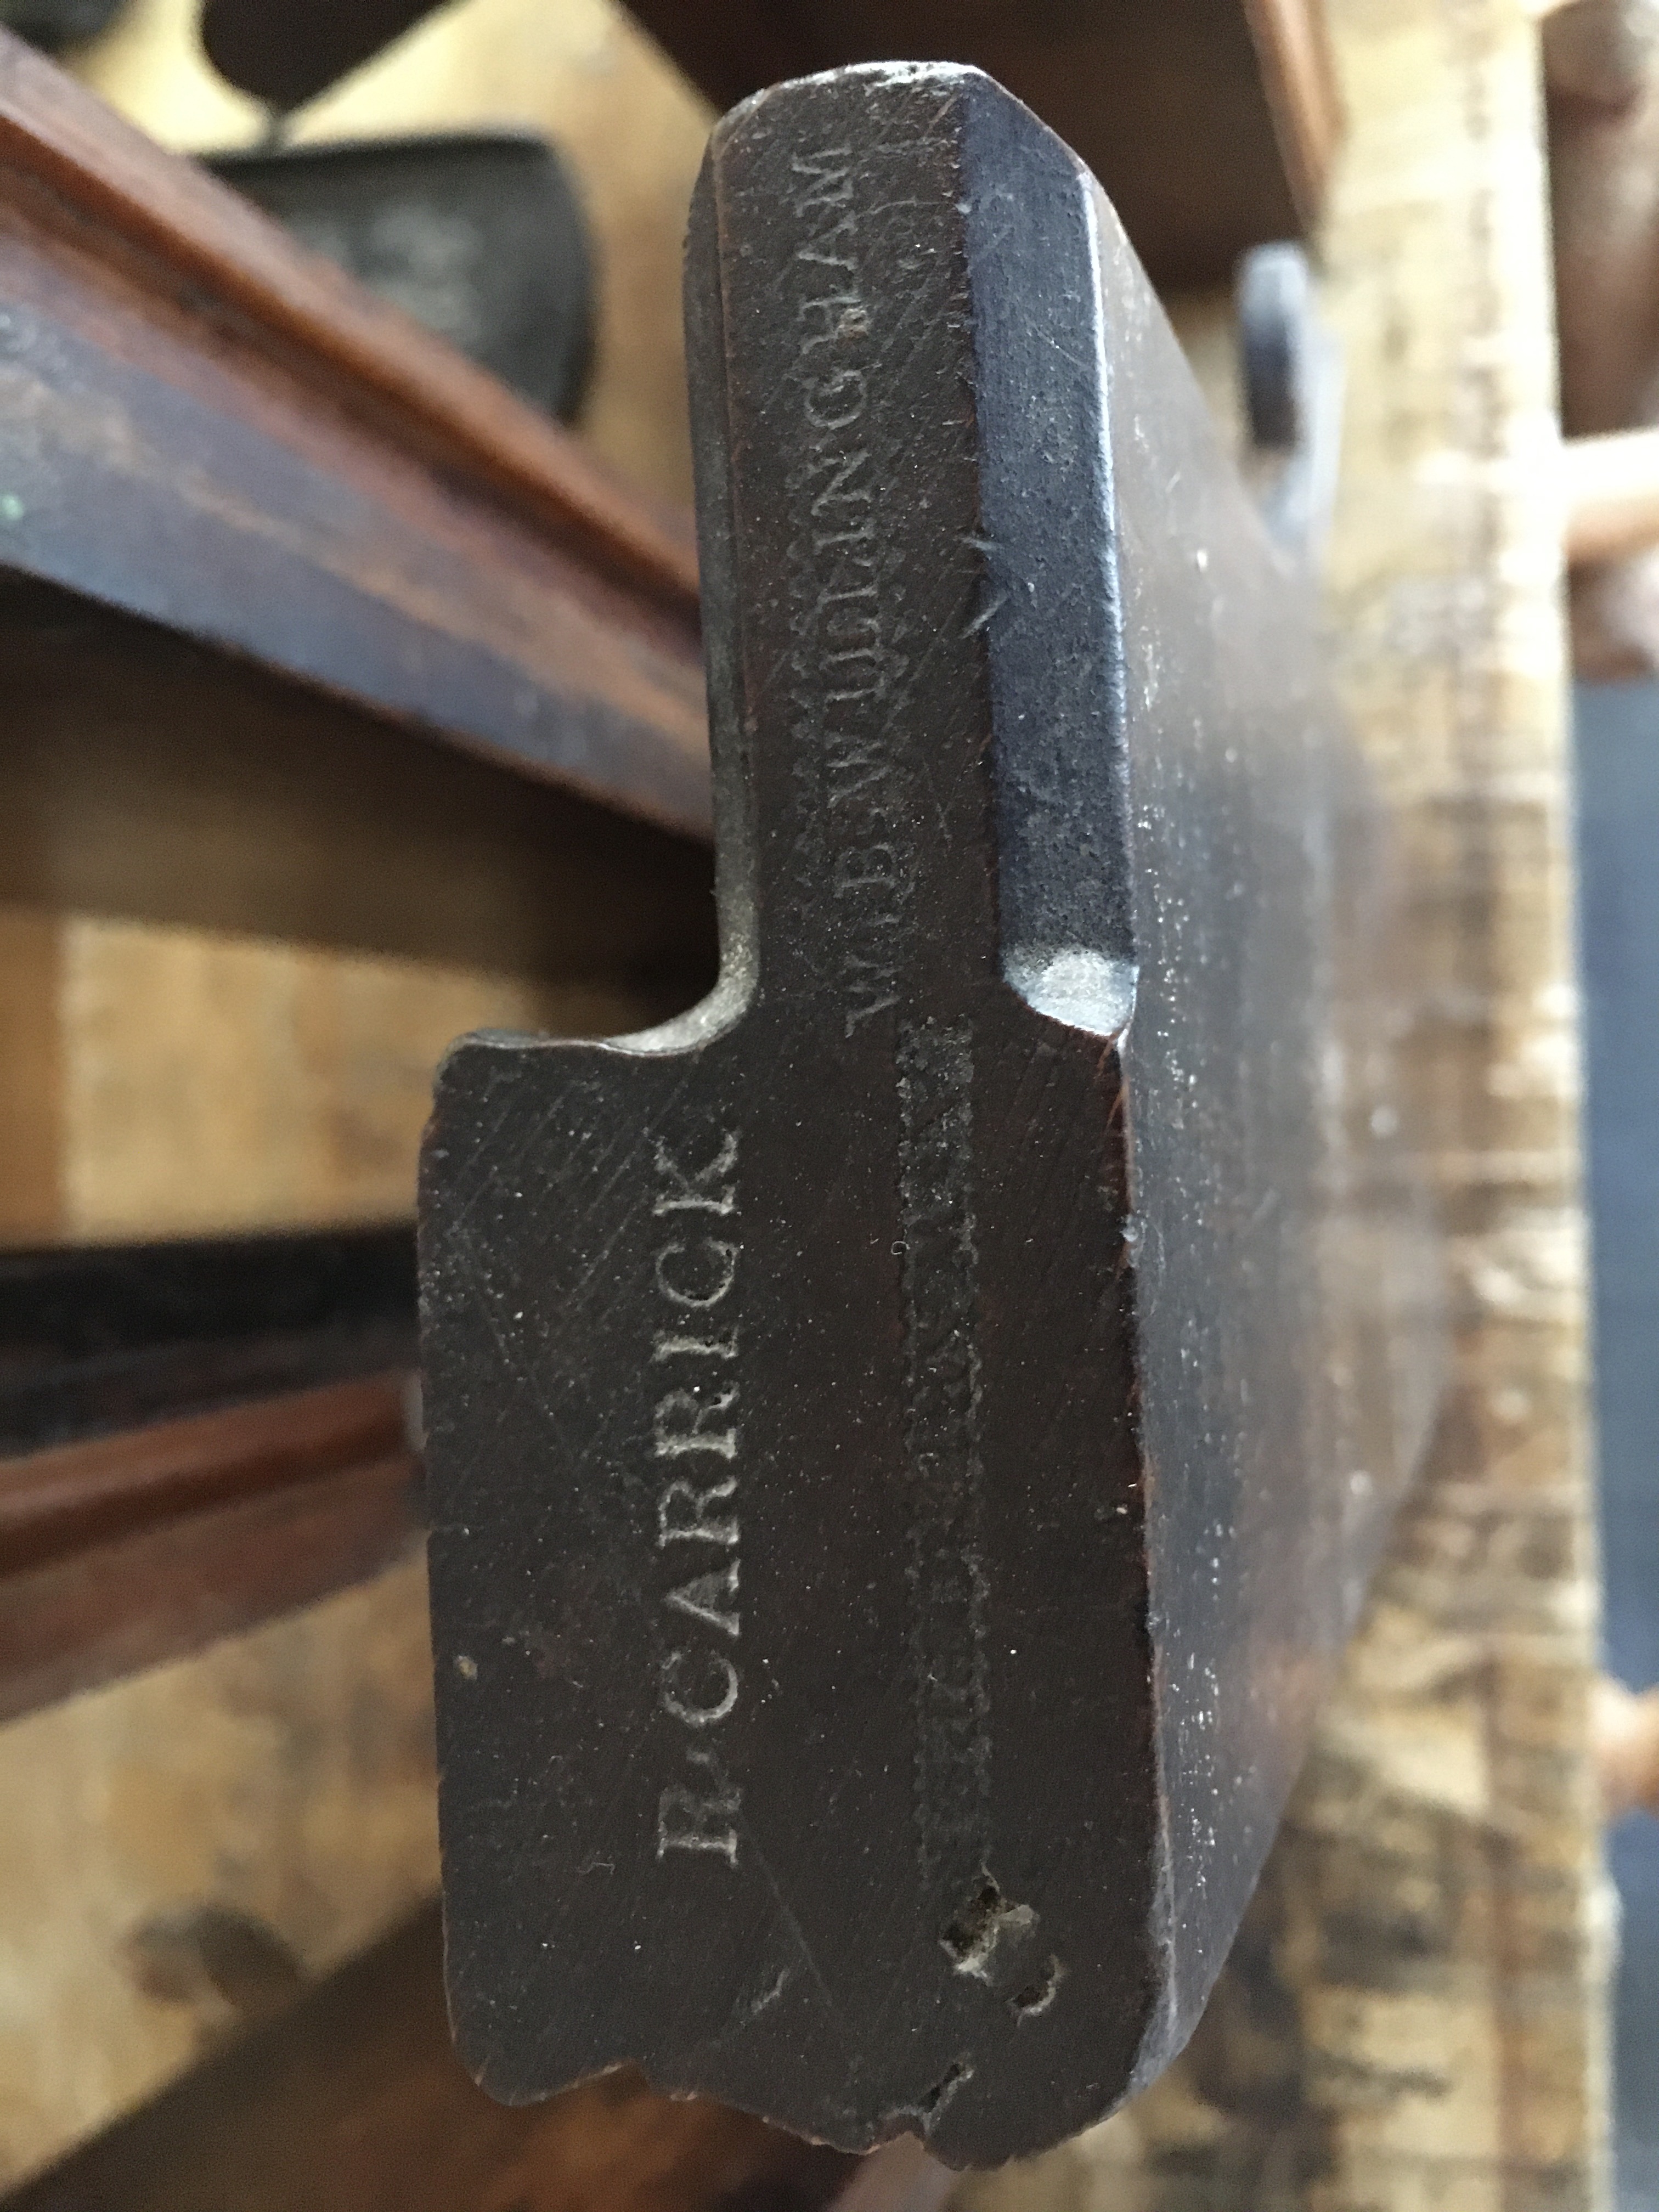
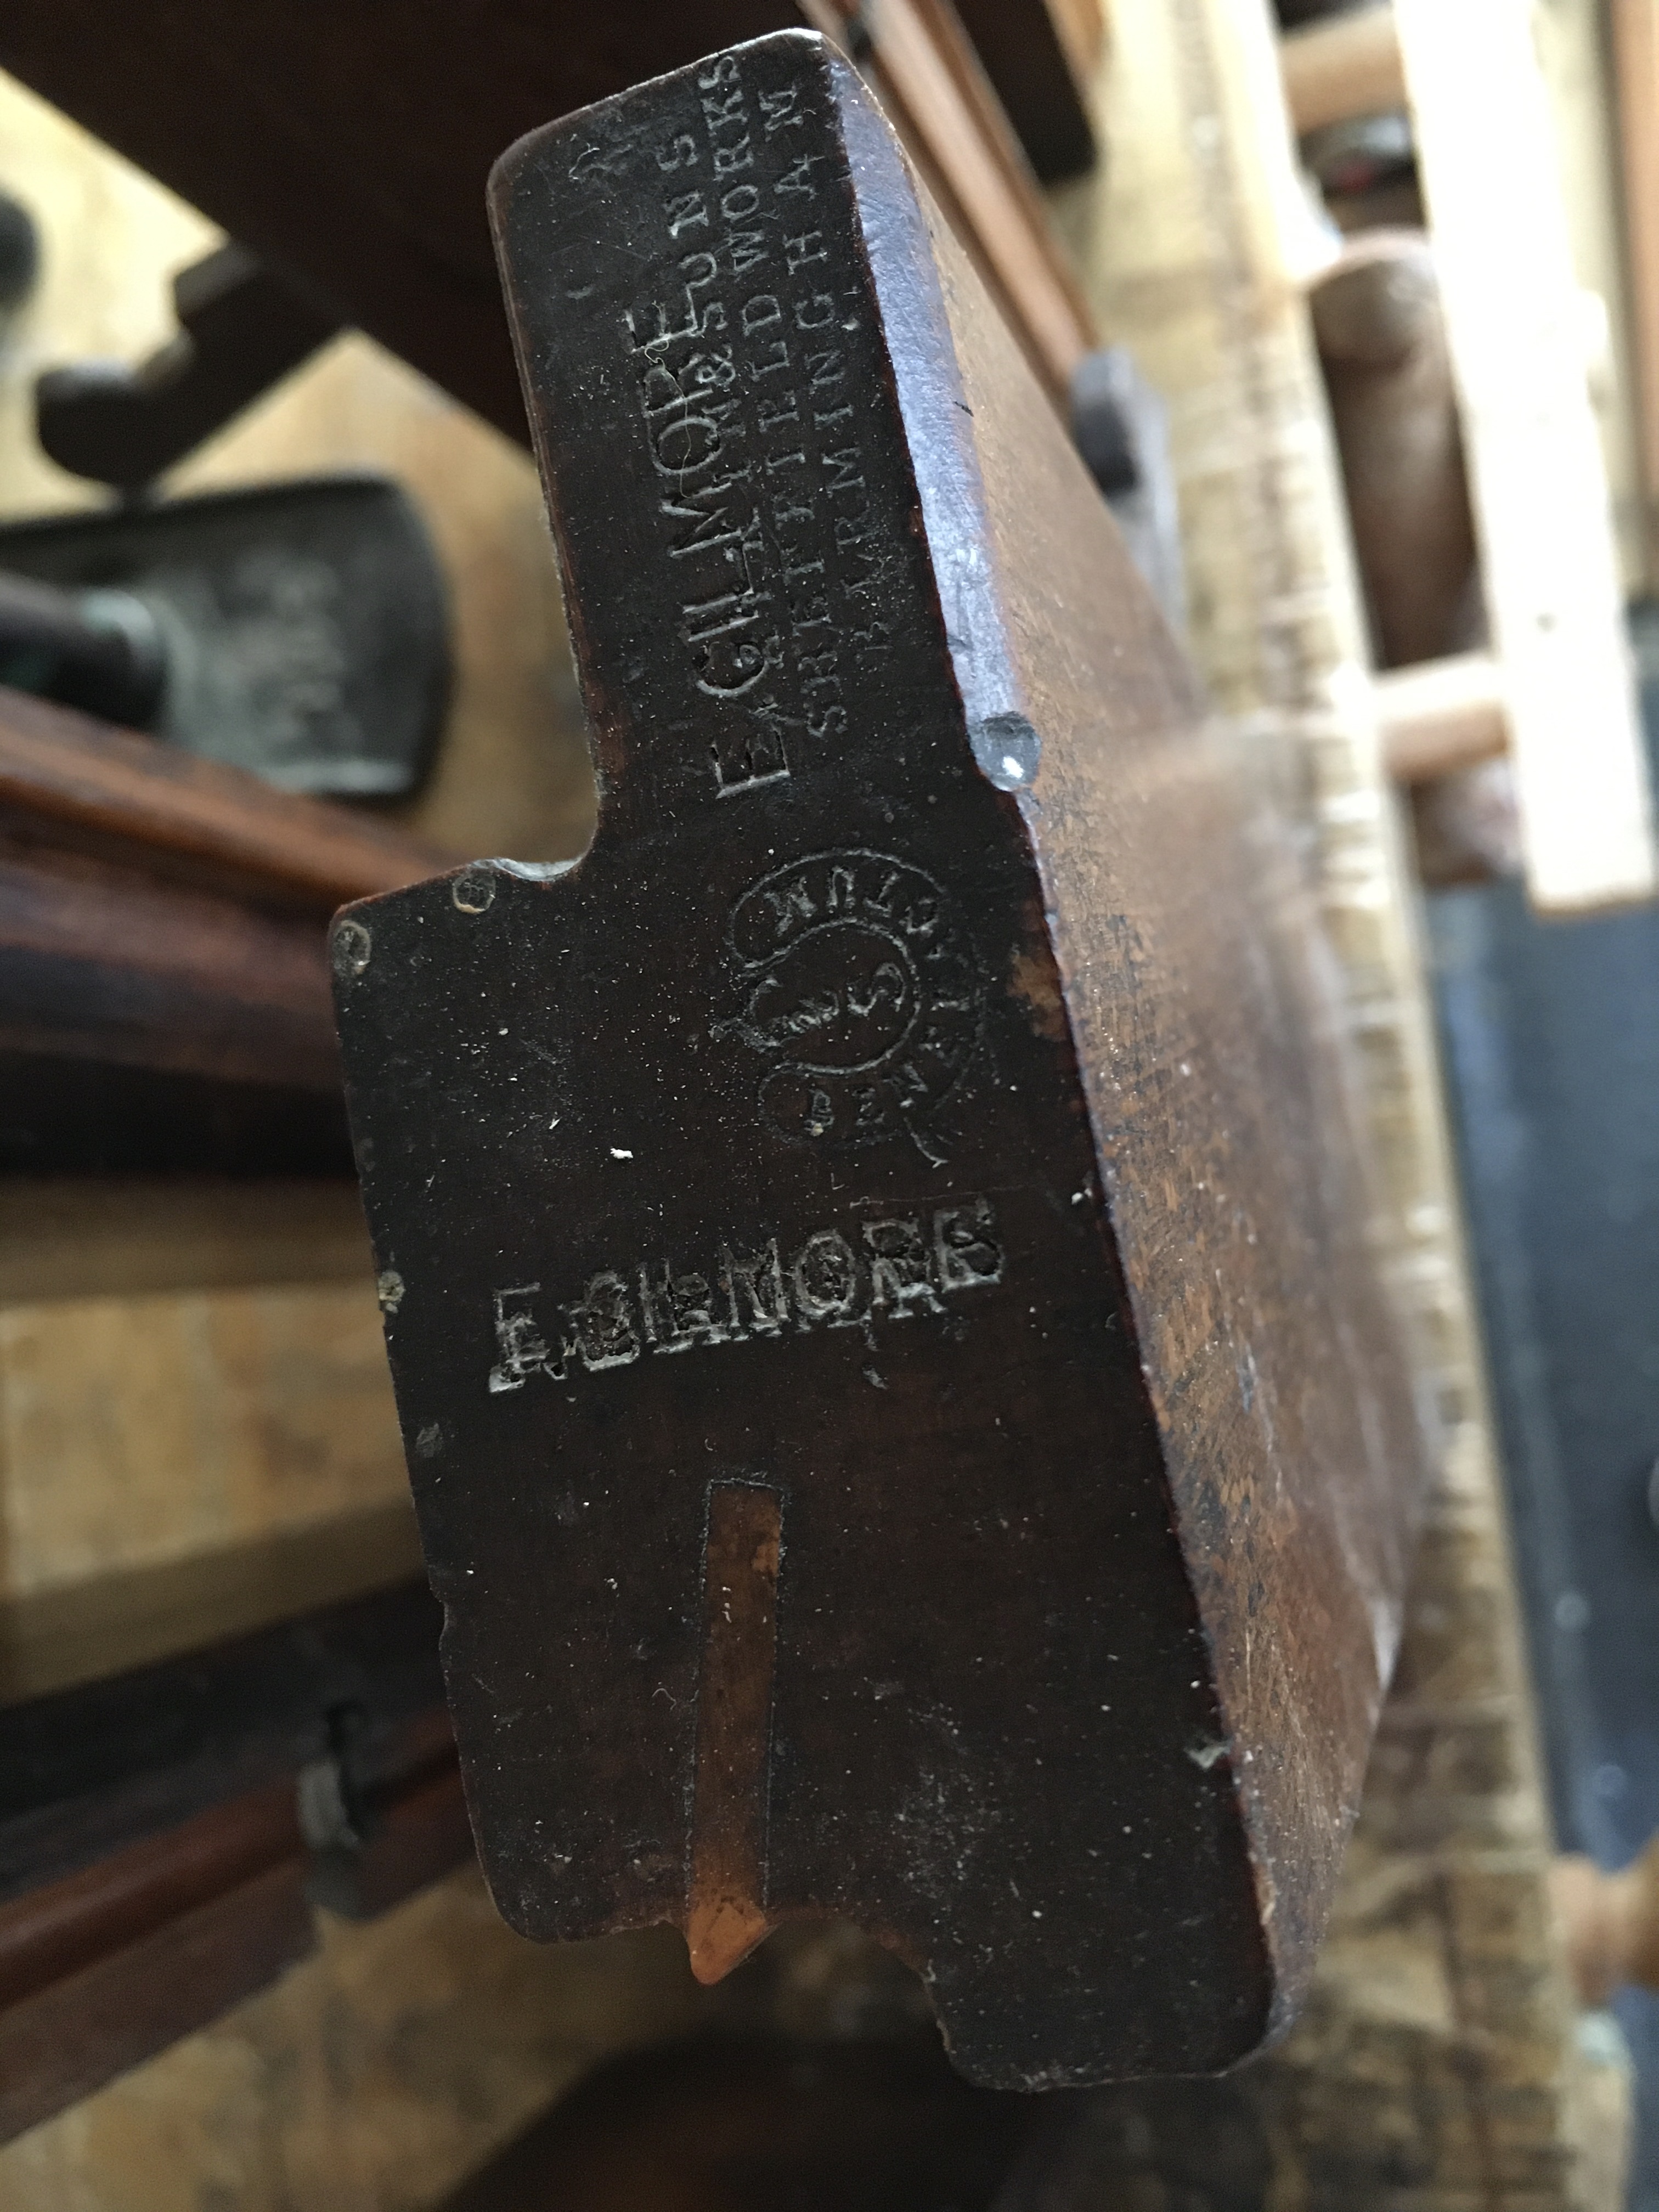
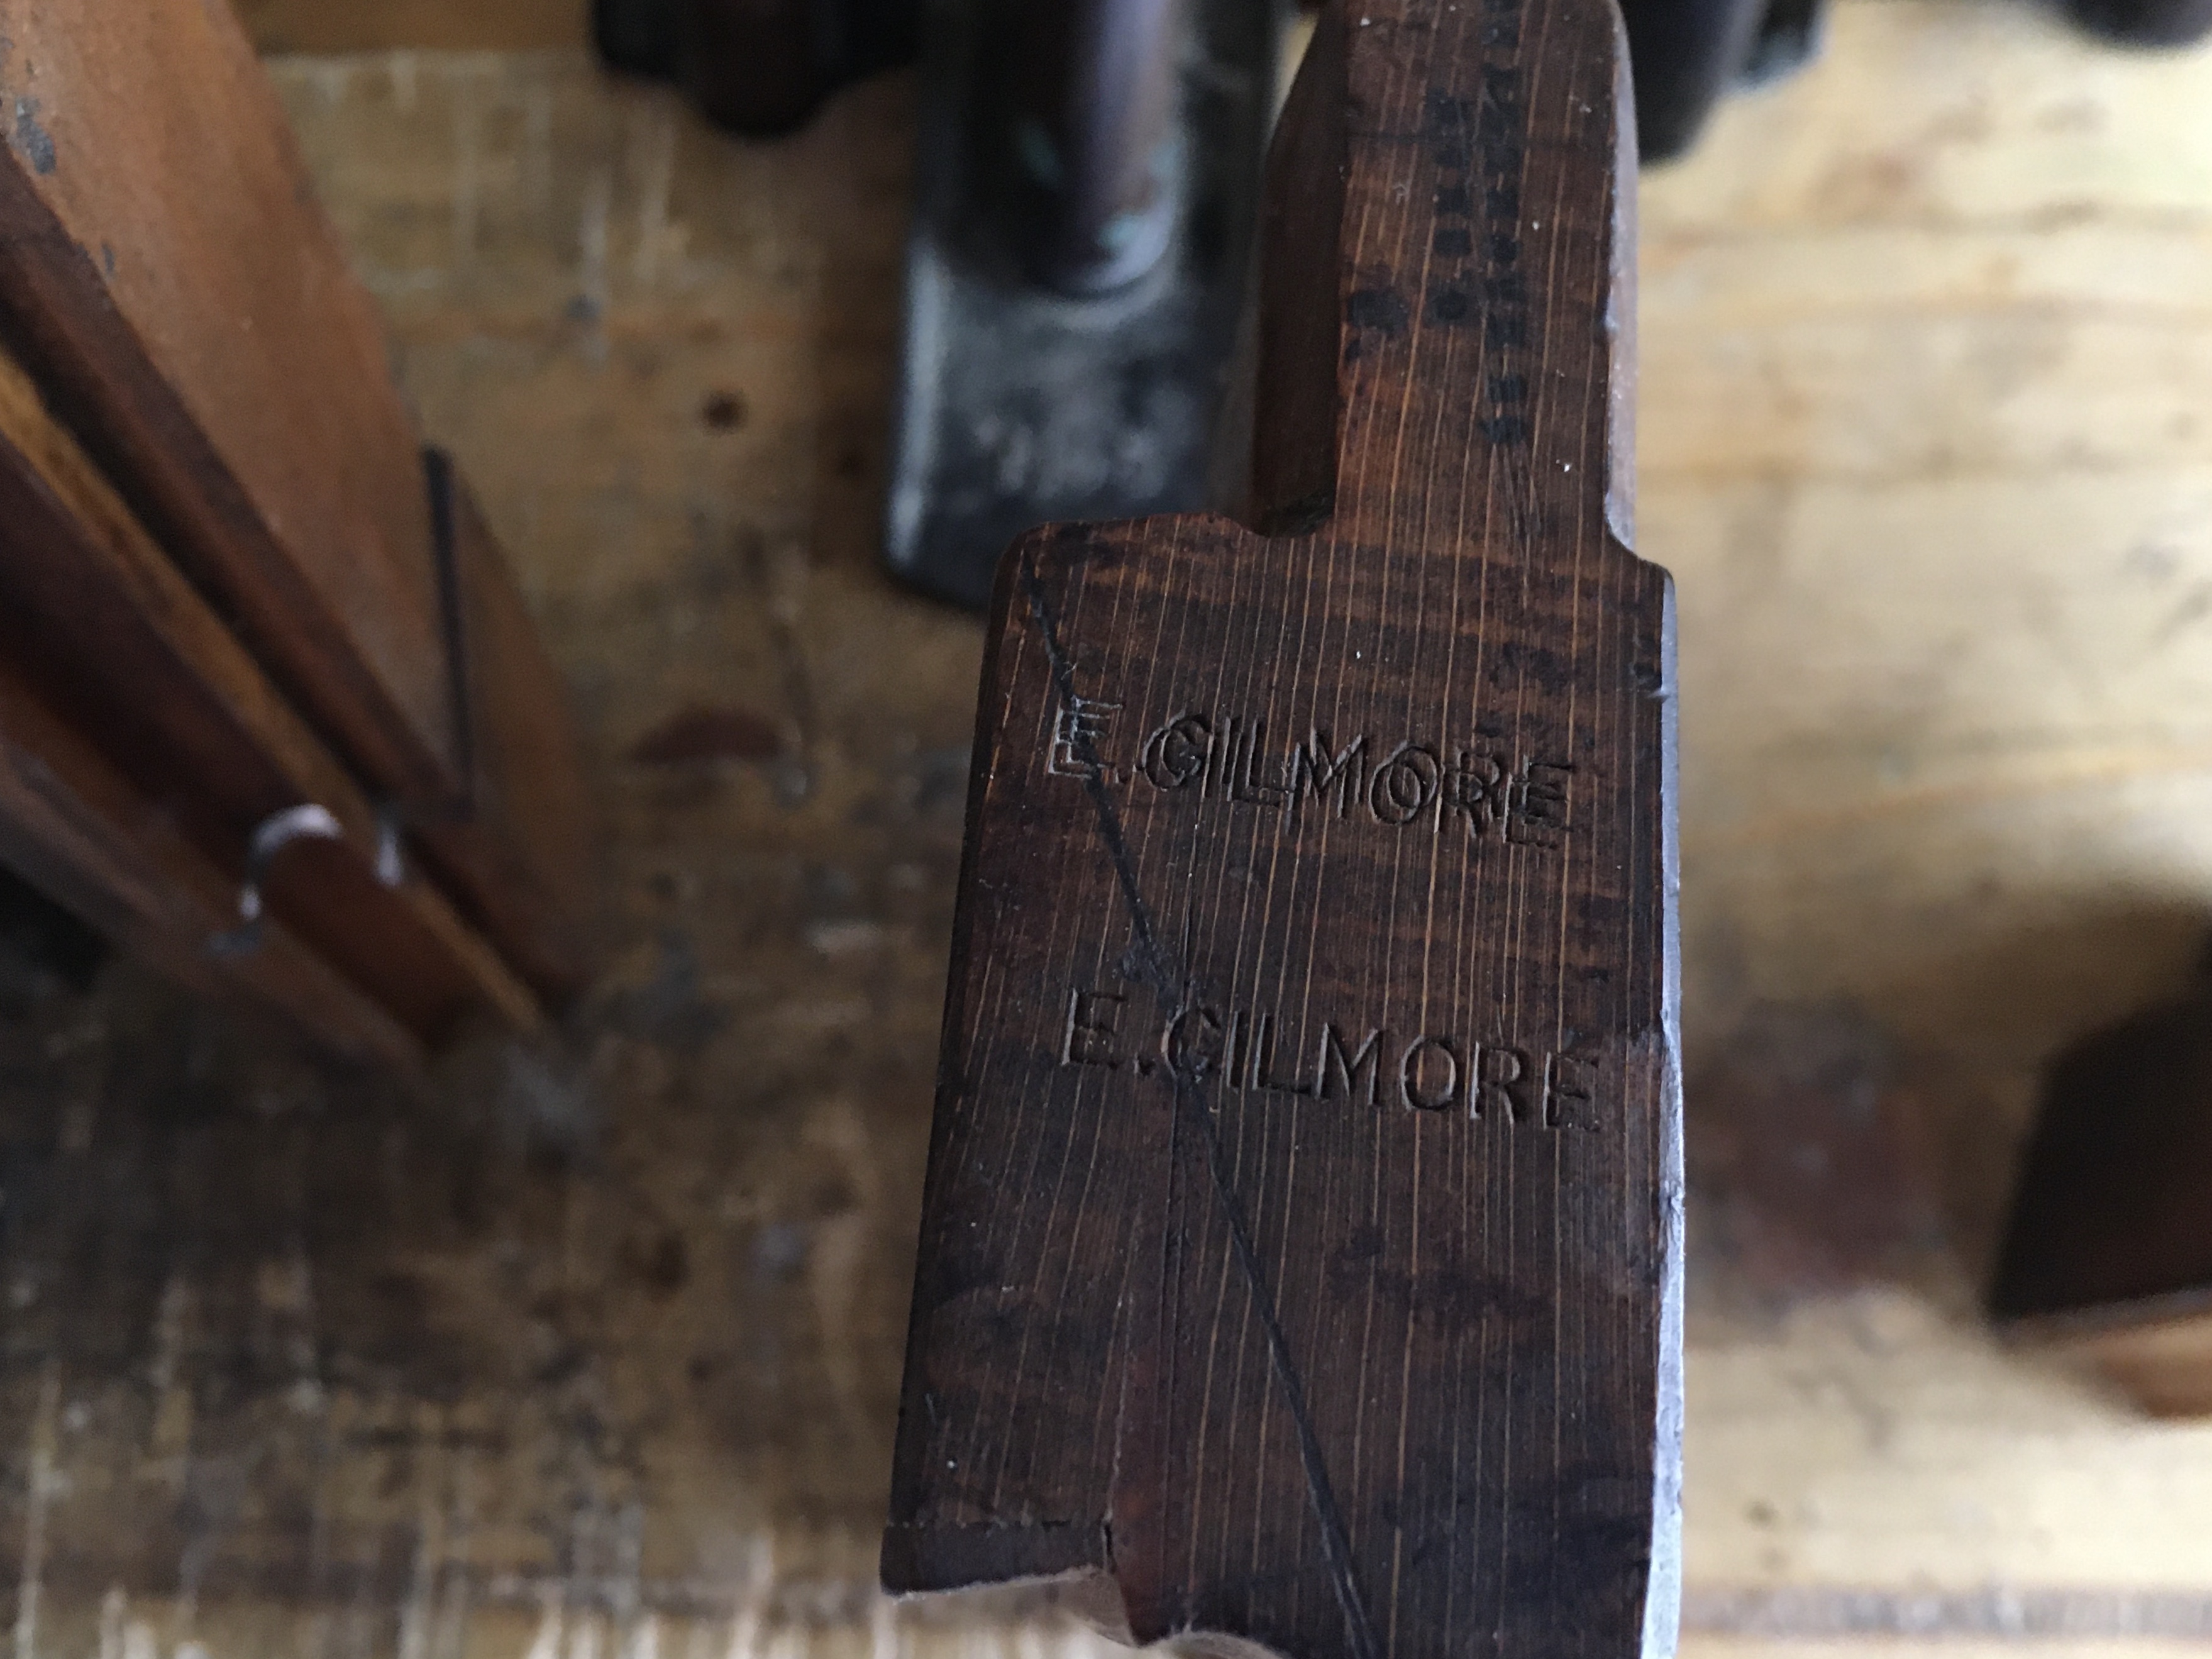
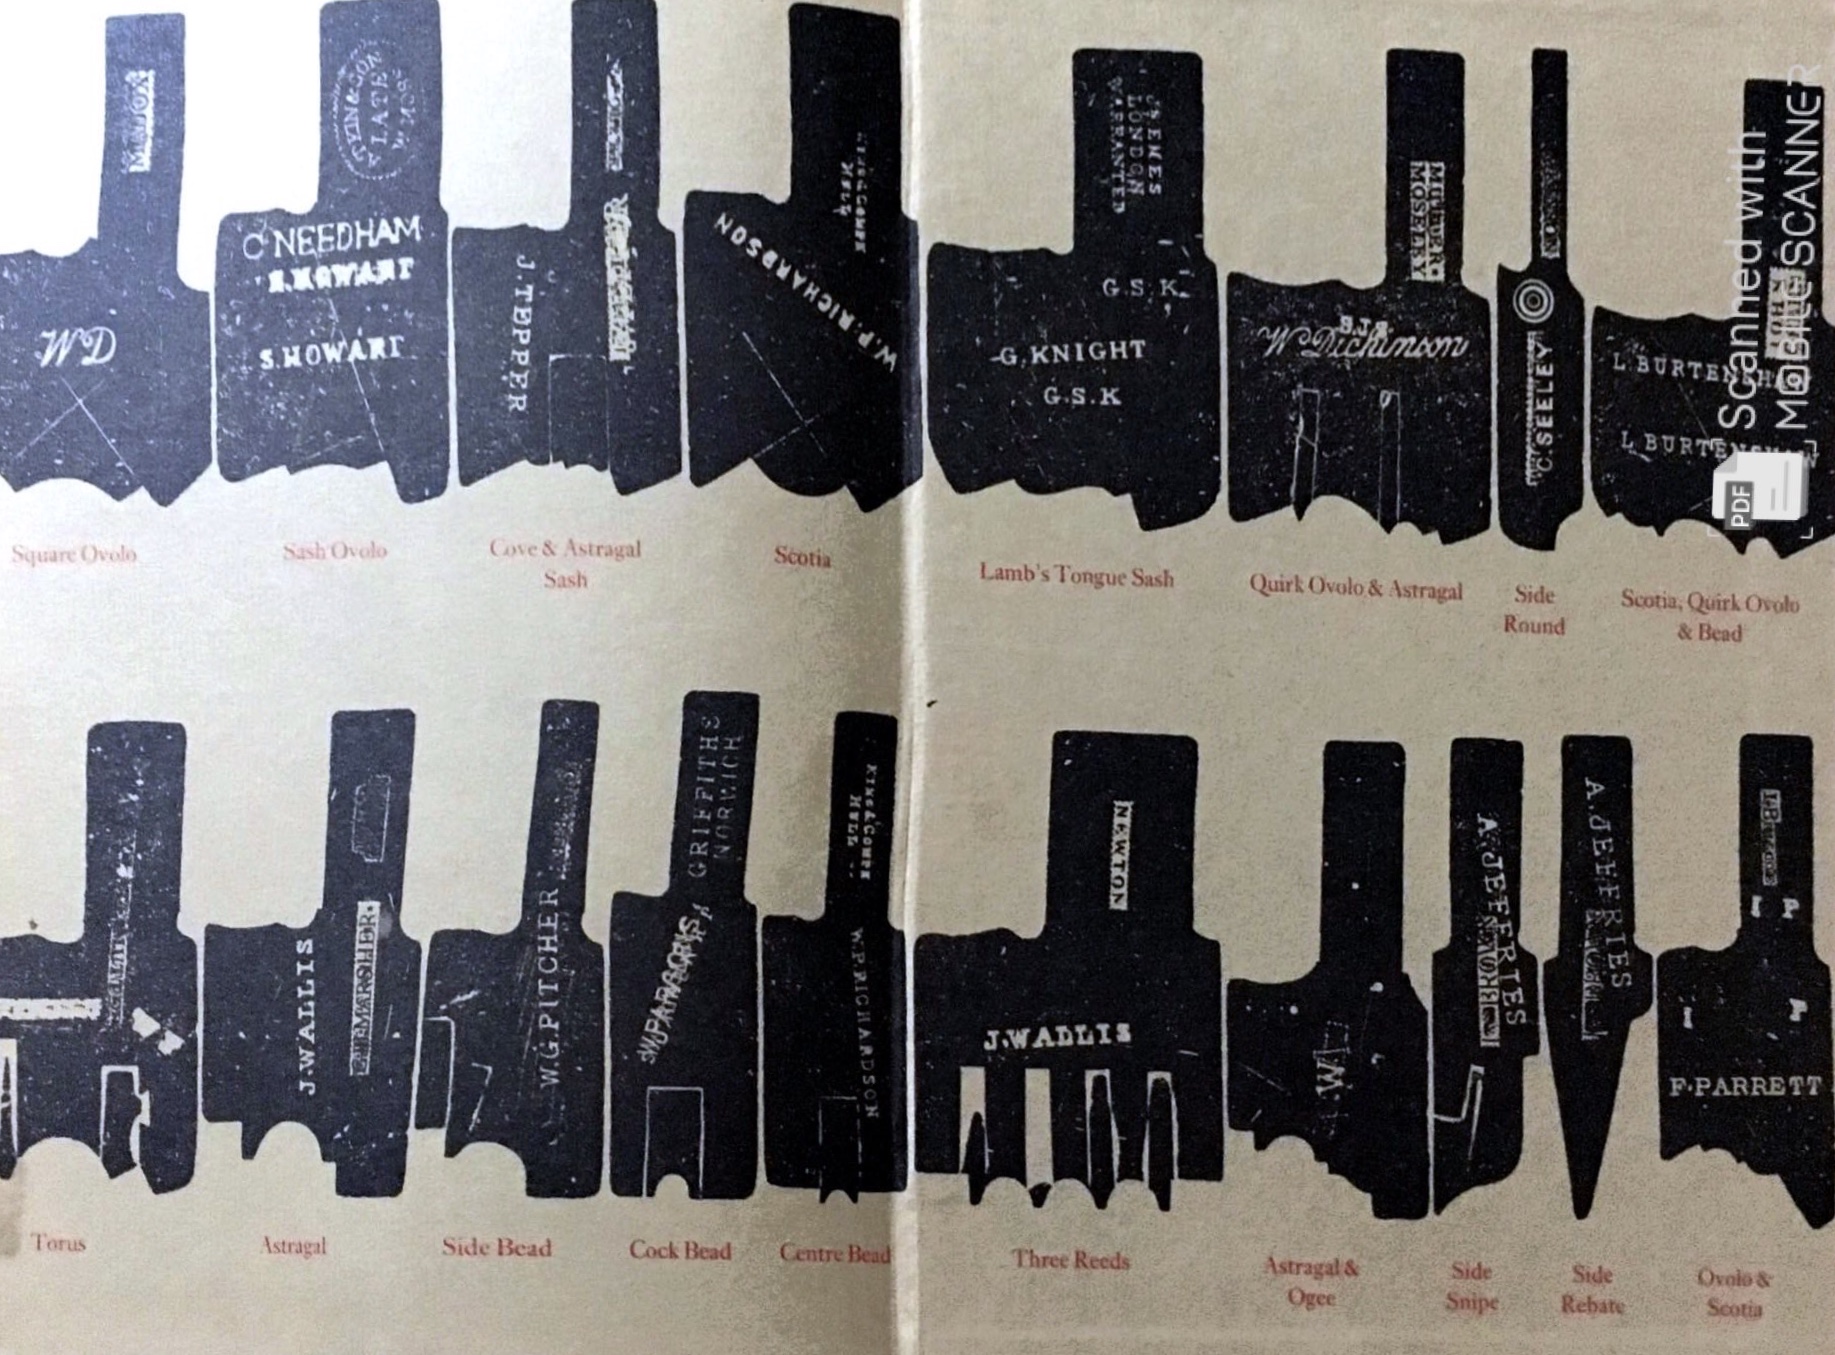
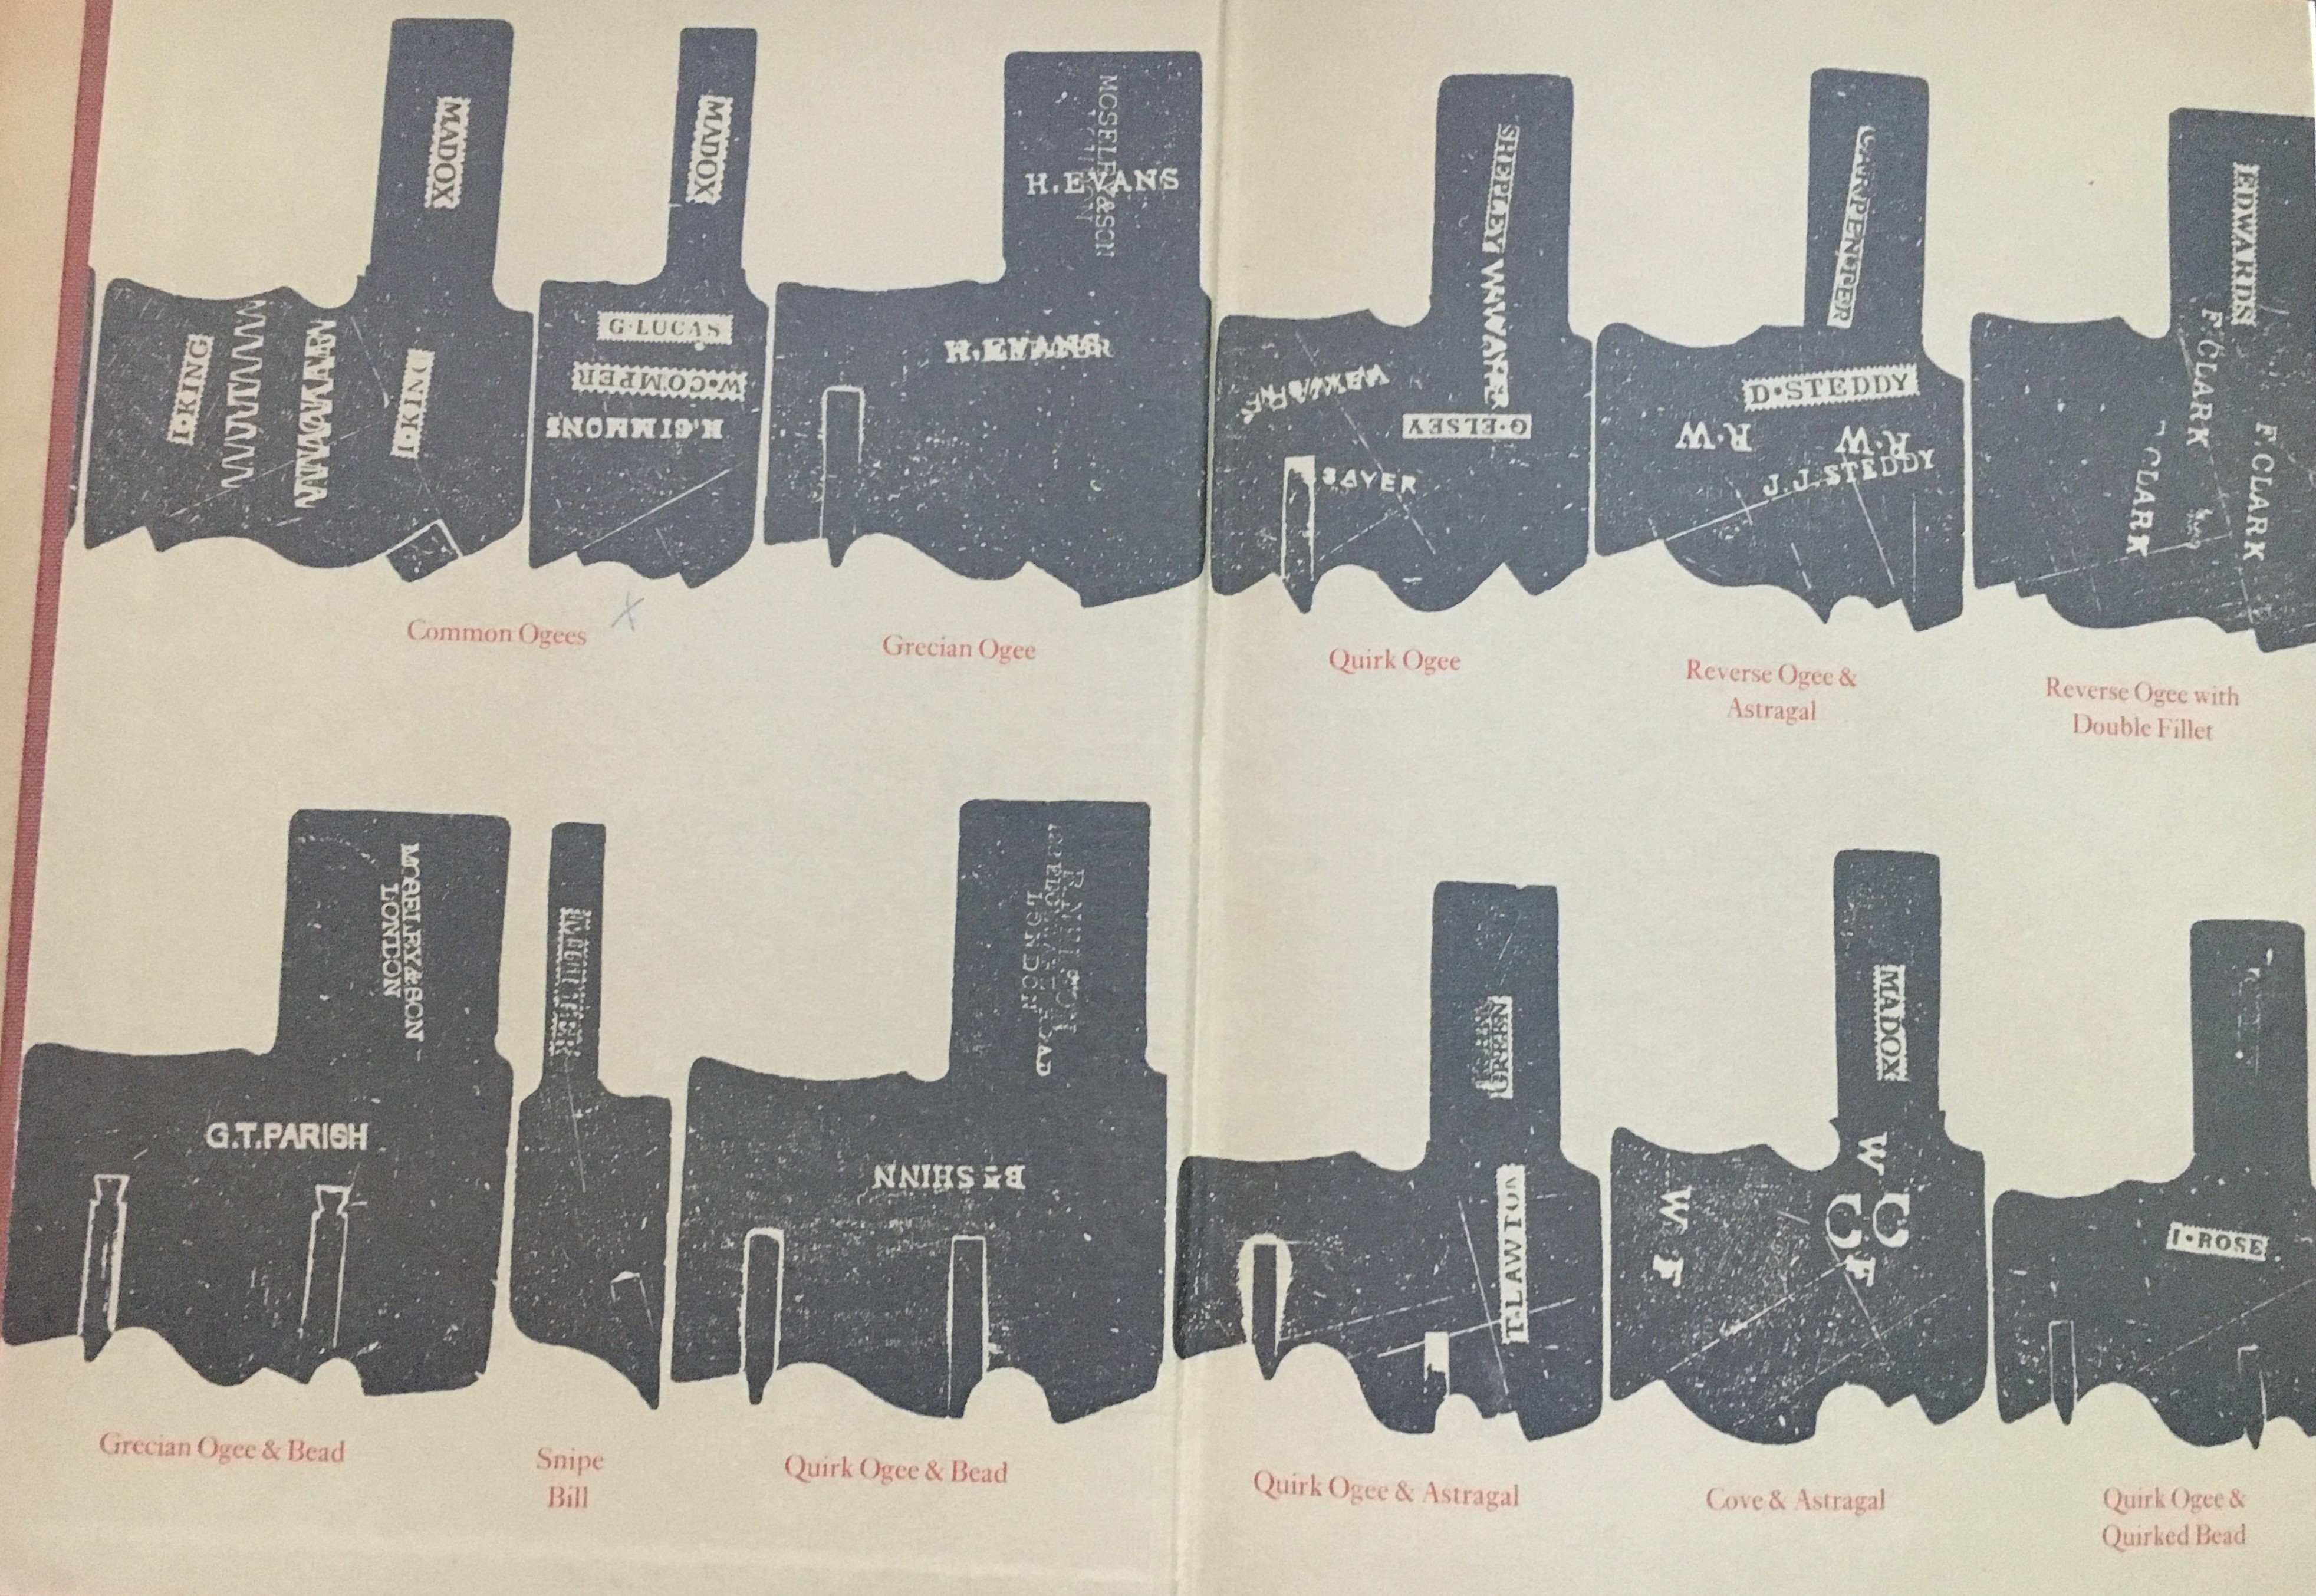
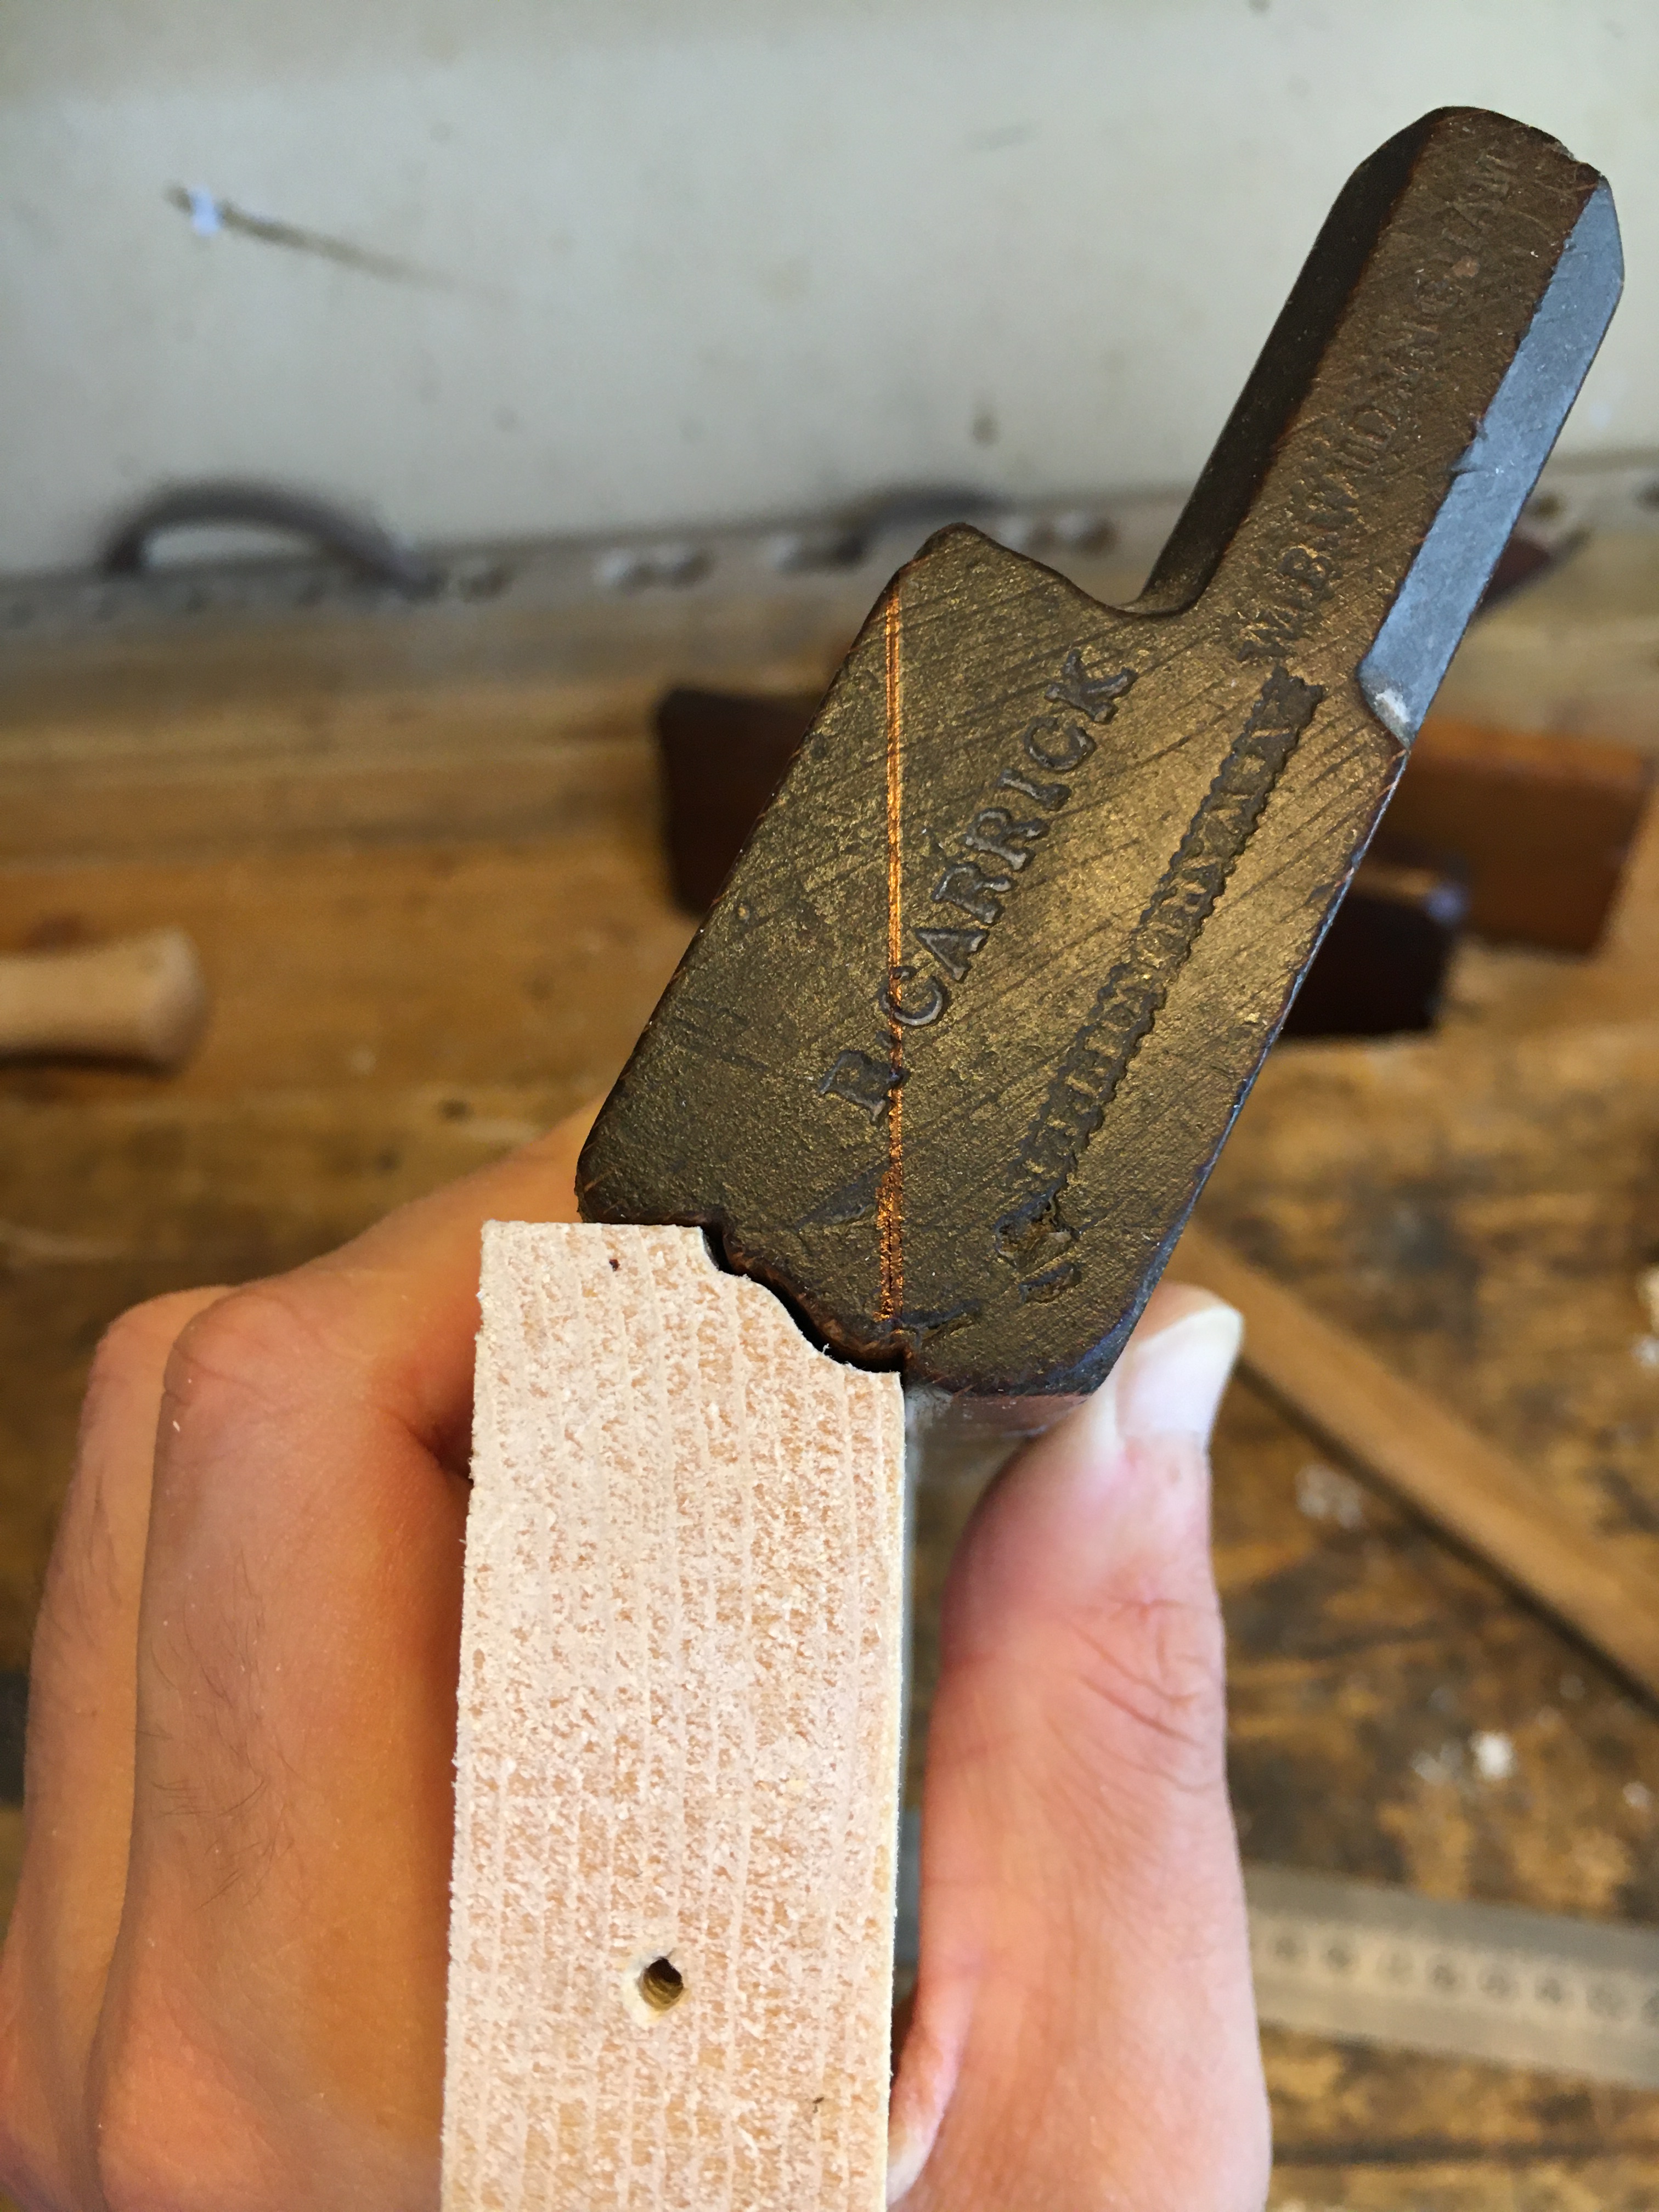
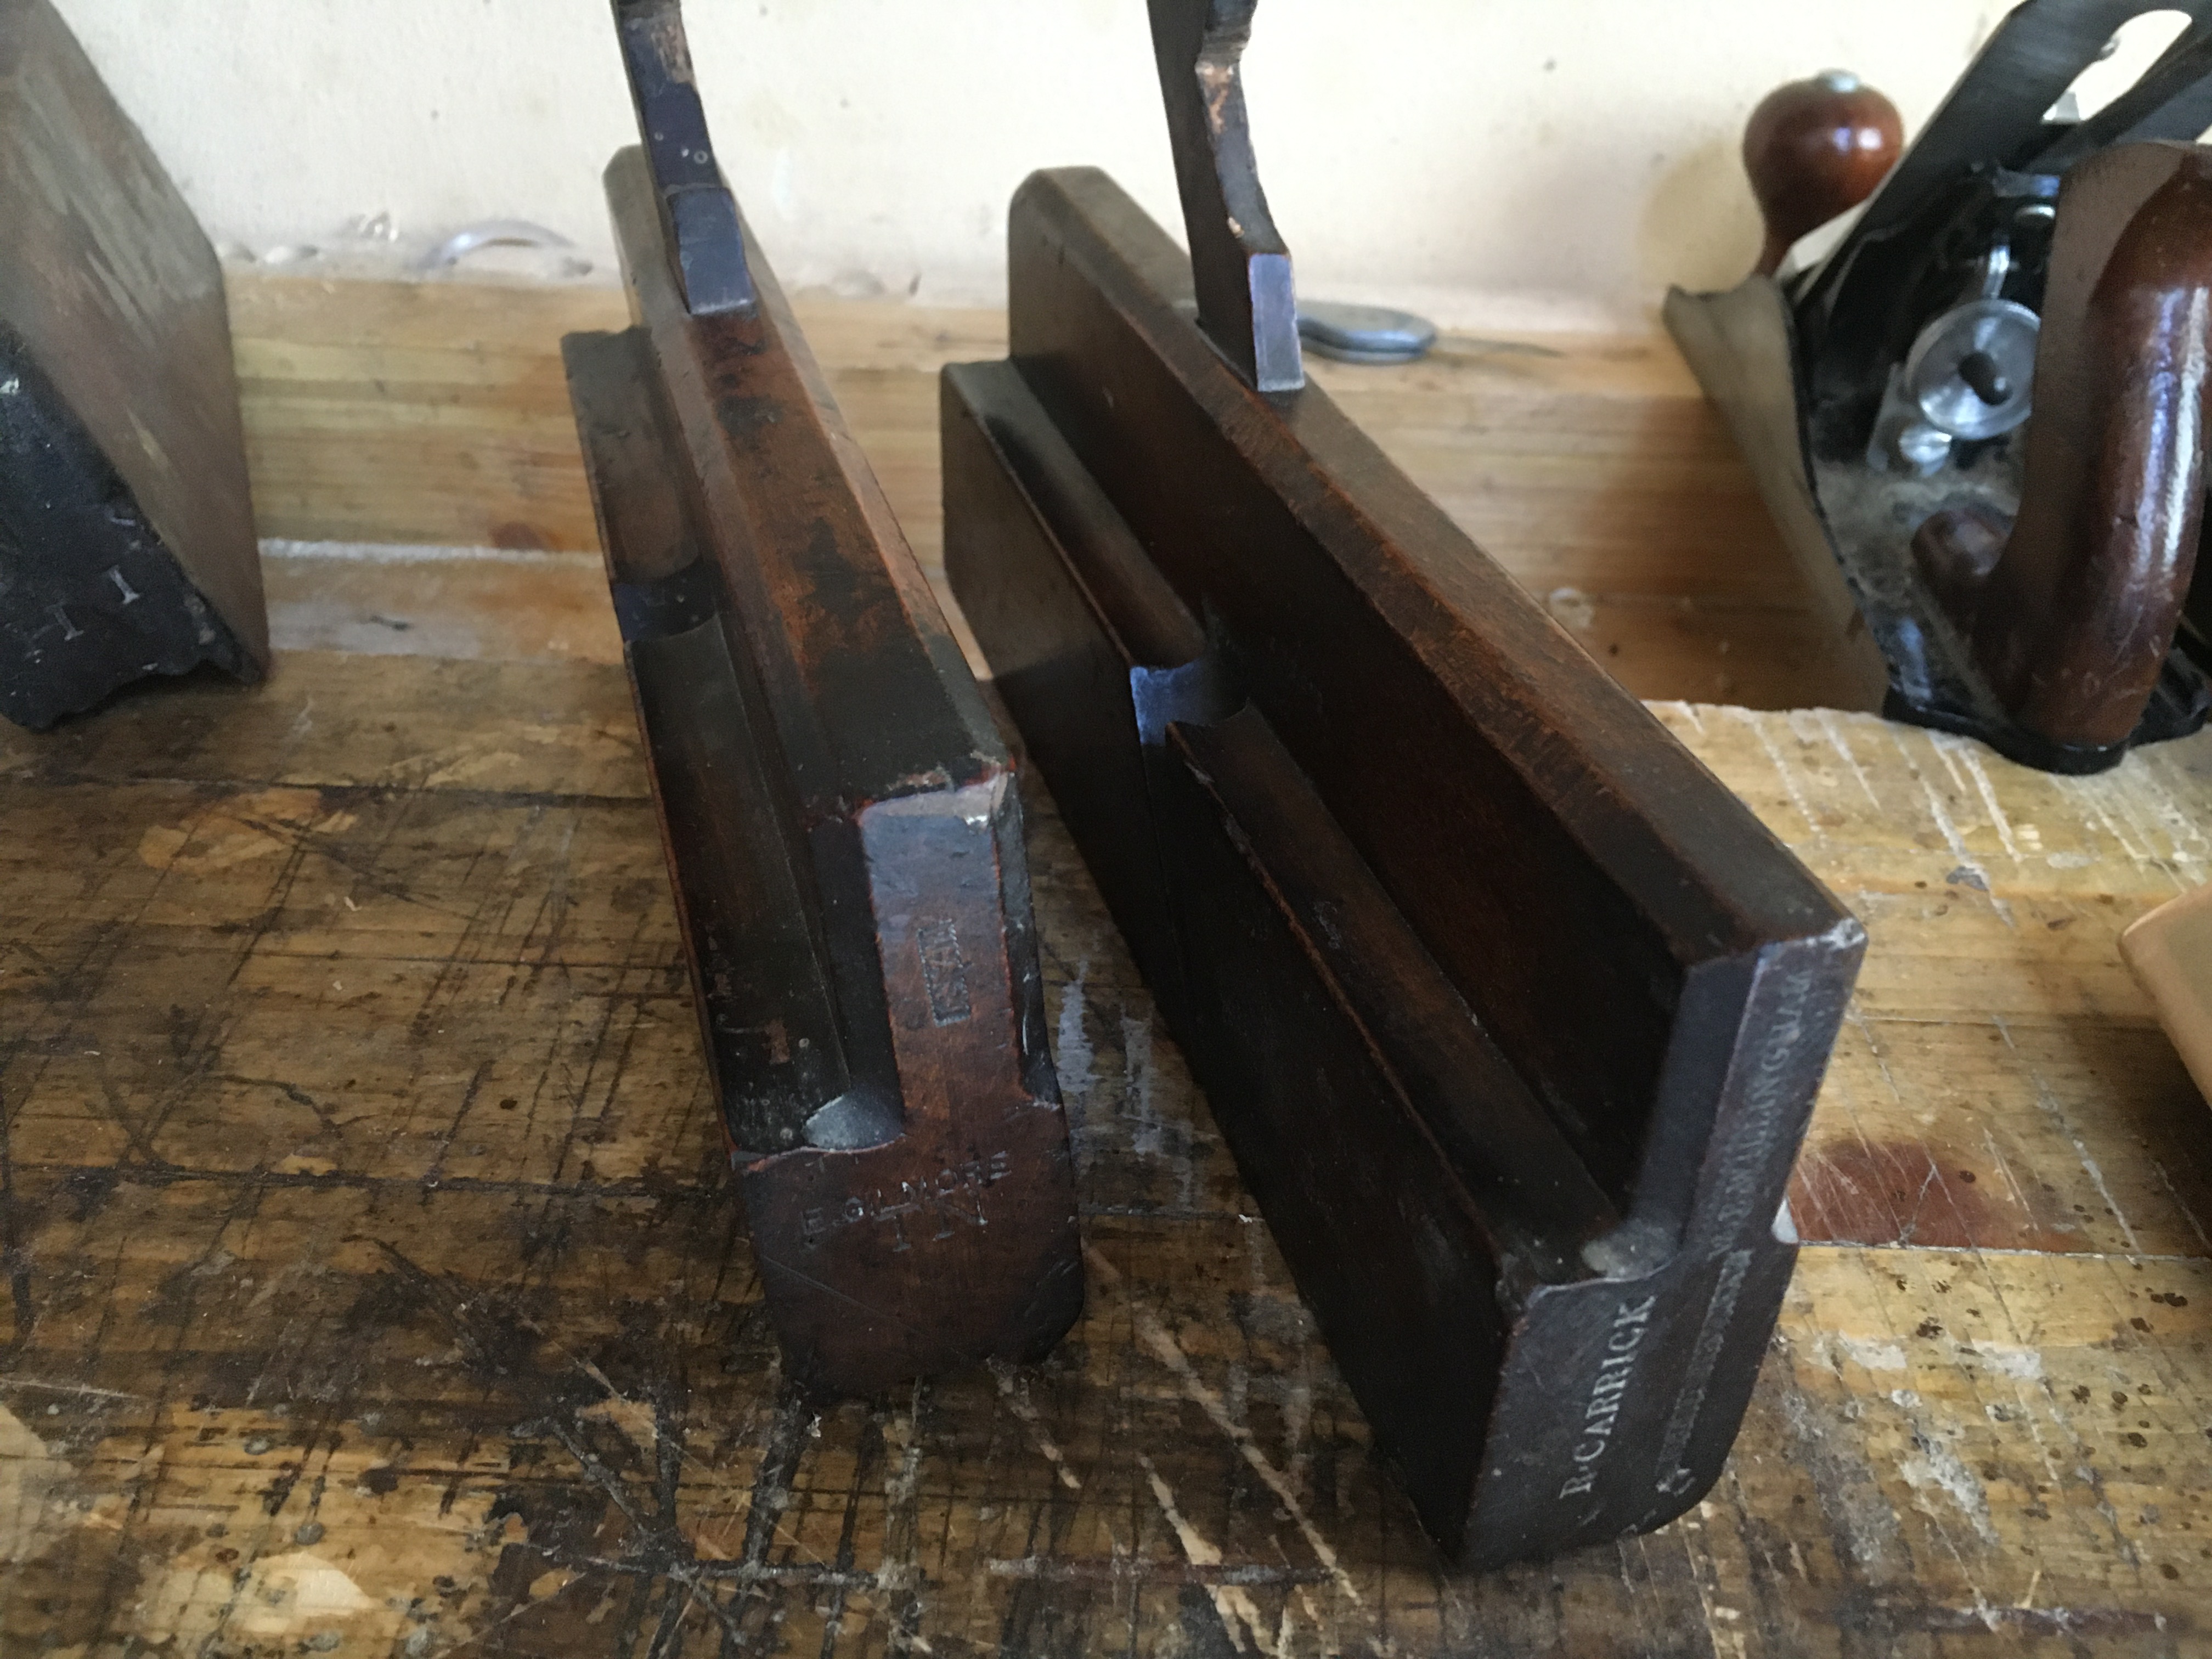
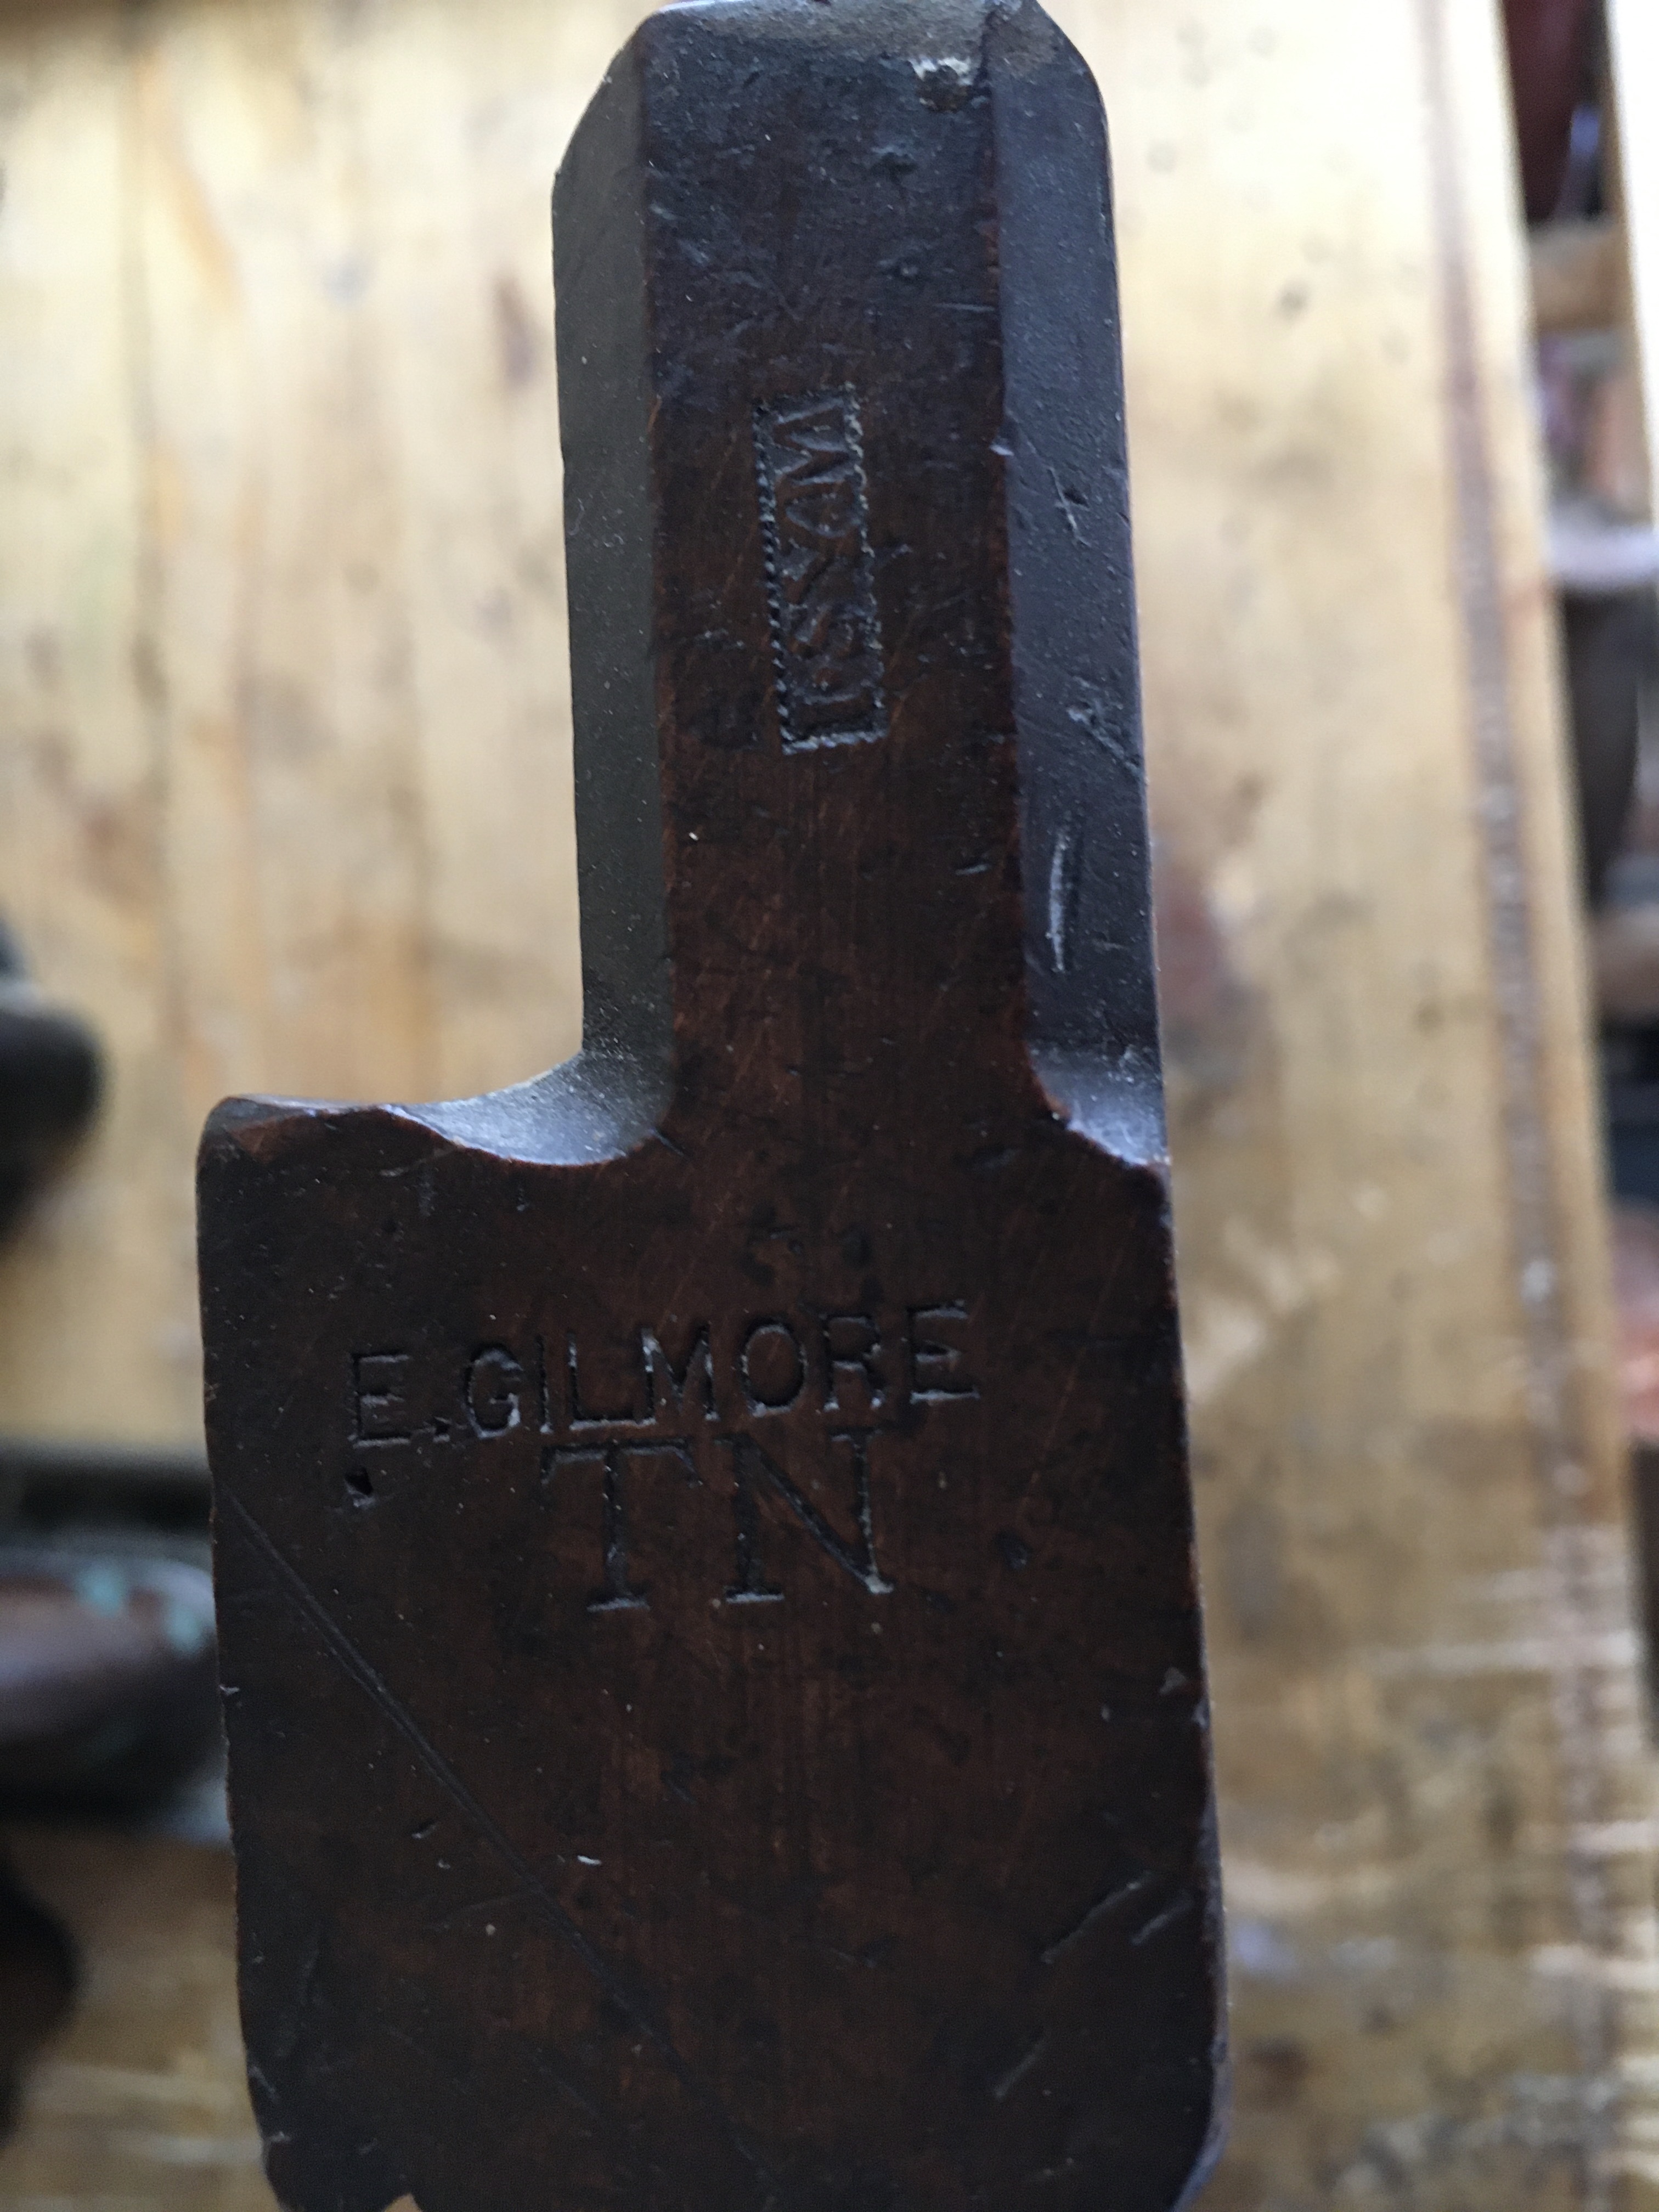 Come accennato precedentemente le pialle per modanatura, almeno le prime che vennero prodotte, riportavano impresso sul fronte e/o sul retro del corpo pialla il timbro del produttore che spesso era una famiglia di artigiani. I primi produttori londinesi del ‘700 furono Wooding, Cogdell, Jennion, ai quali nel tempo se ne aggiunsero altri come Moseley e Sym. Con il tempo però i falegnami che utilizzavano le pialle hanno iniziato ad imprimere anche le loro proprie iniziali sul corpo pialla, talvolta andando a coprire il marchio del produttore originario. Molto spesso con il tempo questi marchi sono diventati illeggibili e questo ne rende ancora più difficoltosa una loro datazione. In linea di massima però le pialle più antiche dovrebbero avere il nome del produttore impresso all’interno di un riquadro. I falegnami utilizzatori infatti erano soliti imprimere soltanto le loro iniziali oppure il cognome per esteso ma senza riquadri.
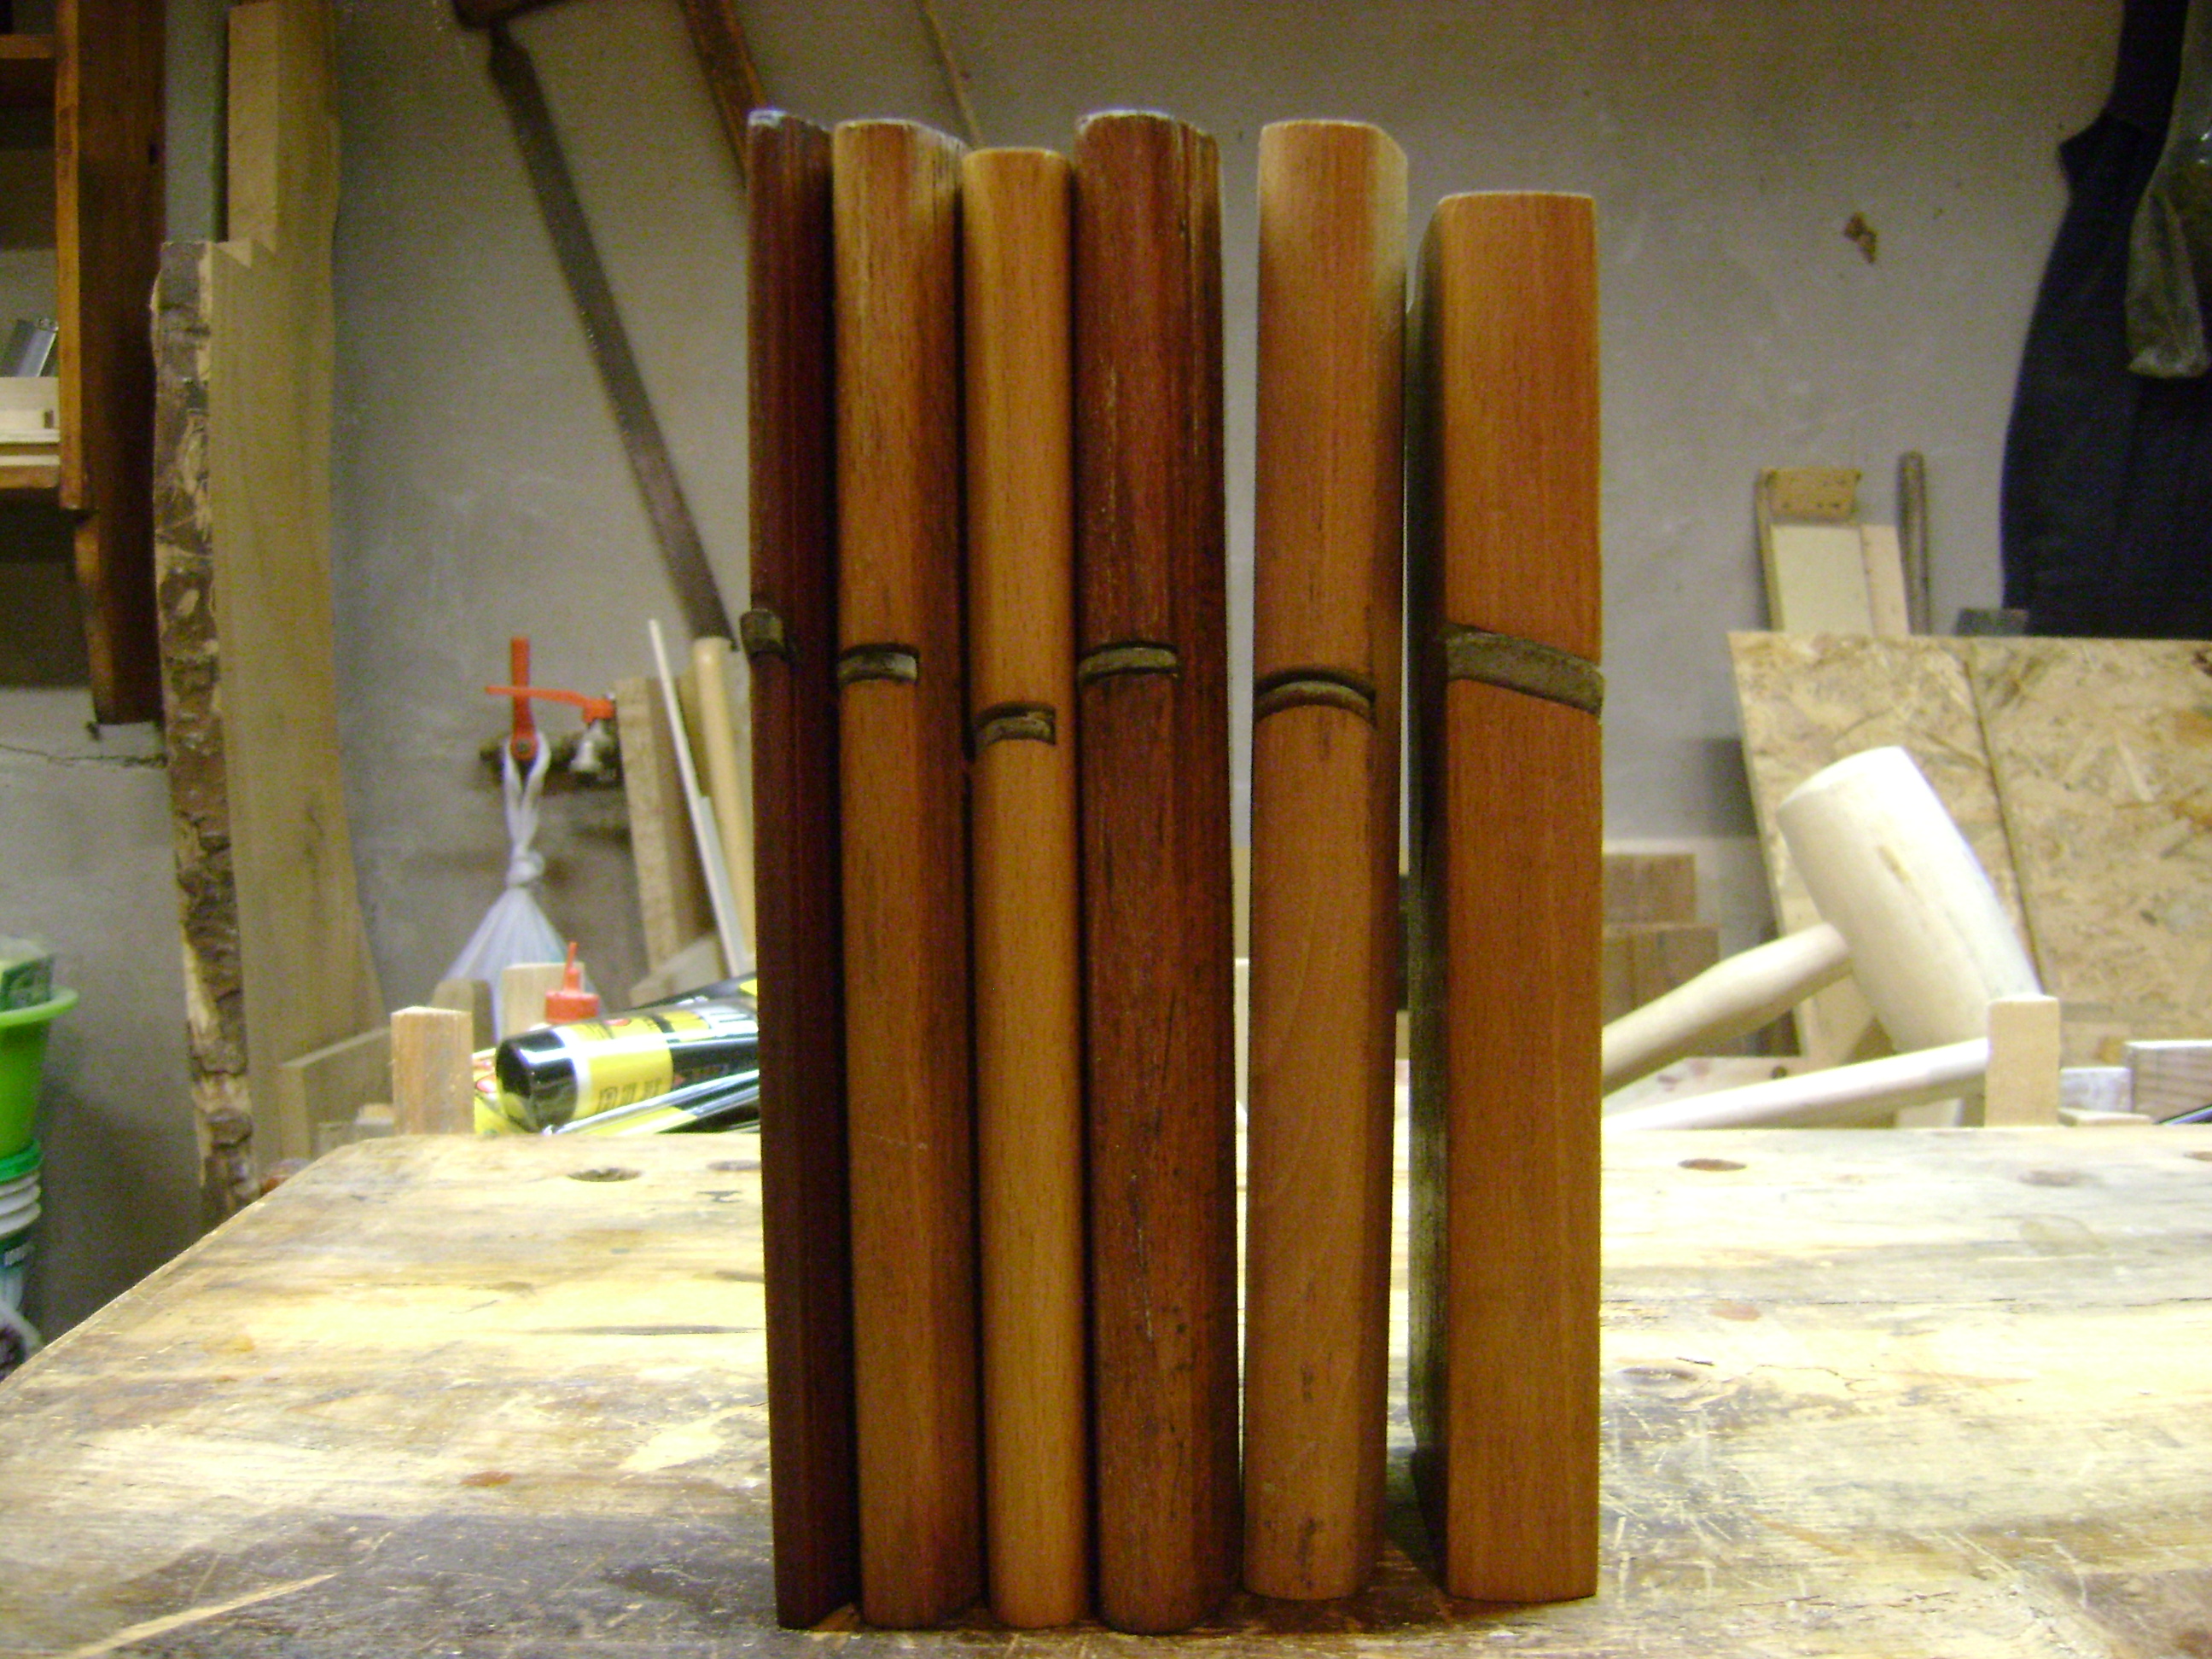
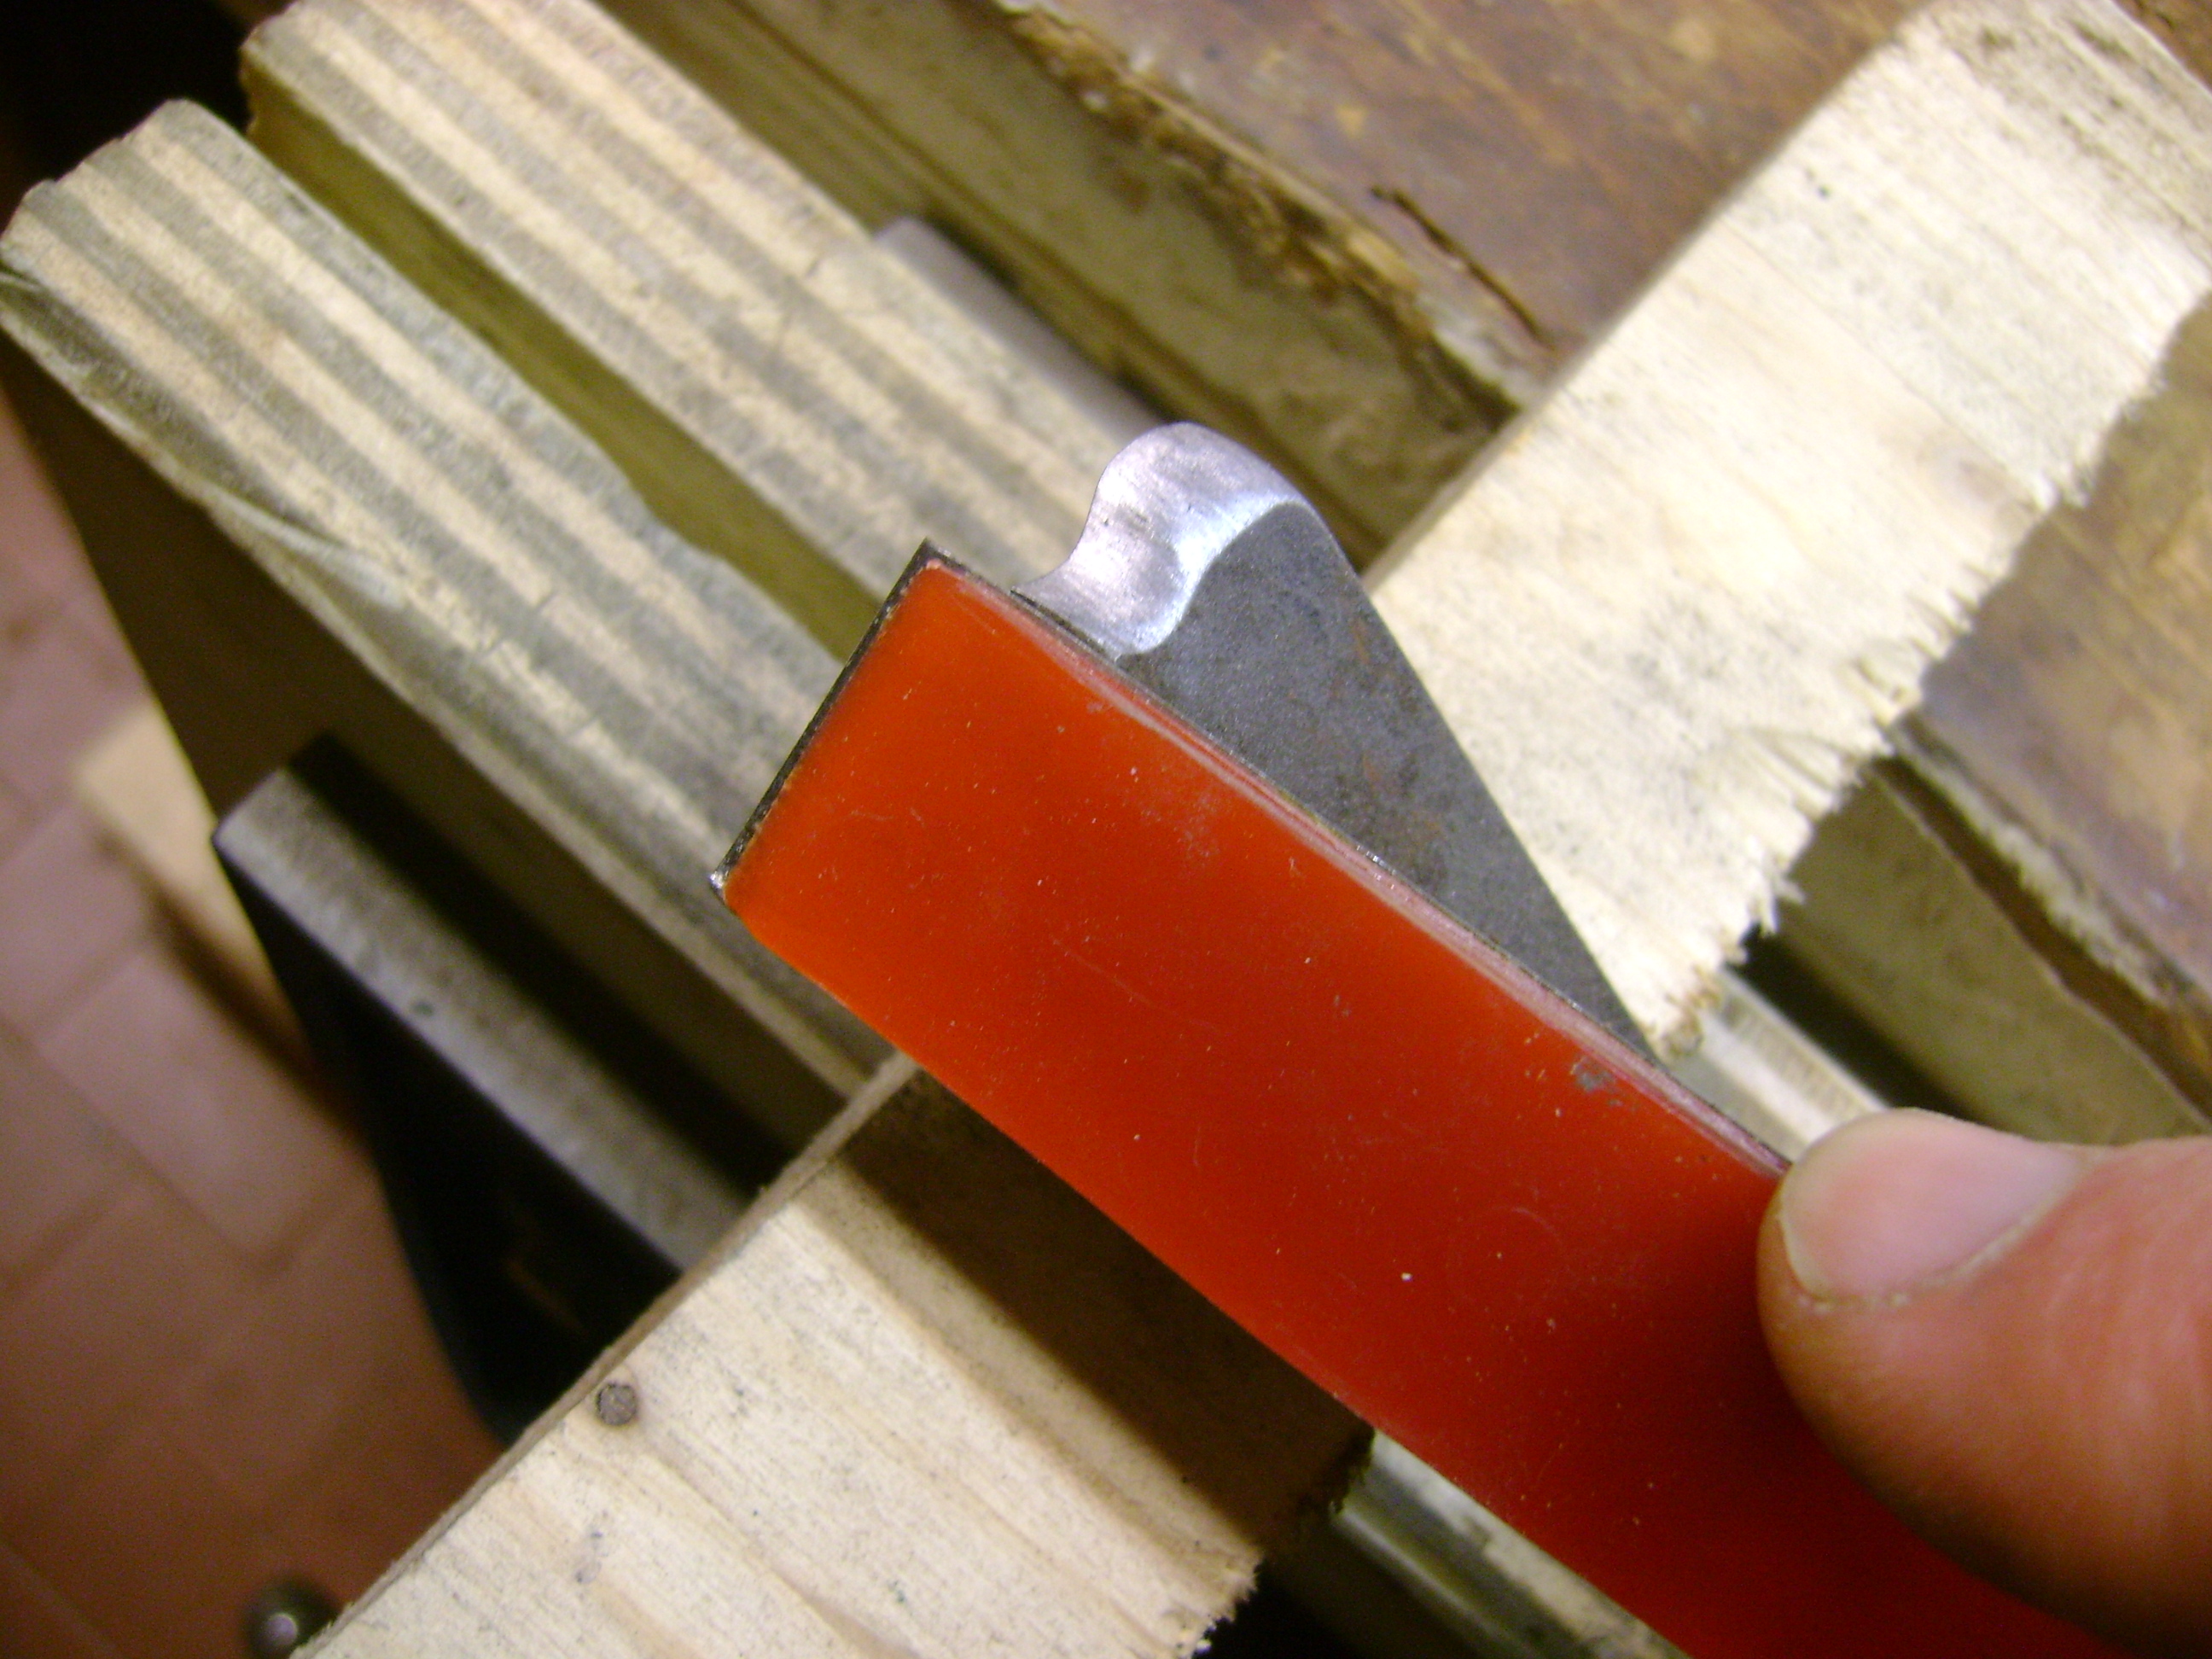
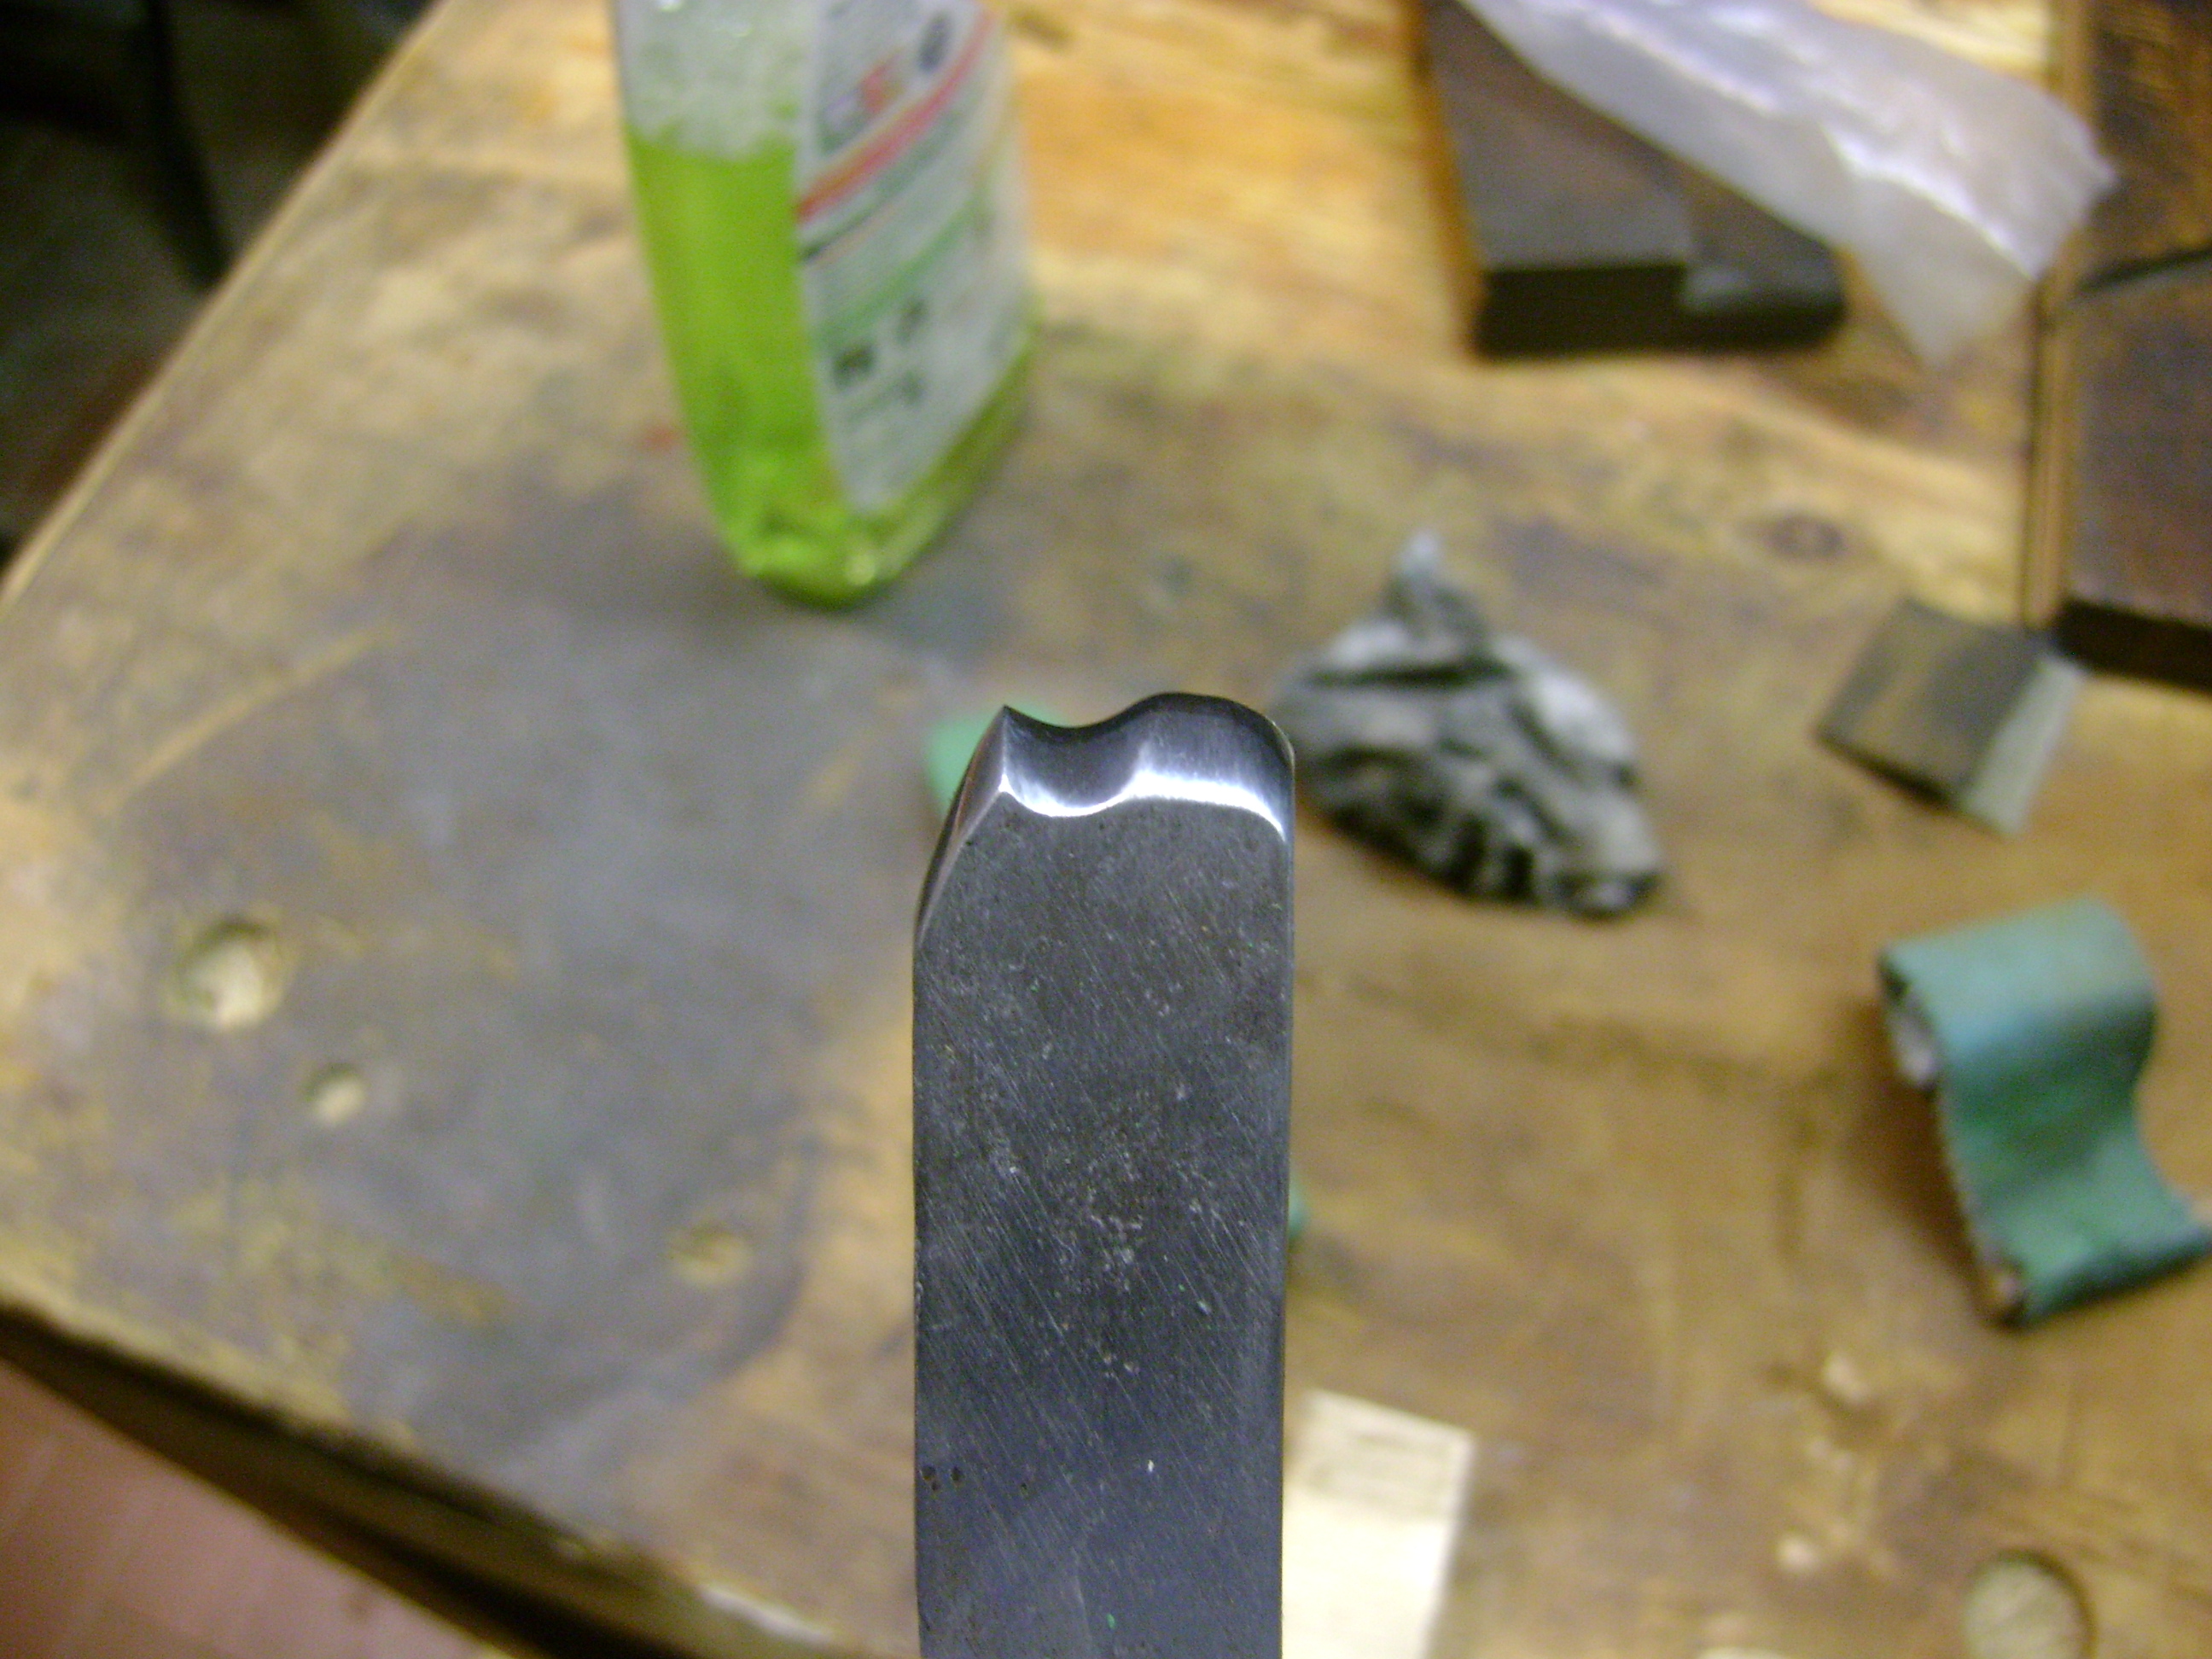
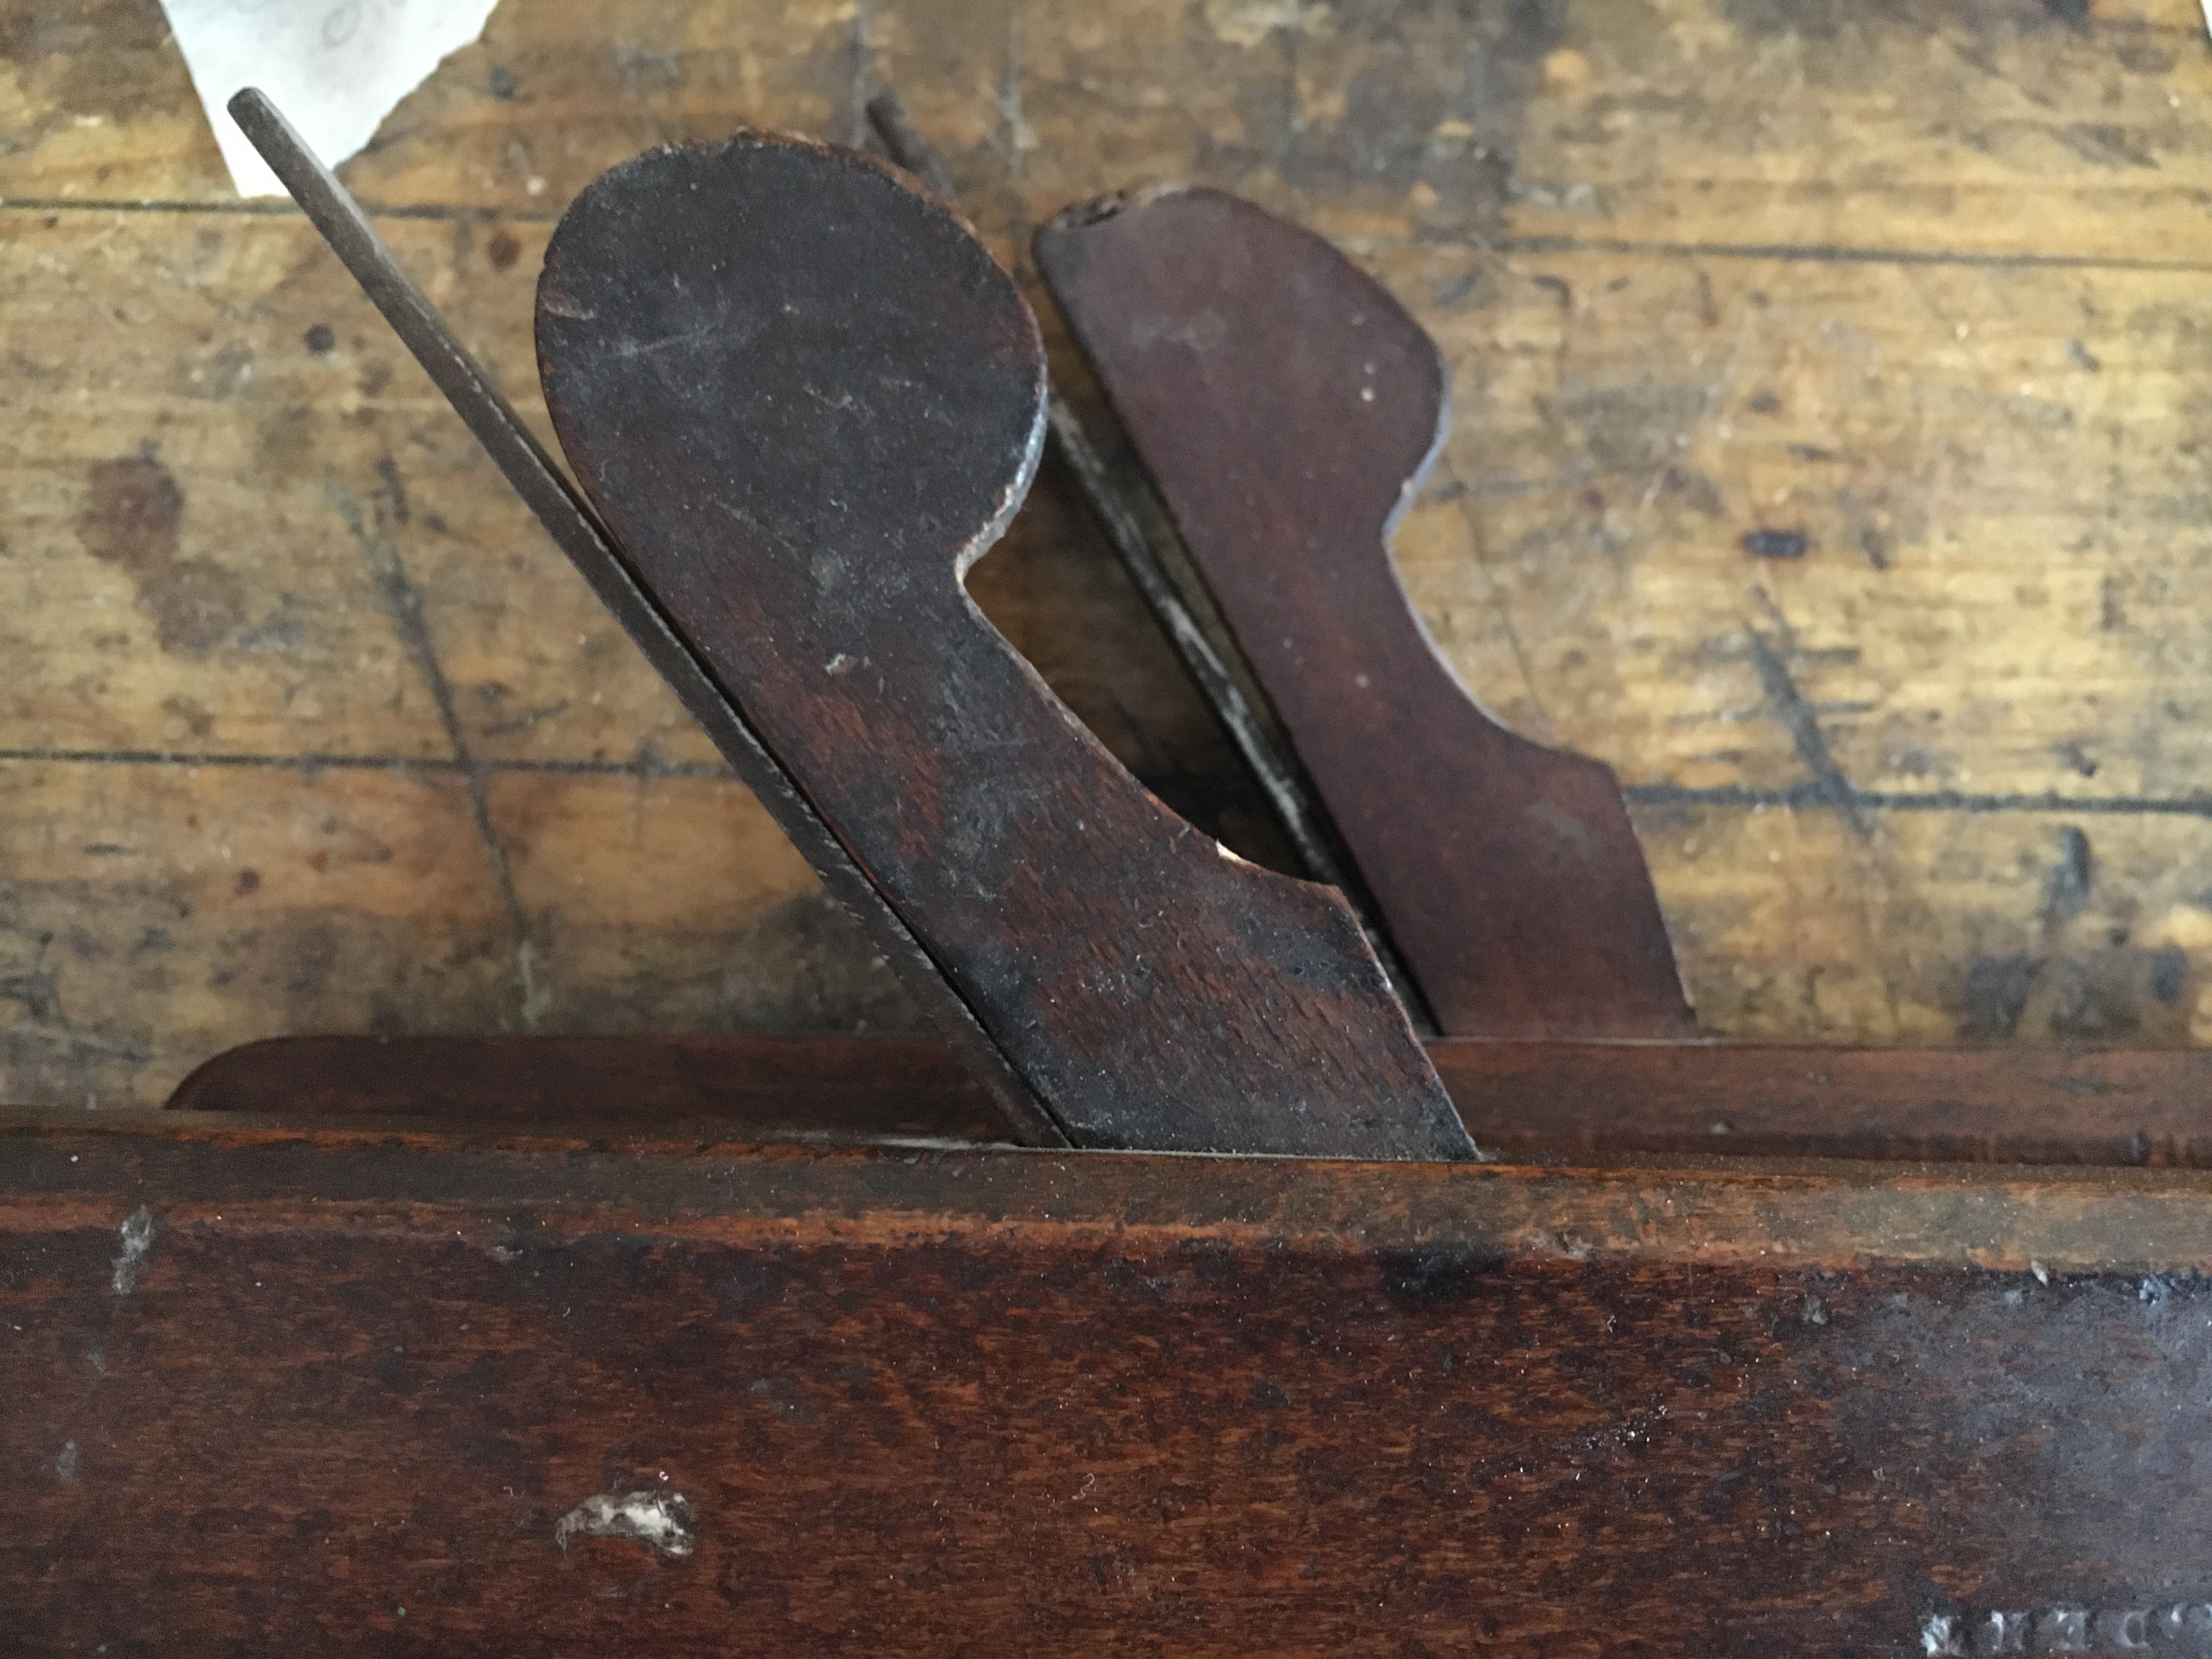 Un modo per riuscire a datare in modo approssimativo una pialla da modanatura ed eventualmente scoprirne anche la nazionalità è la forma del cuneo in legno. Ammesso che il cuneo sia ancora quello originale, la forma più rotondeggiante della testa ed una gola più pronunciata sono indizi che la pialla potrebbe essere molto vecchia. Con il tempo infatti la forma del cuneo si è trasformata, variando da tondeggiante a quasi ovale. Inoltre anche la forma del cuneo più squadrata rimanda a pialle di fabbricazione del centro Europa più che di origine anglosassone.
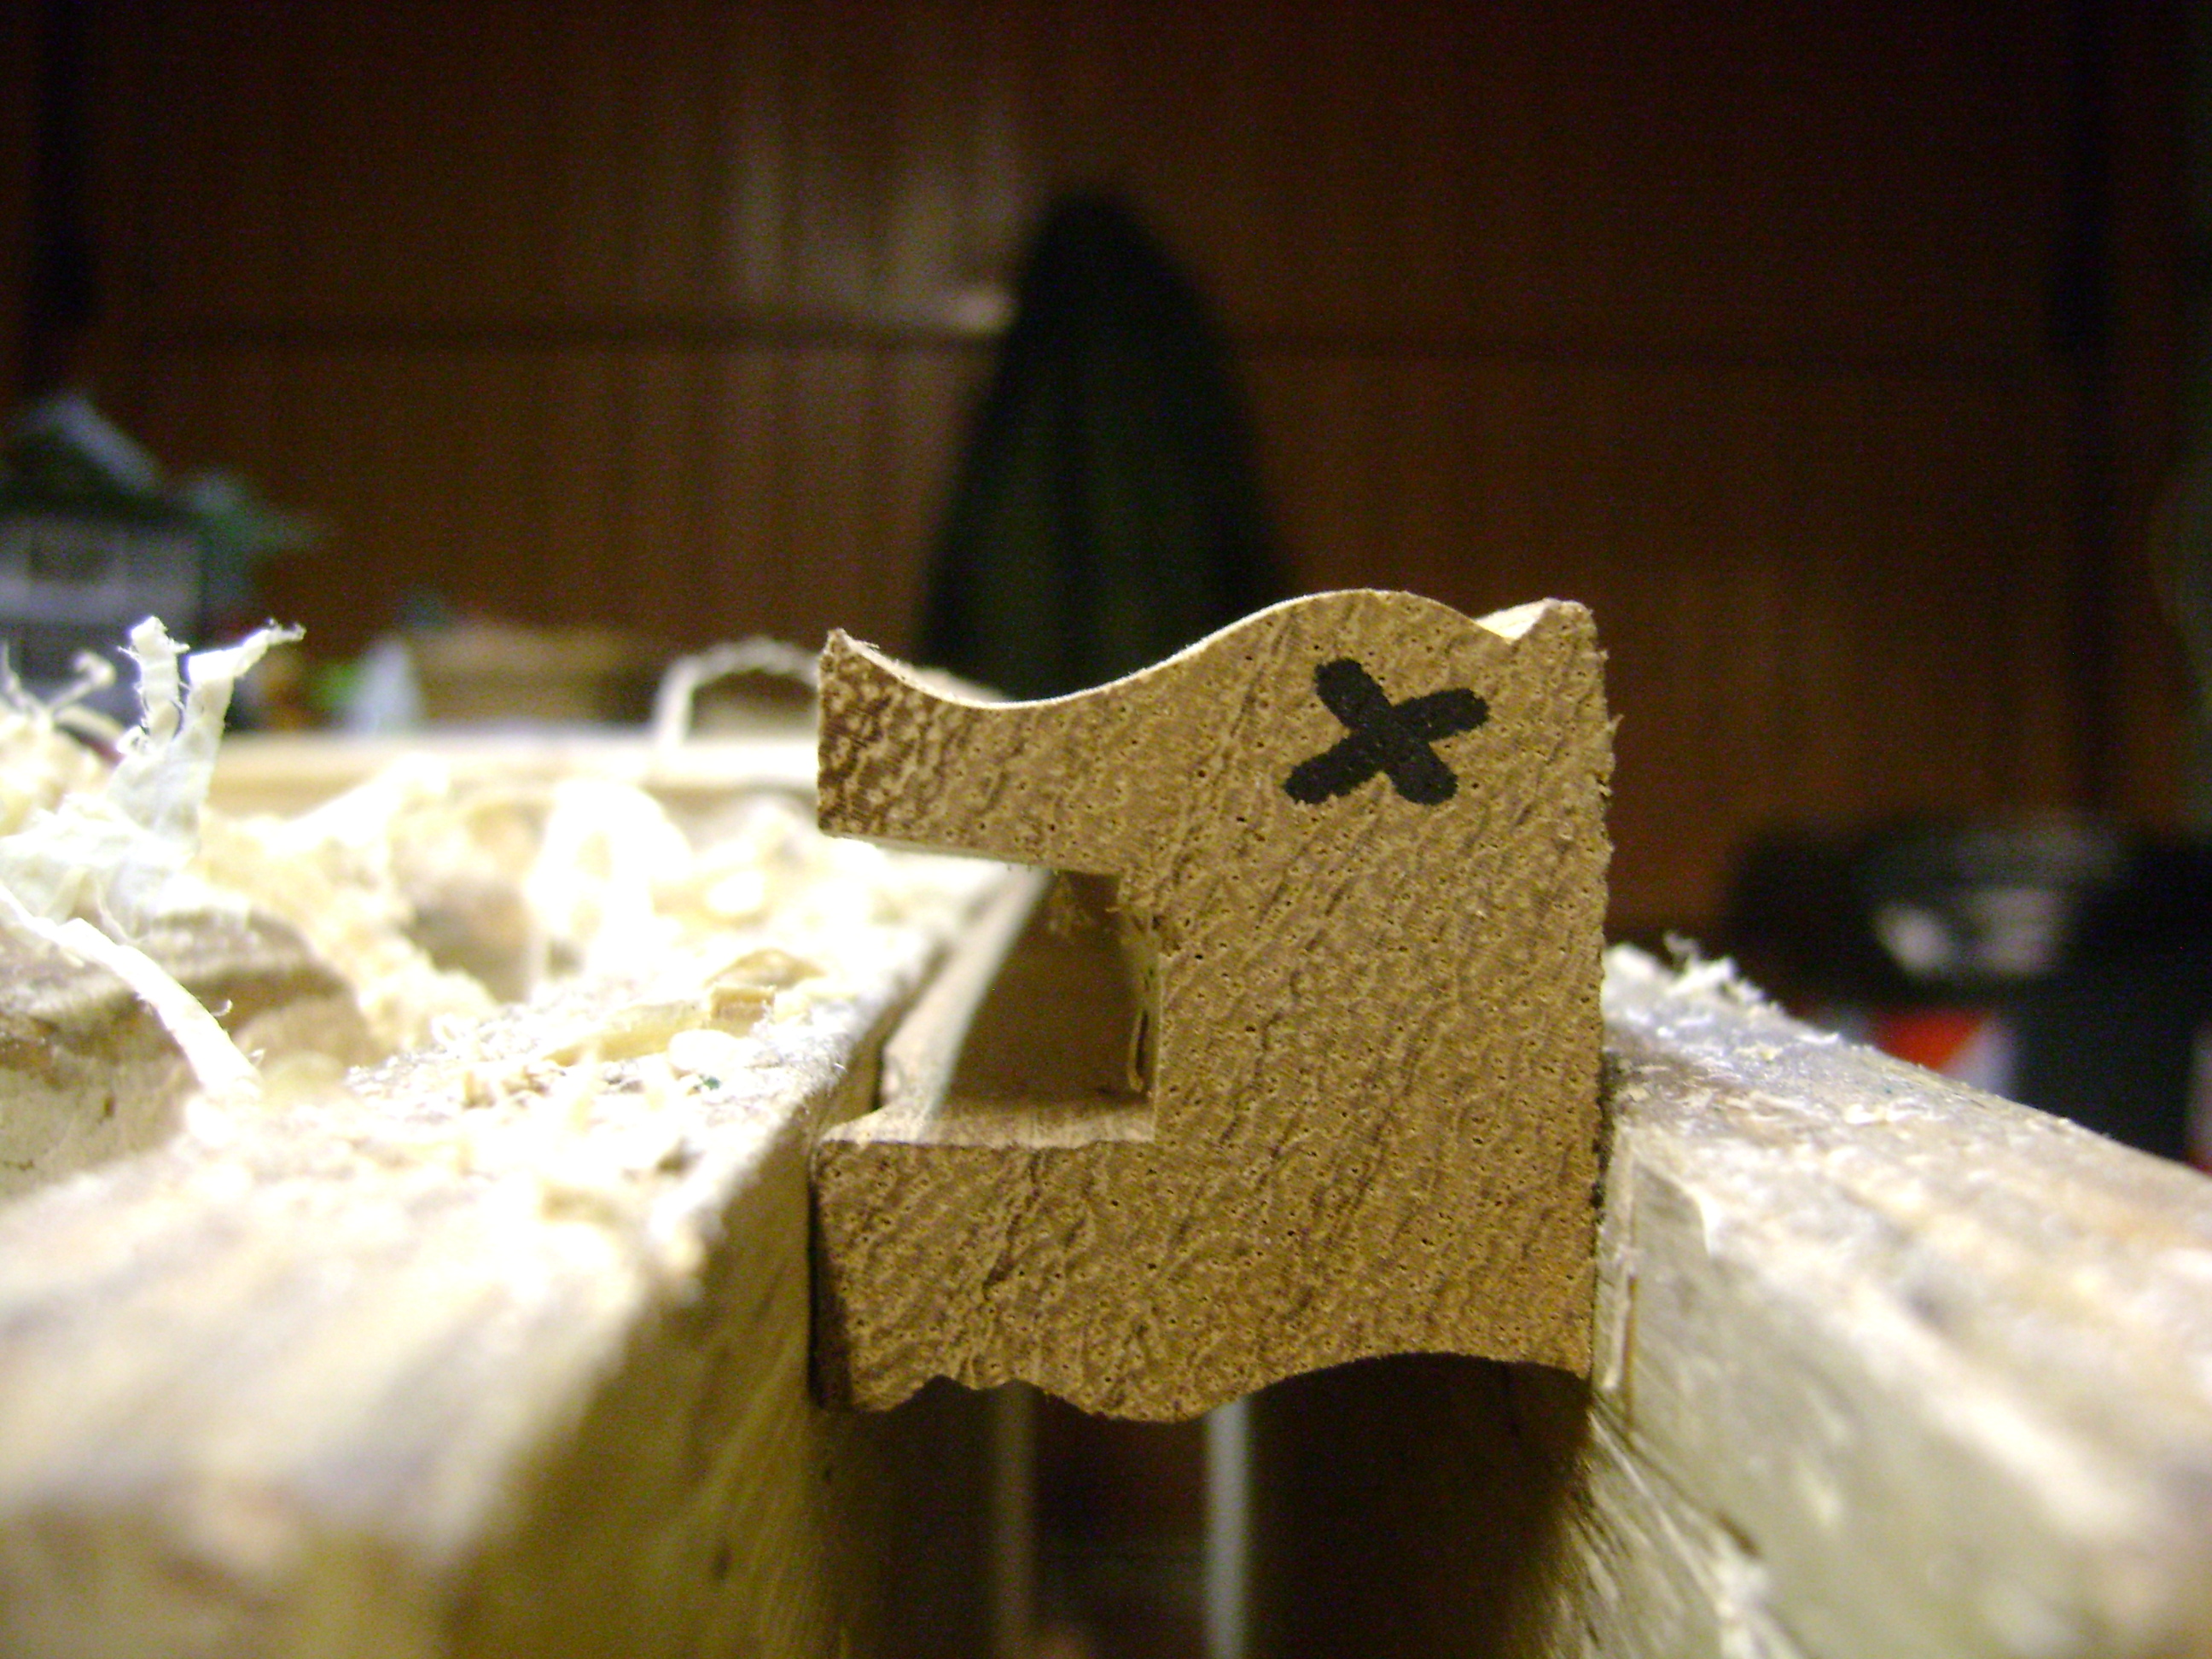
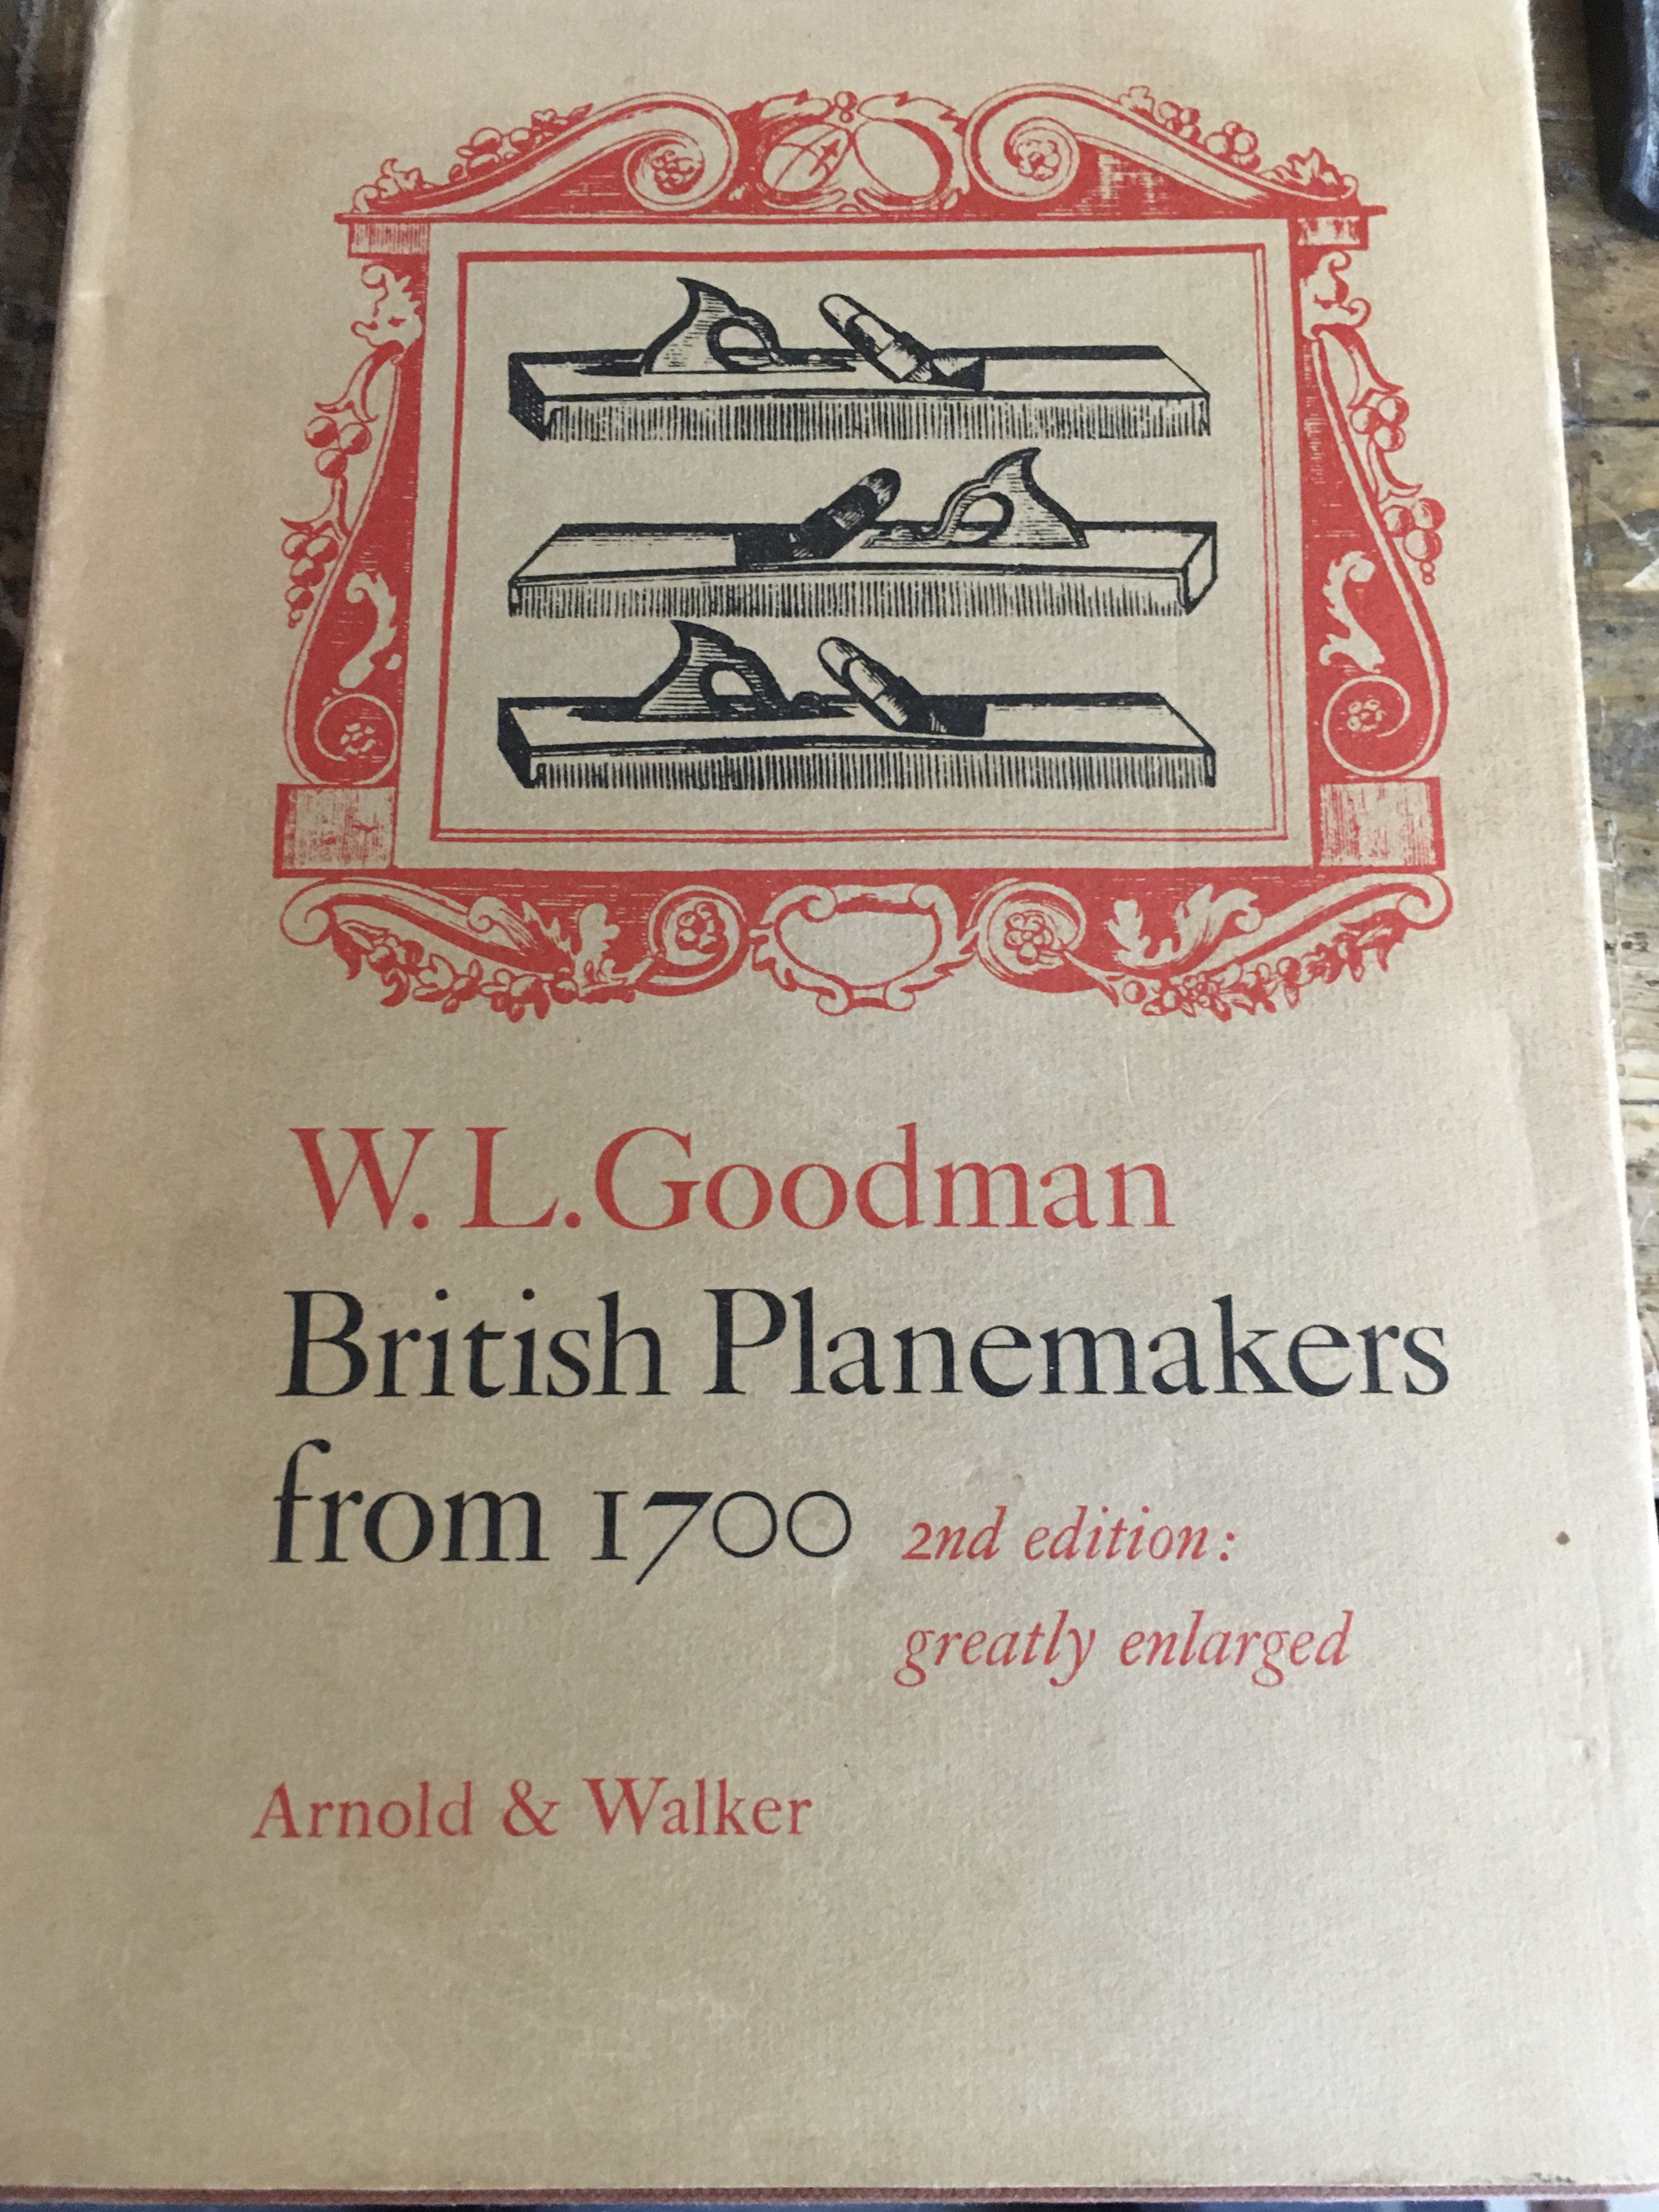 Il libro di W.L. Goodman – British Planemakers from 1700 spiega molto bene, seppure in lingua inglese, queste ed altre tematiche e riporta inoltre un’ esauriente catalogazione di pialle per modanatura attraverso la quale è possibile risalire alla datazione del modello in nostro possesso. In questo modo sono riuscito a datare alcune pialle acquistate qualche anno fa su Ebay tra cui una in particolare ho scoperto risalire intorno al 1750. Sulle pialle da modanatura, oltre ai marchi distintivi del produttore e dei vari possessori che si sono susseguiti, spesso sono riportate delle linee sul fronte e/o sul retro della pialla. Queste linee indicano l’angolo di spring. Vedremo tra poco di cosa si tratta, quando tratteremo nello specifico della dinamica di funzionamento di questo tipo di pialle.
Prima però rimane ancora da parlare dell’argomento affilatura della lama.
Affilatura della lama.
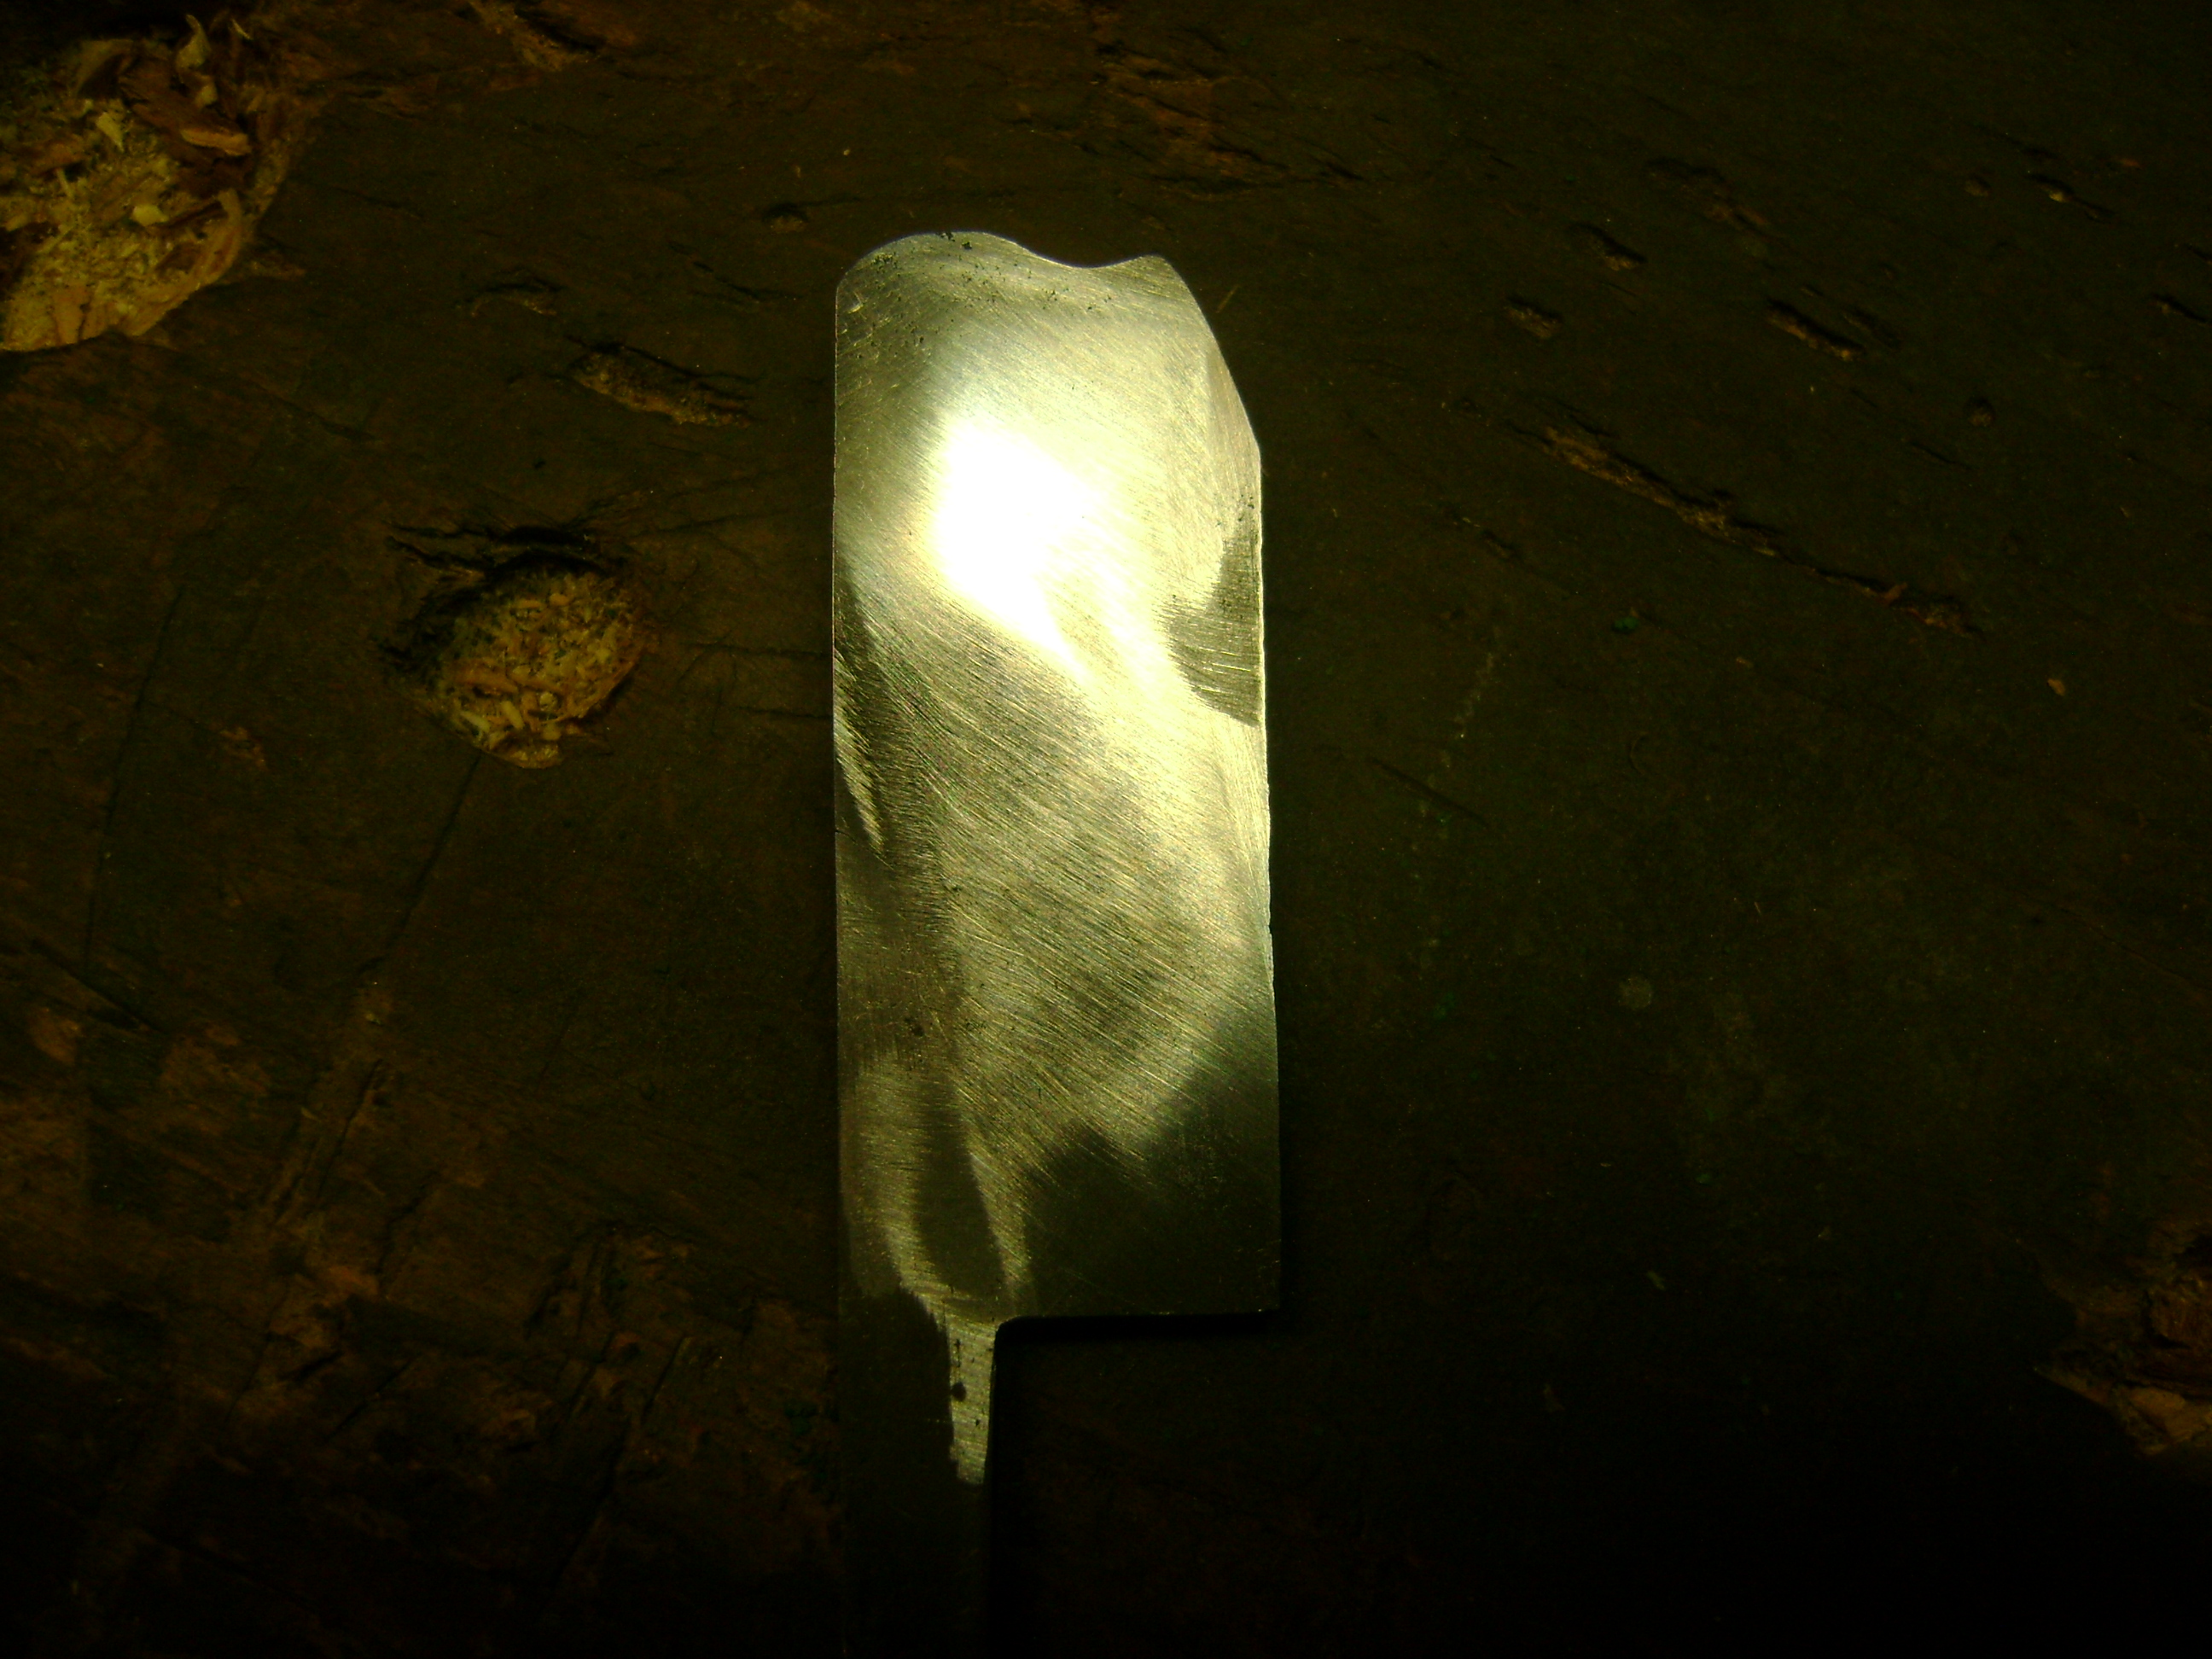
L’inclinazione della gola delle pialle da modanatura si attesta normalmente tra i 50 ed i 60 gradi e talvolta veniva costruita leggermente obliqua rispetto al piano cosicché la lama potesse lavorare in posizione diagonale (skewed) rispetto alla direzione di piallatura. L’angolo di inclinazione del bisello varia invece tra i 25 ed i 30 gradi e a questi si possono aggiungere un paio di gradi di microbevel cosi da formare il tagliente, linea di incontro tra il bisello ed il dorso della lama.
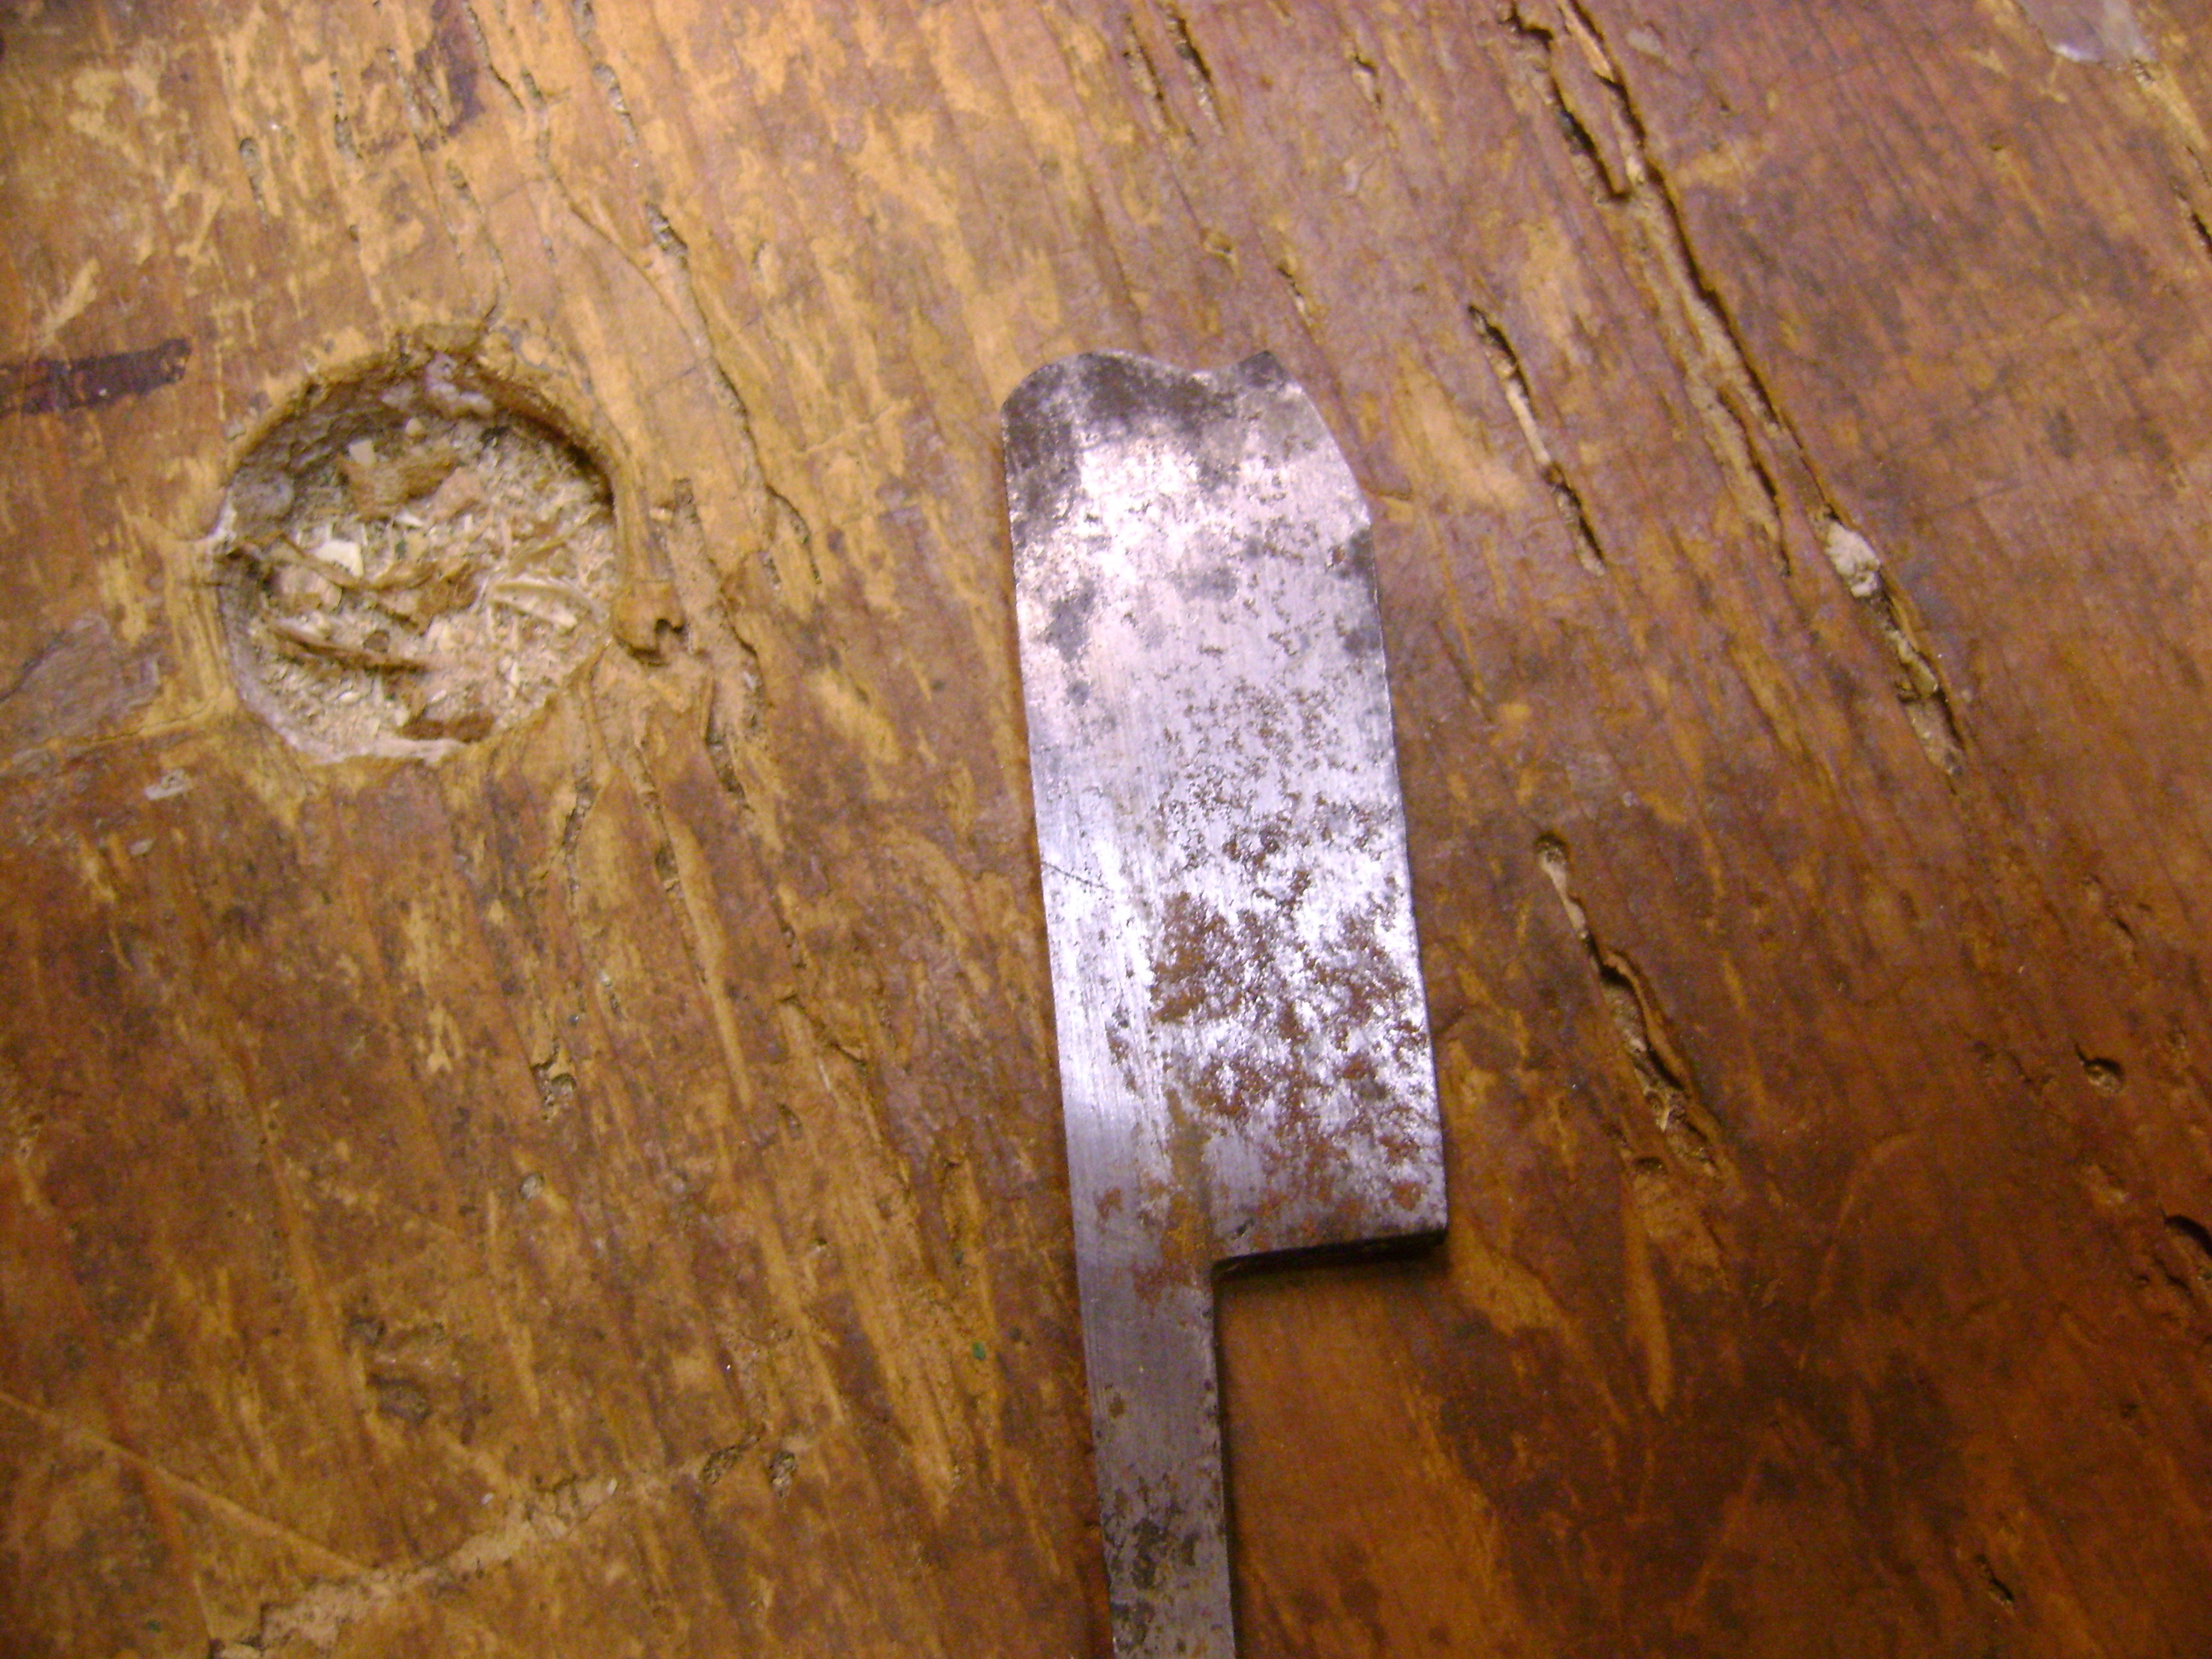
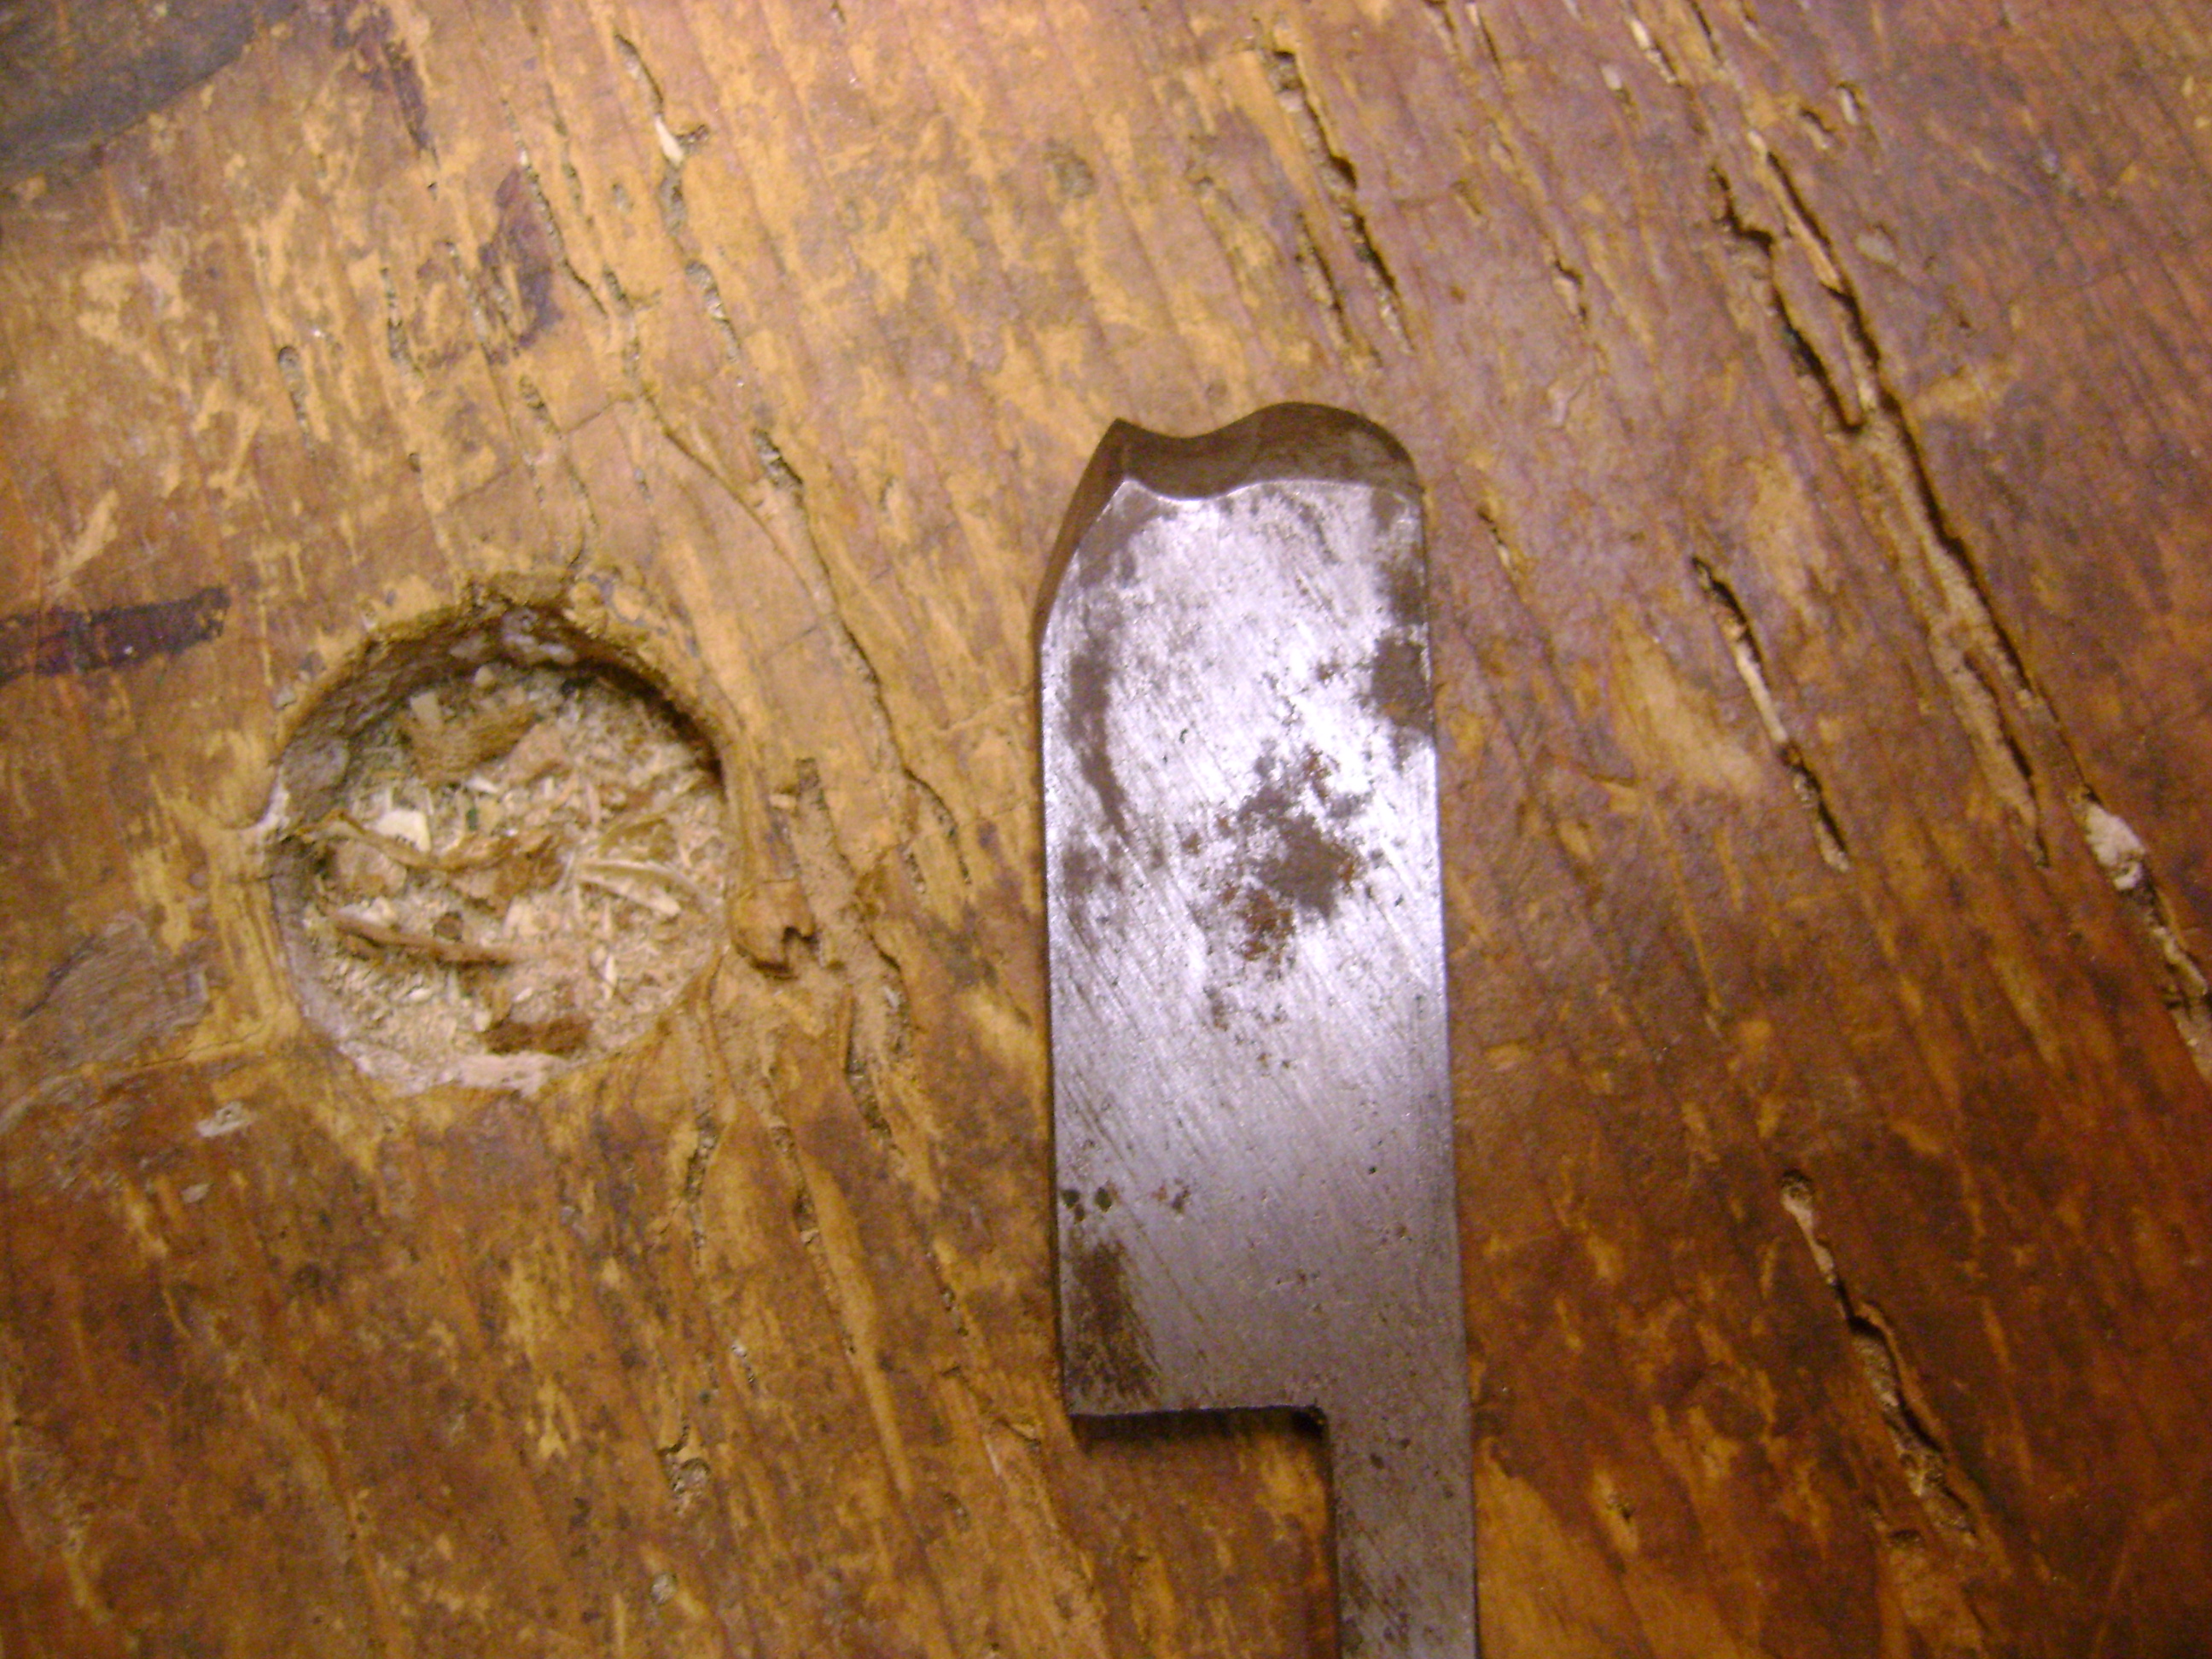 Le lame di questo tipo di pialle sono abbastanza robuste e comunque più spesse sulla punta rispetto al codolo che è più sottile. Le pialle da modanatura lavorano in posizione bevel down ovvero con il bisello rivolto verso il basso. Abbiamo già visto in precedenti post che quando si acquista una pialla vintage bisogna porre in essere tutta una serie di operazioni affinché la lama possa lavorare a dovere. Le operazioni più comuni sono la rimozione della ruggine della lama con acqua e aceto e carta abrasiva. A seguire una passata di olio, cera o WD40 (comunque un lubrificante protettivo) e quindi si può passare all’affilatura vera e propria.
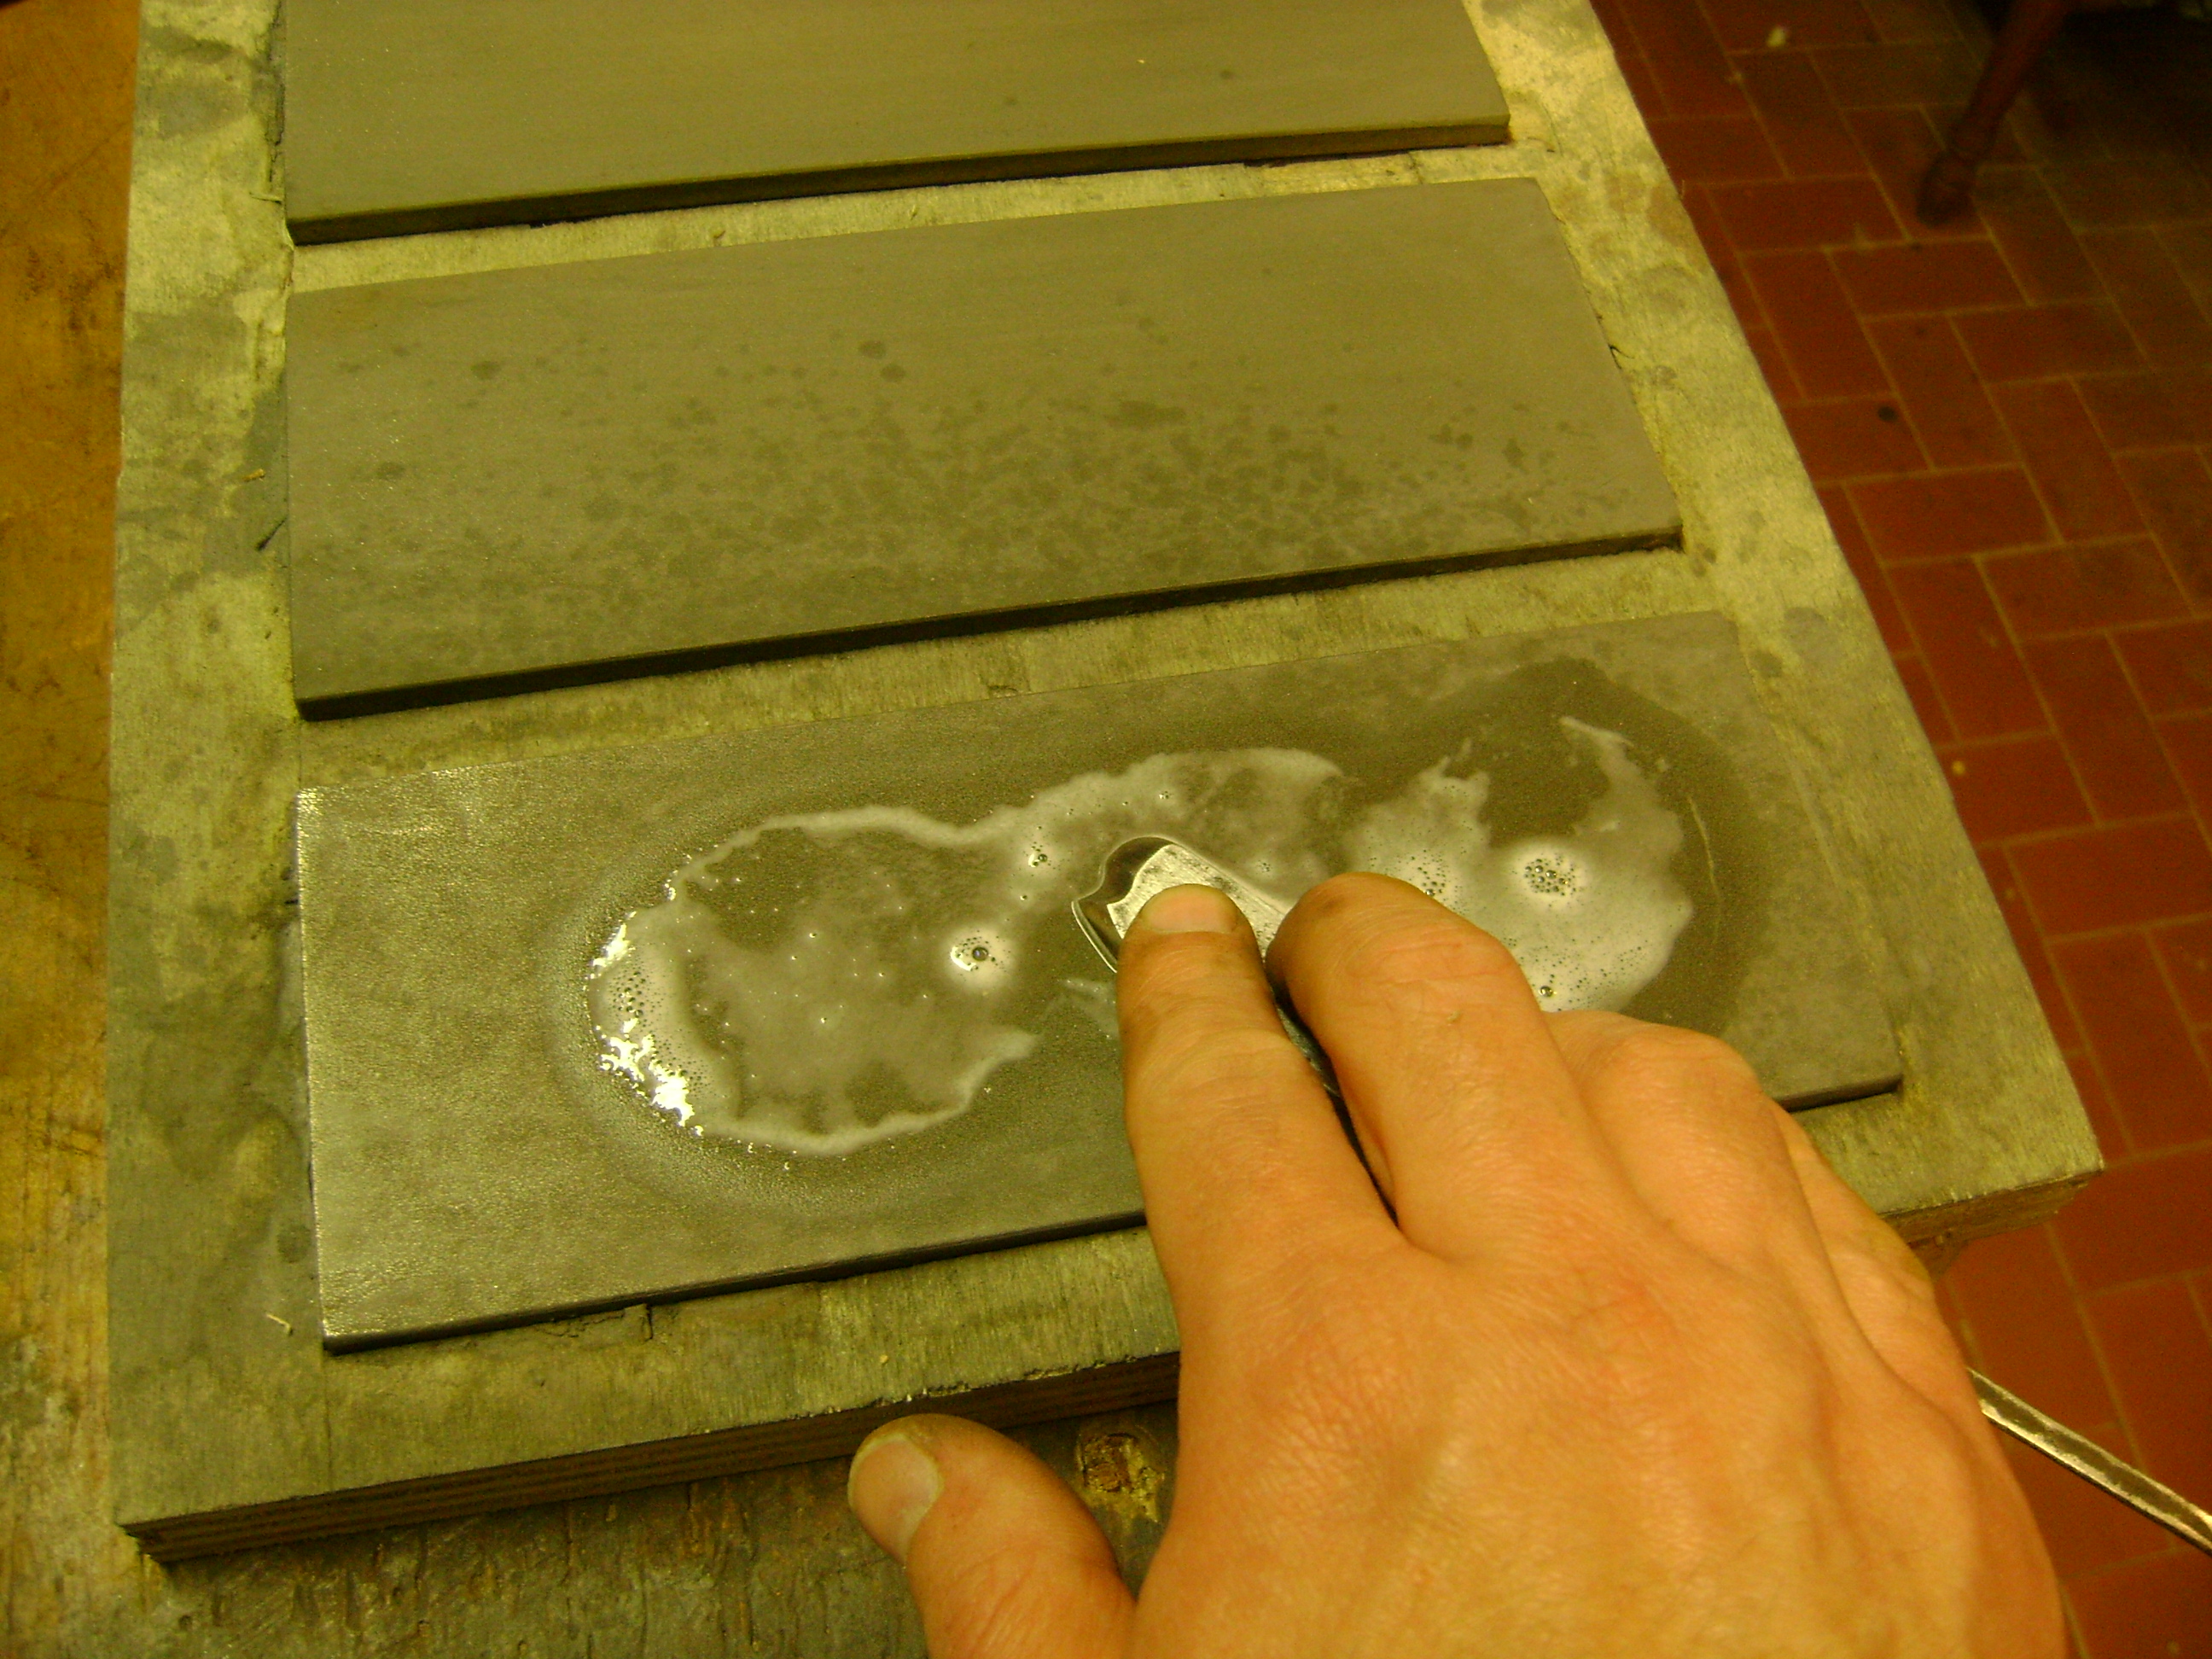
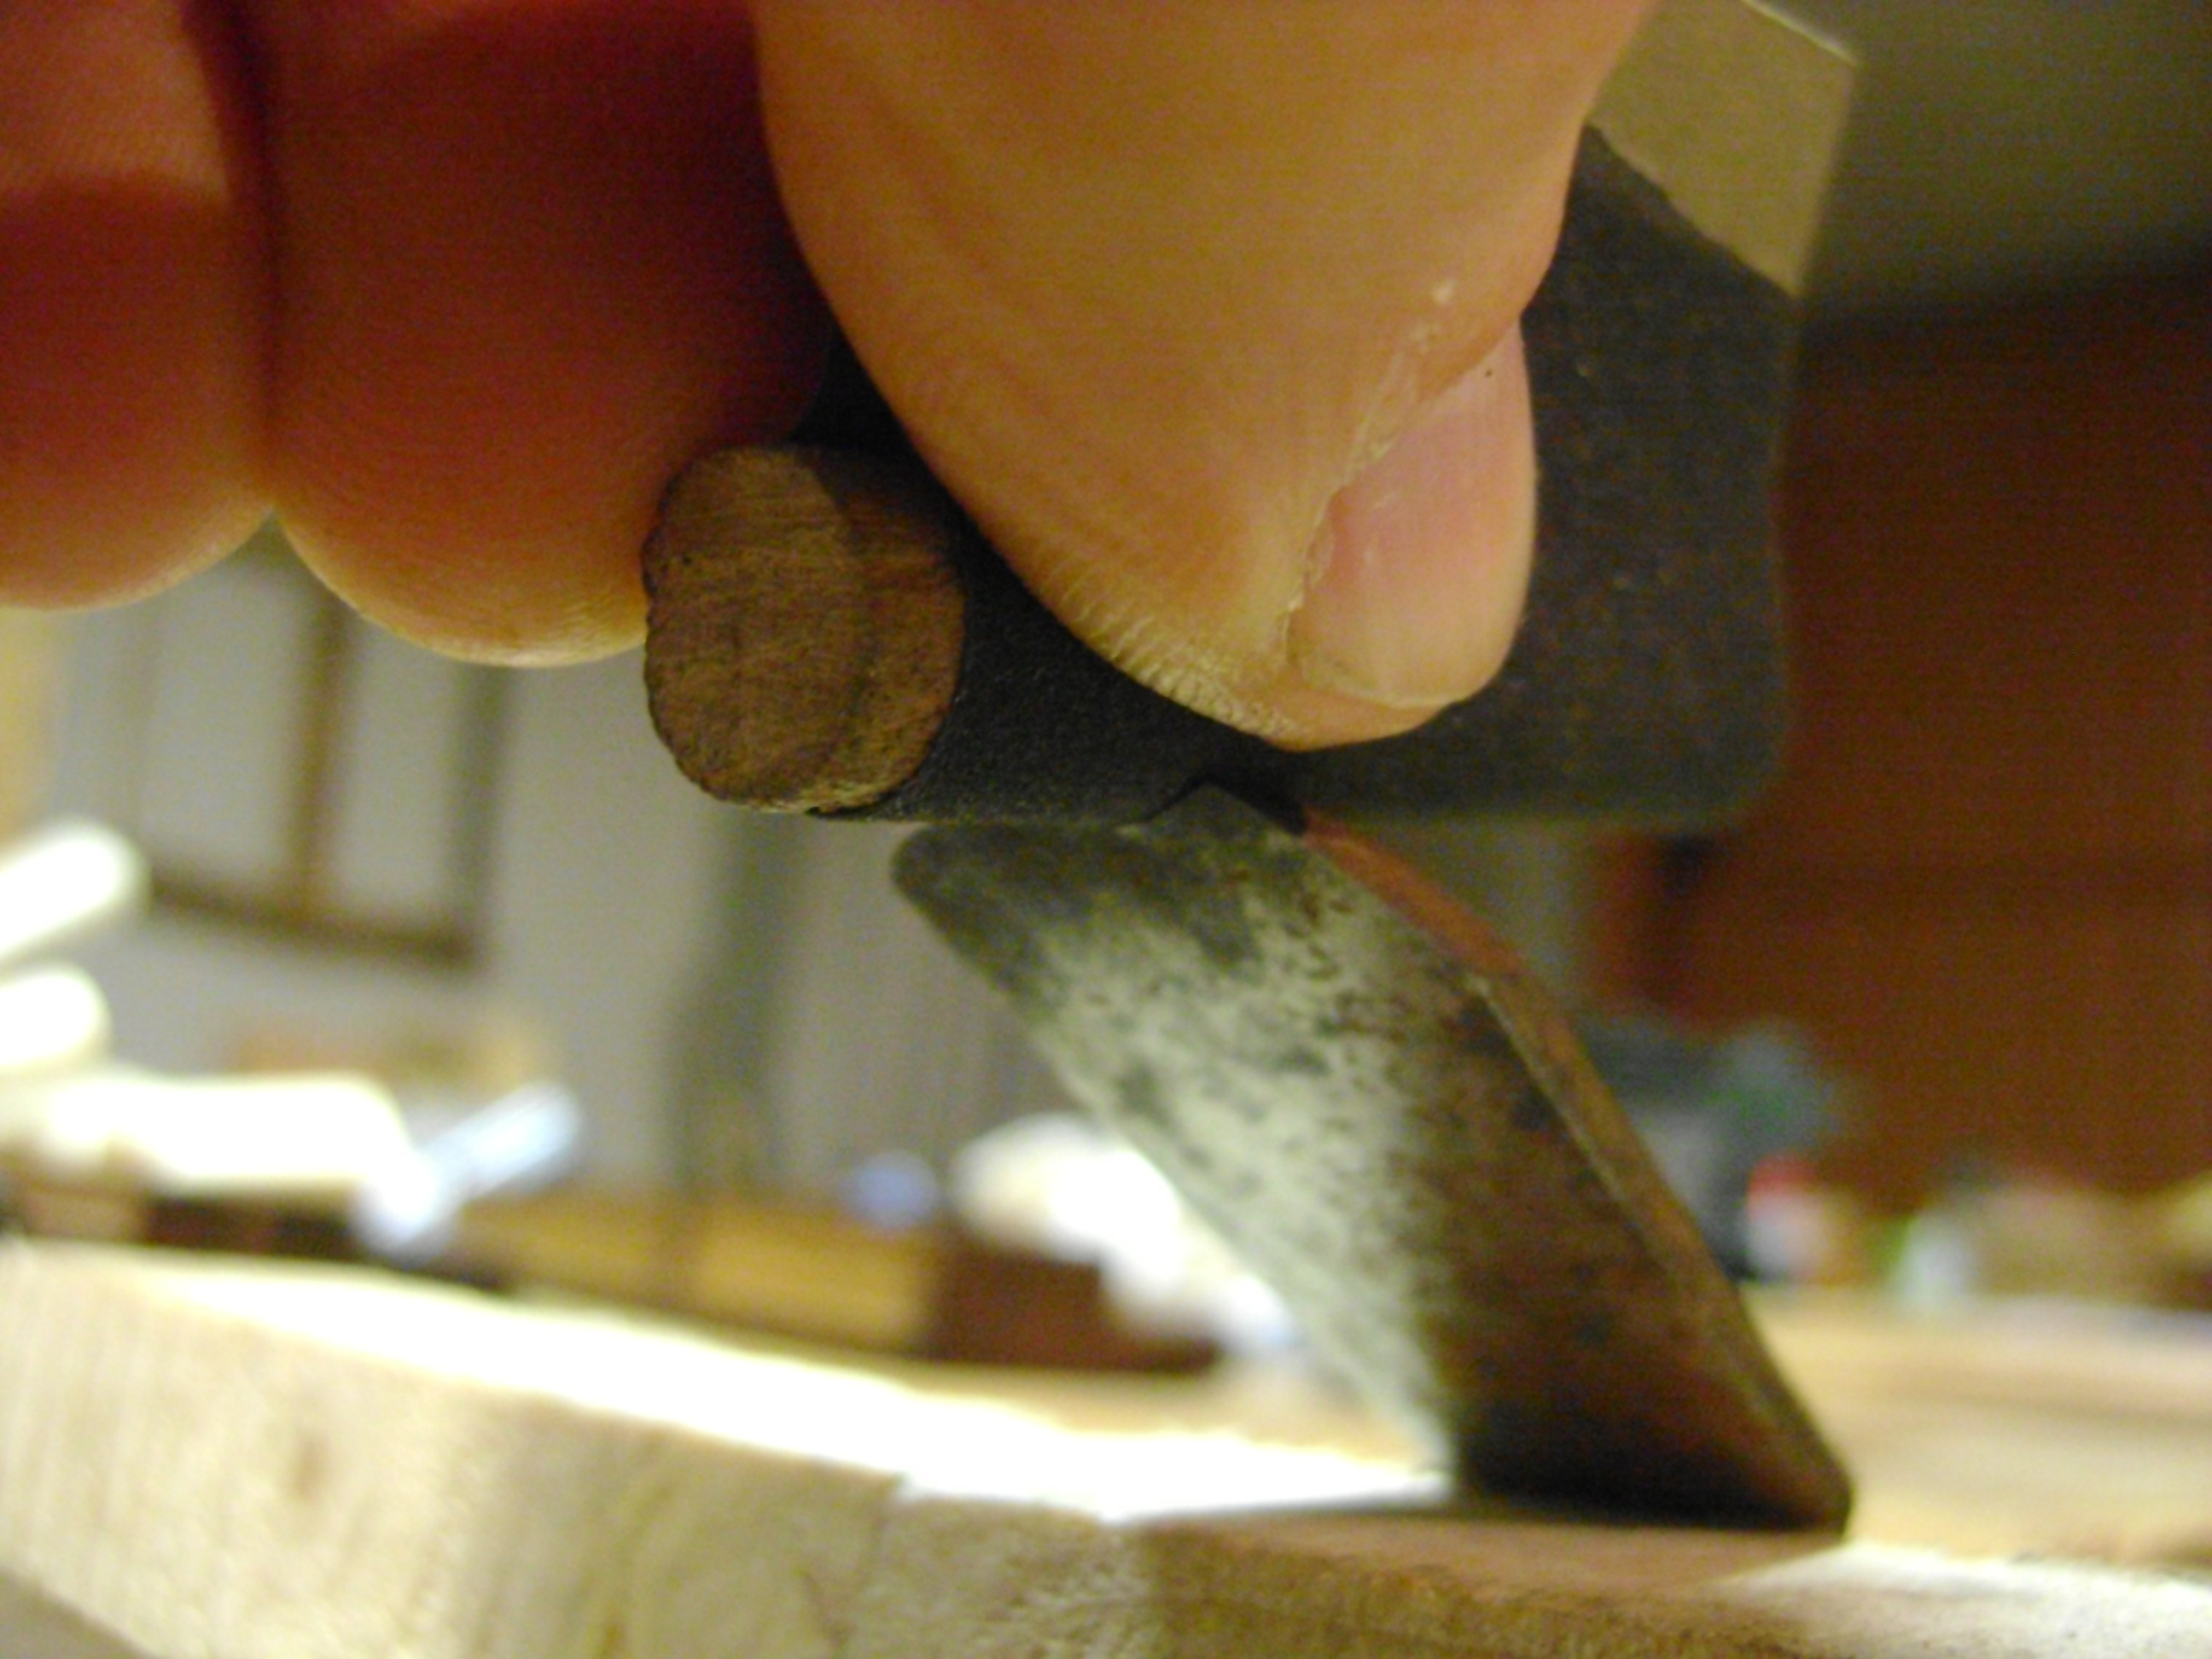
 Per la spianatura del dorso valgono le stesse regole viste per le normali lame delle pialle. Passaggi sulle carte abrasive o sulle pietre a varie grane e lucidatura con lo strop. L’affilatura del bisello necessita invece di maggiori accortezze. I profili più semplici delle pialle convesse possono essere affilati dapprima con delle lime a faccia piatta e successivamente con della carta abrasiva a varie grane partendo dalla 250 a salire. Per i profili convessi il metodo migliore, se non vogliamo acquistare le apposite pietre sagomate, è quello di usare piccole lime a sezione cilindrica e successivamente dei tondini di legno di varia misura, ma comunque sempre con un raggio di curvatura leggermente inferiore alla curva da affilare, con avvolta della carta abrasiva da usare in grane crescenti.
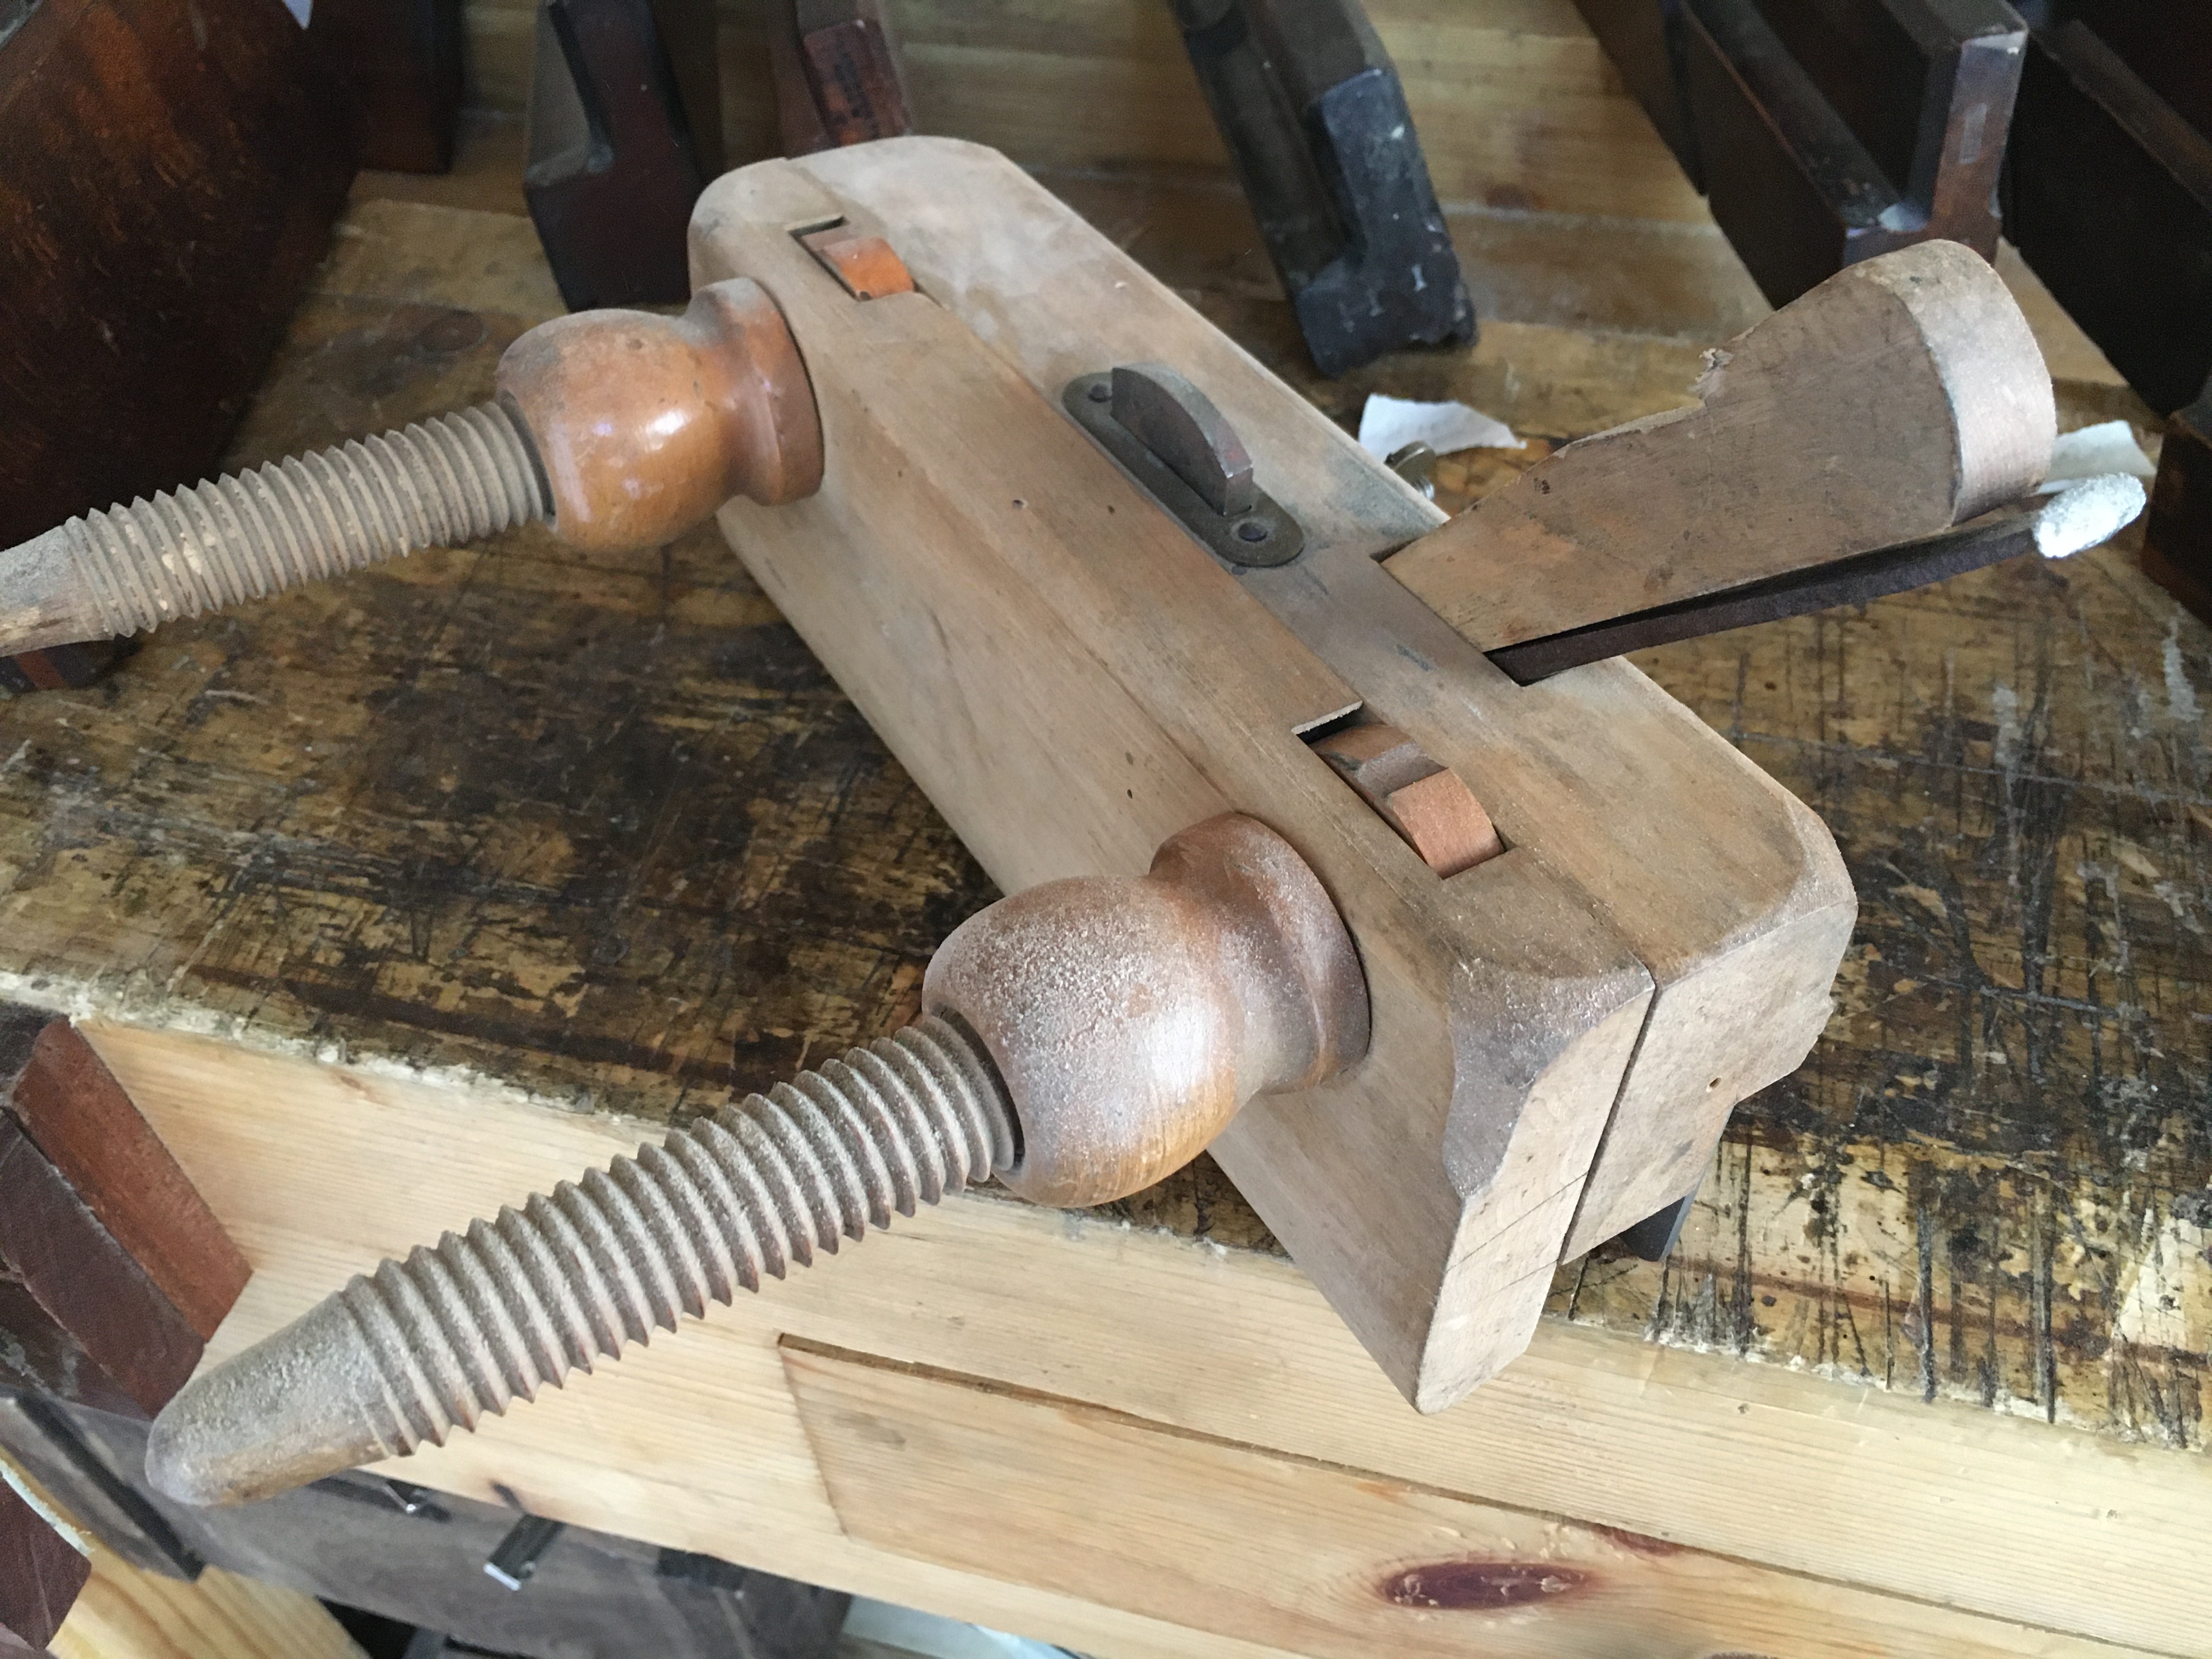
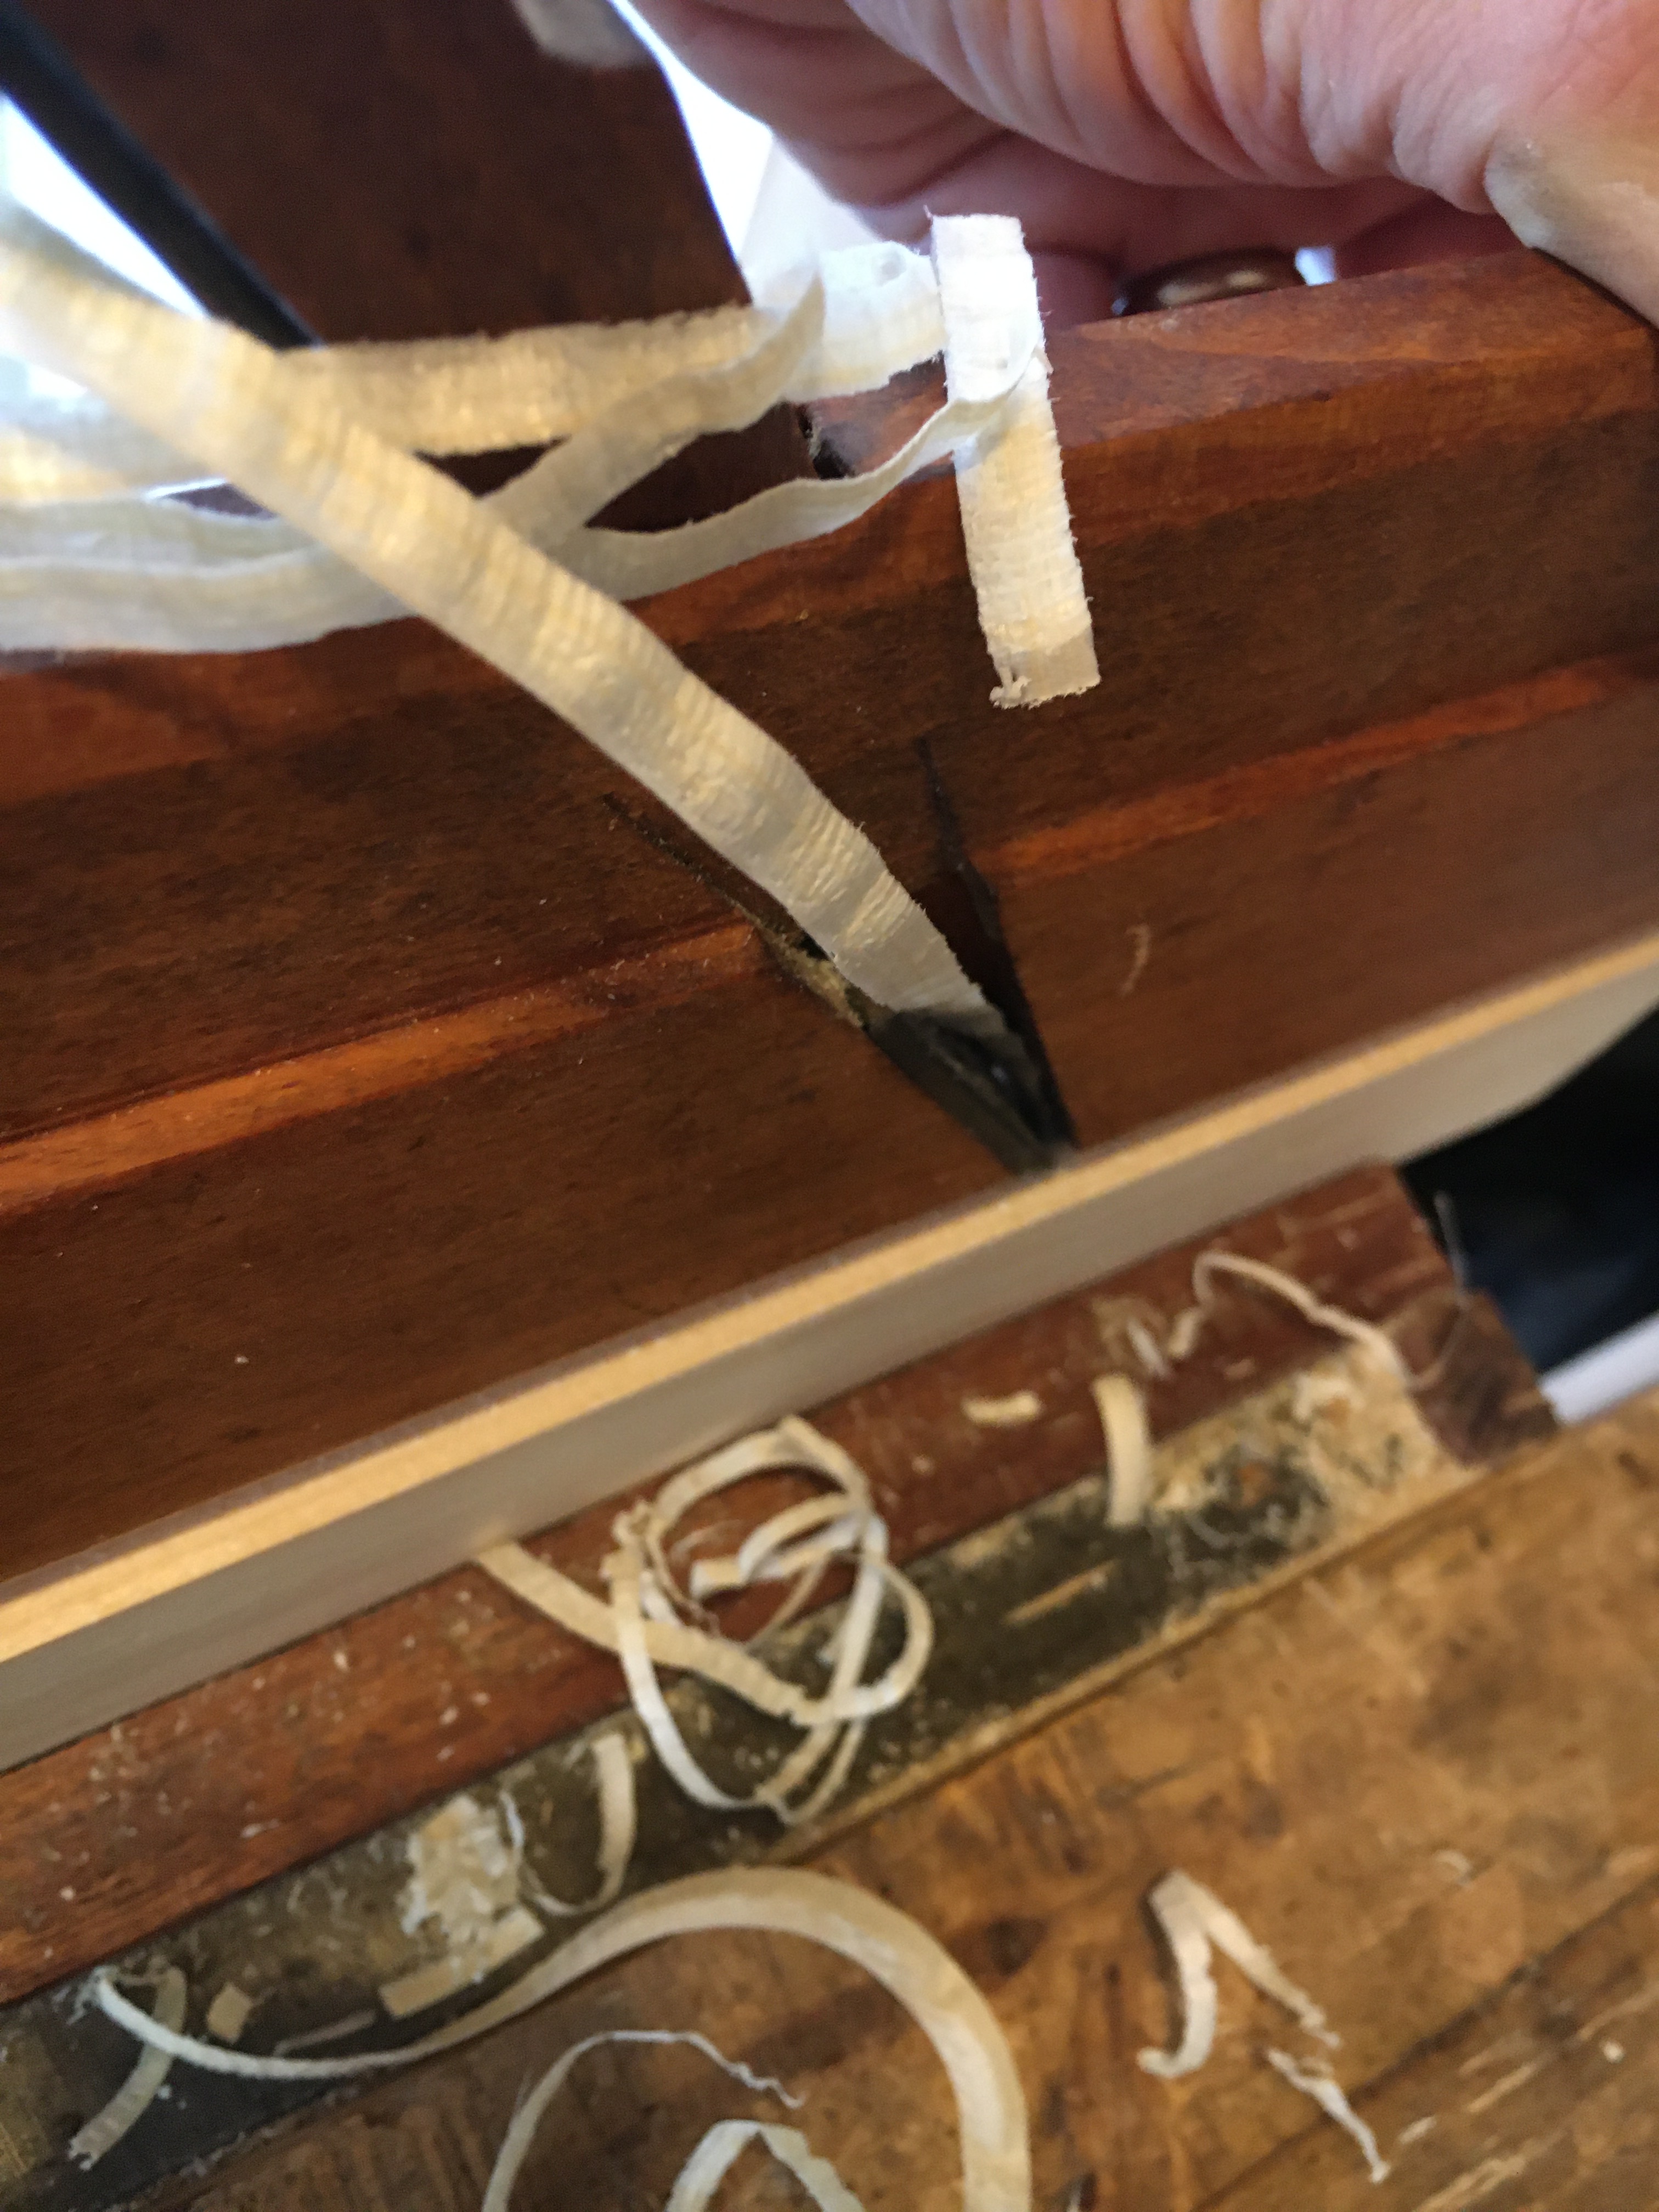
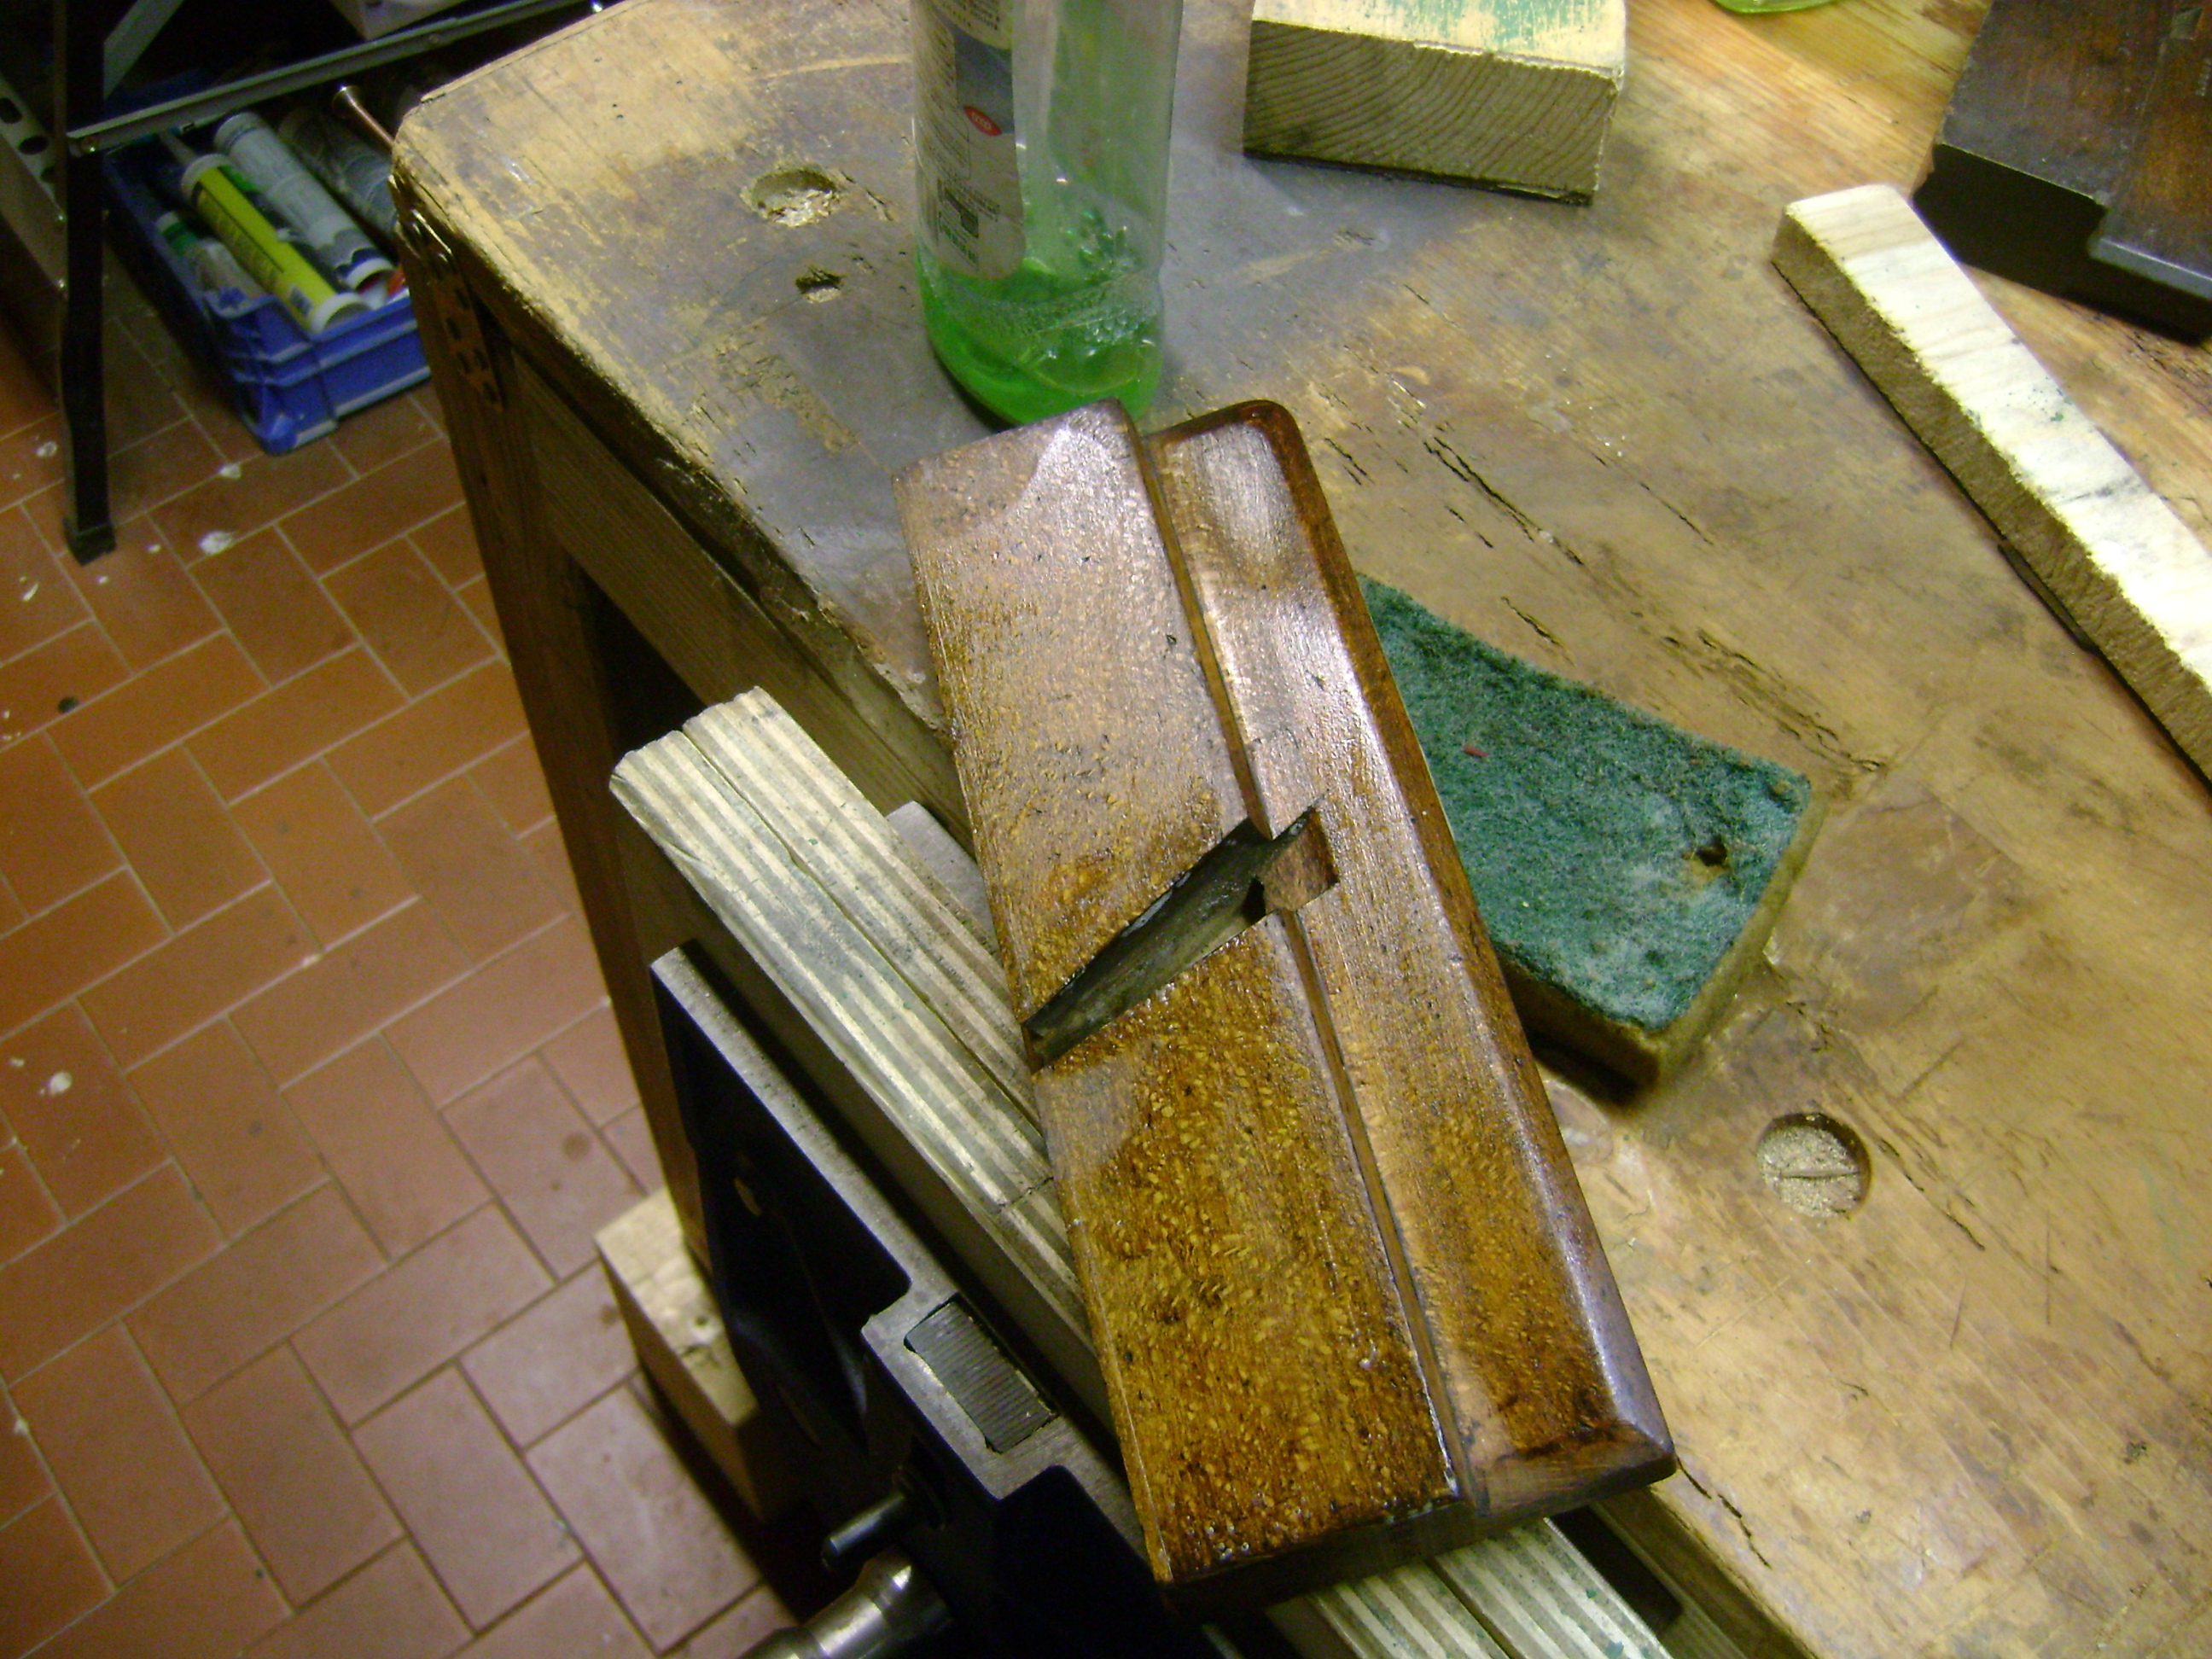
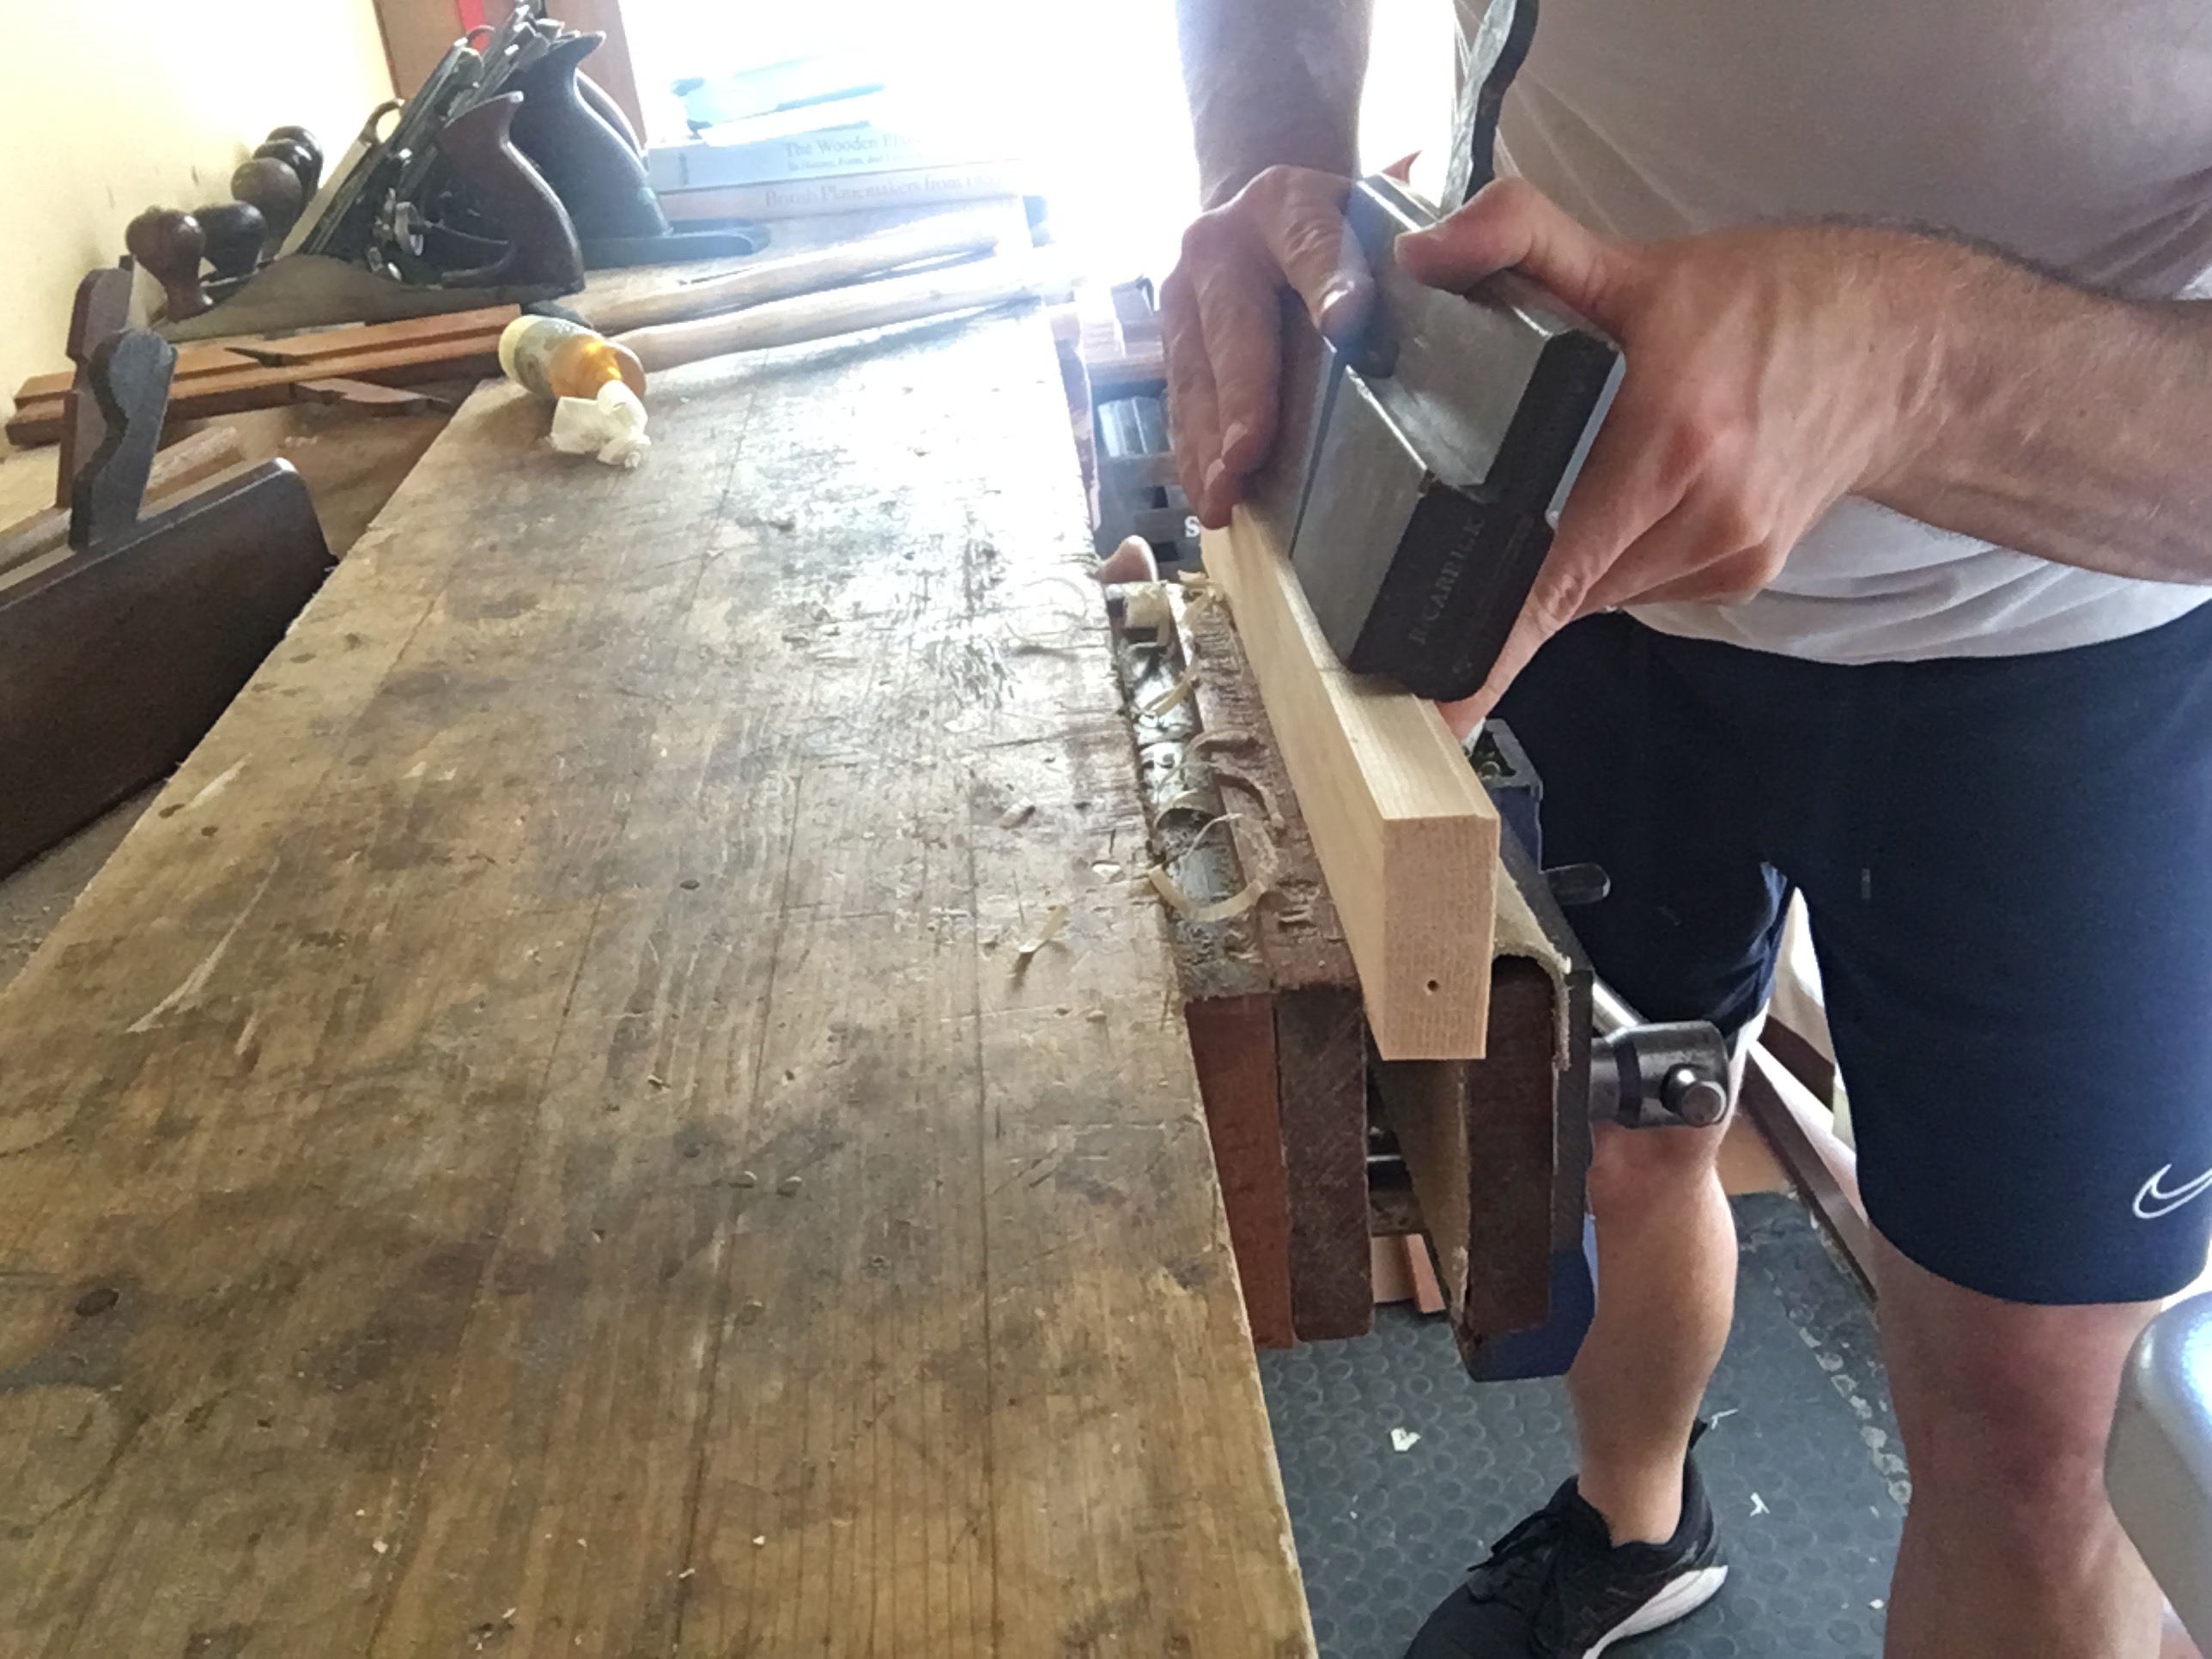
 Per la fase di affilatura si possono utilizzare due metodi. Il primo consiste nel rimuovere la lama ed inserirla nella morsa in posizione capovolta con il bisello rivolto verso l’alto. Eventualmente possiamo inserire un supporto da frapporre tra la testa della lama e la morsa per evitare che la lama fletta troppo o si sfili dalla morsa. Il secondo sistema consiste nel mantenere la lama inserita nella pialla e leggermente esposta rispetto alla suola. Si inserisce la pialla capovolta dentro la morsa (non stringiamo troppo) con il bisello della lama rivolto verso l’alto con la precauzione di coprire la suola della pialla con del nastro carta al fine di evitare di rovinare inavvertitamente con la carta abrasiva la suola stessa.

 Avendo cura di seguire il profilo del bisello per tutta la sua larghezza e seguendo l’inclinazione già presente si fanno passate leggere sempre in direzione del tagliente e senza bisogno di insistere troppo, fino a circa 1 decimo di millimetro dal bordo. Quest’ultima parte del bisello la si può affilare utilizzando direttamente le carte abrasive più fini, unendola al dorso inclinando leggermente di un paio di gradi il supporto abrasivo così da ottenere il tagliente. I profili concavi vengono bene con questo metodo, mentre per i profili convessi si possono utilizzare in aggiunta anche supporti a faccia piana.
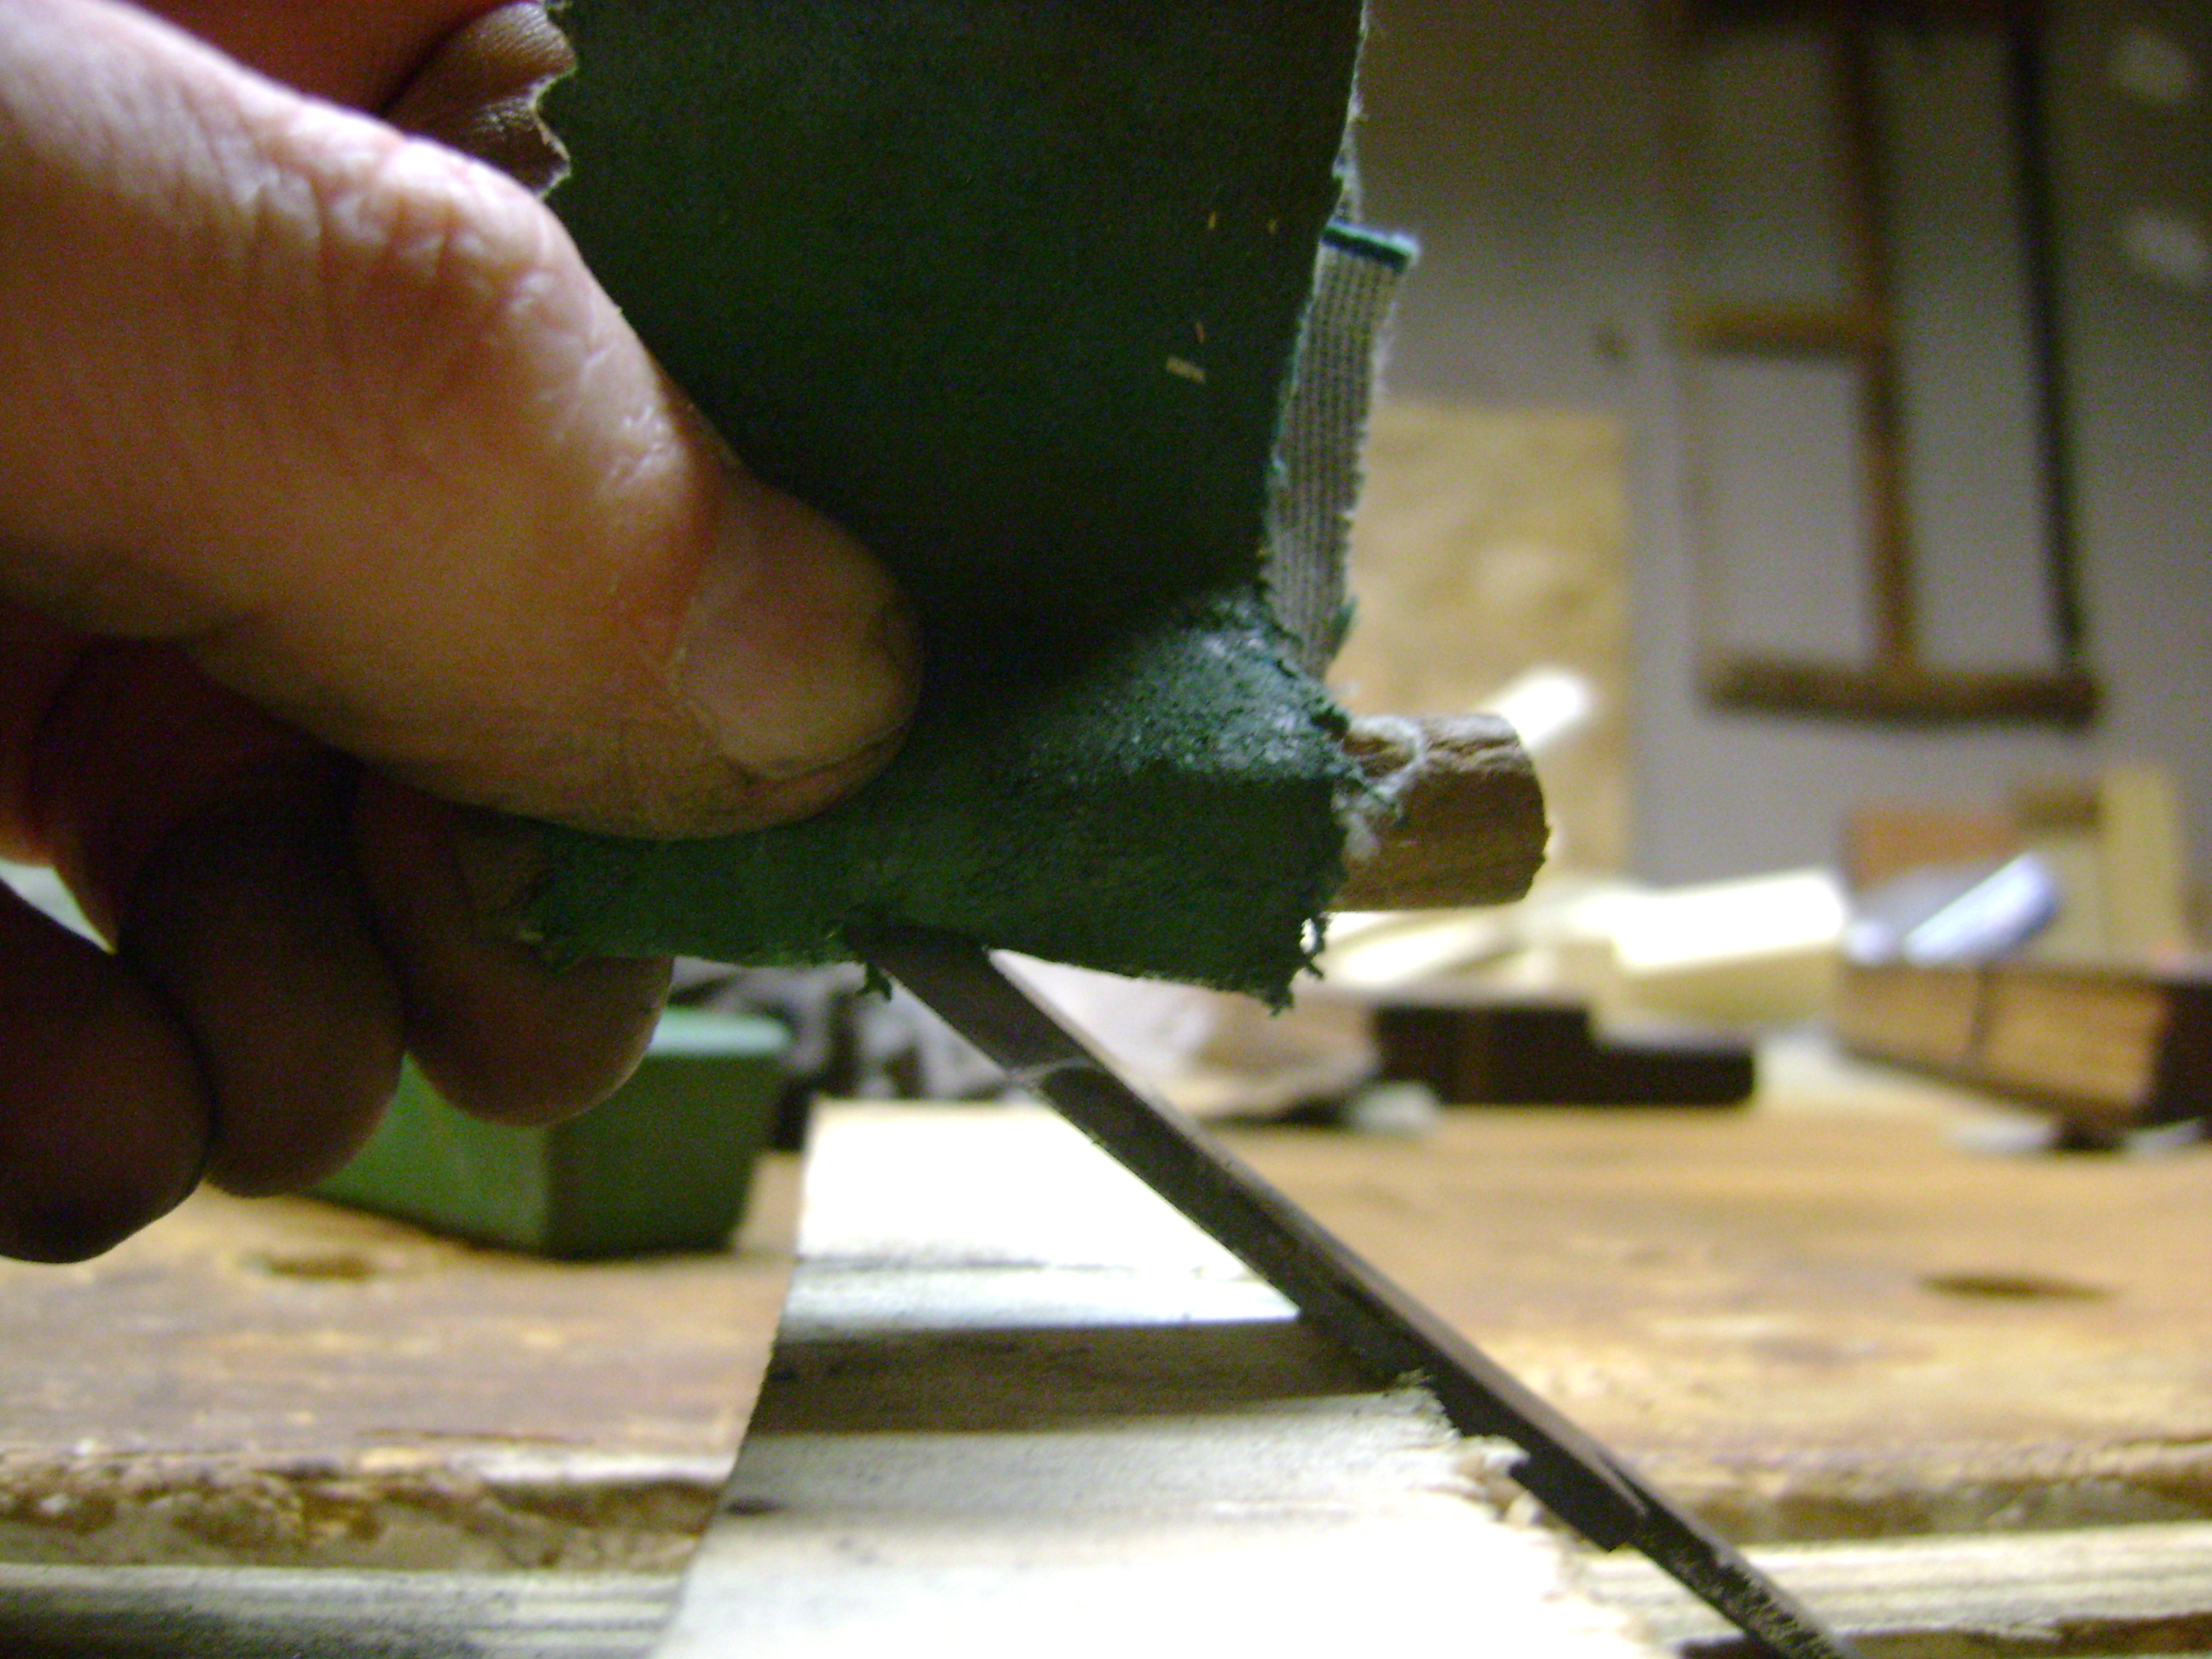
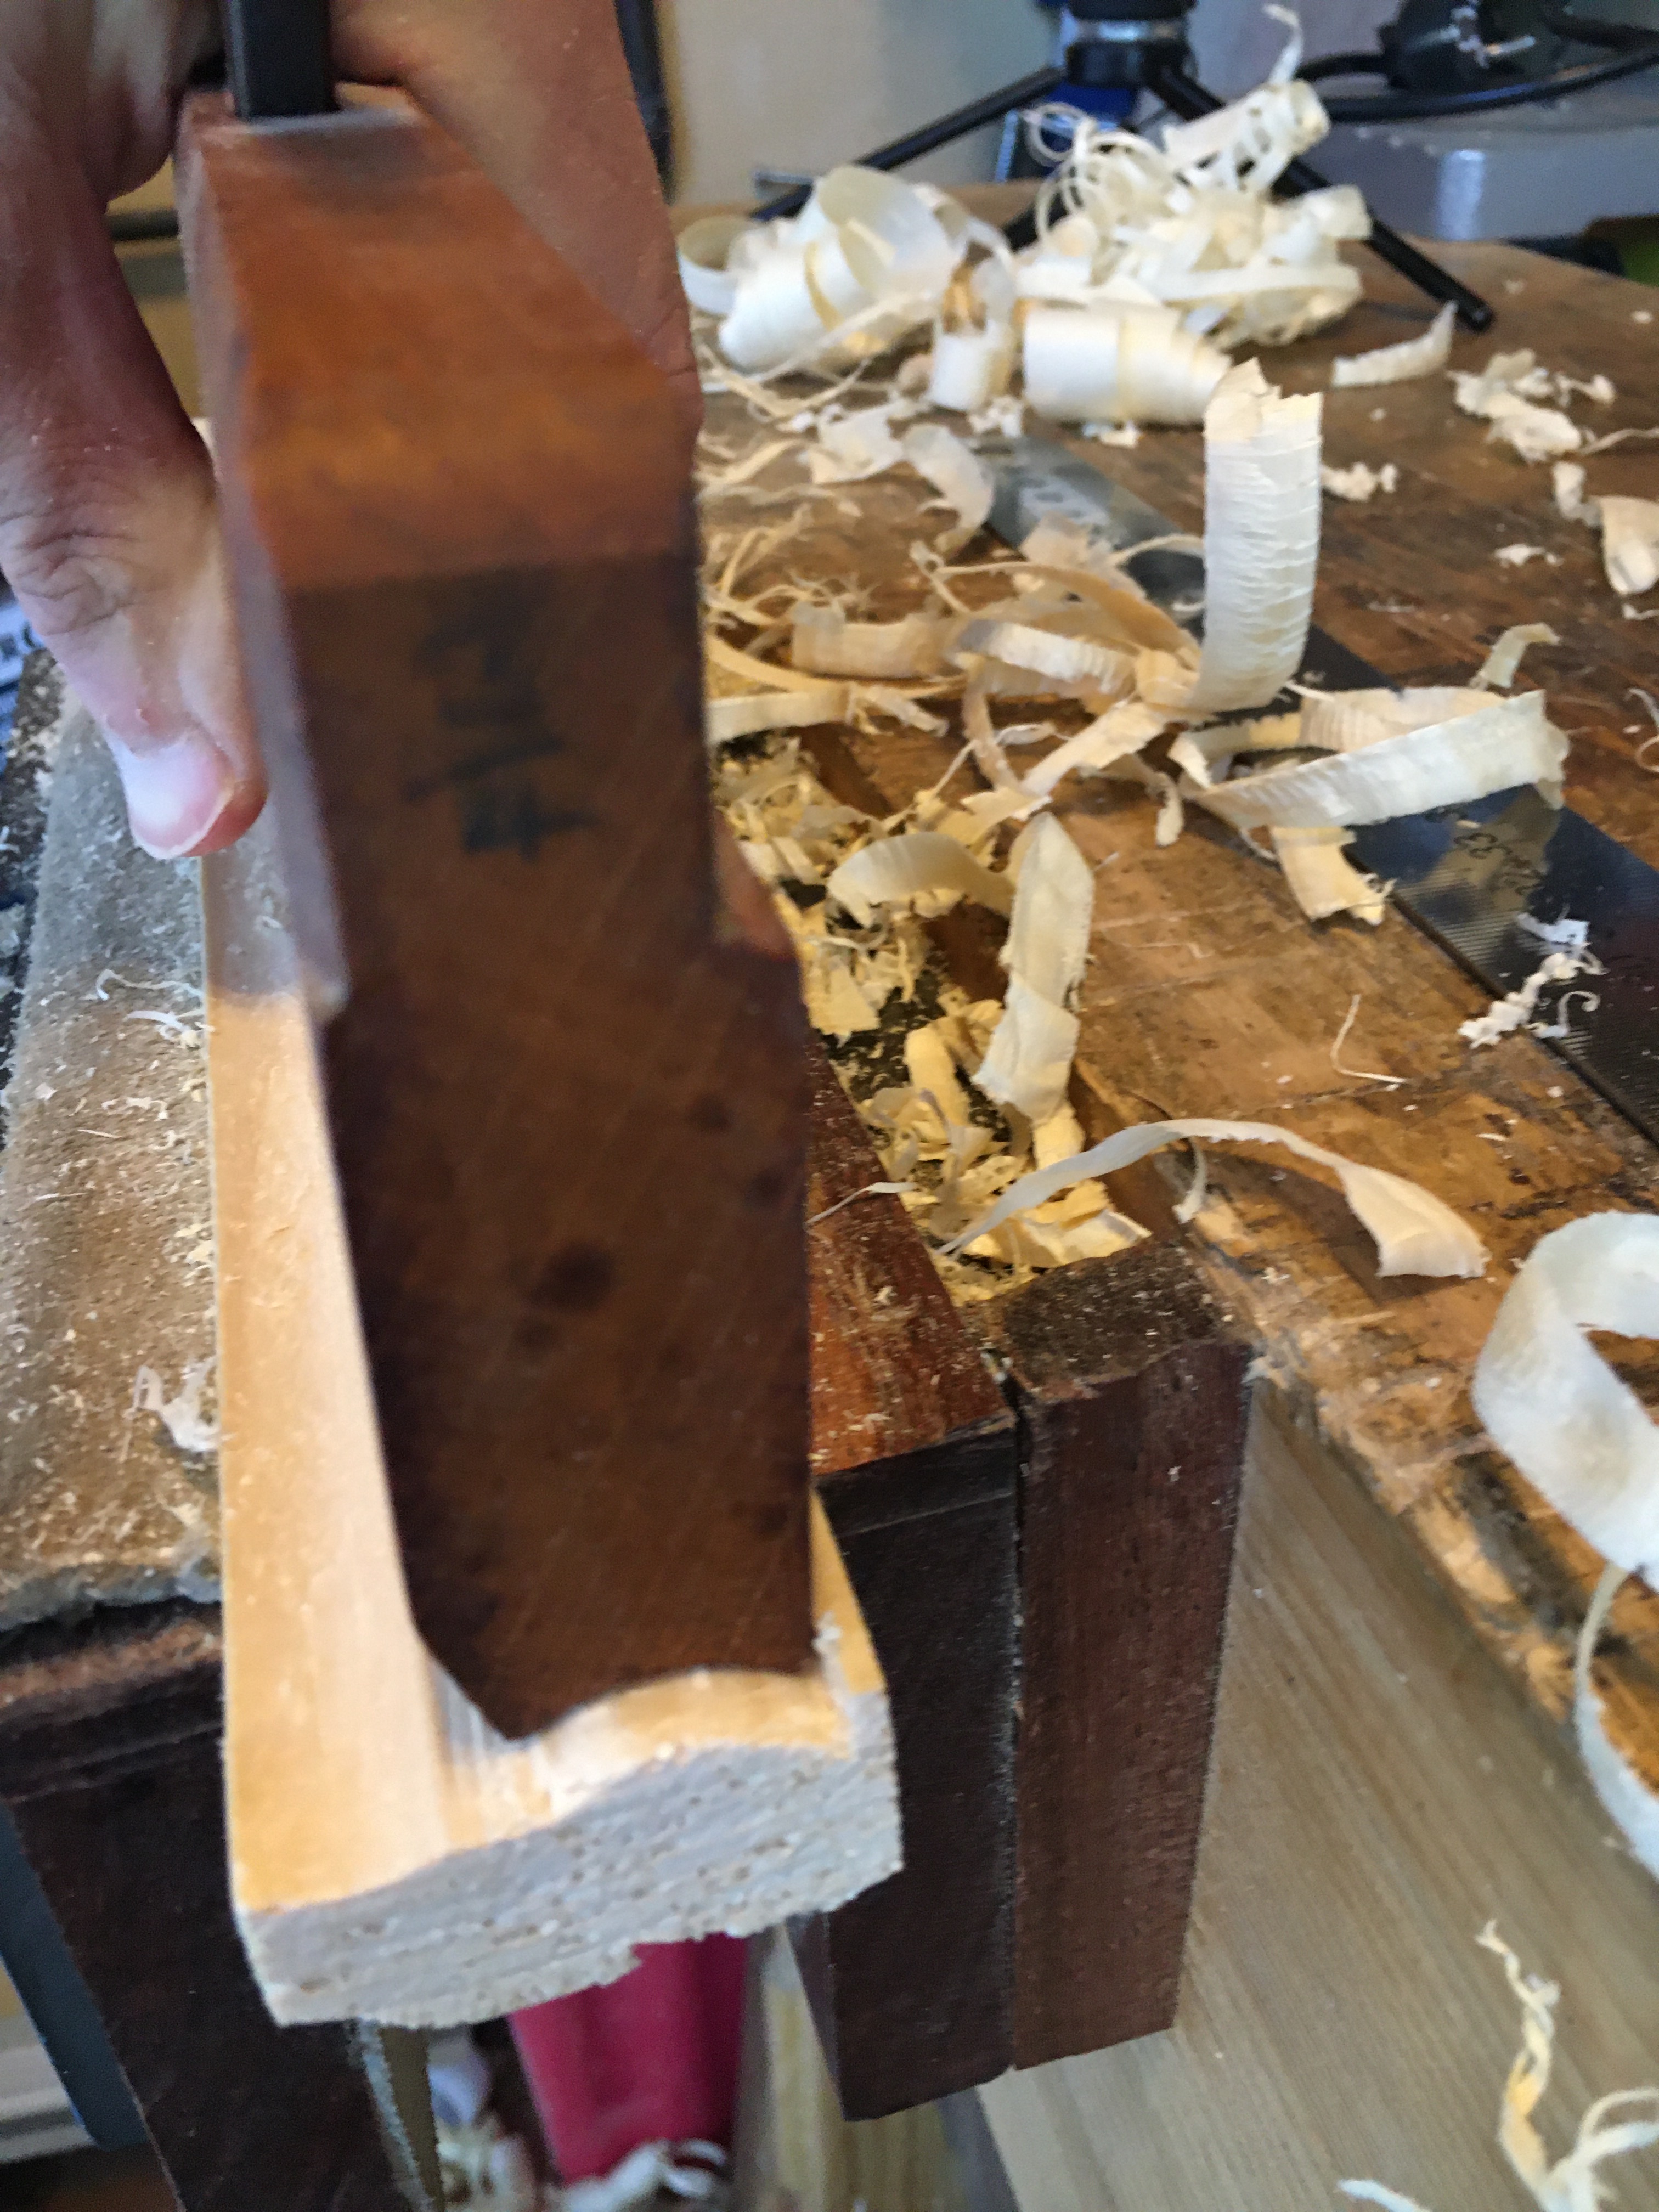
 A questo punto, possiamo concludere l’affilatura facendo la lucidatura del bisello. Utilizziamo la pasta abrasiva applicata su dei ritagli di pelle (come per lo strop), avvolgendoli poi sugli appositi supporti sagomati. Questo tipo di lame non necessitano di un’affilatura maniacale, come siamo portati a fare per le normali pialle da finitura. Già arrivando ad una grana intorno alla 1200 si può passare direttamente alla lucidatura e questo sarà sufficiente affinché la lama tagli a dovere. Come detto sopra, a volte può succedere che il profilo della lama non coincida perfettamente con il profilo della suola. Se la problematica non rientra tra quelle viste precedentemente (ovvero non sia un problema di allineamento tra lama, suola e gola della pialla) e se non riusciamo a recuperare il divario con la normale affilatura, dovremo intervenire in modo più drastico direttamente sulla sagoma della lama con l’ausilio della mola o di abrasivi a grana grossa cercando di ripristinarne la corretta forma. Un’operazione sicuramente non semplice e che necessita di tanta pazienza.
Piallare con le moulding planes.
Scegliere con cura il legno sul quale effettuare la modanatura è di fondamentale importanza per la buona riuscita del lavoro di piallatura. Il legno dovrà presentare le facce perfettamente in squadra tra loro e possedere una fibra dritta, regolare e possibilmente convergente nel senso di piallatura su ambo le superfici interessate. Legni con nodi e fibre irregolari risultano difficilmente lavorabili con questo tipo di pialle, lasciando una superficie poco rifinita.
 Piallare in favore di venatura faciliterà invece molto il lavoro, evitando inceppamenti e strappi di fibra. La superficie così ottenuta avrà bisogno solo di una leggerissima levigata prima di ricevere la finitura. Legni teneri e legni duri (ma non troppo) possono essere lavorati senza problemi con questo tipo di pialle a patto che si stia piallando lungovena. Se dobbiamo modanare il legno di testa dovremo preventivamente accertarci che la lama sia perfettamente affilata, fare brevi e leggere passate esponendo poca lama e lubrificare spesso la suola per facilitare lo scorrimento. Ricordiamoci sempre che lo spessore del legno dovrà essere in grado di accogliere la grandezza della modanatura che vogliamo praticare. Quindi scegliamo una pialla con la lama di larghezza adeguata.
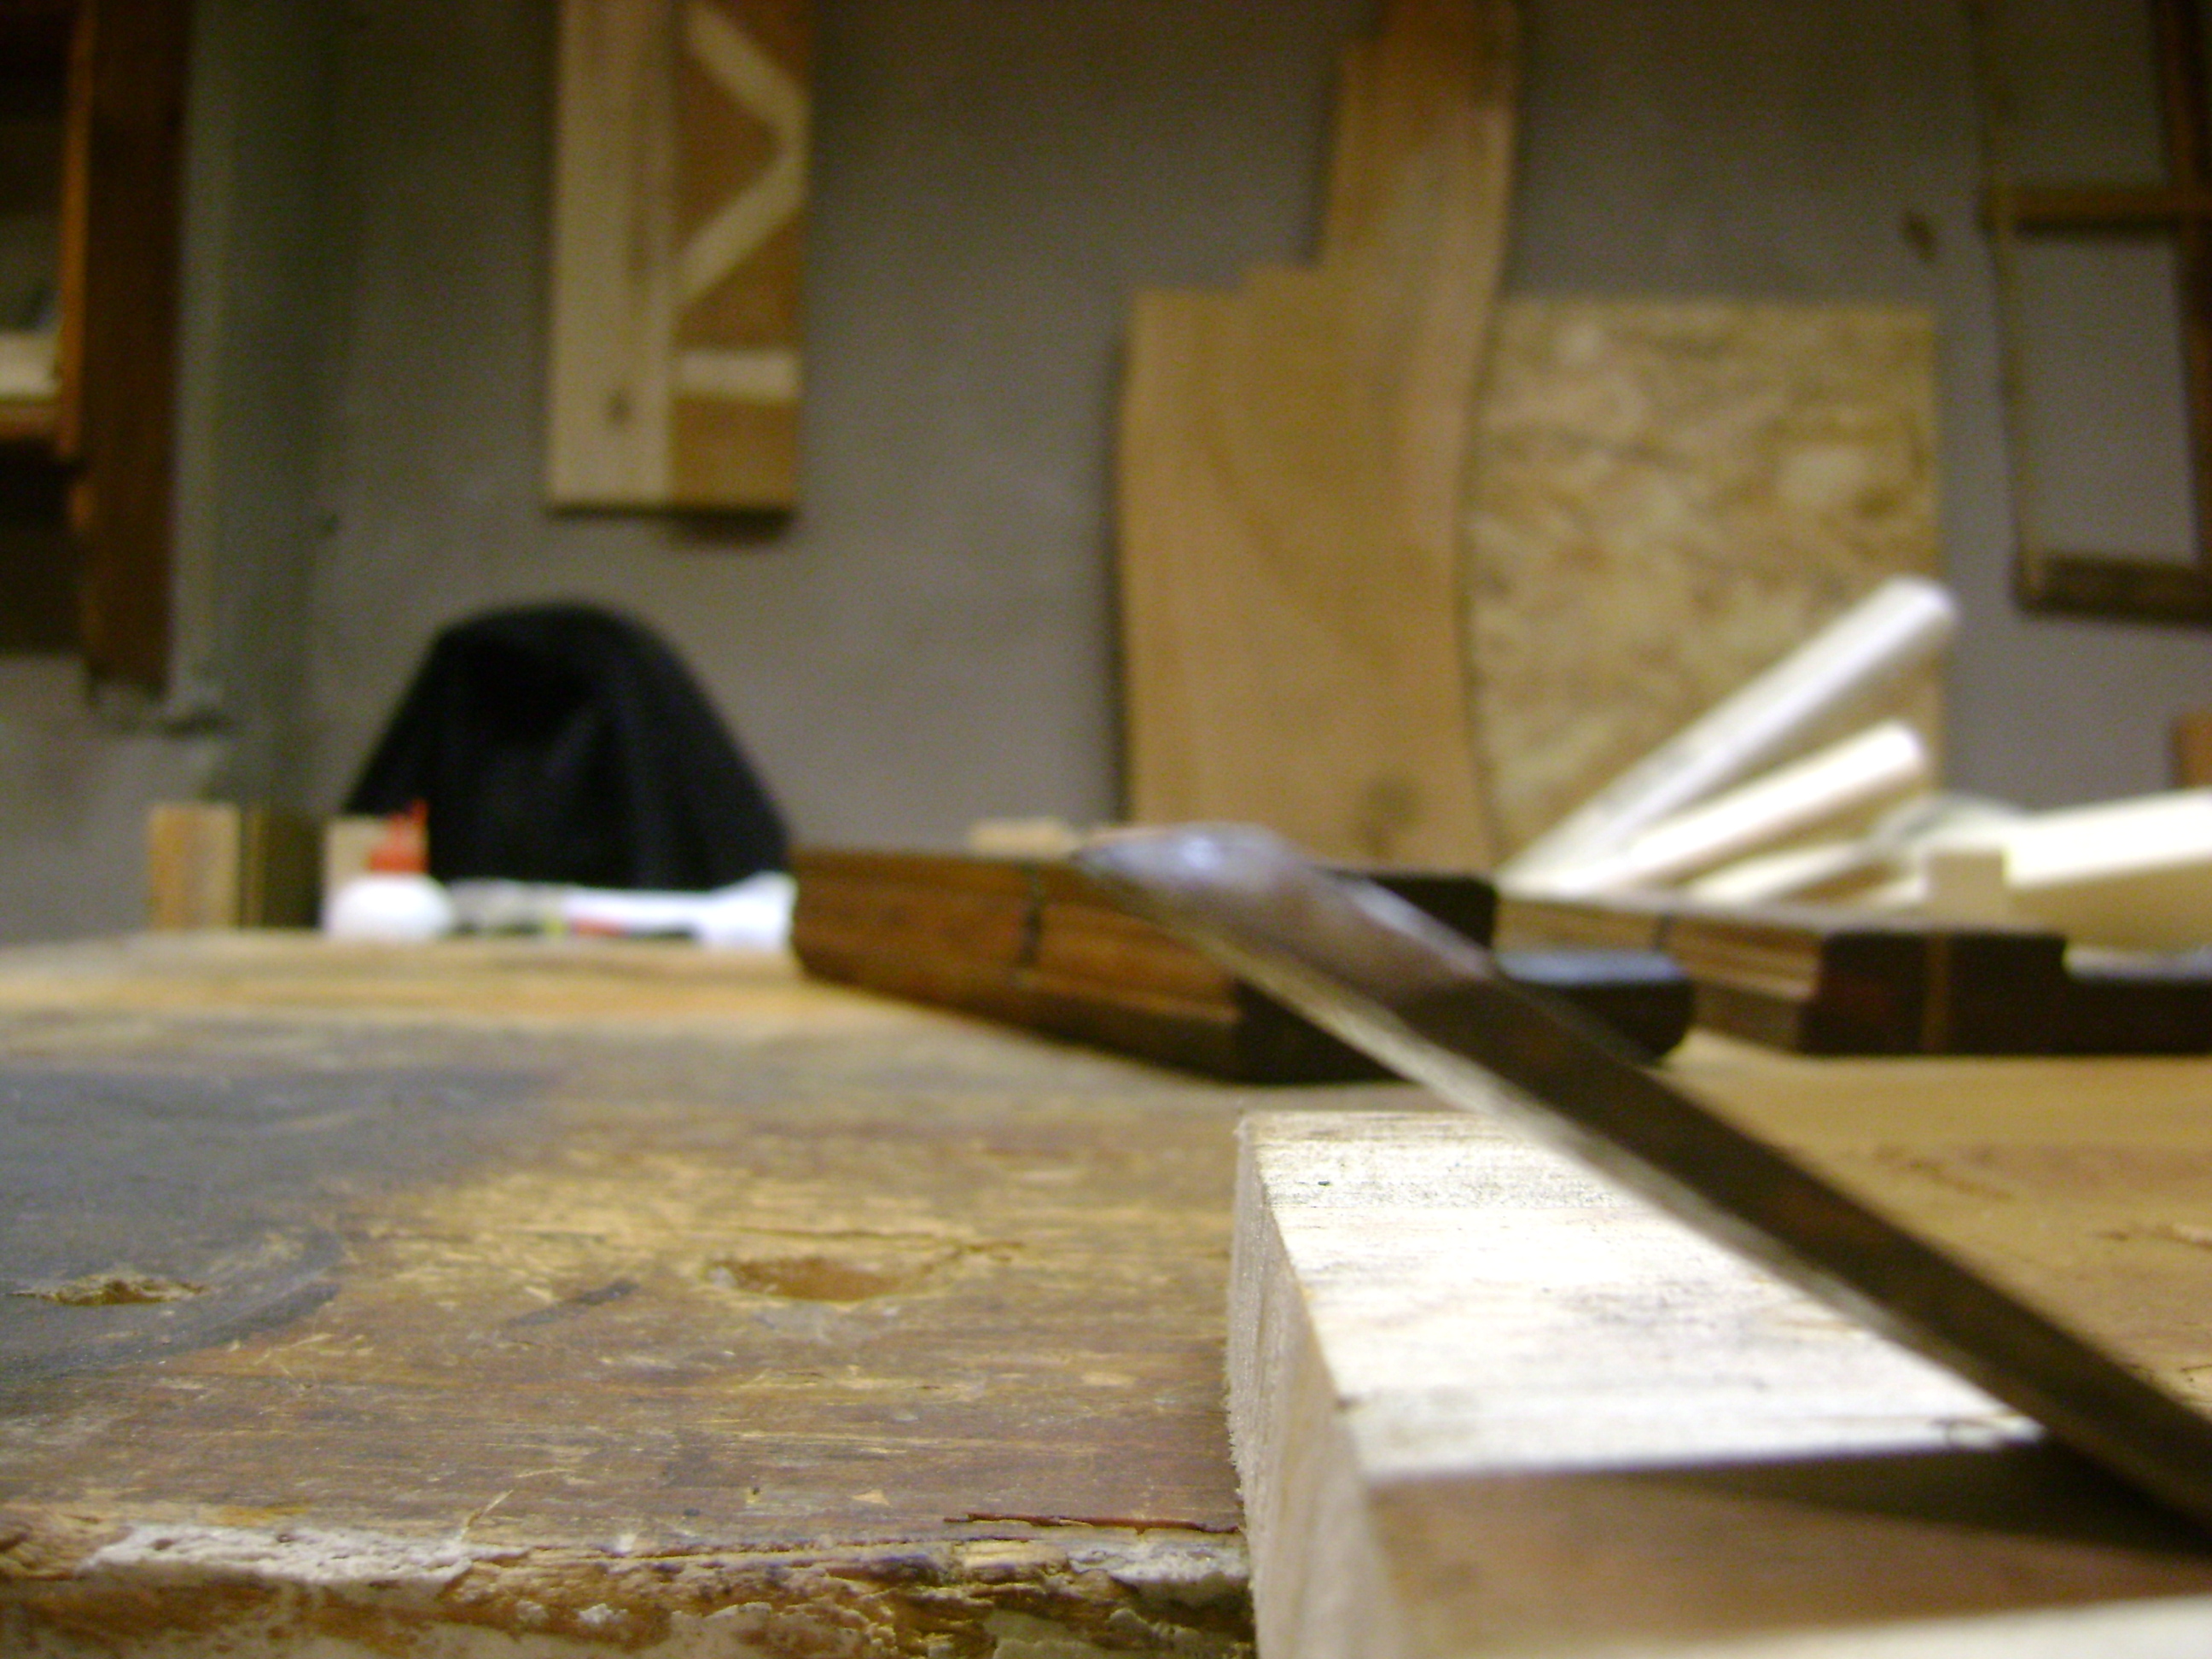
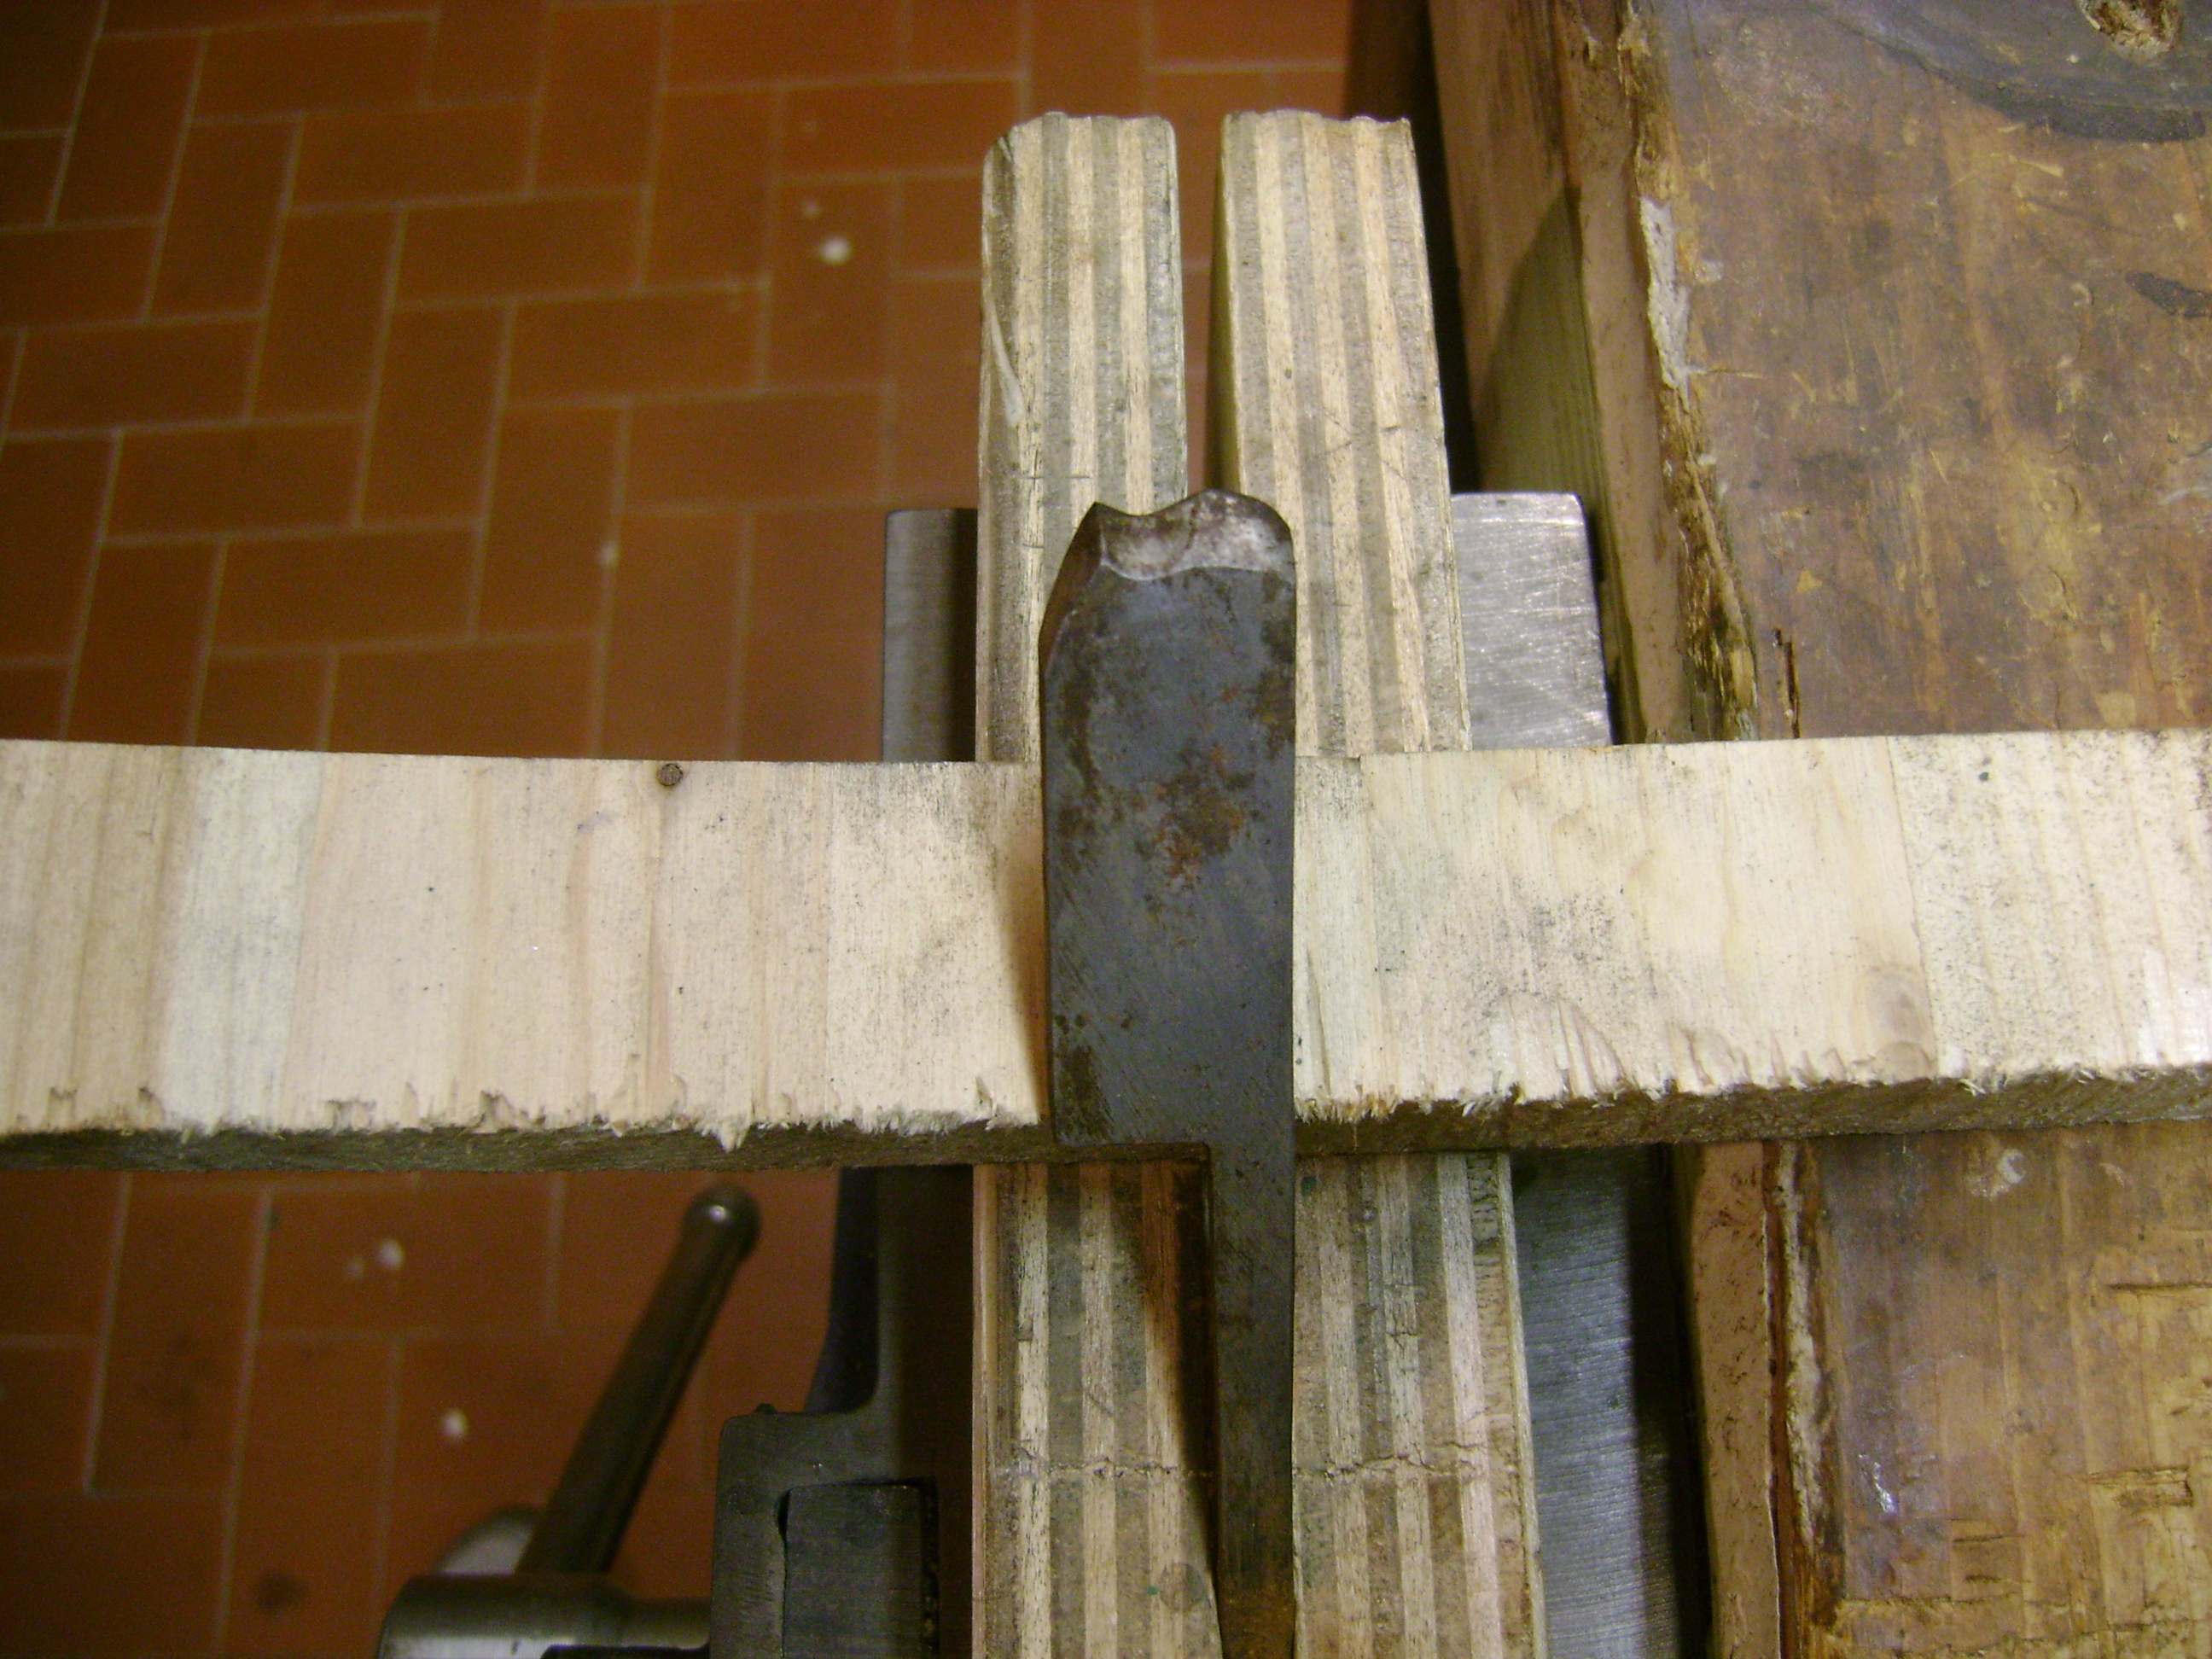
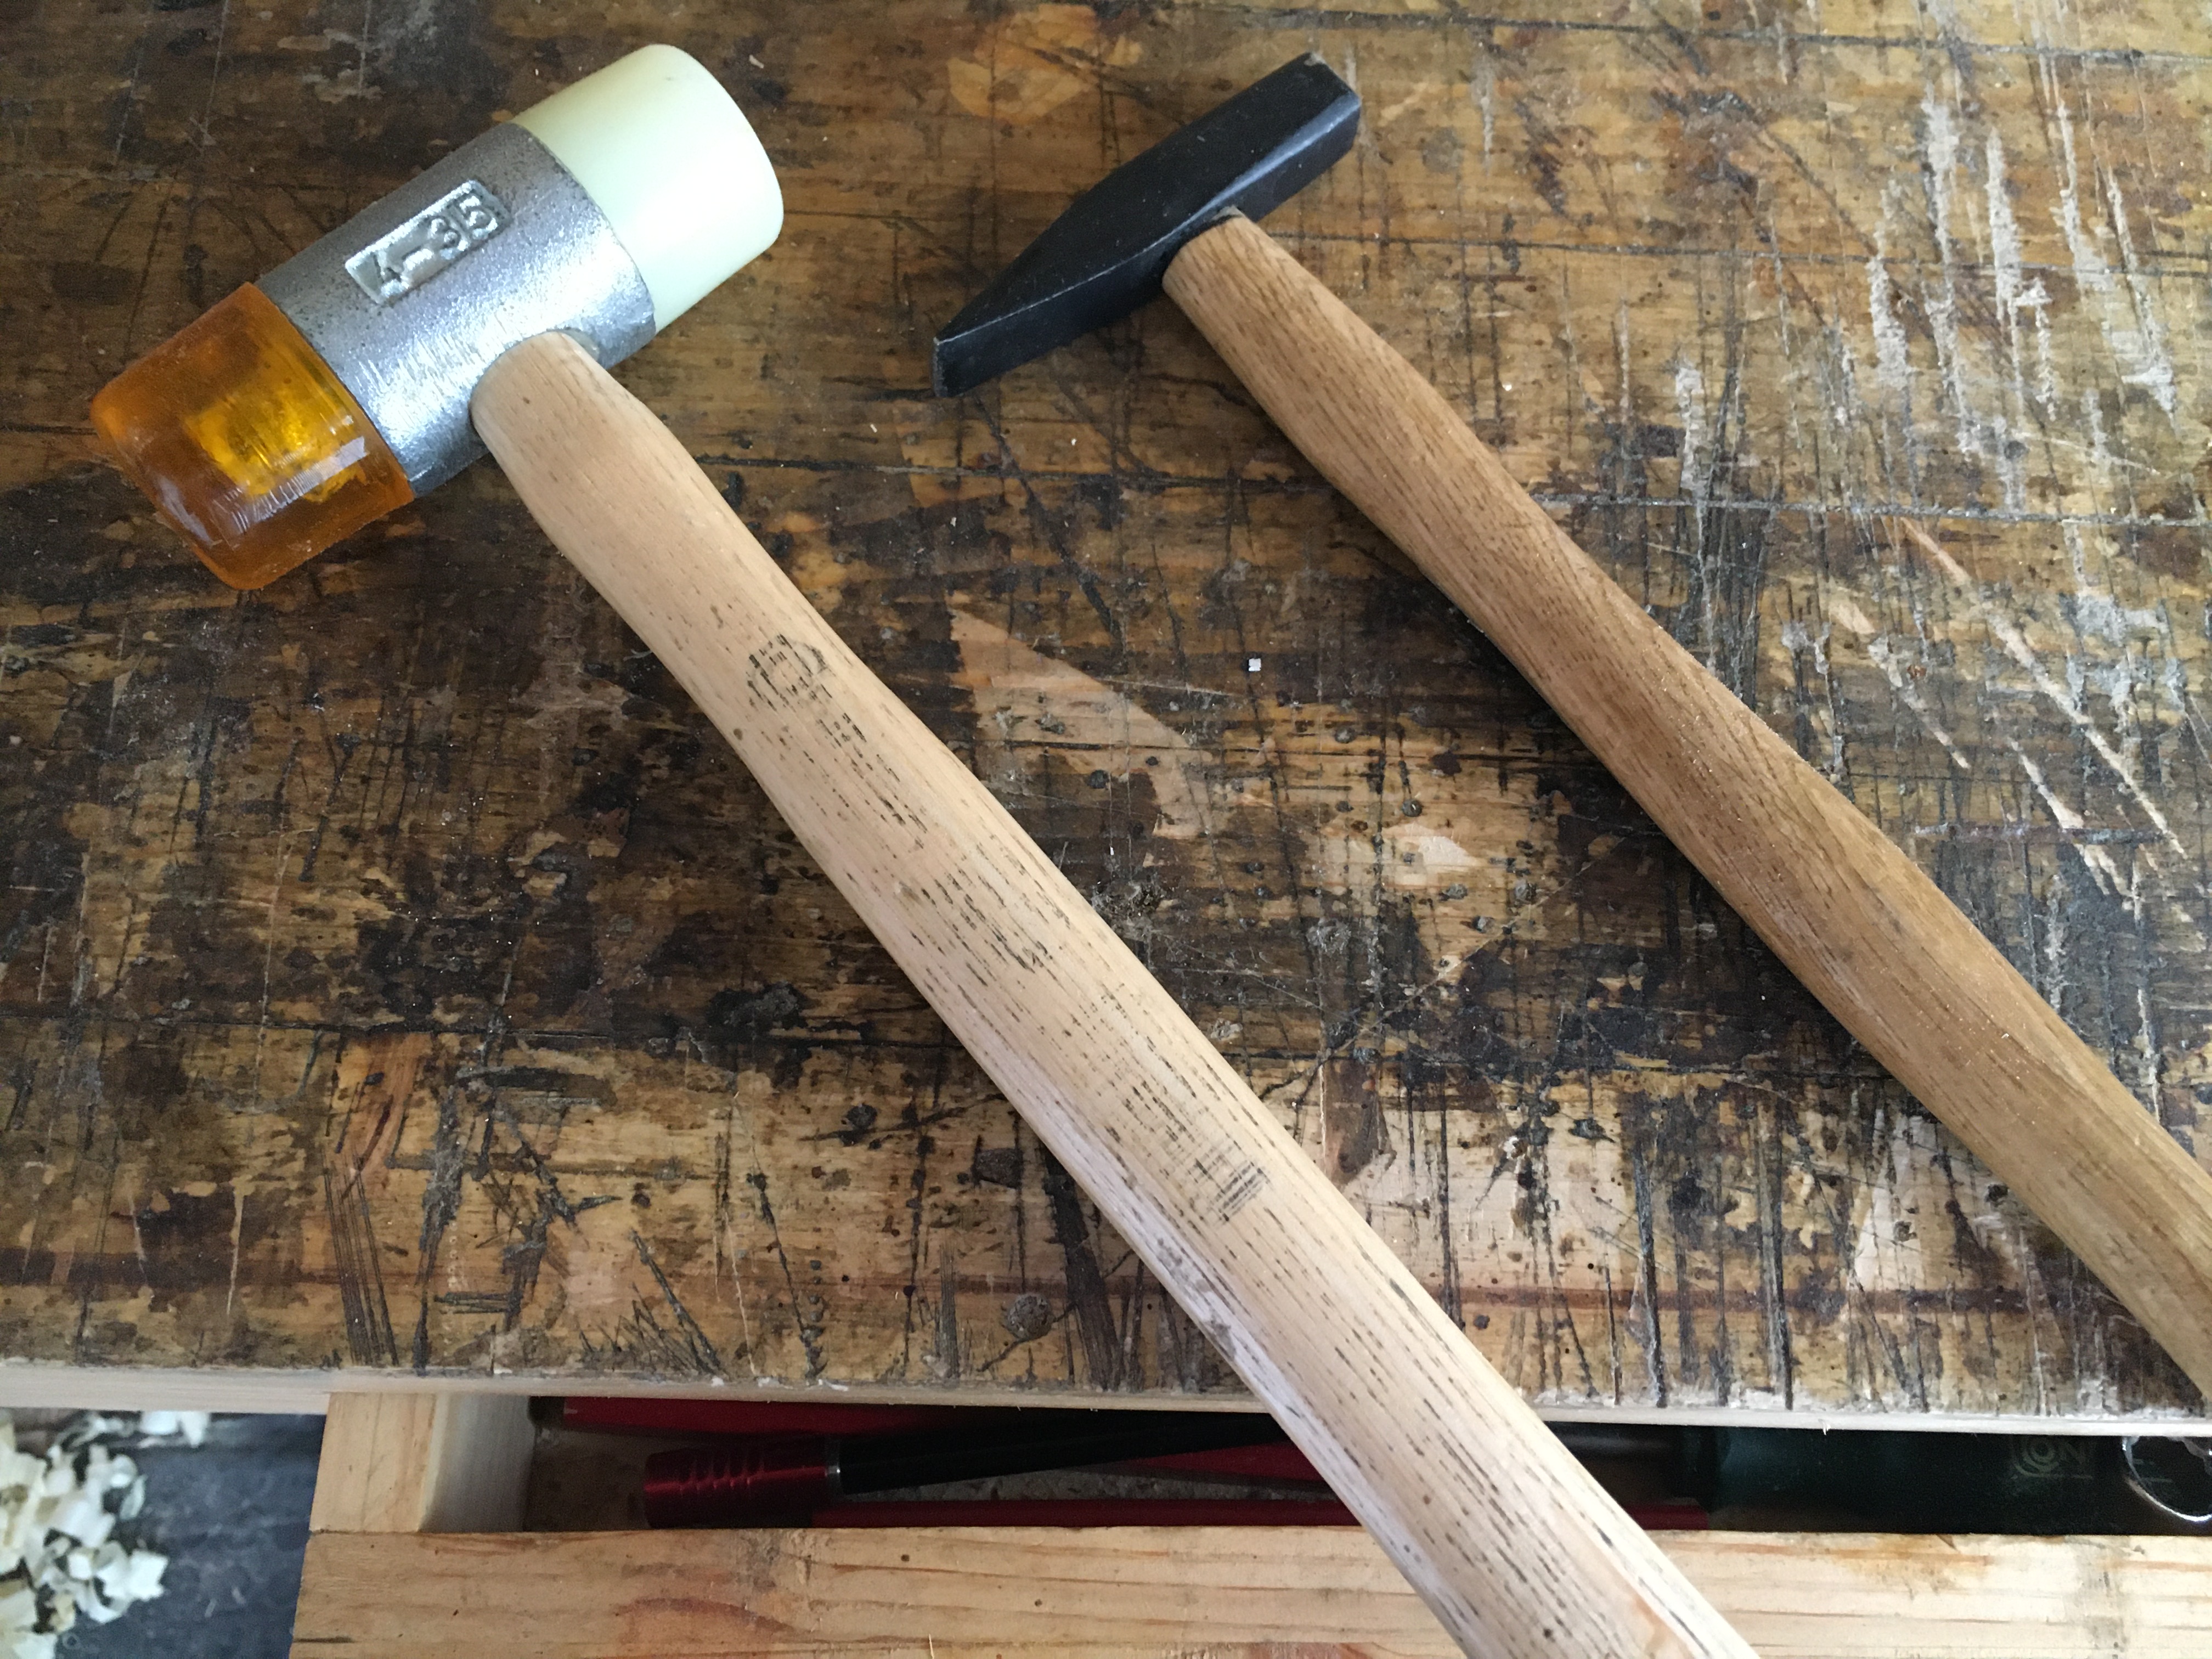 Teniamo sempre a portata di mano un piccolo martello in ferro, di quelli con la testa a penna, ed anche un mazzuolo in legno o in gomma per gli eventuali aggiustamenti da fare alla lama della pialla ed al cuneo. Il martello di ferro di piccole dimensioni è l’ideale per fare i microaggiustamenti della lama. Martellando leggermente il codolo della lama questa scenderà verso il basso. Continuiamo a martellare poco per volta e controlliamo spesso capovolgendo la pialla e traguardando la suola per vedere quando il tagliente fuoriesce dalla suola. Non appena lo vedremo apparire, con il mazzuolo in legno o con il martello in gomma colpiamo leggermente la testa del cuneo di modo che lo stesso vada a serrare la lama contro la gola della pialla. A questo punto teniamo a portata di mano un pezzo di legno di scarto e verifichiamo su questo che la pialla asporti la giusta quantità di materiale. L’asportazione dovrebbe produrre trucioli sottili. Se fossero troppo sottili abbassiamo ancora di più la lama, se fossero troppo spessi, ritraiamo la lama. Per farlo possiamo utilizzare il martello in ferro, questa volta dalla parte della penna. Capovolgiamo la pialla e battiamo leggermente con la penna del martello nella gola del cuneo. Questo allenterà leggermente il cuneo e ci permetterà di aggiustare nuovamente la lama. Se il cuneo non dovesse rilasciare la lama si può in alternativa battere con il martello in gomma o in legno sul tacco della suola della pialla oppure sulla parte superiore della pialla nella porzione tra la gola ed il fronte della pialla. Il martello non danneggerà il legno e creerà quello shock necessario al legno ad allentare il cuneo. Controlliamo infine che il profilo del tagliente coincida con il profilo della pialla. Questo dovrebbe avvenire naturalmente se blocchiamo la lama in posizione ben aderente al fianco della bocca. Facciamo tutte queste operazioni sempre in sicurezza lavorando sopra al piano del banco. Potrebbe infatti accadere che allentando troppo il cuneo la lama scivoli dalla sede finendo a terra, danneggiandosi. Blocchiamo il pezzo di legno da sagomare nella morsa del banco, assicurandoci che la corsa della pialla sia libera per tutta la sua lunghezza. Possiamo eventualmente utilizzare a questo scopo una guida per modanare (sticking board) che vedremo tra poco come costruire e come usare. Nel post dedicato all’incorsatoio era indicato come bisogna utilizzare quel tipo di pialla. Le moulding planes si utilizzano allo stesso modo. Quindi appoggiamo la pialla all’estremità del pezzo di fronte a noi e con brevi e leggere passate pialliamo procedendo a ritroso fino a portarci all’altra estremità del pezzo. Nelle prime passate ci accorgeremo di asportare poco materiale e maggiormente in determinate aree rispetto ad altre. Questo è del tutto normale ed è dovuto alla conformazione della lama stessa. Una volta che la pialla avrà definito il percorso i trucioli diventeranno più consistenti ed uniformi e potremo cominciare a fare passate continue a tutto pezzo. Se la pialla è dotata dello stop di profondità questo, una volta arrivato a contatto con la superficie del pezzo, non permetterà di piallare oltre. Se non ci fosse stop di profondità, come nelle pialle a profilo concavo e convesso, dovremo regolarci ad occhio. Ricordiamoci che le pialle con profili complessi, a differenza delle hollows and rounds, lavorano solo in una direzione.
 La pialla, se dotata di battuta, deve essere mantenuta sempre ben aderente al profilo e nella corretta posizione soprattutto nella fase iniziale del lavoro. Può accadere infatti che la suola della pialla scivoli inavvertitamente vesto sinistra con la conseguenza che la pialla non segua la battuta bensì una curvatura della suola. Se non correggiamo l’errore sin dall’inizio sarà difficile, se non impossibile, riuscire a recuperare il lavoro in seguito. Controlliamo quindi attentamente, soprattutto nelle prime piallate, che la traccia sia giusta. Eventualmente possiamo ovviare al problema prevedendo il pezzo da lavorare leggermente più lungo dell’occorrente. Questo ci permetterà in seguito di eliminare le parti terminali, specialmente la parte iniziale di fronte a noi che è quella che risente maggiormente della minor pressione e del minor controllo esercitati in fase di uscita della pialla.
 È anche importante la postura da assumere durante la piallatura. Cerchiamo di rimanere il più possibile accostati al banco e al pezzo da lavorare, quasi a metterci sopra di esso. La mano sinistra va sul fianco sinistro e il pollice sulla parte superiore della pialla di fronte al cuneo e mantiene aderente la battuta al pezzo. La mano destra afferra la parte posteriore e superiore della pialla e imprime la spinta all’utensile. La gamba sinistra rimane protesa in avanti. Se la pialla si intasa di trucioli liberiamo la bocca con un cacciavite. Se si intasa troppo spesso probabilmente stiamo lavorando con troppa lama esposta oppure il cuneo è troppo corto/rovinato e non permette di espellere bene il truciolo. Se la pialla scorre poco lubrifichiamo la suola con della cera o del sapone di Marsiglia. Molte pialle da modanatura si usano in posizione inclinata rispetto al pezzo da lavorare. Praticamente la battuta della suola è leggermente inclinata rispetto alla suola in modo tale che, una volta appoggiata al pezzo e quindi in posizione perpendicolare rispetto ad esso, la pialla si ritrovi in una posizione angolata.
 Questo angolo è chiamato angolo di spring ed è solitamente compreso tra 20 e 30 gradi. Sul fronte e/o sul tacco della pialla è indicato con una traccia che altro non è che il prolungamento della linea di battuta della suola. Questa traccia, che deve essere mantenuta perpendicolare, aiuta visivamente l’operatore a far lavorare in posizione inclinata l’utensile durante la piallatura. I vantaggi si traducono in una maggiore aderenza della battuta al pezzo e nel mantenere le varie parti del profilo della suola allo stesso livello. Oltre alla traccia di prolungamento della battuta molto spesso è riportata anche una seconda traccia che indica il prolungamento dello stop di profondità. Se pensiamo di dover eliminare molto materiale dal pezzo in lavorazione il modo migliore di procedere è di eliminare preliminarmente il grosso del materiale con le normali pialle da banco e con le sponderuole e poi, una volta vicini al profilo che vogliamo creare, rifinire con la pialla da modanatura. Lavorare in questo modo prevede di segnare preliminarmente in testa ed in coda al pezzo da sagomare il profilo che vogliamo realizzare, riportandolo direttamente dal profilo della pialla o segnandolo con delle apposite dime a forma concava e convessa. Una volta terminata la modanatura potremo rifinire i filetti con la sponderuola, passare sopra gli stessi trucioli che abbiamo prodotto e se necessario fare una levigata finale con una carta abrasiva fine.
Tavola per modanare (sticking board).
Spesso i profili da realizzare possono essere particolarmente lunghi. Già bloccare in morsa un listello di legno lungo più di 60 centimetri, anche se di notevole spessore, può creare dei problemi in quanto il pezzo tenderà a flettere lateralmente e a sfilarsi verso il basso a causa della spinta necessaria a piallare. È quindi necessario bloccare il pezzo in modo tale che lo stesso possa rimanere stabile ed in grado di sopportare le forti sollecitazioni al quale è soggetto.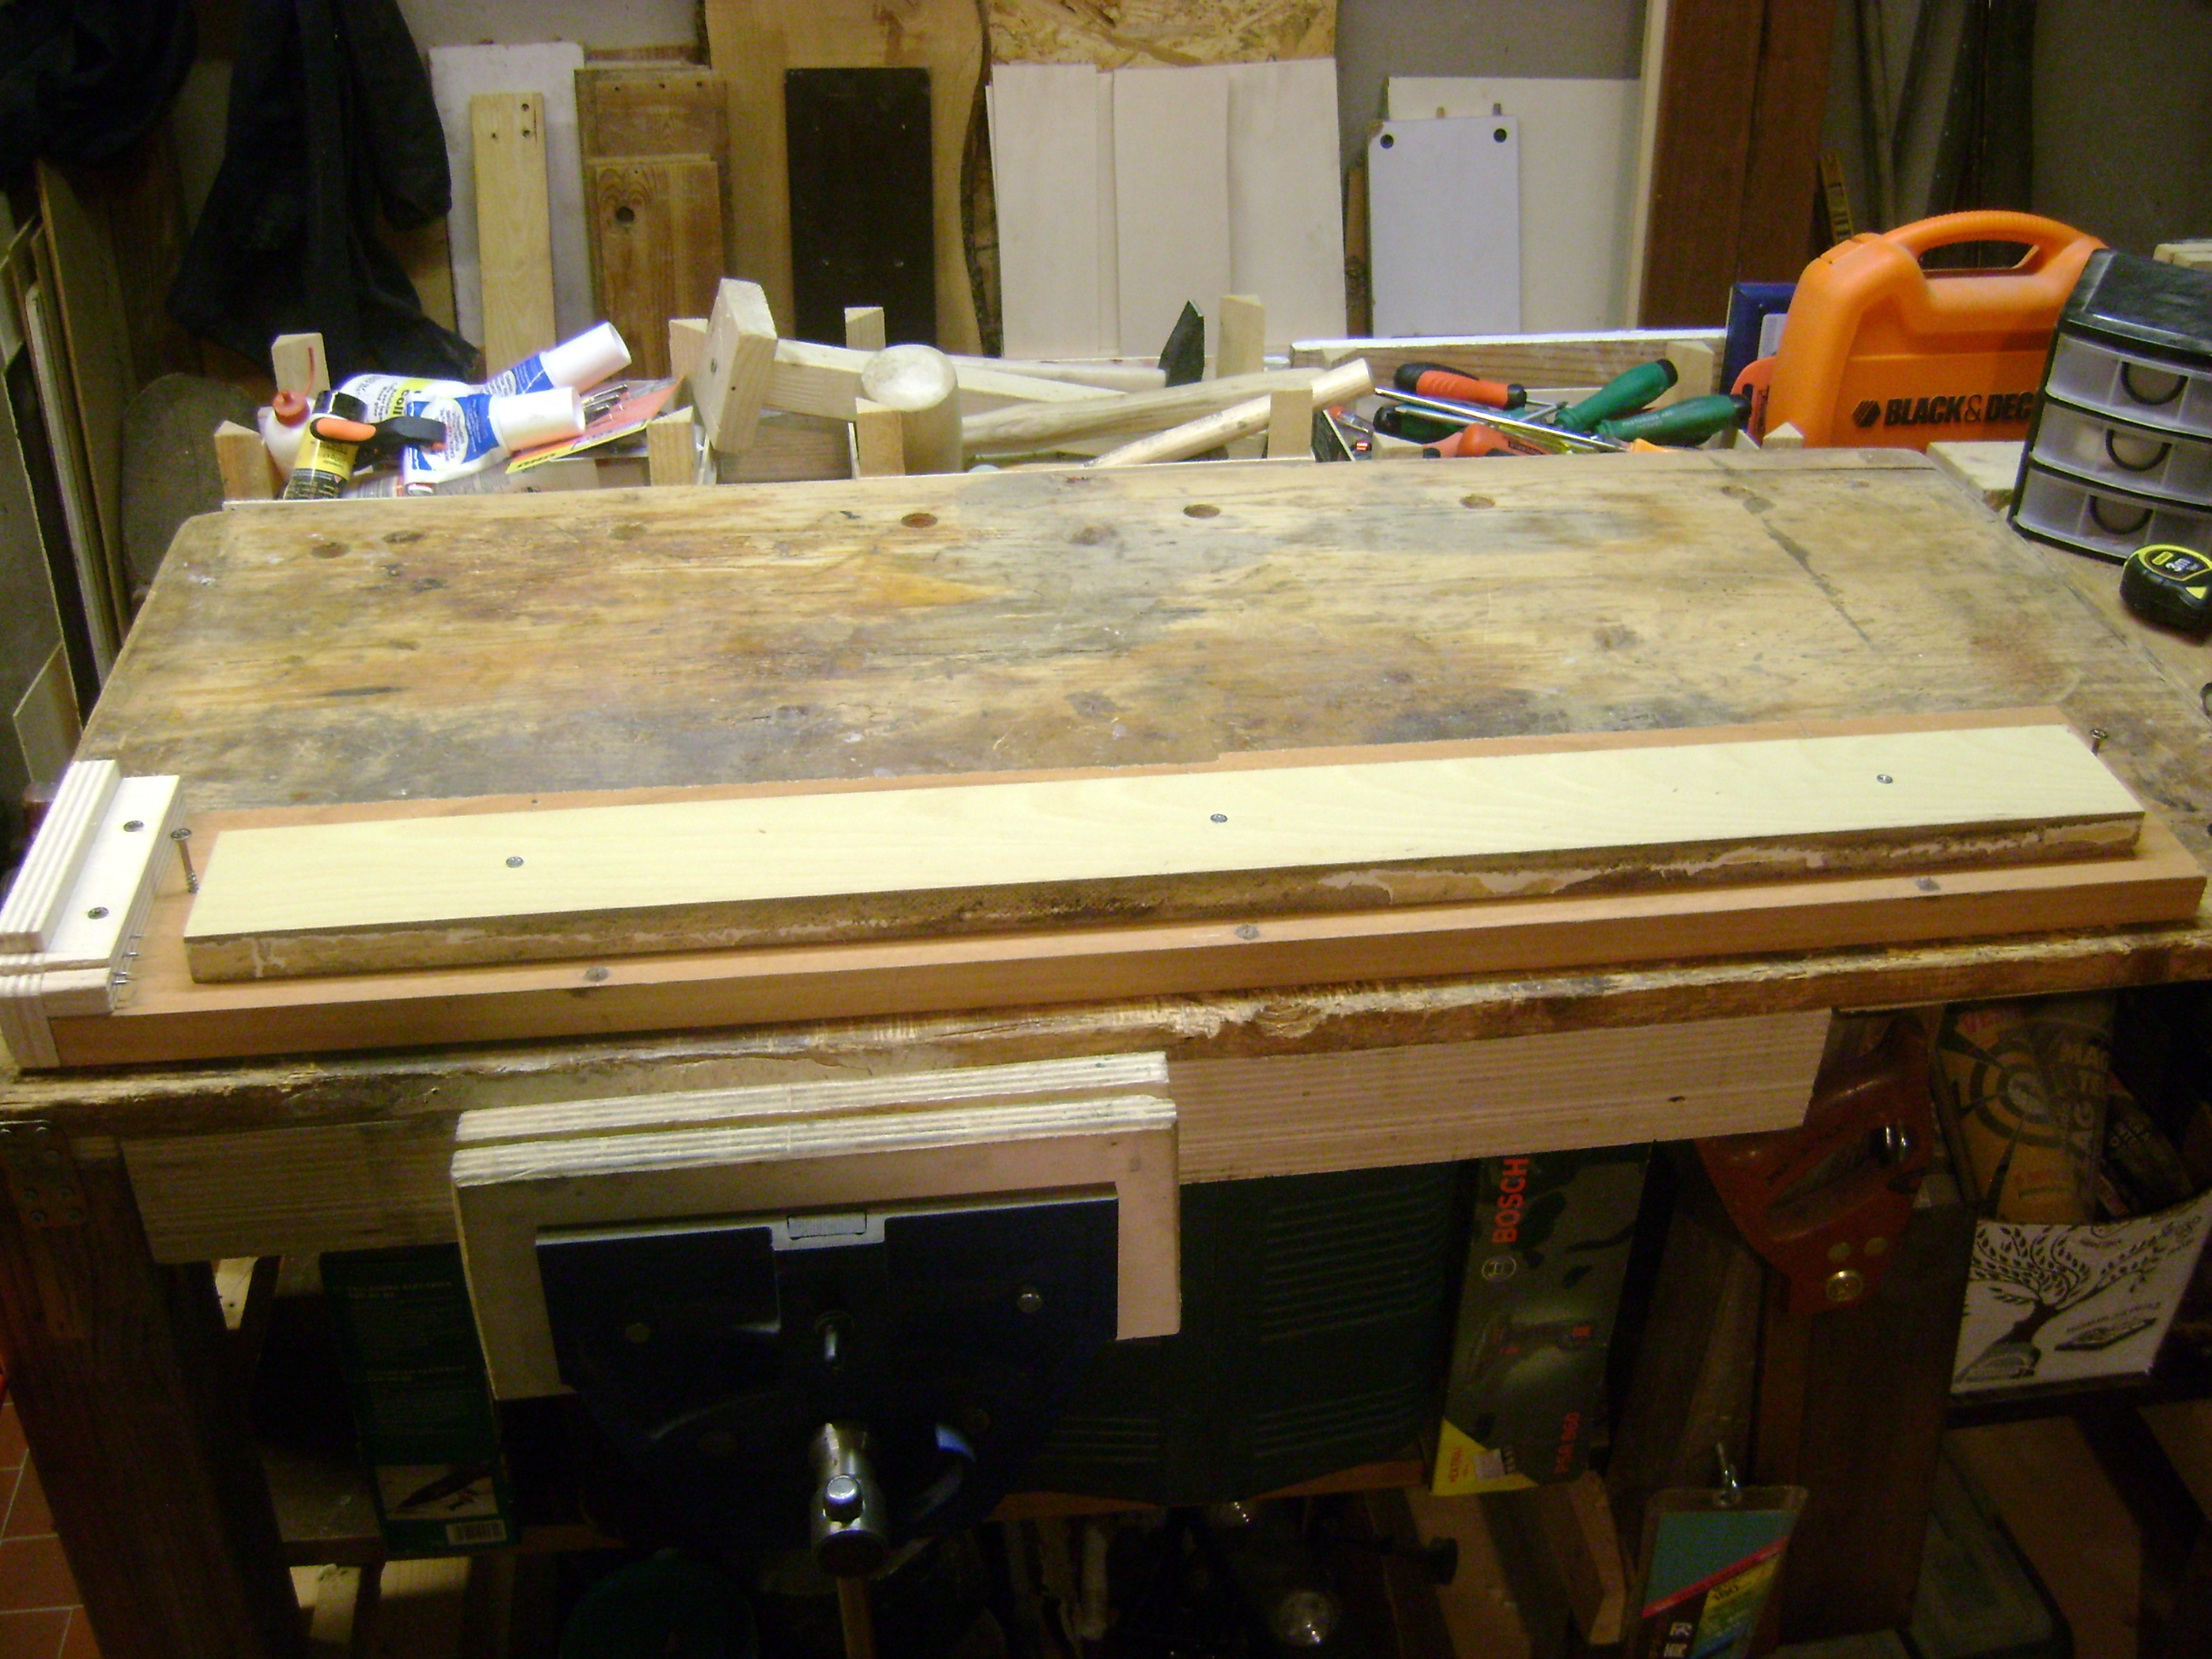
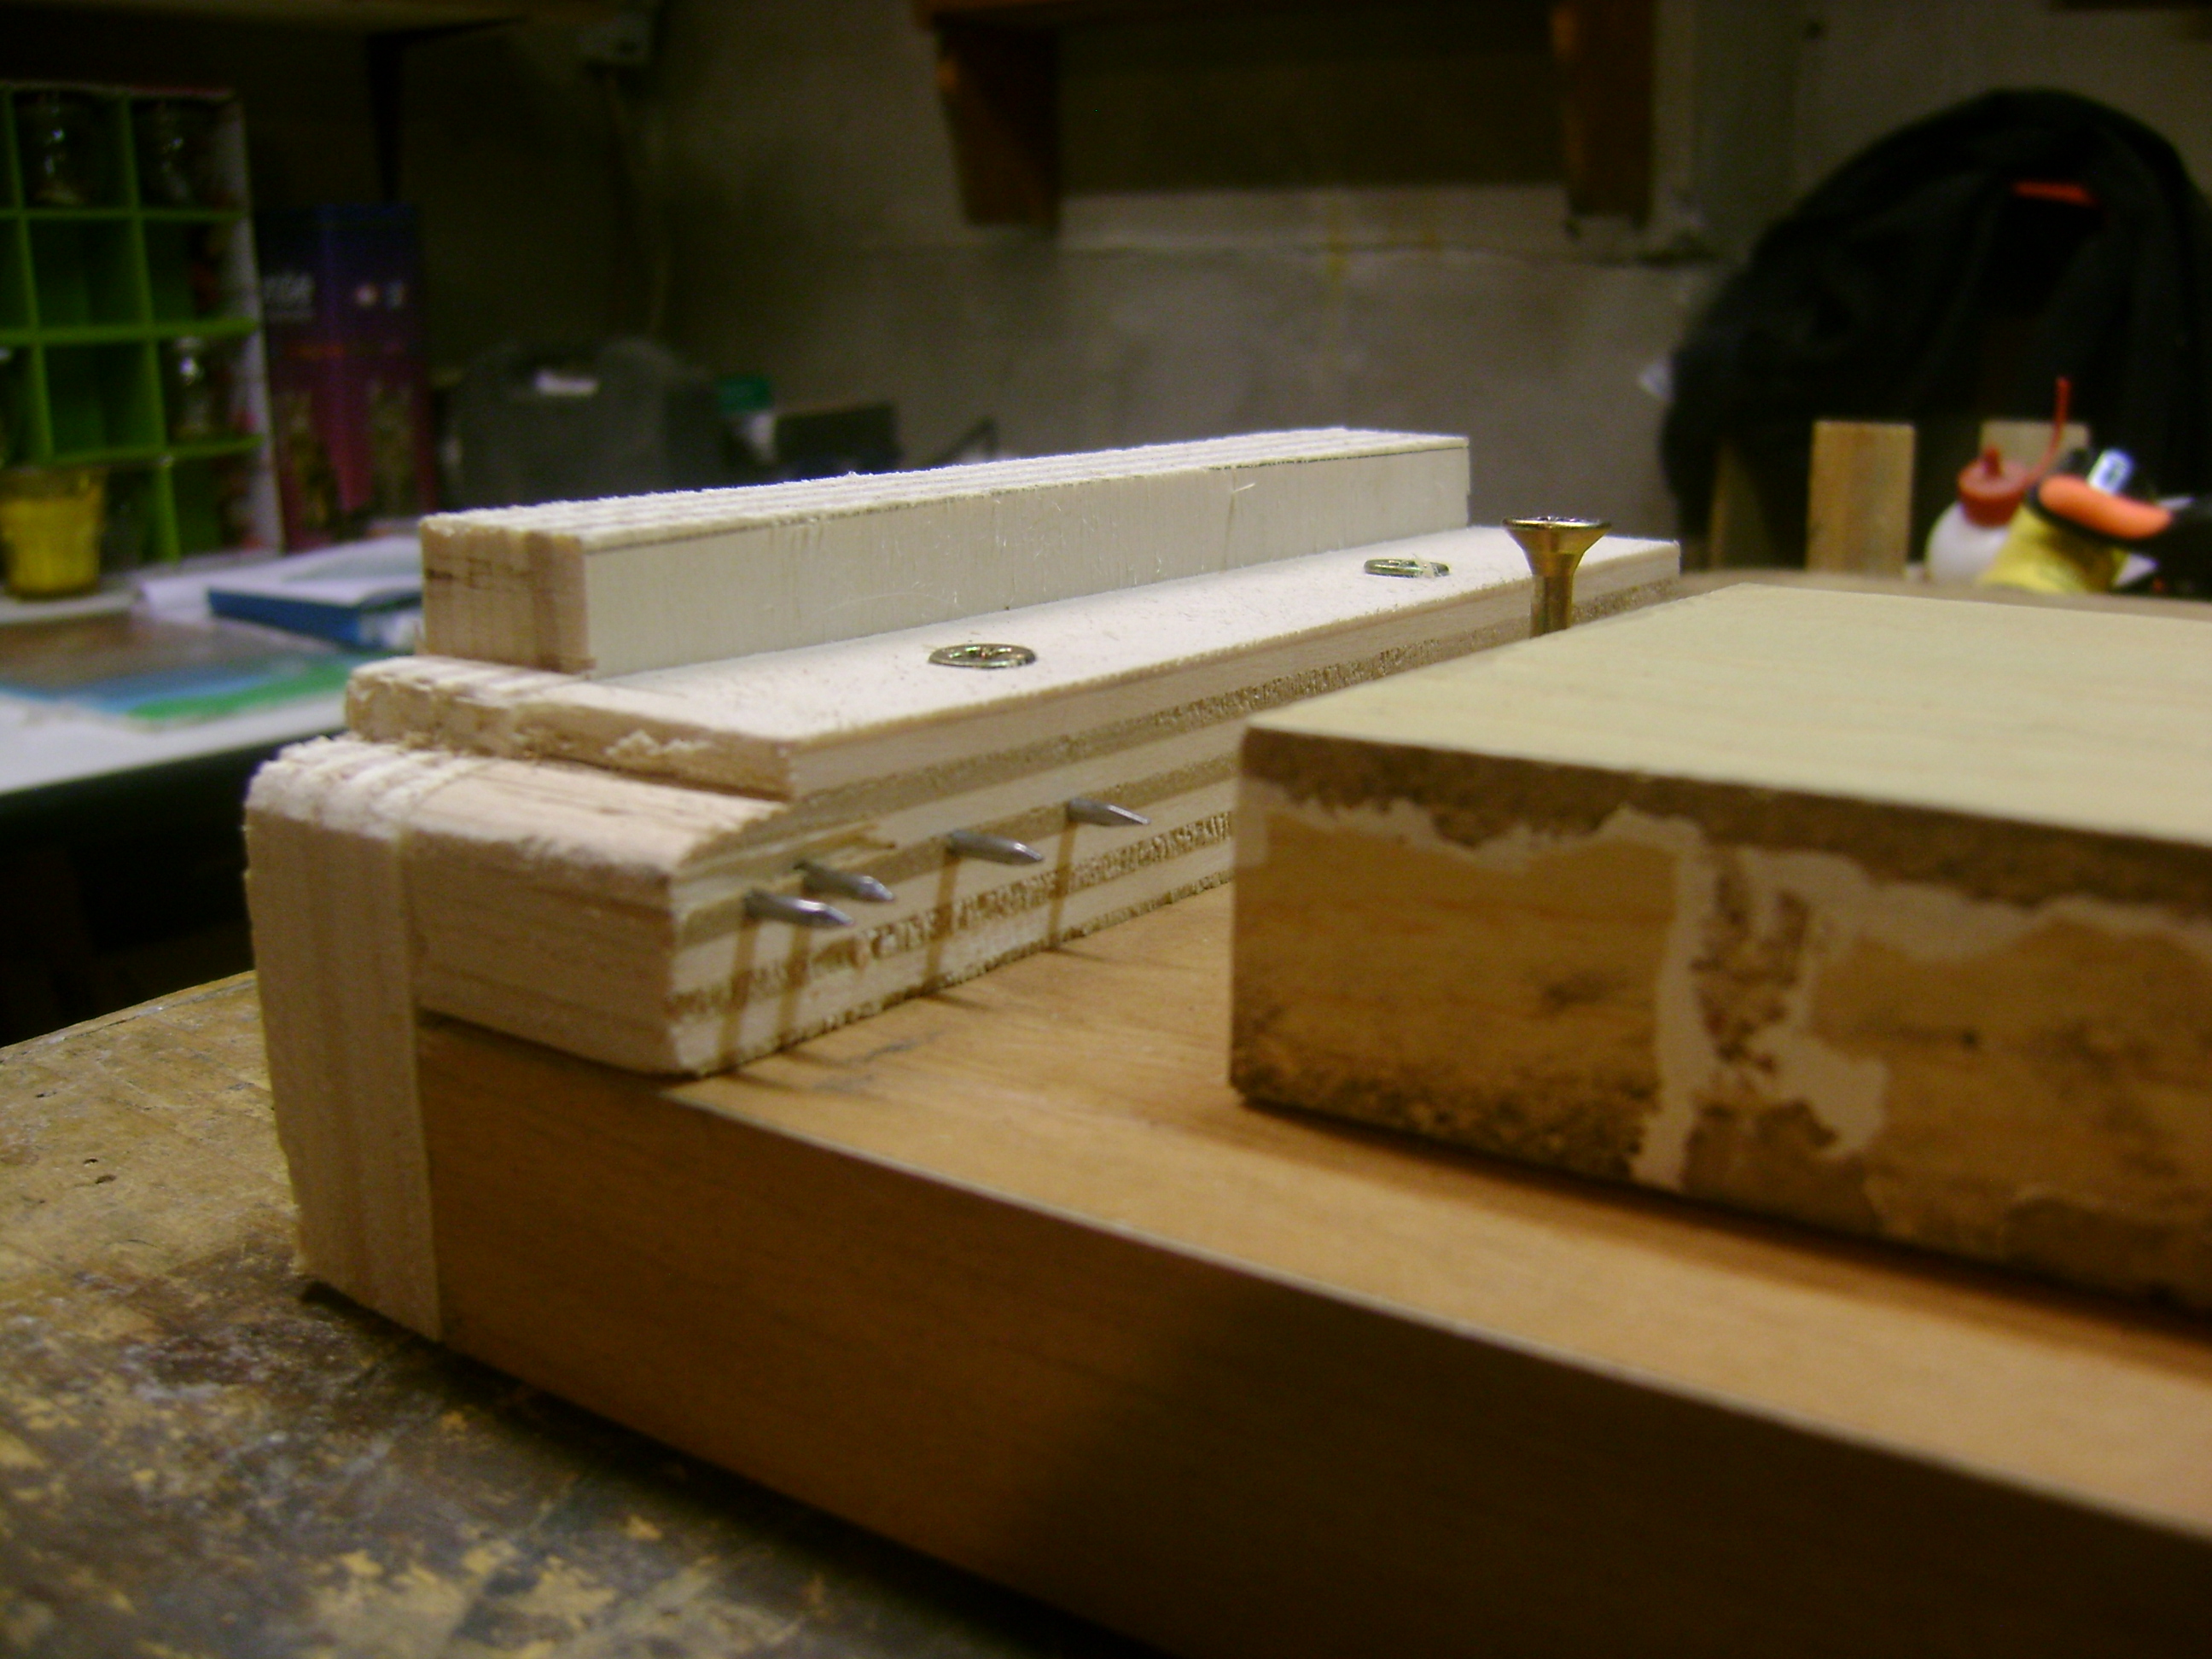
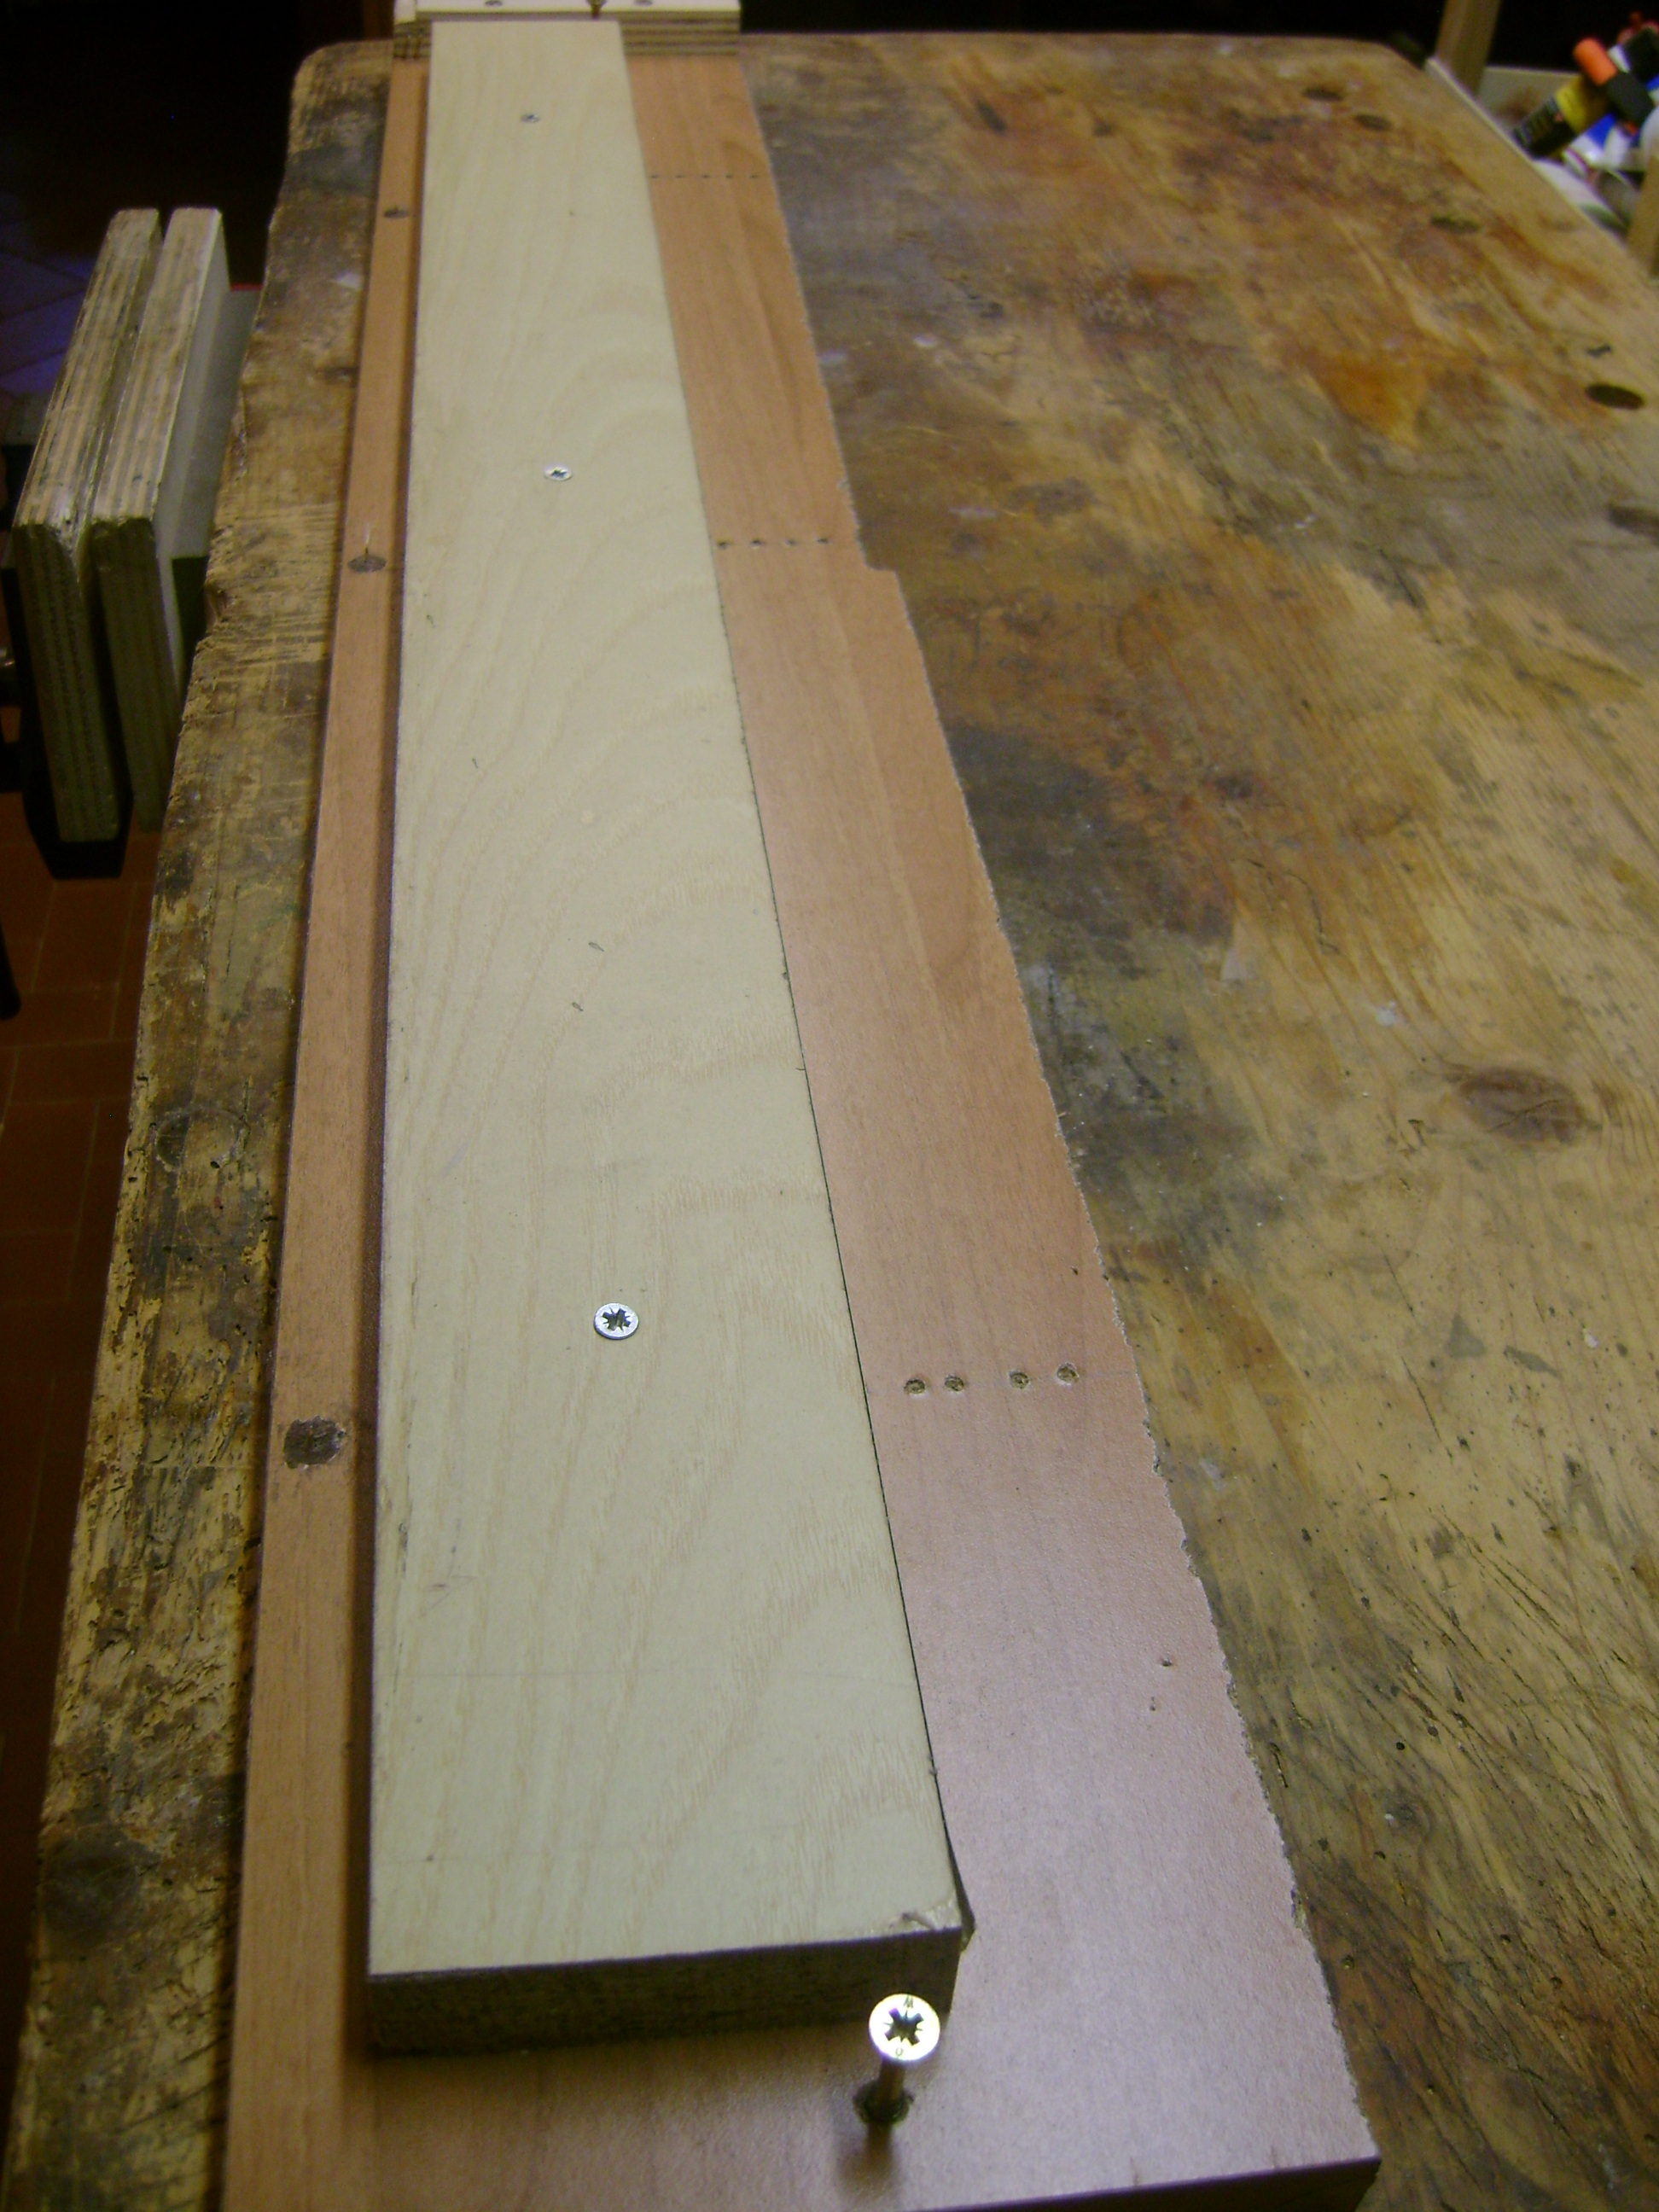 Oltre ai normali sistemi di ancoraggio al piano del banco possiamo pensare all’utilizzo di una tavola per modanare (sticking board). Questa può essere costruita in vari modi. Nella sua forma più semplice si tratta di una tavola piana di almeno 120/150 cm. di lunghezza per 20/30 cm. di larghezza. Su questa tavola viene avvitata e/o incollata su un lato lungo una battuta laterale. In testa alla tavola viene avvitato e/o incollato un pezzo di legno perpendicolare alla tavola che farà da battuta al pezzo e sul quale sono inseriti, sulla parte interna, dei chiodini opportunamente sagomati ed in posizione sfalsata. In alternativa è possibile inserire quest’ultima battuta nella parte finale della tavola e nella parte iniziale sostituirla con una semplice vite messa in una posizione tale che non intralci il lavoro e faccia da stop al pezzo.
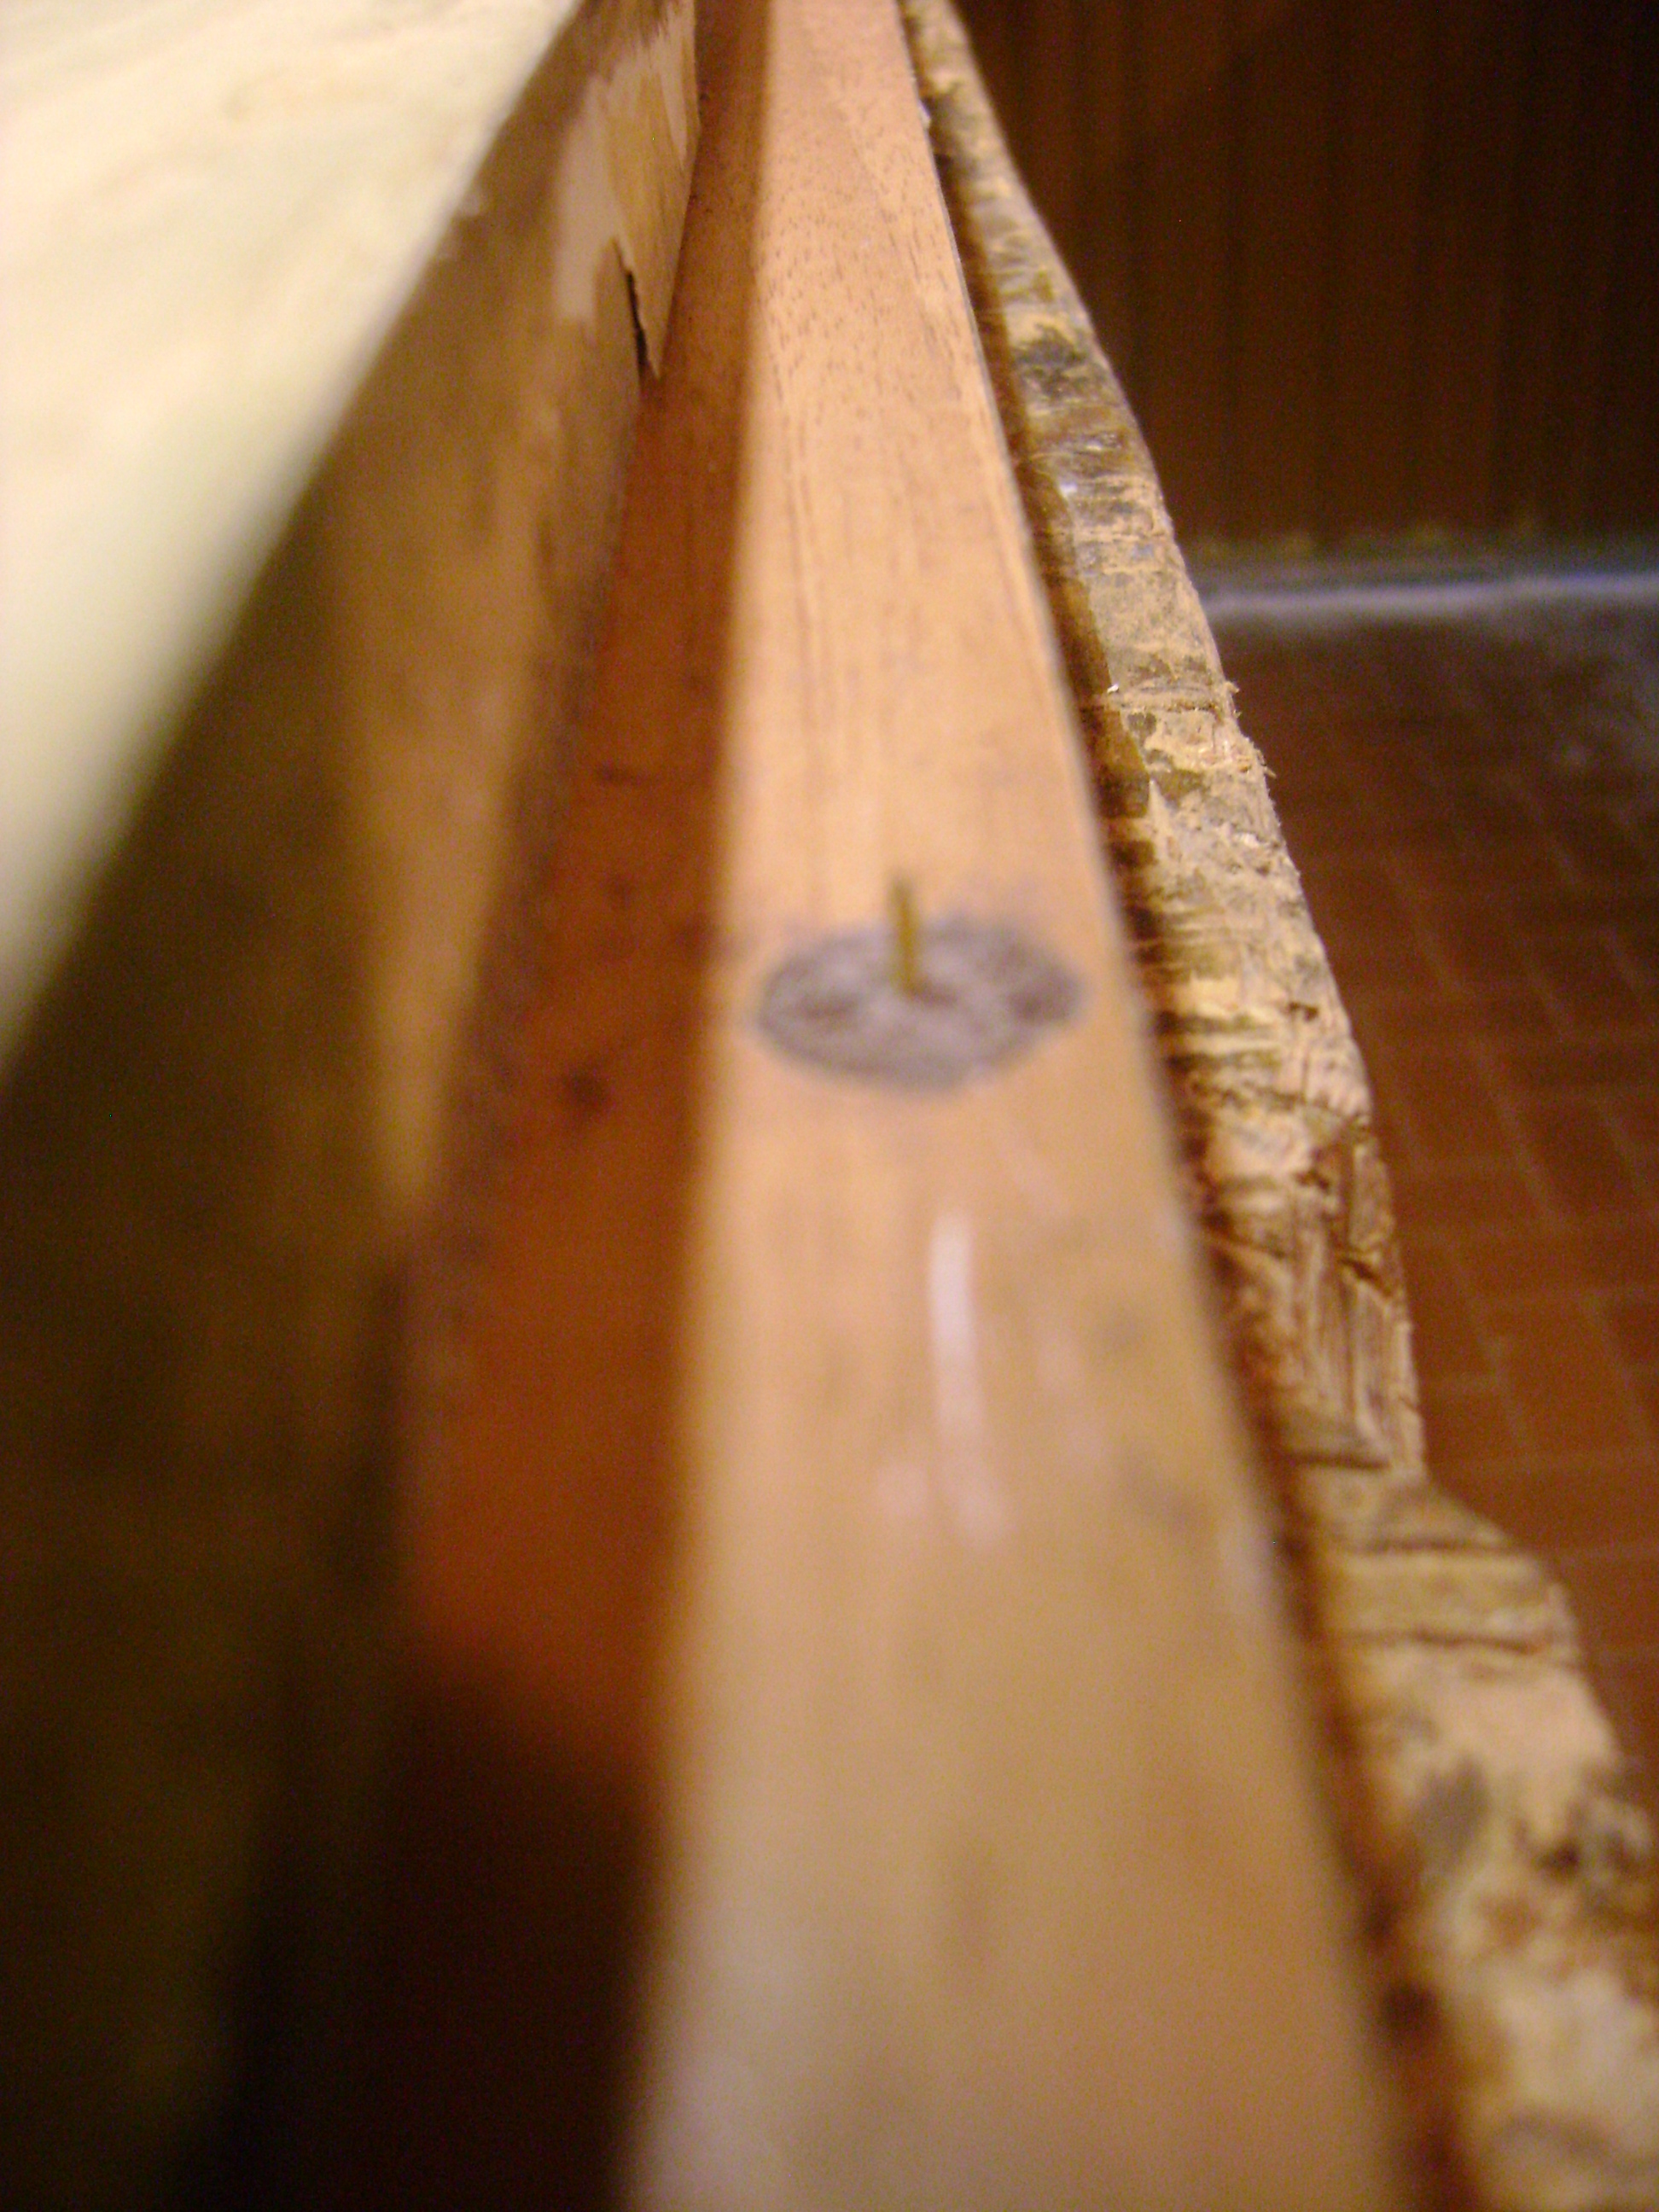
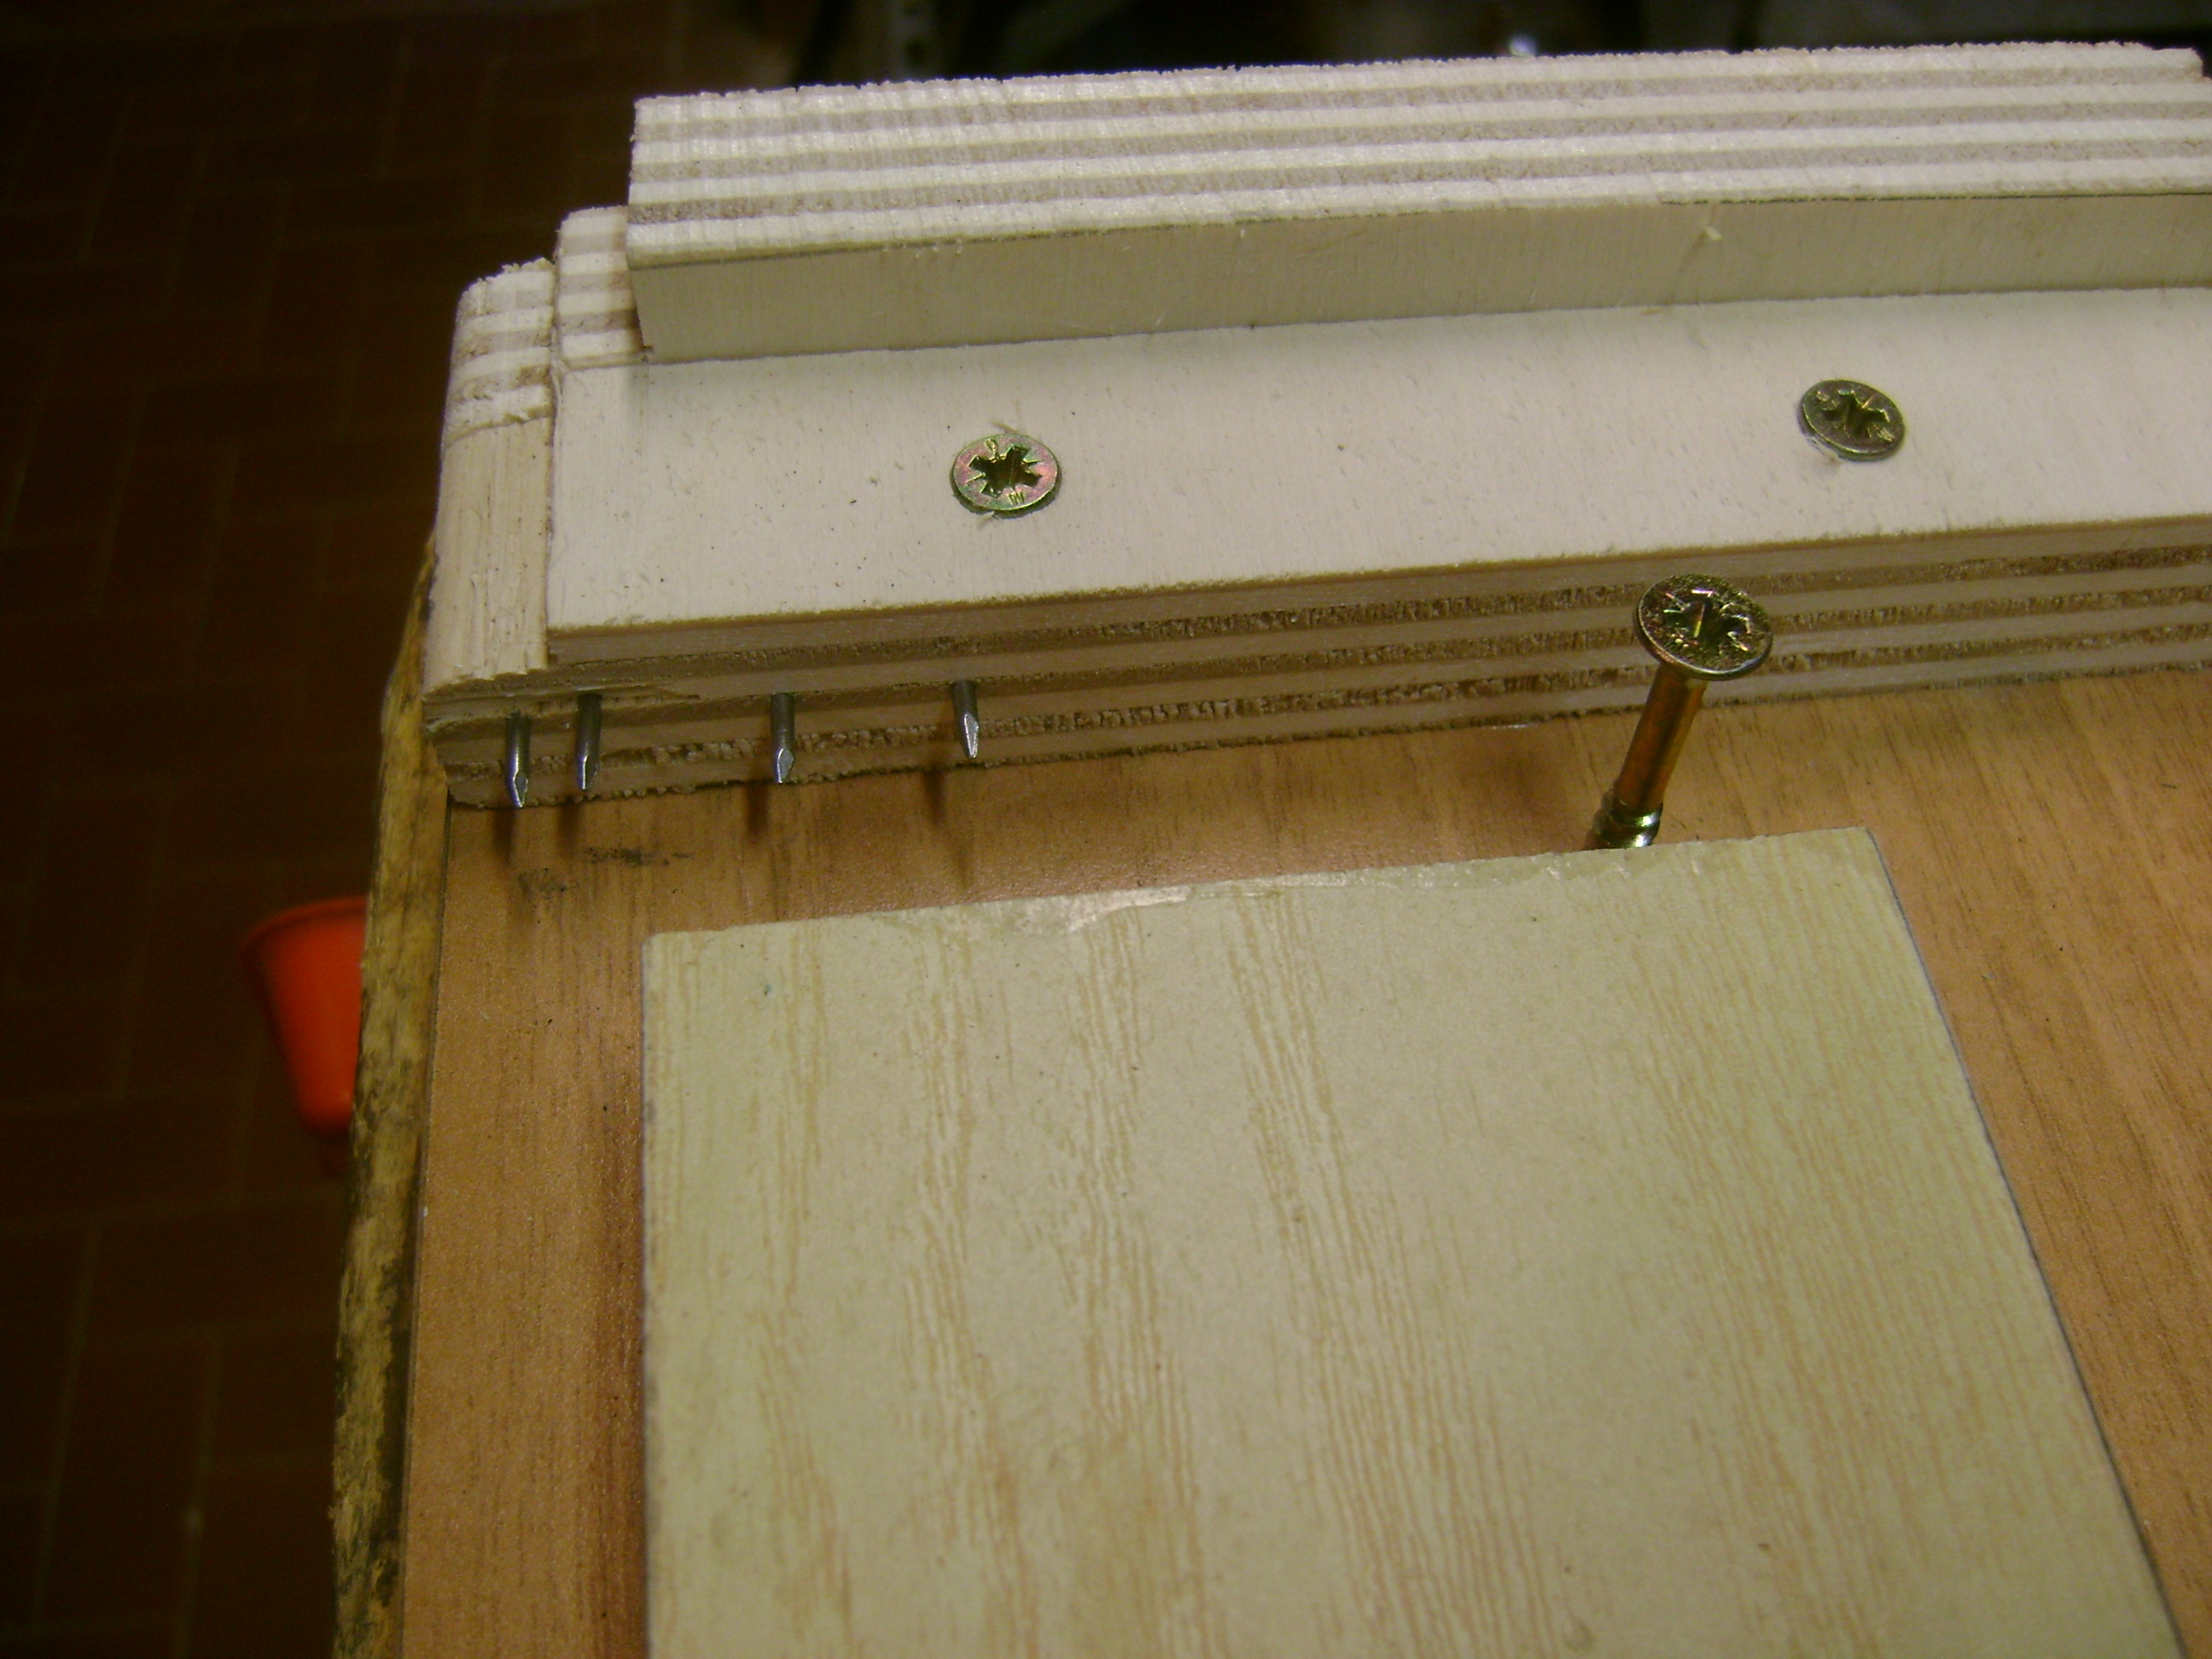
 Le battute perpendicolari dovranno essere ovviamente più basse del pezzo da sagomare per non intralciare l’azione della pialla. Sulla superficie della tavola è anche possibile inserire dei chiodini sagomati che serviranno a tenere più fermo il pezzo in posizione. Infine inseriamo nella parte inferiore della tavola, sul lato lungo che andrà rivolto verso di noi, un listello di una lunghezza tale che permetta di essere stretto nella morsa da banco, così da bloccare tutta la tavola. Una volta inserita la tavola nella morsa, poniamo il pezzo da sagomare a battuta contro il listello laterale e contro la battuta frontale facendo penetrare i chiodi inseriti nella battuta nella testa del pezzo. Il pezzo rimarrà bloccato in posizione, senza flessioni, per tutta la lavorazione.
 Le moulding planes sono forse, tra tutte le pialle, quelle che hanno risentito maggiormente dell’innovazione tecnologica della lavorazione del legno. Un tempo, quando non esistevano i macchinari, le pialle da modanatura erano l’unico strumento in grado di creare profili nel legno. Oggigiorno esistono elettro utensili portatili come i rifilatori e le fresatrici verticali e tra le macchine stazionarie i banchi fresa e le più grandi toupie in grado di fare lo stesso lavoro in meno tempo ed in modo estremamente preciso. Questi utensili possono montare frese di diversa grandezza e con svariati profili e sono in grado di riprodurre un’infinità di profili nel legno. Per chi fa il falegname di mestiere queste macchine sono oramai indispensabili. Per l’hobbista probabilmente può bastare dotarsi di una fresatrice verticale o al limite di un banco fresa. Ma se si lavora il legno per diletto e in modo prevalentemente manuale, come faccio io, posso consigliare l’acquisto di qualche pialla per modanatura usata. Oltre al fatto che non dovremo spendere un capitale in frese non avremo bisogno di energia elettrica per farle funzionare, non sono pericolose come le fresatrici, non producono polveri e mantengono intatto tutto il loro valore nel tempo. E una volta restaurate avremo degli utensili destinati a durare ancora centinaia di anni. Far rivivere queste pialle, facendole ancora lavorare, è il miglior modo di perpetuare la storia di questo straordinario utensile.
___________________________________________________________________________________________________________________
Introduction: history and general information
Although we are not certain about its origins, it is believed that the wooden plane was already known and used in the times of the ancient Egyptians and Greek civilization. On the other hand, there is sure evidence that these planes were built and used by the ancient Romans. These were simple wooden planes but also some more complex types of planes, such as those for moulding. Unfortunately, the collapse of the Roman Empire first and then the Middle Ages will drag this type of tool into darkness. But around 1500, thanks to the Renaissance taste, the wooden planes have risen from centuries of oblivion. It will be between 1700 and 1850 that the wooden planes will experience their maximum expansion. It was mostly a production made by artisans for artisans, flourishing especially in Northern European states such as England and Holland. Subsequently, around 1850 and following industrial development, the USA invaded the market with the first metal planes, which in fact will replace the wooden ones. Production will then extend throughout Europe (especially in England) until 1960, the year from which the decline in the manufacture of this type of tool can be said to begin. As it is easy to guess from this brief introduction, the history of planes is almost entirely made up of wooden planes. This is because even in ancient times it was relatively easy to build one. Drawing inspiration from how chisels work was just a matter of inserting a sharp blade into a suitably shaped opening in a piece of hardwood and holding it in place with a wooden wedge. This form was maintained almost unchanged up to the present day. It would be impossible to condense in a single article the enormous amount of notions concerning the immense universe of wooden planes. It is therefore preferable to talk about it a little at a time, perhaps combining some basic notions, common to all wooden planes, with the specific illustration of a particular type of plane. That’s why I promised myself to soon write an article dedicated to the scrub plane, a wooden plane extremely useful in the manual processing of raw wood and then also of the wooden rabbet and plough planes. In this article, however, I would like to talk about another category of planes, to which I refer above, that is, moulding planes . As you can guess from the name itself, this type of planes are specific for creating shaped profiles in wood. Examples of processes that can be carried out with this type of plane are the copings in general, the frames of paintings or mirrors, the finishing strips of the doors of some furniture and windows, the internal profiles of the frames of a door, the edges of a table or a wall unit and in any case any shaped decorative element you want to practice on the edge of the wood. It is with this type of plane that it has been possible in the past to reproduce profiles of any type on the furniture. Among these, just to name one, the famous “beak of an owl”. The molding planes, like all wooden planes, are made from pieces of hard wood, mainly beech, but also from other types of wood (always hardwood), such as holm oak and in general from the woods of fruit trees. However, the wood used should always be well seasoned, better if quartered, with regular and compact fibers. These characteristics help to prevent the phenomena of exchange of humidity with the surrounding environment, to which the wooden planes are particularly subject, and also guarantee greater resistance both against the wear to which they are constantly subjected in the work of rubbing wood on wood during planing, as well as hammer blows against the plane body in order to release the wedge. The conformation of the moulding planes differs substantially from the normal planes. There is the absence of both the rear and the front handle, the latter present for example in the scrub plane. There is no adjustable and removable parallel guide, at least in the simpler and most used models. They almost always have a side opening in the plane body on the right side for shavings expulsion. They have a shaped sole that exactly replicates the shape of the blade being mounted. Finally, the method of use can differ significantly depending on the type of plane being used. In the plane models that create complex profiles in the wood, the parallel guide and the depth stop are obtained directly in the sole . In other models, such as for example in the planes hollows and rounds (concave and convex profile) both the rip fence and the depth stop are not present. Moulding planes can create profiles ranging from a few millimeters to several centimeters in width. Obviously, the larger the plane is, the more tiring it will be to make it work on wood. For this reason it is sometimes preferred, instead of using a single plane with a sole that is too wide and with a complex profile, to use a combination of smaller planes of different shapes and sizes. Because if it is true that over the centuries dozens and dozens of planes with the most varied profiles have been produced, it is also true that by using smaller planes and different profiles together, the possibilities of creating new shapes in wood become practically infinite. The peculiarity of the moulding planes is above all in the shape of the sole and the blade. Looking at the sole of the plane, front or back, we will be able to see its profile. The profile of the sole faithfully reflects the profile of the blade. And the profile we see will be what we will get on the wood, but in the negative. So we always pay attention to choose the right plane for the correct profile we want to practice, always bearing in mind that the shape of the sole of the plane we see is not the one we will get by working the wood but exactly its opposite. For this reason, for each type of plane we own, it is advisable to keep a small piece of wood nearby, on which we will have obtained the shape of the profile obtainable from that plane, so as to have an immediate visual feedback. The moulding planes also have another special feature. Not infrequently we can find planes that have inserts in hard wood (usually boxwood), easily recognizable by the different color and shape, inserted in the sole of the plane ( boxing ). These strips can be of various shapes and sizes and also the type of insertion can diverge. The sliding dovetail insert is very special and beautiful to look at. The addition of these hard wood laths pursued the aim of preventing wear on the sole, subjected to continuous wear, with the possibility of being able to be replaced once worn. As mentioned, there are many plane models capable of creating profiles in wood, often even very complex ones. To catalog them in this article would be impossible, as well as superfluous, but I consider it useful to recommend reading the following three books which illustrate very well the vast majority of the profiles obtainable while providing an infinite number of historical references:
British Planemakers from 1700 of W . L . Goodman second edition, particularly useful for historical research on molding planes;
Moldings in practice of M . S . Bickford , a relatively recent book that explains planing techniques very well;
The Wooden Plane by J . M . Whelan , a truly comprehensive book that addresses every aspect related to the world of molding planes.
Classic profiles.
However, if we want to list the most popular classic profiles we could indicate the following:
Cove, also called cavetto or cimbia . It is a quarter of a circumference obtainable with a plane with a convex profile ( round );
Ovolo, or echino. It is a quarter of a circumference obtainable with a plane with a concave profile ( hollow );
Astragal. It is a semicircle that can be obtained with a plane with a convex profile ( round );
Ogee. Sinusoidal shape, formed by consequential concave and convex profiles of a quarter of a circle. There is the lying (or lesbia) and reverse (or Doric) ogee. It can be obtained with moulding planes with suitably shaped blades.
Scotia. With concave profile, an arc of variable circumference and with non-centered axis. It can be obtained with planes with a convex profile with the sole with spring angle.
Bead. It is a convex section profile of various sizes. The part of the circumference can be symmetrical or not. It can be obtained with planes with a concave profile with suitably shaped blades.
Fillet. Unlike the other profiles, it has a square section and can take the shape of a relief or a channel. They can be obtained with particular types of planes sometimes used in pairs to make a housing dado joint, as in beads.
With a few rare exceptions, all the profiles of the moulding planes can be defined as variations on the theme and attributable to the classic profiles shown above.
There was usually only one type of profile in the mouldings of period furniture and antique frames. Sometimes, however, if the dimensions allowed it, it was possible to practice even more types of profiles together using, if necessary, a single plane whose blade could include two different architectural styles. In most cases, however, the complex profile moldings were created using 2 different types of plane for molding, one with an ovolo or beading profile and the other with a lying or reverse ogee profile
Planes hollows and rounds
Although complex moulding planes, i.e. those capable of creating elaborate profiles in wood, are the most fascinating, the most used planes, at least originally, were those called hollows and rounds . This is due to their relative ease of use, speed of sharpening, and extreme versatility in being able to create curved shapes in the wood simply by alternating the concave and convex profile. They were also extremely useful for removing material quickly before finishing the job with the plane of the desired shape. This type of plane deserves a little study. The hollows and rounds moulding planes translate into Italian as concave and convex planes. The concave and convex terminology indicates the shape of the sole and not the profile obtainable on the wood (even if in the USA the opposite is often indicated). So when we talk about a plane hollow it will be a plane with a concave profile sole and blade able to practice profiles of convex shape. When we talk about a plane round it will be a plane with a convex profile sole and blade capable of practicing concave profiles. They were usually sold in pairs (one with a concave profile and one with a convex profile) of equal size. Very popular (and today sought after by collectors) was the set comprising 18 pairs of planes ( full set ) of various radii but also the smaller set of 9 pairs ( half set ). This type of plane can make about a quarter of a circle in the wood. Their peculiarity lies in the fact that they are not equipped with lateral stop and depth stop. Therefore it makes them suitable for working not only on the side of a piece but on any face of the piece and giving the possibility to intervene from both planing directions. The only precaution is to be able to keep them in a stable position throughout the planing movement, which is not exactly easy if you do not have the foresight to help yourself with the support of your fingers and in any case if not after having acquired some experience. In these cases, it may be useful to use a wooden strip that acts as a guide and stop alongside the plane so that it can always be kept in the same position. These planes in Italian are commonly called sticks even if, to be precise, stick is only the plane with a convex profile while the fork (from the shape of the blade) is called the plane with a concave profile. If you want to buy them on Ebay, you must pay particular attention to the size of the blade as, if the pair was not made by the same manufacturer, there may be small differences in terms of blade radius . It is therefore better, where possible, to buy pairs of planes that bear the same manufacturer’s stamp on the front and / or back of the sole .
Complex profiles
Much of what has been said so far for planes with a concave and convex profile also applies to planes capable of reproducing complex profiles, i.e. those capable of creating mouldings with several classic profiles at the same time. Sometimes this was possible with complex profile planes of considerable size, which could measure several centimeters in width. Much more often, however, as already mentioned above, complex profiles were nothing more than the union in the same moulding of several classic profiles, usually two, obtainable by using two different types of plane, usually one with an ovolo or beading profile and the other with a lying or reverse ogee profile. When dealing with planes with classic profiles and therefore with particularly elaborate soles, problem is that you may find yourself with a sole that is not perfectly flat (in length or width) or with a profile that no longer corresponds to that of the blade supplied. In these cases it is necessary to intervene on the plane body or on the blade itself, trying where possible to remedy the problem. If the profile is damaged or the reliefs are too smooth and irregular, it is very difficult to intervene with the restoration, even if you can still try. Of all the defects that can be found, I think that the the worn sole is still the most serious of all. If the blade is too far laterally to the left with respect to the profile, you can try to intervene by carefully filing the right side of the blade and thus try to bring it back to its axis, or try to intervene directly in the throat that houses the wedge and the blade, creating a further lateral space able to accommodate the side of the blade. If the blade is shifted too far to the right with respect to the profile of the sole, you can try to insert a shim in the groove on the right side. If the wedge is too loose, you can try to rebuild it in the worn part or create a new one. The main problem with this type of plane is that those in circulation are almost all of Anglo-Saxon origin and therefore can be purchased exclusively used online on specialized sites or on Ebay.co.uk. In the latter case, very often the descriptions provided by the seller are approximate, you want a little for dishonesty, you want for actual ignorance about the technical characteristics of what you sell. Often then the photos inserted do not help to understand if we are dealing with a plane in good condition or not. In general it can be said that almost all used planes will certainly need a good cleaning with water and soap or water and vinegar. Then a couple of coats of oil (boiled or raw linseed oil for example) interspersed with fine sandpaper or steel wool and finally a pass of neutral wax. However, it is always better not to be too aggressive with interventions also in order to preserve the natural patina that time has deposited on this type of tool. As previously mentioned, the moulding planes, at least the first ones that were produced, had the stamp of the manufacturer, which was often a family of craftsmen, stamped on the front and / or back of the plane body. The first London producers of the 1700s were Wooding , Cogdell , Jennion , to which over time others were added such as Moseley and Sym . Over time, however, the carpenters who used the planes also began to imprint their own initials on the plane body, sometimes covering the original manufacturer’s brand. Very often over time these marks have become illegible and this makes dating them even more difficult. In principle, however, the oldest planes should have the name of the manufacturer imprinted inside a box. In fact, the carpenters who used it used to print only their initials or surname in full but without boxes. One way to roughly date a molding plane and possibly also discover its nationality is the shape of the wooden wedge. Assuming the wedge is still the original one, the rounder shape of the head and a more pronounced throat are indications that the plane may be very old. Over time, in fact, the shape of the wedge has transformed, varying from roundish to almost oval. Furthermore, the more squared shape of the wedge also refers to planes manufactured in Continental Europe rather than Anglo-Saxon origin. The book by WL Goodman – British Planemakers from 1700 explains very well, these and other issues and also reports an exhaustive cataloging of moulding planes through which it is possible to trace the dating of model in our possession. In this way I was able to date some planes purchased a few years ago on Ebay, including one in particular, I discovered dating back to around 1750. On the moulding planes, in addition to the distinctive marks of the manufacturer and the various owners who have followed one another, they are often reported lines on the front and / or back of the plane. These lines indicate the angle of spring . We will see shortly what it is, when we deal specifically with the dynamics of operation of this type of plane. But first, we still have to talk about the sharpening of the blade.
Sharpening the blade
The inclination of the throat of the moulding planes is normally between 50 and 60 degrees and was sometimes built slightly oblique with respect to the plane so that the blade could work in a skewed position with respect to the direction of planing. The angle of inclination of the bevel varies instead between 25 and 30 degrees and to these you can add a couple of degrees of microbevel so as to form the cutting edge, the meeting line between the bevel and the back of the blade. The blades of this type of plane are quite sturdy and in any case thicker at the tip than the shank which is thinner. The moulding planes work in the bevel down position, i.e. with the bevel facing down. We have already seen in previous posts that when you buy a vintage plane you have to carry out a whole series of operations so that the blade can work properly. The most common operations are removing rust from the blade with water and vinegar and sandpaper. Following a coat of oil, wax or WD40 (however a protective lubricant) and then you can move on to the actual sharpening. The same rules as for normal plane blades apply to back sharpening. Passes on abrasive papers or stones with various grits and polishing with the strop. The sharpening of the bevel, on the other hand, requires greater care. The simpler profiles of convex planes can be sharpened first with flat-faced files and then with sandpaper of various grits starting from 250 upwards. For convex profiles, the best method, if we do not want to buy the appropriate shaped stones, is to use small files with a cylindrical section and then wooden rods of various sizes, but always with a radius of curvature slightly lower than the curve to be sharpened, wrapped with sandpaper to be used in increasing grits. Two methods can be used for the sharpening phase. The first is to remove the blade and insert it into the vice in an upside-down position with the bevel facing up. Eventually we can insert a support to be placed between the head of the blade and the vice to prevent the blade from flexing too much or slipping out of the vice. The second system consists in keeping the blade inserted in the plane and slightly exposed with respect to the sole. Insert the plane upside down in the vice (do not tighten too much) with the bevel of the blade facing upwards with the precaution of covering the sole of the plane with masking tape in order to avoid inadvertently damaging the sole itself with sandpaper. Taking care to follow the profile of the bevel for its entire width and following the already present inclination, light passes are always made in the direction of the cutting edge and without needing to insist too much, up to about 1 tenth of a millimeter from the edge. This last part of the bevel can be sharpened directly using the finest abrasive papers, joining it to the back by slightly tilting the abrasive support by a couple of degrees so as to obtain the cutting edge. Concave profiles look good with this method, while flat-faced supports can also be used for convex profiles. At this point, we can finish the sharpening by polishing the bevel. We use the honing compound applied on some scraps of leather (as for the strop ), then wrapping them on the special shaped supports. This type of blades do not require obsessive sharpening, as we are inclined to do for normal smoothing planes. Already arriving at a grain around 1200 you can go directly to polishing and this will be enough for the blade to cut properly. As mentioned above, it can sometimes happen that the profile of the blade does not coincide perfectly with the profile of the sole. If the problem is not one of those seen previously (i.e. it is not a problem of alignment between the blade, sole and throat of the plane) and if we are unable to recover the gap with normal sharpening, we will have to intervene more drastically directly on the shape of the blade with the aid of the grinding wheel or coarse-grained abrasives trying to restore the correct shape. An operation that is certainly not easy and requires a lot of patience.
Planing with moulding planes.
Choosing carefully the wood on which to make the moulding is of fundamental importance for the success of the planing work. The wood must have the faces perfectly squared with each other and have a straight, regular and possibly converging fiber in the planing direction on both the surfaces concerned. Woods with irregular fibers and knots are difficult to work with this type of plane, leaving a poorly finished surface. Planing with the grain grain will make the job much easier, avoiding jams and tearing of the fiber. The surface thus obtained will only need a very light sandpaper before receiving the finish. Soft woods and hard woods (but not too hard) can be worked without problems with this type of plane as long as you are planing with the grain . If we have to mould the end grain we must first make sure that the blade is perfectly sharp, make short and light passes exposing a little blade and lubricate the sole often to facilitate sliding. Always remember that the thickness of the wood must be able to accommodate the size of the moulding that we want to practice. Then we choose a plane with the blade of adequate width. We always keep at hand a small iron hammer, of those with a pen head, and also a wooden or rubber mallet for any adjustments to be made to the plane blade and the wedge. The small iron hammer is ideal for making micro adjustments to the blade. By lightly tapping the tang of the blade, the blade will drop downwards. We continue to hammer a little at a time and check often by flipping the plane and sighting the sole to see when the cutting edge comes out of the sole. As soon as we see it appear, with the wooden mallet or with the rubber hammer we lightly hit the head of the wedge so that it tightens the blade against the throat of the plane. At this point, we keep a piece of waste wood at hand and check on this that the plane removes the right amount of material. Removal should produce fine shavings. If they were too thin we lower the blade even further, if they were too thick we retract the blade. To do this we can use the iron hammer, this time on the pen side. We turn the plane upside down and lightly tap the wedge groove with the hammer pen. This will loosen the wedge slightly and allow us to re-adjust the blade. If the wedge does not release the blade, you can alternatively hit the heel of the plane sole with a rubber or wooden hammer or on the upper part of the plane in the portion between the throat and the front of the plane. The hammer will not damage the wood and will create the shock necessary for the wood to loosen the wedge. Finally, we check that the profile of the cutting edge coincides with the profile of the plane. This should happen naturally if we lock the blade in a tight position to the side of the mouth. We always do all these operations in safety by working on the bench top. In fact, it could happen that by loosening the wedge too much, the blade slips from its seat ending up on the ground, damaging itself. We block the piece of wood to be shaped in the bench vice, making sure that the plane’s stroke is free for its entire length. We can possibly use for this purpose a sticking board which we will see shortly how to build and how to use. In the post dedicated to the plough plane it was indicated how to use that type of plane. The moulding planes are used in the same way. Then we place the plane on the end of the piece in front of us and with short and light passes we plane going backwards until we reach the other end of the piece. In the first few passes we will find that we remove little material and more in certain areas than others. This is absolutely normal and is due to the shape of the blade itself. Once the plane has defined the path, the shavings will become more consistent and uniform and we can begin to make continuous passes to the entire piece. If the plane is equipped with a depth stop this, once it comes into contact with the surface of the piece, will not allow you to plan further. If there was no depth stop, as in the concave and convex profile planes, we will have to adjust by eye. Let’s remember that planes with complex profiles, unlike hollows and rounds , work only in one direction. The plane, if equipped with a stop, must always be kept well adherent to the profile and in the correct position, especially in the initial phase of work. In fact, it may happen that the sole of the plane inadvertently slips to the left with the consequence that the plane does not follow the stop but a curvature of the sole . If we don’t correct the mistake from the start, it will be difficult, if not impossible, to get the job back later. So let’s check carefully, especially in the first strokes, that the track is right. Eventually we can solve the problem by providing the piece to be worked slightly longer than necessary. This will then allow us to saw down the end parts, especially the initial part in front of us which is the one that is most affected by the least pressure and control exerted in the plane exit phase. The posture to take while planing is also important. We try to stay as close as possible to the bench and the piece to be worked, as if to put ourselves on top of it. The left hand goes to the left side of the plane and the thumb to the top of the plane in front of the wedge and keeps the fence to the piece. The right hand grasps the back and top of the plane and pushes the tool. The left leg remains extended forward. If the plane becomes clogged with shavings, free the mouth with a screwdriver. If it clogs too often, we are probably working with too much exposed blade or the wedge is too short / damaged and does not allow the shavings to be ejected well. If the plane runs a little, we lubricate the sole with wax or Marseille soap. Many moulding planes are used at an angle to the workpiece. Practically, the sole stop is slightly inclined with respect to the sole so that, once it is placed on the piece and therefore in a perpendicular position with respect to it, the plane finds itself at an angled position. This angle is called the spring angle and is usually between 20 and 30 degrees. On the front and / or on the heel of the plane it is indicated with a trace which is nothing more than the extension of the fence line of the sole. This trace, which must be kept perpendicular, visually helps the operator to make the tool work in an inclined position during planing. The advantages translate into greater adherence of the fence to the piece and keeping the various parts of the sole profile at the same level. In addition to the extension trace of the fence, a second trace is also very often shown, indicating the extension of the depth stop. If we think we need to remove a lot of material from the workpiece, the best way to proceed is to preliminarily remove the bulk of the material with the normal bench planes and with the rebate planes and then, once close to the profile we want to create, finish with the moulding planes. Working in this way involves first marking at the head and at the end of the piece to be shaped the profile that we want to make, bringing it directly from the profile of the plane or marking it with special concave and convex shaped templates. Once the molding is finished, we can finish the fillets with the board, pass over the same shavings we produced and if necessary make a final smooth with a fine sandpaper.
Sticking board
Often the profiles to be made can be particularly long. Already clamping a piece of wood more than 60 centimeters long, even if of considerable thickness, in the vice, can create problems as the piece will tend to flex laterally and slide downwards due to the thrust necessary to plane. It is therefore necessary to block the piece in such a way that it can remain stable and able to withstand the strong stresses to which it is subjected. In addition to the normal clamping systems to the bench top, we can think of the use of a sticking board. This can be built in various ways. In its simplest form it is a flat board of at least 120/150 cm. in length for 20/30 cm. wide. On this board it is screwed and / or glued on one side along a fence. At the head of the table a piece of wood perpendicular to the table is screwed and / or glued, which will act as a stop to the piece and on which suitably shaped and offset nails are inserted on the inside. Alternatively, it is possible to insert this last stop in the final part of the table and replace it in the initial part with a simple screw placed in a position that does not hinder the work and acts as a stop to the piece. The perpendicular stops must obviously be lower than the piece to be shaped in order not to hinder the action of the plane. On the surface of the table it is also possible to insert shaped nails that will serve to hold the piece more firmly in position. Finally we insert in the lower part of the table, on the long side that will be facing us, a strip of such a length that it can be tightened in the bench vice, so as to block the whole table. Once the board has been inserted into the vice, we place the piece to be shaped against the side fence and against the front stop by penetrating the nails inserted in the stop in the head of the piece. The piece will remain locked in position, without bending, during planing.
The moulding planes are perhaps, among all the planes, the ones that have suffered most from the technological innovation of woodworking. Once upon a time, when there were no machinery, moulding planes were the only tool capable of creating profiles in wood. Nowadays there are hand power routers and among the stationary machines there are bench routers and the larger toupie able to do the same job in less time and in an extremely precise way. These tools can mount cutters of different sizes and with various profiles and are able to reproduce an infinite number of profiles in wood. For professional woodworkers, these machines are now indispensable. For the hobbyist it is probably sufficient to have a hand power router or, at the limit, a router bench. But if you work wood for pleasure and mainly by hand, as I do, I can recommend the purchase of some used moulding planes. In addition to the fact that we will not have to spend a capital on cutters, we will not need electricity to make them work, they are not as dangerous as the power routers, they do not produce dust and keep all their value intact over time. And once they are restored we will have tools destined to last hundreds of years. Reviving these planes, making them still work, is the best way to perpetuate the history of this magnificent tool.
Alcune foto ed immagini sono state tratte da siti internet esterni / libri per soli scopi informativo didattici e senza fini di lucro. Se si è proprietari delle immagini e se ne desidera la rimozione si prega di segnalarlo nella sezione contatti.

Lascia un commento