IL TRAPANO A MANOVELLA / THE HAND DRILL
English translation at the end of the article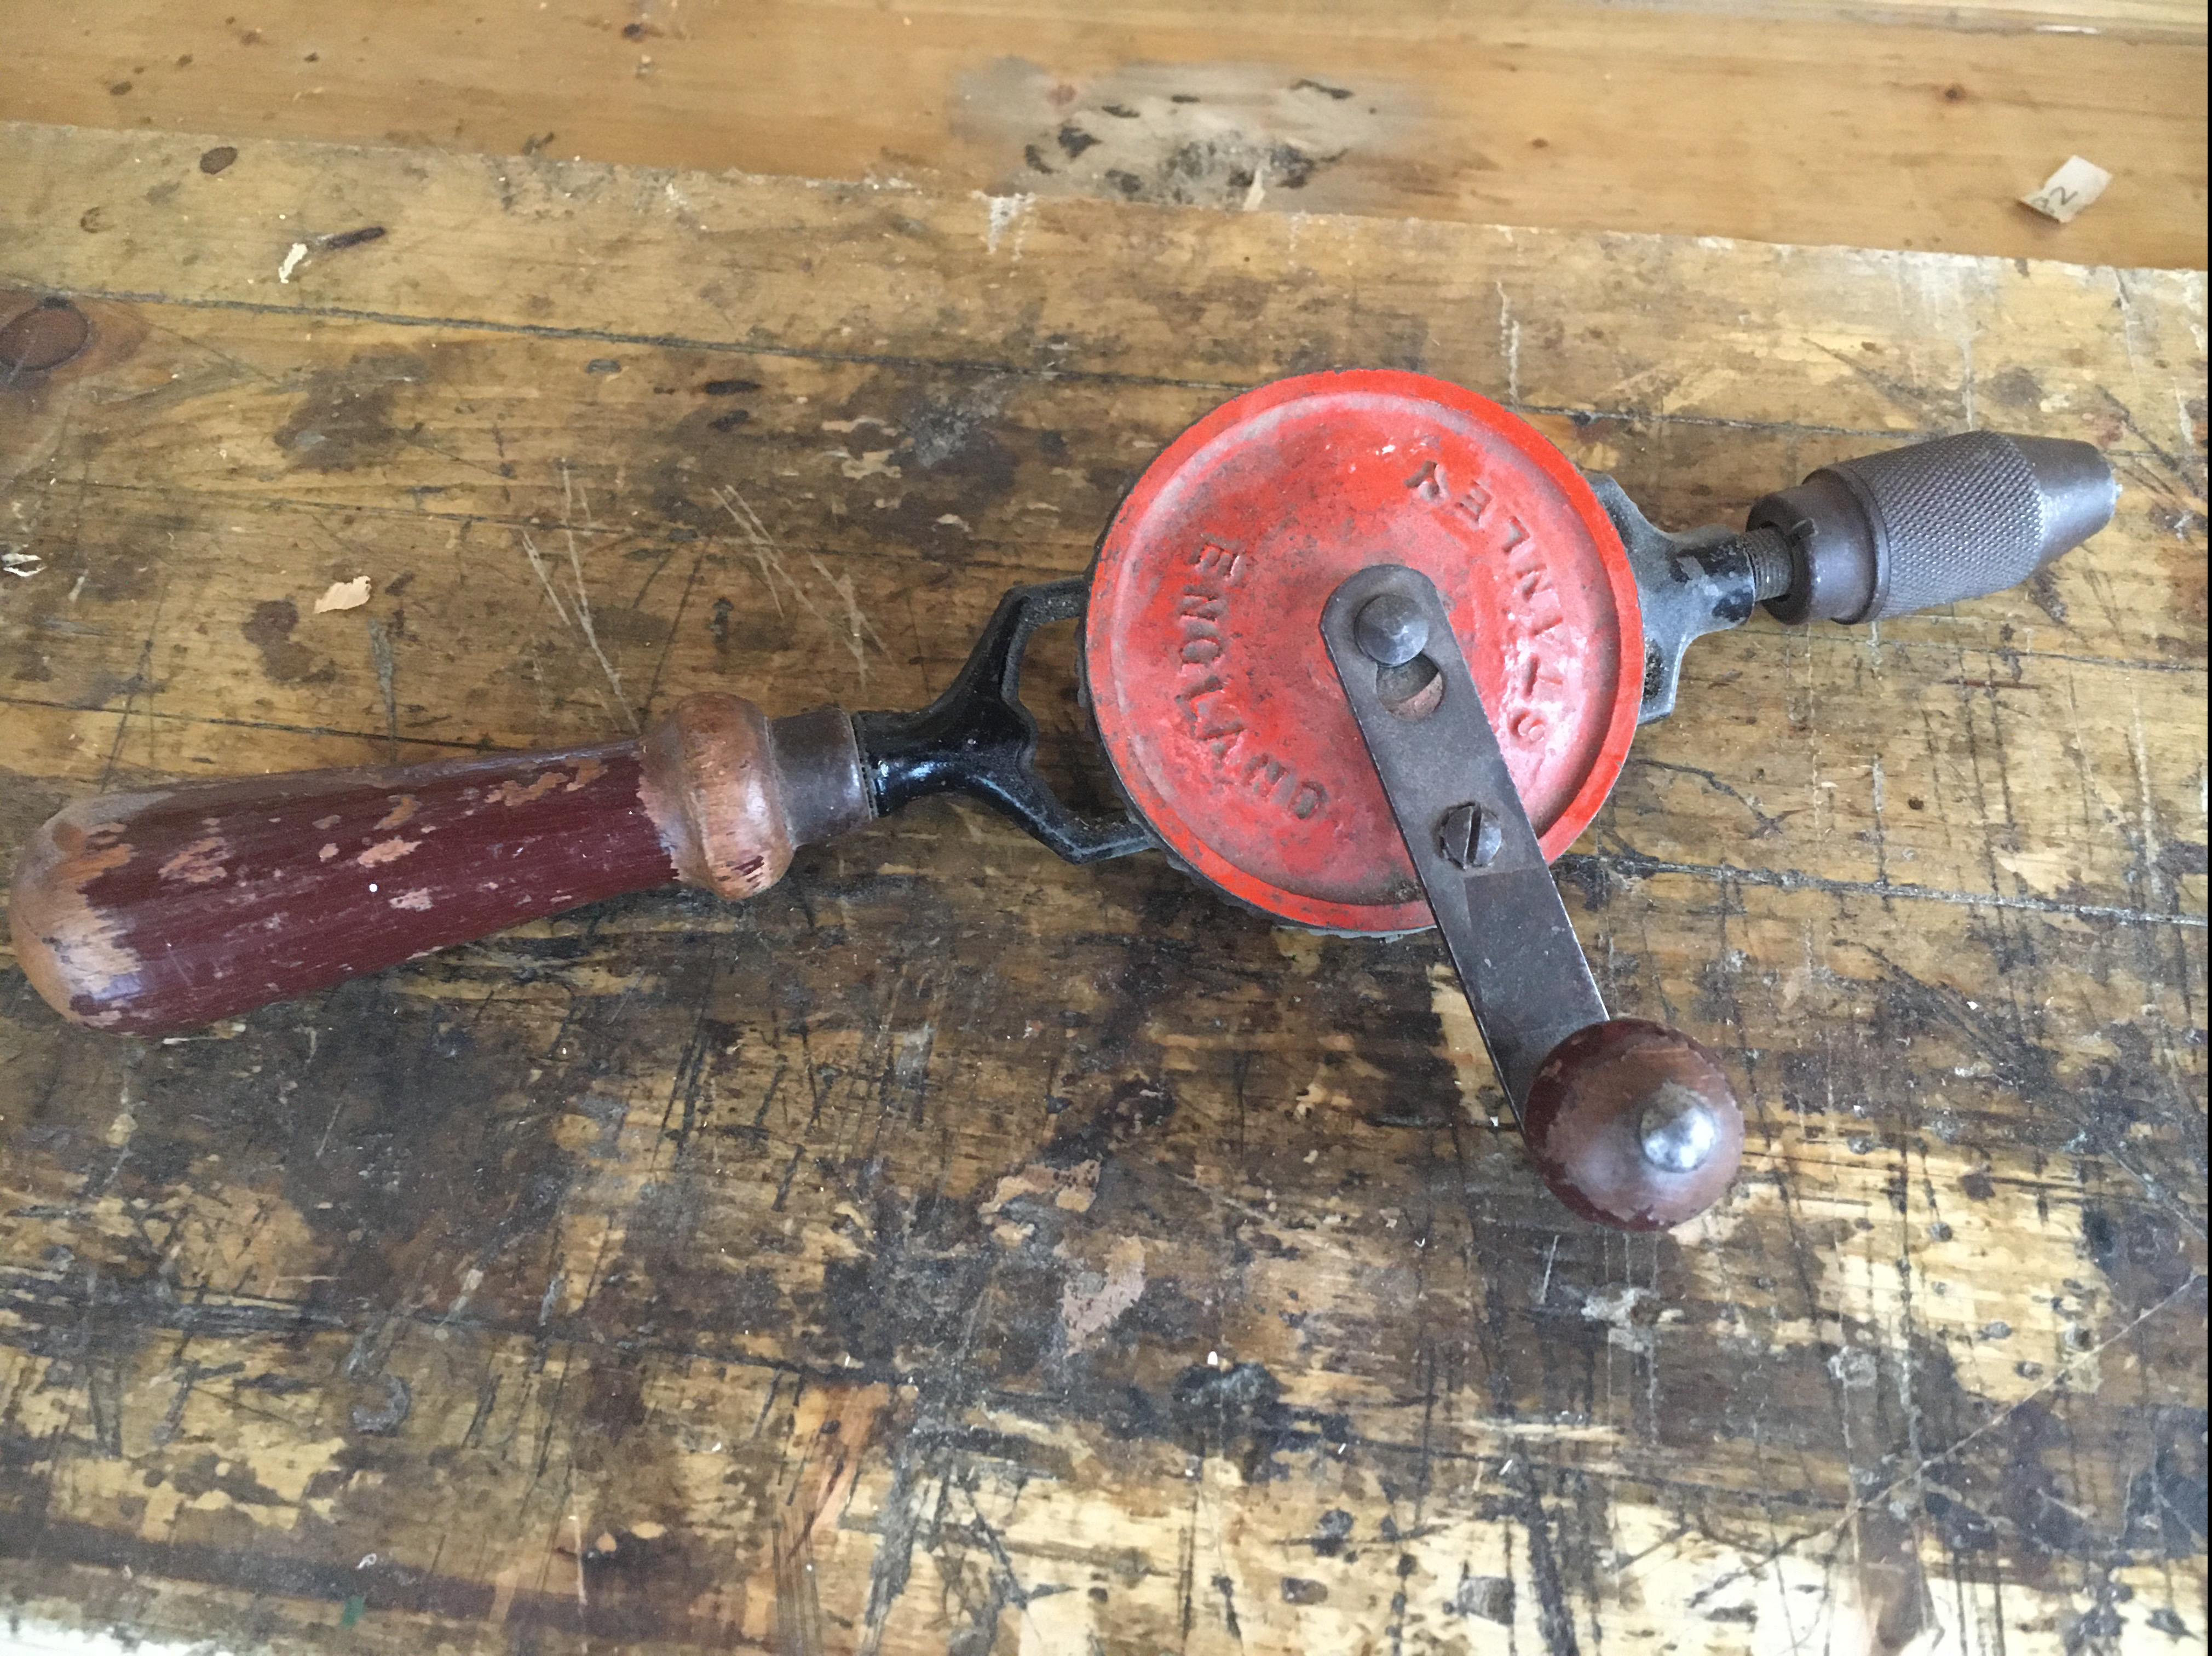 In un articolo di qualche tempo fa ho parlato del girabacchino come dell’antenato del moderno trapano avvitatore elettrico o a batteria. In questo articolo vorrei parlare del fratello del girabacchino, anch’esso antenato dell’attuale trapano elettrico, ovvero del trapano a manovella (negli USA chiamato simpaticamente eggbeater ovvero “sbattiuova”). In effetti il trapano a manovella ed il girabacchino sono stati per centinaia
di anni gli unici utensili in grado di poter praticare dei fori nel materiale. Questo almeno fino all’avvento dell’elettricità. I due attrezzi sono molto simili, nella forma e nell’utilizzo.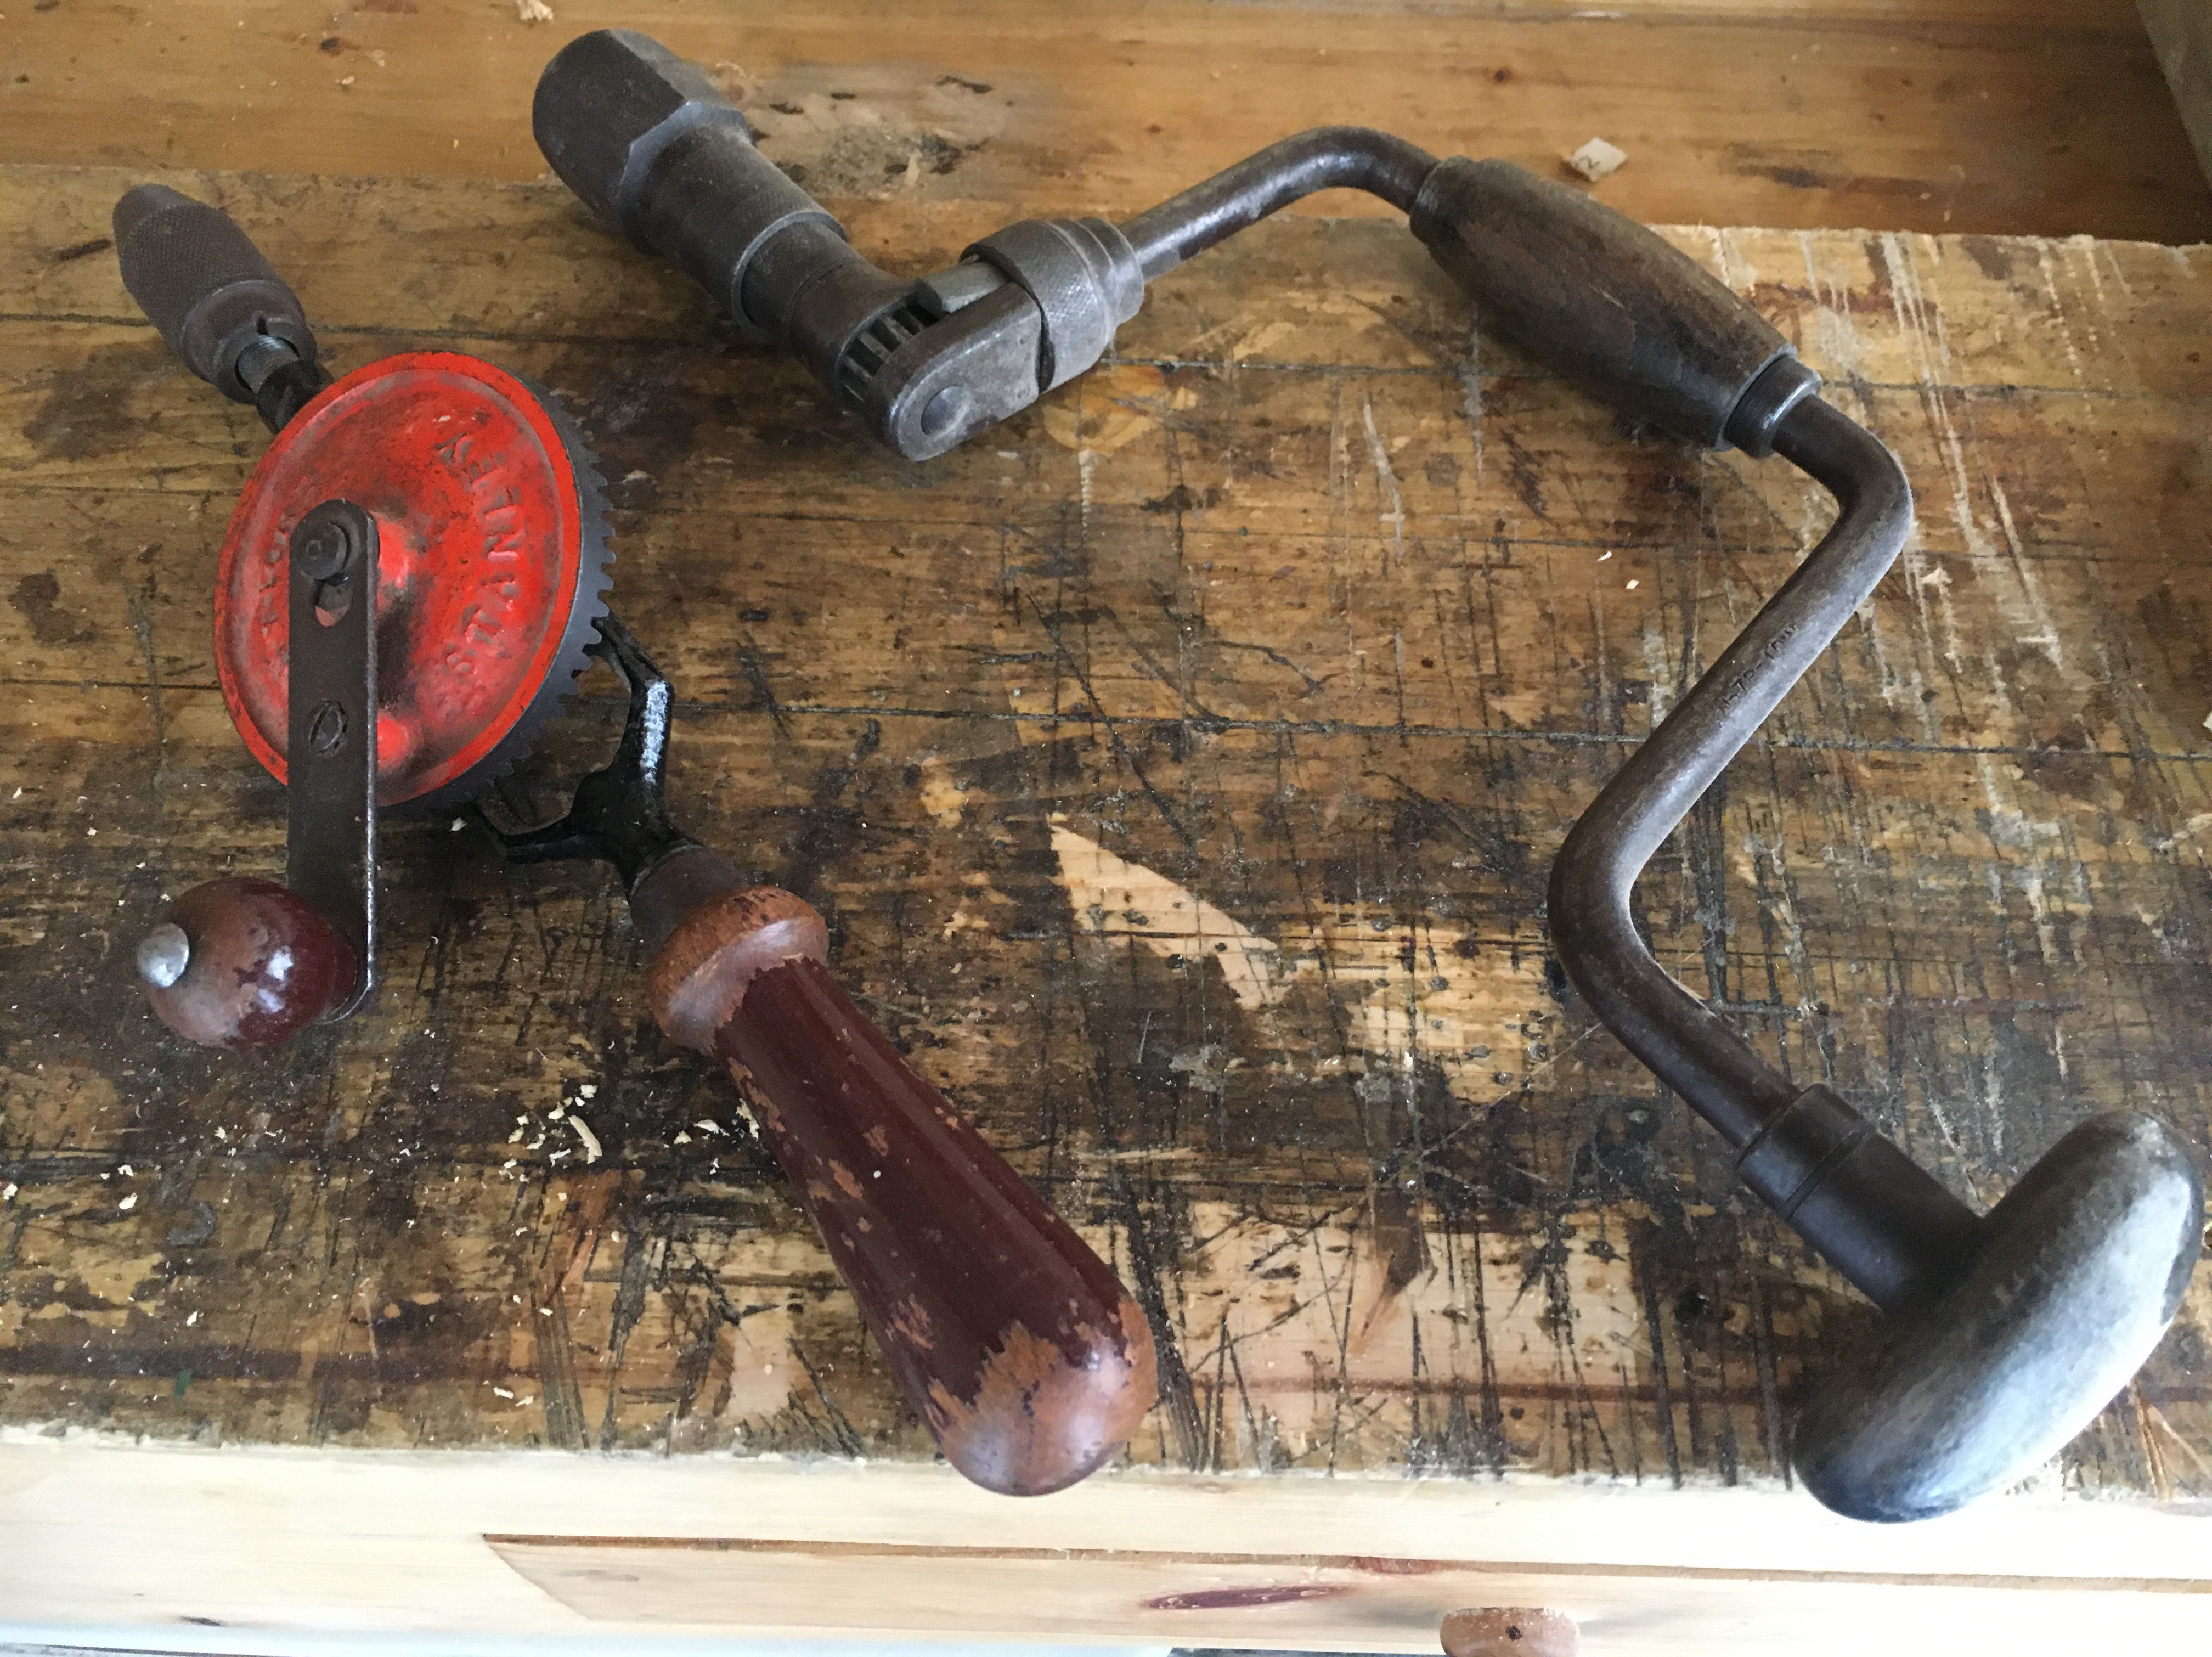 La differenza maggiore risiede forse nella grandezza dei fori che possono praticare. Il mandrino del girabacchino è in grado di ospitare punte con diametro oltre il centimetro e quindi di fare forature più grandi rispetto al trapano a manovella che invece è in grado di accogliere punte di minor grandezza, sotto il centimetro di diametro. Questo lo rende particolarmente utilizzato per quei lavori dove bisogna fare piccoli buchi come ad esempio nell’inserimento delle cerniere dei mobili.
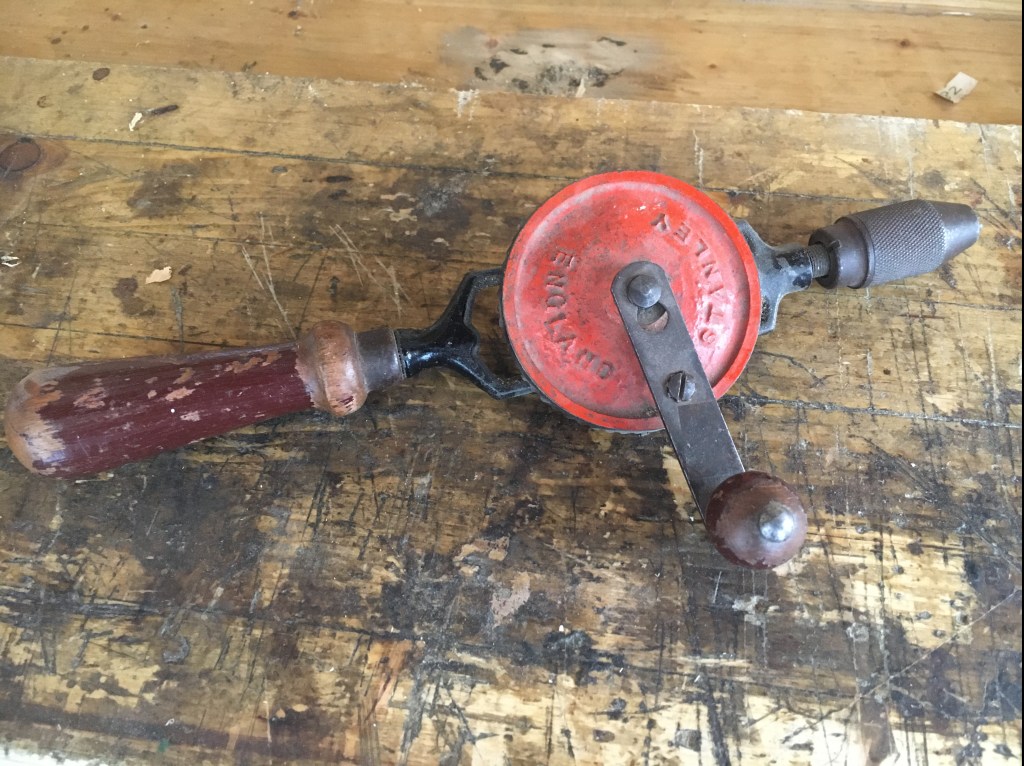
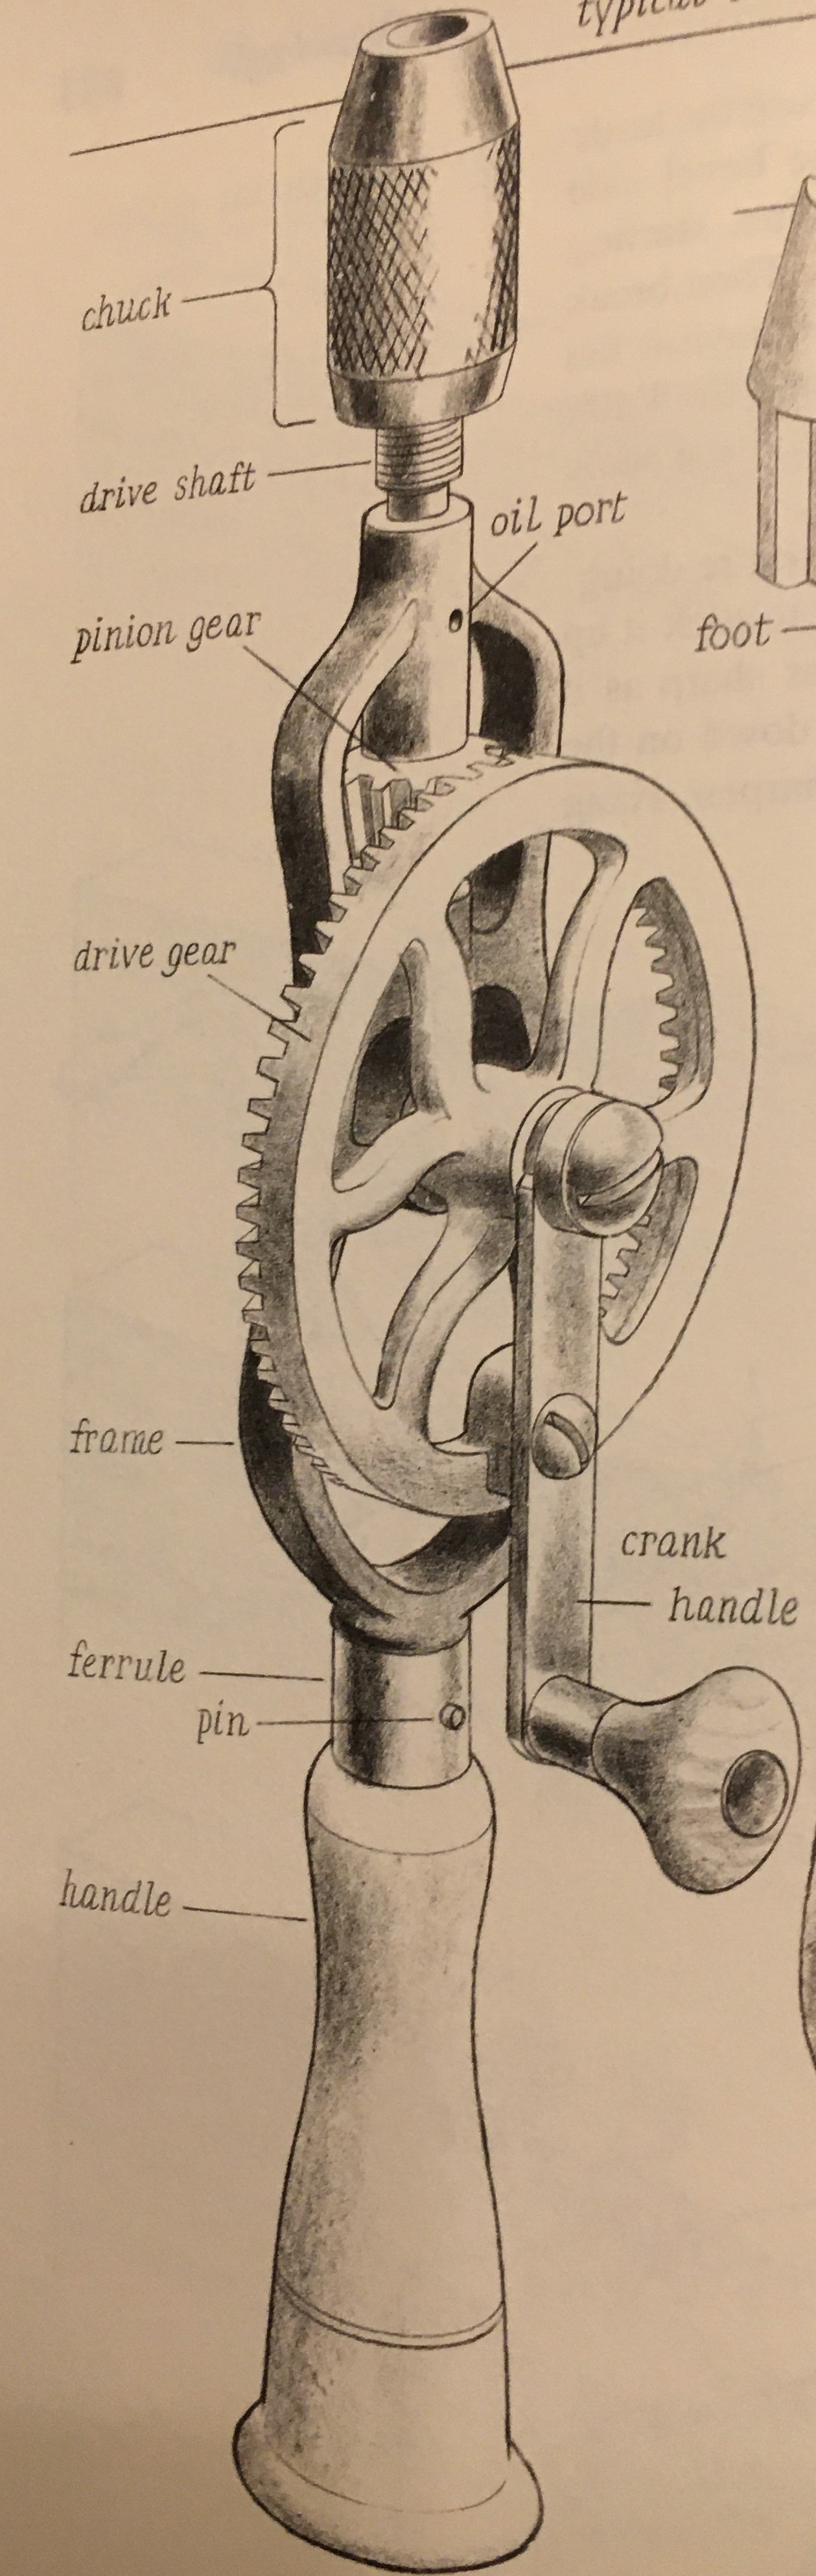 Il trapano a manovella è composto da un corpo in metallo nel quale, alla sua estremità inferiore è inserita un’impugnatura in legno. Nella parte centrale è presente una grande ruota dentata che viene azionata per mezzo di una manovella. Ruotando la manovella in senso orario la ruota centrale trasmette il movimento ad un pignone che a sua volta fa ruotare il mandrino, presente all’estremità superiore e nel quale viene inserita la punta.
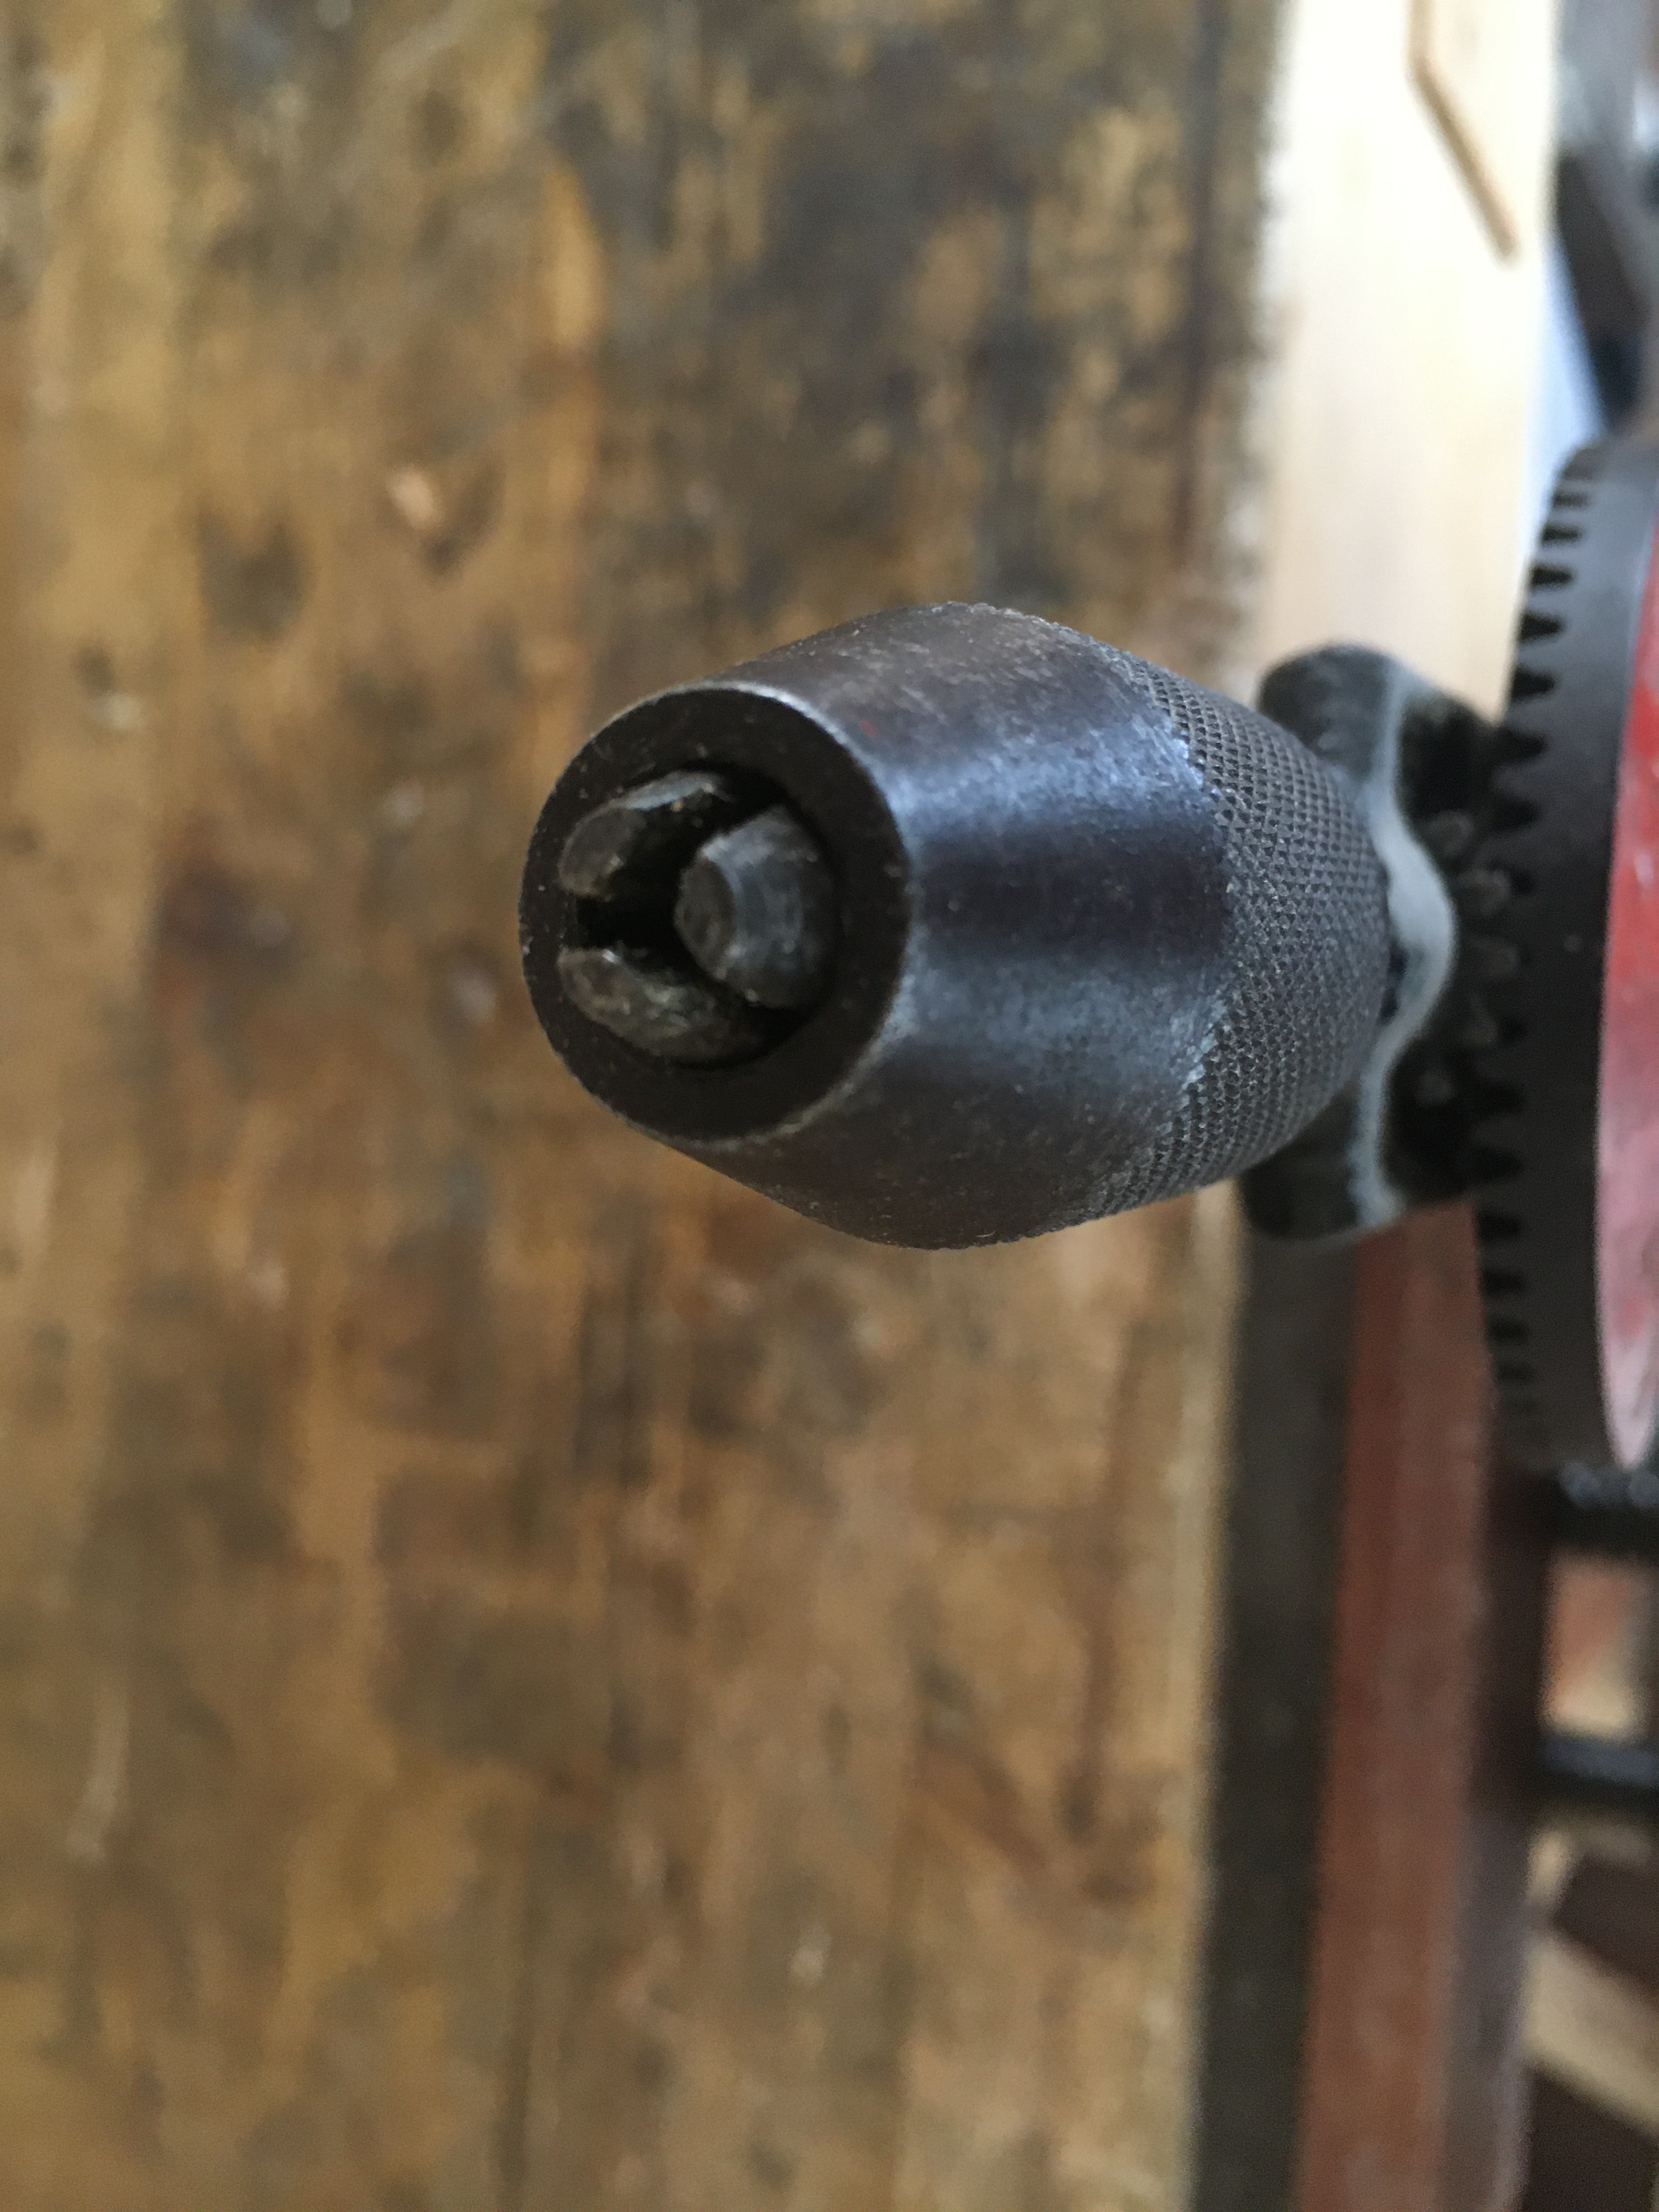 Nel mandrino sono presenti tre ganasce che, per mezzo di una boccola zigrinata serrante, permettono il bloccaggio della punta in posizione.
 Tutti i trapani a manovella sono più o meno strutturati come sopra descritto ma ve ne sono alcuni che invece di un solo pignone, presente nella parte superiore, ne hanno un altro nella parte inferiore. Questo dovrebbe ovviare a fenomeni di fuori asse della ruota e migliorarne la stabilità. Ed è probabilmente per questo motivo che i modelli con due pignoni sono reputati di miglior qualità e maggior pregio.
 La maggioranza dei modelli sono dotati di fori, di solito in prossimità del pignone e sul retro della ruota dentata, nei quali è possibile inserire qualche goccia di olio o altro lubrificante per favorire la mobilità degli ingranaggi e prevenirne l’usura. Se il modello in nostro possesso non ne fosse fornito è comunque possibile (e consigliabile) lubrificare direttamente le parti in movimento ed i vari ingranaggi.
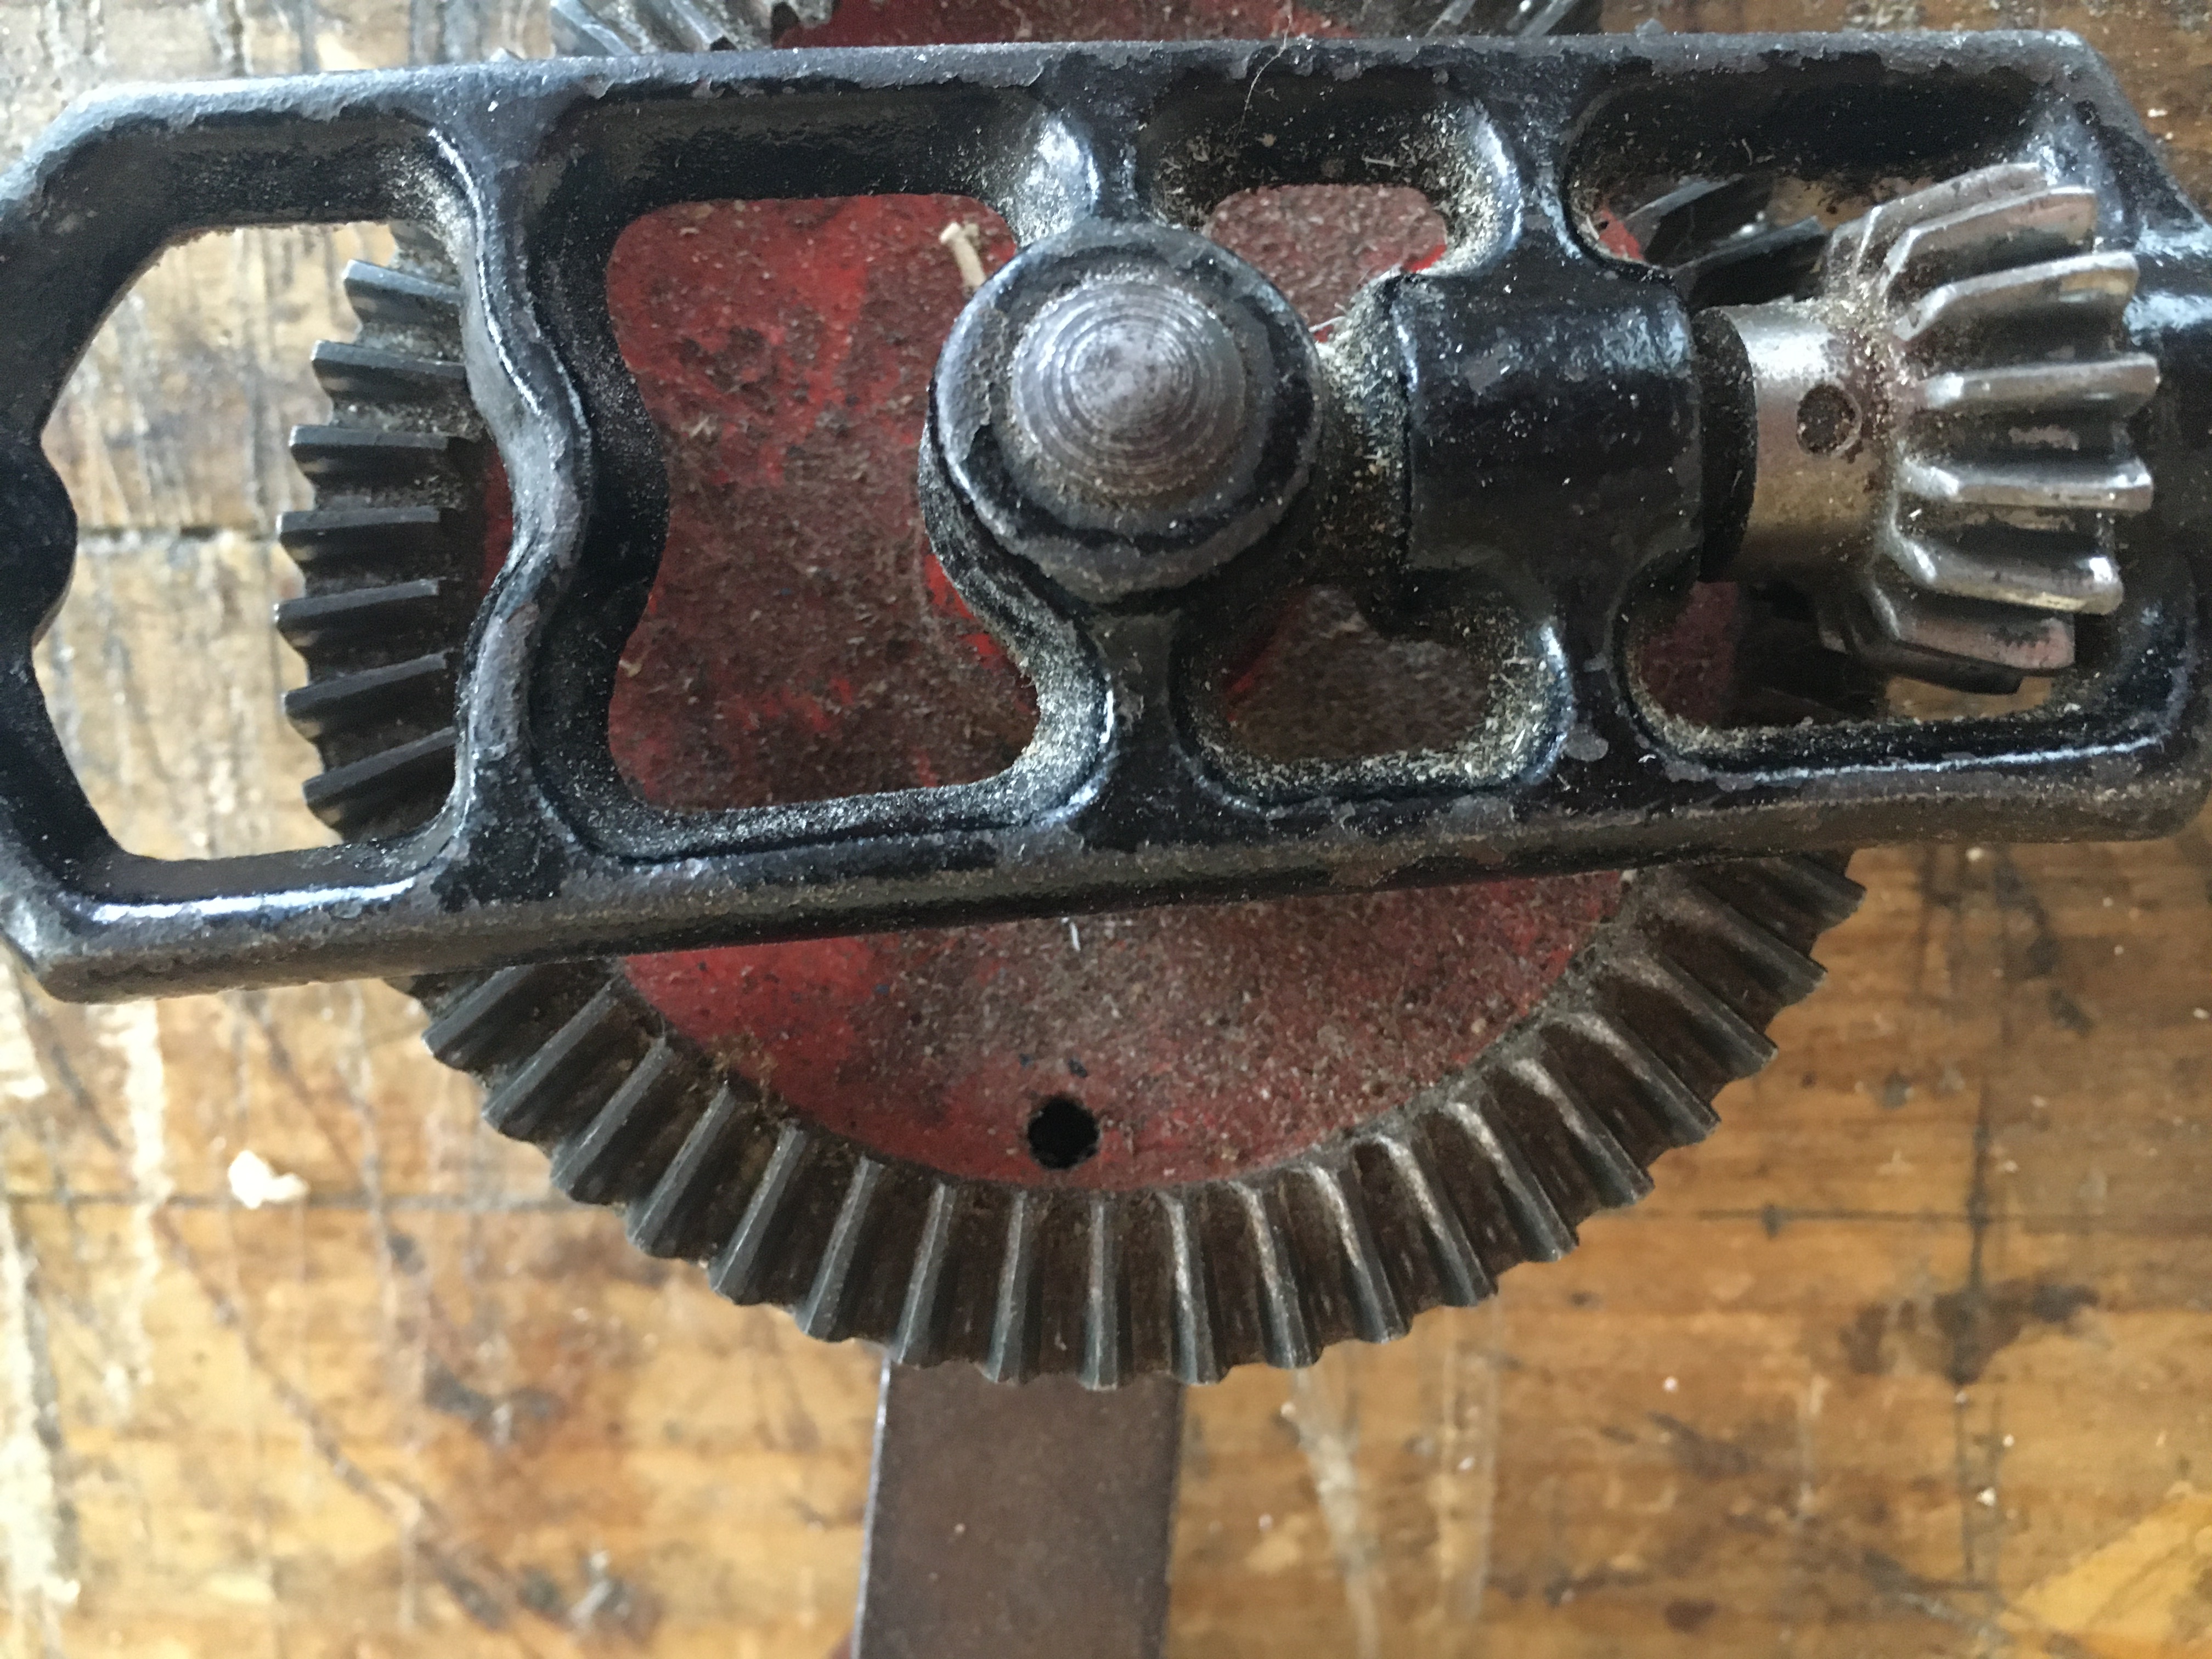
 Per inserire la punta nel trapano occorre mantenere bloccata la ruota dentata al corpo dell’utensile (per mezzo della manovella) con una mano e con l’altra ruotare in senso antiorario la boccola zigrinata del mandrino per poter aprire le tre ganasce. Una volta inserita la punta in posizione si procede a serrare il mandrino ruotando la boccola zigrinata in senso orario.
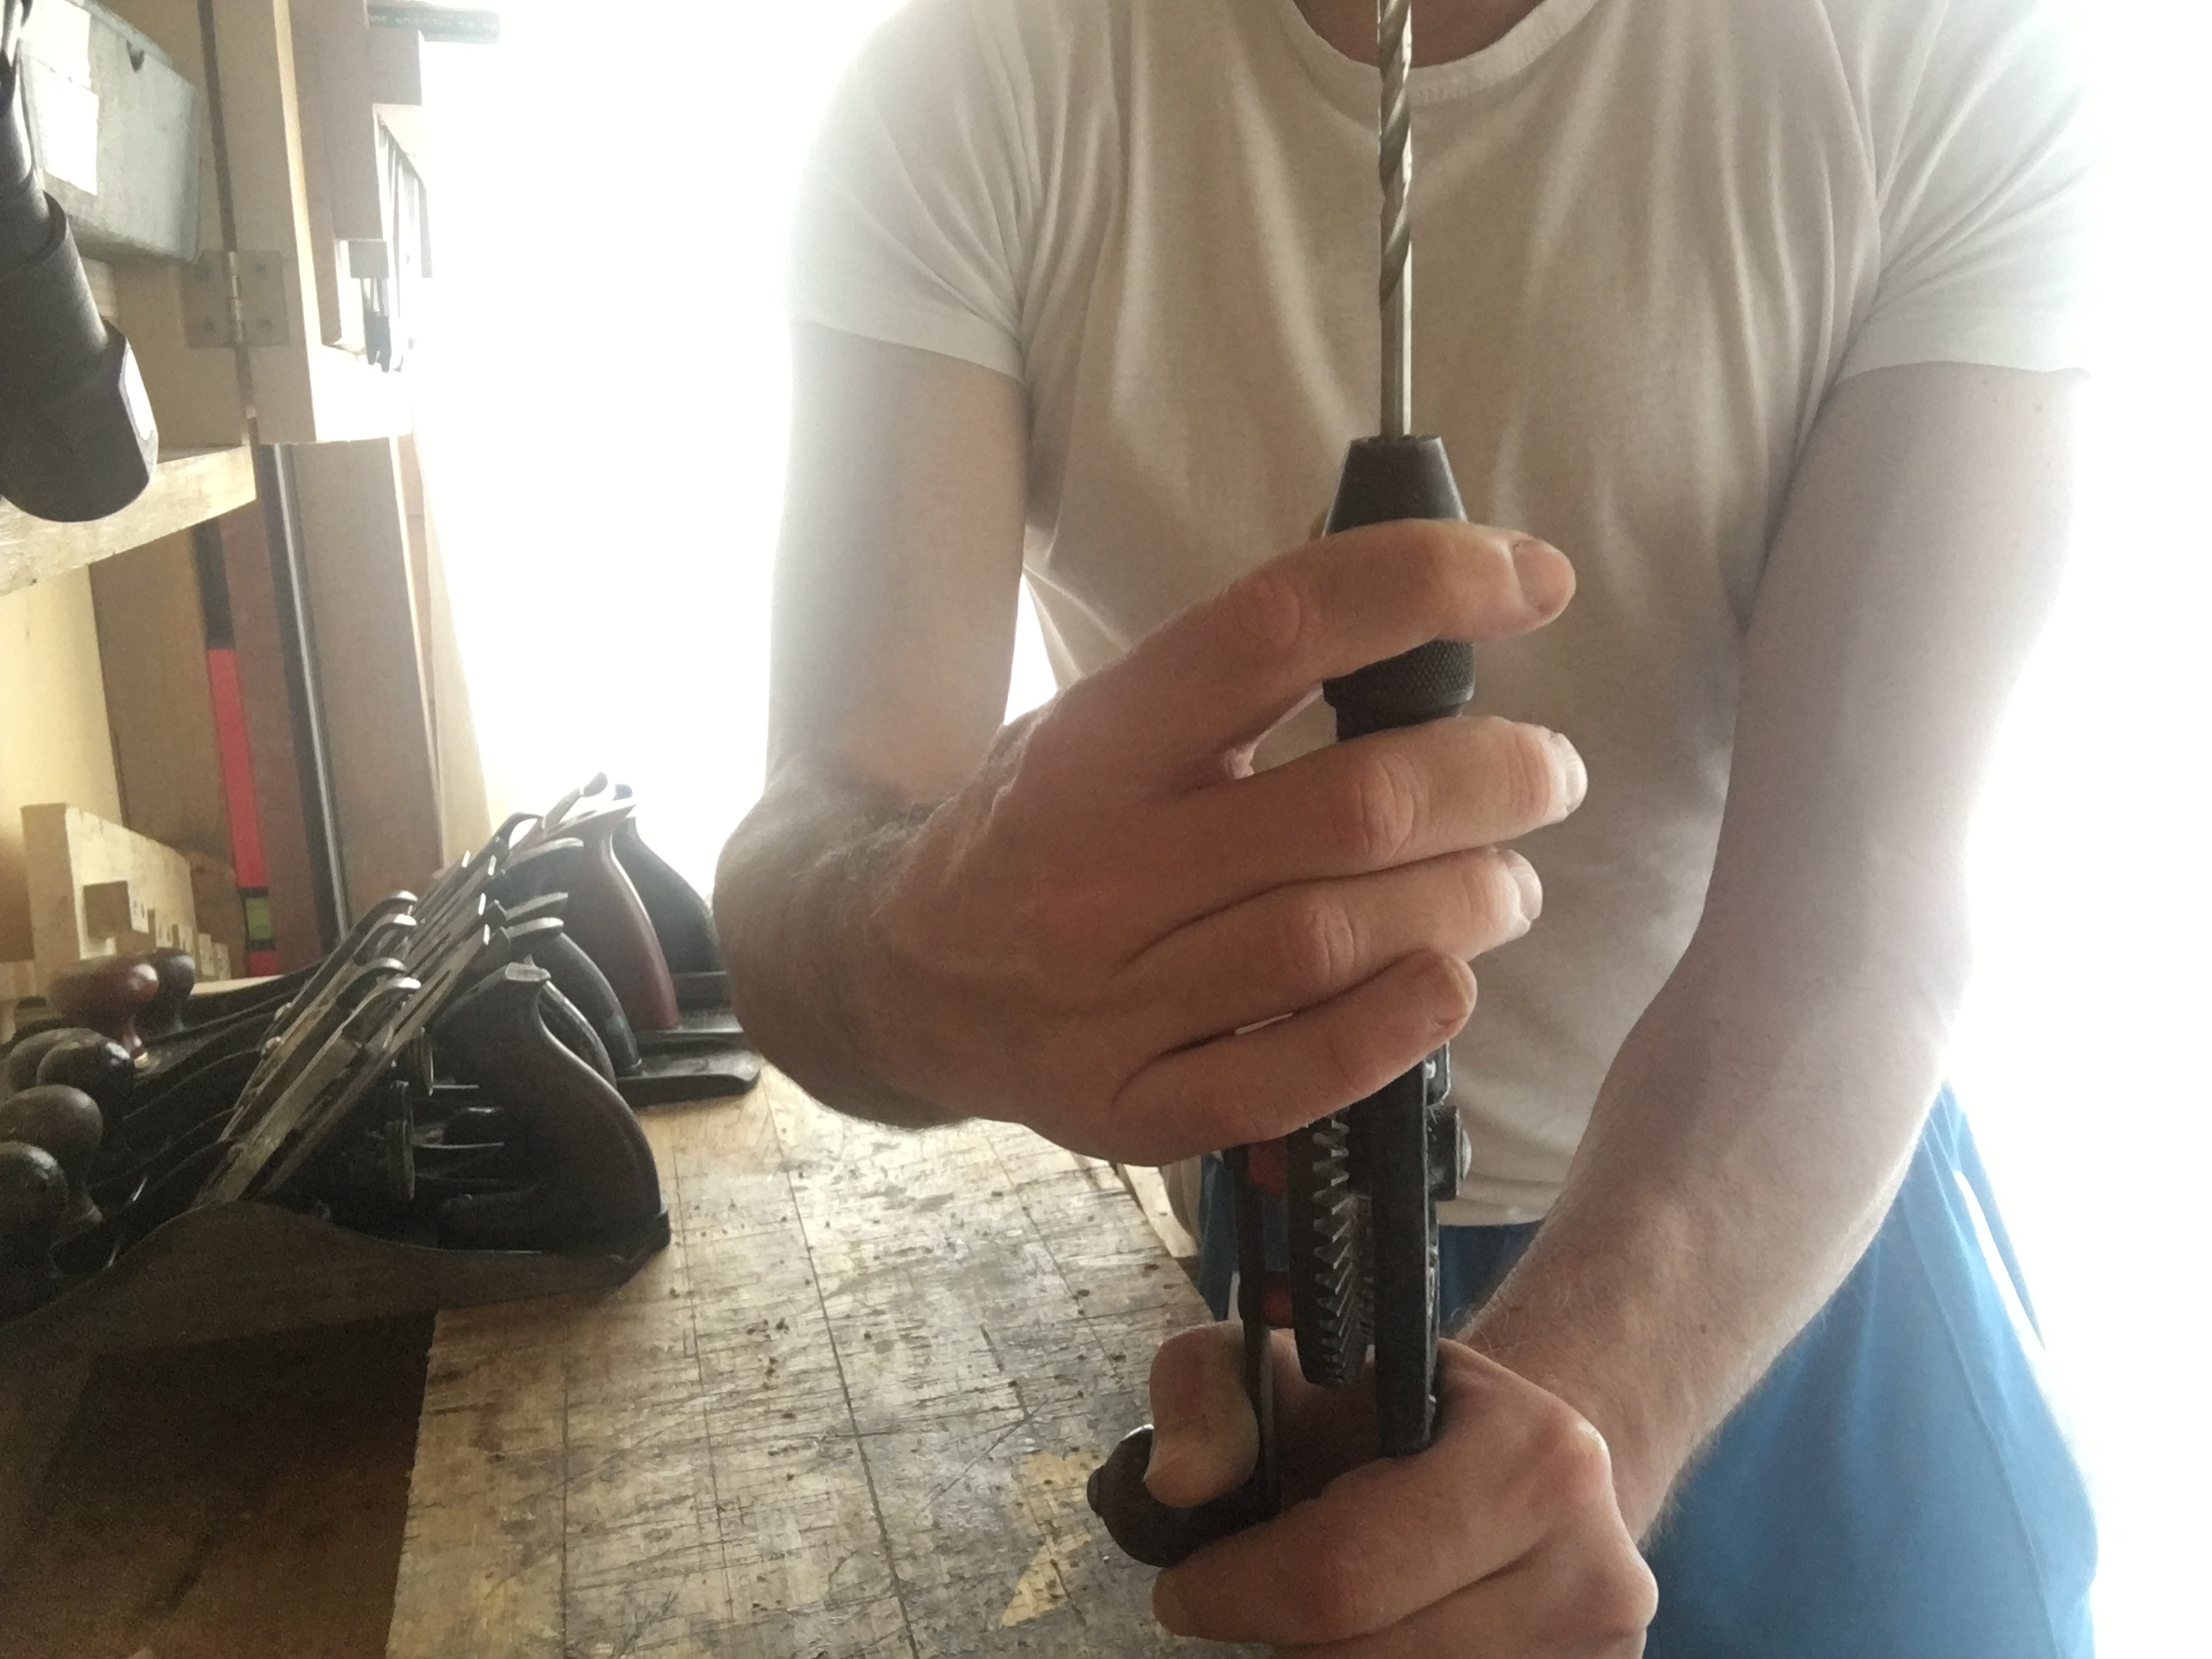 Prima di prendere la punta è comunque consigliabile svitare preventivamente la boccola e preparare l’apertura delle ganasce in modo tale che creino uno spazio il più possibile preciso con il diametro della punta. In questo modo sarà più agevole l’inserimento, in quanto la punta troverà già un appoggio stabile nelle ganasce stesse. Per rimuovere la punta sarà sufficiente seguire la stessa operazione, ma questa volta ruotando la boccola del mandrino in senso antiorario, per far aprire le ganasce. Durante le fasi di inserimento e rimozione della punta può accadere che le tre ganasce si blocchino in posizione e non si aprano né chiudano. In questo caso sarà sufficiente fare un po’ di pressione sulle stesse perché scendano leggermente e si aprano.
 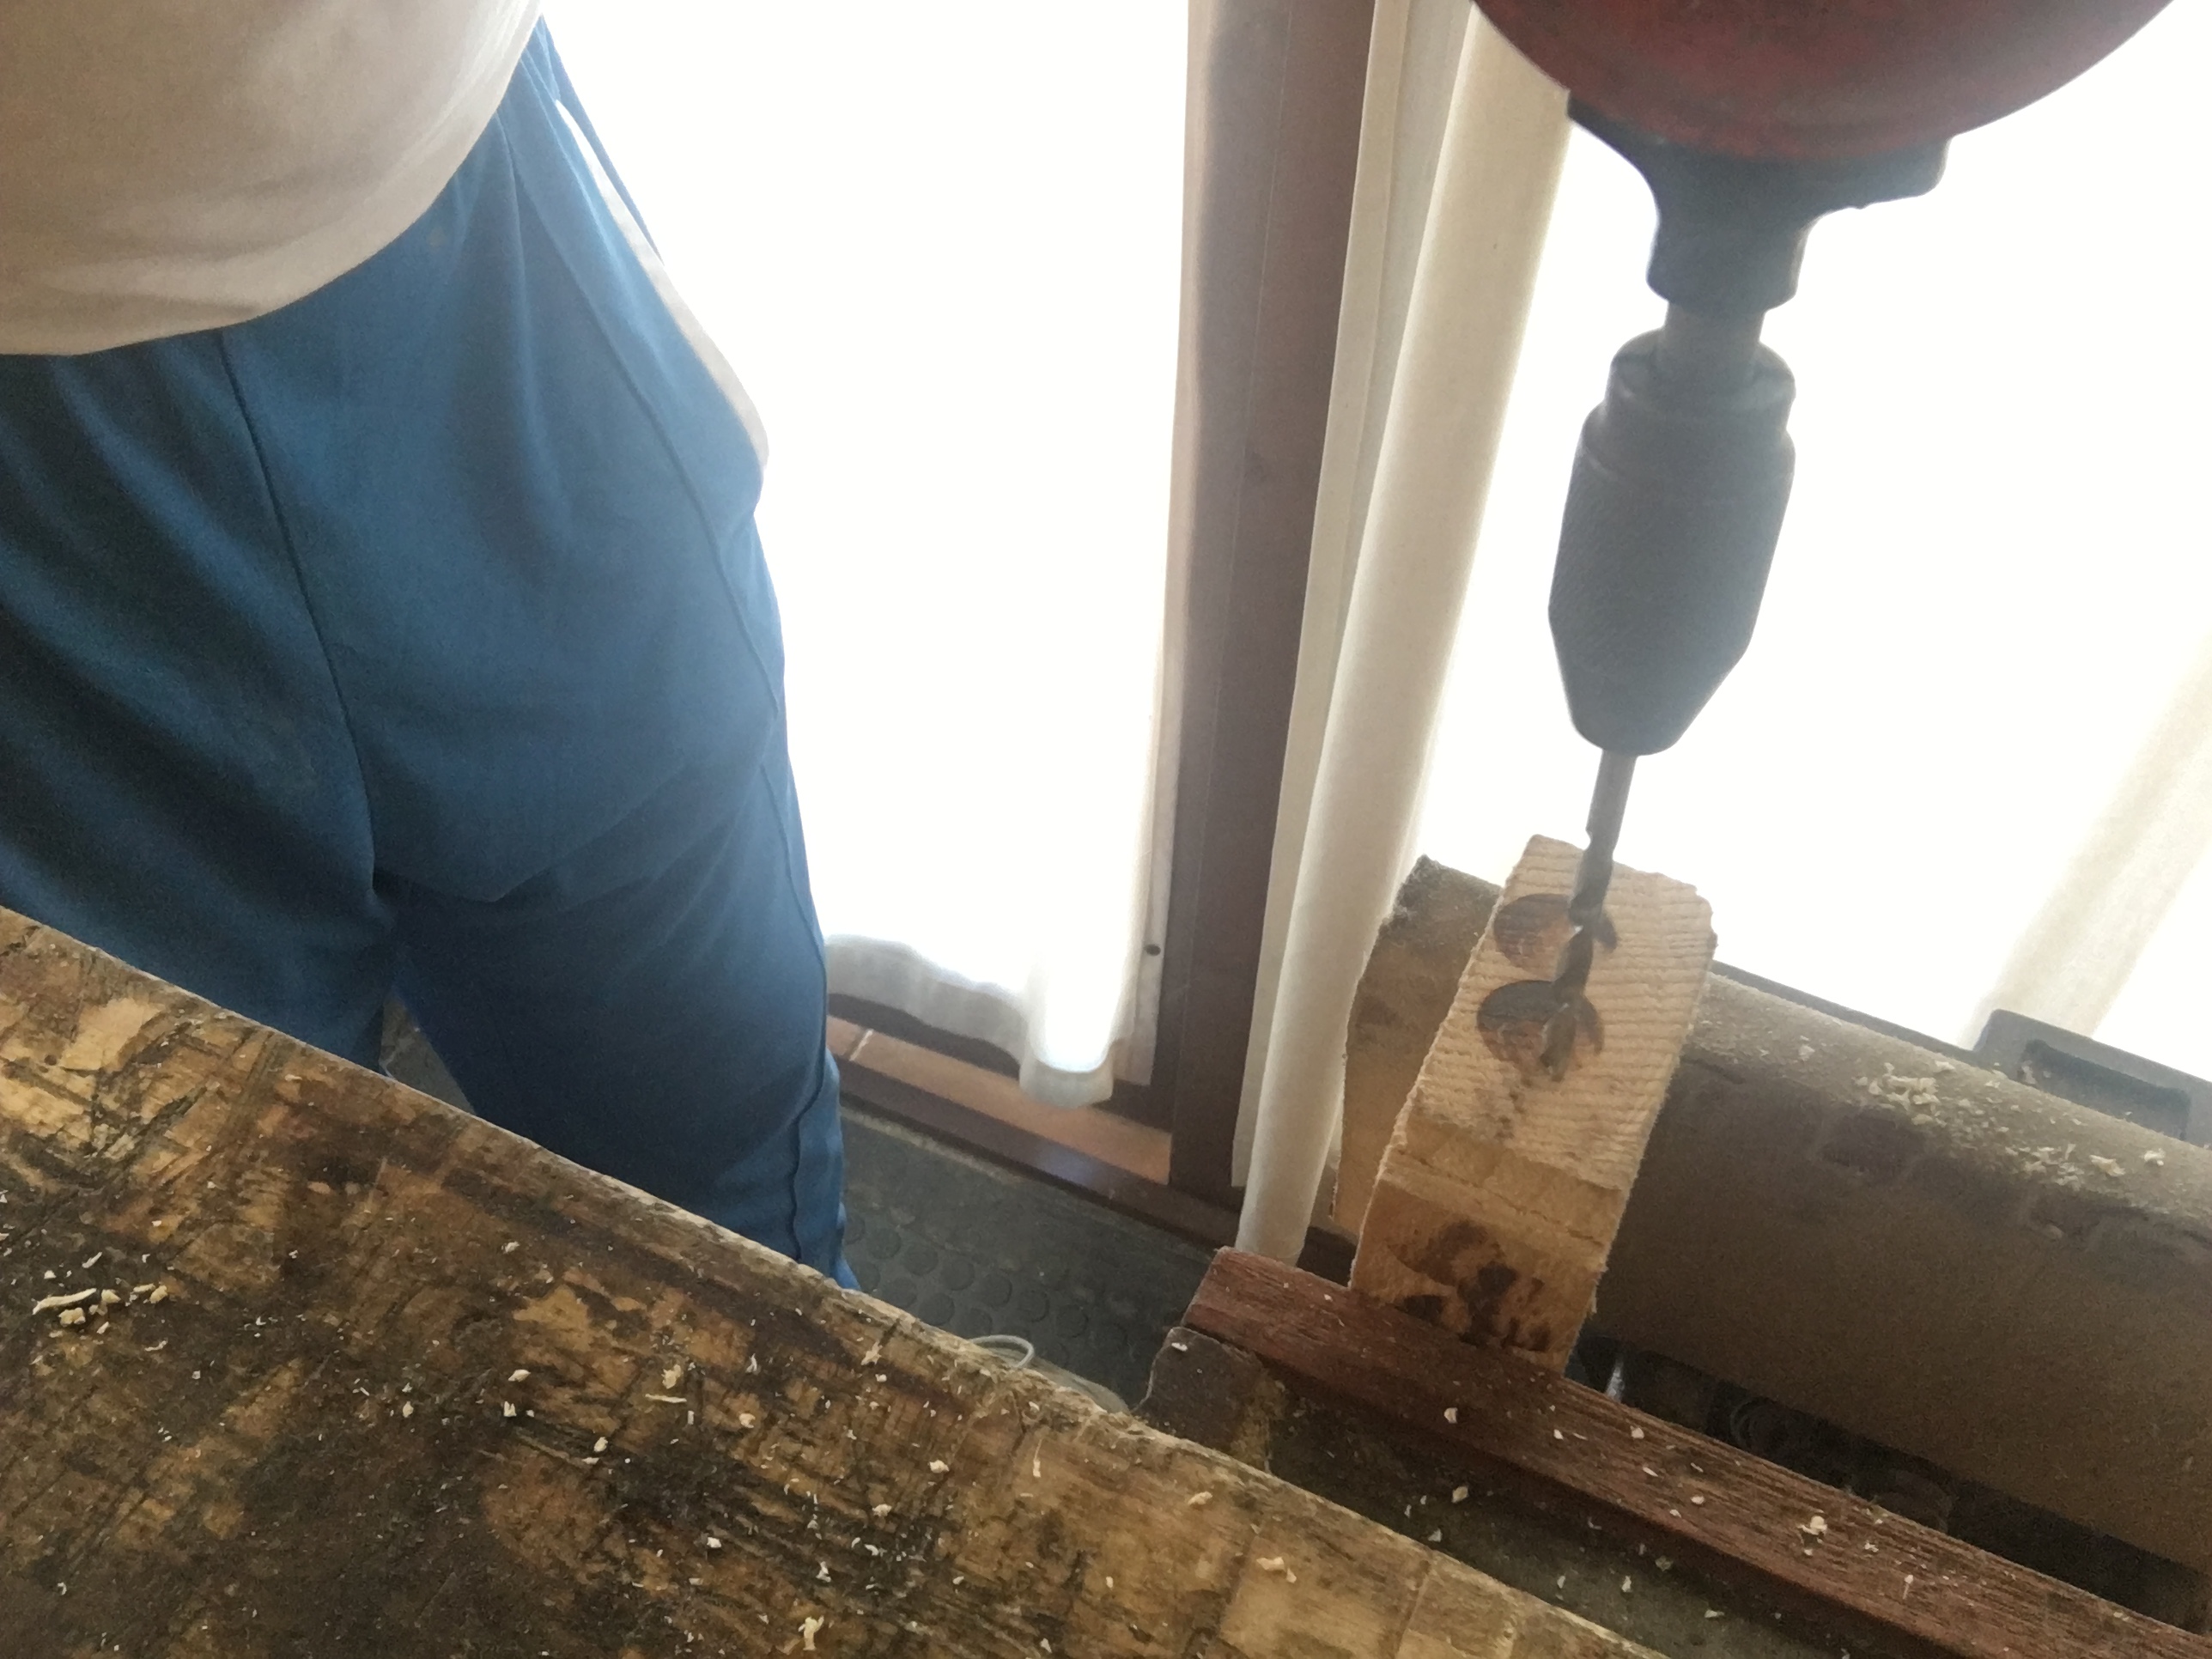 Il trapano a manovella può essere utilizzato in posizione orizzontale o verticale (ma anche inclinato). Nella posizione orizzontale il pezzo da forare dovrà essere posizionato sul banco ed opportunamente bloccato.
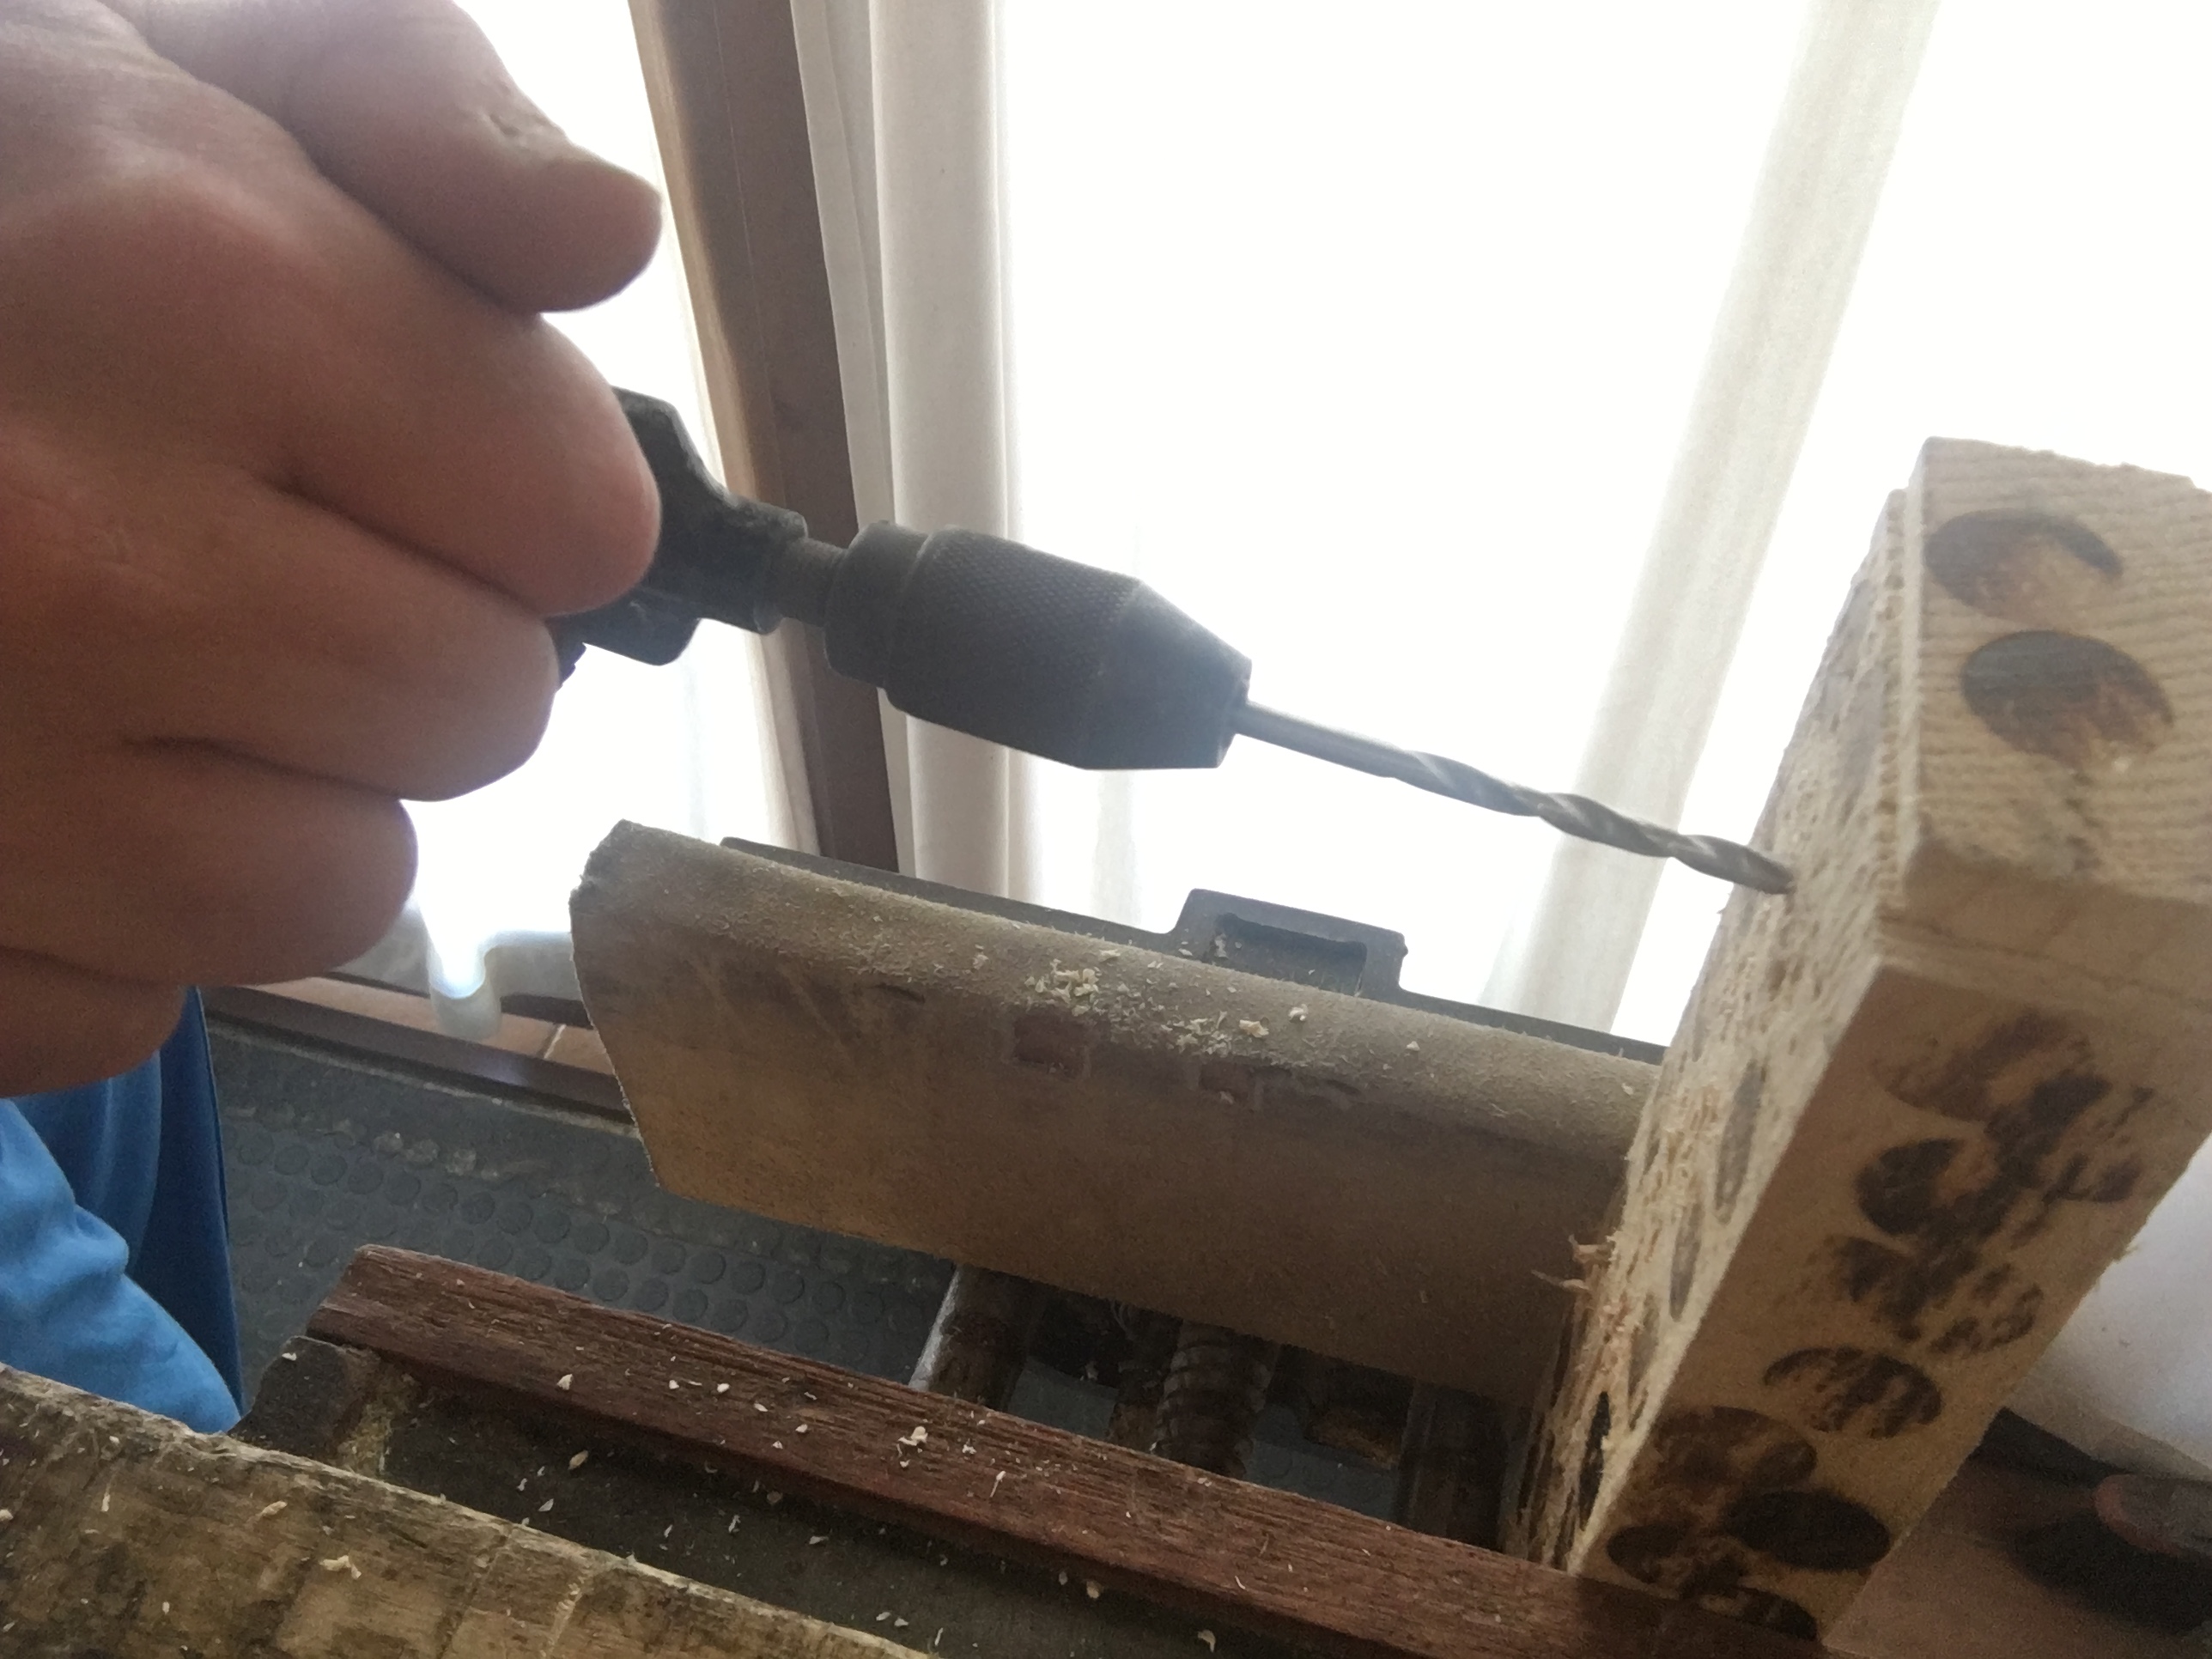 Nella posizione verticale il pezzo da forare viene inserito nella morsa e sta di fronte a noi. Tra le due pratiche, se possibile scegliere, è preferibile quella di foratura in orizzontale, in quanto si ha maggior controllo e visibilità durante il lavoro, oltre a permettere una maggiore pressione, potendo utilizzare il peso della parte superiore del corpo. Se si è destrorsi il trapano va impugnato per il manico con la mano sinistra, ruotando la manovella con la mano destra, manovella che va mantenuta sul fianco destro. Se lo utilizzassimo con la manovella sul lato sinistro non riusciremmo a forare in quanto la punta girerebbe in senso inverso. Come detto il trapano a manovella può montare punte fino a circa un centimetro di diametro. Per le punte più piccole, essendo estremamente fini, occorre prestare attenzione a non esercitare troppa pressione perché potrebbero storcersi o peggio spezzarsi. Comunque, mentre si pratica il foro, non bisognerebbe mai esercitare troppa spinta sul trapano ma lasciare lavorare la punta dandogli il tempo di scaricare la segatura prodotta, evitando così che si blocchi nel legno. La regola vuole che per le punte più piccole la velocità di rotazione della manovella debba essere nell’ordine di circa settanta rotazioni al minuto. Per le punte più grandi bisogna girare più velocemente, anche a centoventi rotazioni al minuto. Questo teoricamente. Nella pratica molto dipenderà dal tipo di legno che stiamo forando e dallo stato di affilatura della punta. Durante la foratura se la punta dovesse incastrarsi nel legno possiamo tirare leggermente verso di noi il trapano continuando comunque a ruotare la manovella come se stessimo forando. In questo modo daremo la possibilità alla punta di liberarsi dell’intasamento della segatura prodottasi nella spirale.
 Le punte che si utilizzano di solito con il trapano a manovella non sono quelle classiche per il legno (per intenderci quelle con la punta di centraggio) e normalmente usate sui trapani elettrici. Vengono invece usate quelle per metallo, che hanno una diversa conformazione e permettono una miglior foratura, veloce e senza inceppamenti nel legno. Questo perché le normali punte per legno hanno bisogno di maggiori velocità di rotazione, raggiungibili solo con i trapani elettrici.
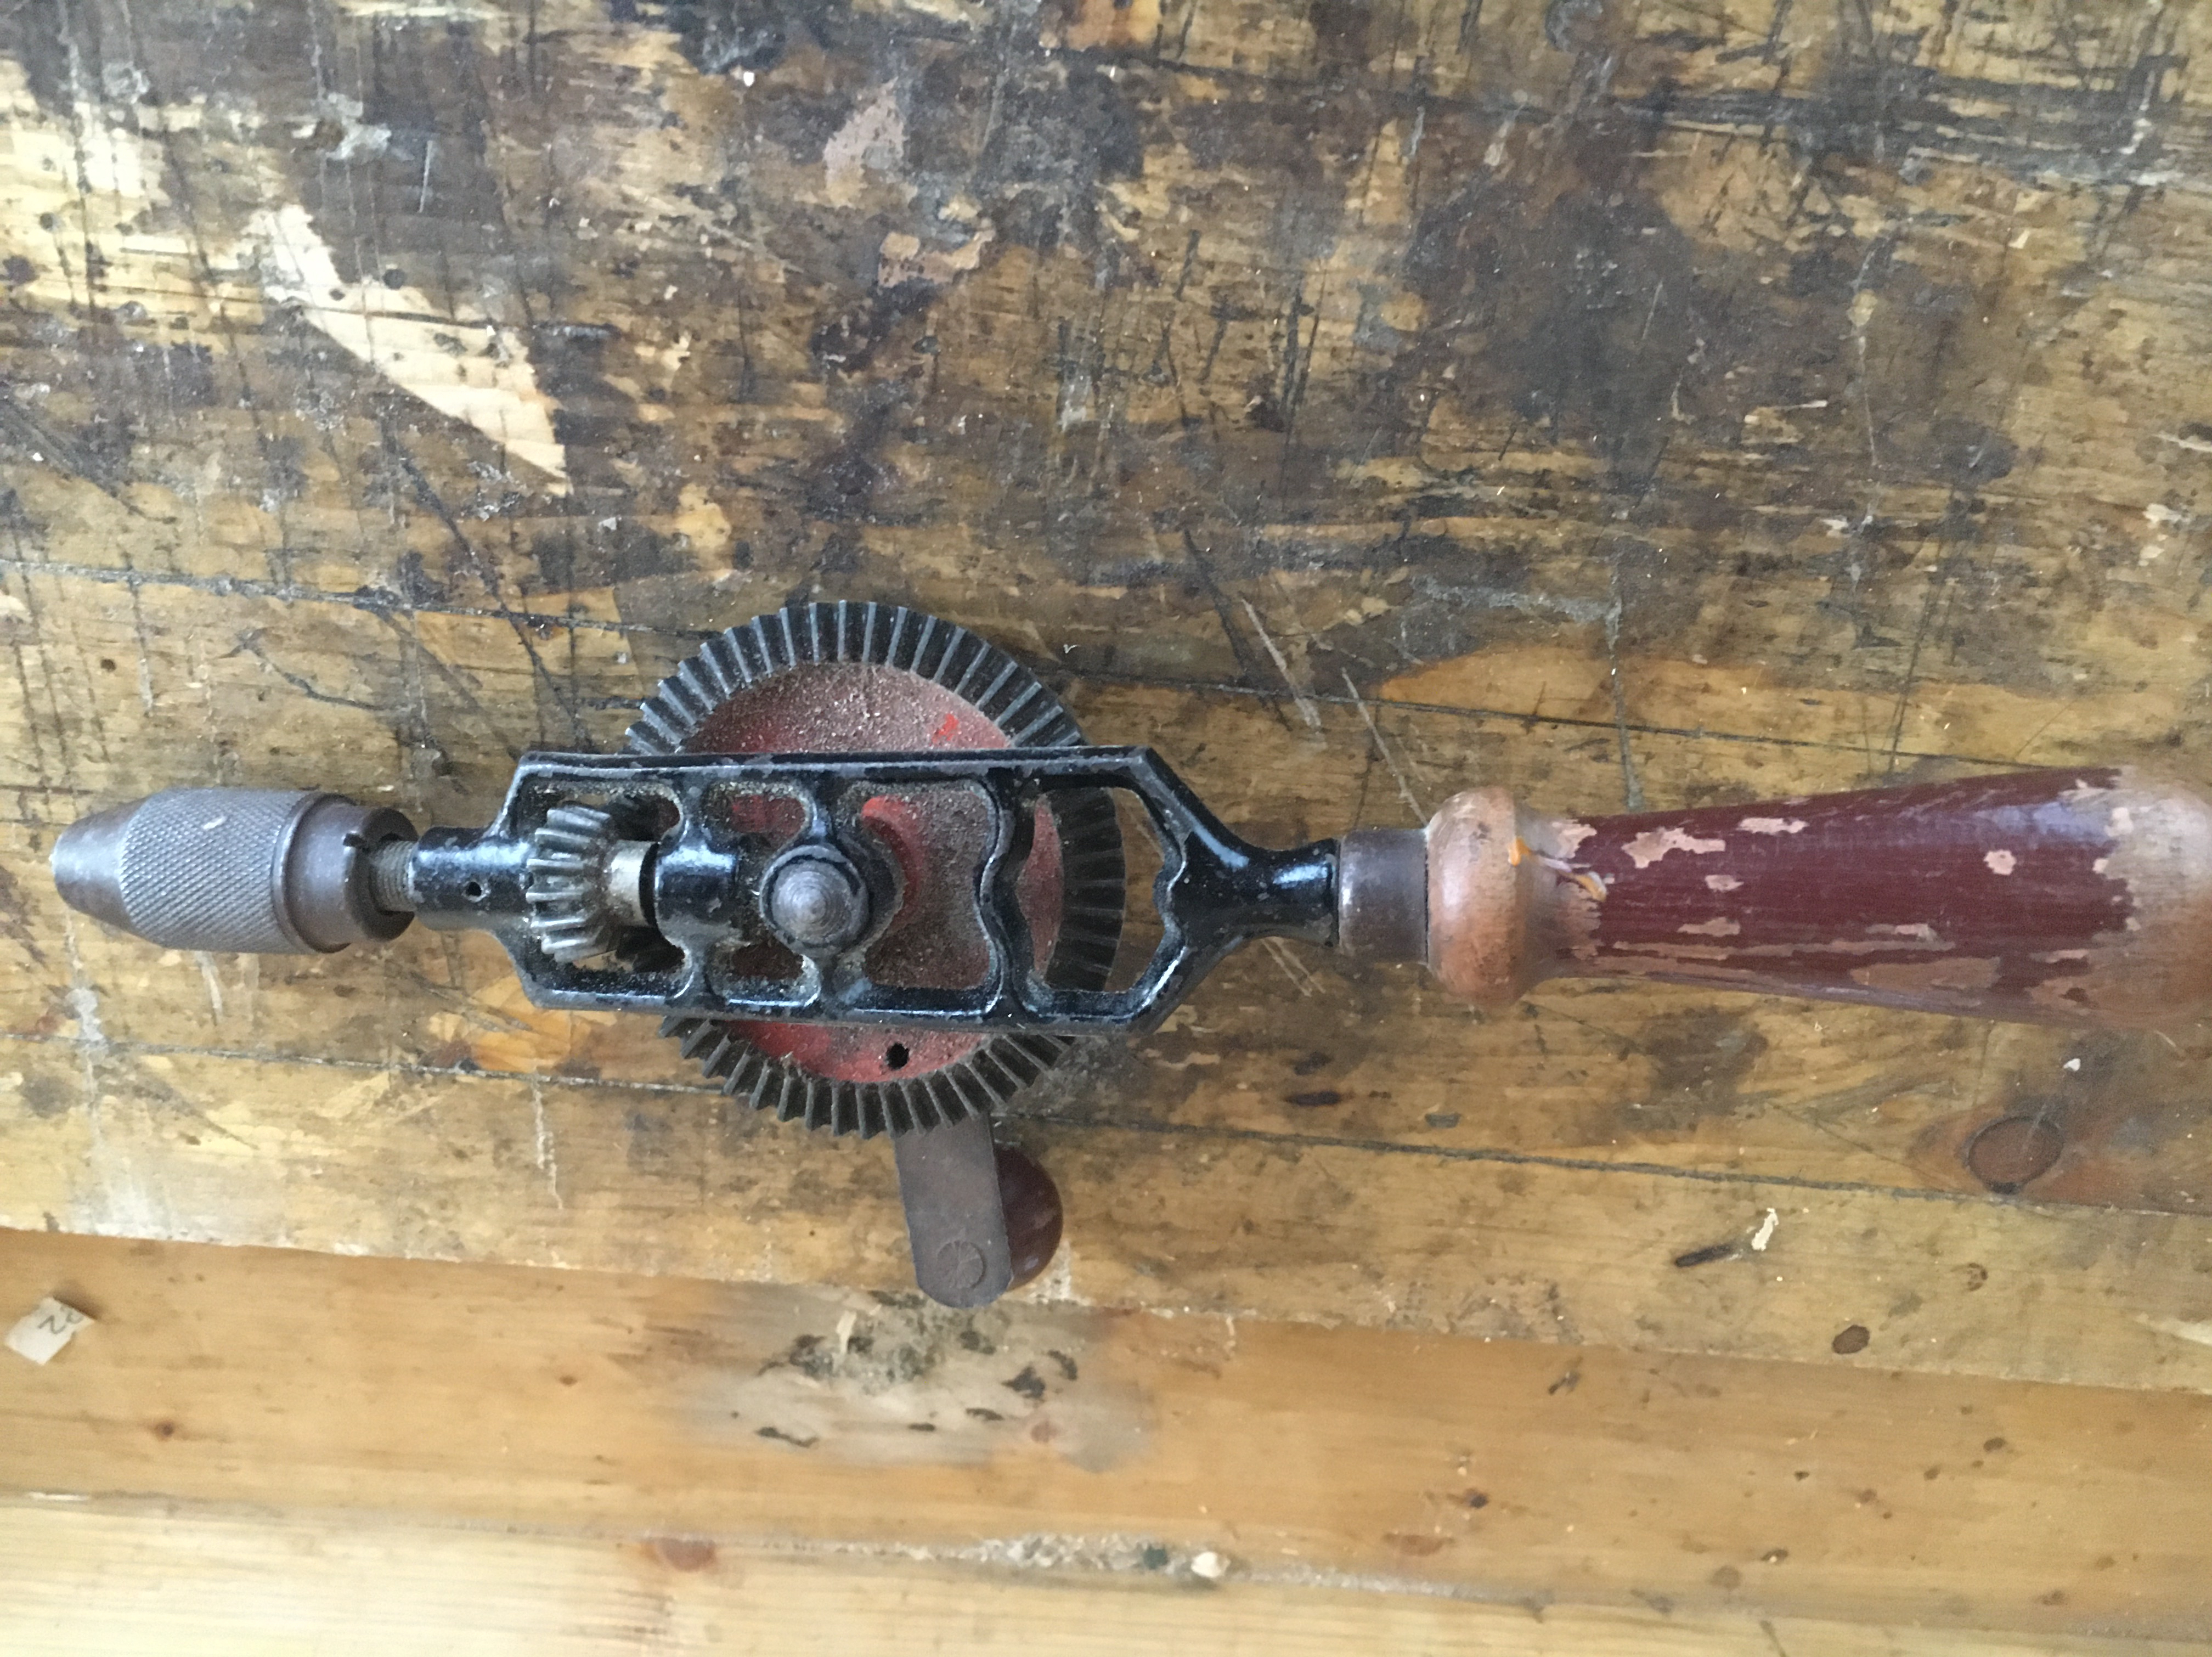 I trapani a manovella sono facilmente acquistabili nei brico o su internet a prezzi molto economici. Il mio consiglio è però quello di acquistarne uno usato su Ebay, cercando come al solito su Ebay.co.uk. Se ne trovano molti e a prezzi economici. I modelli più rinomati sono sicuramente i Miller Falls, in particolare i numeri due e cinque (facilmente riconoscibili dalla ruota centrale aperta e fatta a razze), ma anche i North Brothers, anche se per entrambi i modelli i prezzi lievitano sensibilmente. La migliore scelta per qualità e prezzo sono però sicuramente gli Stanley.
Ne sono stati prodotti in svariati esemplari e sono tutti eccellenti, a patto sempre di comprare quelli vintage e non quelli moderni. Solitamente i modelli più vecchi sono comunque quasi sempre in ottime condizioni, necessitando solo di un pò di pulizia e di lubrificazione. L’unica accortezza forse, non potendoli provare per testarne il corretto funzionamento, è quella di verificare che le ganasce non presentino palesi disallineamenti in fase di chiusura, dovuti ad un non corretto inserimento delle punte da parte di precedenti proprietari. Se infine riuscissimo a trovare un modello con due pignoni anziché uno, per soddisfare il nostro ego collezionista, ancora meglio, anche se questo non è assolutamente un fattore determinante per la sua corretta funzionalità. Oggigiorno i trapani a manovella sono stati sostituiti da quelli elettrici e cordless, più veloci e comodi soprattutto perché possono essere utilizzati con una sola mano, cosa non possibile con i trapani a mano. Trovo comunque che quest’ultimi conservino ancora una loro utilità ed un indubbio fascino. Sono sicuri, silenziosi, economici e penso che non ne dovrebbe mancare un esemplare nel laboratorio di chi lavora il legno con gli utensili manuali.
__________________________________________________________________________________________
In an article of some time ago I spoke of the hand brace drill as the ancestor of the modern electric or cordless drill. In this article I would like to talk about the brother of the hand brace drill, who was also an ancestor of the current electric drill, the hand drill (in the USA nicely called eggbeater ). In fact, the hand drill and the nand brace drill have been the only tools capable of drilling holes in the material for hundreds years. This at least until the advent of electricity. The two tools are very similar in shape and use. The biggest difference perhaps lies in the size of the holes they can make. The chuck of the hand brace drill is able to accommodate drill bits with a diameter of more than one centimeter and therefore to make larger holes than the hand drill which is instead able to accommodate smaller bits, below the centimeter in diameter. This makes it particularly used for those works where you have to bore small holes such as inserting furniture hinges. The hand drill consists of a metal frame in which a wooden handle is inserted at its lower end. In the central part there is a large drive gear which is activated by means of a crank handle. By turning the crank handle clockwise the central drive gear transmits the movement to a pinion gear which rotates the chuck, present at the upper end and in which the drill bit is inserted. There are three jaws in the chuck which, by means of a knurled locking bush, allow the drill bit to be locked in position. All the hand drills are more or less structured as described above but there are some that instead of a single pinion gear , present in the upper part, have another in the lower part. This should overcome off-axis phenomena of the drive gear and improve its stability. And it is probably for this reason that the models with two pinion gears are considered to be of better quality and greater value. Most of the models are equipped with holes, usually near the pinion gear and on the back of the drive gear, in which it is possible to insert a few drops of oil or other lubricant to facilitate the mobility of the gears and prevent wear. If the model in our possession is not provided, it is however possible (and advisable) to directly lubricate the moving parts and the various gears. To insert the bit into the hand drill, the drive gear must be kept locked to the tool frame (by means of the crank handle) with one hand and with the other turn the chuck counterclockwise in order to open the three jaws. Once the bit is inserted in position, the chuck is tightened by turning the knurled bush clockwise. Before taking the drill bit, however, it is advisable to open the chuck before and and prepare the opening of the jaws so that they create a space as precise as possible with the diameter of the drill bit. In this way the insertion will be easier, since the bit will already find a stable support in the jaws themselves. To remove the bit, simply follow the same operation, but this time turning the chuck counterclockwise, to open the jaws. During the insertion and removal of the bit, it may happen that the three jaws lock in place and do not open or close. In this case, it will be sufficient to put a little pressure on them to drop slightly and open. The hand drill can be used in a horizontal or vertical position (but also inclined). In the horizontal position the piece to be drilled must be positioned on the bench and clamped. In the vertical position the piece to be drilled is inserted in the vice and stands in front of us. Of the two practices, if possible choose, horizontal drilling is preferable, as you have greater control and visibility during the work, as well as allowing greater pressure, being able to use the weight of the upper body. If you are right-handed, the drill must be held by the handle with your left hand, turning the crank handle with your right hand, a crank handle that must be kept on the right side. If we used it with the crank handle on the left side we would not be able to drill as the drill bit would turn in the opposite direction. As said the hand drill can mount bits up to about one centimeter in diameter. For the smaller tips, being extremely fine, care should be taken not to exert too much pressure because they could twist or worse break. However, while drilling the hole, you should never exert too much pressure on the drill but let the bit work giving it time to unload the sawdust produced, thus avoiding it getting stuck in the wood. The rule states that for the smaller points the rotation speed of the crank handle must be in the order of about seventy rotations per minute. For larger points you have to turn faster, even at one hundred and twenty rotations per minute. This theoretically. In practice, a lot will depend on the type of wood we are drilling and the sharpness of the bit. During drilling, if the bit gets stuck in the wood, we can pull the drill slightly towards us while continuing to rotate the handle as if we were drilling. In this way we will give the bit the possibility to get rid of the clogging of the sawdust produced in the flutes. The bits that are usually used with the hand drill are not the classic ones for wood (the brad point bits) and normally used on electric drills. Instead, those for metal working are used, which have a different conformation and allow a better drilling, fast and without jams in the wood. This is because normal brad point bits need higher rotation speeds, which can only be reached with electric drills. The hand drills are easily purchased in brico or on the internet at very cheap prices. My advice, however, is to buy a used one on Ebay, looking as usual on Ebay.co.uk. Many are found and at cheap prices. The most renowned models are certainly the Miller Falls, in particular the numbers two and five (easily recognizable by the open and spoked drive gear), but also the North Brothers, although for both models the prices rise significantly. Stanley are the best choice for quality and price.
They have been produced in various models and they are all excellent, as long as you always buy the vintage ones and not the modern ones. Usually the older models are however almost always in excellent condition, requiring only a little cleaning and lubrication. The only foresight perhaps, not being able to try them to test their correct functioning, is to verify that the jaws do not show obvious misalignments in the closing phase, due to incorrect insertion of the bits by previous owners. Finally, if we could find a model with two pinion gears instead of one, to satisfy our collector ego, even better, even if this is absolutely not a determining factor for its correct functionality. Nowadays the hand drills have been replaced by electric and cordless drills, faster and more comfortable especially because they can be used with one hand, which is not possible with hand drills. However, I find that the latter still retain their usefulness and undoubted charm. They are safe, silent, cheap and I think they should be present in the workshop of those who work wood with hand tools.
Alcune foto ed immagini sono state tratte da siti internet esterni / libri per soli scopi informativo didattici e senza fini di lucro. Se si è proprietari delle immagini e se ne desidera la rimozione si prega di segnalarlo nella sezione contatti.

Lascia un commento