
LA FINITURA DEL LEGNO. LA RASIERA E LA CABINET SCRAPER / WOOD FINISHING. CARD (BENCH) SCRAPER AND THE CABINET SCRAPER
English translation at the end of the article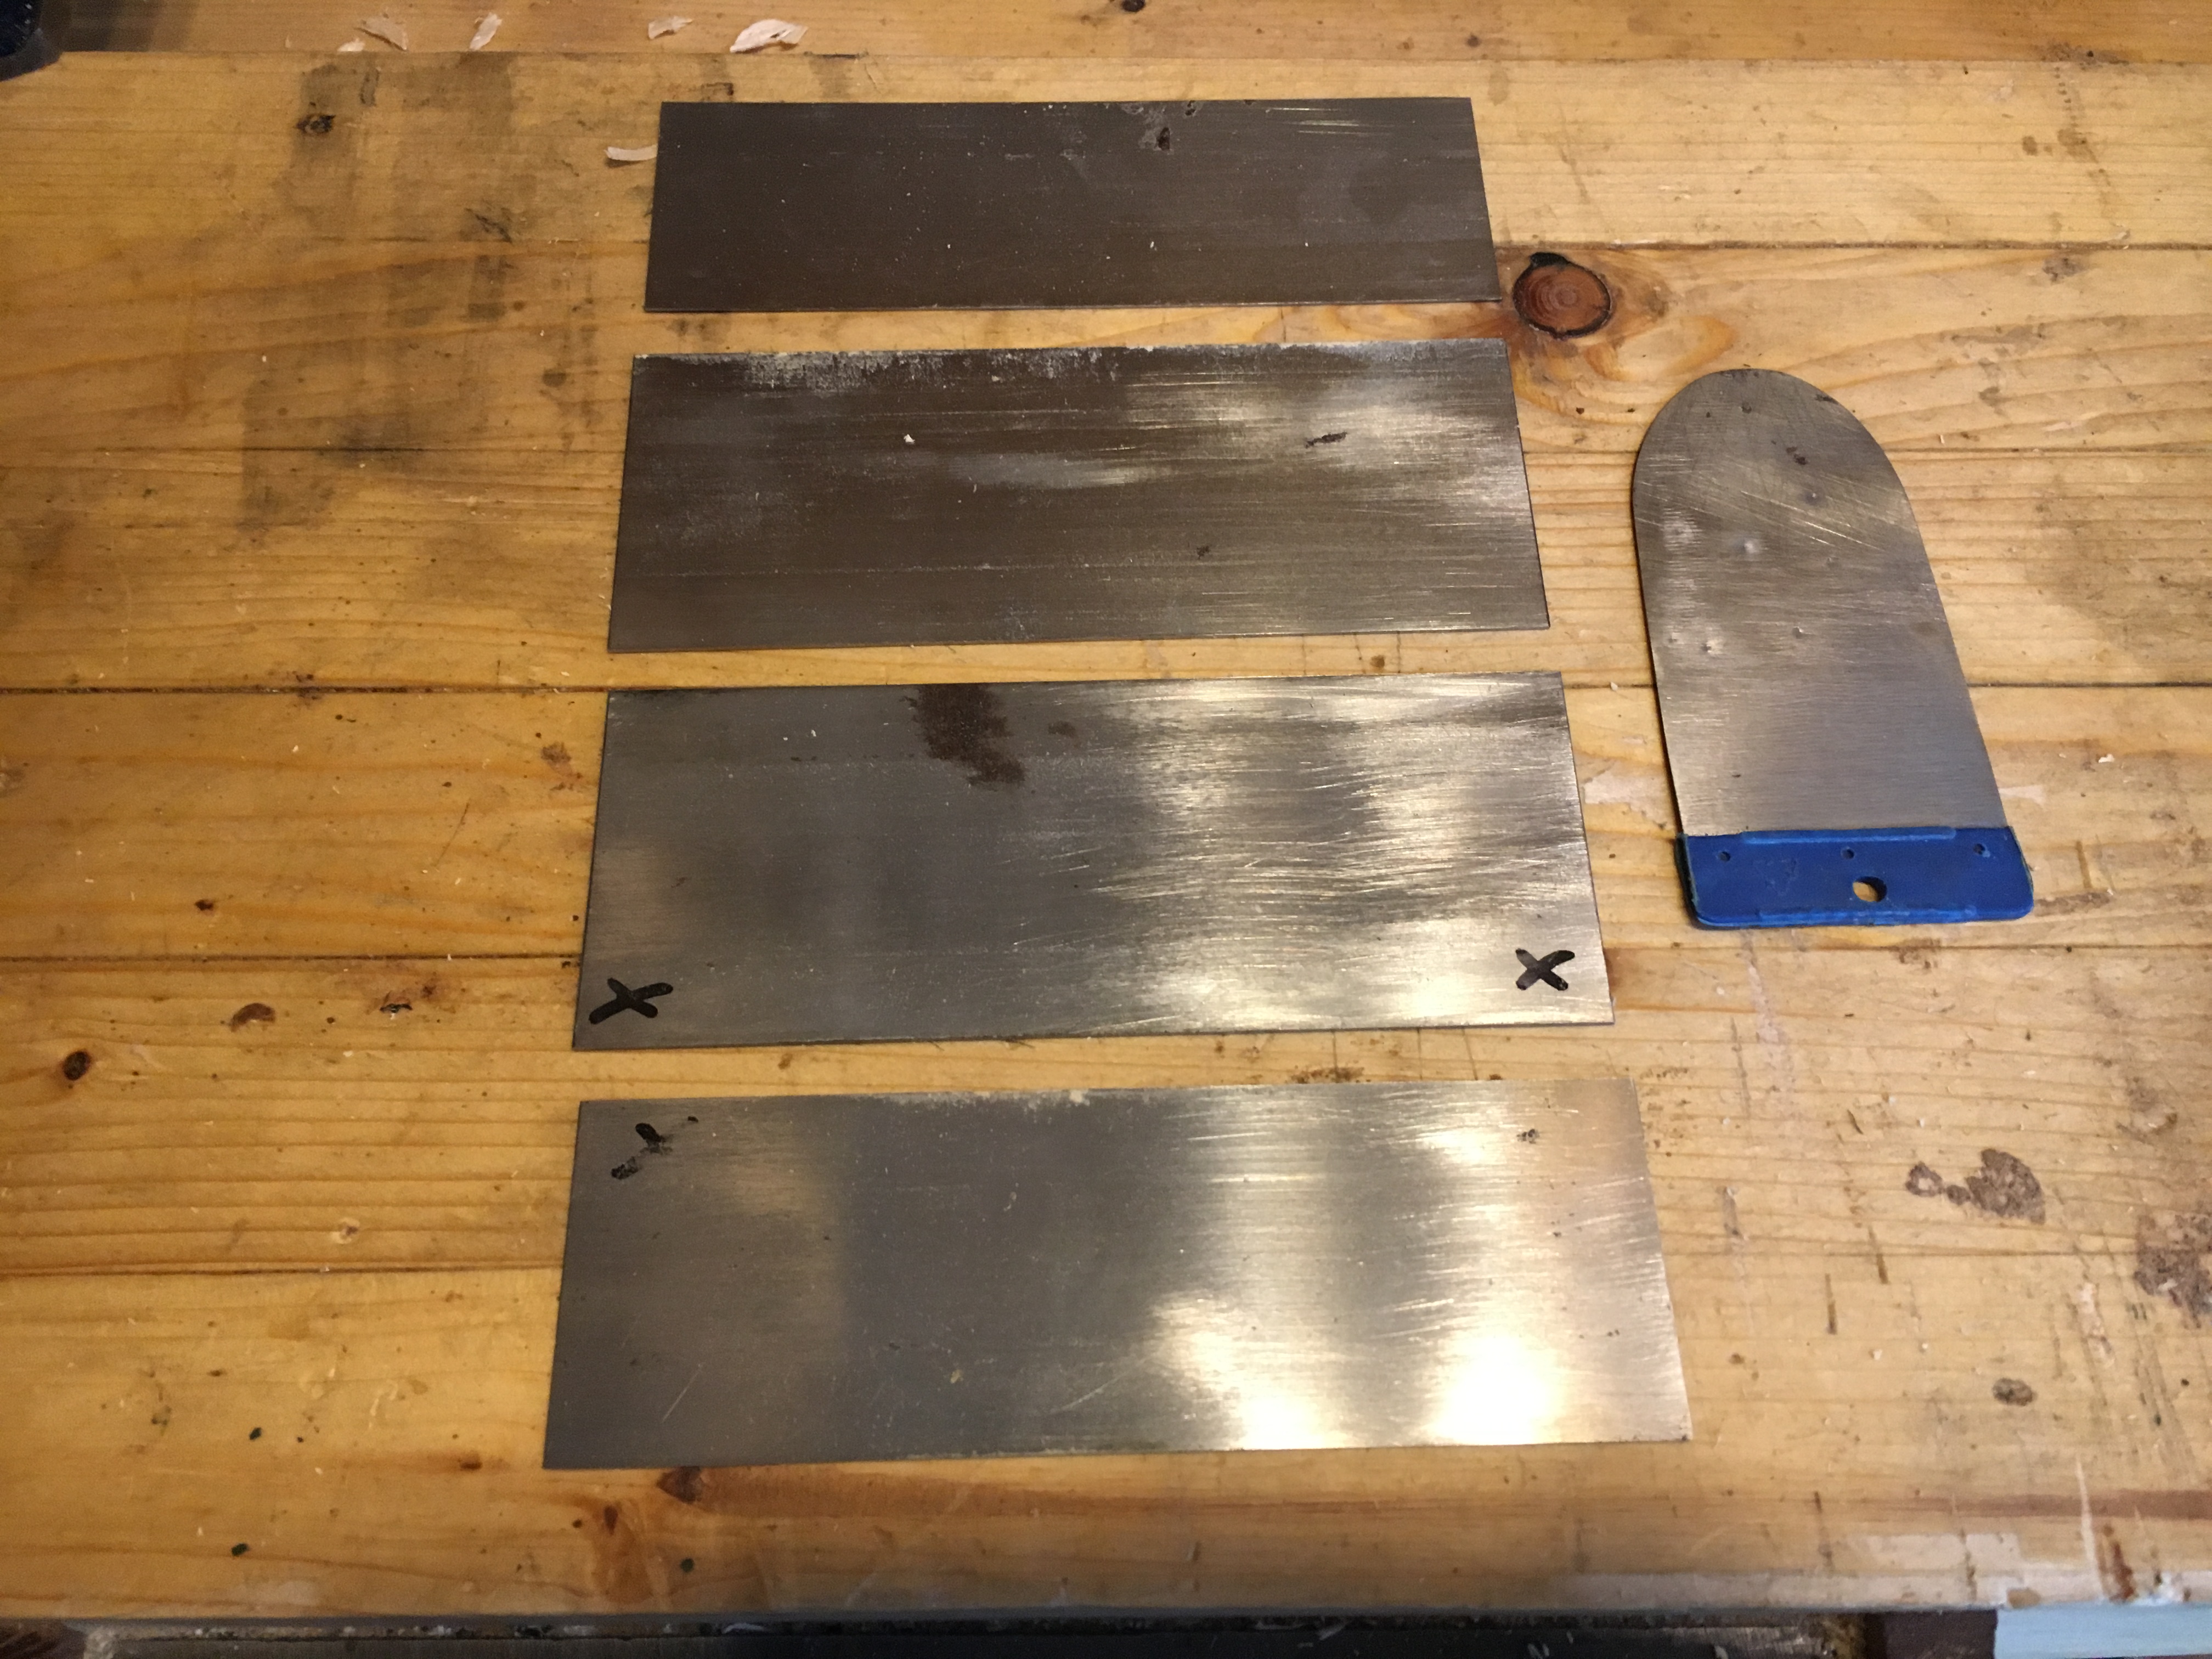

Nei precedenti post abbiamo parlato di alcune attrezzature manuali che servono a spianare e rendere liscia la superficie del legno. Penso sia utile riassumerle, inserendo anche quelle di cui fino ad adesso non abbiamo parlato, mettendole in ordine di utilizzo, ovvero secondo la priorità di scelta per
portare un legno dallo stato grezzo ad una superficie la più levigata e liscia possibile.
1) Sbozzino;
2) Raspa;
3) Lima;
4) Pialla da banco (smoothing plane);
5) Rasiere (Cabinet scraper e scraper card);
6) Carta abrasiva varie grane e paglietta metallica.
In questo articolo parliamo nello specifico della rasiera e della cabinet scraper. Questi utensili, levigando il legno, si pongono per così dire a metà strada tra le pialle e le carte abrasive, potendosi quindi far rientrare nella cosiddetta fase di finitura del legno. Sono utensili spesso dimenticati e poco utilizzati, sottovalutati nella loro funzione e questo a torto perché sono in grado di portare una superficie piallata ad un elevato grado di levigatura facendoci risparmiare tempo, soldi e fatica nell’utilizzo delle carte abrasive (almeno quelle di grana fino alla 250).
RASIERA (generalità)
La rasiera non è altro che un semplice pezzo di metallo. Esso può essere di varia grandezza ed assumere varie forme come quella rettangolare, ovale o sinusoidale con curve concave e convesse. Lo spessore del metallo è generalmente di alcuni decimi di millimetro ma in commercio è possibile trovarne comunque di svariati spessori permettendo così una certa flessibilità in fase di utilizzo, adattandosi alle varie lavorazioni e tipi di legno. Vengono utilizzate principalmente per levigare piccole aree circoscritte, specialmente su legni duri, (dove danno il meglio di se stesse) e dove trovano quindi il principale campo di applicazione. Possono essere utilizzate anche su legno morbidi, come il pino e l’abete, ma in questi casi il risultato non sarà ottimale, anche mettendo in atto talune strategie, come ad esempio l’applicare meno forza e lavorare con un tagliente molto affilato. Come accennato possiamo utilizzarle per spianare e levigare la superficie del legno (dopo l’utilizzo della pialla e prima delle carte abrasive), oppure in determinate situazioni ove l’utilizzo della pialla risulti particolarmente ostico, come ad esempio in presenza di nodi o cambi repentini di venatura o per venature difficili. La si può utilizzare anche per rimuovere graffi profondi o tracce a matita nel legno e ancora per rimuovere gli eccessi della colla e gli strati di vernice. Lavora bene su superfici già piallate, mentre non è particolarmente adatta se utilizzata su legno grezzo. Il suo utilizzo prevede di essere impugnata come indicato nelle foto a seguito, in un movimento a spingere o a tirare ed in posizione diagonale e spesso inclinata (di circa 30 – 40 gradi, ma la posizione è molto soggettiva) rispetto alla direzione nella quale stiamo lavorando, così da migliorare l’approccio con la superficie.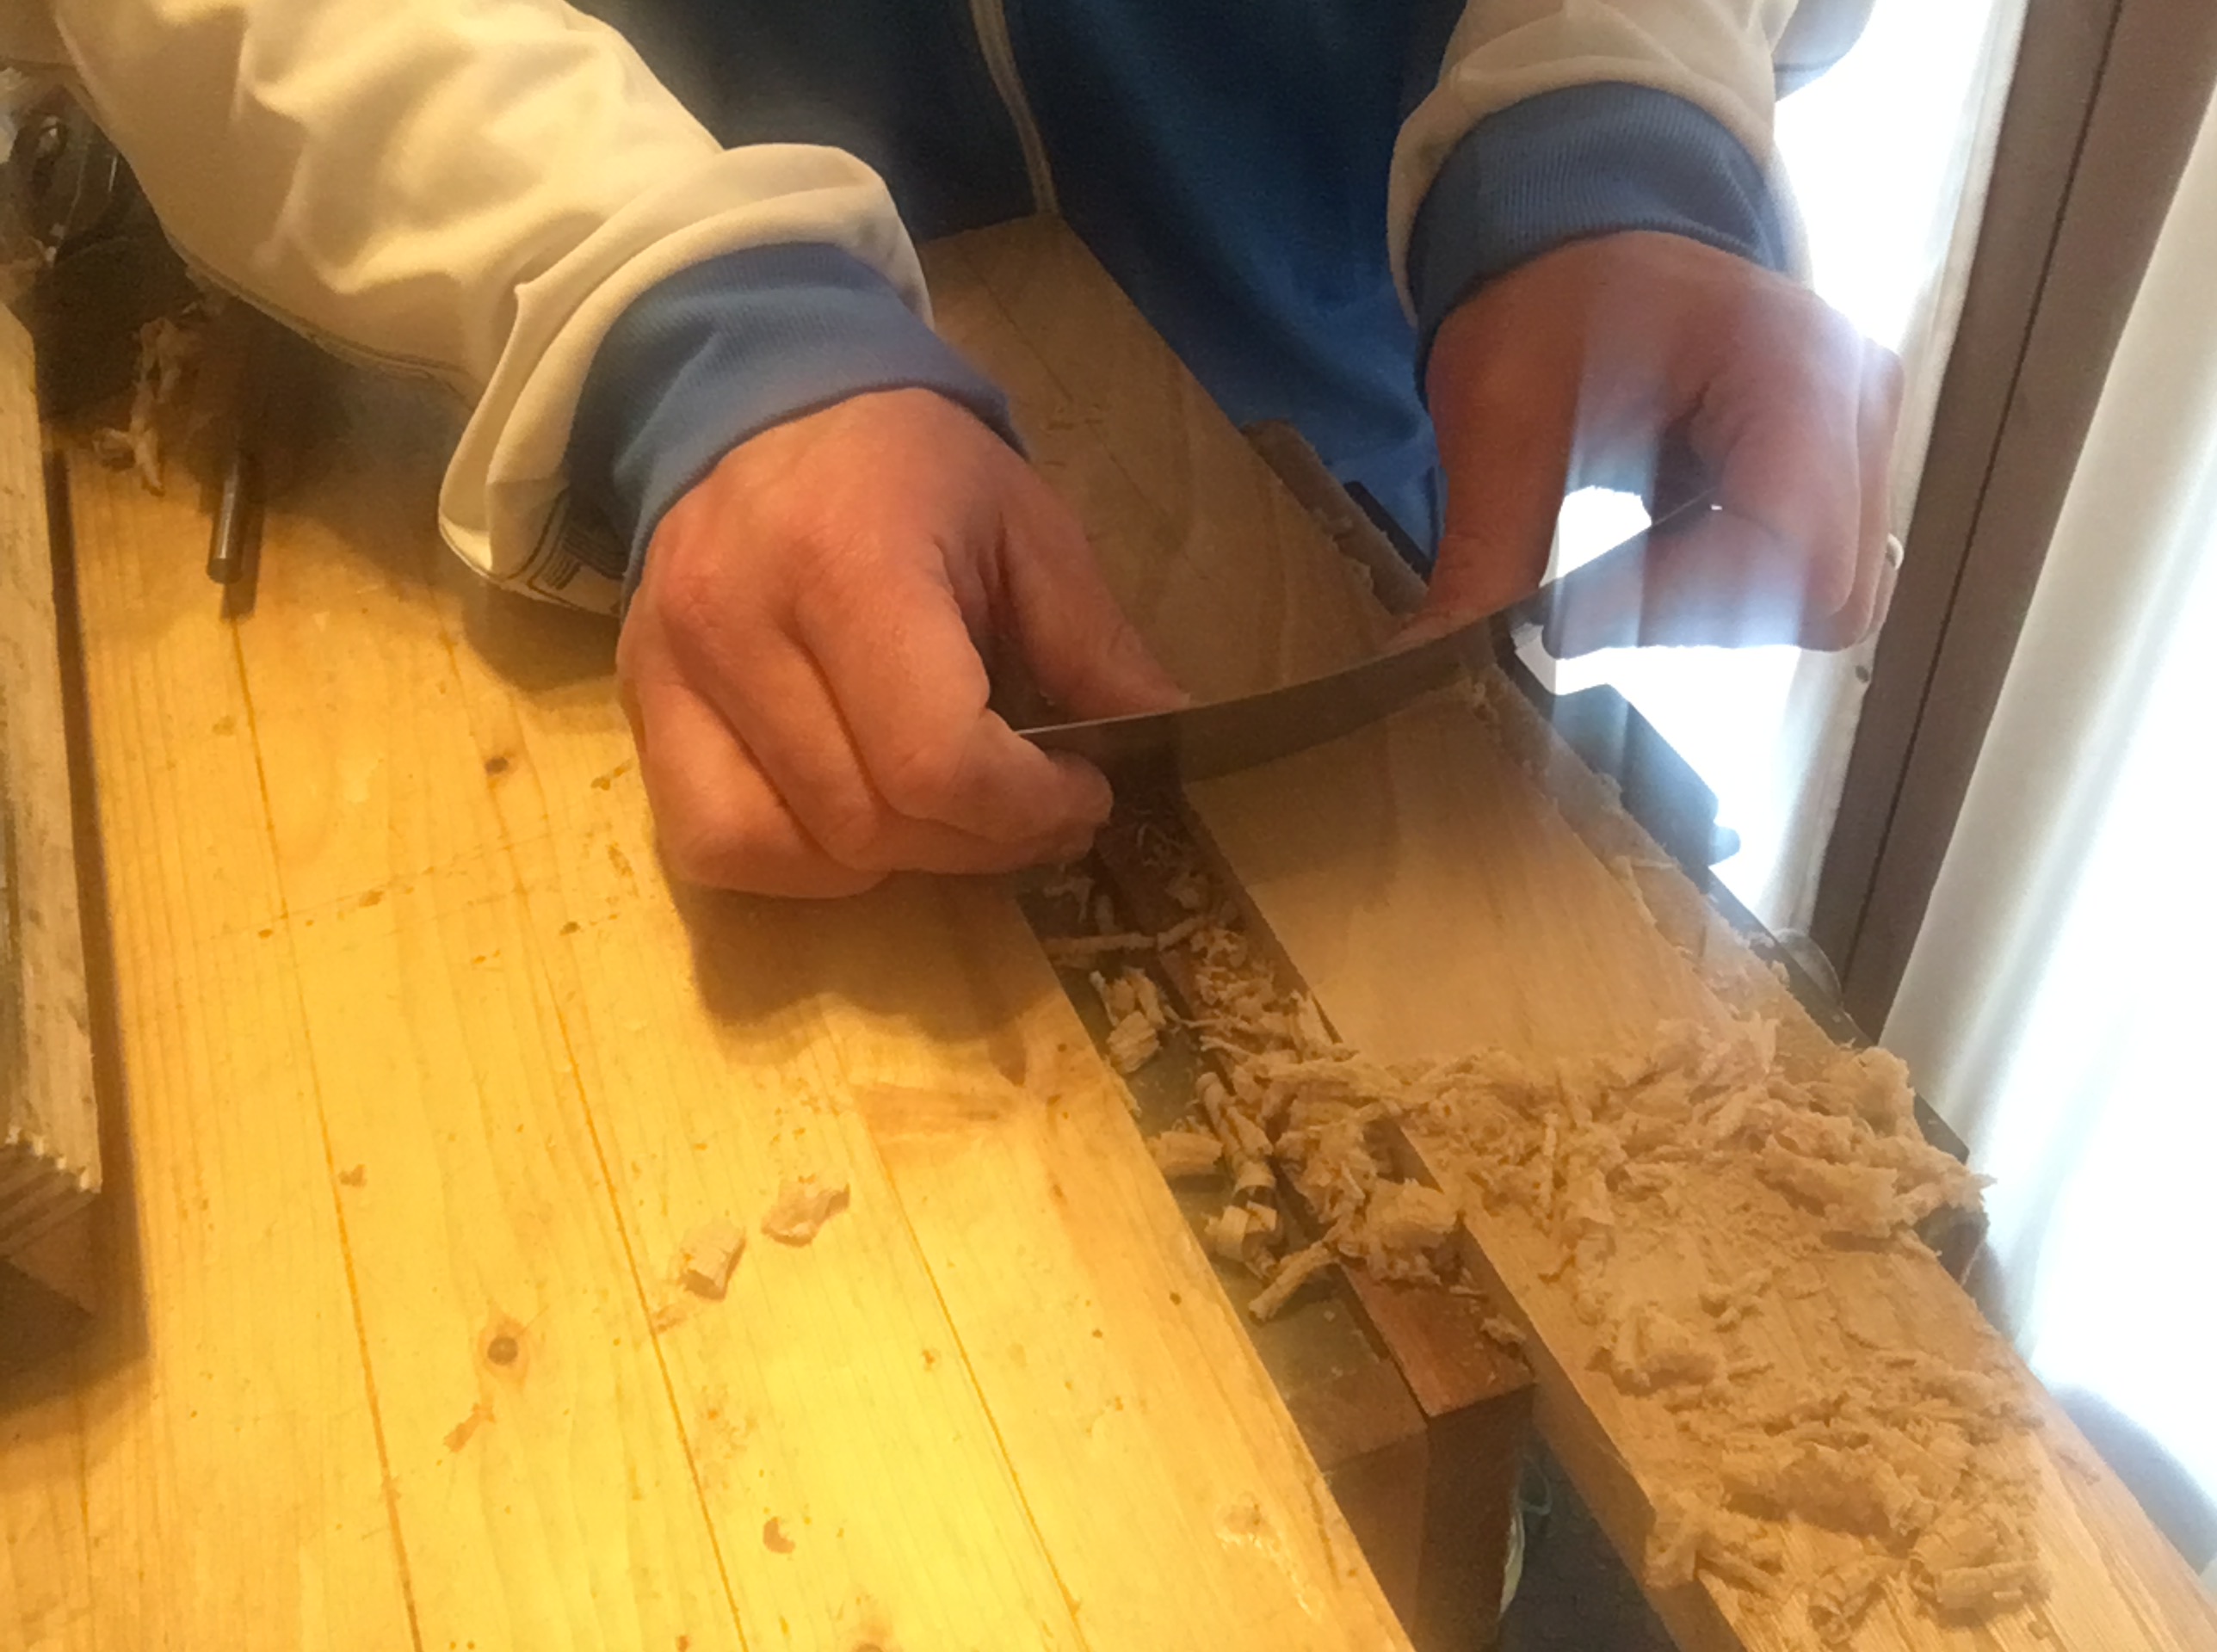

Il fatto di essere più o meno flessibile ci permette di adattarla alla lavorazione che stiamo effettuando. Se vogliamo concentrarci in un punto ben preciso possiamo fletterla maggiormente con i pollici delle mani posti sul retro oppure variare l’angolo di inclinazione di presentazione della rasiera.
La buona riuscita della lavorazione con la rasiera dipende, in buona sostanza, non tanto dalla durezza dell’acciaio (comunque modesta nelle rasiere), quanto dall’accuratezza dell’affilatura. Se l’affilatura è fatta a dovere si dovrebbero produrre dei soffici riccioli di legno. Se non è fatta bene o comunque risulta poco affilata si produrrà solo segatura. È interessante notare una sostanziale differenza tra l’affilatura delle rasiere e, ad esempio, l’affilatura delle lame delle pialle e degli scalpelli. In questi ultimi infatti il tagliente si crea dall’incontro di due superfici estremamente levigate. Nel caso delle rasiere invece il tagliente si forma dall’ispessimento e successiva curvatura dell’acciaio stesso di cui è formata la rasiera, per mezzo del brunitoio. Cerchiamo di capire come questo avviene. Sotto ho inserito un piccolo disegno, spero esplicativo.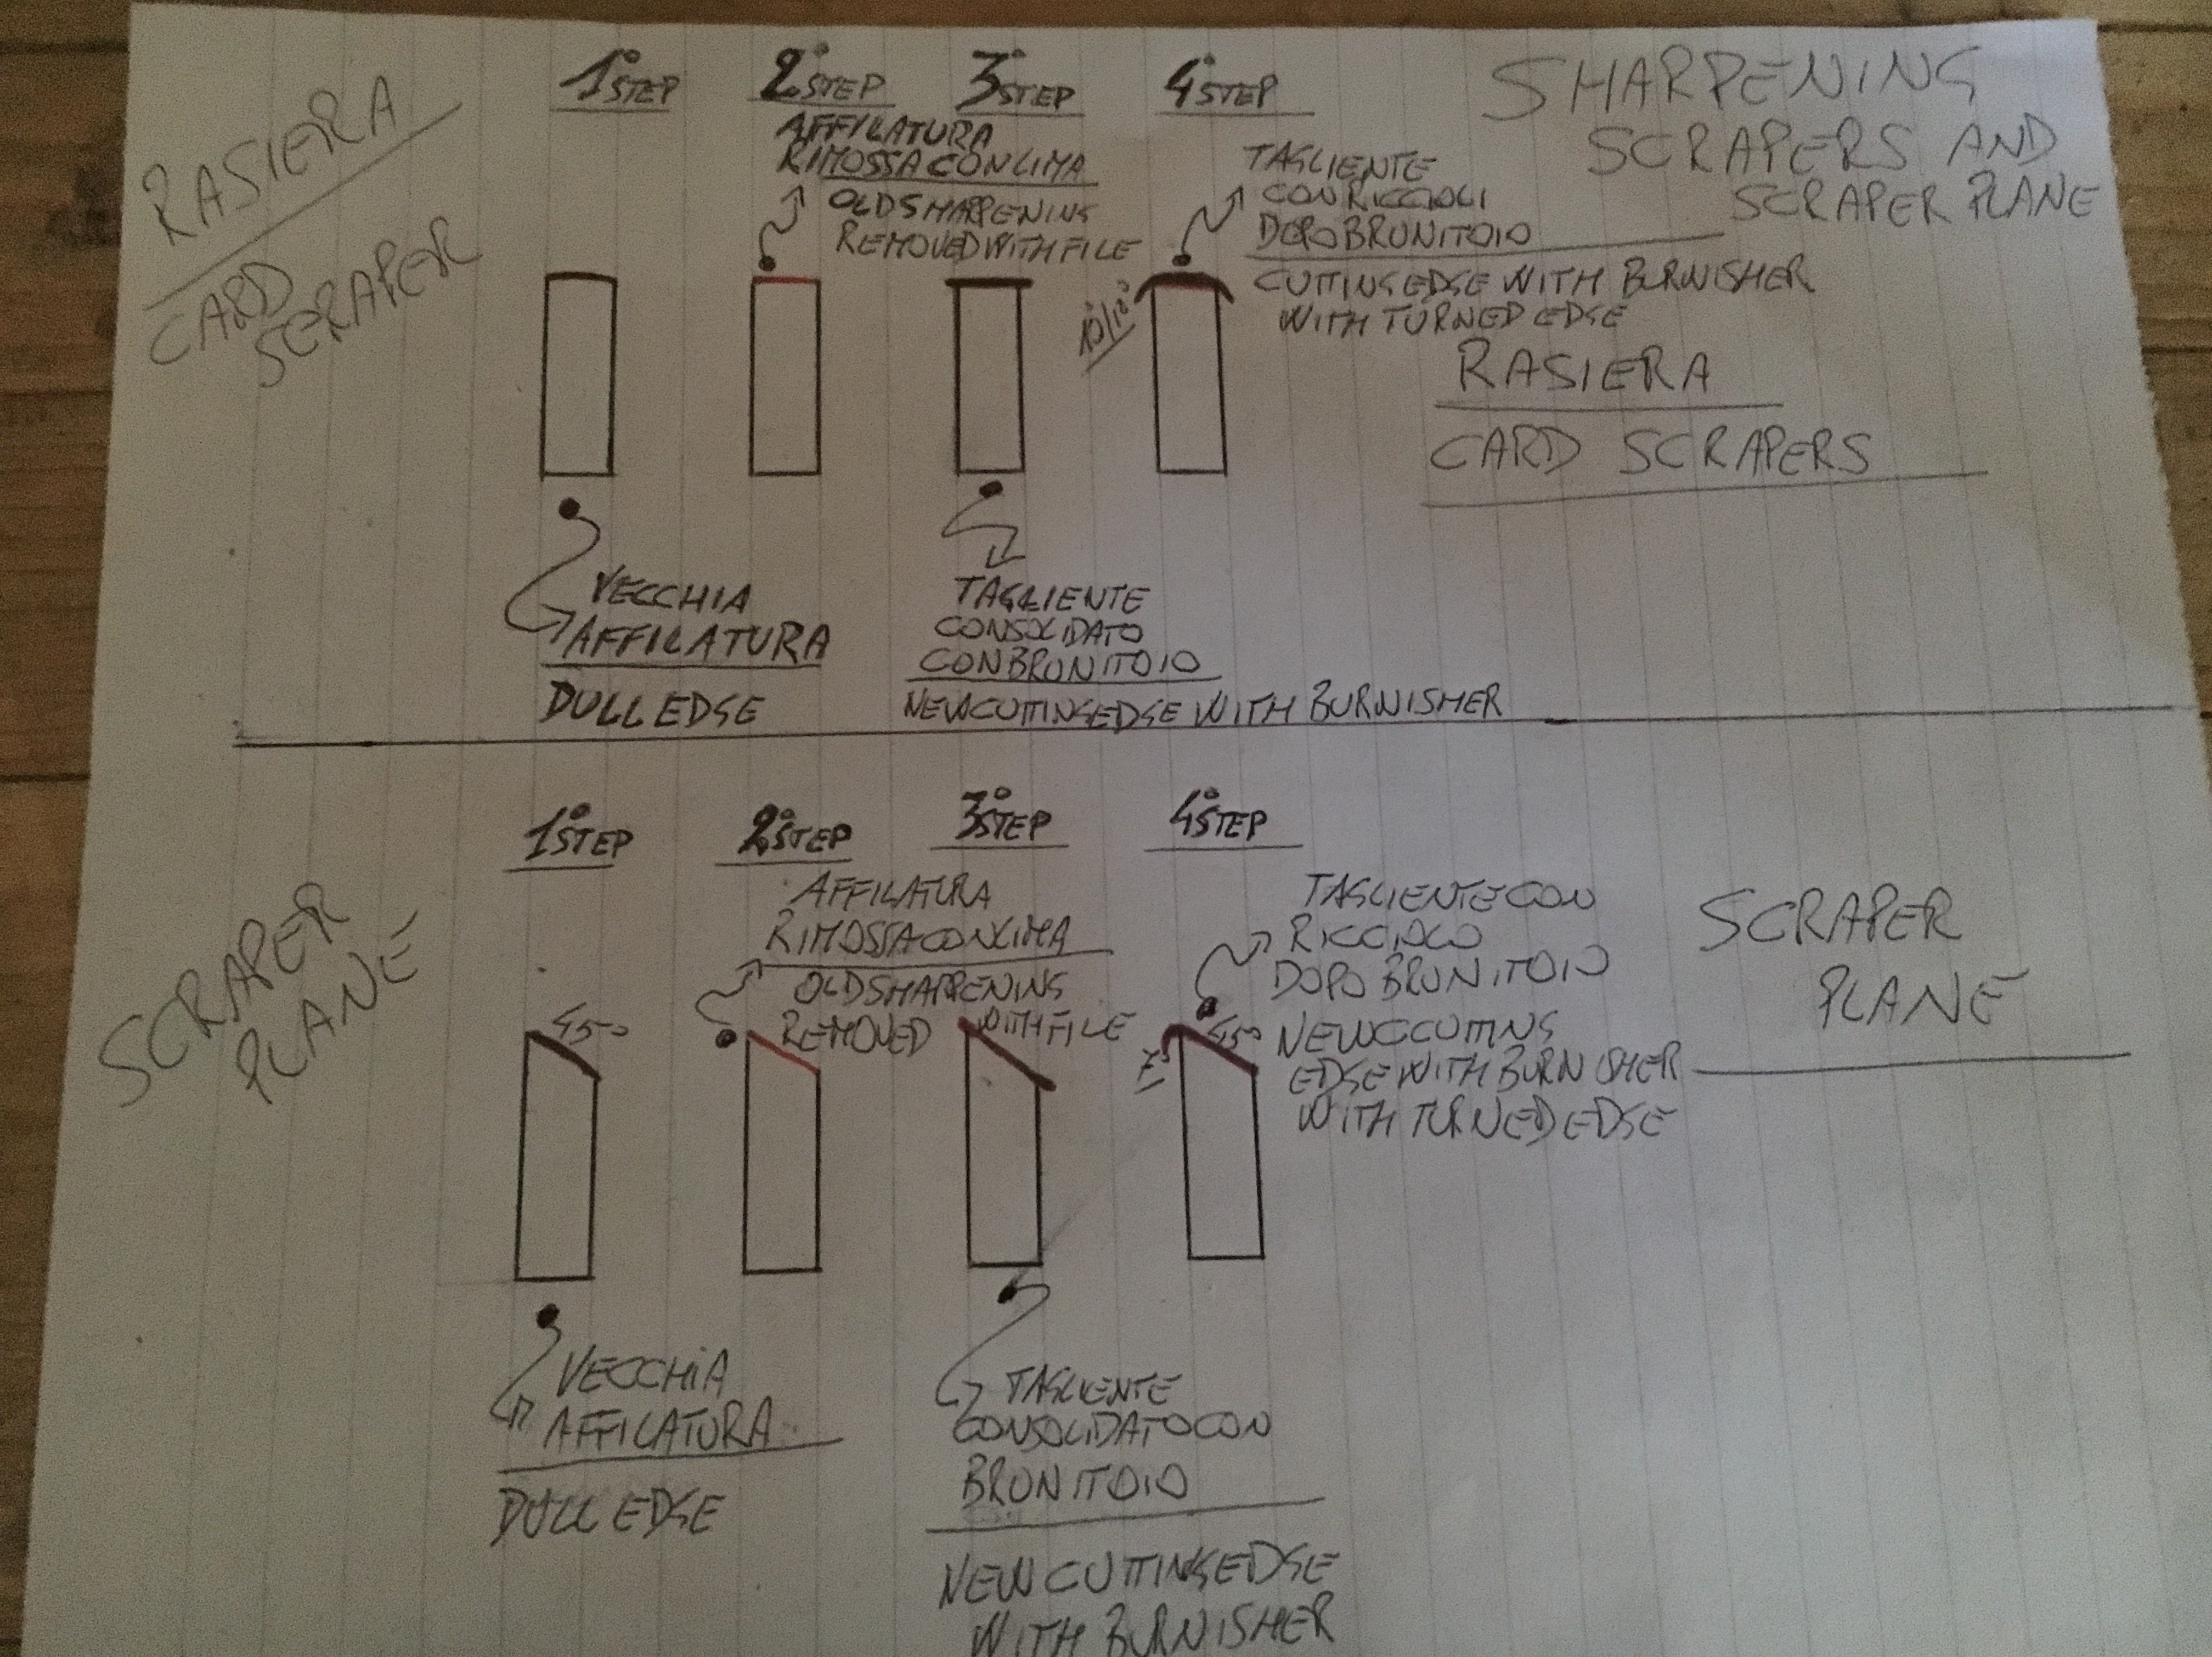
AFFILATURA DELLA RASIERA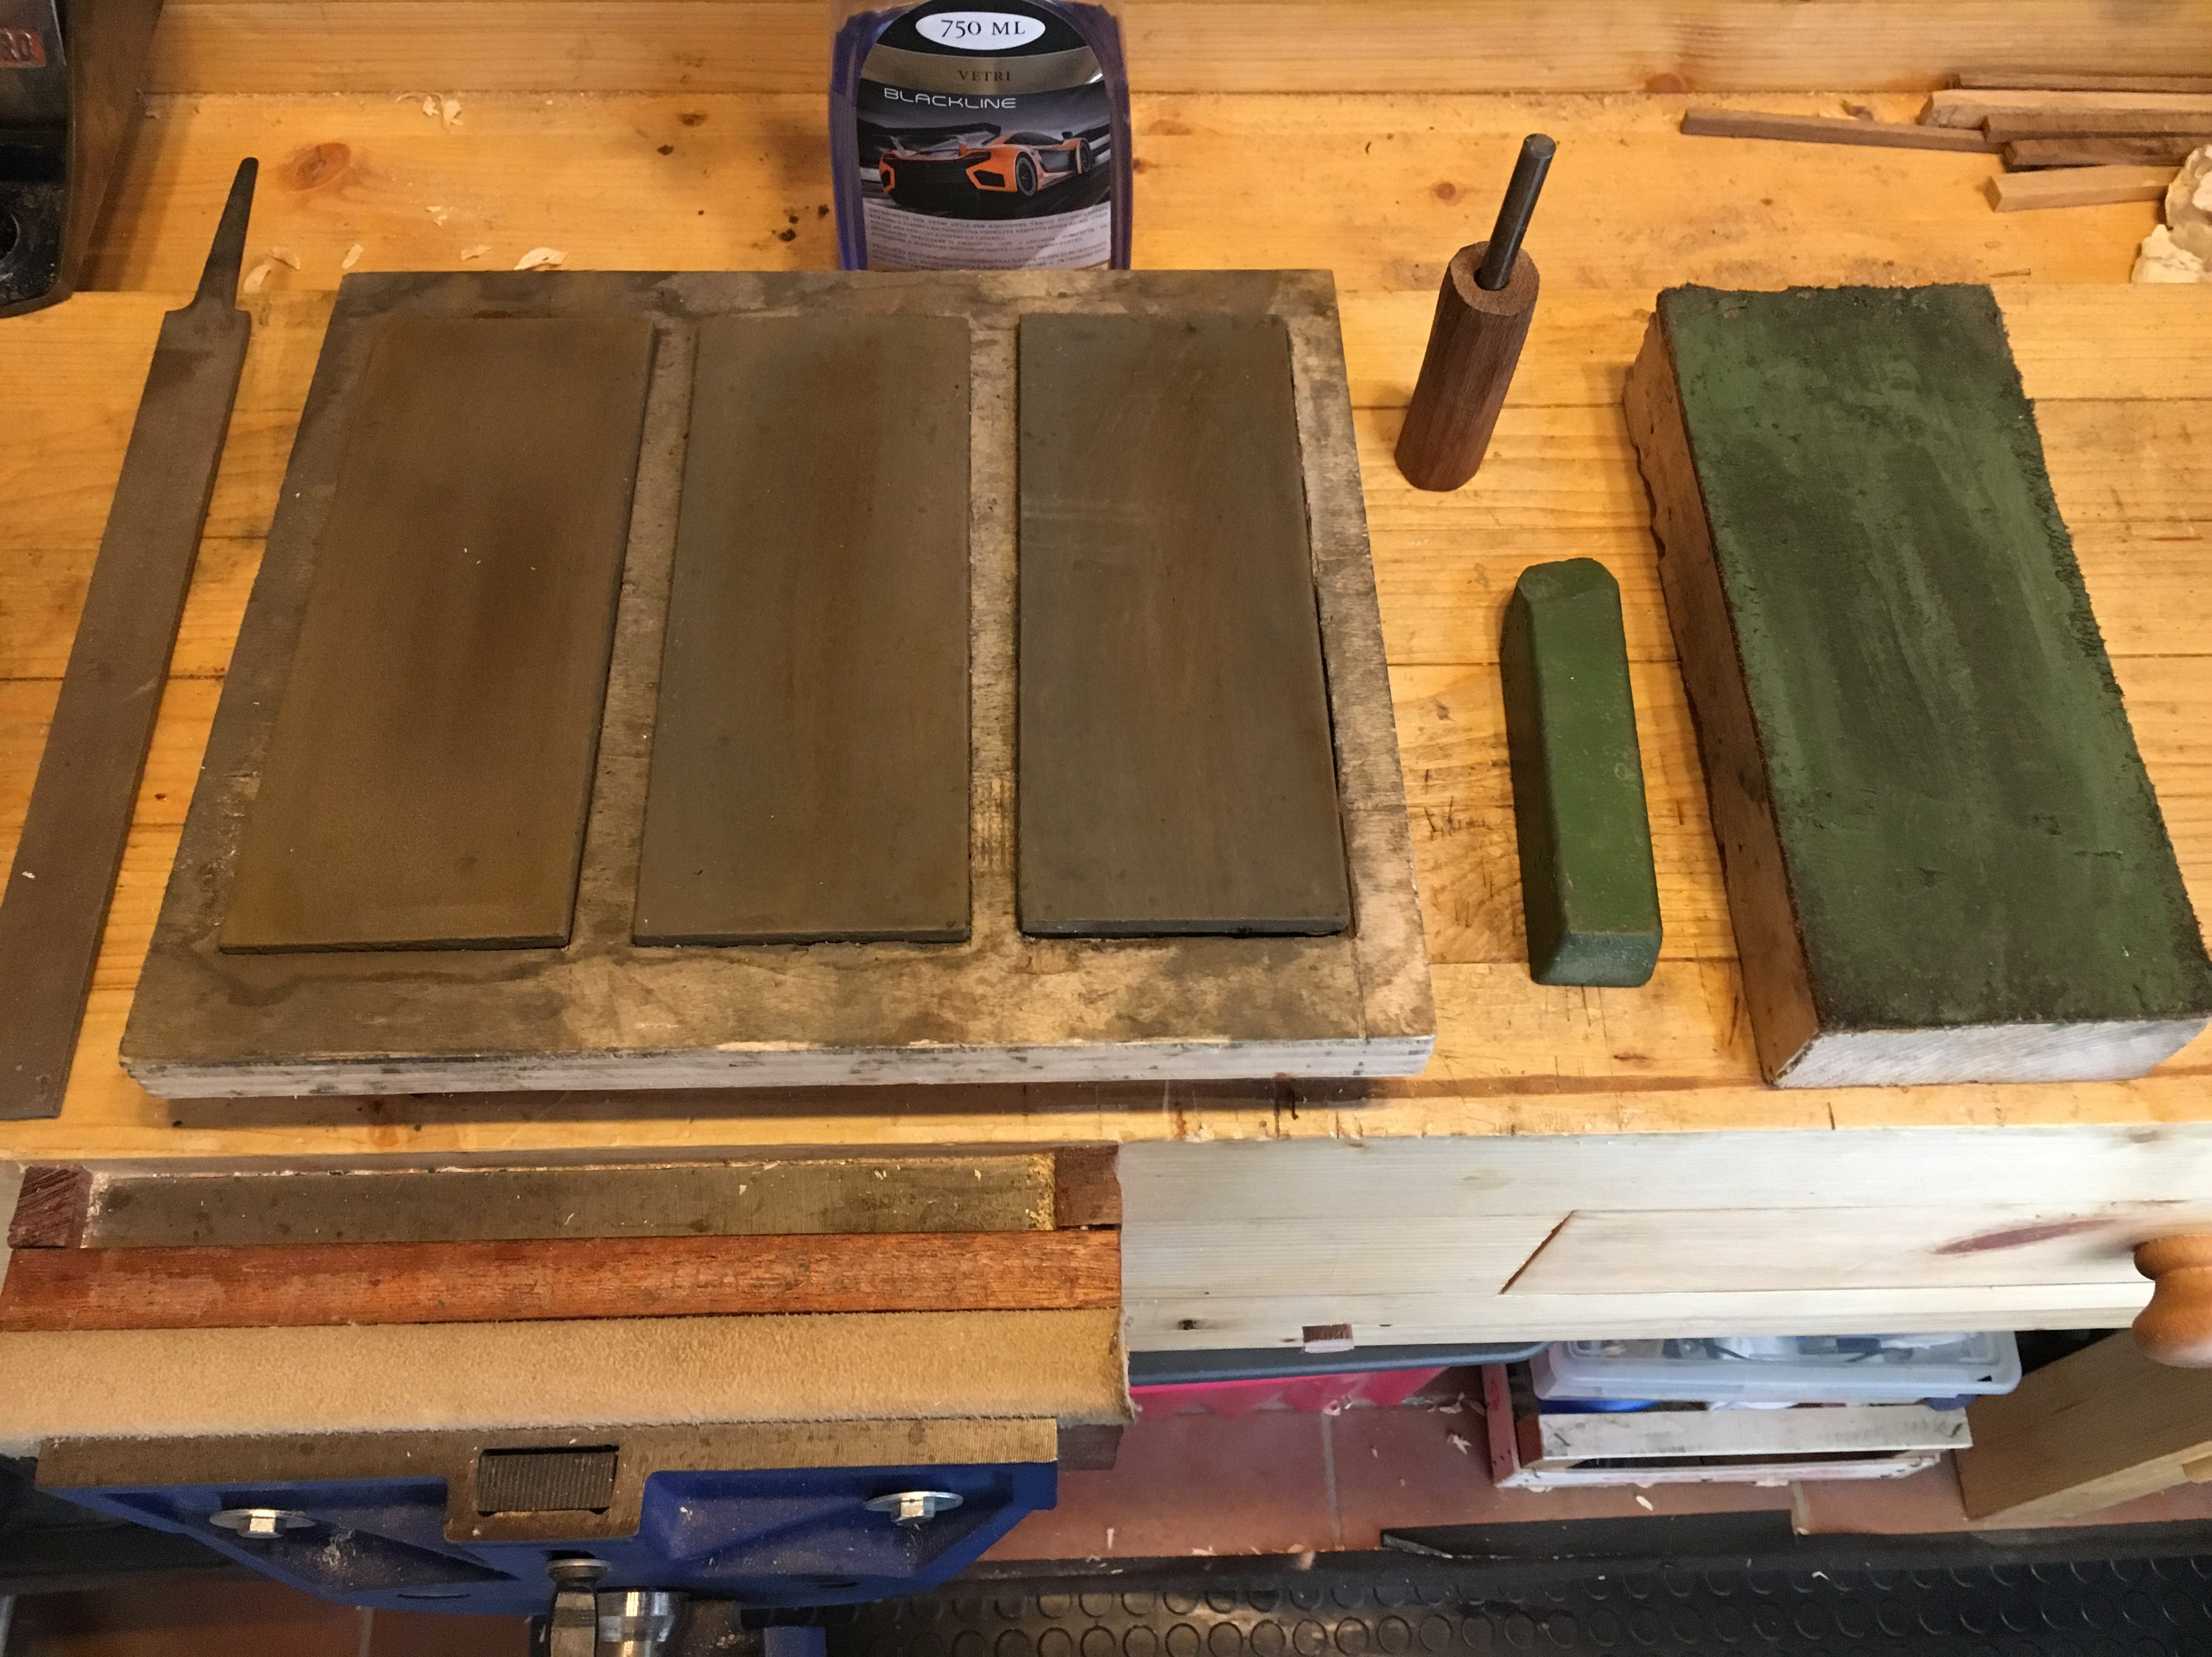
Nella foto che precede sono raffigurate le attrezzature che servono per affilare una rasiera. Dall’affilatura dipende, in larga parte, la riuscita del lavoro di levigatura e spianatura del legno.
Il materiale occorrente è il seguente:
1) Pietre diamantate (o altri tipi di pietre o carta abrasiva) e lubrificante;
2) Pasta abrasiva e strop (opzionali);
3) Brunitoio, detto anche acciaino (burnisher);
4) Lima a faccia piatta;
5) Eventuali guide in legno (autocostruzione).
Una rasiera che ha perso l’affilatura non produrrà più dei riccioli di legno ma solo segatura. Anche se la rasiera è nuova di zecca e quindi mai usata andrà comunque affilata. I produttori assicurano solo la regolarità dei lati della rasiera ma non la loro affilatura (ad eccezione, che io sappia, della Veritas che le vende già affilate e pronte all’uso).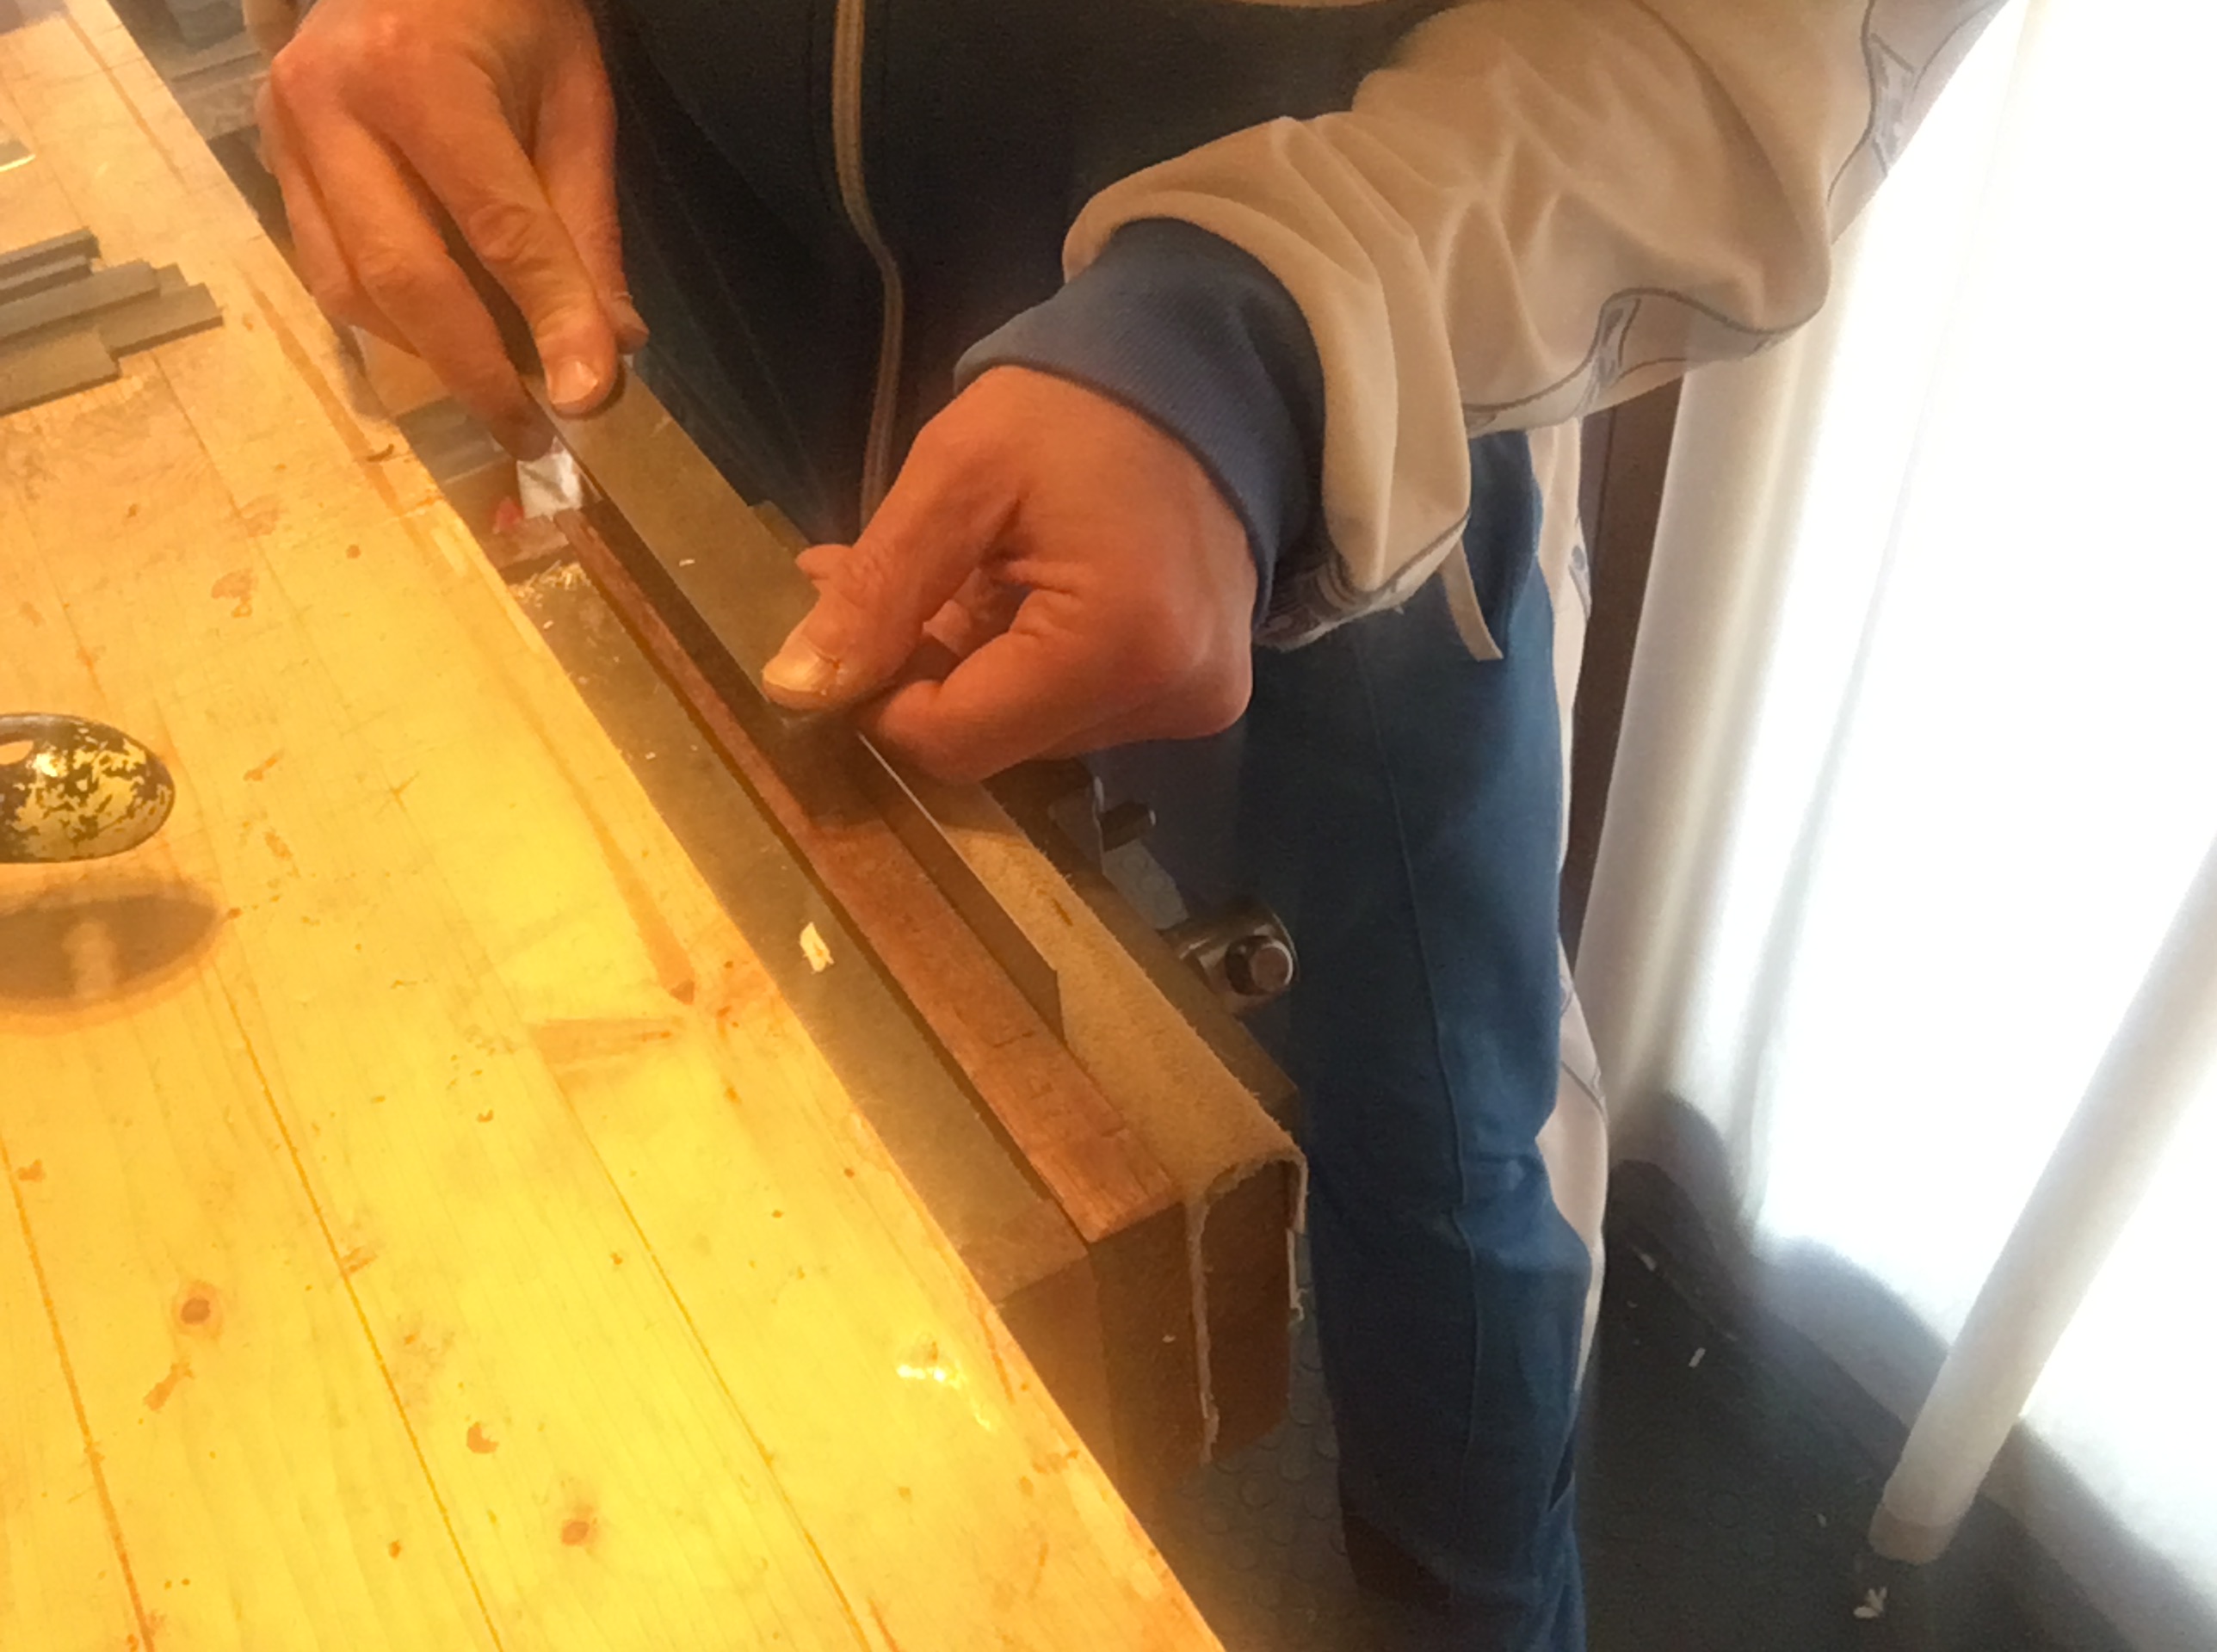
Se si tratta di una rasiera non nuova il primo passo da fare è rimuovere la vecchia affilatura consumata mediante l’utilizzo di una lima in ferro a faccia piatta lunga almeno 20 cm. La lima va passata tre o quattro volte con decisione da un estremo all’altro del tagliente posto sulla rasiera cercando di mantenere il più possibile la perpendicolarità, aiutandoci eventualmente con un riscontro che ci aiuti a mantenere i 90 gradi. Si può utilizzare la lima sia in senso longitudinale che trasversale rispetto al tagliente.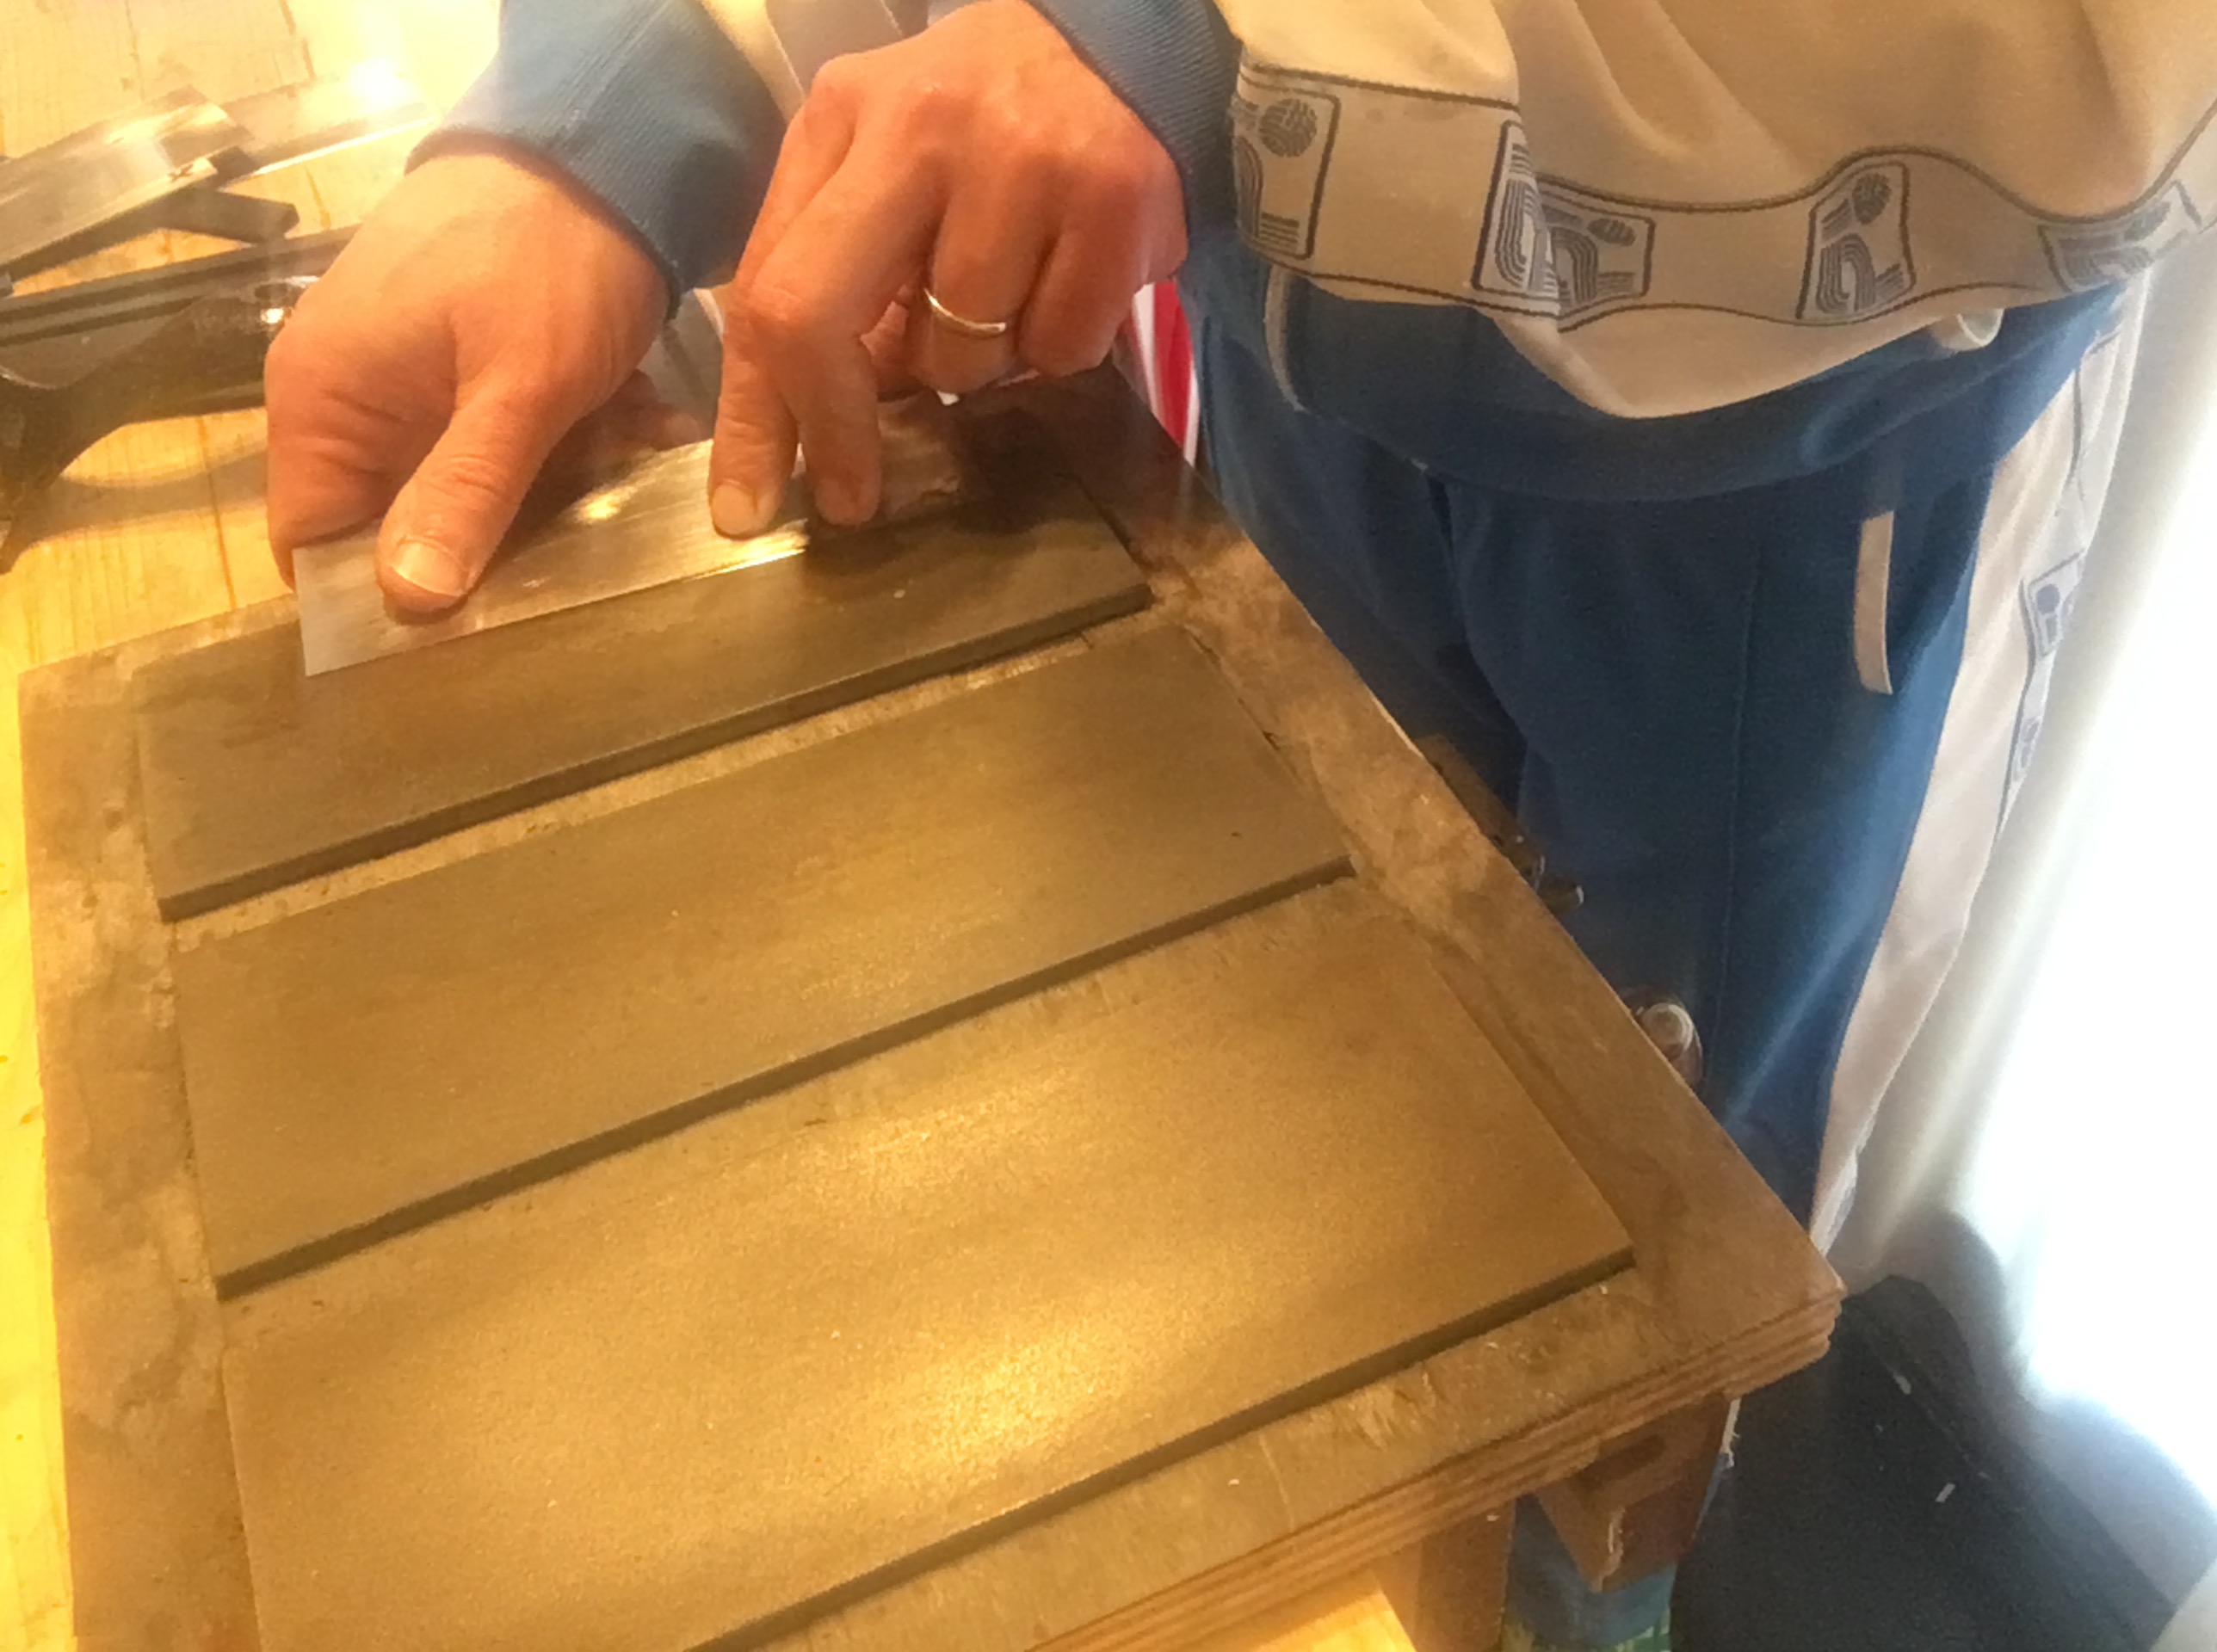
Di seguito passiamo le due facce vicino al tagliente sulla pietra diamantata grana 1200. Così facendo avremo rimosso totalmente la vecchia affilatura.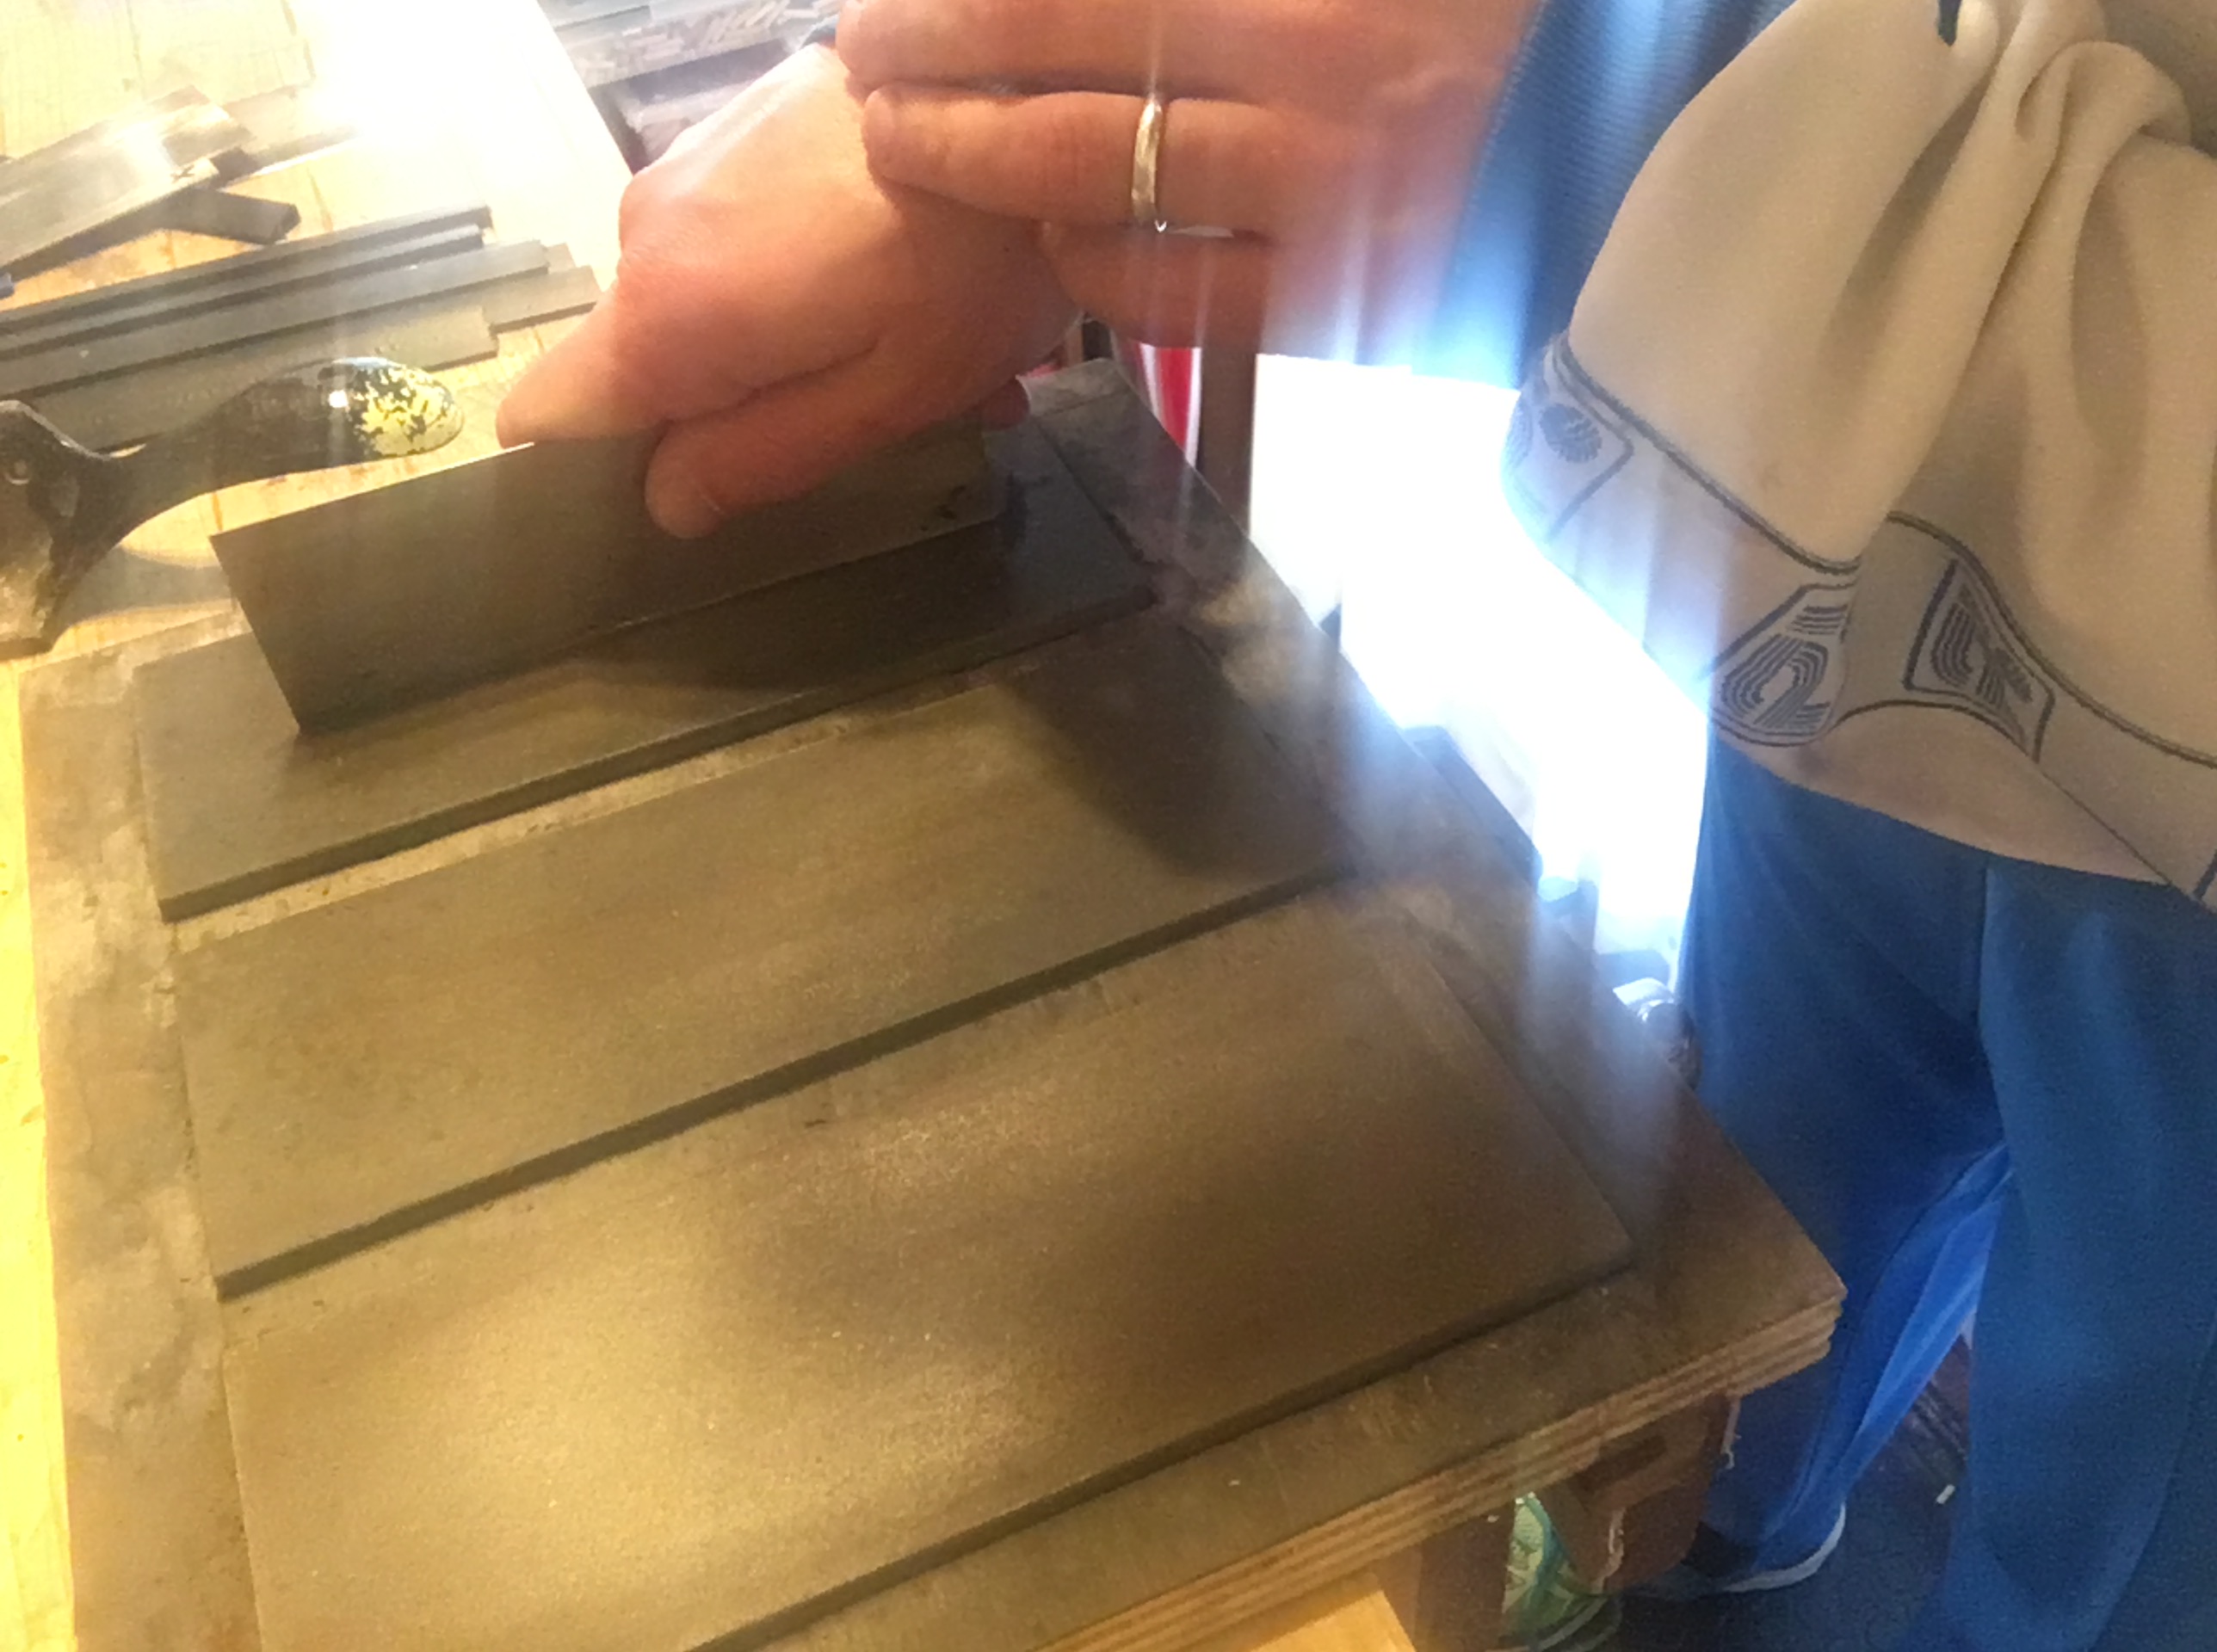
Per creare la nuova affilatura facciamo alcune passate al tagliente sulla pietra diamantata a grana 1200 cercando di mantenere il più possibile la perpendicolarità (aiutandoci eventualmente con un supporto a 90 gradi) e poi di nuovo sulle due facce per rimuovere la bava creatasi.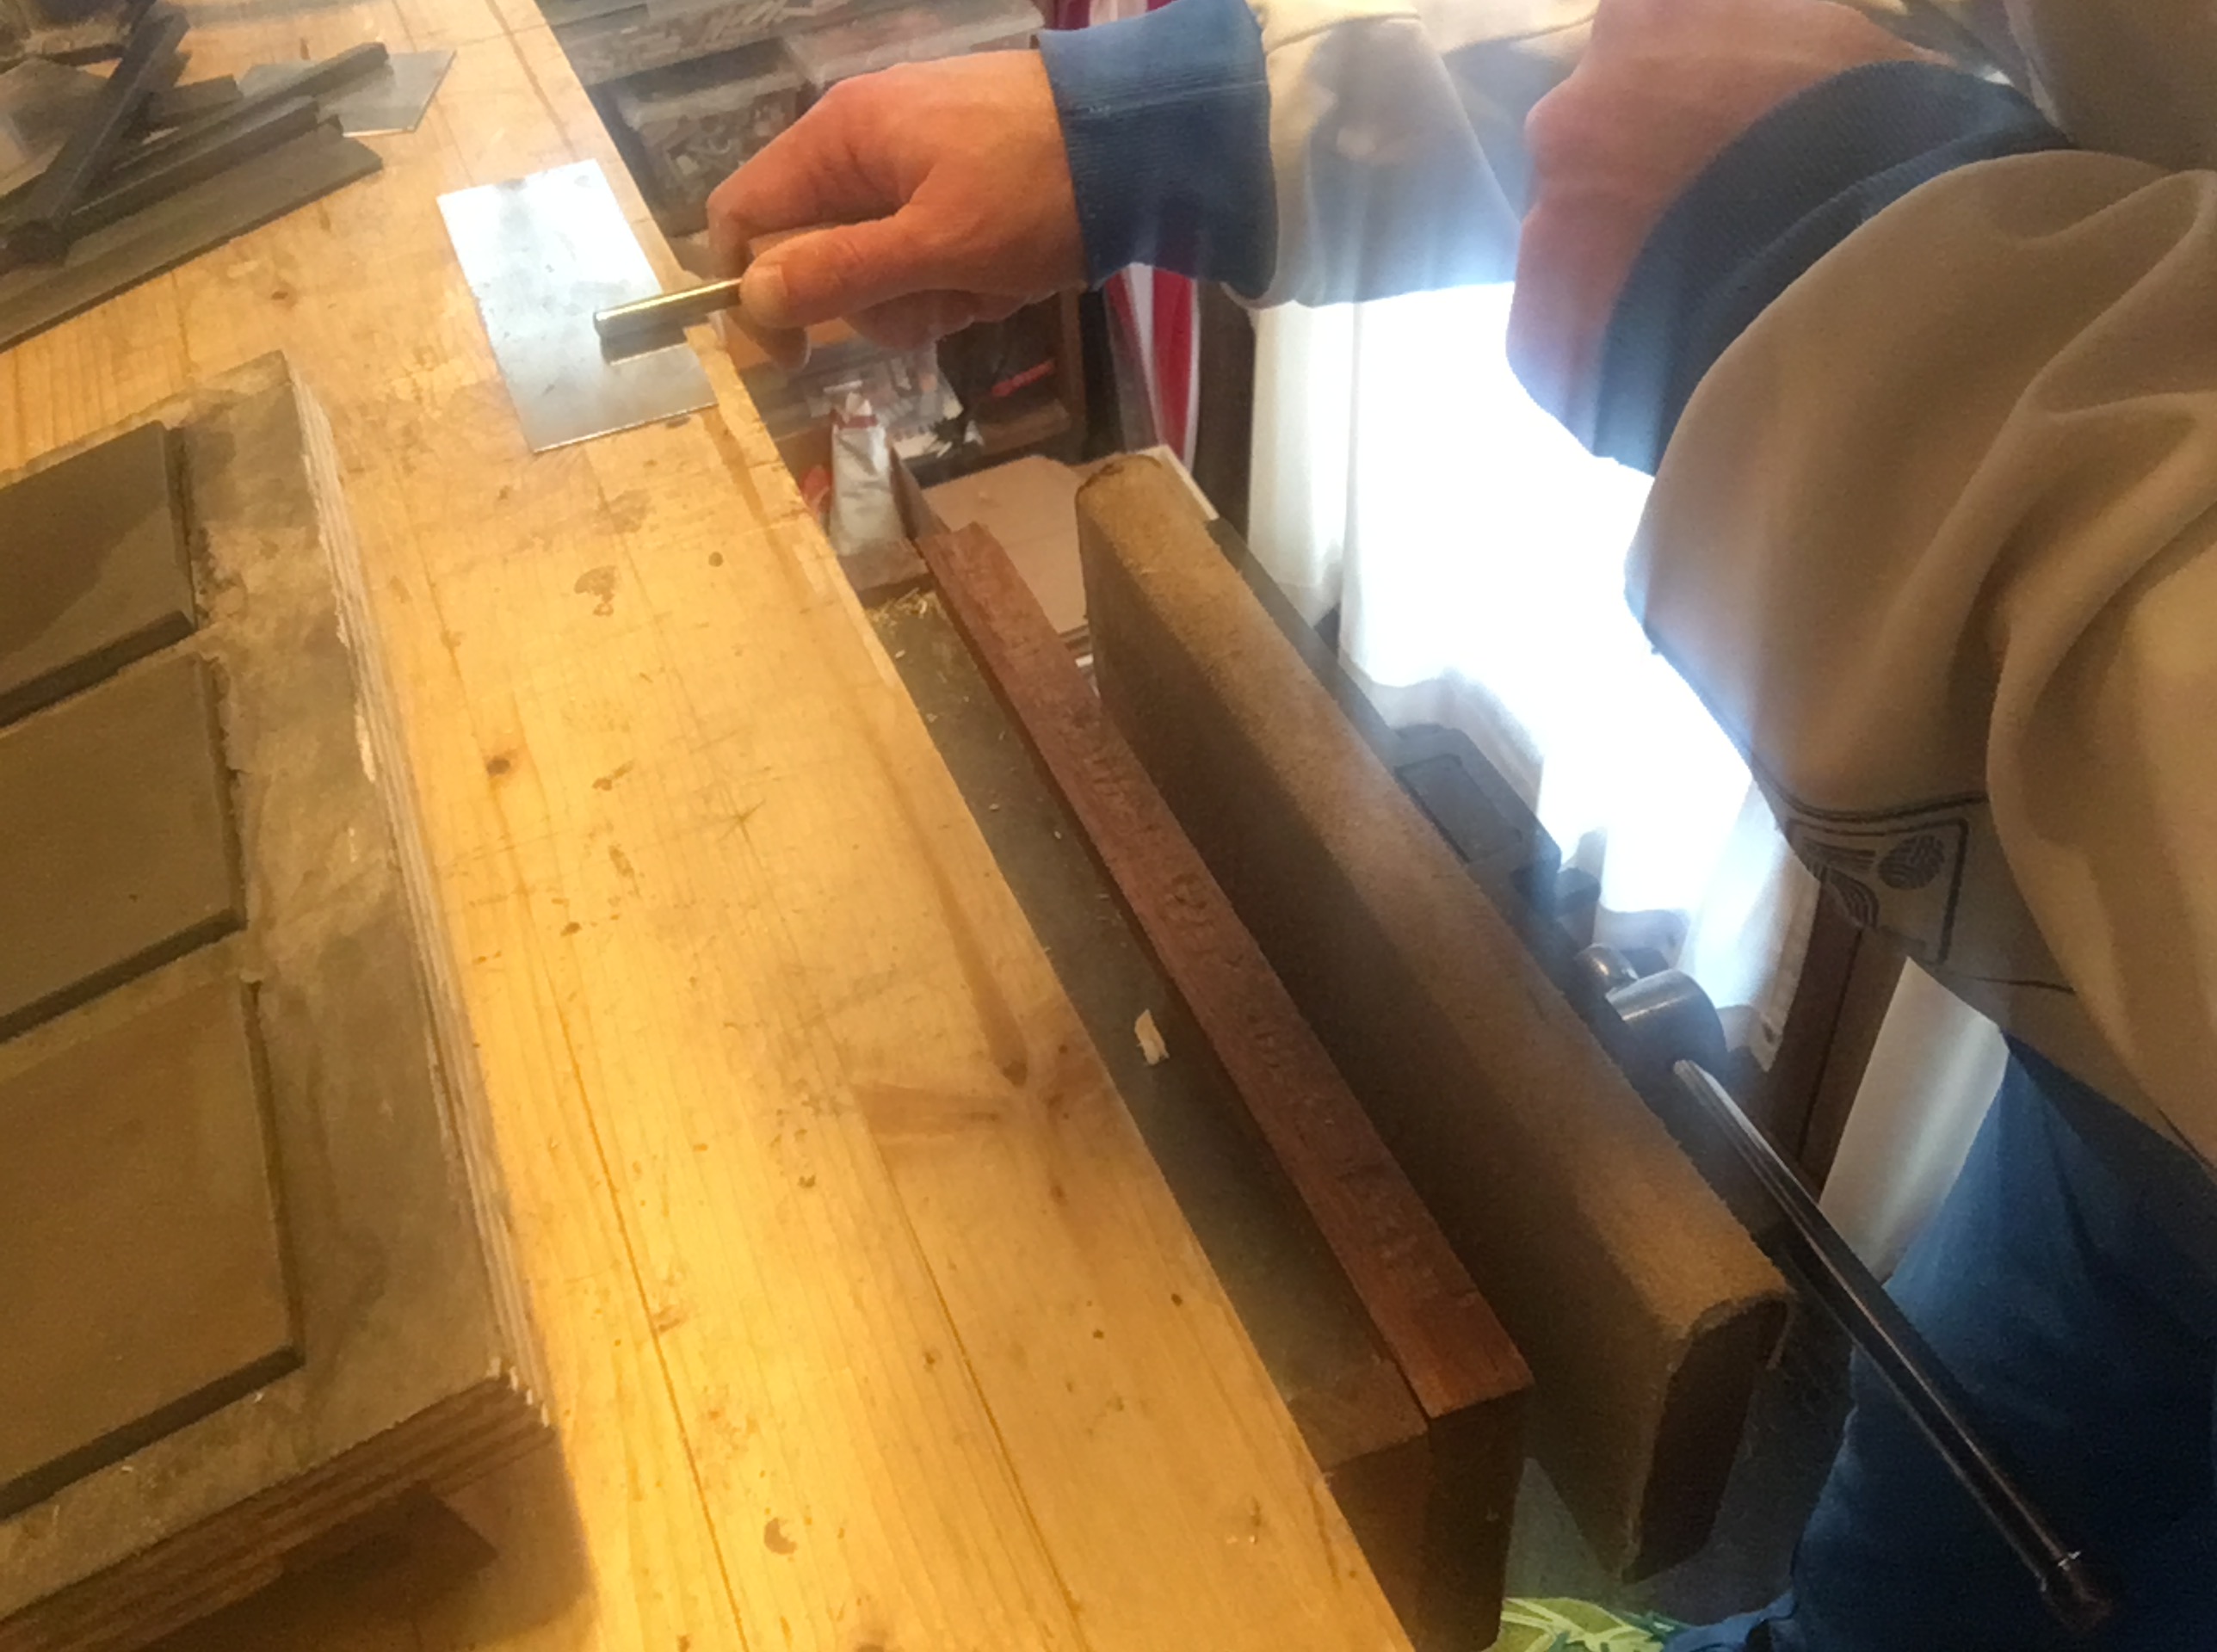
A questo punto poniamo la rasiera sul piano del banco e con il brunitoio facciamo alcune passate veloci (circa 30 passate) avanti ed indietro su entrambe le facce della rasiera, vicino al tagliente allo scopo di consolidare l’acciaio.A questo livello di affilatura la rasiera presenterebbe già un tagliente affilato, ma non al punto di essere in grado di lavorare come dovrebbe sul legno. Per ottenere una vera e propria affilatura dovremo consolidare anche l’acciaio del tagliente, sempre con l’ausilio del brunitoio.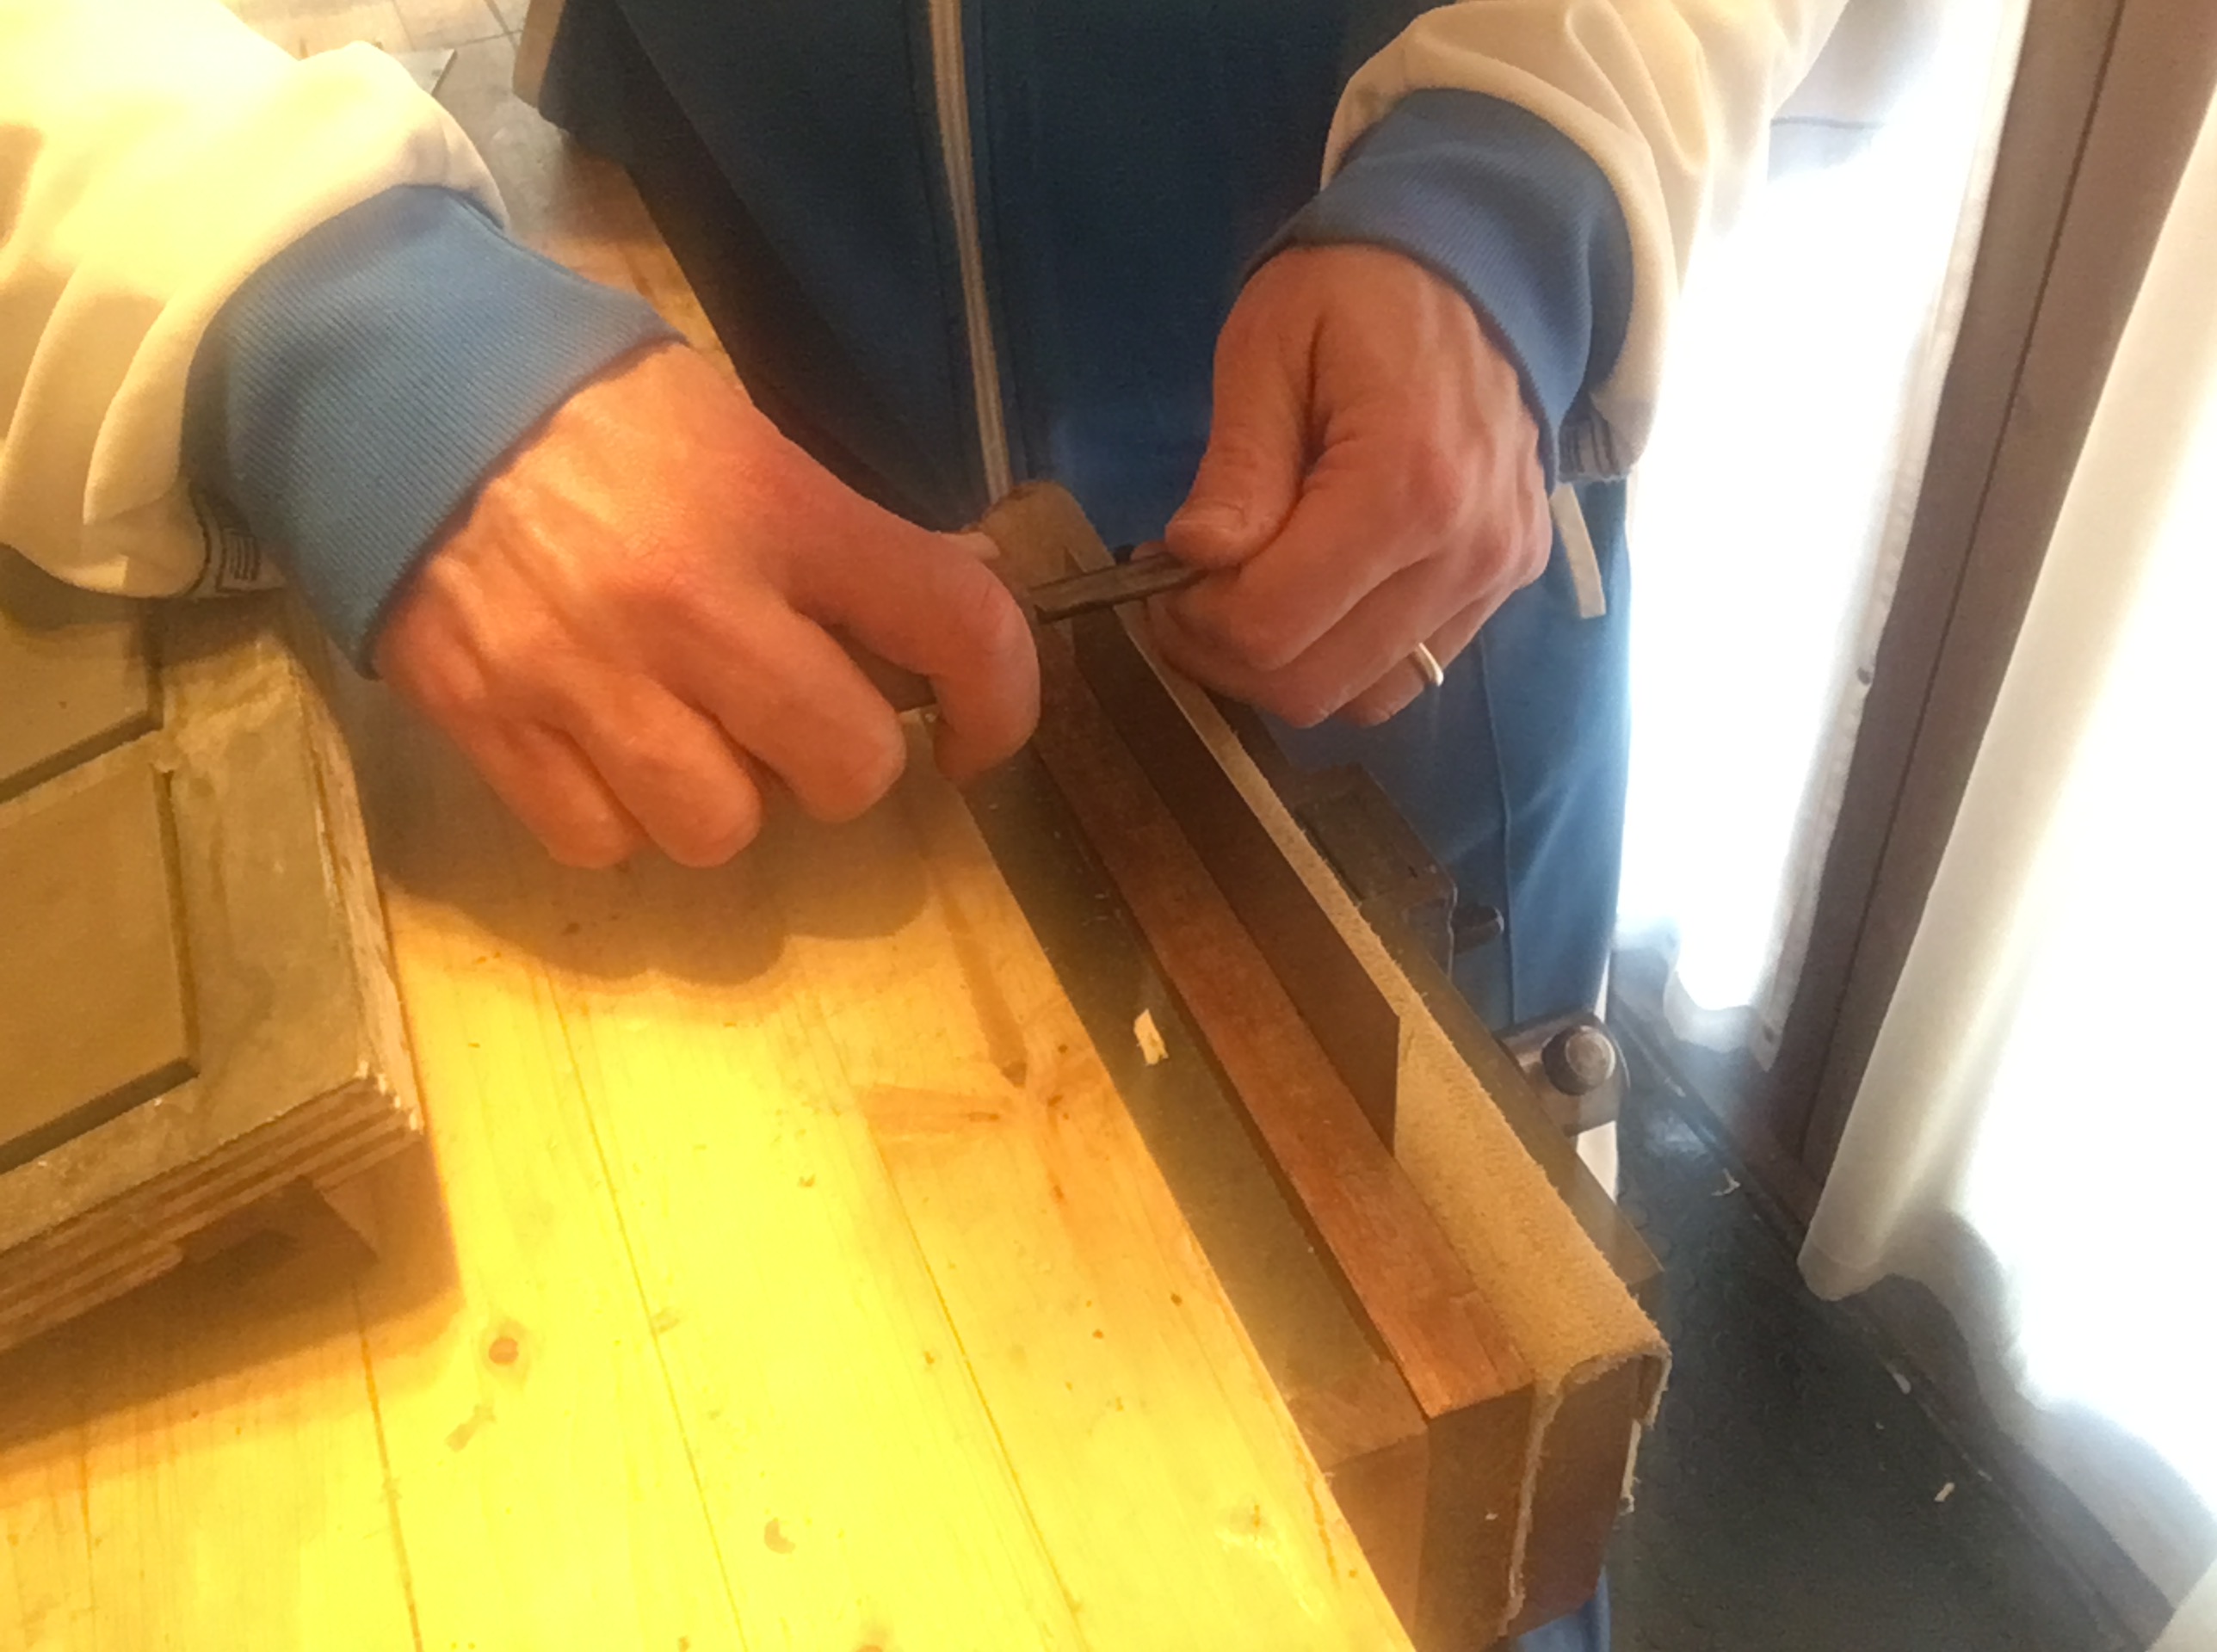
Inserendo la rasiera nella morsa del banco con il tagliente rivolto verso l’alto effettuiamo diverse passate avanti ed indietro sul tagliente stesso mantenendo ben premuto ed in posizione perpendicolare il brunitoio. In questo modo il tagliente, sotto la pressione del brunitoio (fatto di un metallo più duro della rasiera), modellerà il tagliente alle due estremità della rasiera creando una sorta di forma a martello.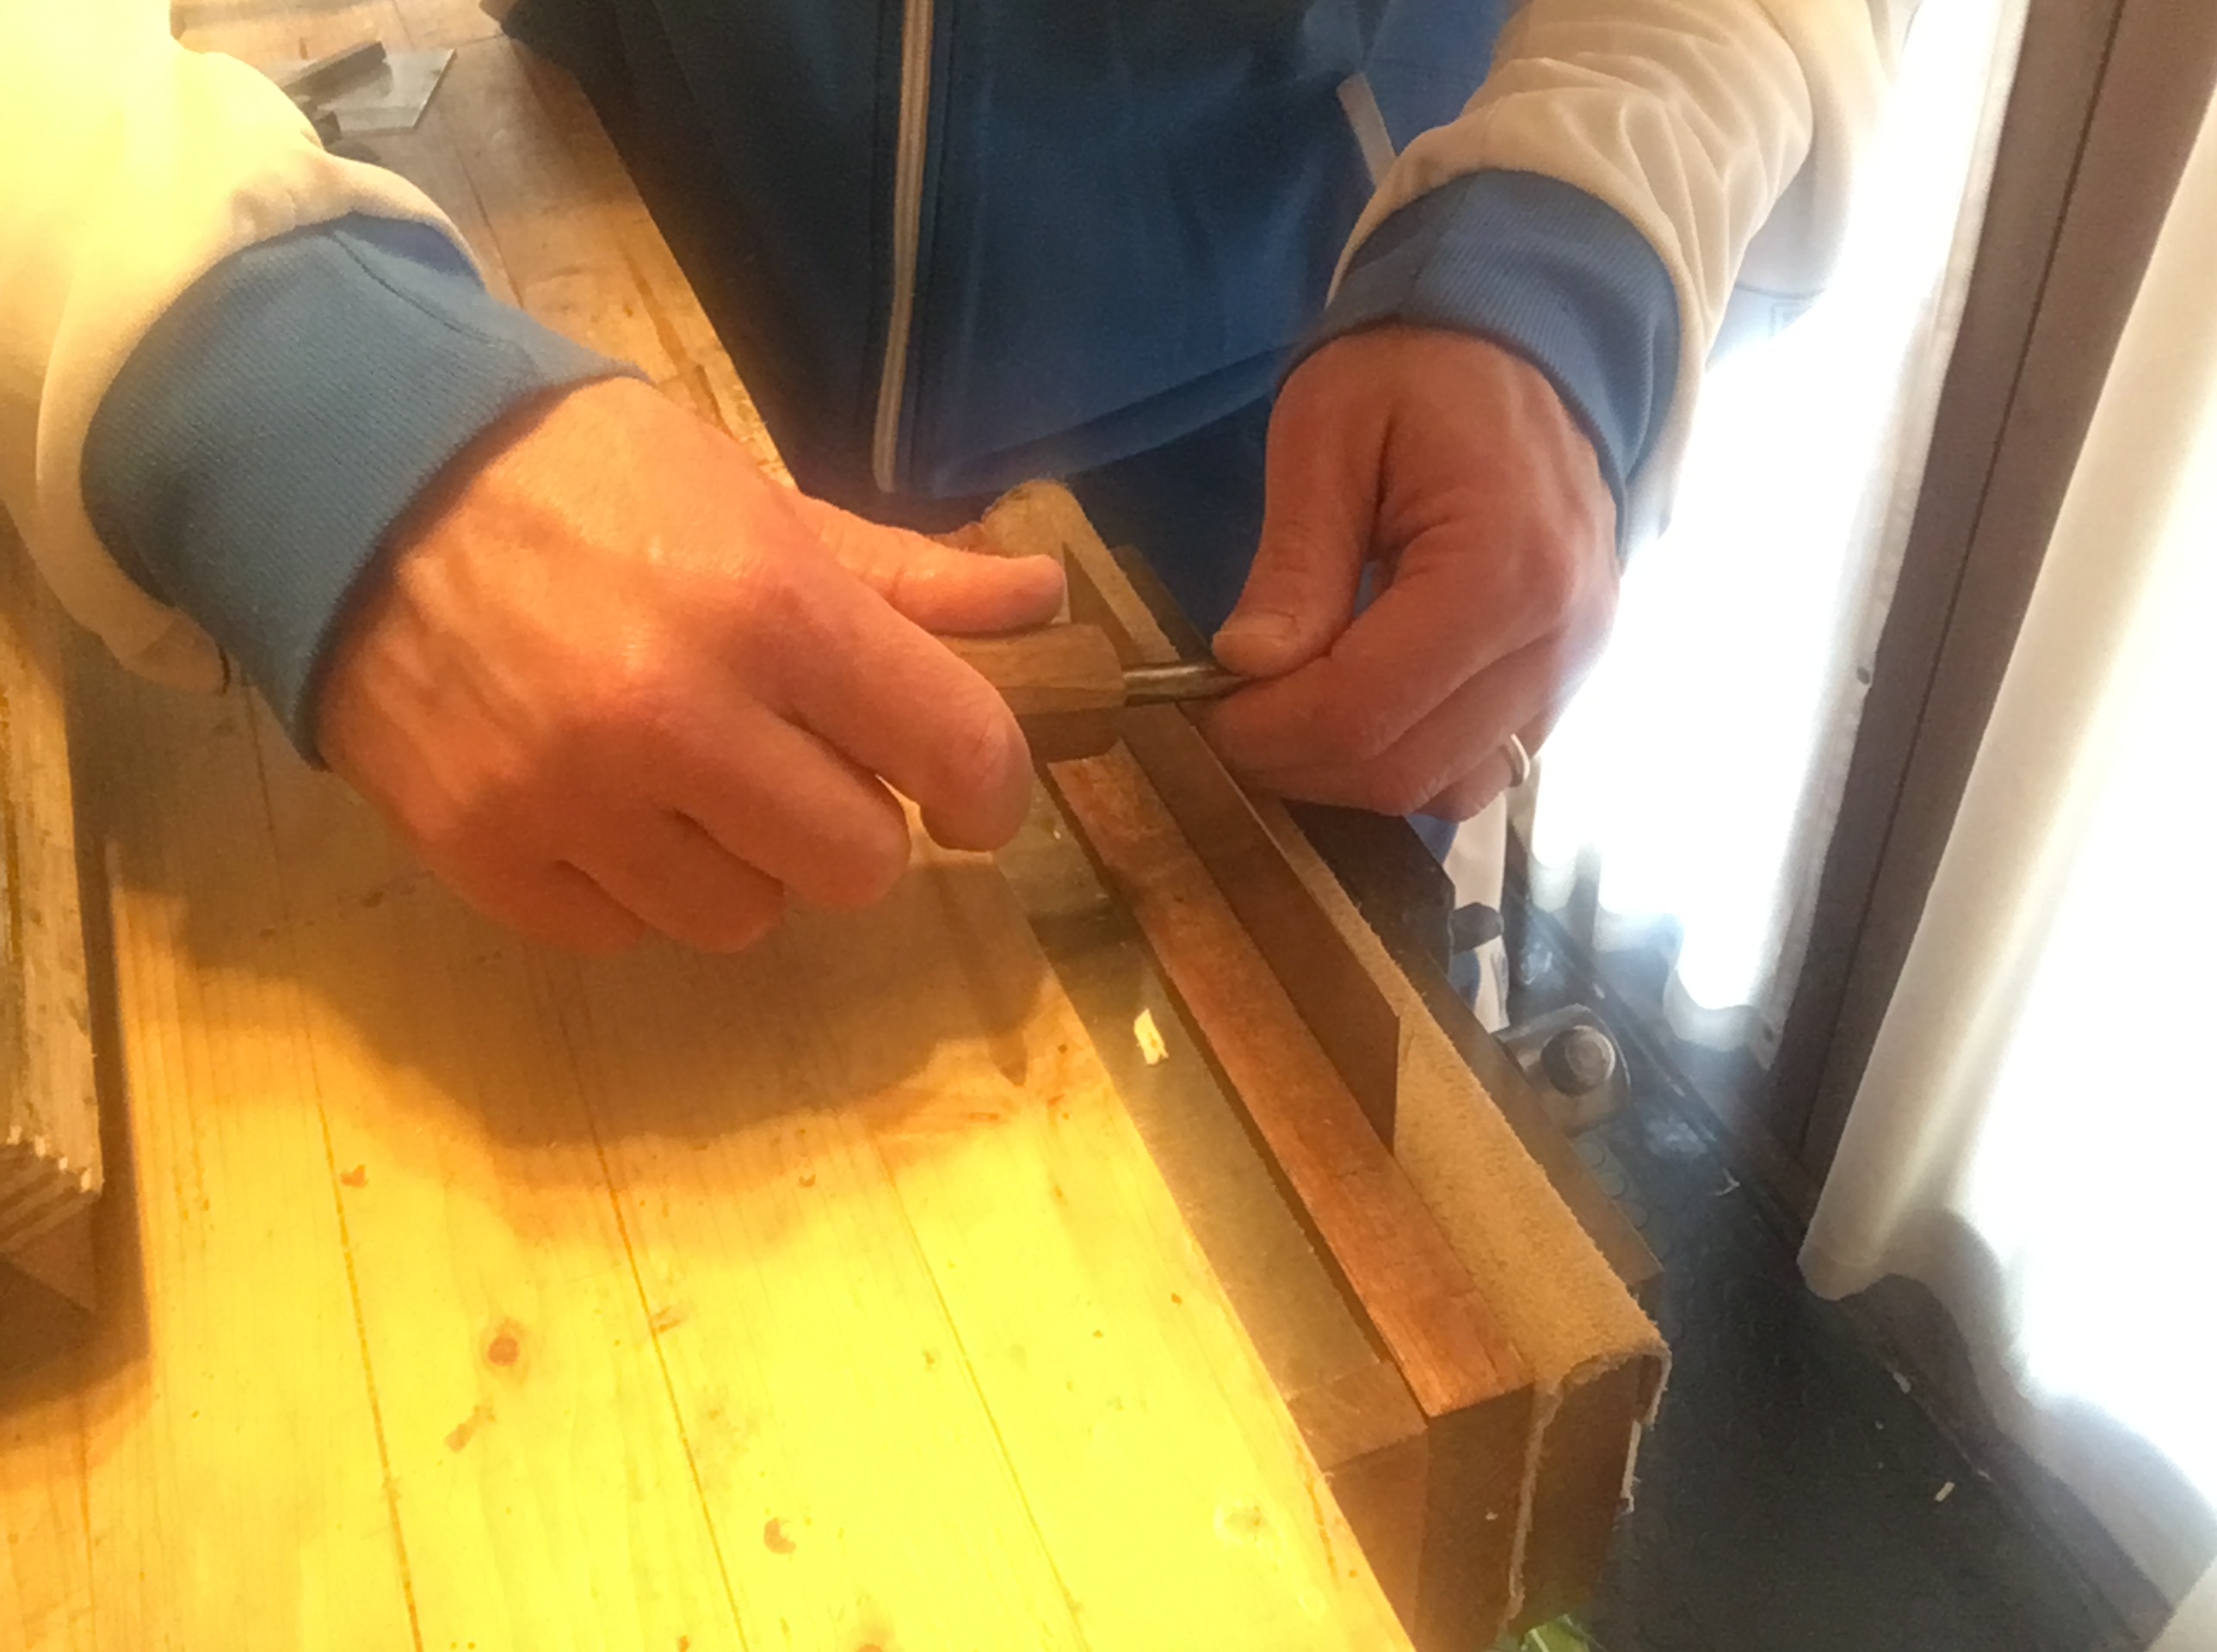
Infine, con l’ausilio di un supporto (o a mano libera) effettuiamo, sempre con il brunitoio, diverse passate sul tagliente inclinando progressivamente il brunitoio fino ad arrivare ad una inclinazione di qualche grado, (meglio non superare i 10 gradi) avendo l’accortezza di effettuare tale operazione su entrambe le facce della rasiera. Lo scopo è quello di creare una sorta di uncino (o ricciolo) su entrambe le parti del tagliente. É questo ricciolo che permetterà di far funzionare sia in fase di spinta che a tirare la nostra rasiera. È possibile ovviamente affilare ambedue i lati lunghi della rasiera.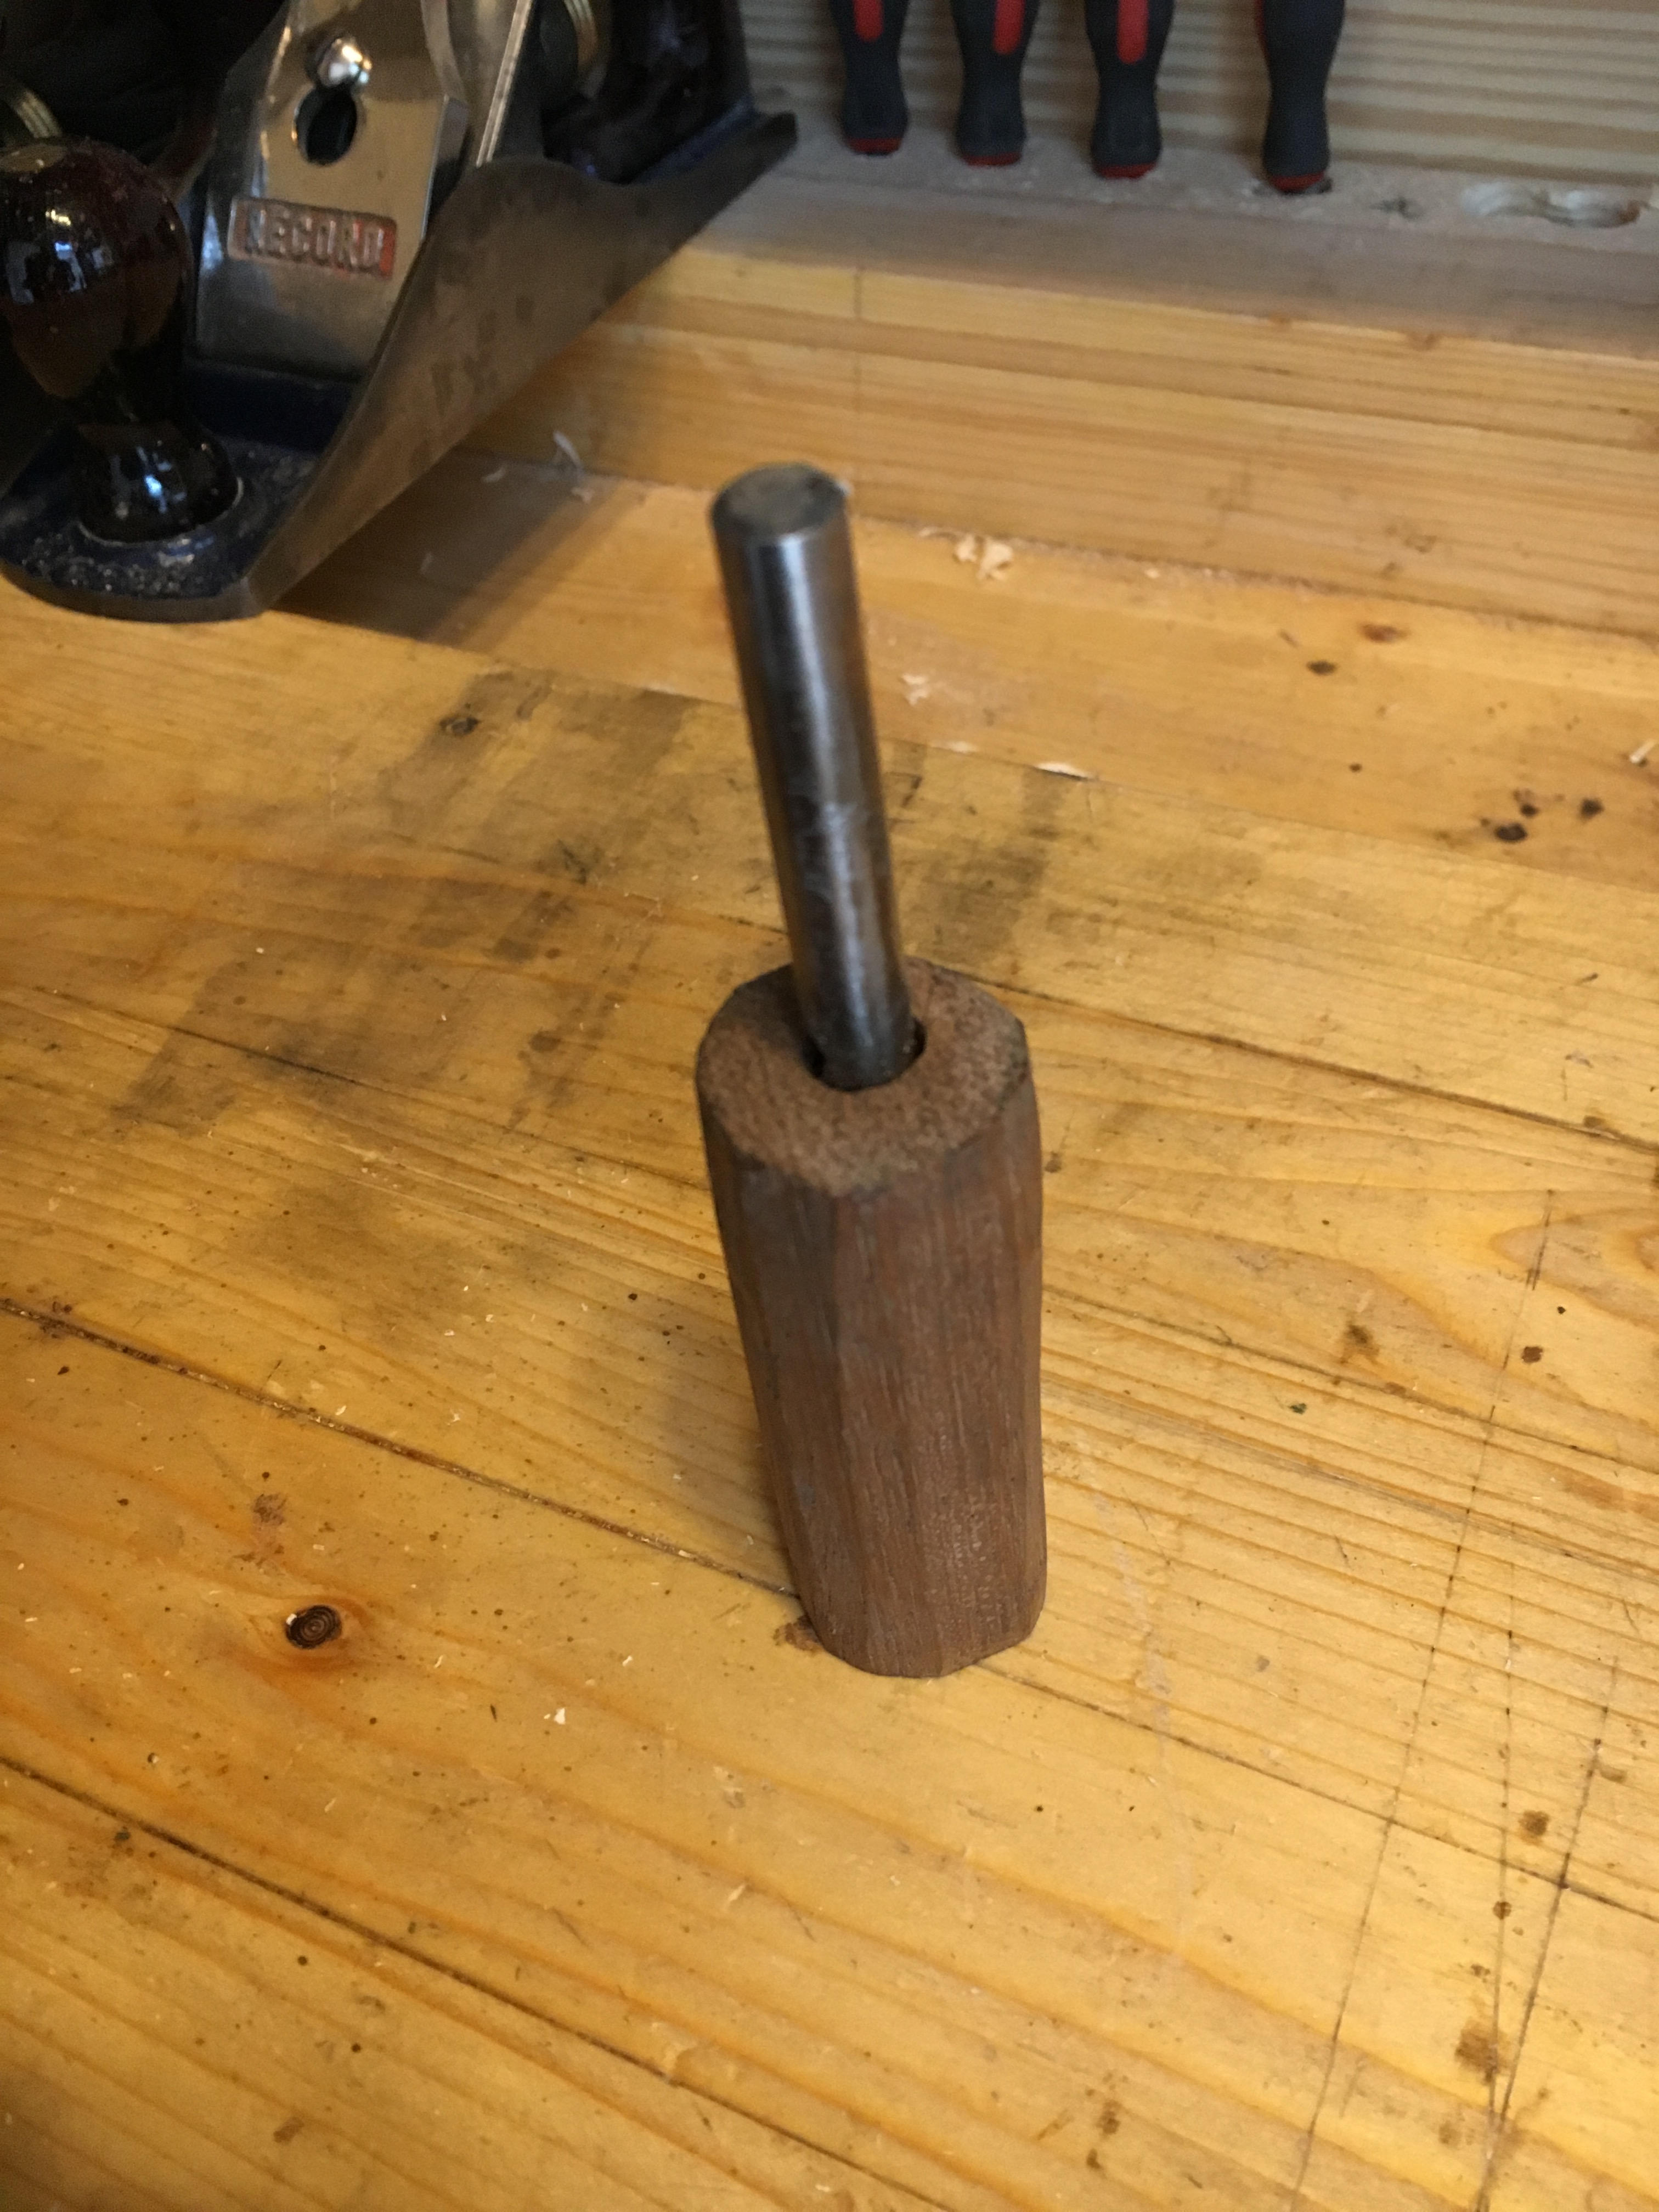
Il brunitoio deve essere costituito di un metallo più duro della rasiera stessa e questo al fine di poter consolidare l’acciaio (più tenero) della rasiera su se stesso. Solitamente hanno un grado di durezza che varia tra i 58 ed i 60 hrc, ma se ne trovano anche di più duri. Possiamo comprarne uno già pronto all’uso oppure usare un cacciavite (di solito fatto in un acciaio più duro, almeno sulla punta) o farcene uno utilizzando il cilindro di una punta per trapano, come nel mio caso, meglio se abbastanza lungo per non farsi male durante l’uso. Ne esistono comunque in commercio di varie forme (solitamente cilindrica o triangolare) e misure a prezzi abbordabili.
PIALLA PER RASIERA (CABINET SCRAPER). Generalità
La cabinet scraper rientra tra le cosiddette pialle speciali o particolari. Nella sua forma ricorda la vastringa (spokeshave) ma la lavorazione alla quale è deputata è completamente diversa. Si compone di un unico pezzo che comprende la suola, la seduta per la lama ed i manici per poterla afferrare. La si adopera prevalentemente a spingere ed ovviamente l’angolo di presentazione del tagliente rimarrà sempre quello preimpostato in fase di affilatura, che solitamente si aggira attorno ai 45 gradi.
La sua particolare conformazione la rende di fatto meno versatile in fase di utilizzo rispetto alle rasiere ma più utile per grandi superfici, specialmente di legno duro e su legni con nodi e cambi repentini di venatura. L’inclinazione della seduta è fissa e di circa 70 gradi.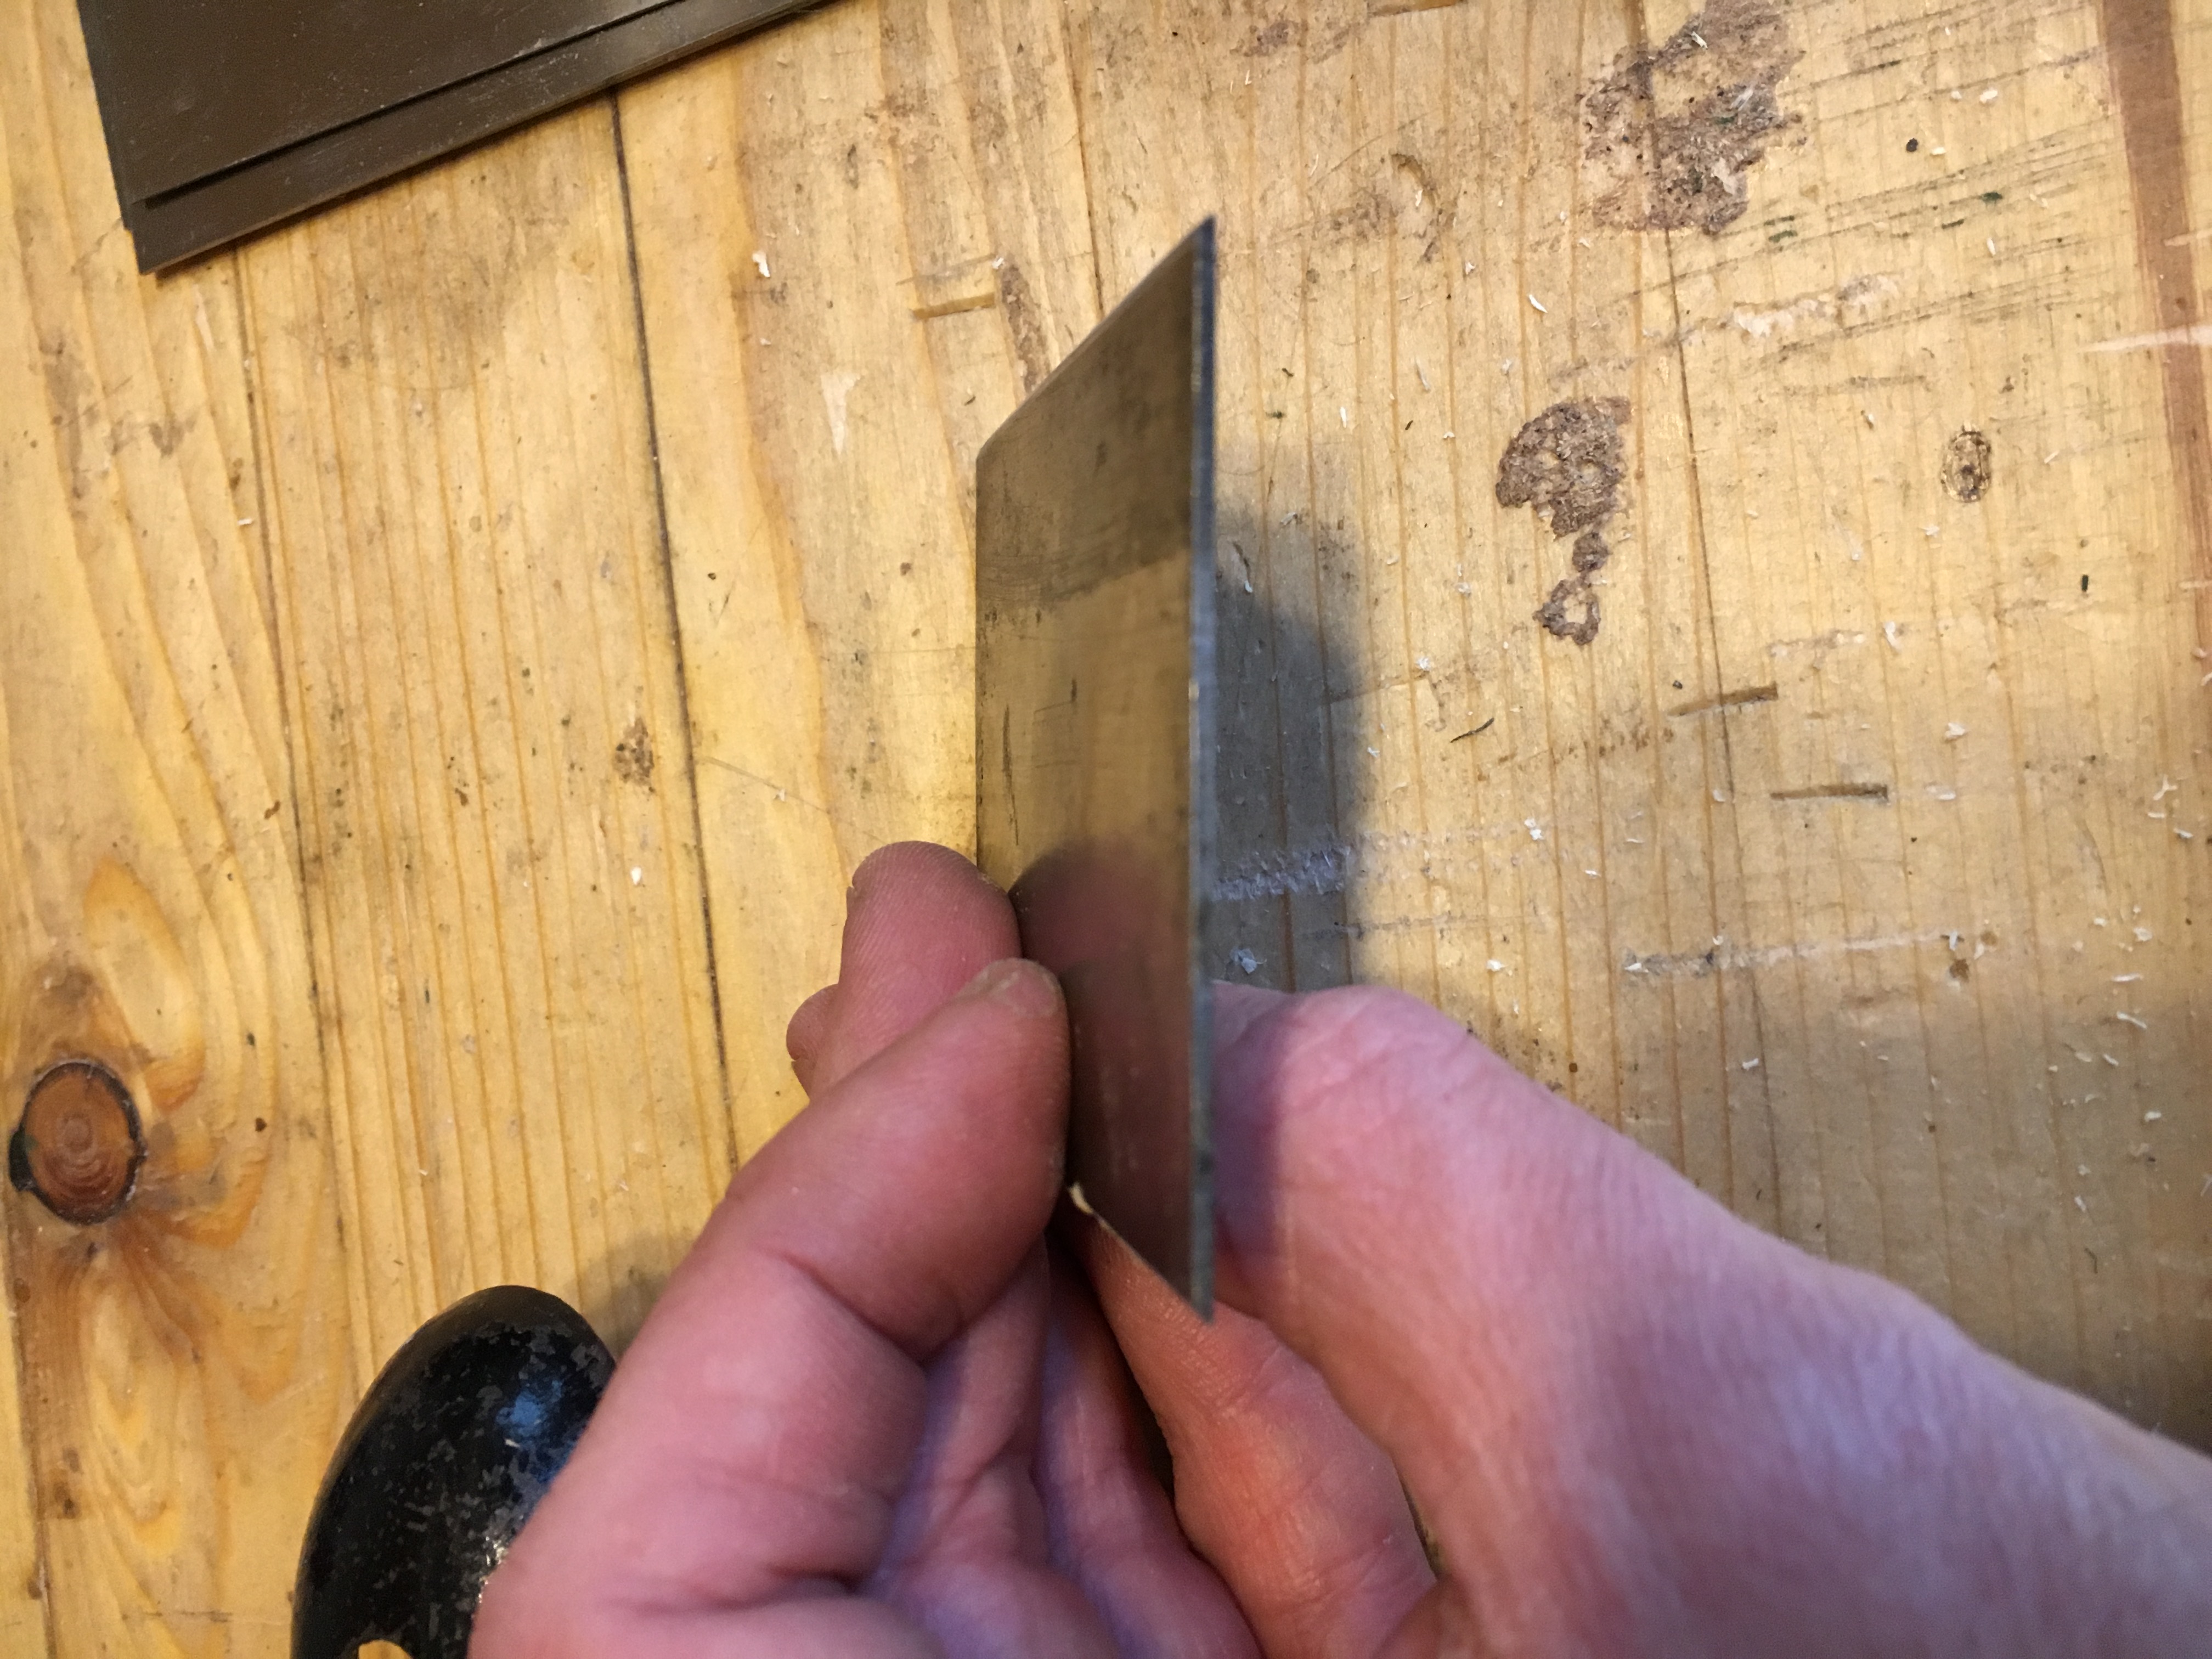
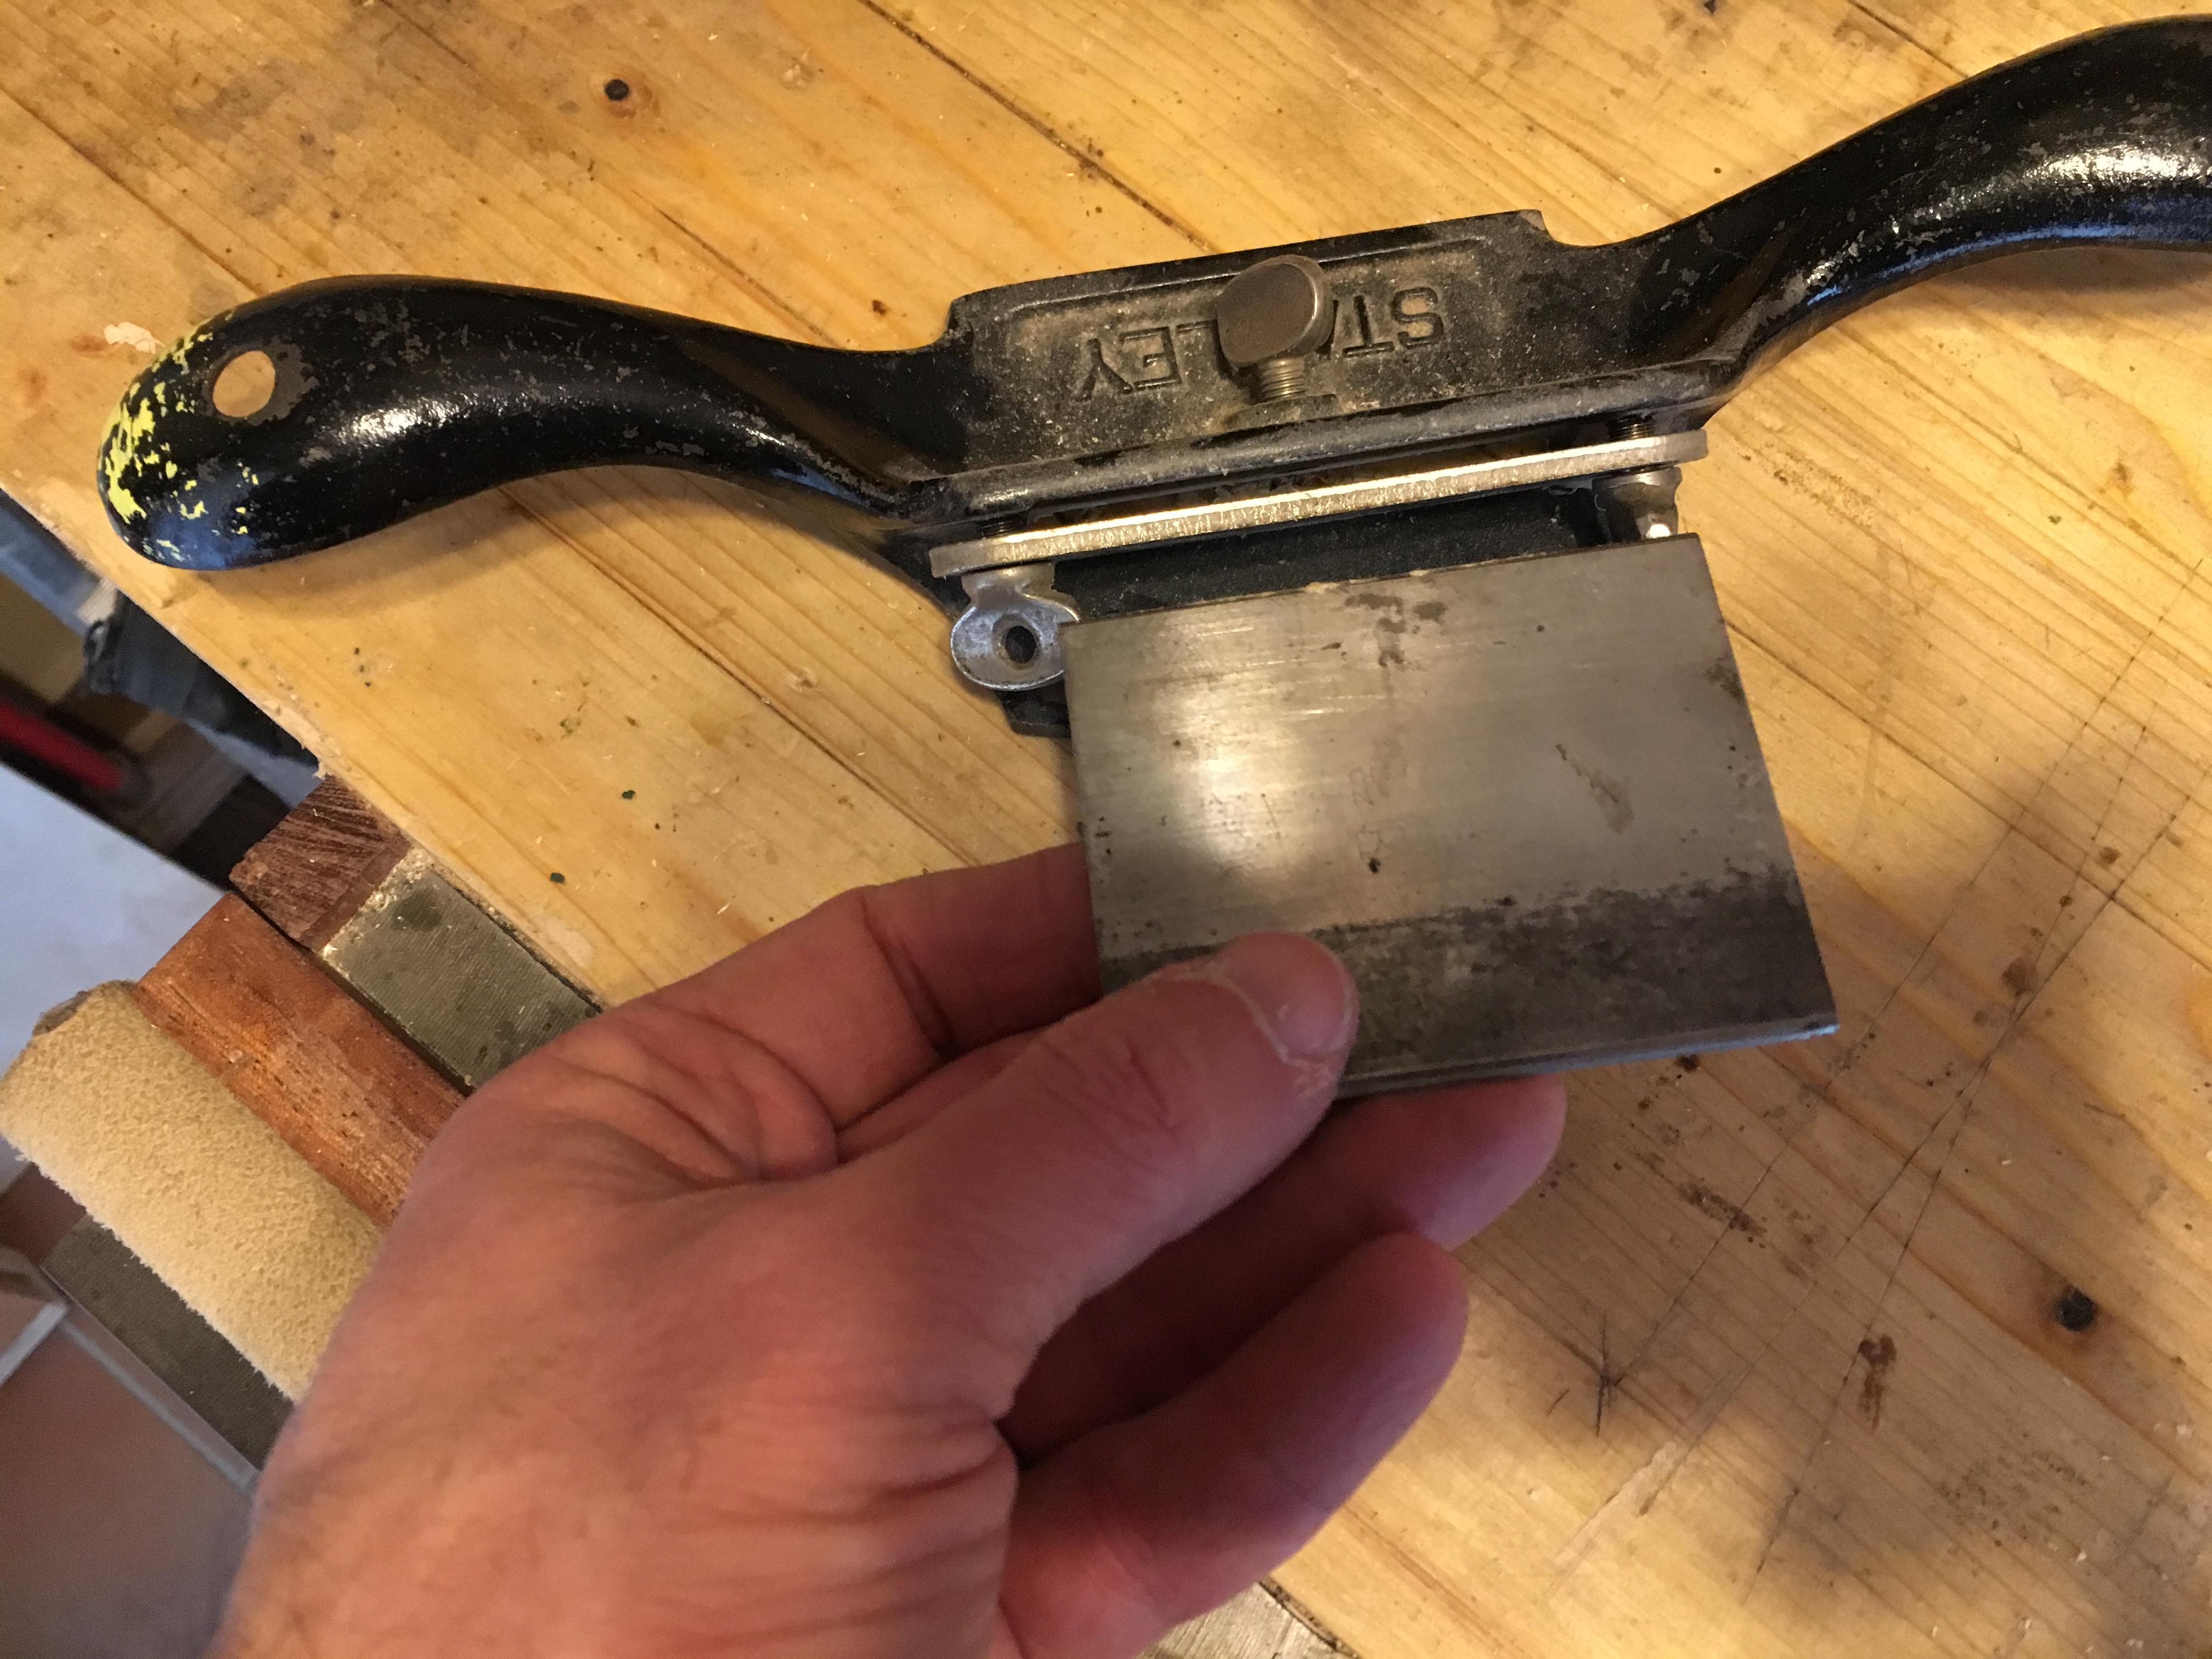
La lama è di un acciaio più spesso delle normali rasiere in quanto deve sopportare un lavoro gravoso e sovente si trova a dover operare in zone difficili, dove le normali pialle non funzionano bene. Così come per le rasiere, la si può utilizzare in diagonale rispetto alla direzione voluta. Se desideriamo una maggiore flessione della lama si può agire sulla vite a galletto posta sulla barra situata sul retro. La lama è inserita nella pialla in posizione bevel up, ovvero con il tagliente rivolto verso l’alto.
AFFILATURA DI UNA CABINET SCRAPER
Come per le rasiere la funzionalità della cabinet scraper dipende in buona sostanza dall’ affilatura della lama. Quindi come detto se la lama è poco affilata non otterremo riccioli di legno ma quasi tutta segatura. Se acquistiamo una cabinet scraper vintage il modello per eccellenza è la Stanley cabinet scraper 080.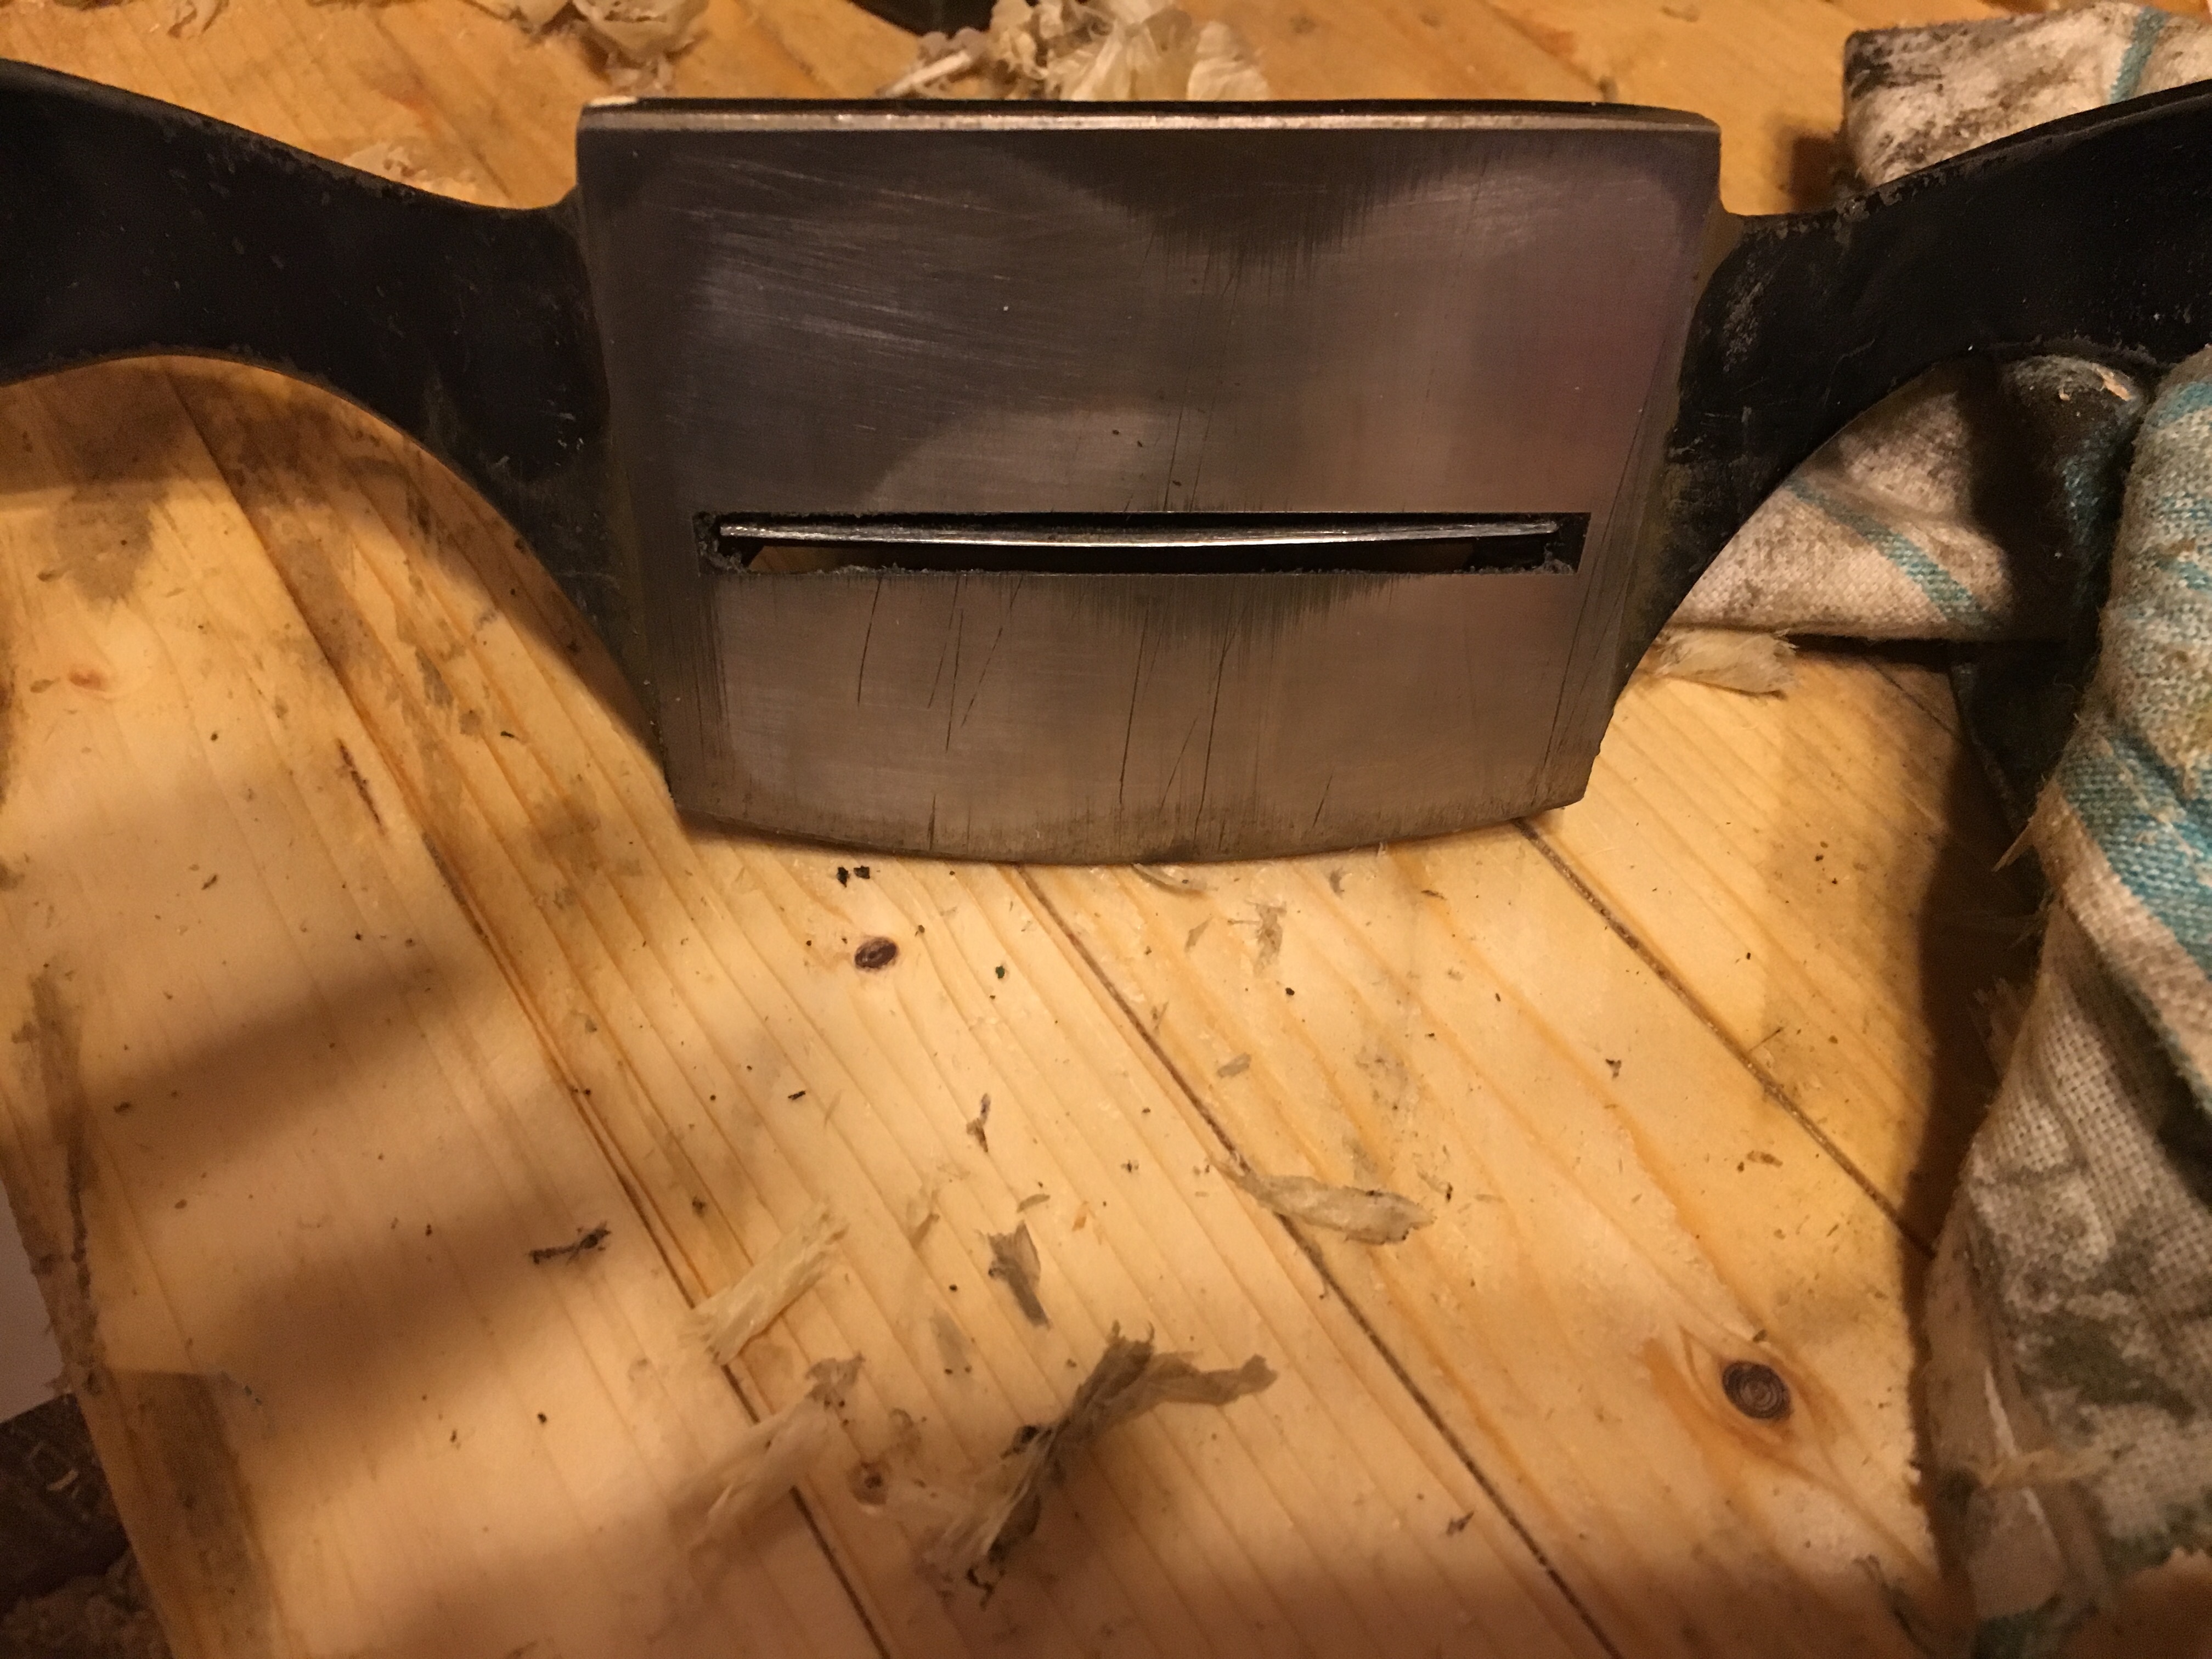
La prima cosa da verificare è la condizione della suola. Possiamo eventualmente provvedere a spianarla passandola sulla carta abrasiva iniziando dalla grana 60 o 80 e proseguendo alle grane successive per rimuovere i graffi lasciati dalle precedenti carte fino alla 1200 ed oltre, oppure agire sulle pietre, diamantate o non.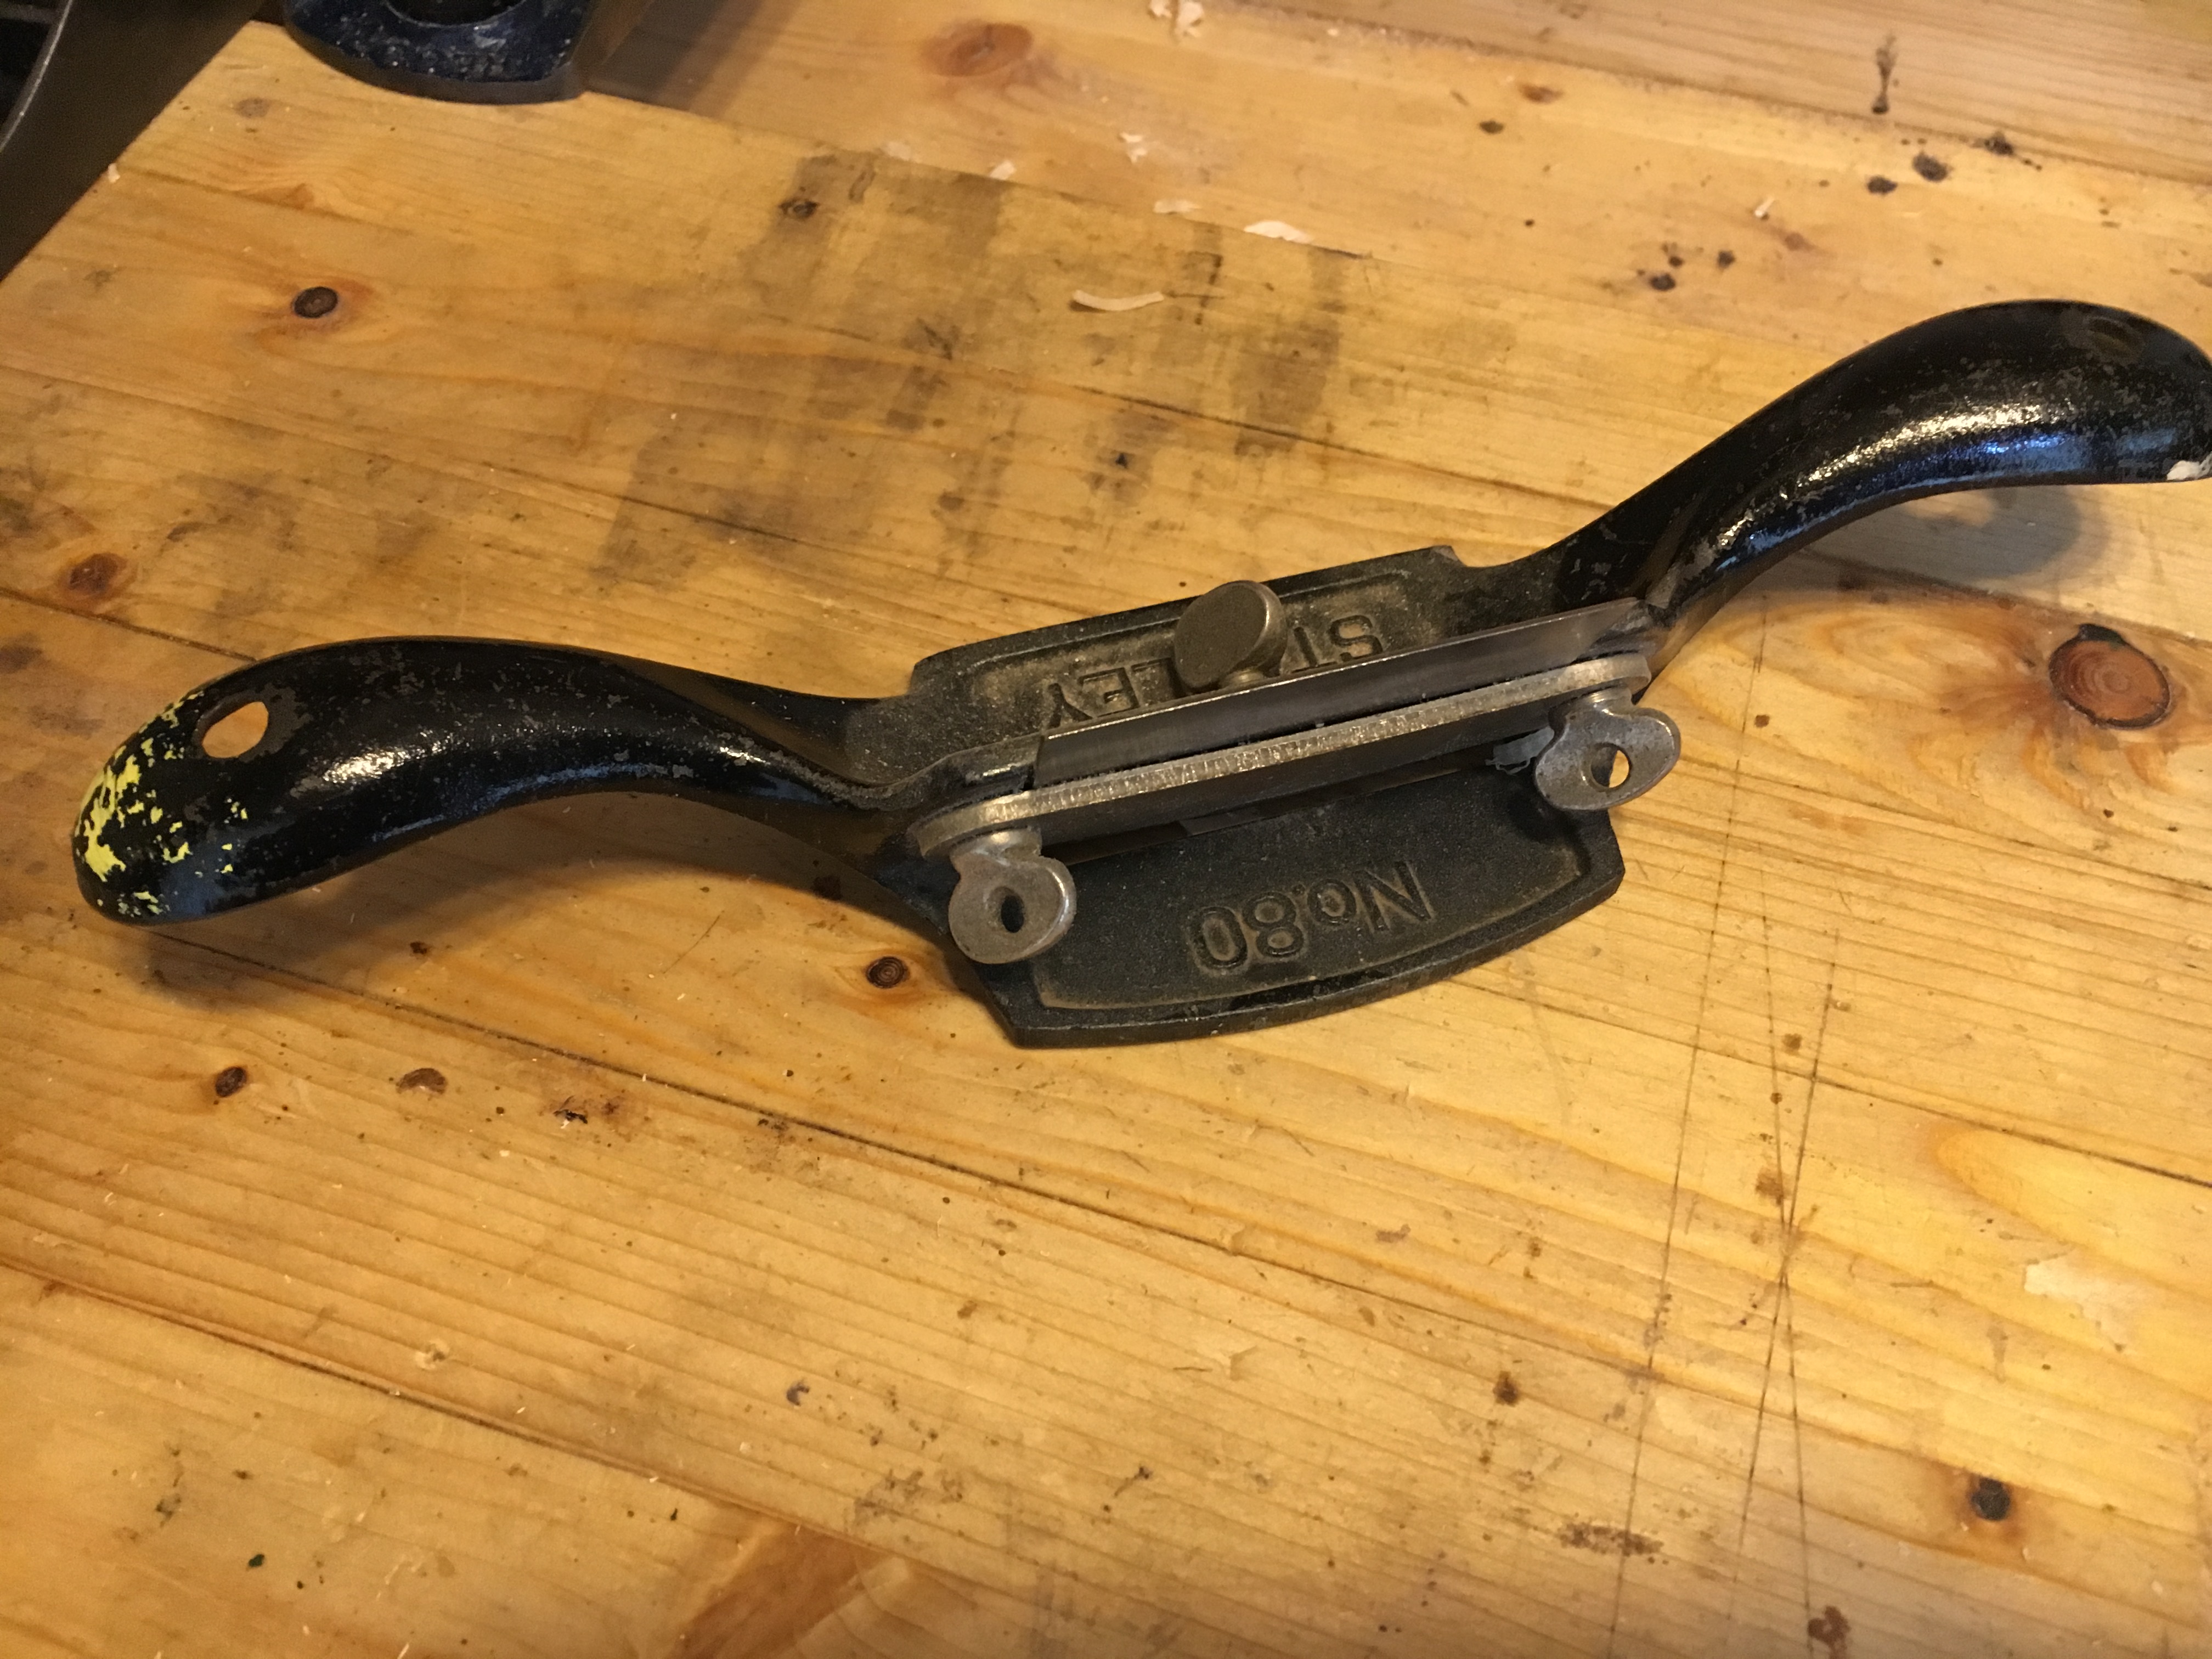
Una volta che la suola sarà perfettamente spianata si procede a svitare le due viti poste sul retro e che sostengono la barra metallica che fa da fermo per la lama. Si procede alla rimozione della lama ed alla sua affilatura. Come detto per le rasiere l’affilatura può avvenire su entrambi i lati della lama e viene fatta a 45 gradi più un ulteriore affilatura (uncino) ottenuta aggiungendo un’inclinazione al tagliente di circa 7 gradi.
Vediamo nello specifico come si affila la lama di una cabibet scraper.
Anzitutto il materiale occorrente (che poi è lo stesso utilizzato per l’affilatura delle rasiere) è il seguente:
1) Pietre diamantate ( o altri tipi di pietre o carta abrasiva) e lubrificante;
2) Pasta abrasiva e strop (opzionali);
3) Brunitoio, detto anche acciaino (burnisher);
4) Lima a faccia piatta;
5) Eventuali guide in legno (autocostruzione).
Prima di tutto se non è mai stato fatto è buona regola provvedere a spianare il retro della lama almeno nella porzione vicino al tagliente, seguendo la procedura vista per le lame delle pialle, questo anche per rimuovere l’eventuale vecchio ricciolo.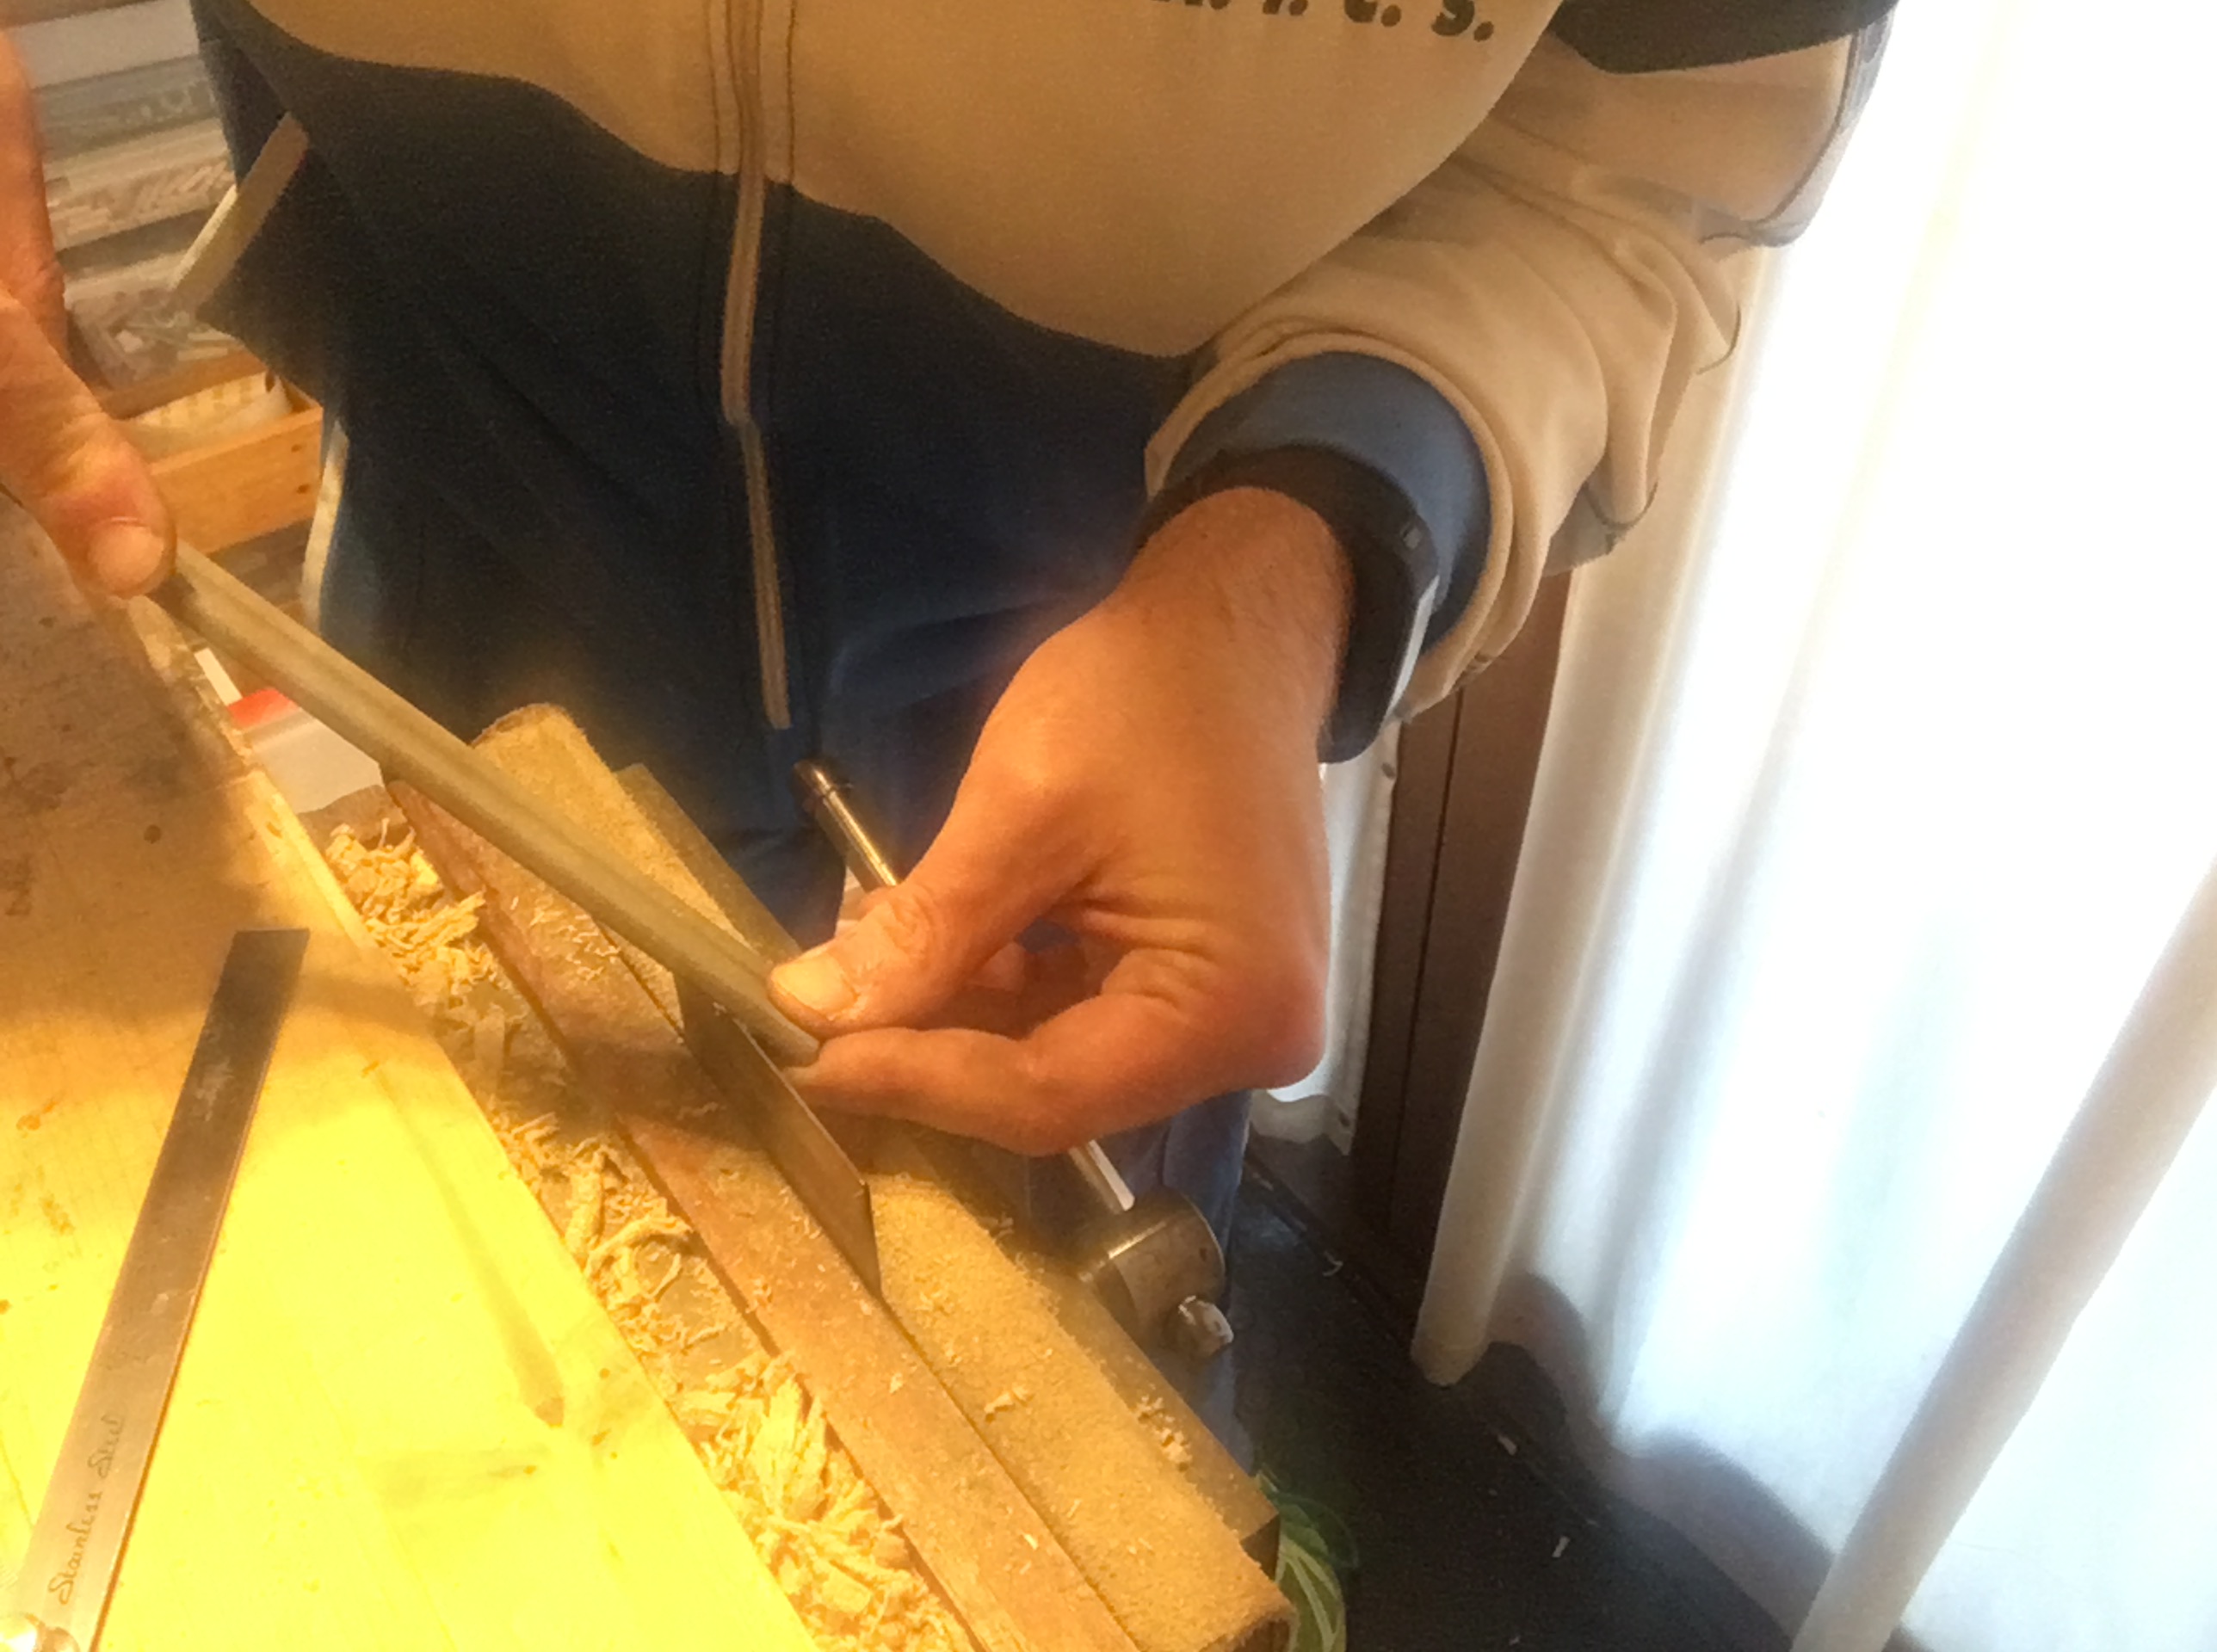
Per affilare il tagliente invece serriamo la lama nella morsa del banco (o all’interno della nostra guida auto costruita) con il tagliente rivolto verso l’alto. Con l’ausilio di una lima piatta lunga non meno di 20 cm. facciamo alcune passate premendo fermamente sul tagliente con un movimento in diagonale e dall’alto verso il basso così da rimuovere la vecchia affilatura e definire l’angolo a 45 gradi. E’ importante in questa fase cercare di mantenere il più possibile l’inclinazione a 45 gradi.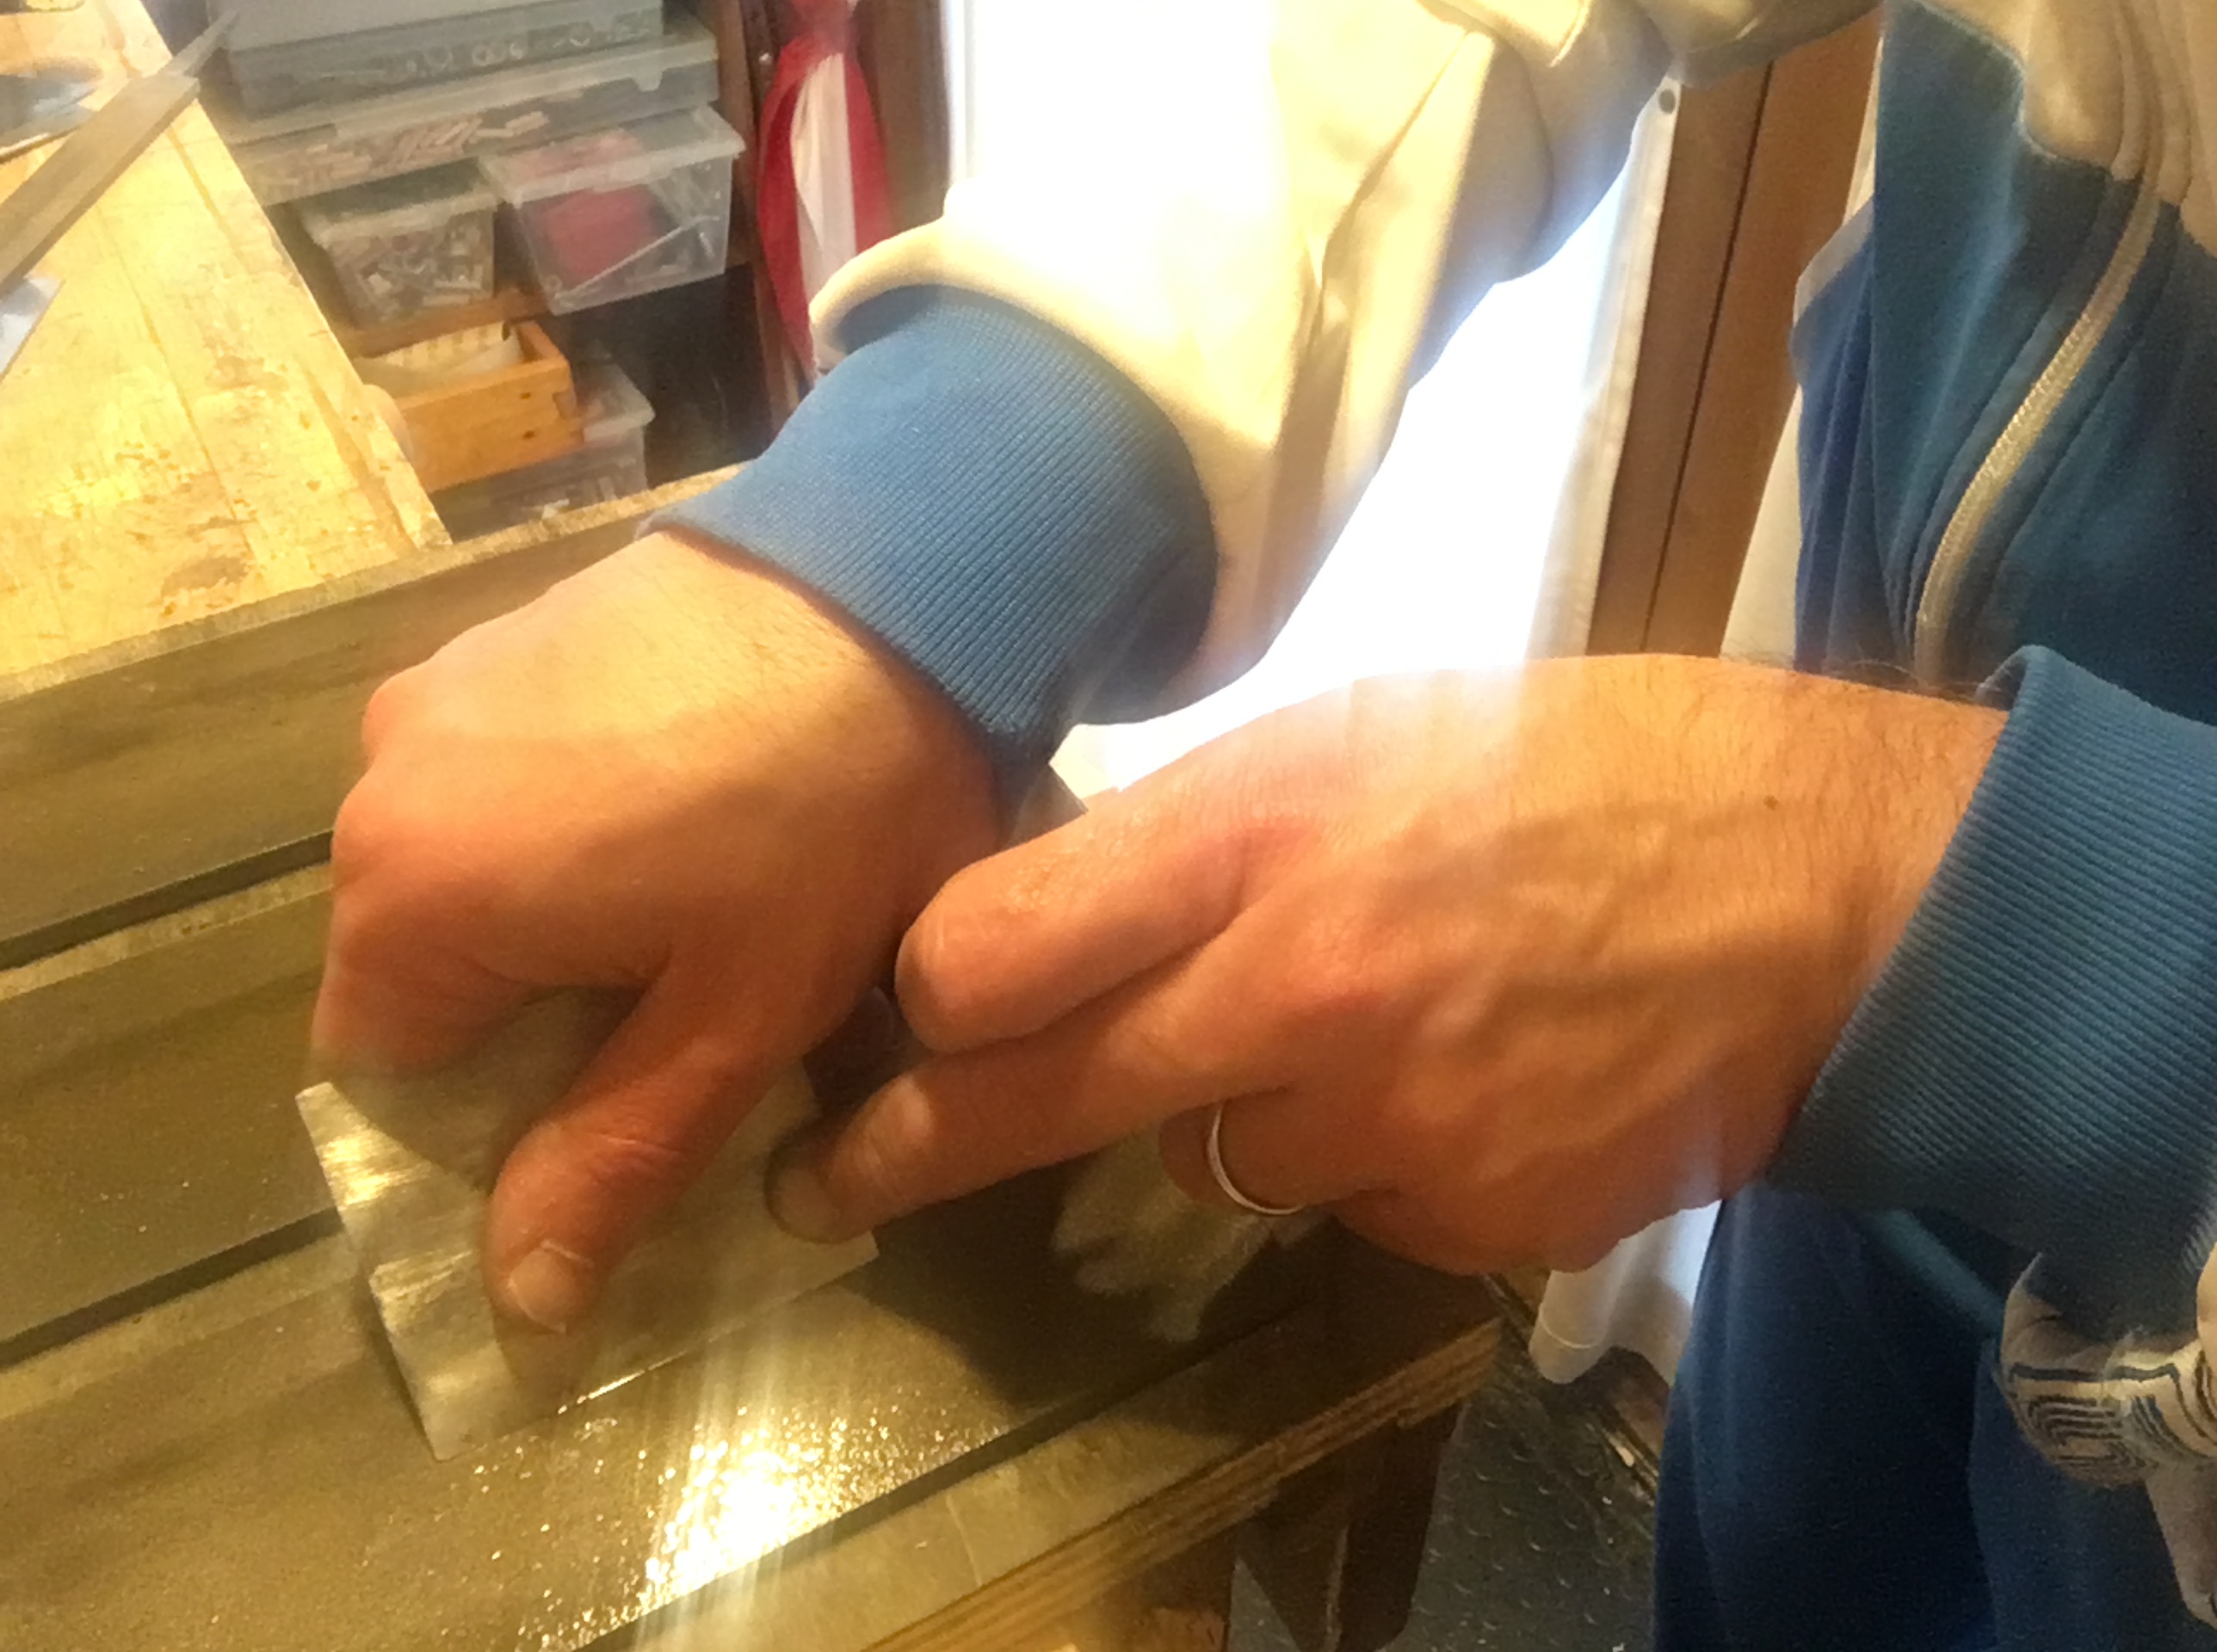
Di seguito passiamo all’affilatura del tagliente sulla pietra a grana 1200 cercando anche qui di mantenere il più possibile l’inclinazione della lama a 45 gradi. Sempre sulla pietra a grana 1200 si fanno alcune passate sulla lato opposto della lama rispetto al tagliente allo scopo di rimuovere la bava metallica creatasi. A questo punto il tagliente è affilato ma per farlo lavorare a dovere dobbiamo consolidare l’acciaio e creare il ricciolo (o uncino) sul tagliente stesso con l’ausilio del brunitoio.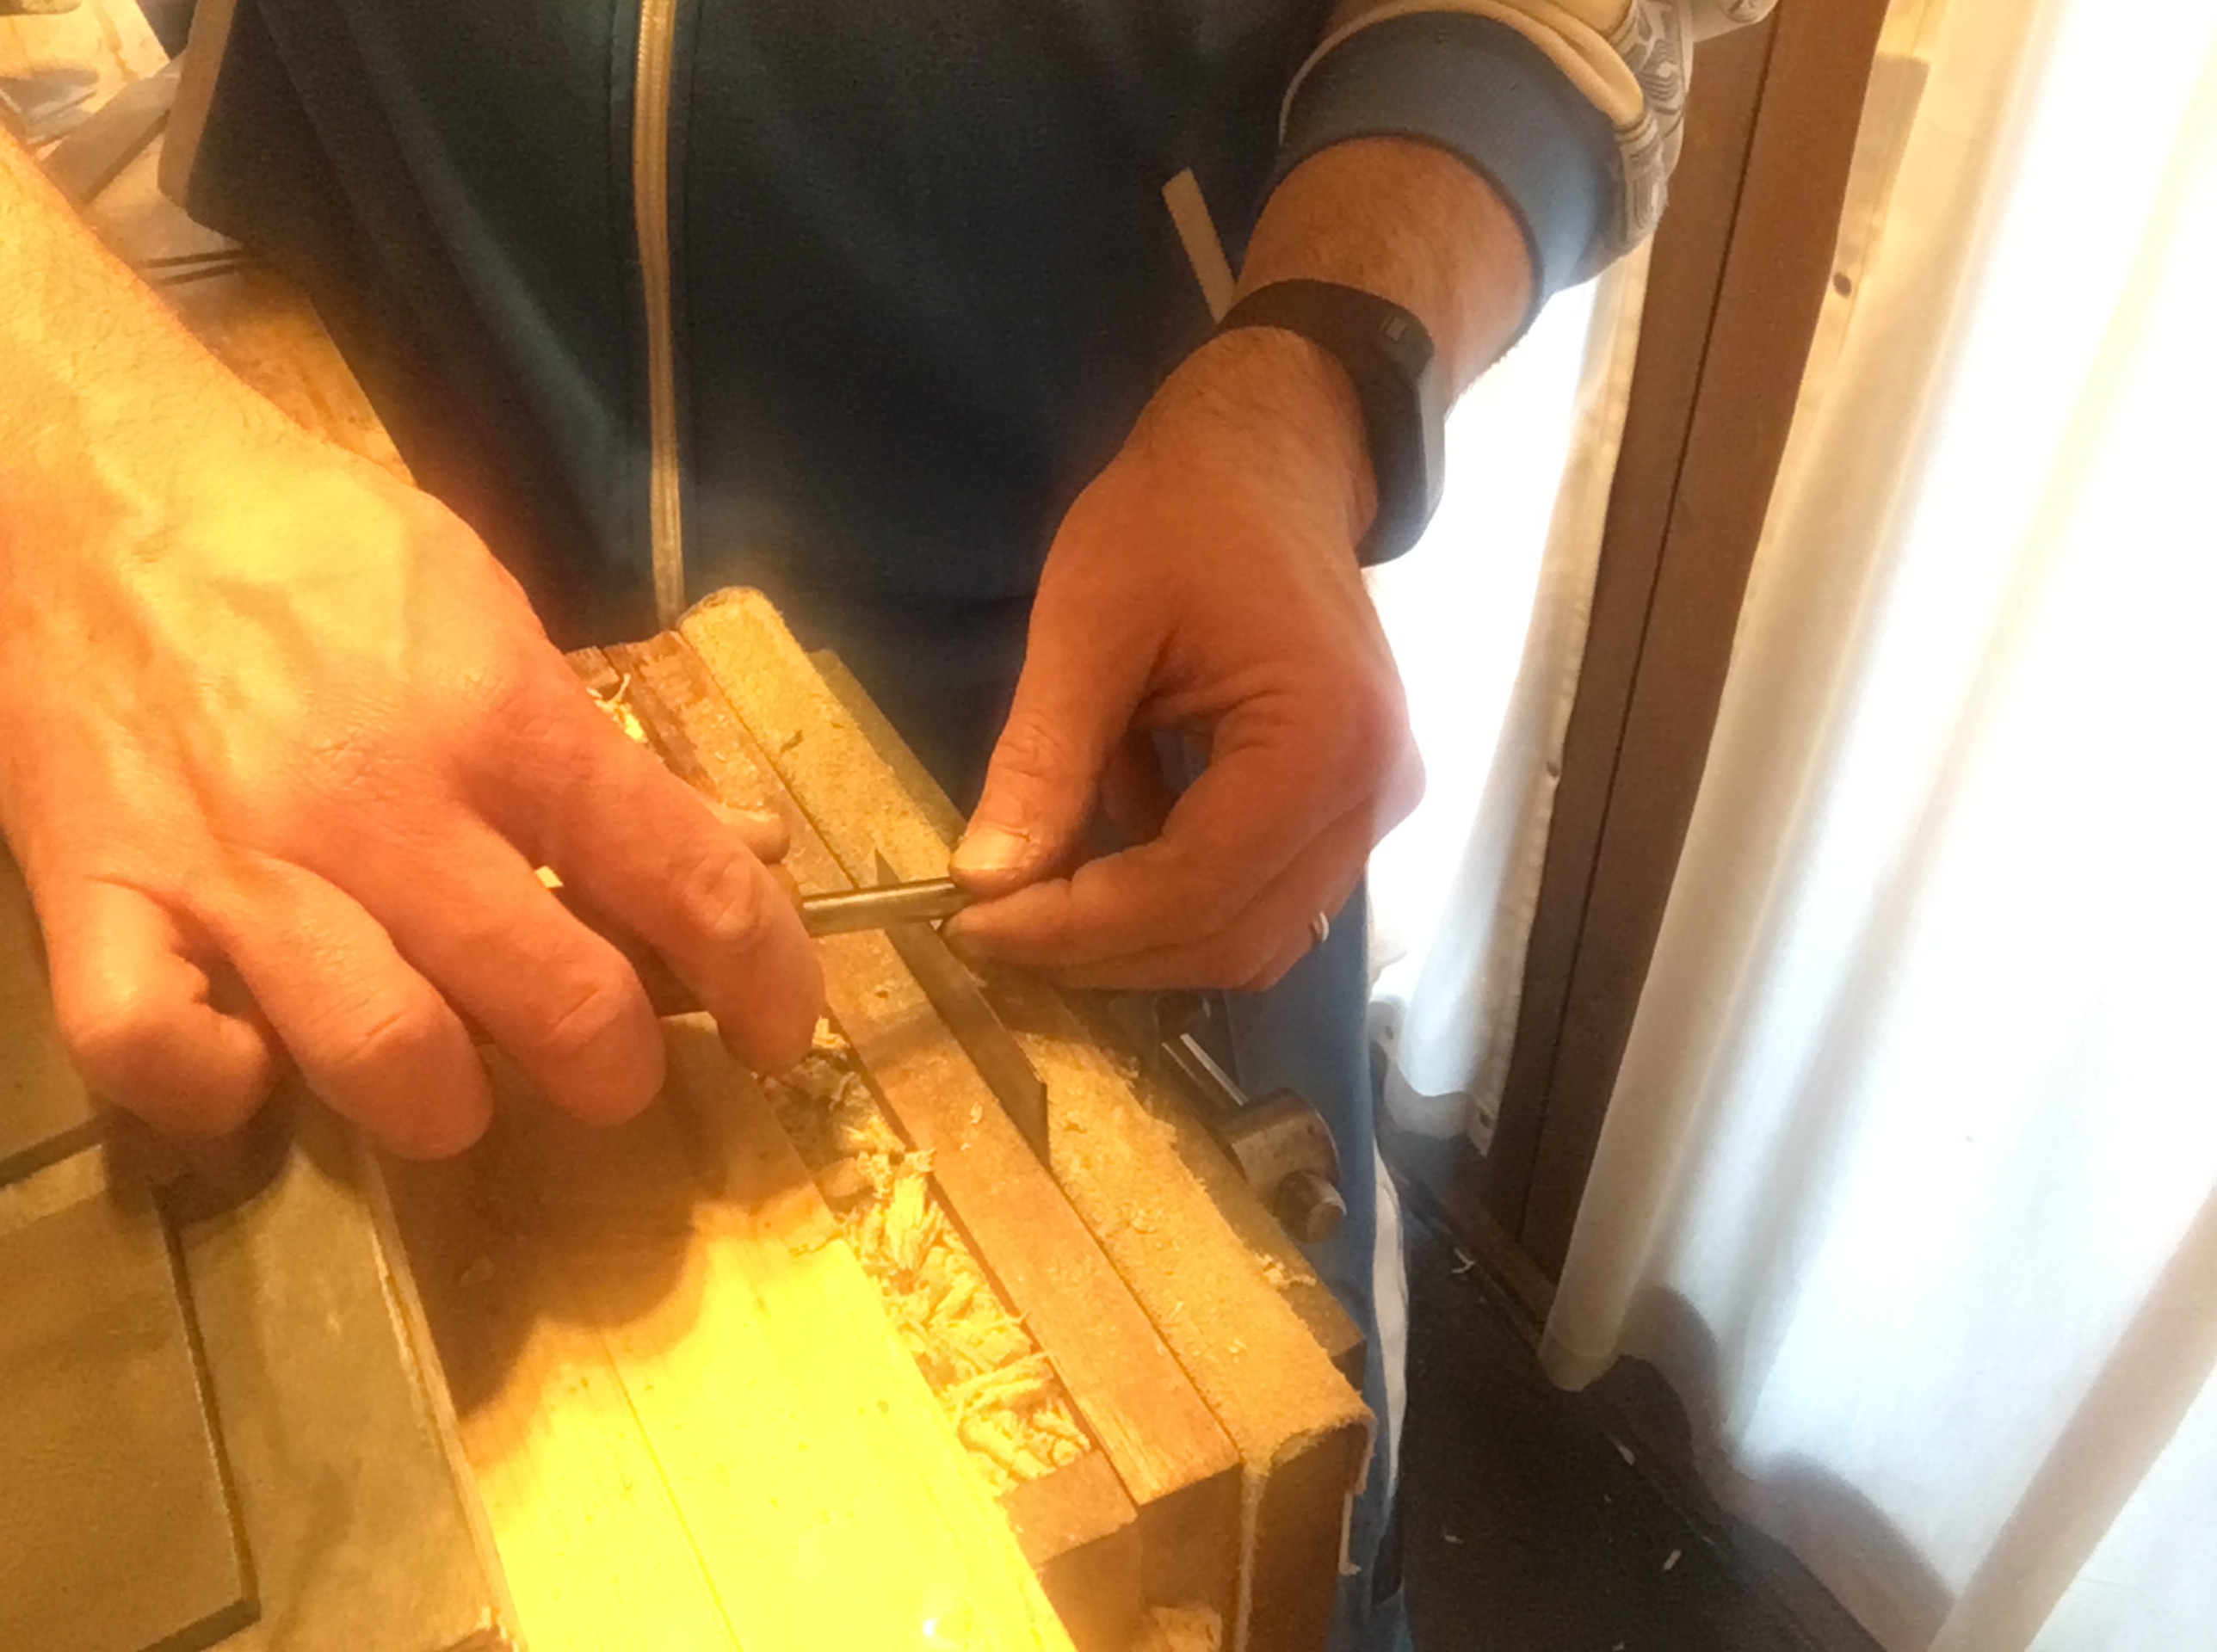
Dapprima consolidiamo l’acciaio sulla faccia opposta della lama rispetto al tagliente facendo circa 30 passate avanti ed indietro con forza con il brunitoio. Di seguito montiamo la lama nel supporto auto costruito con inclinazione a 52 gradi, che di fatto aggiunge 7 ai 45 gradi, o nella morsa del banco. Facciamo di nuovo parecchie passate (circa 20) con forza avanti ed indietro con il brunitoio e, se lavoriamo a mano libera con la lama inserita nella morsa, aumentando l’inclinazione leggermente al brunitoio ad ogni passata così da arrivare progressivamente ai 7 gradi di inclinazione. Alla fine del processo otterremo una specie di ricciolo in aggiunta al tagliente.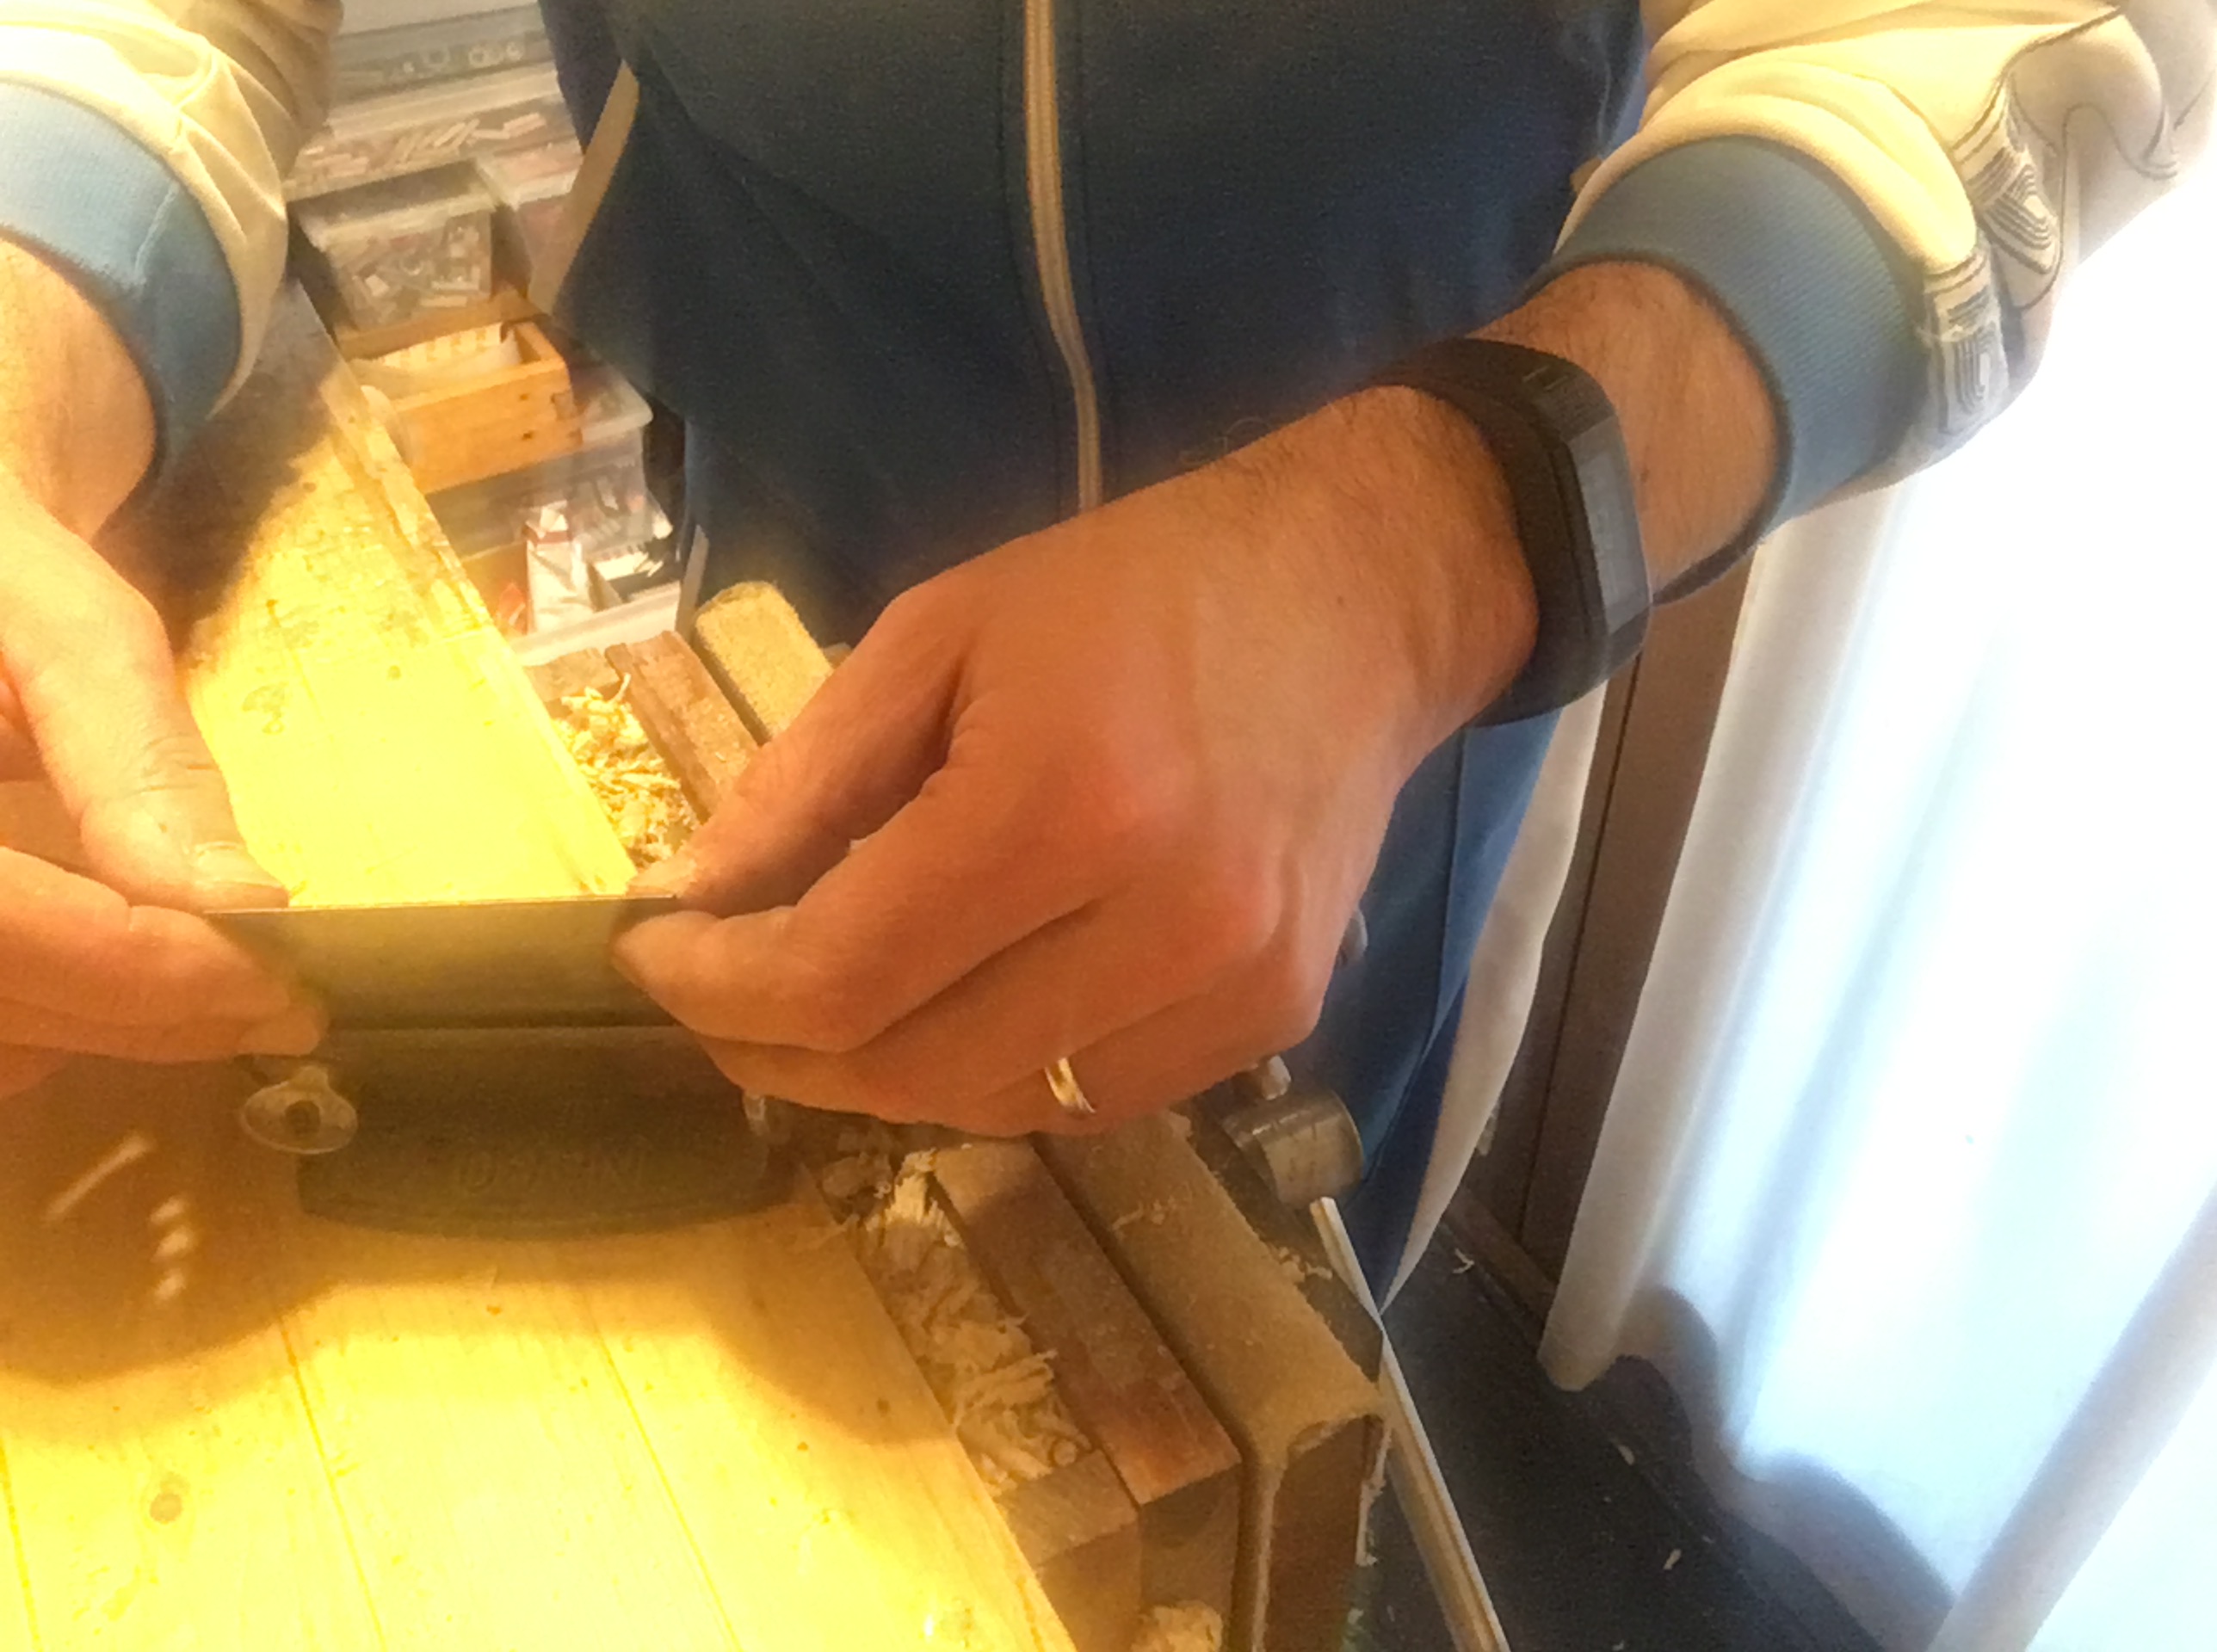
Infine rimontiamo la lama con il tagliente rivolto verso l’alto, appoggiandola nella seduta della pialla sino a farla toccare sul banco, quindi stringiamo bene le due viti poste sul retro che, attraverso una barra di acciaio, serrano la lama in posizione. Infine diamo una leggera curvatura alla lama ruotando la vite a galletto di un quarto di giro. Con la lama inserita in questa posizione il ricciolo sarà contro la direzione di lavoro, permettendo alla cabinet scraper di levigare la superficie. Se la lama non dovesse “mordere” il legno possiamo aggiustarne manualmente la profondità allentando le due viti che la tengono serrata oppure darle una maggiore curvatura o infine direzionare l’utensile in una posizione obliqua.

La cabinet scraper funziona meglio a spingere. Non è intuitivo capire subito come debba essere orientata ma per non sbagliarsi si può prendere a riferimento la vite a galletto che flette la lama che dovrebbe essere visibile e rivolta verso di noi. Questo nel movimento a spingere. Per il movimento a tirare è necessario ruotare l’utensile e quindi vedremo di fronte a noi le due viti che sorreggono la barra reggilama. La tecnica di utilizzo della rasiera è molto intuitiva e standardizzata. Lo stesso non si può dire per la tecnica di affilatura, essendosi sviluppate con il tempo molte varianti sul tema. L’importante è non farsi scoraggiare dall’apparente difficoltà del procedimento. Una volta presa dimestichezza con questi utensili, ci renderemo infatti conto che sono una valida alternativa all’utilizzo delle carte abrasive a grana grossa.
_____________________________________________________________
In previous posts we talked about some hand tools that are used to smooth the surface of the wood. I think it would be useful to summarize them, including those we haven’t talked about so far, putting them in order of use, or according to the priority of choice to bring a wood from the rough to a surface as smooth as possible.1) Scrub plane; 2) Rasp; 3) File, 4) Bench plane (smoothing plane), 5) Scrapers (cabinet scraper and scraper cards), 6) Various grit abrasive paper and steel wool. In this article we talk specifically of the scraper and the cabinet scraper. These tools, by smoothing the wood, are placed half way between the planes and the abrasive papers, so that they can be brought back into the so-called wood finishing phase. They are tools often forgotten and little used, undervalued in their function and this wrongly because they are able to bring a planed surface to a high degree of sanding making us save time, money and effort in the use of abrasive papers (at least those up to the 250 grit).
SCRAPERS
The scraper is nothing more than a simple piece of metal. It can be of various sizes and take various forms such as rectangular, oval or sinusoidal with concave and convex curves. The thickness of the metal is generally a few tenths of a millimeter, but on the market it is possible to find them of various thicknesses, thus allowing a certain flexibility in the using, adapting to the various processes and types of wood. They are mainly used for smoothing small circumscribed areas, especially on hard woods, (where they give the best of themselves) and where they find the main field of application. They can also be used on soft wood, such as pine and fir, but in these cases the result will not be optimal, even by implementing certain strategies, such as applying less force and working with a very sharp cutting edge. As mentioned we can use them to smooth the surface of the wood (after using the plane and before the abrasive papers), or in certain situations where the use of the plane is particularly difficult, such as in the presence of knots or sudden change grain direction or difficult grains. It can also be used to remove deep scratches or pencil marks in the wood and again to remove excess glue and varnish. It works well on planed surfaces, while it is not particularly suitable if used on raw wood. Its use is to be held as shown in the photos, in a movement to push or pull and in a diagonal position and often inclined (about 30 – 40 degrees, but the position is very subjective) compared to the direction in which we are working, so as to improve the approach with the surface.Being more or less flexible allows us to adapt it to the work we are doing. If we want to concentrate on a precise point we can flex it more with the thumbs of the hands placed on the back or vary the angle of inclination of the presentation of the scraper.The success of working with the scraper depends, in substance, not much on the hardness of the steel (however modest in this tool), but on the accuracy of the sharpening. If the sharpening is done properly you should produce soft wooden curls. If it is not done well or in any case it is not very sharp, only sawdust will be produced. It is interesting to note a substantial difference between the scraper sharpening and, for example, the sharpening of the plane or of the chisels. In the latter, in fact, the cutting edge is created by the meeting of two extremely smooth surfaces. On the other hand, in the case of scrapers the cutting edge is formed by the thickening and subsequent curvature of the steel itself of which the blade is formed, by the use of the burnisher. Let’s try to understand how this happens. Below I have inserted a small drawing, I hope it will help.
SHARPENING SCRAPERS
The picture above shows the equipment used to sharpen a scraper. The success of the polishing and leveling of the wood depends largely on sharpening. The material required is the following: 1) Diamond stones (or other types of stones or abrasive paper) and lubricant, 2) Buffing compound and strop (optional); 3) Burnisher; 4) Flat-faced file; 5) wooden guides (optional). A scraper that has lost its sharpness will no longer produce wood-like curls but only sawdust. Even if the scraper is brand new and therefore never used it will need to be sharpened. The producers ensure only the regularity of the sides of the scraper but not their sharpening (except, as I know, of Veritas that sells them already sharpened and ready to use).If it is not brand new, the first step is to remove the old sharpening by using a flat-faced iron file at least 20 cm. long. The file must be passed three or four times decisively from one end to the other of the cutting edge placed on the scraper, trying to keep perpendicularity as much as possible, possibly helping us with a squared piece of wood that helps us to support and maintain the 90 degrees. The file can be used both longitudinally and transversely referring to the cutting edge.Next we pass the two faces near the cutting edge on the 1200 grit diamond stone. In doing so we will have completely removed the old sharpening.To create the new sharpening we make some passes to the cutting edge on the 1200 grit diamond stone trying to keep the perpendicularity as much as possible (again possibly helping us with a support at 90 degrees) and then again on the two faces to remove the burr created.At this point we place the scraper on the bench top and with the burnisher we make some quick passes (about 30 passes) back and forth on both sides of the scraper, near the cutting edge in order to consolidate the steel. The scraper would already have a sharp cutting edge, but not to the point of being able to work as it should on the wood. To get a real sharpening we will also need to consolidate the steel of the cutting edge, again with the aid of a burnisher.Inserting the scraper in the bench vice with the cutting edge facing upwards, we make several passes back and forth on the cutting edge itself, keeping the burnisher well pressed and in perpendicular position. In this way, the cutting edge, under the pressure of the burnisher (made of a metal harder than the scraper), will shape the cutting edge at the two ends of the scraper, creating a sort of hammer shape.Finally, with the help of a support (or freehand) we carry out, always with the burnisher, several passes on the cutting edge, gradually inclining the burnisher until reaching an inclination of a few degrees, (better not to exceed 10 degrees) having the care to carry out this operation on both sides of the scraper. The purpose is to create a sort of hook (or curl) on both sides of the cutting edge. It is this curl that will make it possible to operate the scraper both in push and pull movement. It is obviously possible to sharpen both long sides of the scraper.The burnisher must be made of a metal that is harder than the scraper and this in order to consolidate the (softer) steel of the scraper on itself. Usually they have a degree of hardness that varies between 58 and 60 hrc, but they are even harder. We can buy one ready to use or use a screwdriver (usually made of a harder steel, at least on the tip) or make one using the cylinder of a drill bit, as in my case, better if long enough to avoid bad during use. However, there are various shapes available on the market (usually cylindrical or triangular) and at affordable prices.
THE CABINET SCRAPER
The cabinet scraper it’s a special plane and in its shape recalls the spokeshave but its work is completely different. It consists of a single piece that includes the sole, the seat for the blade and the handles to grasp it. It is mainly used to push and obviously the angle of presentation of the cutting edge will always remain the one preset in the sharpening phase, which is usually around 45 degrees. This in fact makes it less versatile in the use phase than the scraper but more useful for large surfaces, especially of hard wood and on wood with knots and sudden grain change direction. The inclination of the seat is fixed and around 70 degrees.The blade is made of steel thicker than the normal scraper as it has to withstand heavy work and often has to work in difficult areas, where normal planes do not work well. As with the scraper, it can be used diagonally with respect to the desired direction. If we want a greater flexion of the blade we can act on the wing nut screw located on the bar located on the back. The blade is inserted into the plane in the bevel up position, ie with the cutting edge facing upwards.
SHARPENING CABINET SCRAPER
As for the scraper, the functionality of the cabinet scraper largely depends on the sharpening of the blade. So as I said if the blade is not very sharp we will not get wood curls but almost all sawdust. If we buy a vintage plane scraper the model par excellence is the Stanley scraper plane 080.
The first thing to check is the condition of the sole. We can eventually smooth it by passing it on the abrasive paper starting from 60 or 80 grit and continuing to the following grits to remove the scratches left by the previous papers up to 1200 and beyond, or act on the stones, diamond or not.Once the sole is perfectly flattened, proceed by unscrewing the two screws at the back and supporting the metal bar that acts as a stop for the blade. The blade is removed and sharpened. As mentioned for the scraper sharpening it can take place on both sides of the blade and is done at 45 degrees plus a further sharpening (hook) obtained by adding an inclination to the cutting edge of about 7 degrees. We see specifically how to sharpen the blade of a scraper plane.
First of all the necessary material (which is the same used for sharpening the scraper) is the following: 1) Diamond stones (or other types of stones or abrasive paper) and lubricant 2) Buffing compound and strop ( optional); 3) Burnisher; 4) Flat-faced file; 5) Wooden guides (optional). First of all, if it has never been done, it is a good rule to flatten the back of the blade at least in the portion near the cutting edge, following the procedure seen for the blades of the planes, this also to remove any old curl.To sharpen the cutting edge instead we tighten the blade in the bench vice (or inside our self-built guide) with the cutting edge facing upwards. With the help of a flat file no less than 20 cm. long let’s do some passes pressing firmly on the cutting edge with a diagonal movement and from top to bottom so as to remove the old sharpening and define the angle at 45 degrees. It is important at this stage to try to keep the inclination at 45 degrees as much as possible.Next we go on to sharpen the cutting edge on 1200 grit stone, trying to maintain the inclination of the blade as much as possible at 45 degrees. Still on the 1200 grit stone, some passes are made on the opposite side of the blade with respect to the cutting edge in order to remove the metal burr created. At this point the cutting edge is sharp but to make it work properly we must consolidate the steel and create the curl (or hook) on the cutting edge itself with the help of the burnisher.First we consolidate the steel on the opposite face of the blade with respect to the cutting edge, making about 30 passes back and forth strongly with the burnisher. Then we put the blade in the self-built support with a 52 degree inclination, which actually adds 7 to 45 degrees, or in the bench vice. We make several passes again (about 20) pressing firmly back and forth with the burnisher and, if we work freehand with the blade inserted in the vice, increasing the inclination slightly to the burnisher at each pass so as to progressively reach 7 degrees of inclination . At the end of the process we will get a kind of curl in addition to the cutting edge.Finally we reassemble the blade with the cutting edge facing upwards, placing it in the plane seat until it touches the bench top, then tighten the two screws on the back that, through a steel bar, tighten the blade in position. Finally we give a slight curvature to the blade by turning the thumbscrew a quarter turn. With the blade inserted in this position the curl will be against the working direction, allowing the cabinet scraper to smooth the surface. If the blade does not “bite” the wood, we can manually adjust the depth by loosening the two screws that hold it tight, or give it a greater curvature or finally direct the tool to an oblique position.The cabinet scraper works better in a pushing movement. It is not intuitive to immediately understand how the scraper plane should be oriented, but in order not to make a mistake it is possible to refer to the wing nut screw that flexes the blade which should be visible and facing us. This in the push movement. For the pulling movement it is necessary to rotate the tool and then we will see in front of us the two screws that hold the blade support bar. The technique of using the scraper is very intuitive and standardized. The same cannot be said for the sharpening technique, having developed over time many variations on the theme. The important thing is not to be discouraged by the apparent difficulty of the procedure. Once we are familiar with these tools, we will realize that they are a valid alternative to the use of coarse-grained abrasive papers.

Lascia un commento