Come affilare una sega / How to sharpen a saw
English translation at the end of the article
La peculiarità degli attrezzi manuali è che quasi tutti possono essere riaffilati. E’ per questa loro caratteristica che, se ben mantenuti, possono continuare a lavorare anche per centinaia di anni. In un precedente post ho accennato brevemente ad alcuni elementi comuni a tutte le tipologie di affilatura, regole generali che si attagliano alla
maggior parte degli utensili manuali presenti nel nostro laboratorio. Nello specifico vedremo però che questo procedimento può divergere anche significativamente, a seconda che si tratti di affilare la lama di una pialla, di uno scalpello, di una rasiera o di una sega. Ogni utensile manuale, data la sua predisposizione ad effettuare specifiche lavorazioni, necessita perciò di un processo di affilatura specifico.
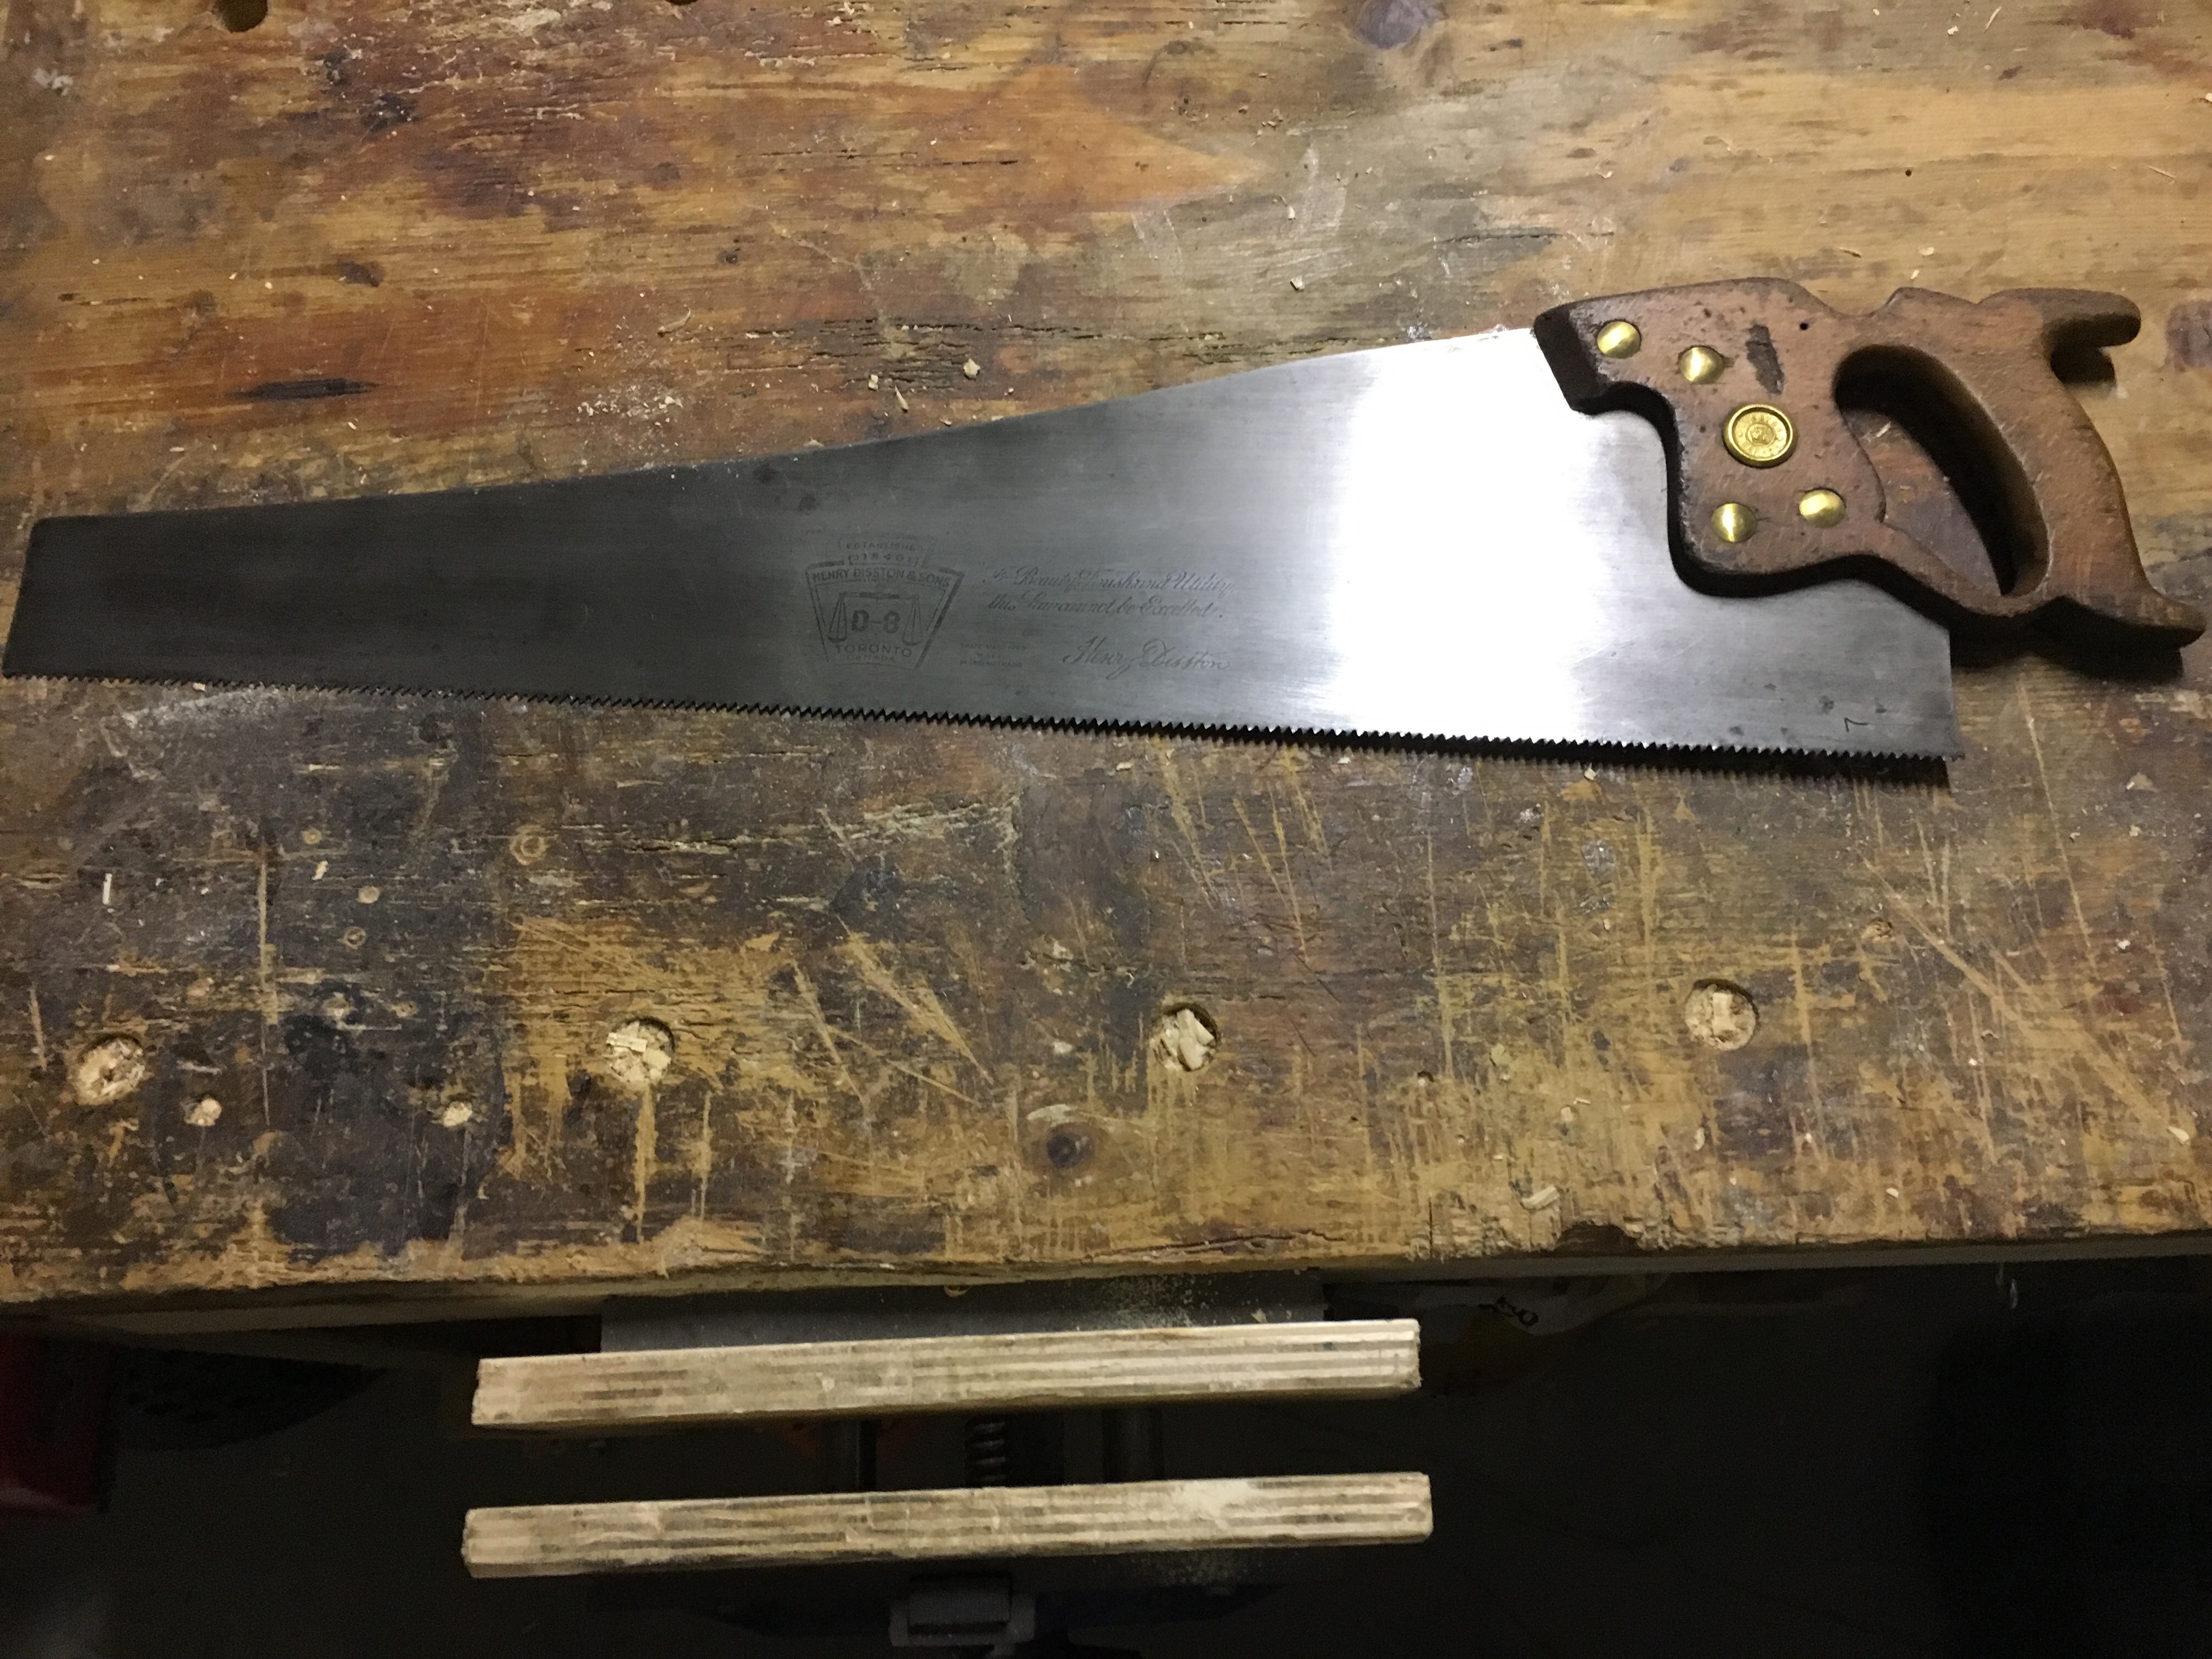
In questo post vedremo come affilare le seghe di tipo occidentale. Questo tipo di seghe, data la particolare consistenza dell’acciaio con il quale sono fatte, sono quasi sempre riaffilabili, quantomeno le seghe di vecchia generazione, quei modelli prodotti prima della seconda guerra mondiale. Le seghe più moderne, invece, nella maggioranza dei casi, sono difficilmente riaffilabili in quanto la tempra di acciaio dei denti è rinforzata attraverso dei procedimenti industriali così da determinarne una maggiore robustezza e durata che ne rende però di fatto impraticabile la loro riaffilatura. Inoltre, quest’ultima tipologia di seghe, viene quasi esclusivamente prodotta per tagli traverso vena o adatte per entrambi i tipi di taglio (traverso vena e lungovena), probabilmente per assecondare la notevole presenza in commercio di legno pressato ed assemblato con colle come ad esempio il truciolare, il multistrato e l’MDF.
Per spiegare come avviene l’affilatura dei denti di una sega occorre fare alcune premesse. Esistono in commercio molte tipologie di seghe: occidentali ed orientali, a spingere ed a tirare, con diversa grandezza e numero di denti (TPI o PPI, di cui parleremo in prossimi post), spessore e conformazione della lama, lunghezza della sega, destinazione finale di utilizzo ed altro ancora. La distinzione che ci interessa in questa sede però è quella tra seghe che tagliano lungo vena (ripsaw) e seghe che tagliano traverso vena (crosscut saw). Le seghe che lavorano lungo vena tagliano il legno separandone le fibre nel senso della venatura e per fare questo necessitano di denti con un grado di affilatura a 90 gradi e una ridotta stradatura. Le seghe traverso vena tagliano il legno recidendo le fibre perpendicolarmente alla direzione della venatura del legno e per questo motivo presentano dei denti affilati a 65 gradi ed una stradatura di solito più accentuata. La diversa tipologia di taglio che dovremo effettuare (lungo vena o traverso vena) giustificherà la scelta del giusto tipo di sega, ottimizzandone quindi la qualità del taglio.
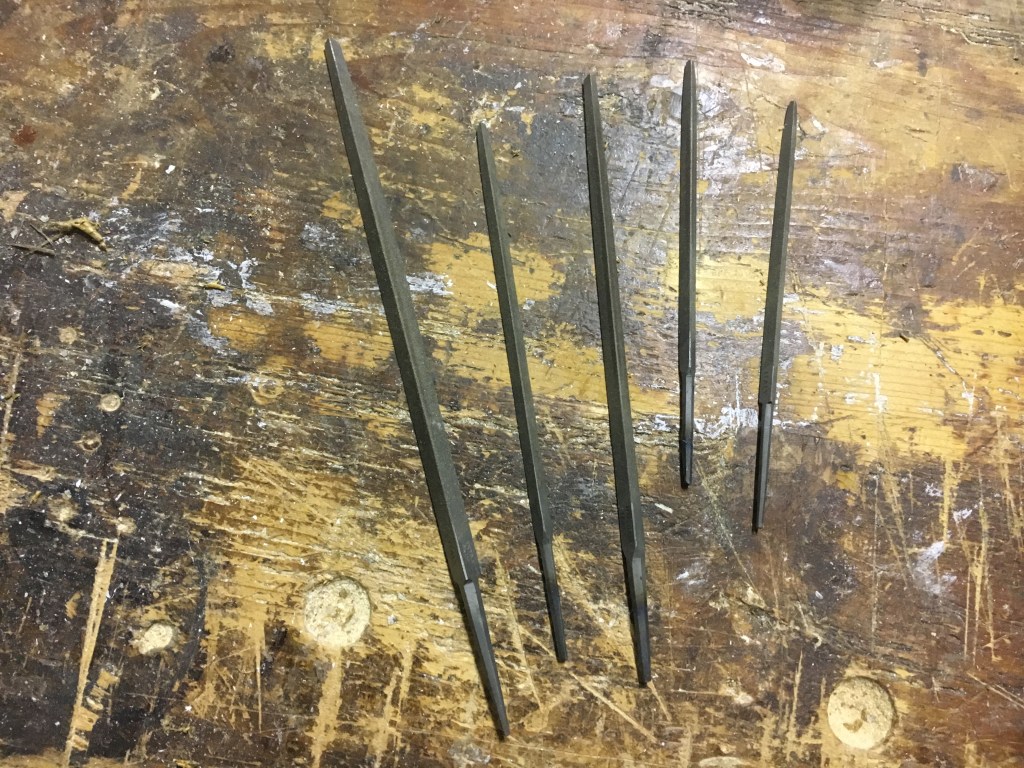
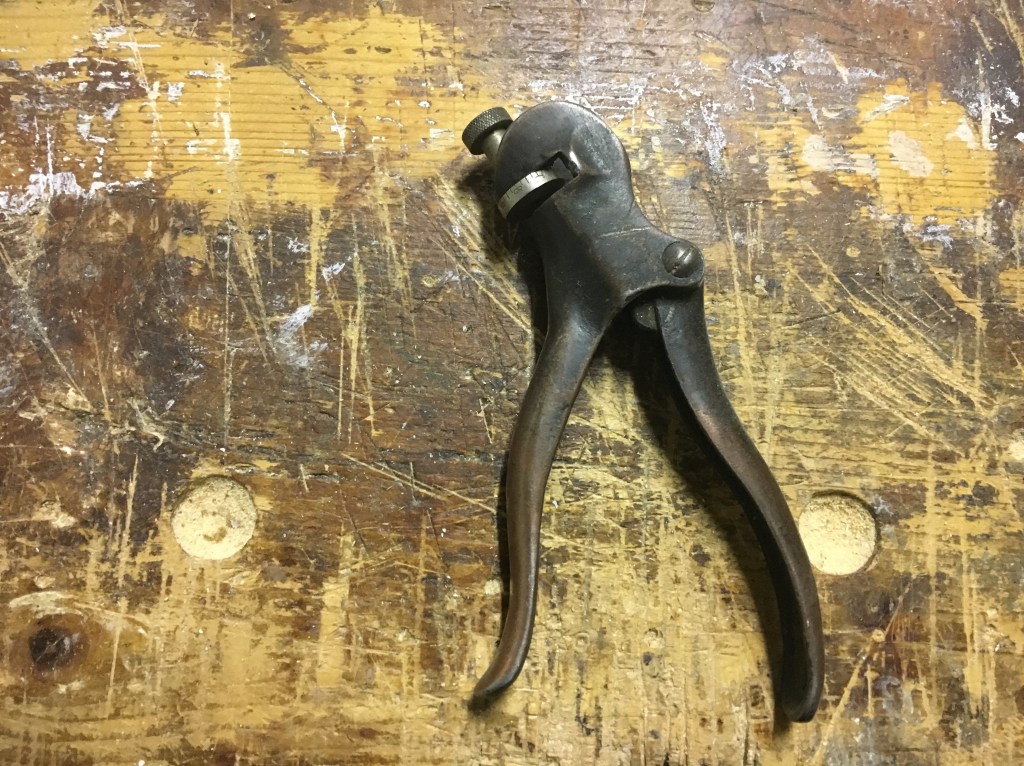
Gli accessori indispensabili per l’affilatura di entrambe le tipologie di sega sono delle lime di forma triangolare di diverse dimensioni, una lima piatta ed una pinza strada seghe (ed eventualmente anche un martello in ferro ed un punteruolo). Il procedimento di affilatura può dividersi in due fasi principali: la stradatura dei denti e l’affilatura dei denti.
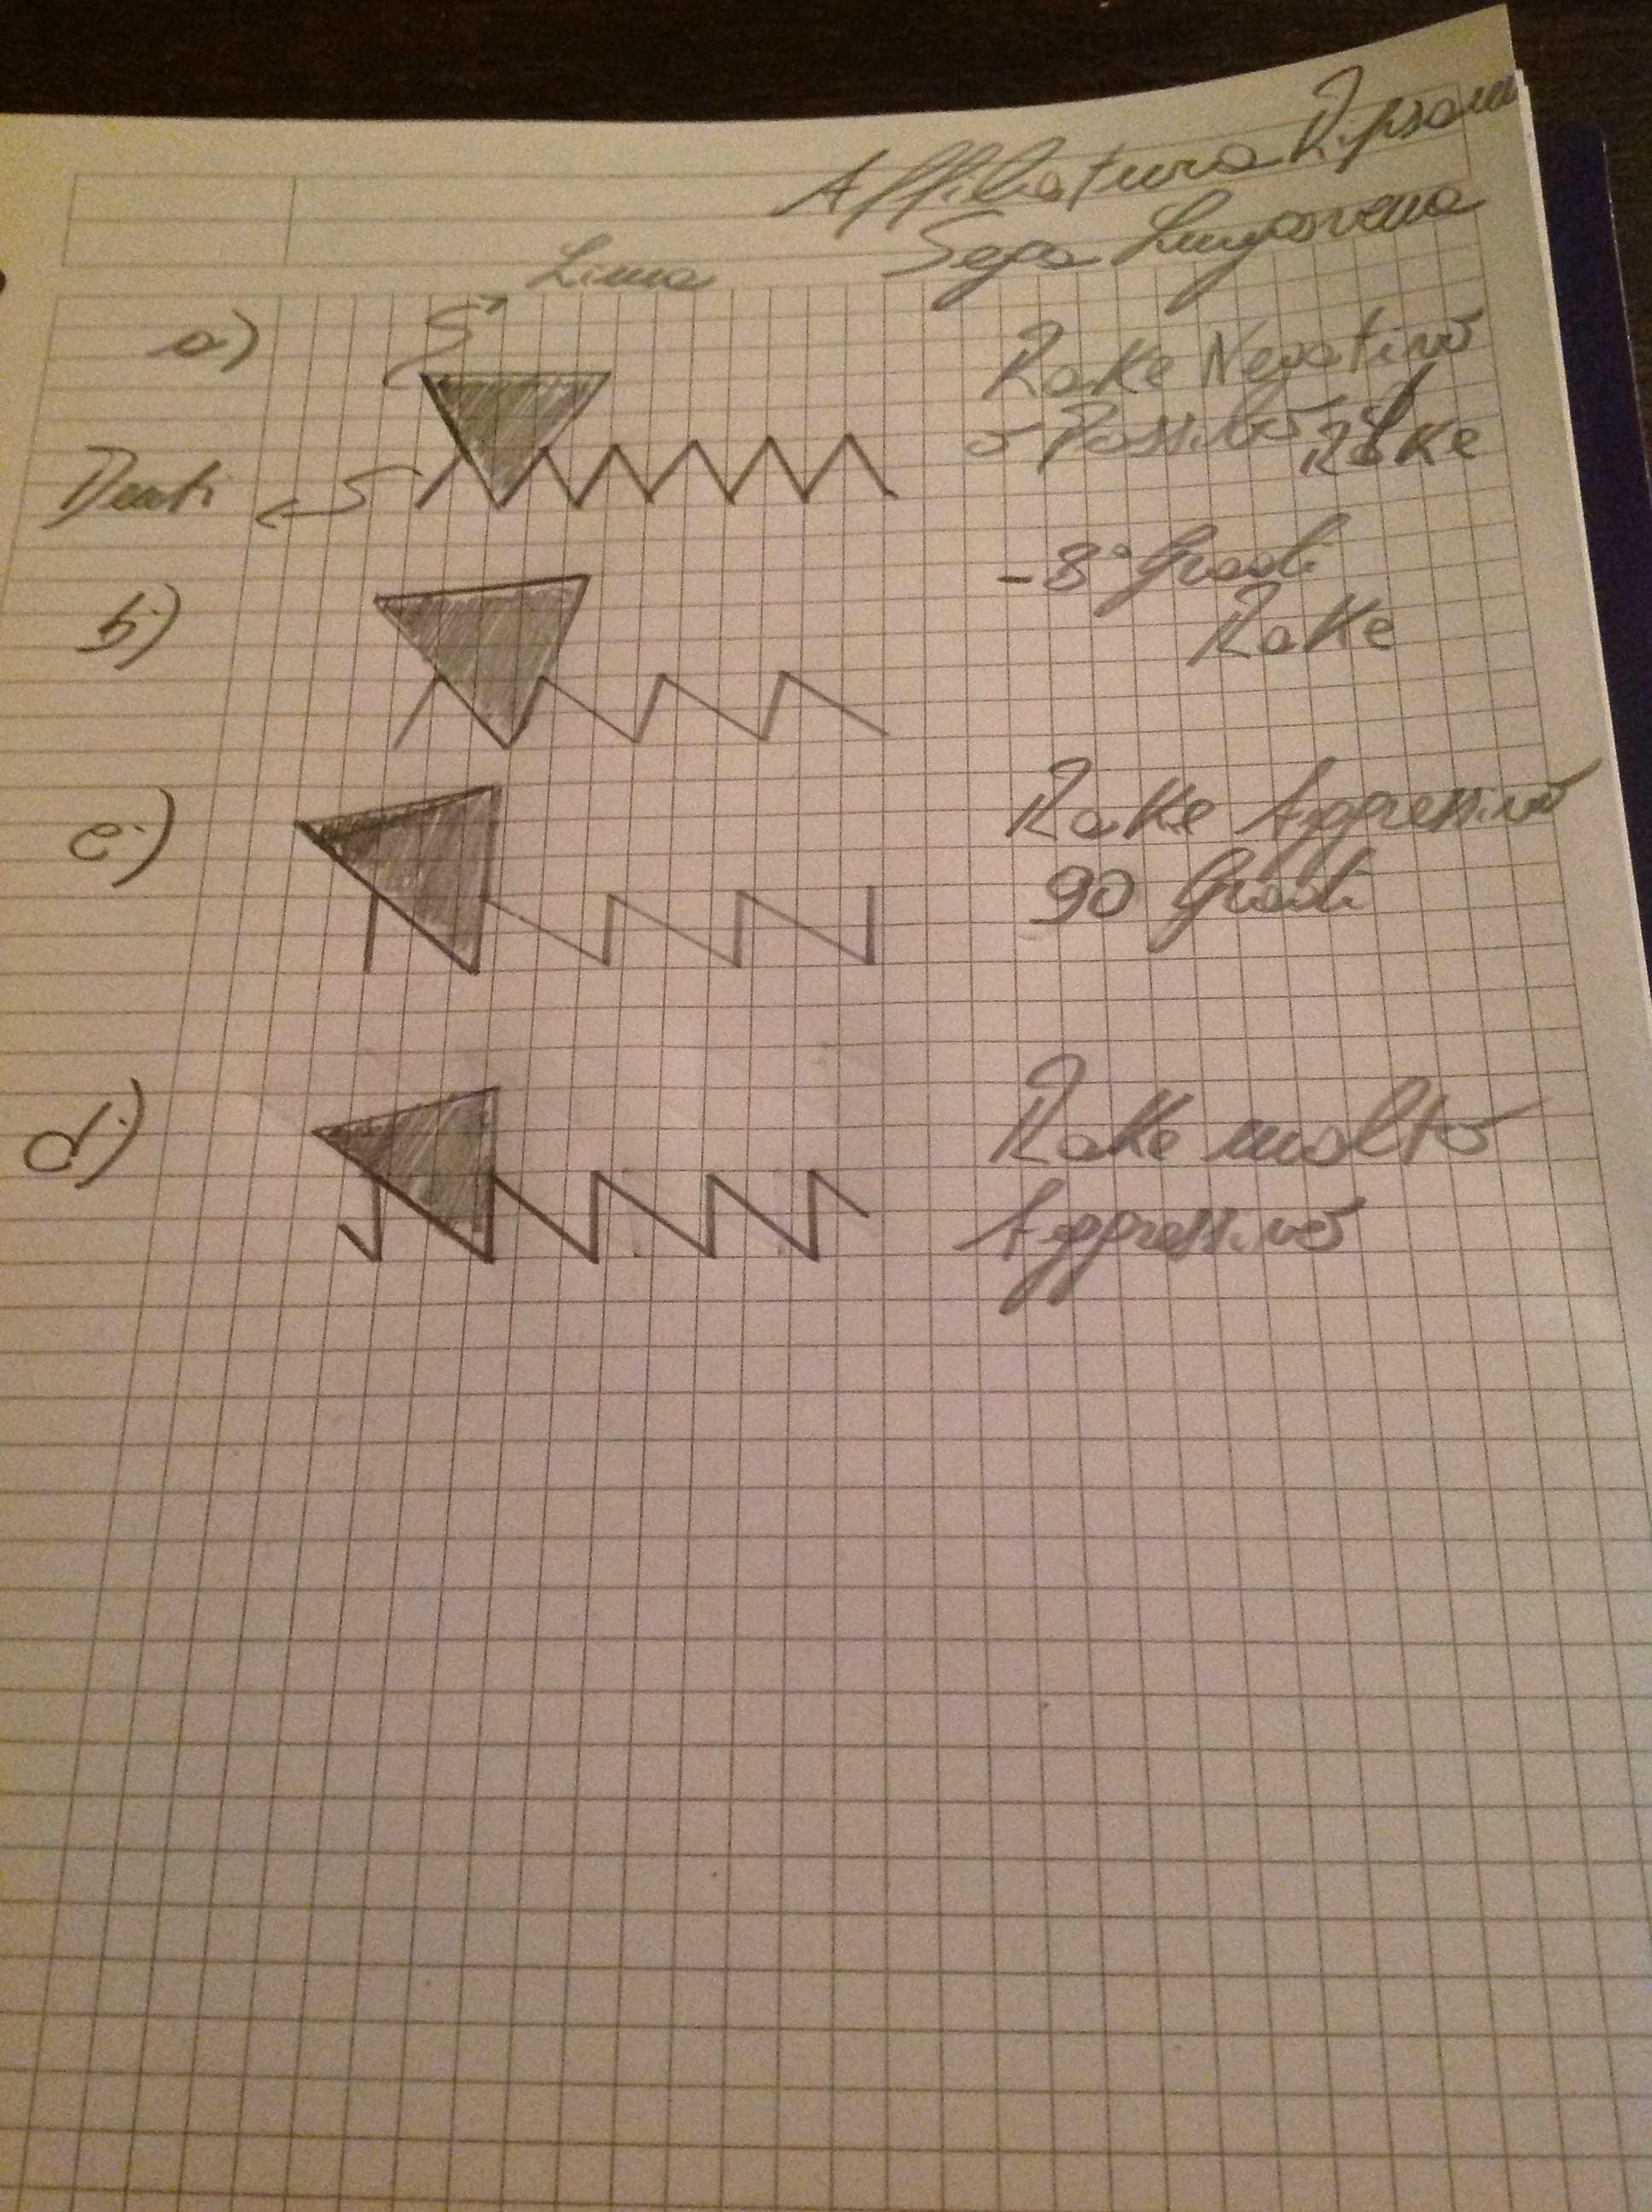
Stradatura dei denti. Da effettuarsi non necessariamente assieme all’affilatura dei denti ma solo periodicamente allorquando si noti che la sega, durante il movimento di rientro, tenda ad impuntarsi, a causa delle fibre di legno che non riescono più a passare agevolmente nel canale creato dalla divaricazione alternata dei denti a destra e a sinistra (la c.d. stradatura). Si possono mettere in pratica tre diversi metodi di stradatura:
a) con l’ausilio del solo martello in ferro (per le seghe sotto i 3 PPI o 2 TPI, ovvero quelle seghe che comprendano 3 punte di dente per inch = 2,54 cm. o 2 denti per inch = 2,54 cm.);
b) con martello e punteruolo (per seghe tra i 3 PPI ed i 15 PPI, quindi seghe più fini), martellando il fianco del dente, appoggiando la lama della sega su una superficie di legno tenero che ne permetta la divaricazione in direzione opposta a quella dell’operatore;
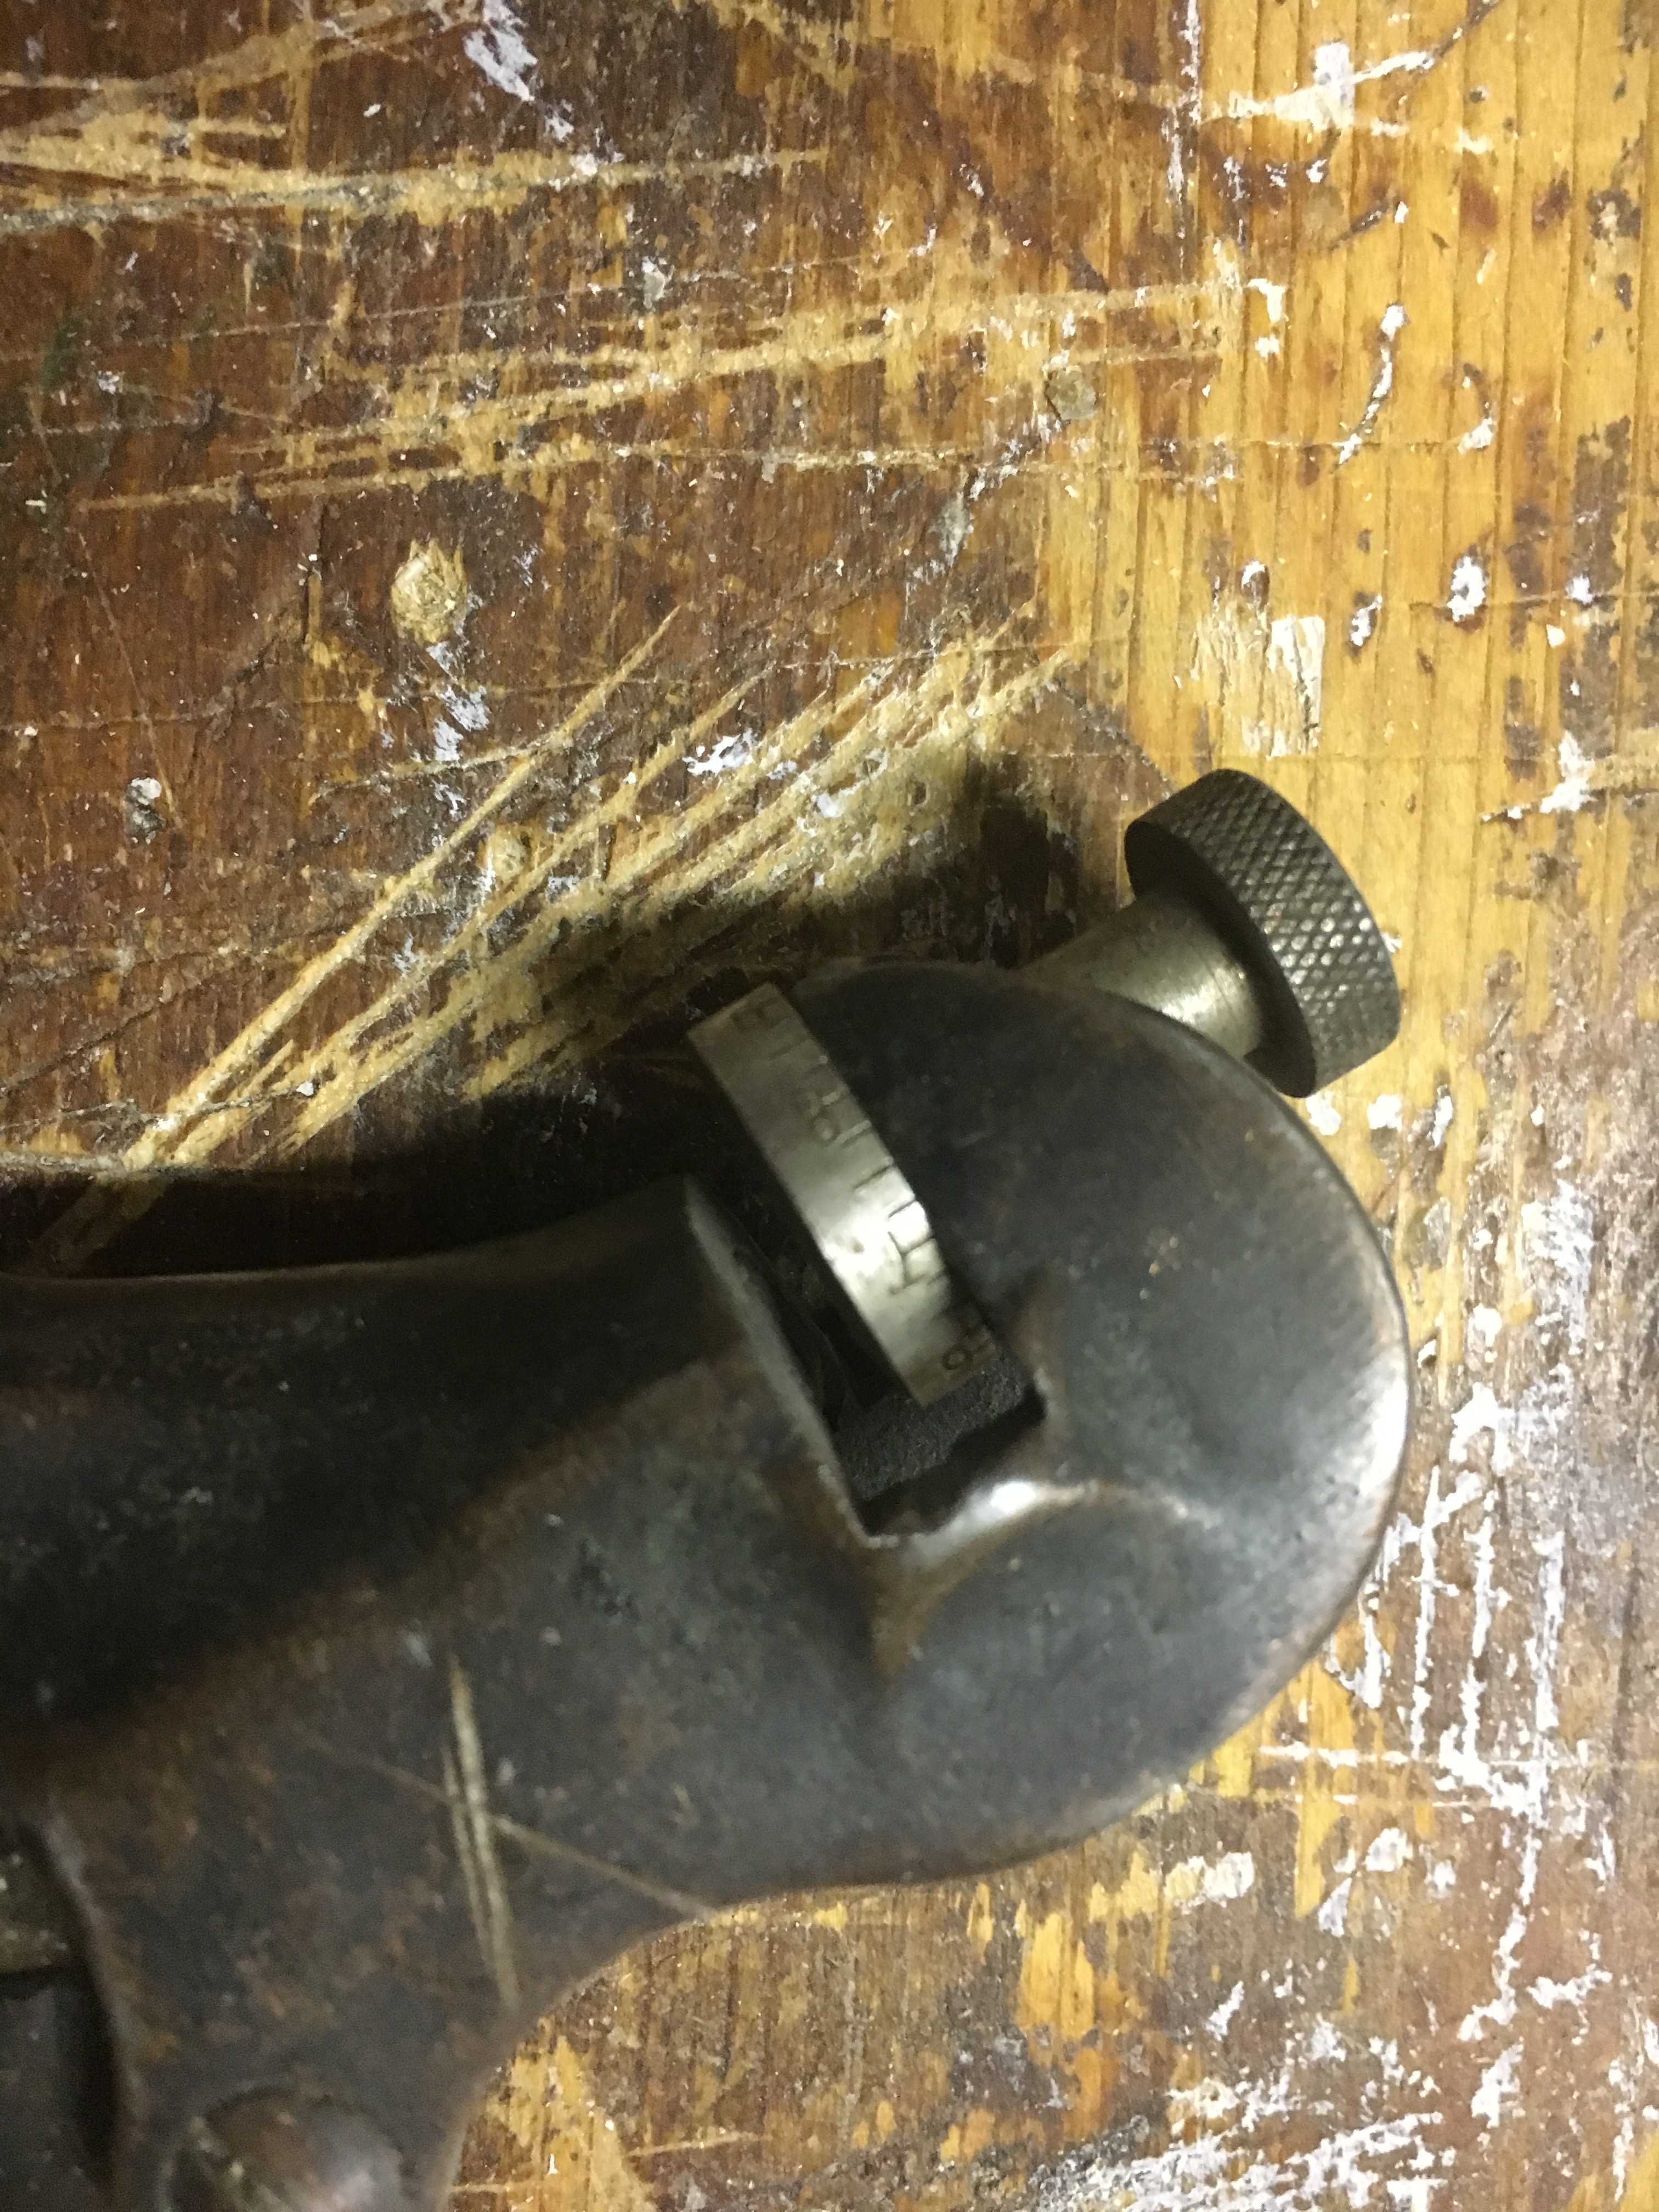
c) con la pinza strada seghe (sawset). Quest’ultimo metodo è quello più comunemente usato. Si procede dapprima a regolare la rotella zigrinata facendo corrispondere la misura indicata sul disco metallico della pinza (che va da 4 PPI a 12 PPI) con la misura del PPI della sega da affilare. Ho trovato utile comunque mantenere la rotella sempre sulla posizione di 10 PPI, qualunque sia la sega da affilare.
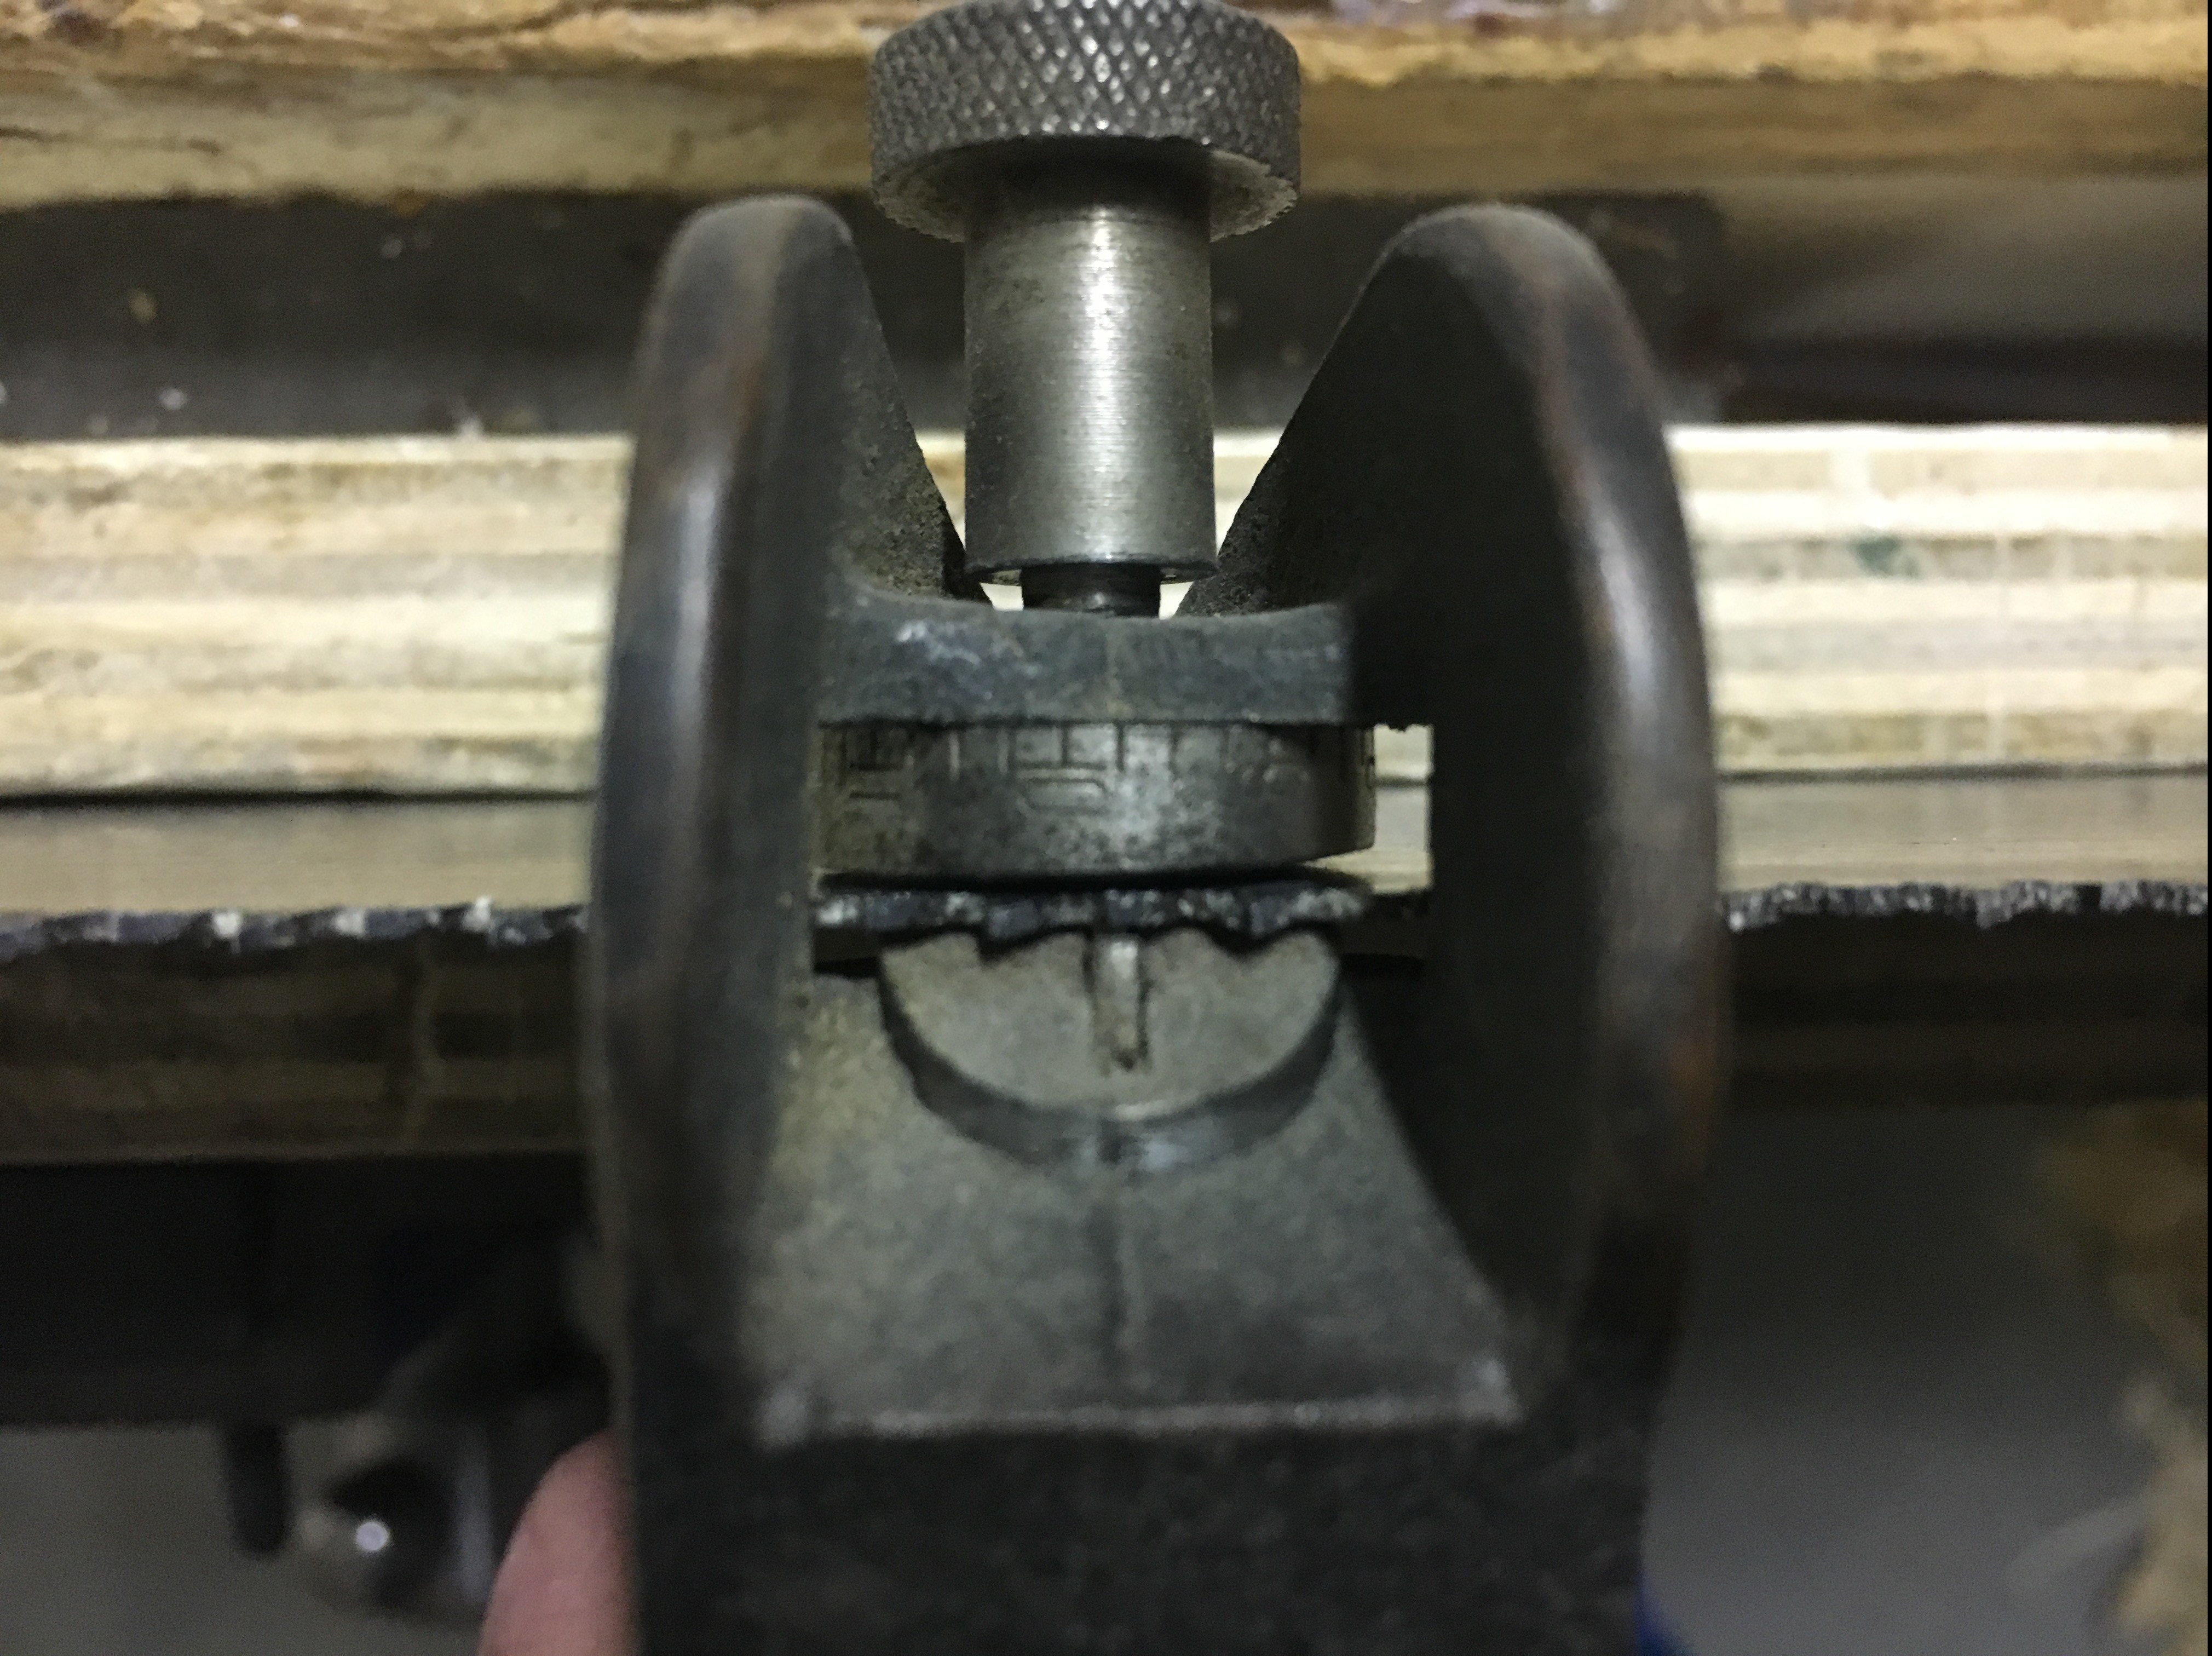
Fatta questa regolazione si impugna la pinza e la si appoggia sulla lama della sega in corrispondenza del dente da stradare. Si preme l’impugnatura in modo che il martelletto all’interno della pinza spinga il dente in direzione opposta alla nostra fino a premerlo contro il disco di ferro inserito nella pinza. Procediamo per ogni dente da stradare saltandone uno, (quindi uno si ed uno no, e così via). Quando avremo terminato giriamo la sega e procediamo a stradare i denti che abbiamo saltato nella prima fase.
Solitamente per tagliare legni poco stagionati o teneri è utile effettuare una stradatura più accentuata. La sega in questi casi taglierà più velocemente ma il solco lasciato sarà più grande e grossolano. Per legni duri o stagionati invece è preferibile una stradatura meno accentuata, che avrà come risultato una velocità di taglio della sega ridotta ma di contro un taglio decisamente più fine. Una stradatura di questo tipo è comunque preferibile quando affiliamo seghe per tenoni o per code di rondine.
In sintesi: troppa stradatura, i denti vanno molto oltre lo spessore della lama della sega ed il taglio sarà largo; poca stradatura, il taglio sarà stretto; nessuna stradatura, la sega si impunterà nel legno.
Qualunque sia il procedimento utilizzato, alla fine si potrà sempre procedere a livellare leggermente la stradatura ottenuta martellando delicatamente la superficie dei denti con un martello di ferro. Vale comunque sempre la raccomandazione di prestare particolare attenzione a non piegare i denti dalla parte sbagliata: le seghe escono di fabbrica con una stradatura ben definita e se in fase di affilatura dovessimo sbagliare il senso di piegatura del dente correremmo il serio rischio di romperlo.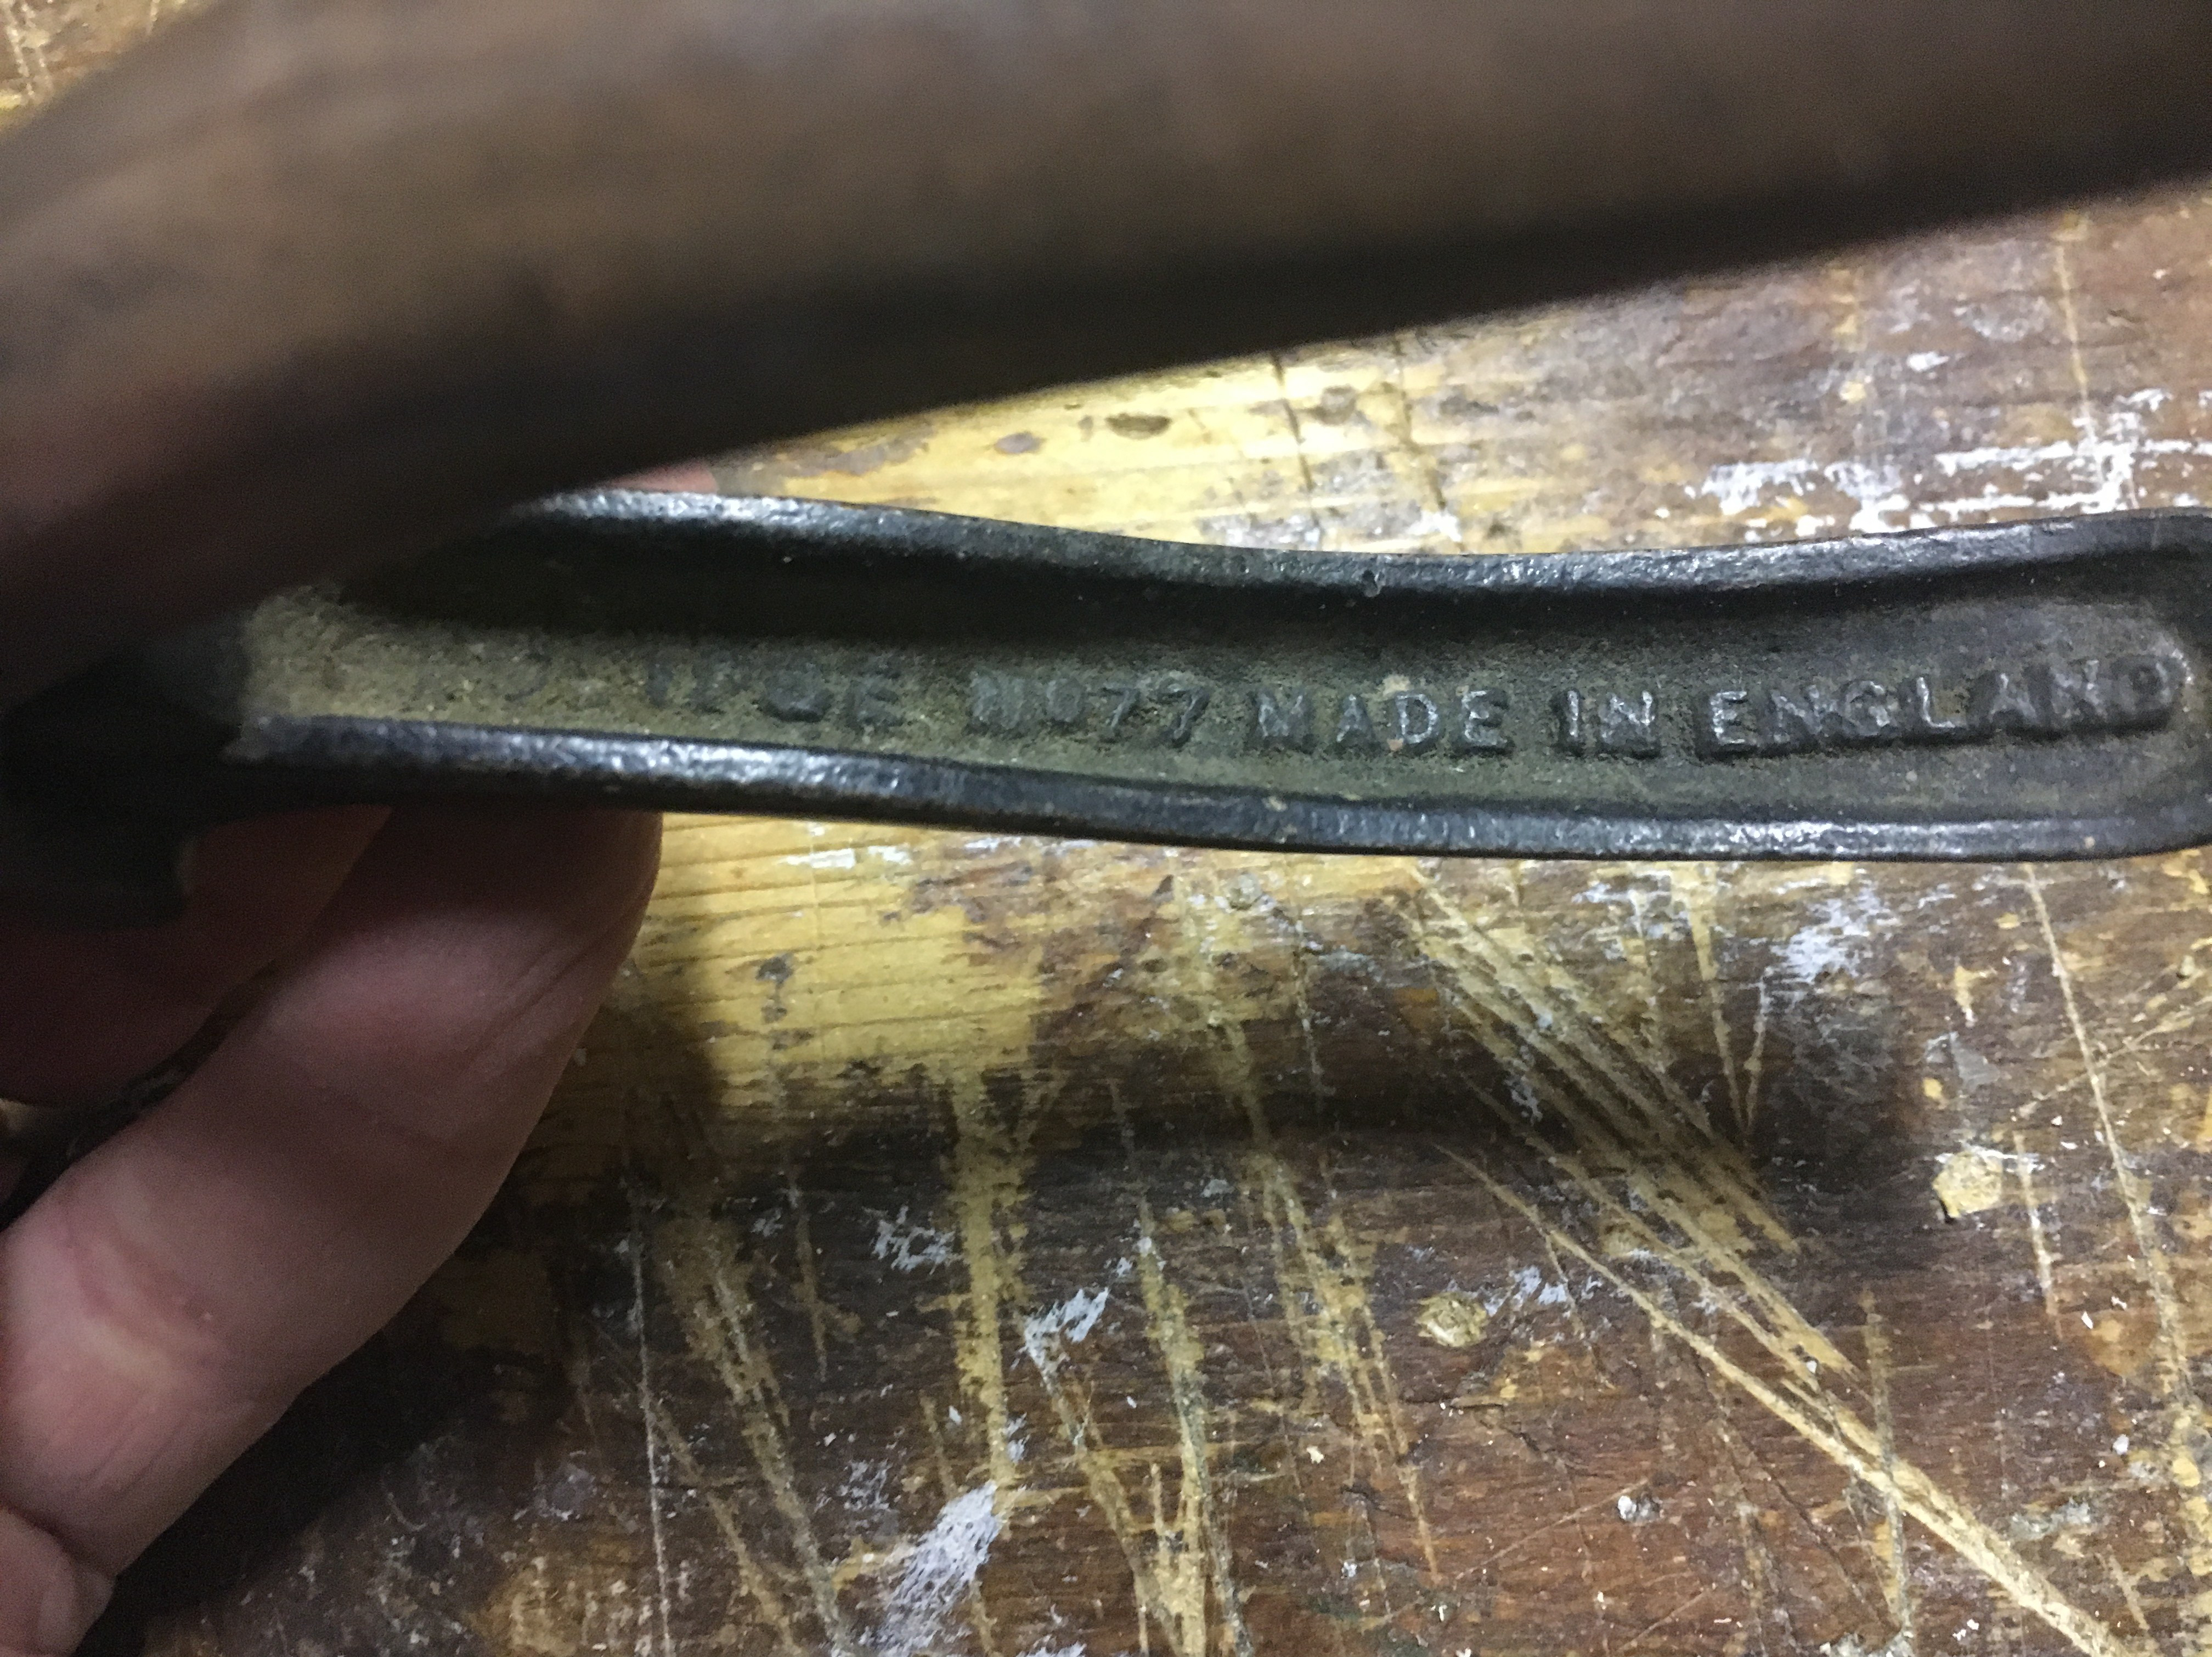
Per l’acquisto di una pinza strada seghe ci si può tranquillamente indirizzare su ebay.co.uk e cercare nell’usato, digitando “sawset Eclipse 77” oppure cercare nel nuovo valutando come valida alternativa la pinza stradaseghe Somax 250. Sarebbe preferibile, ove possibile, acquistare i modelli più vecchi della Eclipse 77, cioè quelli che possiedono il martelletto più stretto, quindi adattabile ad un maggior numero di seghe (anche a quelle con i denti particolarmente piccoli). L’accortezza per riconoscerle è di cercare la scritta “Made in England” sul retro del manico della pinza, riportata per esteso su una riga, invece che su due righe.
Affilatura dei denti. L’affilatura dei denti è un’operazione che dovrebbe rientrare nella normale manutenzione delle nostre seghe in modo tale da mantenerle sempre in buono stato di efficienza. Una sega non affilata si riconosce dal fatto che il taglio avviene con difficoltà ed è poco preciso; al tatto si sentiranno i denti poco affilati e visivamente le loro punte rifletteranno la luce, cosa che non dovrebbe avvenire se il tagliente è affilato a dovere.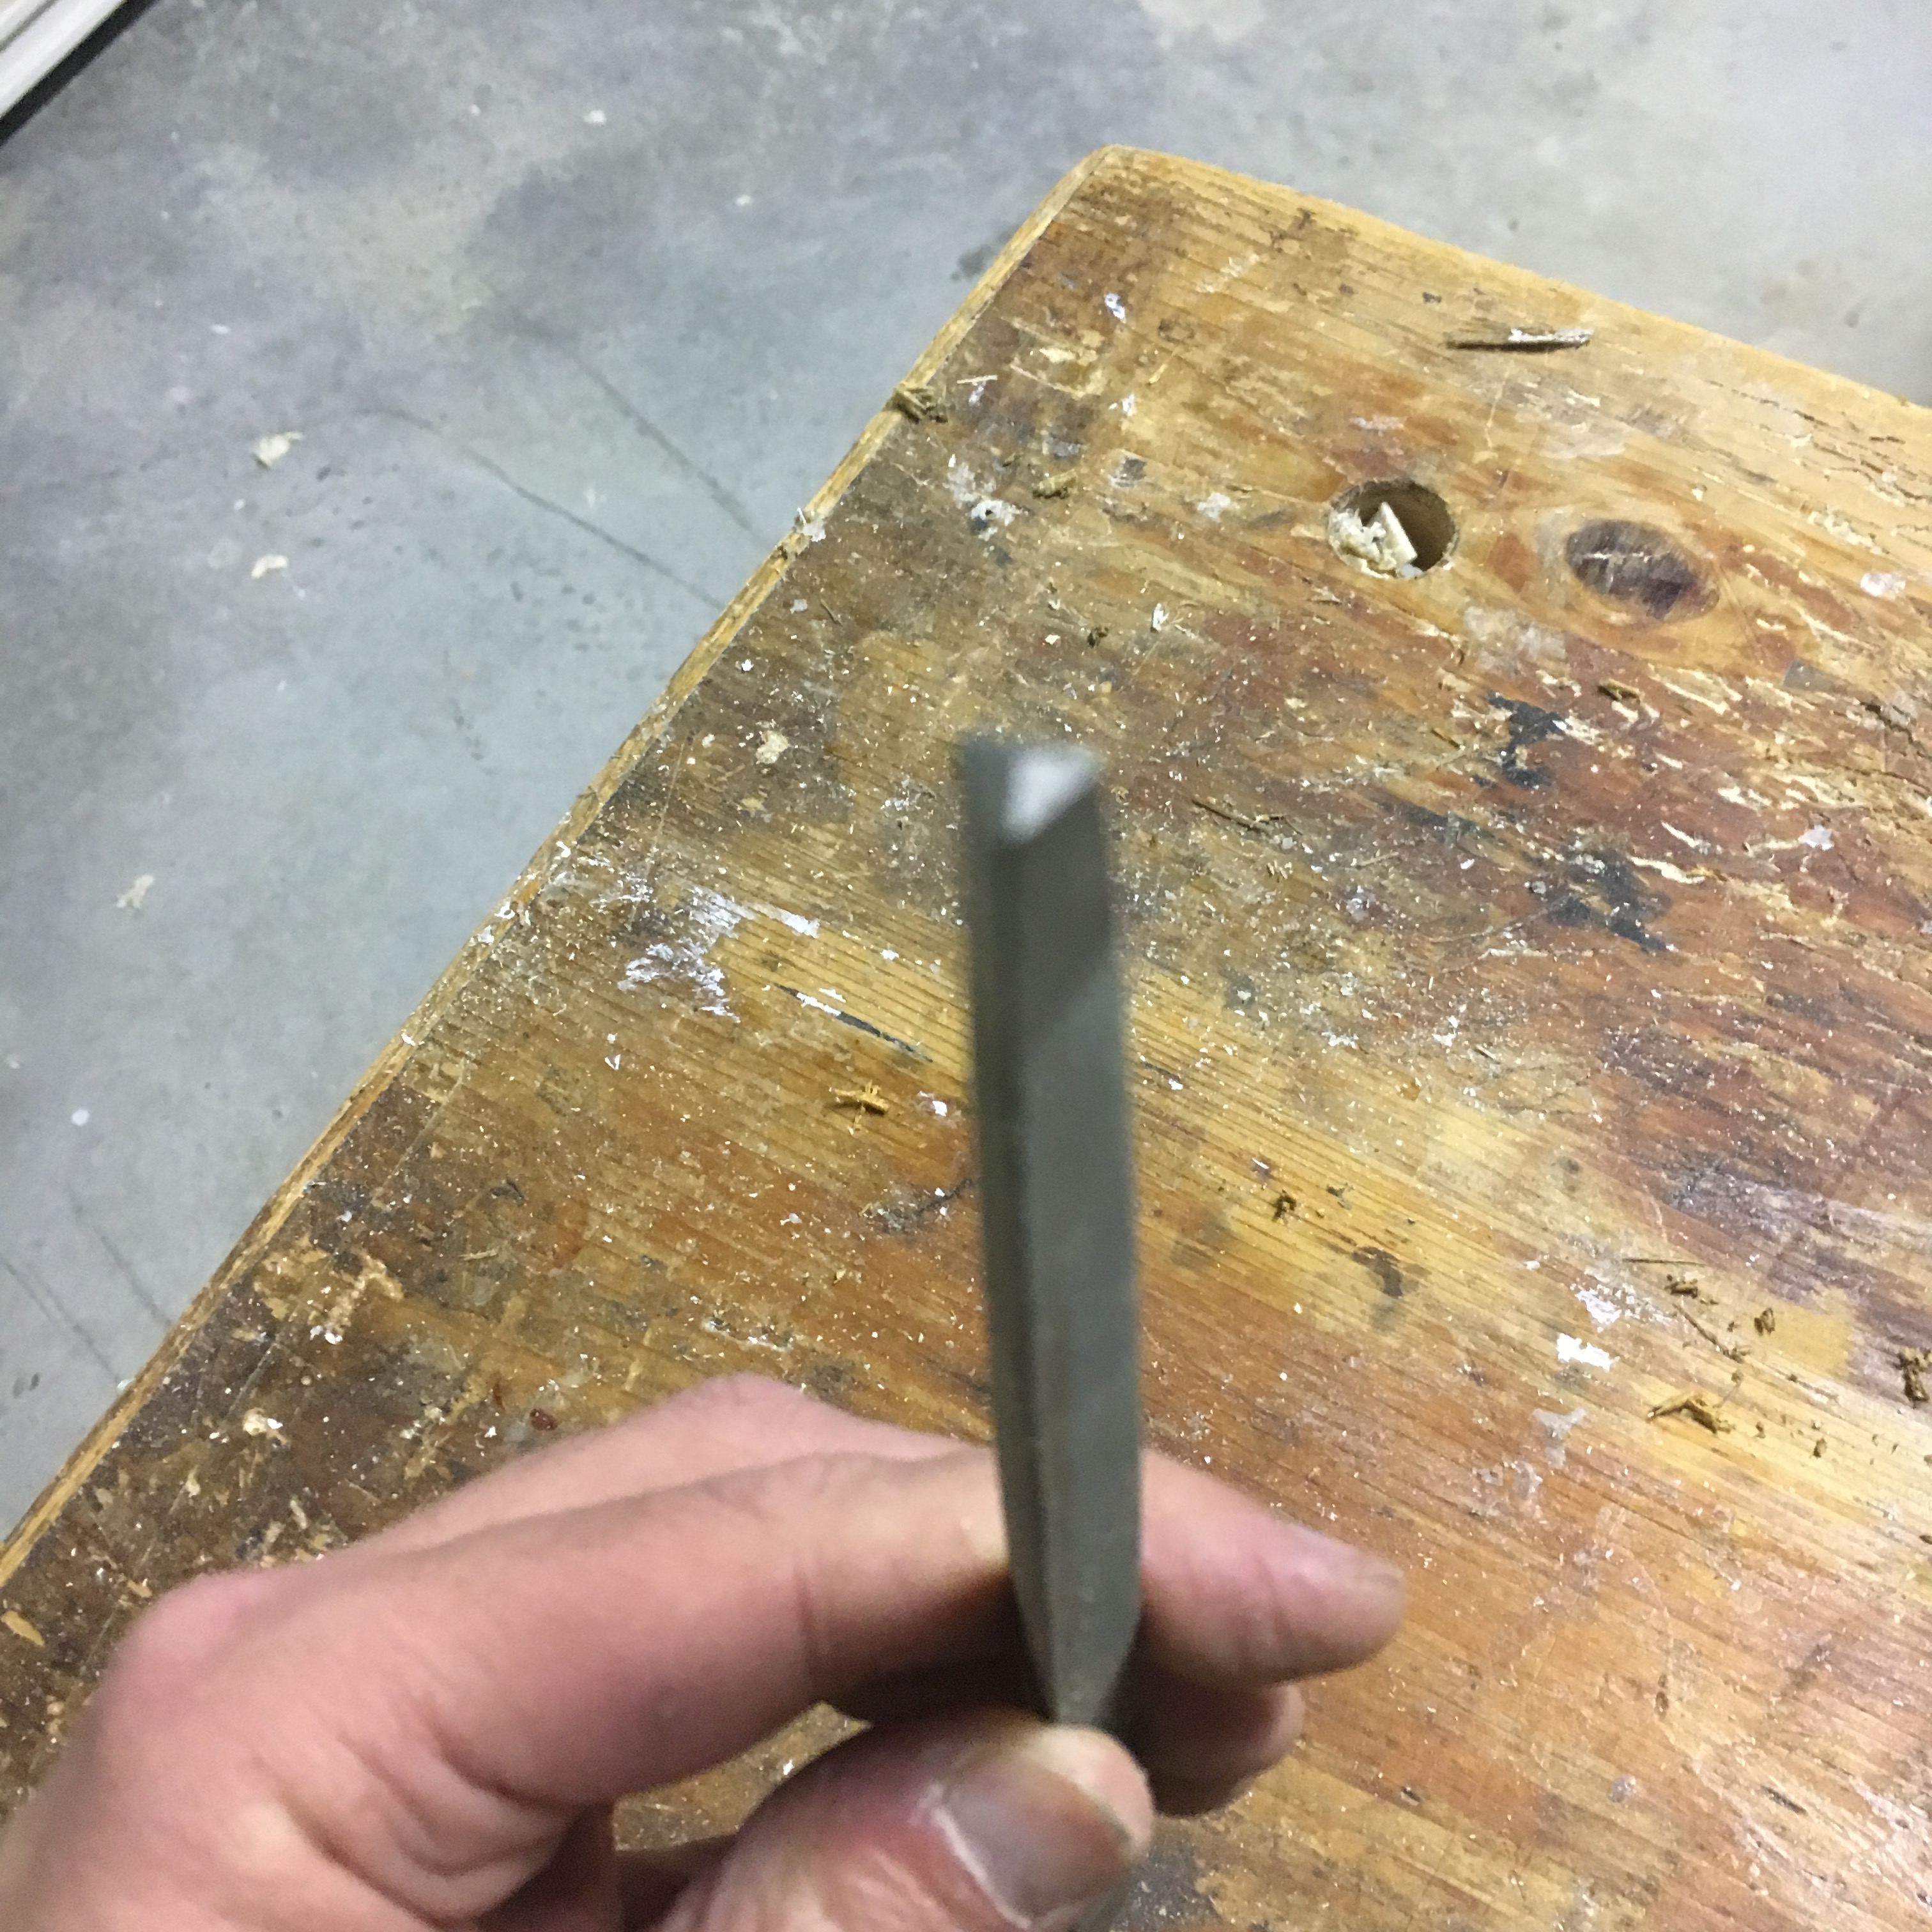
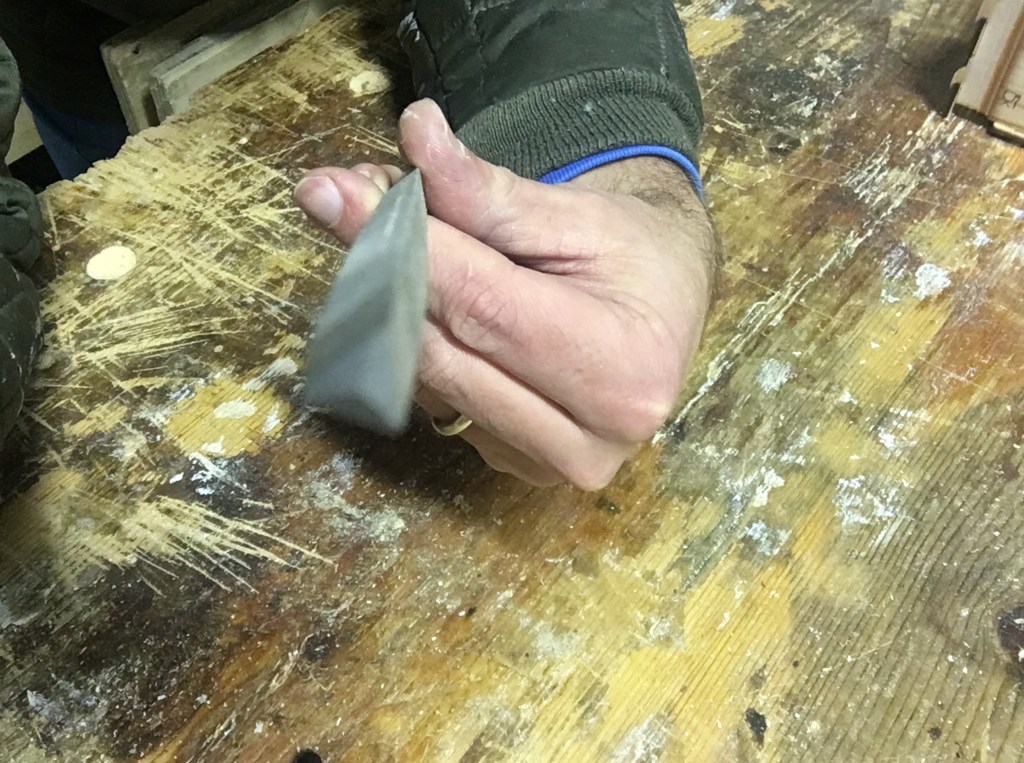
Il materiale necessario per l’affilatura dei denti, come accennato, è composto dalle lime a sezione triangolare, di diversa grandezza e misura, dalla lima piatta e da un supporto per la sega. Le lime triangolari possiedono tre superfici utili. In realtà le superfici abrasive sarebbero sei in quanto, seppur poco visibile, tra una faccia e l’altra è presente un piccolo smusso anch’esso in grado di affilare. Anche in questo caso è valido il consiglio di dotarsi di lime di buona qualità (il loro prezzo non è comunque eccessivo) ed ovviamente di durezza superiore a quella dell’acciaio della sega. Inoltre è consigliabile acquistare lime di diverse misure in quanto queste devono conformarsi allo spazio esistente tra un dente e l’altro. La regola vuole che la superficie della lima triangolare da utilizzare abbia un’altezza almeno doppia rispetto all’altezza del dente da affilare. Un set composto da 3 lime basterà comunque a coprire quasi tutte le nostre necessità e ci dureranno anni (anche se non sono riaffilabili). Per la lima piatta valgono le stesse raccomandazioni. E’ comunque sufficiente acquistarne una soltanto, che presenti una superficie larga abbastanza da permetterne il comodo utilizzo nella preliminare fase di livellamento dei denti.
Se vuoi approfondire queste tecniche manuali, ho raccolto la mia esperienza in due volumi dedicati alla falegnameria manuale.
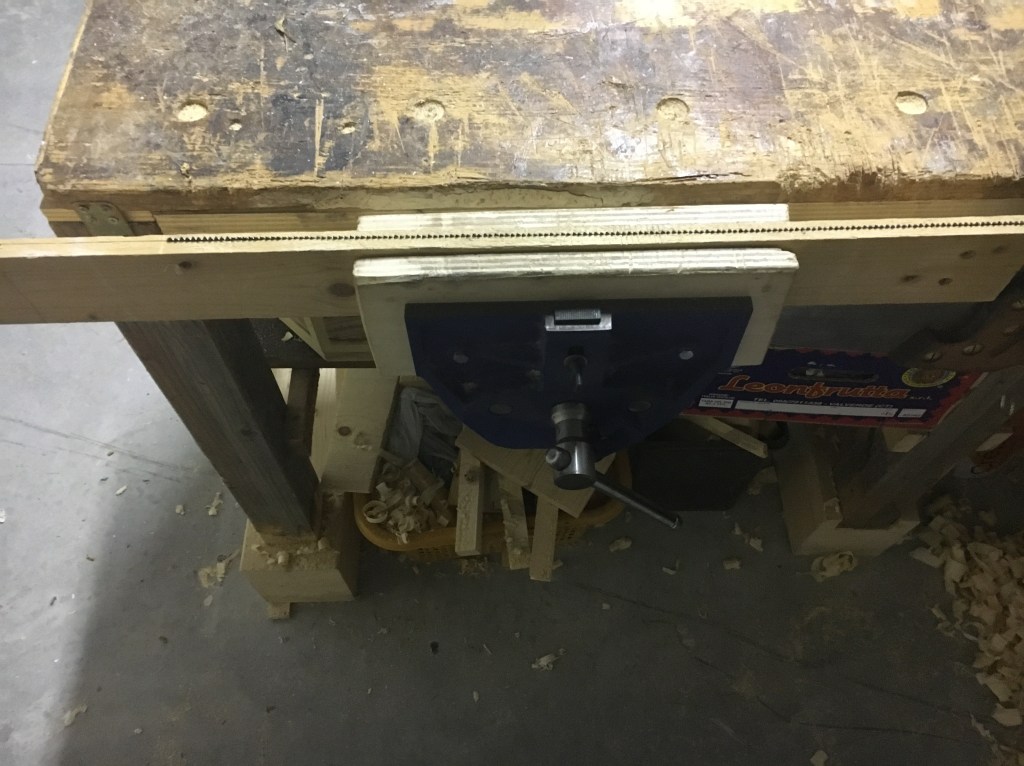

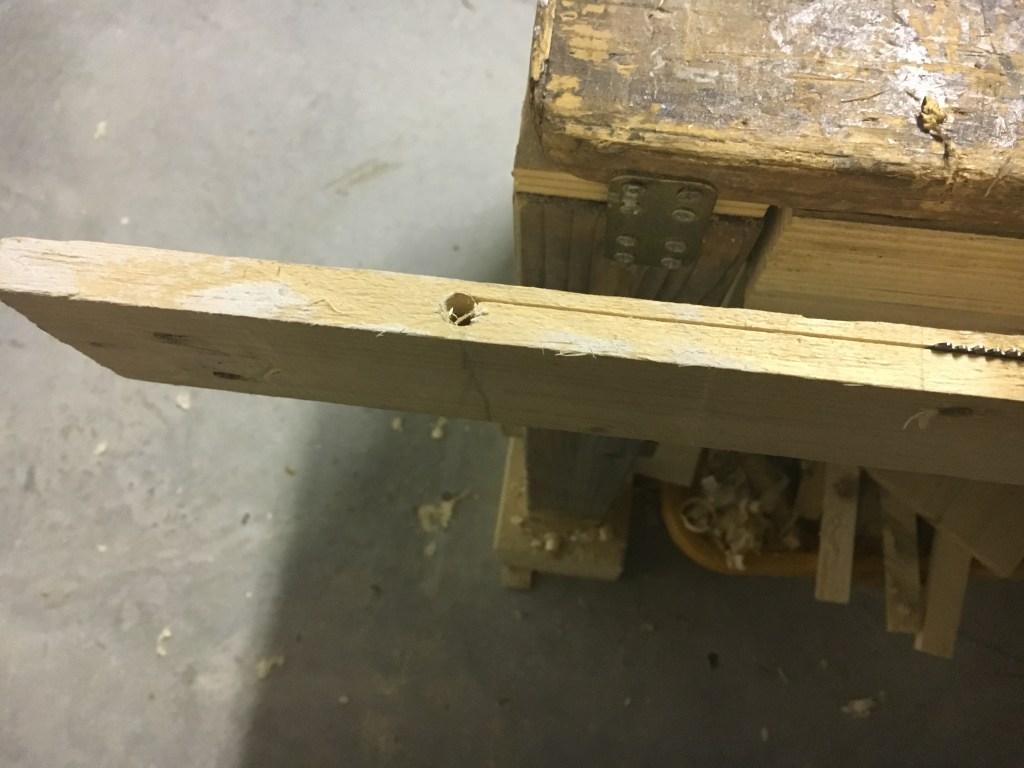
Detto questo, vediamo dapprima nello specifico la procedura di affilatura di una sega per tagli traverso vena (crosscut saw). Per prima cosa dobbiamo avere disponibile un sostegno di legno o altro materiale in grado di accogliere, stringendola, la lama della sega, posta capovolta con i denti rivolti in alto, verso di noi. Sempre cercando su Ebay.co.uk. ne possiamo trovare di nuove od usate cercando con la dicitura “saw vice o saw vise”. Trattandosi di utensili poco comuni, specialmente quelli in legno, i prezzi non sono economici, quindi il consiglio che posso dare è di provvedere all’autocostruzione, come ho fatto io. E’ sufficiente una stecca di legno di circa 2 cm. di spessore segata a metà per quasi tutta la sua lunghezza e sufficiente ad ospitare la lama della sega, ed all’estremità del taglio praticare un piccolo foro che ne eviti l’ulteriore fessurazione. Dopo averla opportunamente sagomata per ospitare il manico della sega, all’interno del taglio si andrà ad inserire la lama della sega, così come indicato sopra, ed a bloccare il tutto nella morsa del banco.
Per prevenire le vibrazioni della lama durante l’affilatura è preferibile far fuoriuscire di pochissimo i denti della sega dal sostegno in legno e serrare bene nella morsa. Una volta messo tutto in posizione cerchiamo una posizione a noi comoda, eventualmente seduti ed aiutandoci con una luce sul banco ed una lente di ingrandimento.
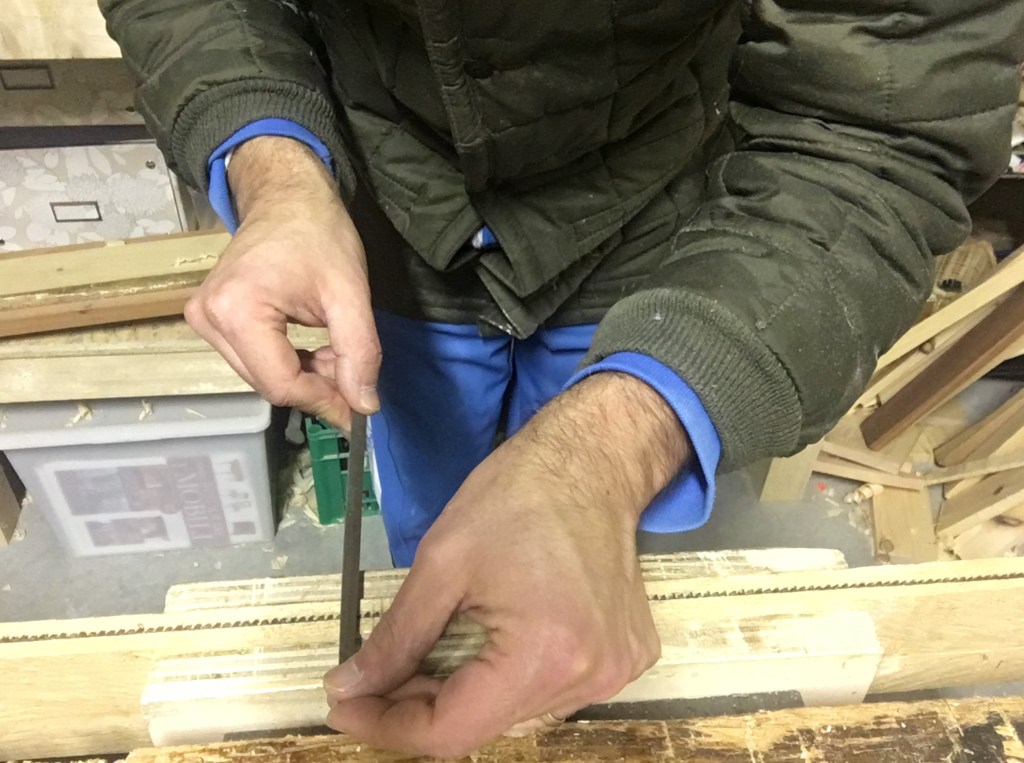
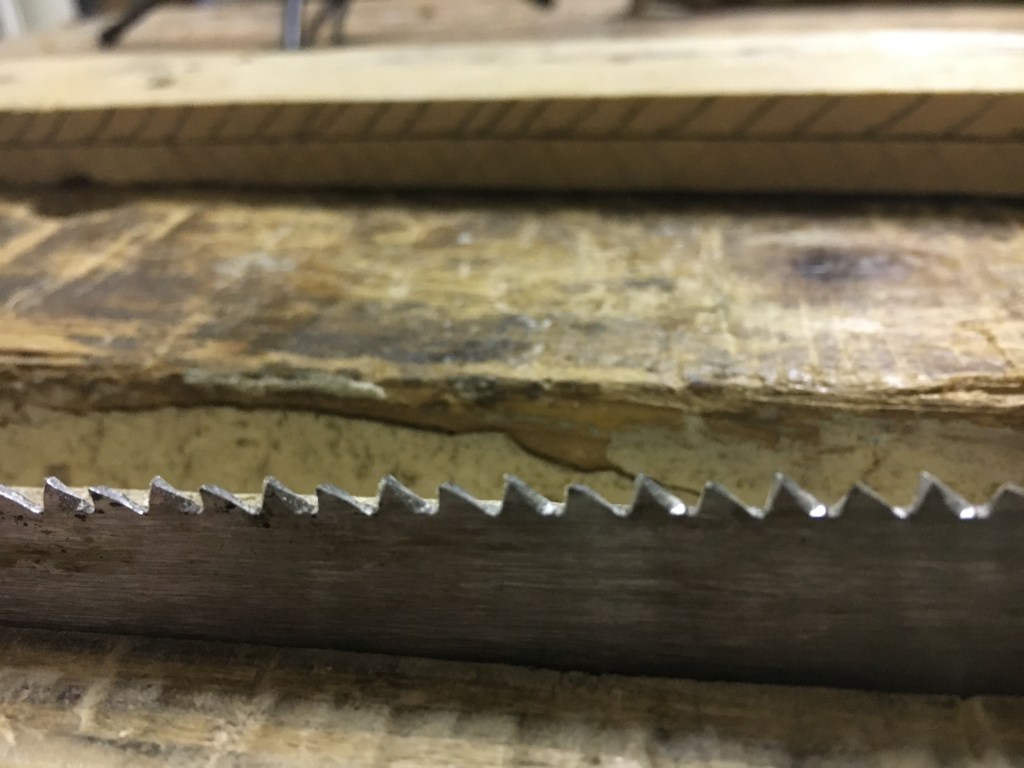
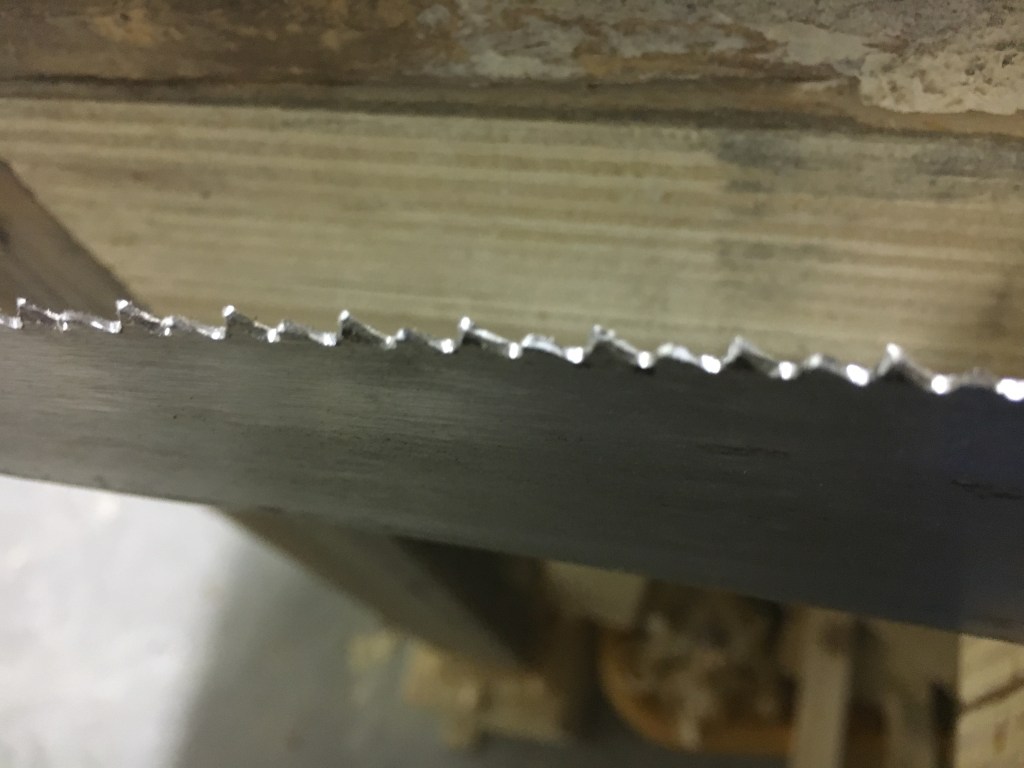
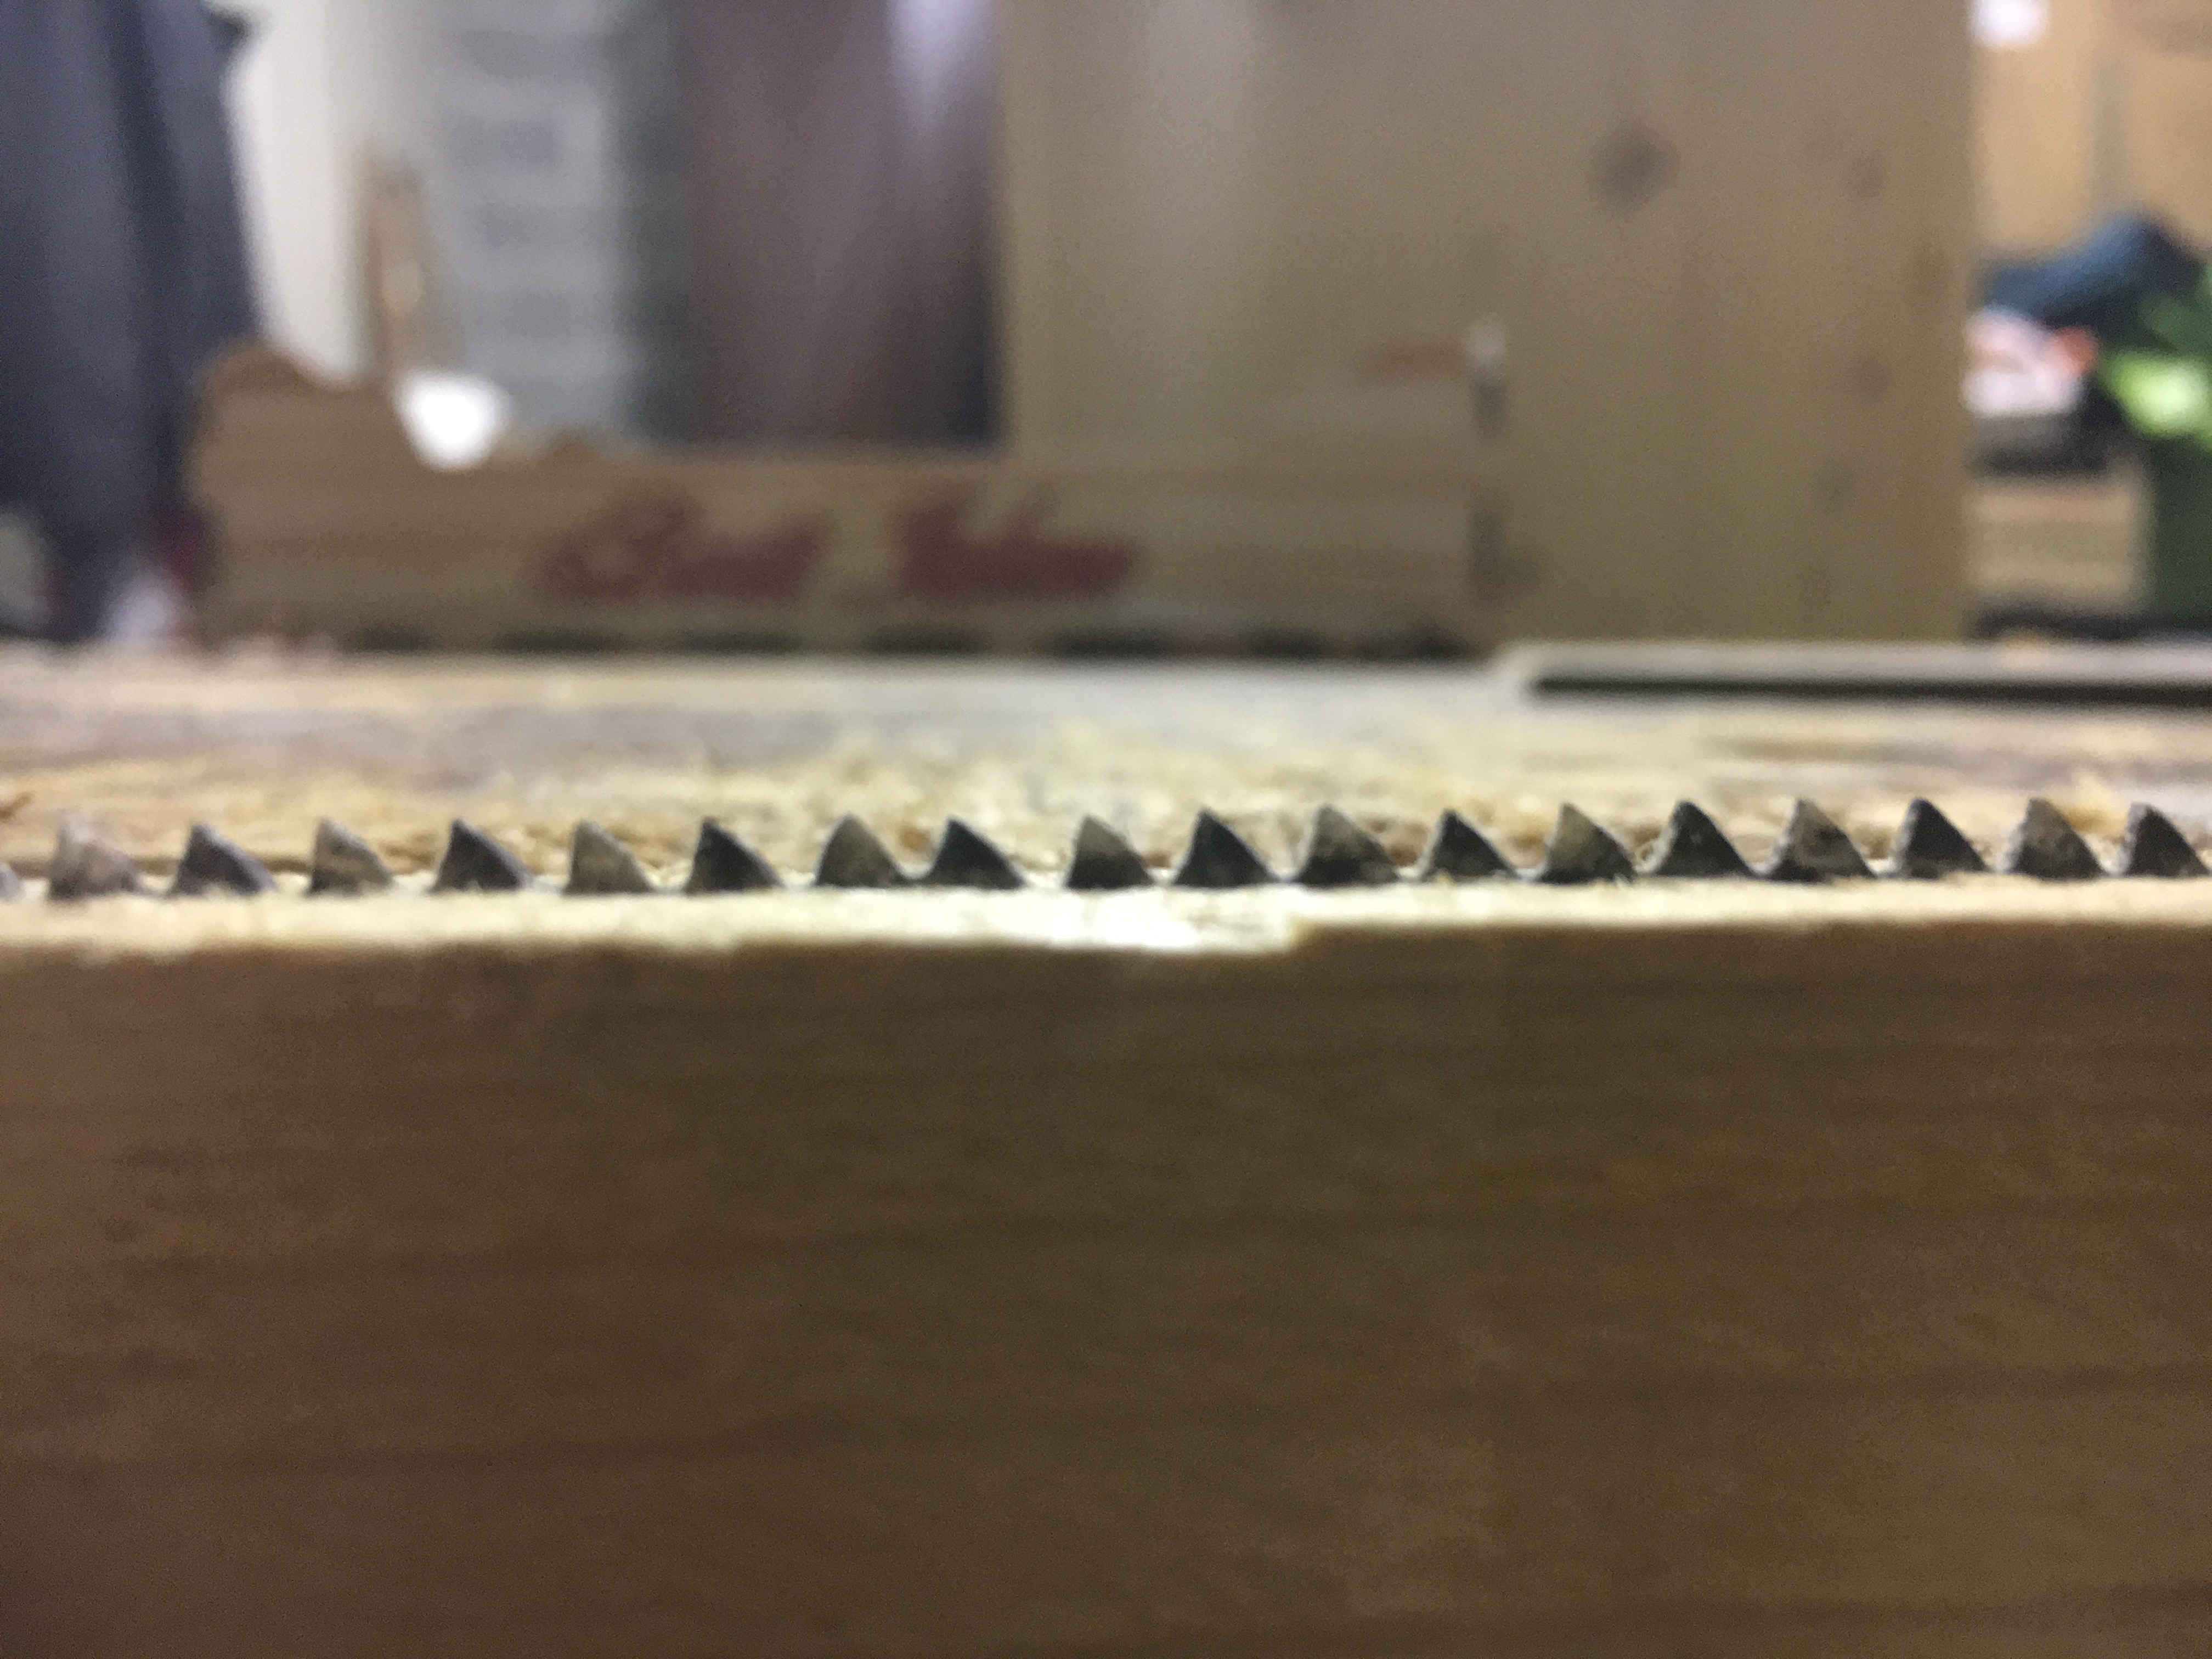
Per prima cosa, con la lima a faccia piatta, si effettuano un paio di passate sulla punta dei denti, per tutta la lunghezza della lama, prestando attenzione a non inclinare la lima durante il passaggio. Le passate non dovranno essere né troppo leggere né troppo aggressive. Lo scopo è quello di spianare le punte dei denti della sega portandoli tutti ad una stessa altezza. Trattandosi dell’affilatura di una sega per tagli traverso vena la particolare conformazione dei suoi denti e la loro posizione obbligano ad inserire la lima tra un dente e l’altro orientandola solitamente di 65 gradi rispetto alla nostra posizione ed a mantenerla a 90 gradi rispetto al piano. Inserita saldamente la lima triangolare nell’incavo tra un dente e l’altro si effettuano un paio di passate in modo deciso e con forza e sempre e solo in fase di spinta. Dopo la prima passata si solleva la lima e si effettua la seconda passata. Cerchiamo di mantenere sempre la stessa pressione, lunghezza ed inclinazione ad ogni passaggio allo scopo di evitare il formarsi di denti più alti e più bassi. Il risultato sarà quello di affilare il tagliente del dente che precede e quello del dente immediatamente successivo, oltre all’incavo tra un dente e l’altro. In sostanza ciò che viene affilato sarà uno dei due taglienti di cui è provvisto ogni dente. L’altro tagliente verrà affilato quando provvederemo ad affilare la lama dall’altro lato. E’ in questa fase quindi che, abradendo le superfici dei denti, si verrà a creare la classica forma a punta dei denti della sega.
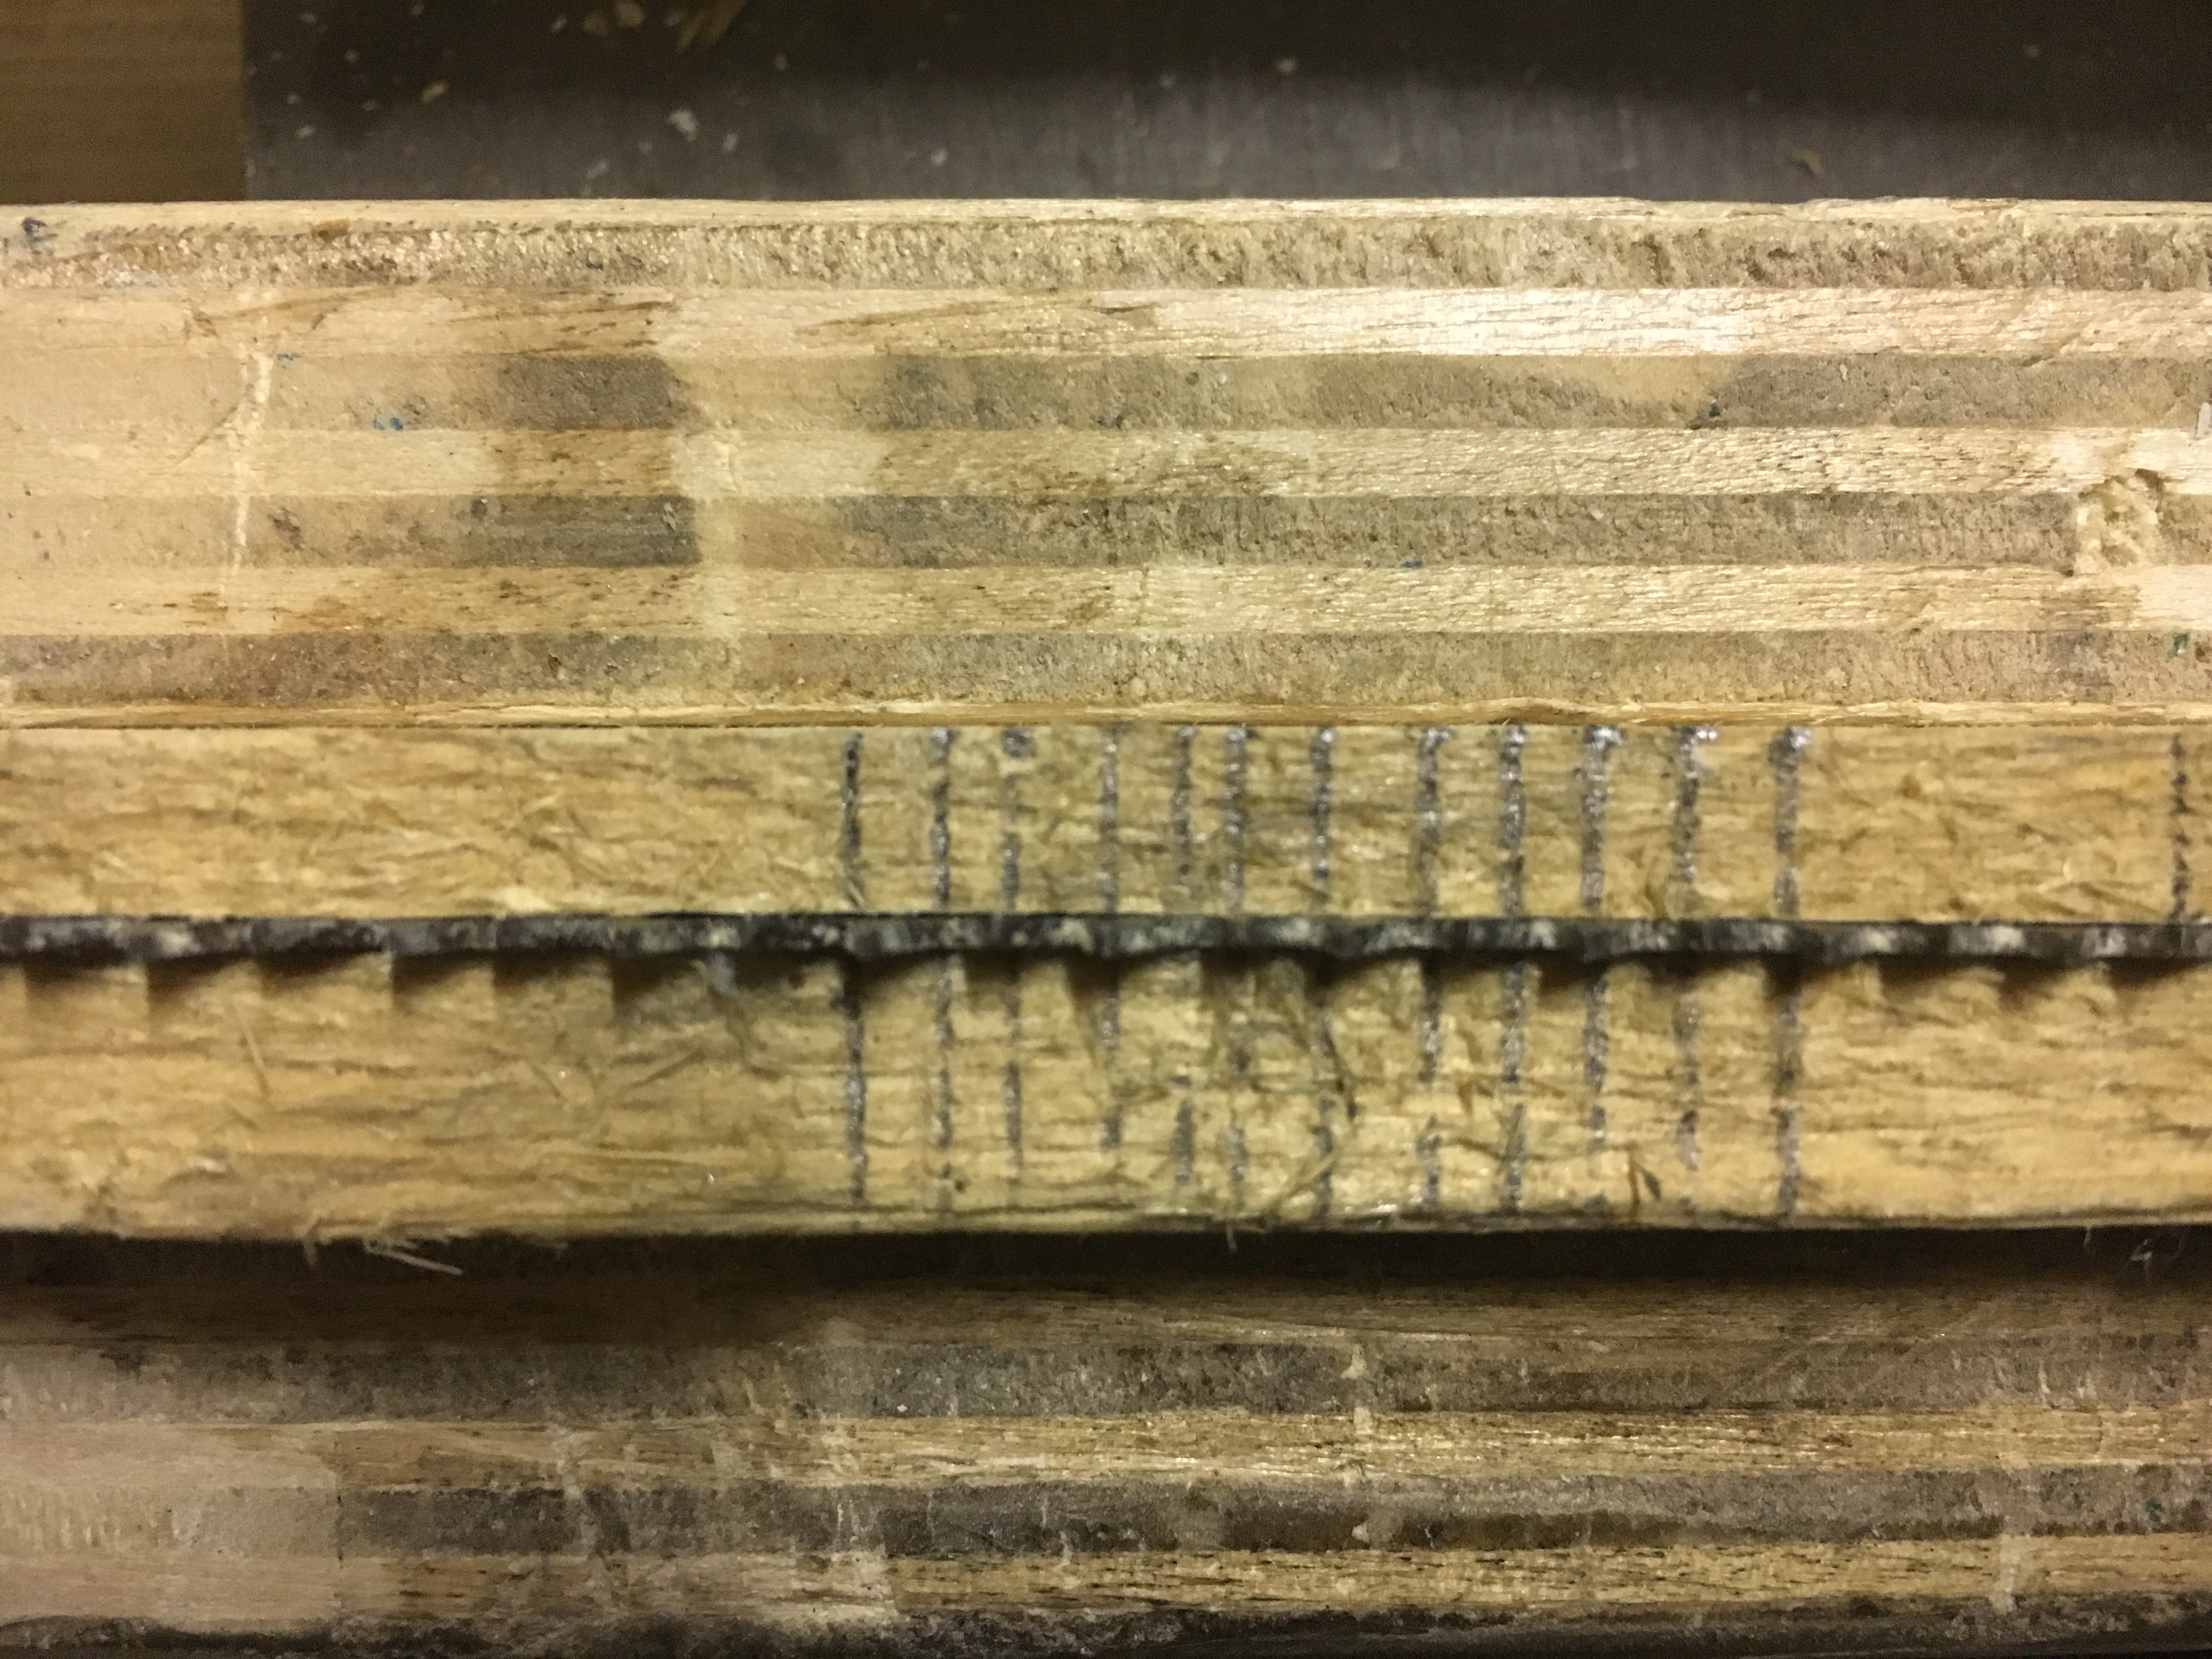
Per mantenere la giusta angolazione le prime volte ci si può aiutare con un riscontro visivo posto a fianco della sega stessa, come ad esempio un foglio di carta con tracciate delle linee a 65 gradi (o a 90 gradi, come indicato in foto per le seghe rip) , oppure segnare le linee sullo stesso sostegno che regge la sega. Si procede per tutta la lunghezza della lama avendo l’accortezza di saltare un dente, quindi affilando un dente si ed uno no, prestando particolare attenzione a non sbagliare. Una volta arrivati al termine della lama si provvede a girarla dall’altro lato e ad affilare tutti i denti saltati nella prima fase, sempre avendo cura a non sbagliare il conteggio. Per finire si può eventualmente decidere di passare sulla parte superiore di ogni tagliente della sega una piccola lima diamantata a grana media per creare una sorta di “microbevel secondario”. Ad affilatura ultimata se del caso possiamo decidere di effettuare la stradatura così come indicato sopra.
Per quanto riguarda l’affilatura delle seghe per tagli lungo vena (ripsaw) si segue lo stesso procedimento con alcune varianti che indico di seguito. I denti di questo tipo di seghe sono disposti in linea, senza alcuna inclinazione. Quindi per l’affilatura la lima si inserisce tra un dente e l’altro parallelamente al dente stesso, quindi a 90 gradi, sia rispetto ai denti che rispetto al piano di lavoro. Si effettuano sempre un paio di passate, alzando sempre la lima dopo ogni passaggio, evitando quindi la cosiddetta “passata di ritorno” verso l’operatore e facendo in questo modo per tutti i denti, uno dopo l’altro, senza bisogno quindi di affilarne uno si ed uno no. Ne consegue che l’affilatura si completa lavorando solo da una parte della lama, senza bisogno di ruotarla.
Per prendere confidenza con l’affilatura è meglio iniziare con una sega con denti abbastanza grandi, come ad esempio una sega da 7 TPI (tooth per inches – dente per pollice) procedendo con molta calma e pazienza. Con la pratica acquisiremo velocità e saremo in grado di affilare seghe con un maggior numero di denti e di minori dimensioni.
Potremo infine anche decidere di cambiare il grado di aggressività (rake) del taglio di una sega lungovena (ripsaw) semplicemente variando l’orientamento della lima con la quale affiliamo. Ad esempio, se vogliamo un taglio particolarmente aggressivo, porremo la lima con una faccia perpendicolare alla superficie di lavoro. Se da questa posizione incliniamo leggermente la lima verso sinistra otterremo un rake più aggressivo. Se infine poniamo una faccia della lima parallela alla superficie otteniamo un rake meno aggressivo.
In linea generale si consiglia di affilare tutte le seghe con denti superiori a 10 PPI con profilo ripsaw. Sotto i 10 PPI possiamo optare se affilare ripcut o crosscut.
E’ anche possibile affilare i denti ad un diverso grado di rake nella medesima sega. Ad esempio, per offrire una partenza “soft” al taglio, possiamo affilare la parte terminale della lama con un rake poco aggressivo (per i primi tre cm. circa) ed aumentarlo poi gradualmente ruotando la lima verso sinistra (per i successivi tre cm. circa) e proseguire la restante parte con un rake aggressivo.
Affilatura degli utensili manuali
Utilizzo delle seghe occidentali
———————————————————————————–
The peculiarity of hand tools is that they can be re-sharpened and it is for this reason that they can continue to work for hundreds of years if they are well maintained. In a previous post I briefly mentioned some elements common to all types of sharpening, general rules that fit most of the hand tools in our lab. Specifically, however, we will see that the sharpening process diverges, even significantly, if we are sharpening the blade of a plane, instead of a chisel, a scraper or a saw. Each hand tool, given its predisposition to perform specific processes, requires a special sharpening process. In this post we will see how to sharpen the western type saws. This type of saw, given the particular consistency of the steel of the blade, is in many cases re sharpenable, at least the ancient saws, those models produced before the Second World War. Most modern saws, in most cases, are difficult to re-sharpen because the steel hardening of the teeth is reinforced so as to determine a greater strength and durability that makes it hard to re-sharpen. Moreover, this last type of saw is almost exclusively produced in crosscut pattern or suitable for rip and crosscut together, given the considerable presence on the market of pressed wood and assembled with glues such as chipboard, plywood and MDF. To explain how to sharpen a saw we have to know some things. There are many types of saws on the market: western and eastern, push and pull, with different size and number of teeth (TPI or PPI, which we will see in the next post), thickness and shape of the blade, length of the saw, final destination of use and more. The difference that is important here is, however, between crosscut saws , working cross the grain and ripcut saws. working in the grain direction. The saws that work along the grain cut the wood separating the fibers in the direction of the grain and for this reason they are equipped with teeth with a 90 sharpening degree and a narrow set. The crosscut saws cut the wood perpendicular to the direction of the grain of the wood and for this reason they have 65 sharpened degrees and larger set of the teeth. The different type of cut that we will have to make (along the grain or across the grain) will justify the choice of the right type of saw, optimizing the quality of the cut. The tools we need for the sharpening of both types of saw are: triangular shaped files of different sizes, a flat file and a sawset (and also an iron hammer and an awl). The sharpening process can be divided into two main phases: the setting of the teeth and the sharpening of the teeth. Teeth setting: The setting of the teeth has to be made only if needed and not necessarily with the sharpening of the teeth and has to be made it is noticed that the saw, during the pull stroke, tends to jam because the wood fibers are no longer able to pass easily into the channel created by the alternating gap between the teeth on the right and on the left . You can use three different methods of setting the teeth: a) with the aid of only the iron hammer (for saws under 3 PPI or 2 TPI, or those saws that include 3 tooth tips per inch = 2.54 cm. 2 teeth per inch = 2.54 cm.) B) with hammer and awl (for saws between 3 PPI and 15 PPI, then finer saws) hammering the side of the tooth, resting the saw blade on a soft wood that allows it to diverge in the opposite direction to that of the operator c) with the sawset). The last method is the one commonly used. First, adjust the knurled wheel to match the measurement indicated on the metal disk of the sawset (from 4 PPI to 12 PPI) with the PPI measurement of the saw to be sharpened. However, I found it useful to keep the wheel always at the position of 10 PPI, regardless of the saw to be sharpened. Once this is done, hold the sawset and place it on the saw blade at the tooth to be straddled. You press the handle so that the hammer inside the sawset pushes the tooth in the opposite direction until it is pressed against the iron disk inserted into the sawset. We proceed for each tooth to set skipping one. When we have finished we turn the saw and proceed to set the teeth that we skipped in the first phase. It is usually useful to make a more accentuated set to cut slightly seasoned or soft woods. The saw in these cases will cut faster but the cut left will be larger and coarse. For hard or seasoned woods, on the other hand, a less accentuated set is preferable, which will result in a reduced cutting speed of the saw but in a finer cut. A set of this type is however preferable especially on tenon saws or dovetail saws. So: too much setting, (the teeth protrude the thickness of the saw blade) the cut will be wider. Little setting, the cut will be narrow, no setting, the saw will jam in the wood. Whichever method we want to use at the end you can always proceed to slightly level the obtained set by gently tapping the surface of the teeth with an iron hammer. However, the advice is to pay particular attention not to bend the teeth on the wrong side. The manufacturer in fact creates a “factory” set (together with the fleam) that should not be changed. If we make a mistake changing the sense of bending to the tooth we would run the risk of breaking it. For the purchase of a sawset you can safely address on ebay.co.uk and look for the a used “sawset eclipse 77” or look for the new one by choosing the Somax 250 alternative. It would be preferable, where possible, to buy the older models of the eclipse 77, ie those with the finest hammer, therefore suitable to a greater number of saws (even those with particularly reduced teeth). The advice to recognize them is to look for the words “Made in England” impressed on the back of the handle of the sawset shown in full on a line instead of two lines. Sharpening teeth: The teeth sharpening is an operation that should be part of the normal maintenance of our saws in order to keep them always in good efficiency. The cut of a not sharpened saw will be difficult and not good; to the touch you will notice the slightly sharp teeth and visually their tips will reflect the light, which should not happen if the cutting edge is sharpened properly. The important material for sharpening the teeth, as mentioned, are the triangular section files, of different sizes and shapes, the flat file and a support for the saw. Triangular files have three useful surfaces. In reality the abrasive surfaces are six because there is a small bevel between one face and the other, which is also able to sharpen. Also in this case it is valid the advice to have good quality files (their price is not excessive) and obviously of higher hardness than the steel of the saw. It is also advisable to buy files of different sizes as these must conform to the space between one tooth and another. The rule is that the surface of the triangular file to be used has a height at least twice than the height of the tooth to be sharpened. A set consisting of 3 files will still be enough to cover almost all our needs and will last for years (even if they can not be resharpened). The same recommendations apply to the flat file. In any case, it is sufficient to buy only one with a surface large enough to allow convenient use in the preliminary leveling phase of sharpening teeth. That said, let’s first see the method of sharpening a saw for cross-cutting. First we should have a support made of wood or other material that can hold, by tightening it, the saw blade placed upside down with the teeth turned upwards, towards us. Always looking on Ebay.co.uk. we can find new or used ones looking for the words “saw vice or saw vise”. Since these tools are uncommon especially those made of wood, the prices are quiet expensive, so the advice I can give is to go for a self-construction as I did. A simple piece of wood of about 2 cm. thick is cut in half for almost all its length and of sufficient length to accommodate the saw blade, and at the end of the cut, with a hole that prevents further cracking. After having appropriately shaped it, to accommodate the handle of the saw, inside the cut it will go to insert the saw blade, as indicated above, and secure everything in the bench vice. To prevent blade vibrations during sharpening it is preferable to let the saw teeth protruding the wooden support very little and tighten the whole in the vice. Once put everything in place we look for a comfortable position, possibly sitting and helping with a light on the bench and a magnifying glass. First, with the flat-faced file, you make a couple of passes on the tip of the teeth, along the entire length of the blade, taking care not to tilt the file during the passage, passages that should be not too light and not too much aggressive. The aim is to even the tips of the saw teeth, bringing them all to the same height. Because of the particular conformation of teeth of a crosscut saw and their position, we have to insert the file between a tooth and the other usually orientating (fleam) it of 65 degrees compared to our position and to maintain it at 90 degrees compared to the bench. When the file is firmly inserted into the gullet between one tooth and the other, a couple of passes are made in a decisive and forceful way, always and only during the pushing phase. After the first pass, the file is lifted and a successive pass is made.
We try to always maintain the same pressure, length and inclination at each passage in order to avoid the formation of higher and lower teeth. The result will be the sharpening of the cutting edge of the preceding tooth and that sharpening of the tooth immediately following, in addition to the gullet between one tooth and the other. Basically what is sharpened is one of the two cutting edges of which each tooth is provided. The other edge will be sharpened when we will sharpen the blade on the other side. It is at this stage, therefore, that, by abrading the surfaces of the teeth, the classic pointed shape of the saw teeth will be formed. To keep the right angle the first few times you can help yourself with some visual lines traced at 65 degrees to the saw itself, such as on a sheet of paper or on the wooden saw support itself. We proceed along the entire length of the blade, having the foresight to skip a tooth, i.e. sharpening one tooth and one not, paying particular attention not to make mistakes. Once you have reached the end of the blade, turn it on the other side and sharpen all the skipped teeth in the first phase, always taking care not to mistake the count. Finally you can eventually decide to pass on the upper part of each saw blade a small, medium-grained diamond file to create a sort of “secondary microbevel”. When sharpening is completed, if necessary we can decide to carry out the set of the teeth as shown above. As regards the sharpening of the saws for long cuts (ripsaw) the same procedure is followed with some variations that I indicate below. The teeth of this type of saws are arranged in line, without any orientation. Therefore, for sharpening, the file is inserted between one tooth and the other parallel to the tooth itself, therefore at 90 degrees, both with respect to the teeth and with respect to the work surface. You always make a couple of passes, always lifting the file after each passage, thus avoiding the so-called “return pass” to the operator and doing so for all the teeth, one after another, without needing to skip them. Consequently the sharpening is completed by working only on one side of the blade, so without having to rotate it. To get practice with saw sharpening it is best to start with a saw with fairly large teeth, such as a 7 TPI saw (tooth for inches ) proceeding slowly and with patience. With the practice we will acquire speed and we will be able to sharpen saws with a greater number of smaller teeth. We can also decide to change the degree of aggressiveness (rake) of a riosaw by simply varying the orientation of the file with which we sharpen. For example, if we want an aggressive cut, we place the file with at least one face perpendicular to the work surface. If we tilt the file to the left slightly from this position, we get a more aggressive cut. Finally, if we place the file face parallel to the surface, we get a less aggressive rake. In general I find useful to sharpen all the saws with teeth exceeding 10 PPI with a ripsaw profile. Below 10 PPI we can choose if to sharpen ripcut or crosscut. It is also possible to sharpen the teeth to a different degree of rake in the same saw. For example, to offer a “soft” start to the cut we can sharpen the first 3 cm. at the end of the blade with a little aggressive rake, then gradually increase it for other 3 cm. of its length and then sharpen the rest of the blade to an aggressive rake.

Lascia un commento