
Datemi un martello… / Give me a hammer…
English translation at the end of the article
Quando, in un post di qualche tempo fa, ho descritto sommariamente alcuni aspetti relativi all’uso degli scalpelli ho volutamente tralasciato di parlare dell’utensile che da sempre ne accompagna il loro utilizzo. Un po’ come il coltellino da tracciatura lavora assieme alla squadra combinata così lo scalpello si trova in un connubio quasi
inscindibile con il martello. È altresì vero che lo scalpello puó anche essere utilizzato da solo, azionato dalla forza delle mani, ma nella maggioranza delle lavorazioni è comunque necessario l’ausilio del martello, specialmente per le lavorazioni più gravose.

Il martello, che in falegnameria è comunemente denominato mazzuolo, non è quello al quale si può pensare in un primo momento, cioè quello classico con la testa in ferro. Infatti il martello che viene utilizzato nei lavori in legno deve percuotere la testa degli scalpelli, fatta a sua volta in legno, o colpire direttamente il legno che stiamo lavorando, ed è per questo motivo che vengono utilizzati di norma mazzuoli in legno o martelli con la testa in gomma o altro materiale più o meno rigido.
Il martello in ferro in effetti viene utilizzato in falegnameria quasi esclusivamente per inserire i chiodi o per attività correlate alla manutenzione e settaggio di alcuni utensili, come ad esempio le seghe. Per questo motivo il martello in ferro veniva utilizzato molto di più in passato, quando i falegnami utilizzavano spesso e volentieri i chiodi per le loro costruzioni. Oggigiorno, con l’avvento delle viti, i chiodi sono molto meno utilizzati e quindi l’utilità del martello in ferro si è notevolmente ridotta.
Il mazzuolo (martello con la testa in legno) ed il martello con la testa in gomma invece sono assolutamente indispensabili e di gran lunga i più utilizzati. Generalmente i mazzuoli sono quelli più antichi, perchè a quel tempo l’unico materiale compatibile con il legno era il legno stesso, ma oggigiorno questi sono stati affiancati dai martelli in gomma (più o meno rigida) o in nylon, o plastica o PVC. Quest’ultimo tipo di martelli più moderni presentano una testa in acciaio ed alle estremità uno dei materiali elencati sopra, da una parte più rigido e dall’altra più morbido. La parte più morbida serve per colpire i legni più teneri, la parte più dura per i legni più duri. In linea di massima è bene utilizzare sempre e comunque la parte più morbida quando, in fase di assemblaggio dei pezzi, non vogliamo correre il rischio di segnare il legno. Ovvio poi che molto dipenderà anche dalla forza con la quale percuotiamo il martello stesso. Generalmente i martelli più pesanti sono adatti per lavori più gravosi, quelli più leggeri per i lavori di precisione.
Esistono in commercio tantissimi modelli di martello variando in peso, materiale e dimensioni, ma la struttura di base e la sua funzione è grosso modo sempre la stessa. Un manico, generalmente in legno, talvolta rivestito di materiale gommoso, spesso antiscivolo e traspirante ed una testa, che può assumere diverse conformazioni e diversi materiali ma comunque sempre adatta a percuotere da ambo i lati. Dalla forza e dall’angolazione con il quale viene utilizzato, in associazione con gli scalpelli e le sgorbie, dipende il grado di accuratezza del nostro lavoro.
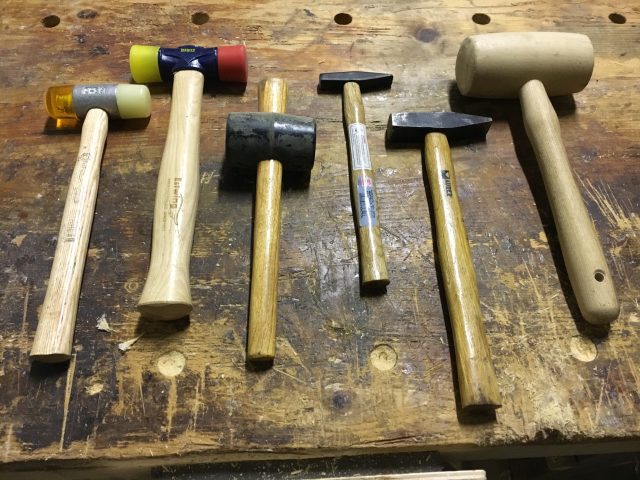
Entrando un pò nello specifico e volendo fare una sommaria distinzione, potremmo individuare tre tipi di martello, comunemente utilizzati in falegnameria: martelli con la testa in ferro, martelli con la testa in legno (comunemente chiamati mazzuoli) e martelli con la testa in gomma (plastica, nylon o PVC) di varia durezza.
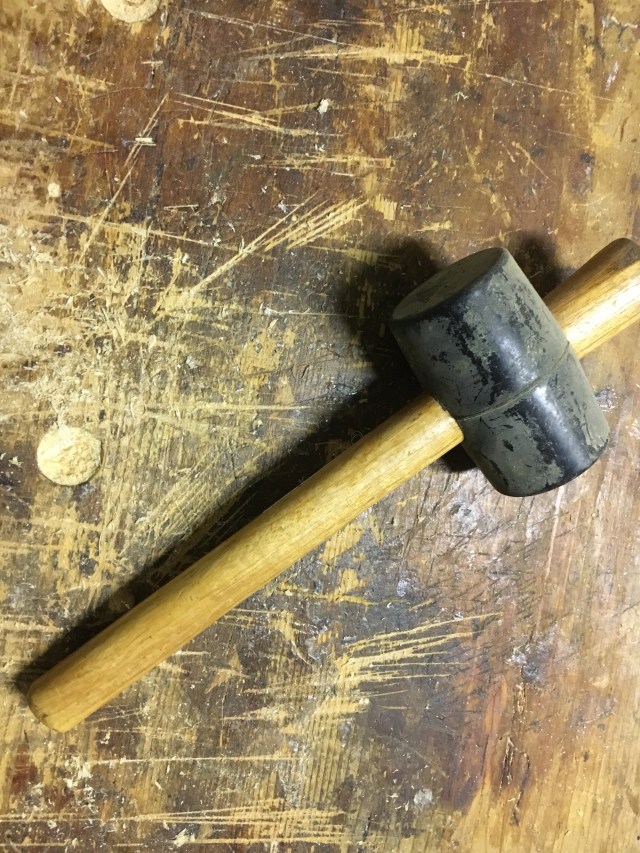
I martelli con la testa in gomma (ed altri nuovi materiali) sono relativamente recenti ed erano assolutamente sconosciuti decenni or sono. Questi materiali infatti ancora non esistevano e sui banchi dei falegnami erano presenti solo quelli in legno, i mazzuoli, e quelli in ferro, di medie e grandi dimensioni per lavori generici o di piccole dimensioni per settare, ad esempio, i cunei e le lame delle pialle in legno. Questa tipologia di martelli presenta una testa di dimensioni generalmente più piccole dei loro parenti in legno e li rende particolarmente adatti in tutti quei lavori in cui il colpo deve essere dato in spazi ridotti. Inoltre la particolare conformazione della testa permette un maggior controllo ed una maggiore precisione in fase di vibrazione del colpo. Ad un primo impatto potrebbe quasi sembrare che, avendo a disposizione una maggiore superficie, come ad esempio quella offerta dal mazzuolo in legno, questo sia più semplice da controllare, ma dopo un poco di pratica, ci si accorgerà della facilità di utilizzo e della efficacia che questo tipologia di utensile offre colpendo precisamente con il suo centro proprio là, dove effettivamente deve andare il colpo, evitando quindi sviamenti e scivolamenti dalla traiettoria voluta. Questo tipo di martello è composto solitamente da un manico in legno, o in legno rivestito in gomma antiscivolo e traspirante, da una testa in acciaio nella quale sono avvitati o incastrati due pezzi in gomma o plastica, nylon o PVC, di diversa durezza tra loro. Da un lato quindi una parte più morbida, dall’altra più dura. Se ne trovano di validi a prezzi particolarmente convenienti anche nei vari brico o su ebay ed amazon.
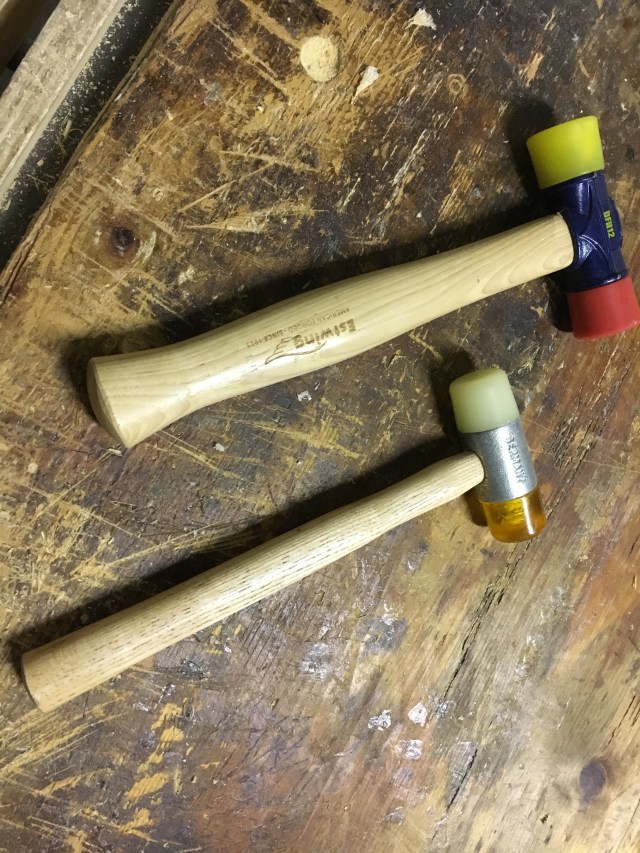
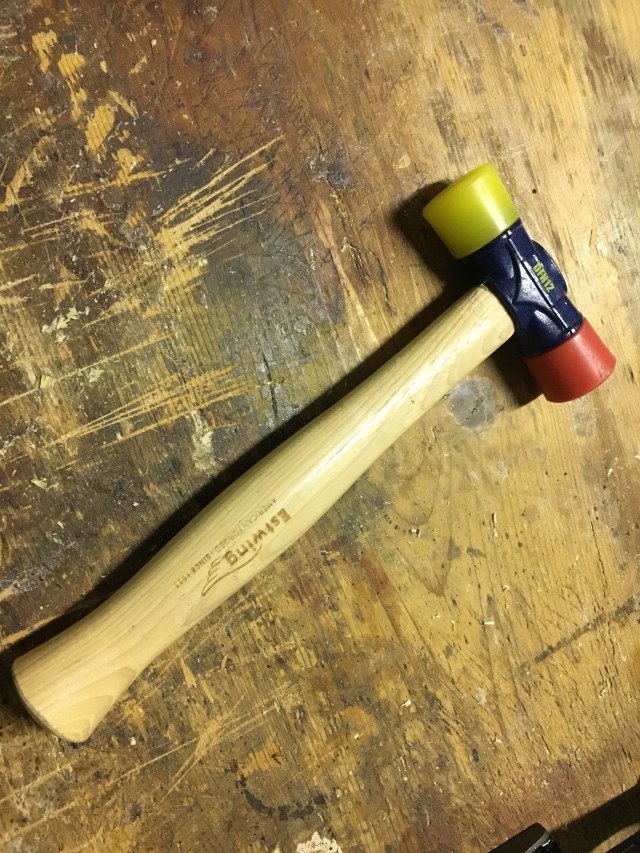
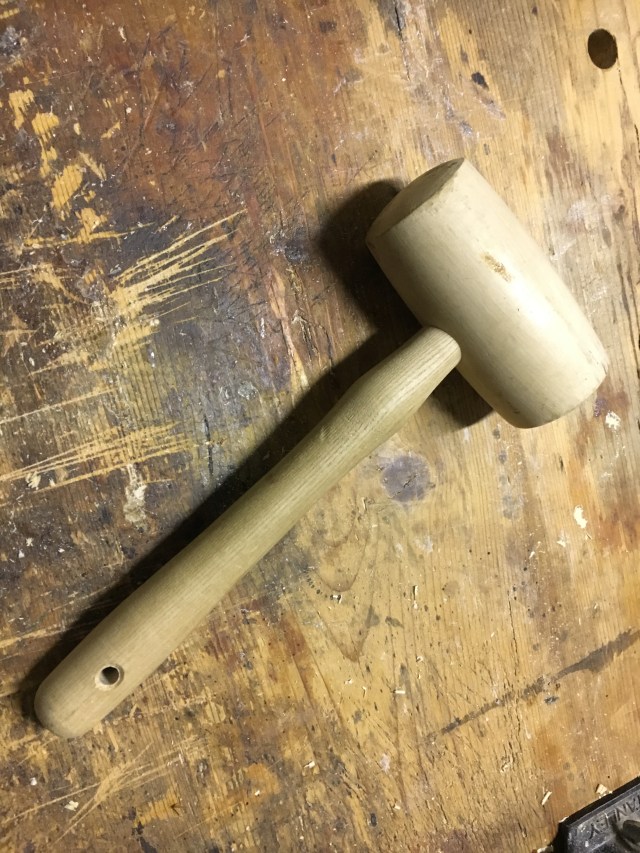
Nella foto sopra il martello che utilizzo per i lavori di tenone e mortasa e quello che utilizzo per i lavori di assemblaggio. Il primo, più economico, è più leggero ed é utilizzato, come dicevo, per i lavori più leggeri e di precisione, per scavare mortase ed altro. L’altro, più costoso e più pesante e che trovo sia di ottima fattura, lo utilizzo quasi esclusivamente per i lavori di assemblaggio di incastri.
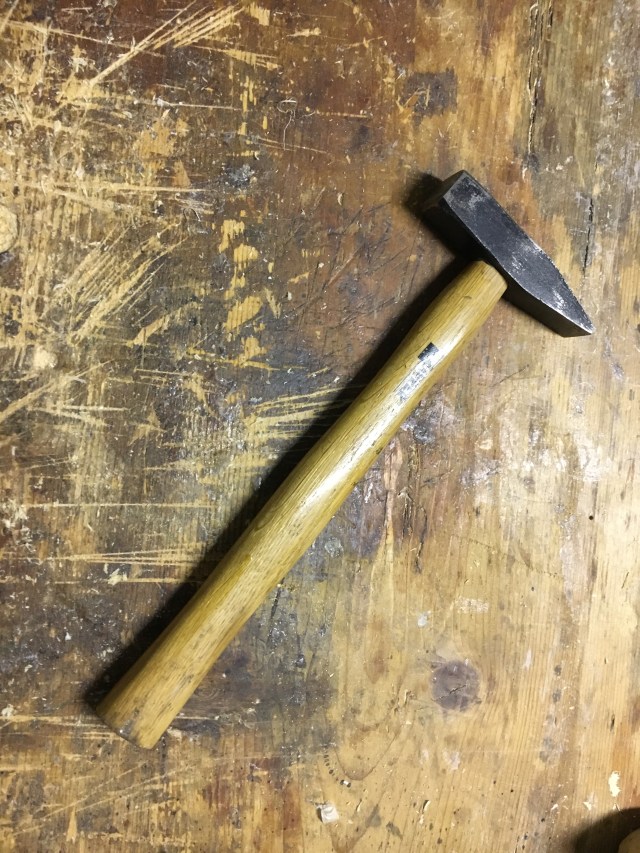
Il martello in ferro, come detto, ha un impiego più limitato in falegnameria. Trova sicuramente molta più utilità in altri settori come quello edile o nella lavorazione del ferro. In falegnameria viene utilizzato essenzialmente su altri metalli, come ad esempio per inserire chiodi e chiodini o per colpire altro ferro, come ad esempio il punteruolo. Si può utilizzare la testa anche dalla parte più sottile, che facilita il suo inserimento tra le dita, per colpire una prima volta il chiodino tenuto tra il pollice e l’indice e stabilire così un primo contatto con il legno. Quindi si continua l’inserimento del chiodo ruotando il martello ed utilizzandolo dall’altra parte della testa, quella più grande, che può essere di forma rettangolare o tonda.

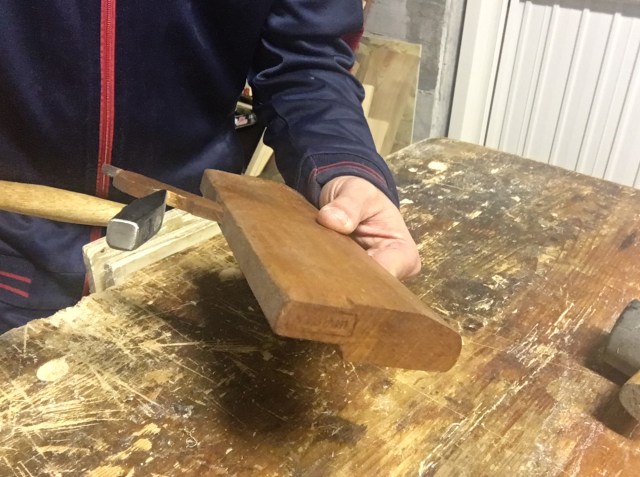
Come detto il martello in legno è chiamato anche mazzuolo. È utilizzato prevalentemente per fare lavori di scavo, mortase, e genericamente per i lavori sugli incastri. Difficilmente viene utilizzato per l’assemblaggio dei pezzi e sicuramente meno che in passato, data la scoperta dei nuovi materiali di cui dicevo sopra. Il mazzuolo può assumere diverse forme e dimensioni e la sua scelta è molto personale, basandosi essenzialmente sul tipo di lavorazione del legno che dobbiamo eseguire. Generalmente è ricavato da legni duri ad alta densitá come ad esempio il rovere, il noce, il ciliegio o il faggio. Vista la relativa semplicità di realizzazione è molto praticata l’autocostruzione.
———————————————————————————–
Some posts ago I shortly wrote about some aspects about chisels and I wanted to skip to talk about the hammer, or mallet, a tool often used with chisels. As the knife works with the combination square so the chisels (and the gouges) work with the hammer. It’s true that we could sue the chisels freehand (so without the hammer) using only the power provider our hands, but I found that in many cases we can’t really do without, especially when particular strenght is needed. In woodworking the hammer is generally called the mallet (describing the particular wooden hammer or the rubber, plastic, nylon or pvc hammer), and it’s not the steel hammer we immediately think when we are referring to woodworking. Because the hammer has to hit the wooden head of the chisels or the piece of wood we are working the hammer we need has to be made of wood or of a material listed above. In woodworking the steel hammer has minor utilities and we use them generally for putting nails or for setting the teeth of the saws or to set the wedge and the iron of wooden planes, the moulding planes. It’s for this reason that steel hammers were used much more in the past than nowadays. At that time woodworkers used nails very much. Nowadays modern screws has nearly replaced nails in woodworking.The mallet (as said a hammer with the wooden head) and the rubber hammer are very important and by far the most used. Generally the mallets are the oldest, because at that time the only material compatible with wood was the wood itself, but nowadays these have been flanked by rubber hammers (more or less rigid) or nylon, or plastic or PVC. The latter type of more modern hammers have a steel head and at the ends one of the materials listed above with a hard and a softer part. The softer part is used to hit the soft wood, the hard part for the hardest woods. In general it is a good thing to use the softer rubber part when assembling pieces, because we do not want to run the risk of marking the wood. Obviously much will also depend on the strength with which we hit the hammer. Generally the heaviest hammers are suitable for heavy work, the lighter ones for precision work. There are many hammer models on the market varying in weight, material and size but the basic figure and its function are always the same. A handle, usually made of wood, sometimes covered with a rubbery material, often non-slip and breathable, and a head, which can take different shapes and different materials but is always suitable to strike on both sides. The degree of accuracy of our work depends on the strength and angle with which it is used, in association with chisels and gouges. Going a little bit in the specific and wanting to make a brief distinction, we could identify three types of hammer, commonly used in woodworking: steel hammers, wooden mallet and rubber hammers (made with rubber, nylon, plastic or PVC of varying hardness).
The hammers with the rubber head (and other modern materials) are relatively recent and were absolutely unknown decades ago.These materials did not yet exist and on the woodworkers benches there were only those made of wood, the mallets, and those made of iron, of various sizes for general or small works, to set, for example, the wedges and the irons of the wooden planes.This type of hammer has a head of dimensions generally smaller than their wooden relatives and makes them particularly suitable in all those jobs where the shot must be given in small spaces. Moreover, the particular shape of the head allows greater control and greater precision during the stroke. At first glance it could almost seem that having a larger surface available, such as that offered by the wooden mallet, is a facilitation, but after a little practice you will notice the ease of use and effectiveness that this type of hammer it offers striking precisely with its center right there, where the shot must actually go, thus avoiding slippages and slips from the desired trajectory. This type of hammer is usually composed of a wooden handle, or wood covered with non-slip and breathable rubber, by a steel head in which two pieces of rubber or plastic, nylon or PVC are screwed or interlocked, of different hardness between them . On one side the soft part, on the other the harder one. You can find them on ebay or amazon and they are really unexpensive. In the picture below my hammer that I use for tenon and mortise and the one I use for assembly work. The first, cheaper, is lighter and is used as I said for lighter and more precise jobs, to make mortise and more. The other one is more expensive and heavier. I find it is of excellent quality and I use it almost exclusively for the assembly work.The steel hammer, as mentioned, has a more limited use in woodworking. It find definitely much more useful in other areas such as construction or in iron processing. In woodworking it is used essentially on other metals such as for example to insert nails or to hit other iron, such as the awl. You can use the head from the thinner part, which allows the insertion between the fingers, to strike a first shot to the nail held between the thumb and the index and establish a first contact with the wood. Then the nail is continued by rotating the hammer and using it on the other side of the head, the larger one, which can be rectangular or round. This type of hammer can also be used to flatten the teeth of a saw or, in the smaller version, to set the wedge and the blades of the wooden planes, as for example in moulding planes. As mentioned, the wooden hammer is also called a mallet. It is mainly used to make recesses in the wood, mortises, and other works on joints. It is difficult to use it for the assembly of the pieces and certainly less than in the past, given the discovery of the new materials mentioned above. The mallet can take different shapes and sizes and its choice is very personal, based essentially on the type of woodwork that we have to perform. Generally it is made from high density hardwoods such as oak, walnut, cherry or beech. Given the relative simplicity of construction, self-construction is very much practiced.

Lascia un commento